ESP MERCEDES-BENZ E-Class WAGON 2012 W212 Service Manual
[x] Cancel search | Manufacturer: MERCEDES-BENZ, Model Year: 2012, Model line: E-Class WAGON, Model: MERCEDES-BENZ E-Class WAGON 2012 W212Pages: 396, PDF Size: 17.07 MB
Page 126 of 396
XInsert new bulb ; and turn it clockwise.XAlign housing cover : and turn it
clockwise until it engages.
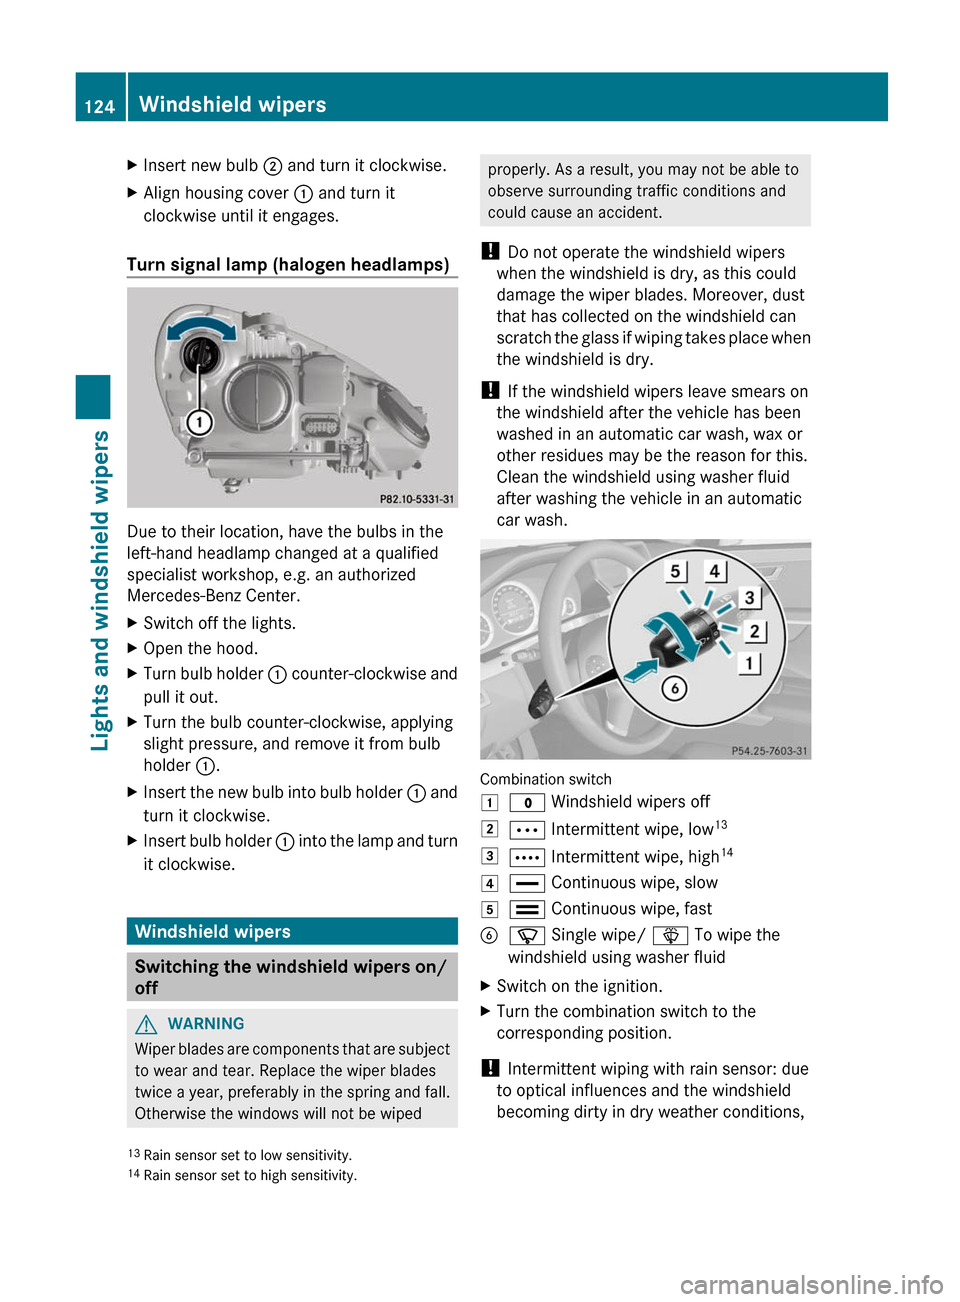
Turn signal lamp (halogen headlamps)
Due to their location, have the bulbs in the
left-hand headlamp changed at a qualified
specialist workshop, e.g. an authorized
Mercedes-Benz Center.
XSwitch off the lights.XOpen the hood.XTurn bulb holder : counter-clockwise and
pull it out.XTurn the bulb counter-clockwise, applying
slight pressure, and remove it from bulb
holder :.XInsert the new bulb into bulb holder : and
turn it clockwise.XInsert bulb holder : into the lamp and turn
it clockwise.
Windshield wipers
Switching the windshield wipers on/
off
GWARNING
Wiper blades are components that are subject
to wear and tear. Replace the wiper blades
twice a year, preferably in the spring and fall.
Otherwise the windows will not be wiped
properly. As a result, you may not be able to
observe surrounding traffic conditions and
could cause an accident.
! Do not operate the windshield wipers
when the windshield is dry, as this could
damage the wiper blades. Moreover, dust
that has collected on the windshield can
scratch the glass if wiping takes place when
the windshield is dry.
! If the windshield wipers leave smears on
the windshield after the vehicle has been
washed in an automatic car wash, wax or
other residues may be the reason for this.
Clean the windshield using washer fluid
after washing the vehicle in an automatic
car wash.
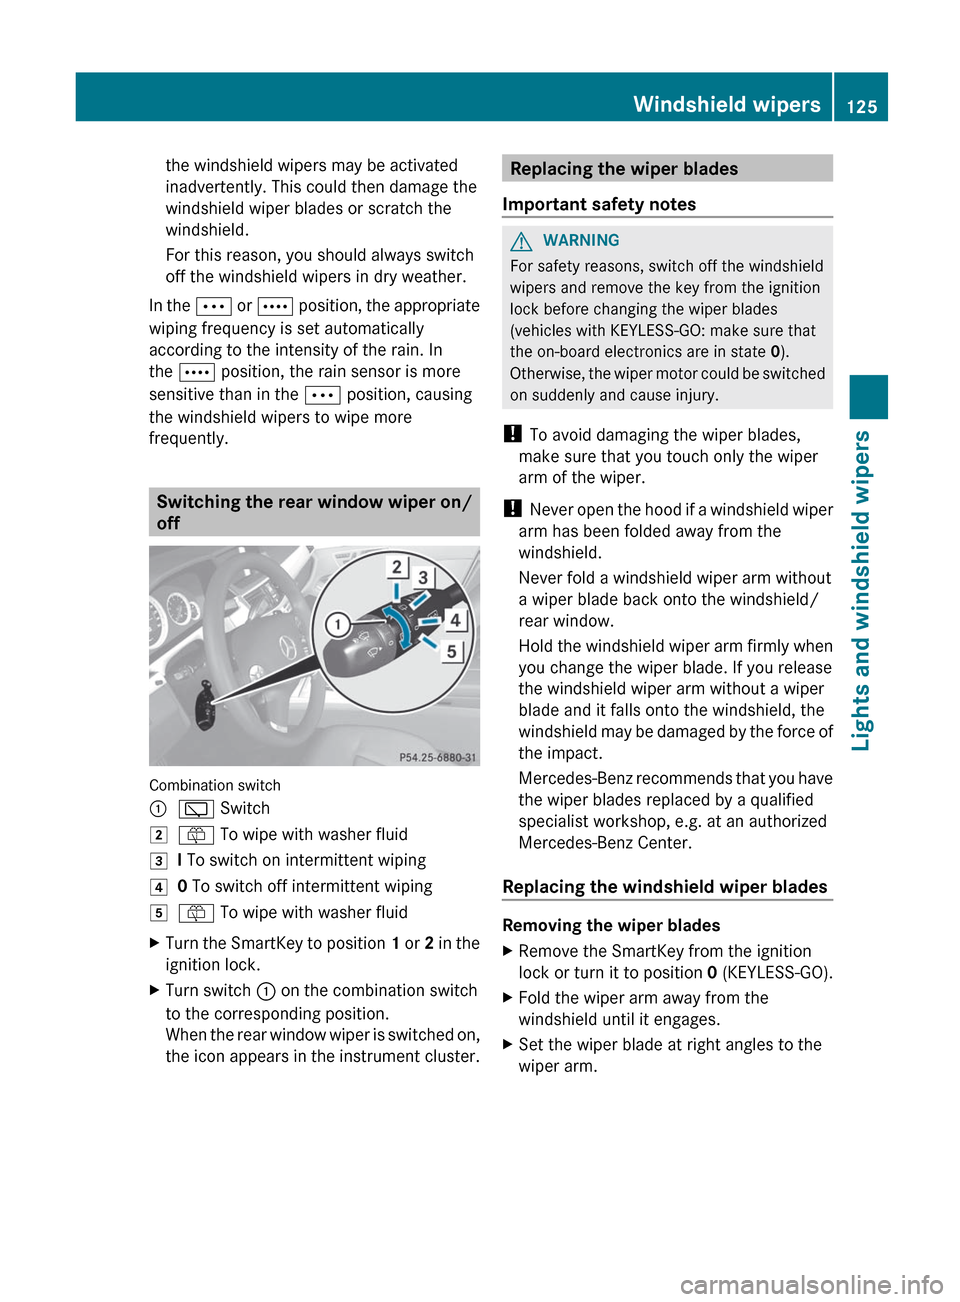
Combination switch
1$ Windshield wipers off2Ä Intermittent wipe, low 133Å
Intermittent wipe, high 144°
Continuous wipe, slow5¯ Continuous wipe, fastBí Single wipe/ î To wipe the
windshield using washer fluidXSwitch on the ignition.XTurn the combination switch to the
corresponding position.
! Intermittent wiping with rain sensor: due
to optical influences and the windshield
becoming dirty in dry weather conditions,
13 Rain sensor set to low sensitivity.
14 Rain sensor set to high sensitivity.124Windshield wipersLights and windshield wipers
Page 127 of 396
the windshield wipers may be activated
inadvertently. This could then damage the
windshield wiper blades or scratch the
windshield.
For this reason, you should always switch
off the windshield wipers in dry weather.
In the Ä or Å position, the appropriate
wiping frequency is set automatically
according to the intensity of the rain. In
the Å position, the rain sensor is more
sensitive than in the Ä position, causing
the windshield wipers to wipe more
frequently.
Switching the rear window wiper on/
off
Combination switch
:è Switch2ô To wipe with washer fluid3I To switch on intermittent wiping40 To switch off intermittent wiping5ô To wipe with washer fluidXTurn the SmartKey to position 1 or 2 in the
ignition lock.XTurn switch : on the combination switch
to the corresponding position.
When the rear window wiper is switched on,
the icon appears in the instrument cluster.Replacing the wiper blades
Important safety notesGWARNING
For safety reasons, switch off the windshield
wipers and remove the key from the ignition
lock before changing the wiper blades
(vehicles with KEYLESS-GO: make sure that
the on-board electronics are in state 0).
Otherwise, the wiper motor could be switched
on suddenly and cause injury.
! To avoid damaging the wiper blades,
make sure that you touch only the wiper
arm of the wiper.
! Never open the hood if a windshield wiper
arm has been folded away from the
windshield.
Never fold a windshield wiper arm without
a wiper blade back onto the windshield/
rear window.
Hold the windshield wiper arm firmly when
you change the wiper blade. If you release
the windshield wiper arm without a wiper
blade and it falls onto the windshield, the
windshield may be damaged by the force of
the impact.
Mercedes-Benz recommends that you have
the wiper blades replaced by a qualified
specialist workshop, e.g. at an authorized
Mercedes-Benz Center.
Replacing the windshield wiper blades
Removing the wiper blades
XRemove the SmartKey from the ignition
lock or turn it to position 0 (KEYLESS-GO).XFold the wiper arm away from the
windshield until it engages.XSet the wiper blade at right angles to the
wiper arm.Windshield wipers125Lights and windshield wipersZ
Page 138 of 396
Adjusting the climate mode settings
(AIR FLOW)
This function is only available with 3-zone
automatic climate control.
The climate mode settings are especially
effective at high temperatures.
You can select the following climate mode
settings in automatic mode:FOCUShigh airflow that is set slightly
coolerMEDIUMmedium airflow, standard settingDIFFUSElow airflow that is set slightly
warmer and with less draftXTurn the SmartKey to position 2 in the
ignition lock.XPress the à button.XPress button G up or down and select the
desired level ( Y page 133)
Setting the temperature
2-zone automatic climate control
Different temperatures can be set for the
driver's and front-passenger sides.
XTurn the SmartKey to position 2 in the
ignition lock.XTo increase/reduce: press button E or
H up or down ( Y page 131).
Only change the temperature setting in
small increments. Start at 72 ‡ (22 †).3-zone automatic climate control
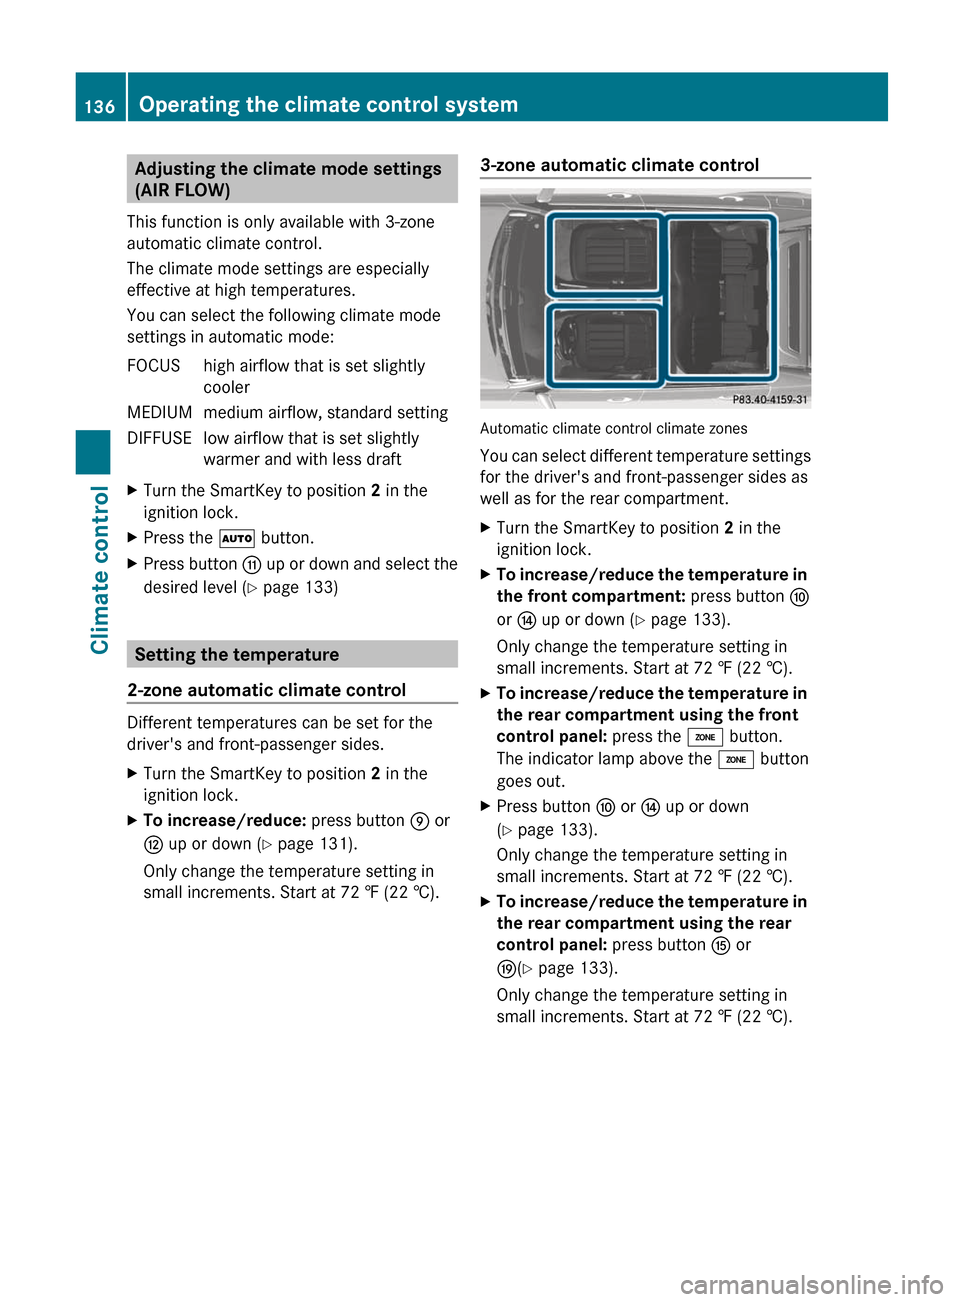
Automatic climate control climate zones
You can select different temperature settings
for the driver's and front-passenger sides as
well as for the rear compartment.
XTurn the SmartKey to position 2 in the
ignition lock.XTo increase/reduce the temperature in
the front compartment: press button F
or J up or down ( Y page 133).
Only change the temperature setting in
small increments. Start at 72 ‡ (22 †).XTo increase/reduce the temperature in
the rear compartment using the front
control panel: press the á button.
The indicator lamp above the á button
goes out.XPress button F or J up or down
( Y page 133).
Only change the temperature setting in
small increments. Start at 72 ‡ (22 †).XTo increase/reduce the temperature in
the rear compartment using the rear
control panel: press button K or
O (Y page 133).
Only change the temperature setting in
small increments. Start at 72 ‡ (22 †).136Operating the climate control systemClimate control
Page 146 of 396
Useful information
i This Operator's Manual describes all
models and all standard and optional
equipment of your vehicle available at the
time of publication of the Operator's
Manual. Country-specific differences are
possible. Please note that your vehicle may
not be equipped with all features
described. This also applies to safety-
related systems and functions.
i Please read the information on qualified
specialist workshops ( Y page 25).
Breaking-in notes
The first 1000 miles (1500 km)
The more you look after the engine when it is
new, the more satisfied you will be with its
performance in the future.
R Drive at varying vehicle speeds and engine
speeds for the first 1000 miles (1500 km)
for this reason.
R Avoid overstraining the vehicle during this
period, e.g. driving at full throttle.
R Change gear in good time, at the latest
when the tachometer needle is 2
/ 3 of the
way to the red area in the tachometer
display.
R If possible, do not depress the accelerator
pedal past the point of resistance
(kickdown).
R Only select shift ranges 3, 2 or 1 when
driving slowly, e.g. in mountainous terrain.
After 1000 miles (1500 km), you can increase
the engine speed gradually and bring the
vehicle up to full speed.
Additional breaking-in notes for AMG
vehicles:
R do not drive faster than 85 mph
(140 km/h) in the first 1000 miles
(1500 km).
R only allow the engine to reach a maximum
engine speed of 4500 rpm briefly.
R change gear in good time.
i You should also observe these notes on
running in if the engine or parts of the drive
train on your vehicle have been replaced.
i Always observe the respective speed
restrictions.
AMG vehicles with rear axle locking
differential
Your vehicle is equipped with a self-locking
differential on the rear axle. For better
protection of the differential on the rear axle,
carry out an oil change after a breaking-in
phase of 2000 miles (3000 km). This oil
change extends the service life of the
differential. Have the oil change carried out
at a qualified specialist workshop. Mercedes-
Benz recommends that you use an authorized
Mercedes-Benz Center for this purpose.
Driving
Important safety notes
GWARNING
Make sure absolutely no objects are
obstructing the pedals' range of movement.
Keep the driver's footwell clear of all
obstacles. If there are any floormats or
carpets in the footwell, make sure the pedals
still have sufficient clearance.
During sudden driving or braking maneuvers
the objects could get caught between the
pedals. You could then no longer brake or
accelerate. This could lead to accidents and
injury.
144DrivingDriving and parking
Page 147 of 396
GWARNING
On slippery road surfaces, never downshift in
order to obtain braking action. This could
result in drive wheel slip and reduced vehicle
control. Your vehicle's ABS will not prevent
this type of loss of control.
GWARNING
It is dangerous to shift the automatic
transmission out of parking position P or
neutral position N if the engine speed is
higher than idle speed. If your foot is not firmly
on the brake pedal, the vehicle could
accelerate quickly forward or in reverse. You
could lose control of the vehicle and hit
someone or something. Only shift into gear
when the engine is idling normally and when
your right foot is firmly on the brake pedal.
! Warm up the engine quickly. Do not use
the engine's full performance until it has
reached operating temperature.
Only shift the automatic transmission to
the desired drive position when the vehicle
is stationary.
Where possible, avoid spinning the drive
wheels when pulling away on slippery
roads. You could otherwise damage the
drive train.
! AMG vehicles: at low engine oil
temperatures (below 68 ‡ (+20 †), the
maximum engine speed is restricted in
order to protect the engine. To protect the
engine and maintain smooth engine
operation, avoid driving at full throttle when
the engine is cold.
SmartKey positions
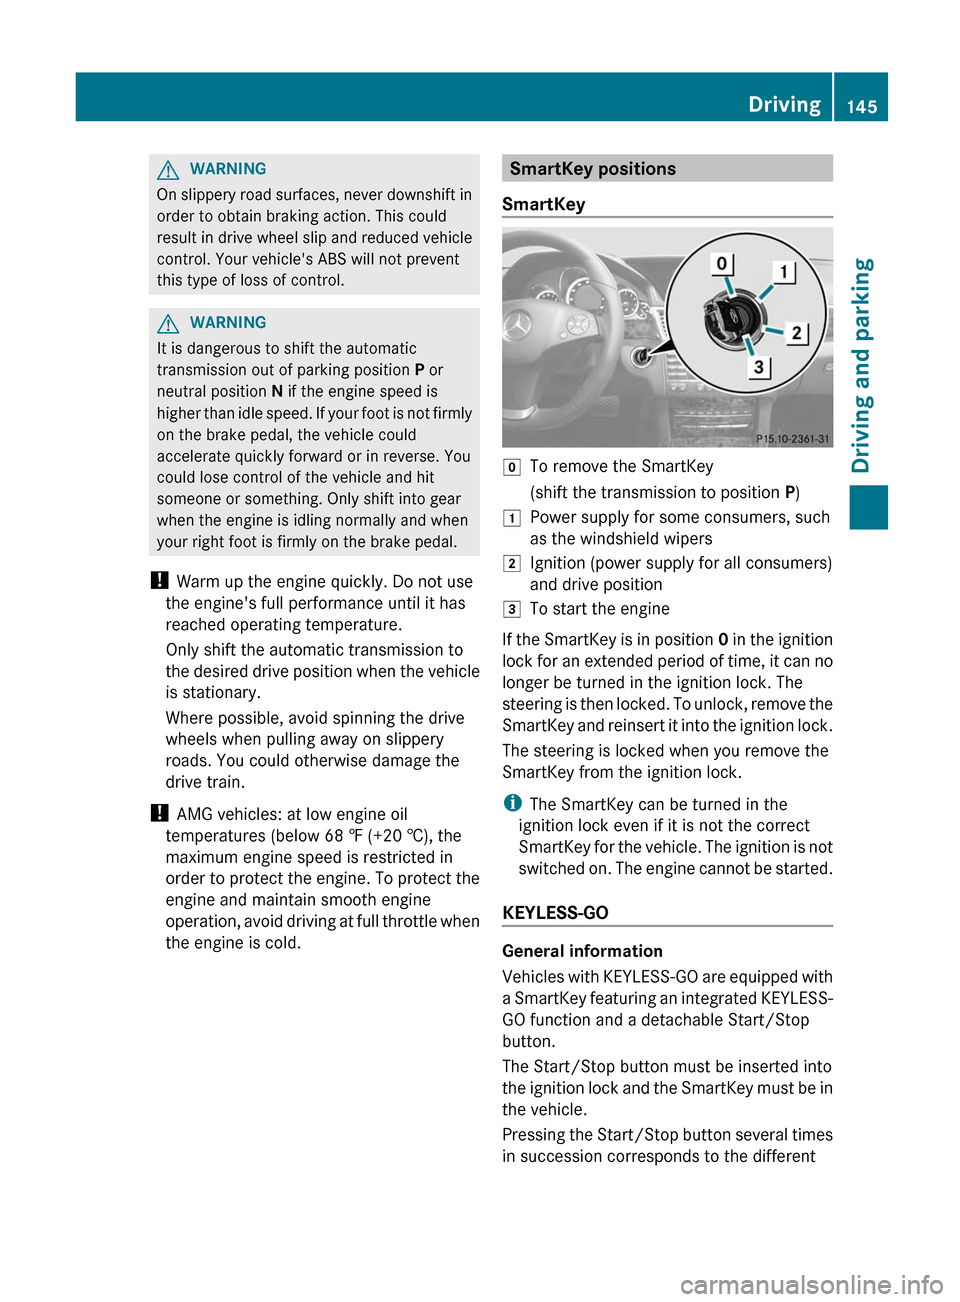
SmartKeygTo remove the SmartKey(shift the transmission to position P)1Power supply for some consumers, such
as the windshield wipers2Ignition (power supply for all consumers)
and drive position3To start the engine
If the SmartKey is in position 0 in the ignition
lock for an extended period of time, it can no
longer be turned in the ignition lock. The
steering is then locked. To unlock, remove the
SmartKey and reinsert it into the ignition lock.
The steering is locked when you remove the
SmartKey from the ignition lock.
i The SmartKey can be turned in the
ignition lock even if it is not the correct
SmartKey for the vehicle. The ignition is not
switched on. The engine cannot be started.
KEYLESS-GO
General information
Vehicles with KEYLESS-GO are equipped with
a SmartKey featuring an integrated KEYLESS-
GO function and a detachable Start/Stop
button.
The Start/Stop button must be inserted into
the ignition lock and the SmartKey must be in
the vehicle.
Pressing the Start/Stop button several times
in succession corresponds to the different
Driving145Driving and parkingZ
Page 148 of 396

SmartKey positions in the ignition lock. This
is only the case if you are not depressing the
brake pedal.
If you depress the brake pedal and press the
Start/Stop button, the engine starts
immediately.
The Start/Stop button can be removed from
the ignition lock. Then, you can insert the
SmartKey into the ignition lock.
i You do not have to remove the Start/Stop
button from the ignition lock when you
leave the vehicle. However, you should
always take the SmartKey with you when
leaving the vehicle. The vehicle can be
started with the Start/Stop button and the
electrical equipment can be operated while
the SmartKey is in the vehicle.:Start/Stop button;Ignition lockXInsert Start/Stop button : into ignition
lock ;.
i
When you insert Start/Stop button :
into ignition lock ;, the system requires a
detection time of approximately two
seconds before you can use Start/Stop
button :.
Start/Stop button
=USA only?Canada onlyXPosition 0: if Start/Stop button : has not
yet been pressed, this corresponds to the
SmartKey being removed from the ignition.XPosition 1: press Start/Stop button :.
You can now activate the windshield
wipers, for example.
i If you then open the driver's door when in
this position, the power supply is
deactivated.
XPosition 2 (ignition): press Start/Stop
button : twice.
i
If you press Start/Stop button : once
when in this position and the driver's door
is open, the power supply is deactivated
again.
As soon as the ignition is switched on, all the
indicator lamps in the instrument cluster light
up. If an indicator lamp does not go out after
the engine is started or if it lights up while the
vehicle is in motion, see ( Y page 263).
Starting the engine
Important safety notes
GWARNING
Inhalation of exhaust gas is hazardous to your
health. All exhaust gas contains carbon
monoxide (CO), and inhaling it can cause
unconsciousness and possible death.
146DrivingDriving and parking
Page 150 of 396

someone or something. Only shift into gear
when the engine is idling normally and when
your right foot is firmly on the brake pedal.
i It is only possible to shift the transmission
from position P to the desired position if
you depress the brake pedal. Only then is
the parking lock released. If you do not
depress the brake pedal, you can move the
DIRECT SELECT lever but the parking lock
remains engaged.XDepress the brake pedal and keep it
depressed.XShift the transmission to position D or R.XRelease the parking brake ( Y page 169).XRelease the brake pedal.XCarefully depress the accelerator pedal.
!
If a warning tone sounds and the
Release Park. Brake message appears
in the multifunction display, the parking
brake is still applied. Release the parking
brake.
i The vehicle locks centrally once you have
pulled away. The locking knobs in the doors
drop down.
You can open the doors from the inside at
any time.
You can also deactivate the automatic
locking feature ( Y page 228).
i Upshifts take place at higher engine
speeds after a cold start. This helps the
catalytic converter to reach its operating
temperature more quickly.
Hill start assist
Hill start assist helps you when pulling away
forwards or in reverse on an uphill gradient.
It holds the vehicle for a short time after you
have removed your foot from the brake pedal.
This gives you enough time to move your foot
from the brake pedal to the accelerator pedal
and depress it before the vehicle begins to
roll.
GWARNING
Never leave the vehicle when it is held by hill
start assist. After approximately one second,
hill start assist will no longer brake your
vehicle and it could roll away.
XTake your foot off the brake pedal.
i Once you have taken your foot off the
brake pedal, the vehicle is held for around
one second.
XPull away.
Hill start assist will not function if:
R you are pulling away on a level road or a
downhill gradient.
R the transmission is in position N.
R the parking brake is applied.
R ESP ®
is malfunctioning.
ECO start/stop function
General information
The ECO start/stop function is only available
for the E 63 AMG.
The ECO start/stop function is only available
in drive program C.
The ECO start/stop function switches the
engine off automatically when the vehicle
stops moving.
The engine starts automatically when the
driver wants to pull away again. The ECO
start/stop function thereby helps you to
reduce the fuel consumption and emissions
of your vehicle.
The ECO start/stop function is activated each
time the engine is switched on. If all the
requirements are fulfilled for automatic
engine switch-off ( Y page 149), the green
¤ ECO symbol is shown in the
multifunction display and Stop/Start
active appears. If not all of the requirements
are fulfilled, the ¤ ECO symbol is shown
in yellow and Stop/Start inactive
appears.
148DrivingDriving and parking
Page 153 of 396

Problems with the engineProblemPossible causes/consequences and M SolutionsThe engine does not
start. The starter motor
can be heard.R There is a malfunction in the engine electronics.
R There is a malfunction in the fuel supply.XBefore attempting to start the engine again, turn the SmartKey
in the ignition back to position 0 or press the Start/Stop button
repeatedly until all indicator lamps in the instrument cluster go
out.XTry to start the engine again ( Y page 146). Avoid excessively
long and frequent attempts to start the engine as these will drain
the battery.
If the engine does not start after several attempts:
XConsult a qualified specialist workshop, e.g. an authorized
Mercedes-Benz Center.The engine does not
start. You cannot hear
the starter motor.The on-board voltage is too low because the battery is too weak
or discharged.XJump-start the vehicle ( Y page 338).
If the engine does not start despite attempts to jump-start it:
XConsult a qualified specialist workshop, e.g. an authorized
Mercedes-Benz Center.The starter motor was exposed to a thermal load that was too high.XAllow the starter motor to cool down for approximately two
minutes.XTry to start the engine again.
If the engine still does not start:
XConsult a qualified specialist workshop, e.g. an authorized
Mercedes-Benz Center.Driving151Driving and parkingZ
Page 157 of 396
Rdepress the brake pedal and keep it
depressed.
R shift to neutral N.
R release the brake pedal.
R if applied, release the parking brake.
R switch off the ignition and leave the
SmartKey in the ignition lock.
Shifting to transmission position DXWhen the vehicle is stationary, depress the
brake pedal.XPush the DIRECT SELECT lever down past
the first point of resistance.
Transmission positions
BPark position
Do not shift the transmission into
position P(Y page 167) unless the
vehicle is stationary. The parking
lock should not be used as a brake
when parking. In addition to
engaging the parking lock, you
must always apply the parking
brake to secure the vehicle.
The SmartKey can only be removed
if the transmission is in position P.
If the SmartKey is removed from
the ignition lock, the selector lever
is locked.
If the vehicle electronics are
malfunctioning, the transmission
may be locked in position P.
Have the vehicle electronics
checked at a qualified specialist
workshop, e.g. an authorized
Mercedes-Benz Center,
immediately.CReverse gear
Only shift the transmission to R
when the vehicle is stationary.ANeutral
Do not shift the transmission to N
while driving. The transmission
could otherwise be damaged.
No power is transmitted from the
engine to the drive wheels.
Releasing the brakes will allow you
to move the vehicle freely, e.g. to
push it or tow it.
If ESP ®
is deactivated or faulty:
only shift the transmission to
position N if the vehicle is in danger
of skidding, e.g. on icy roads.
! Rolling in neutral N can damage
the drive train.7Drive
The automatic transmission
changes gear automatically. All
forward gears are available.
Changing gear
The automatic transmission shifts to the
individual gears automatically when it is in
transmission position D. This automatic
gearshifting behavior is determined by:
R a shift range restriction, if selected
R the selected drive program
E/S or M (AMG vehicles) ( Y page 156)
R the position of the accelerator pedal
R the road speed
Driving tips
AMG vehicles
When shifting down, the double-clutch
function is active regardless of the currently
selected drive program. The double-clutch
function reduces load change reactions and
is conducive to a sporty driving style. The
sound generated by the double-clutch
Automatic transmission155Driving and parkingZ
Page 160 of 396

transmission shifts only as far as the selected
gear.Shift range=You can use the engine's braking
effect.5To use the braking effect of the
engine on downhill gradients and
for driving:
R on steep mountain roads
R in mountainous terrain
R in arduous conditions4To use the braking effect of the
engine on extremely steep downhill
gradients and on long downhill
stretches
Restricting the shift range
XPull the left-hand steering wheel paddle
shifter.
The automatic transmission shifts down
one gear and restricts the shift range to the
relevant gear.
i If the engine exceeds the maximum
engine speed when shifting down, the
automatic transmission protects against
engine damage by not shifting down.
i If the maximum engine speed for the shift
range is reached and you continue to
accelerate, the automatic transmission
shifts up in order to prevent the engine
from overrevving, even if the shift range is
restricted.
Derestricting the shift range
XPull the right-hand steering wheel paddle
shifter.
The shift range is derestricted.Clearing the shift range restrictionXPull and hold the right-hand steering wheel
paddle shifter until D is shown again in the
multifunction display.
The automatic transmission shifts from the
current shift range directly to D.
Selecting the ideal shift range
XPull the left-hand steering wheel paddle
shifter and hold it in position.
The automatic transmission shifts to the
gear which allows optimum acceleration
and deceleration. To do this, the automatic
transmission shifts down one or more
gears.
Manual drive program
Switching on the manual drive program
The manual drive program is only available for
AMG vehicles.
Manual drive program M is different from
drive programs S and S+ with regard to
spontaneity, responsiveness and
smoothness of gear changes.
Manual drive program M can be selected
using the drive program selector. In manual
drive program M, you can change gear
yourself using the steering wheel paddle
shifters if the transmission is in position D.
The gear currently selected and engaged is
shown in the multifunction display.
XTurn the drive program selector
( Y page 156) until M appears in the
multifunction display.
The indicator M on the drive program
selector lights up in red.
Upshifting
! In manual drive program M, the automatic
transmission does not shift up
automatically even when the engine
limiting speed for the current gear is
158Automatic transmissionDriving and parking