oil temperature MERCEDES-BENZ E-Class WAGON 2012 W212 Owner's Manual
[x] Cancel search | Manufacturer: MERCEDES-BENZ, Model Year: 2012, Model line: E-Class WAGON, Model: MERCEDES-BENZ E-Class WAGON 2012 W212Pages: 396, PDF Size: 17.07 MB
Page 11 of 396
Break-in period .............................. 144
DISTRONIC PLUS ........................... 185
Downhill gradient ........................... 171
Drinking and driving .......................170
Driving abroad ............................... 114
Driving on flooded roads ................173
Driving on wet roads ......................173
Exhaust check ............................... 170
Fuel ................................................ 170
General .......................................... 169
Hydroplaning ................................. 173
Icy road surfaces ........................... 175
Limited braking efficiency on
salted roads ................................... 171
Pedals ............................................ 170
Snow chains .......................... 174, 349
Symmetrical low beam ..................114
Wet road surface ........................... 171
DVD audio (on-board computer) ...... 222
DVD-Video (on-board computer) ...... 222
E
EASY-ENTRY feature Activating/deactivating .................229
Function/notes ............................. 108
EASY-EXIT feature
Crash-responsive ........................... 108
Function/notes ............................. 108
Switching on/off ........................... 229
EASY-PACK cargo compartment
management system ........................ 284
EASY-PACK folding luggage-
compartment floor ............................ 286
EASY-PACK load-securing kit ........... 284
EASY-PACK rear sill protector .......... 287
EBD (electronic brake force
distribution) Display message ............................ 236
Function/notes ................................ 69
ECO start/stop function
Deactivating/activating .................150
General information .......................148
Electrical fuses
see Fuses
Electronic brake force distribution
see EBD (Electronic Brake force
Distribution)
Electronic Stability Program
see ESP ®
(Electronic Stability Program)
Electronic Traction System
see ETS/4ETS (Electronic
Traction System)
Emergency release
Driver's door .................................... 83
Fuel filler flap ................................. 163
Trunk ............................................... 89
Vehicle ............................................. 83
Emergency spare wheel
Storage location ............................ 324
Stowing .......................................... 325
Emergency Tensioning Devices
Function ........................................... 56
Safety guidelines ............................. 39
Emergency unlocking
Tailgate ............................................ 89
Emissions purification
Service and warranty information ....22
Engine
Check Engine warning lamp ........... 267
Display message ............................ 245
ECO start/stop function ................148
Emergency starting ........................342
Engine number ............................... 382
Irregular running ............................ 151
Starting problems ..........................151
Starting the engine with the
SmartKey ....................................... 147
Starting with KEYLESS-GO .............147
Switching off .................................. 168
Engine electronics
Problem (malfunction) ...................151
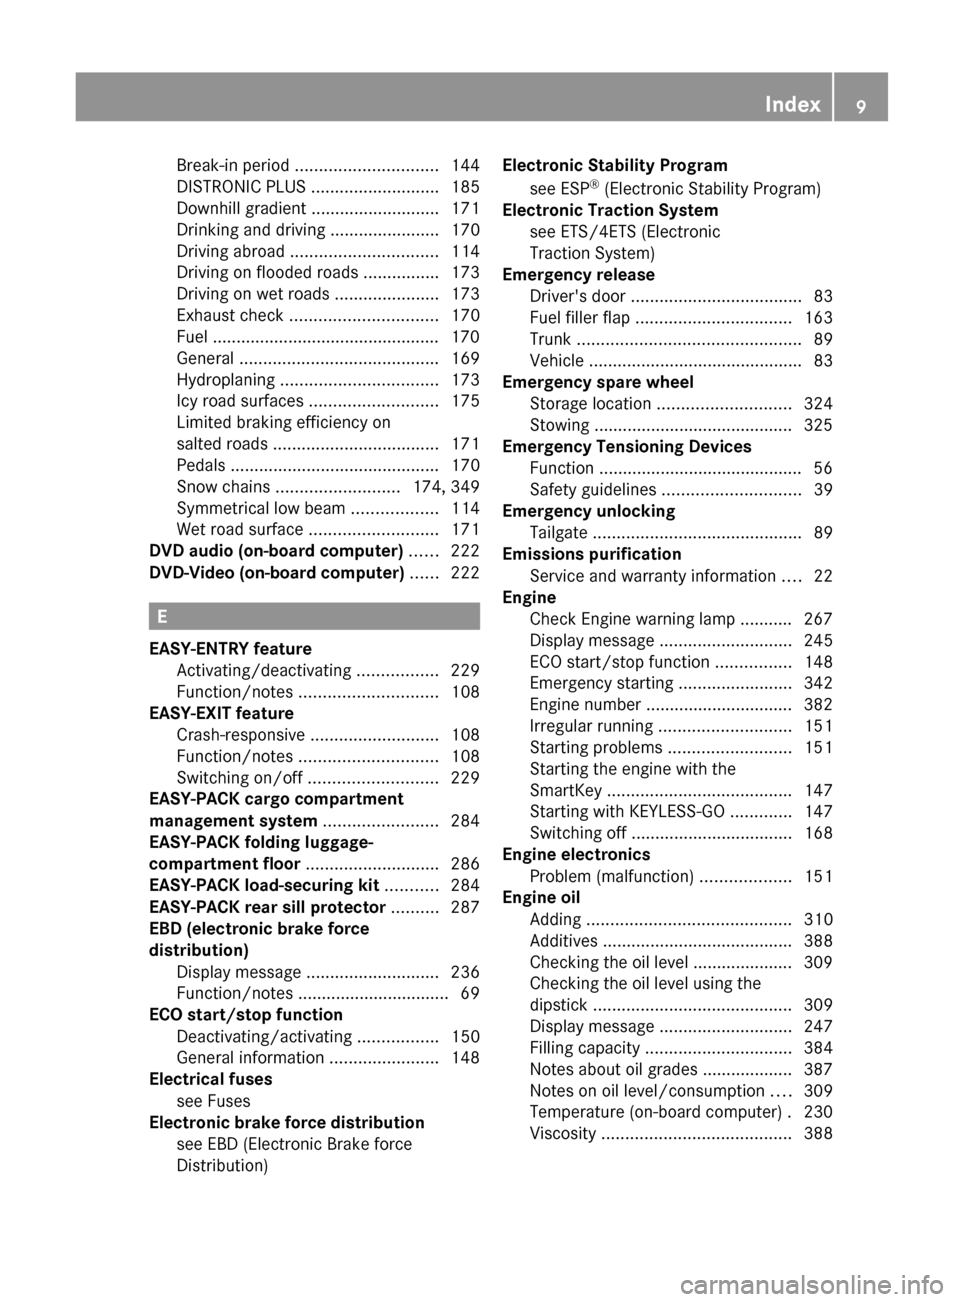
Engine oil
Adding ........................................... 310
Additives ........................................ 388
Checking the oil level ..................... 309
Checking the oil level using the
dipstick .......................................... 309
Display message ............................ 247
Filling capacity ............................... 384
Notes about oil grades ................... 387
Notes on oil level/consumption ....309
Temperature (on-board computer) . 230
Viscosity ........................................ 388Index9
Page 20 of 396
Opening/closing (automatically
from inside) ...................................... 87
Opening/closing (automatically
from outside) ................................... 86
Tail lamps
Display message ............................ 243
Tank
see Fuel tank
Tank content
Fuel gauge ....................................... 29
Technical data
Notes ............................................. 380
Tires/wheels ................................. 371
Vehicle data ................................... 390
TELEAID
Call priority .................................... 300
Display message ............................ 237
Downloading destinations
(COMAND) ..................................... 300
Emergency call .............................. 297
Important safety notes ..................296
Locating a stolen vehicle ...............301
MB info call button ........................299
Remote vehicle locking ..................301
Roadside Assistance button ..........298
Search & Send ............................... 300
Self-test ......................................... 296
System .......................................... 296
Vehicle remote unlocking ..............300
Telephone
Accepting a call ............................. 223
Display message ............................ 259
Menu (on-board computer) ............222
Number from the phone book ........ 223
Redialing ........................................ 223
Rejecting/ending a call .................223
Telescopic rod (EASY-PACK load-
securing kit) ....................................... 286
Temperature Coolant .......................................... 214
Coolant (on-board computer) ......... 230
Engine oil (on-board computer) ...... 230
Outside temperature ...................... 215
Setting (climate control) ................136
Theft deterrent locking system
Immobilizer ...................................... 71
Through-loading ................................ 278
Through-loading feature ................... 279Tilt/sliding sunroof
see Sliding sunroof
Timing (RACETIMER) ......................... 231
Tiredness assistant see ATTENTION ASSIST
TIREFIT kit .......................................... 326
Tire pressure Calling up (on-board computer) .....355
Checking manually ........................353
Display message ............................ 254
Maximum ....................................... 352
Notes ............................................. 351
Not reached (TIREFIT) ....................327
Pressure loss warning ....................353
Reached (TIREFIT) ..........................328
Recommended ............................... 349
Tire pressure monitoring system
Function/notes ............................. 355
Restarting ...................................... 357
Warning lamp ................................. 271
Tires
Aspect ratio (definition) .................369
Average weight of the vehicle
occupants (definition) ....................368
Bar (definition) ............................... 367
Characteristics .............................. 367
Checking ........................................ 347
Definition of terms .........................367
Direction of rotation ......................371
Display message ............................ 254
Distribution of the vehicle
occupants (definition) ....................370
DOT, Tire Identification Number
(TIN) ............................................... 366
DOT (Department of
Transportation) (definition) ............367
GAWR (Gross Axle Weight Rating)
(definition) ..................................... 368
GVW (Gross Vehicle Weight)
(definition) ..................................... 368
GVWR (Gross Vehicle Weight
Rating) (definition) .........................368
Important safety notes ..................346
Increased vehicle weight due to
optional equipment (definition) ......368
Kilopascal (kPa) (definition) ...........369
Labeling (overview) ........................363
Load bearing index (definition) ......37018Index
Page 147 of 396
GWARNING
On slippery road surfaces, never downshift in
order to obtain braking action. This could
result in drive wheel slip and reduced vehicle
control. Your vehicle's ABS will not prevent
this type of loss of control.
GWARNING
It is dangerous to shift the automatic
transmission out of parking position P or
neutral position N if the engine speed is
higher than idle speed. If your foot is not firmly
on the brake pedal, the vehicle could
accelerate quickly forward or in reverse. You
could lose control of the vehicle and hit
someone or something. Only shift into gear
when the engine is idling normally and when
your right foot is firmly on the brake pedal.
! Warm up the engine quickly. Do not use
the engine's full performance until it has
reached operating temperature.
Only shift the automatic transmission to
the desired drive position when the vehicle
is stationary.
Where possible, avoid spinning the drive
wheels when pulling away on slippery
roads. You could otherwise damage the
drive train.
! AMG vehicles: at low engine oil
temperatures (below 68 ‡ (+20 †), the
maximum engine speed is restricted in
order to protect the engine. To protect the
engine and maintain smooth engine
operation, avoid driving at full throttle when
the engine is cold.
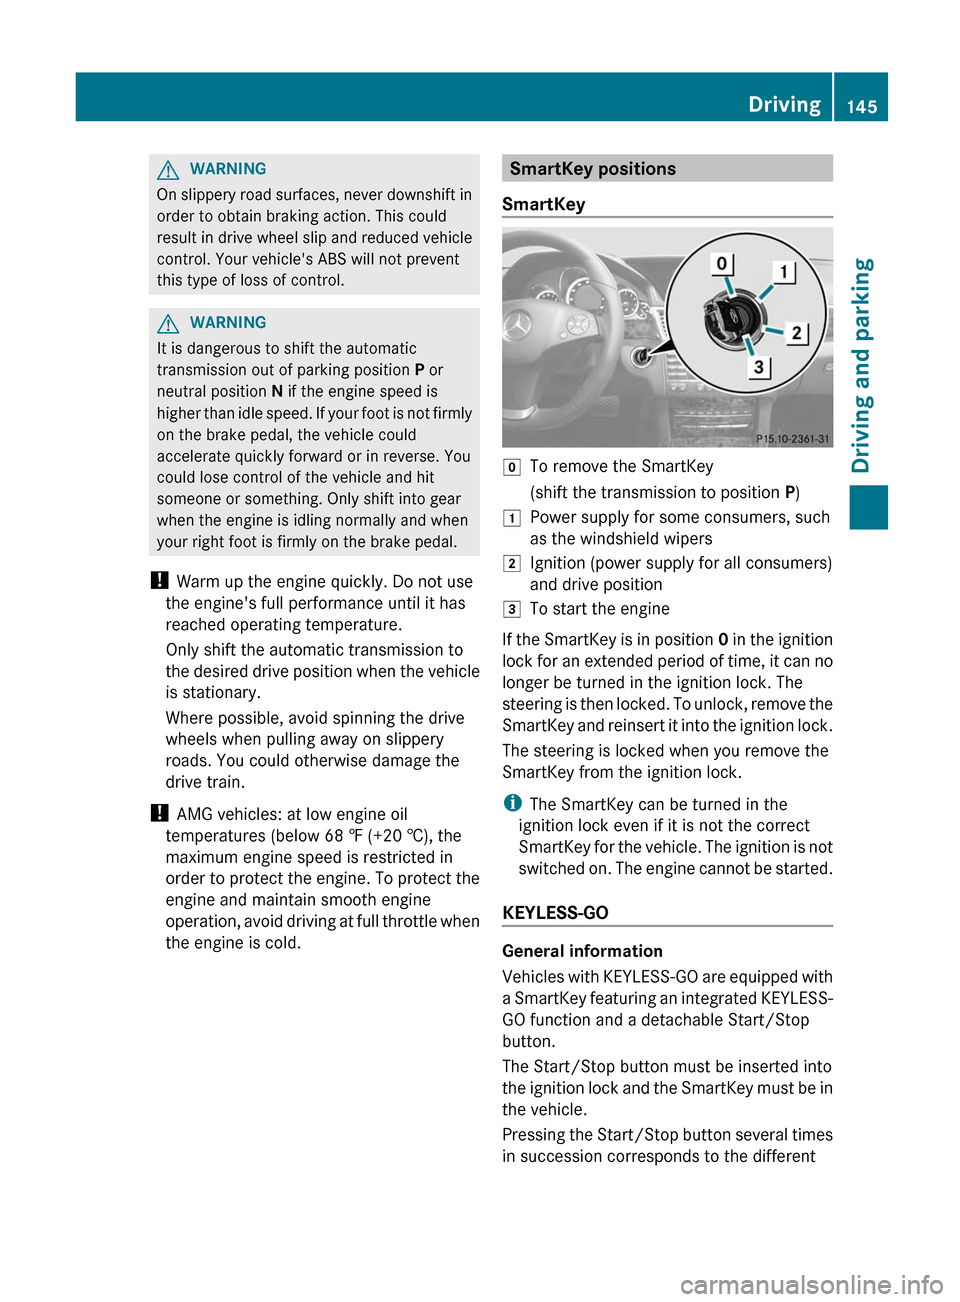
SmartKey positions
SmartKeygTo remove the SmartKey(shift the transmission to position P)1Power supply for some consumers, such
as the windshield wipers2Ignition (power supply for all consumers)
and drive position3To start the engine
If the SmartKey is in position 0 in the ignition
lock for an extended period of time, it can no
longer be turned in the ignition lock. The
steering is then locked. To unlock, remove the
SmartKey and reinsert it into the ignition lock.
The steering is locked when you remove the
SmartKey from the ignition lock.
i The SmartKey can be turned in the
ignition lock even if it is not the correct
SmartKey for the vehicle. The ignition is not
switched on. The engine cannot be started.
KEYLESS-GO
General information
Vehicles with KEYLESS-GO are equipped with
a SmartKey featuring an integrated KEYLESS-
GO function and a detachable Start/Stop
button.
The Start/Stop button must be inserted into
the ignition lock and the SmartKey must be in
the vehicle.
Pressing the Start/Stop button several times
in succession corresponds to the different
Driving145Driving and parkingZ
Page 163 of 396
GWARNING
Overfilling of the fuel tank may create
pressure in the system which could cause a
gas discharge. This could cause the gasoline
to spray back out when removing the fuel
pump nozzle, which could cause personal
injury.
GWARNING
Do not fill diesel tanks with gasoline. Do not
mix diesel fuel with gasoline. Otherwise the
fuel system and engine could be damaged. In
addition, the vehicle could catch fire.
! Do not use gasoline to refuel vehicles with
a diesel engine. Do not use diesel to refuel
vehicles with a gasoline engine. Even a
small quantity of the wrong fuel will
damage the fuel system and engine.
! Do not switch on the ignition if you
accidentally refuel with the wrong fuel.
Otherwise, the fuel will enter the fuel lines.
Notify a qualified specialist workshop and
have the fuel tank and fuel lines drained
completely.
Gasoline
Fuel grade
! You should only refuel with unleaded
premium-grade gasoline as this avoids
damaging the catalytic converter.
If engine running problems are apparent,
have the cause checked immediately and
repaired. Excess unburned fuel can
otherwise enter the catalytic converter,
leading to overheating and possibly
causing a fire.
! Use a filter when refueling from a fuel can.
Otherwise, the fuel lines and/or injection
system could be blocked by particles from
the fuel can.
i Only refuel with premium-grade unleaded
gasoline with a specified minimum octane
number of 91 (average value of 96 RON/
86 MON).
You will usually find information about the
fuel grade on the pump. If you cannot find
the label on the pump, ask the staff for
assistance.
You can find more information under "Fuel"
( Y page 385), or by contacting an
authorized Mercedes-Benz Service Center
or visiting http://www.mbusa.com (USA
only).
Diesel
Fuel grade
! Only refuel with ULTRA-LOW SULFUR
DIESEL FUEL (ULSD, 15 ppm SULFUR
MAXIMUM). Using other diesel fuels could
result in increased wear and damage to the
engine and/or exhaust system.
Never refuel with marine diesel or heating
oil.
Do not mix these fuels with diesel fuels and
do not use any special additives, as this
may result in damage.
! Use a filter when adding fuel from a fuel
can. Otherwise, the fuel lines and/or the
fuel injection system could be blocked by
particles from the fuel can.
i Usually, you will find information about
the fuel grade on the pump. If you cannot
find the label on the gasoline pump, ask the
gas station staff.
You can find more information under “Fuel”
( Y page 385), or by contacting an
authorized Mercedes-Benz Service Center
or visiting http://www.mbusa.com (USA
only).
Low outside temperatures
! Do not use gasoline to refuel vehicles with
a diesel engine. Never mix diesel with
gasoline or kerosene, as this may result in
damage to the engine or fuel system.
Refueling161Driving and parkingZ
Page 190 of 396
If you leave the vehicle or park it, deactivate
the HOLD function and secure the vehicle
against rolling away.
When the HOLD function is activated, the
transmission is shifted automatically to
position P if:
R the driver's door is open and the driver's
seat belt is unfastened.
R the engine is switched off.
R the hood is opened.
R a system malfunction occurs.
R the power supply is not sufficient.
i If the engine has been switched off, it
cannot be started again until the HOLD
function has been deactivated.
If there is a malfunction in the system or
power supply while the HOLD function is
activated, the Brake immediately message
is shown in the multifunction display.
Immediately depress the brake firmly until
the warning message in the multifunction
display goes out.
RACE START
Important safety notes
i RACE START is only available in AMG
vehicles.
RACE START enables optimal acceleration
from a standing start. The precondition for
this is a suitable high-grip road surface.
GWARNING
RACE START is only available when SPORT
handling mode is activated. SPORT handling
mode only stabilizes the vehicle to a limited
extent in the event of swerving or wheelspin.
RACE START should only be used on specially
designated roads. Always adapt your speed
and driving style to the prevailing road and
weather conditions.
Conditions for activation
RACE START can be activated when:
R the doors are closed.
R the engine is running and it has reached an
operating temperature of approximately
176 ‡ (80 †). This is the case when the
engine oil temperature in the multifunction
display stops flashing.
R SPORT handling mode is activated.
( Y page 67)
R the steering wheel is in the straight-ahead
position.
R the vehicle is stationary and the brake
pedal is depressed (left foot).
R the transmission is in position D.
Activating RACE START
XDepress the brake pedal with your left foot,
and keep it depressed.XTurn the drive program selector clockwise
( Y page 156) until the RS lamp lights up.
The multifunction display shows the RACE
START Confirm: Paddle UP Cancel:
Paddle DOWN message.
i
If the conditions for activation are no
longer fulfilled, RACE START is canceled.
The multifunction display shows the RACE
START canceled message.
XTo cancel: pull the left steering wheel shift
paddle ( Y page 157).
or
XTo confirm: pull the right steering wheel
shift paddle ( Y page 157).
The multifunction display shows the RACE
START available Depress
accelerator message.
i
If you do not depress the accelerator
pedal fully within two seconds, RACE
START is canceled. The multifunction
display shows the RACE START not
possible See Operator's Manual
message.
188Driving systemsDriving and parking
Page 232 of 396
XPress the : or 9 button to select the
Belt Adjustment function.
When the Belt Adjustment function is
activated, the vehicle seat belt is displayed
in red in the multifunction display.XPress the a button to save the setting.
Switching the Fold in mirrors when
locking function on/off
This function is only available in Canada.
If you switch on the Auto. Mirror
Folding function, the exterior mirrors fold in
when you lock the vehicle. If you unlock the
vehicle and then open the driver's or front-
passenger door, the exterior mirrors fold out
again.
If you have switched the function on and you
fold the exterior mirrors in using the button
on the door ( Y page 109), they will not fold
out automatically. The exterior mirrors can
then only be folded out using the button on
the door.
XPress the = or ; button on the
steering wheel to select the Sett. menu.XPress the : or 9 button to select the
Convenience submenu.XPress the a button to confirm.XPress the : or 9 to select the
Auto. Mirror Folding function.
If the Auto. Mirror Folding function is
activated, the vehicle's exterior mirror is
displayed in red in the multifunction
display.XPress the a button to save the setting.
Resetting to factory settings
For safety reasons, the Day Lights function
in the Lights submenu is only reset when the
vehicle is stationary.
XPress the = or ; button on the
steering wheel to select the Settings
menu.XPress the : or 9 button to select the
Factory Setting submenu.XPress the a button to confirm.
The Reset All Settings? message
appears.XPress the : or 9 button to select
No or Yes .XPress the a button to confirm the
selection.
If you select Yes, the multifunction display
shows a confirmation message.
AMG menu in AMG vehicles
AMG displays
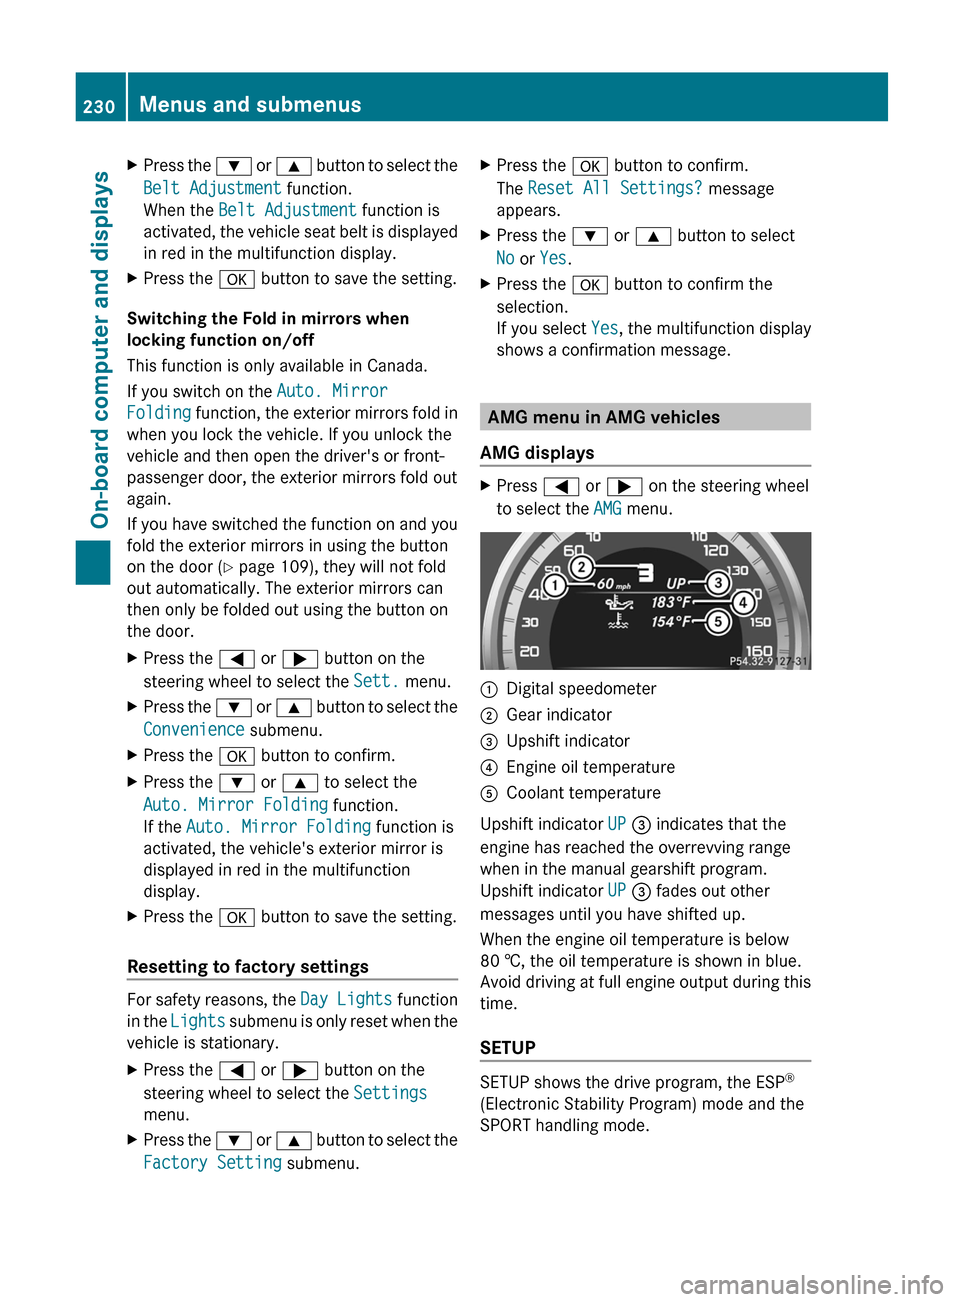
XPress = or ; on the steering wheel
to select the AMG menu.:Digital speedometer;Gear indicator=Upshift indicator?Engine oil temperatureACoolant temperature
Upshift indicator UP = indicates that the
engine has reached the overrevving range
when in the manual gearshift program.
Upshift indicator UP = fades out other
messages until you have shifted up.
When the engine oil temperature is below
80 †, the oil temperature is shown in blue.
Avoid driving at full engine output during this
time.
SETUP
SETUP shows the drive program, the ESP ®
(Electronic Stability Program) mode and the
SPORT handling mode.
230Menus and submenusOn-board computer and displays
Page 249 of 396
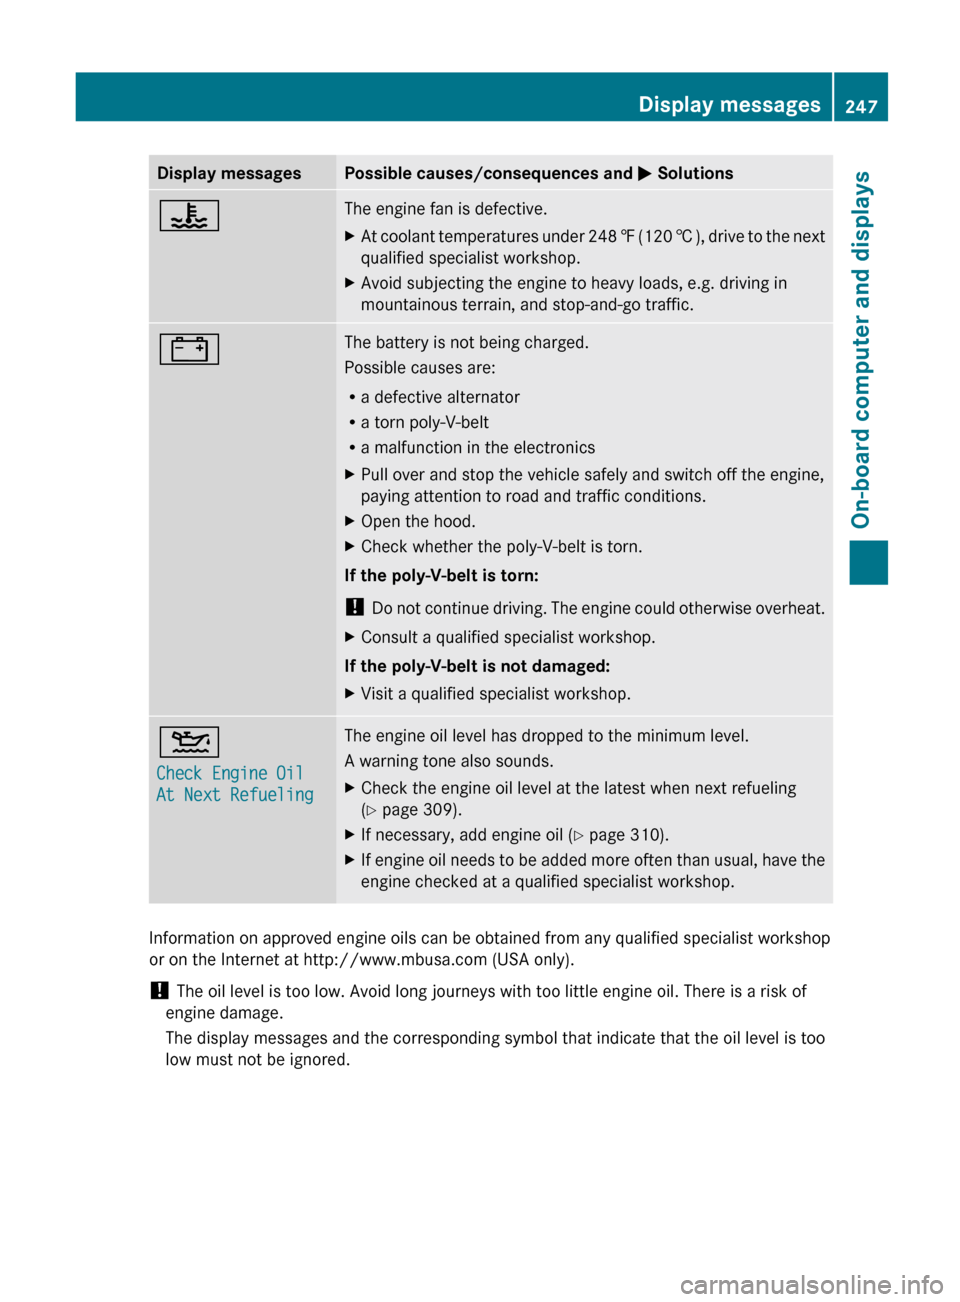
Display messagesPossible causes/consequences and M Solutions?The engine fan is defective.XAt coolant temperatures under 248 ‡ (120 † ), drive to the next
qualified specialist workshop.XAvoid subjecting the engine to heavy loads, e.g. driving in
mountainous terrain, and stop-and-go traffic.#The battery is not being charged.
Possible causes are:
R a defective alternator
R a torn poly-V-belt
R a malfunction in the electronicsXPull over and stop the vehicle safely and switch off the engine,
paying attention to road and traffic conditions.XOpen the hood.XCheck whether the poly-V-belt is torn.
If the poly-V-belt is torn:
! Do not continue driving. The engine could otherwise overheat.
XConsult a qualified specialist workshop.
If the poly-V-belt is not damaged:
XVisit a qualified specialist workshop.4
Check Engine Oil
At Next RefuelingThe engine oil level has dropped to the minimum level.
A warning tone also sounds.XCheck the engine oil level at the latest when next refueling
( Y page 309).XIf necessary, add engine oil ( Y page 310).XIf engine oil needs to be added more often than usual, have the
engine checked at a qualified specialist workshop.
Information on approved engine oils can be obtained from any qualified specialist workshop
or on the Internet at http://www.mbusa.com (USA only).
! The oil level is too low. Avoid long journeys with too little engine oil. There is a risk of
engine damage.
The display messages and the corresponding symbol that indicate that the oil level is too
low must not be ignored.
Display messages247On-board computer and displaysZ
Page 310 of 396

Useful information
i This Operator's Manual describes all
models and all standard and optional
equipment of your vehicle available at the
time of publication of the Operator's
Manual. Country-specific differences are
possible. Please note that your vehicle may
not be equipped with all features
described. This also applies to safety-
related systems and functions.
i Please read the information on qualified
specialist workshops ( Y page 25).
Engine compartment
Hood
Opening the hood
GWARNING
Do not pull the release lever while the vehicle
is in motion. Otherwise, the hood could be
forced open by passing air flow.
This could cause the hood to come loose and
injure you and/or others.
GWARNING
Do not open the hood when the engine is
overheated. You could be seriously injured.
Observe the coolant temperature gauge to
determine whether the engine may be
overheated. If you see flames or smoke
coming from the engine compartment, move
away from the vehicle. Wait until the engine
has cooled. If necessary, call the fire
department.
GWARNING
There is a risk of injury if the hood is open,
even if the engine is not running.
Some engine components can become very
hot.
To avoid the risk of burns, only touch those
components described in the Operator's
Manual and observe the relevant safety notes.
GWARNING
To help prevent personal injury, stay clear of
moving parts when the hood is open and the
engine is running.
The radiator fan may continue to run for
approximately 30 seconds or may even
restart after the engine has been turned off.
Stay clear of fan blades.
GWARNING
Vehicles with gasoline engine:
The engine is equipped with a transistorized
ignition system. Because of the high voltage
it is dangerous to touch any components
(ignition coils, spark plug sockets, diagnostic
socket) of the ignition system
R with the engine running
R while starting the engine
R when the ignition is switched on and the
engine is turned manually
GWARNING
Vehicles with diesel engine:
The engine is equipped with a high-voltage
electronic control unit for the injection
system. Because of the high voltage it is
dangerous to touch any components of the
injection system (injectors, electrical wires)
R with the engine running
R while starting the engine
R when the ignition is switched on
XMake sure that the windshield wipers are
switched off.GWARNING
The windshield wipers and wiper linkage
could be set in motion.
When the hood is open, you or others could
be injured by the wiper linkage.
Make sure that the windshield wipers are
switched off. Remove the SmartKey or make
sure that no ignition position has been
selected with KEYLESS-GO. All indicator
lamps must be off in the instrument cluster.
308Engine compartmentMaintenance and care
Page 312 of 396
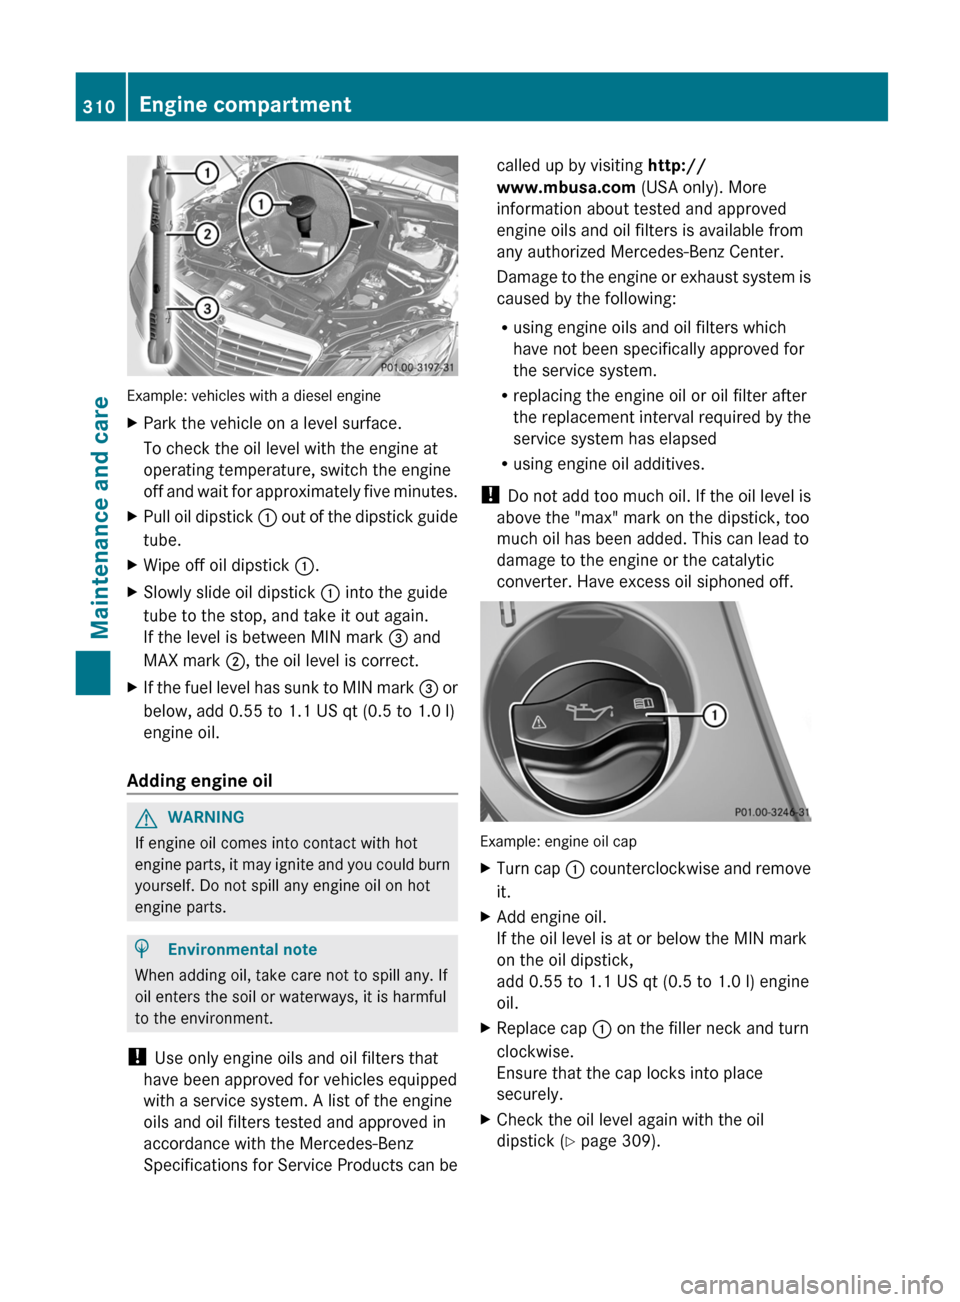
Example: vehicles with a diesel engine
XPark the vehicle on a level surface.
To check the oil level with the engine at
operating temperature, switch the engine
off and wait for approximately five minutes.XPull oil dipstick : out of the dipstick guide
tube.XWipe off oil dipstick :.XSlowly slide oil dipstick : into the guide
tube to the stop, and take it out again.
If the level is between MIN mark = and
MAX mark ;, the oil level is correct.XIf the fuel level has sunk to MIN mark = or
below, add 0.55 to 1.1 US qt (0.5 to 1.0 l)
engine oil.
Adding engine oil
GWARNING
If engine oil comes into contact with hot
engine parts, it may ignite and you could burn
yourself. Do not spill any engine oil on hot
engine parts.
HEnvironmental note
When adding oil, take care not to spill any. If
oil enters the soil or waterways, it is harmful
to the environment.
! Use only engine oils and oil filters that
have been approved for vehicles equipped
with a service system. A list of the engine
oils and oil filters tested and approved in
accordance with the Mercedes-Benz
Specifications for Service Products can be
called up by visiting http://
www.mbusa.com (USA only). More
information about tested and approved
engine oils and oil filters is available from
any authorized Mercedes-Benz Center.
Damage to the engine or exhaust system is
caused by the following:
R using engine oils and oil filters which
have not been specifically approved for
the service system.
R replacing the engine oil or oil filter after
the replacement interval required by the
service system has elapsed
R using engine oil additives.
! Do not add too much oil. If the oil level is
above the "max" mark on the dipstick, too
much oil has been added. This can lead to
damage to the engine or the catalytic
converter. Have excess oil siphoned off.
Example: engine oil cap
XTurn cap : counterclockwise and remove
it.XAdd engine oil.
If the oil level is at or below the MIN mark
on the oil dipstick,
add 0.55 to 1.1 US qt (0.5 to 1.0 l) engine
oil.XReplace cap : on the filler neck and turn
clockwise.
Ensure that the cap locks into place
securely.XCheck the oil level again with the oil
dipstick ( Y page 309).310Engine compartmentMaintenance and care
Page 313 of 396
Further information on engine oil
( Y page 387).
Checking and adding other service
products
Checking the coolant level
Only check the coolant level when the vehicle
is on a level surface and the engine has cooled
down.
XTurn the SmartKey to position
2 (Y page 145) in the ignition lock.
On vehicles with KEYLESS-GO, press the
Start/Stop button twice ( Y page 145).XCheck the coolant temperature display in
the instrument cluster.
The coolant temperature must be below
158 ‡ (70 †).GWARNING
In order to avoid any potentially serious burns:
R use extreme caution when opening the
hood if there are any signs of steam or
coolant leaking from the cooling system, or
if the coolant temperature display indicates
that the coolant is overheated.
R do not remove the pressure cap on the
coolant reservoir if the coolant temperature
is above 158 ‡ (70 †). Allow the engine to
cool down before removing the cap. The
coolant reservoir contains hot fluid and is
under pressure.
R using a rag, slowly turn the cap
approximately 1
/ 2 turn to relieve excess
pressure. If opened immediately, scalding
hot fluid and steam will be blown out under
pressure.
R do not spill antifreeze on hot engine parts.
Antifreeze contains ethylene glycol which
may burn if it comes into contact with hot
engine parts.
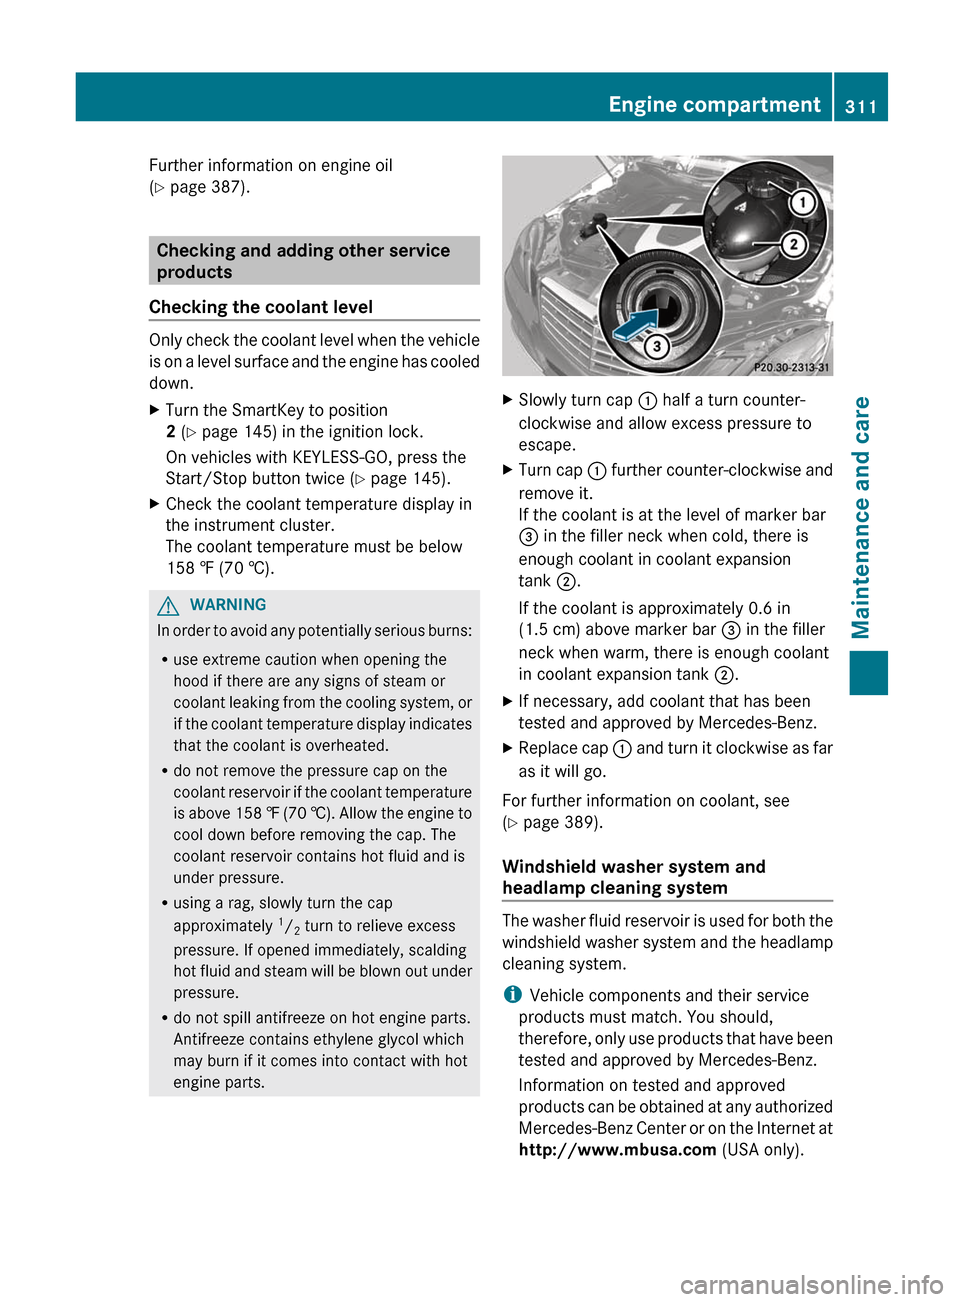
XSlowly turn cap : half a turn counter-
clockwise and allow excess pressure to
escape.XTurn cap : further counter-clockwise and
remove it.
If the coolant is at the level of marker bar
= in the filler neck when cold, there is
enough coolant in coolant expansion
tank ;.
If the coolant is approximately 0.6 in
(1.5 cm) above marker bar = in the filler
neck when warm, there is enough coolant
in coolant expansion tank ;.XIf necessary, add coolant that has been
tested and approved by Mercedes-Benz.XReplace cap : and turn it clockwise as far
as it will go.
For further information on coolant, see
( Y page 389).
Windshield washer system and
headlamp cleaning system
The washer fluid reservoir is used for both the
windshield washer system and the headlamp
cleaning system.
i Vehicle components and their service
products must match. You should,
therefore, only use products that have been
tested and approved by Mercedes-Benz.
Information on tested and approved
products can be obtained at any authorized
Mercedes-Benz Center or on the Internet at
http://www.mbusa.com (USA only).
Engine compartment311Maintenance and careZ