wiper blades MERCEDES-BENZ E-Class WAGON 2012 W212 Owner's Manual
[x] Cancel search | Manufacturer: MERCEDES-BENZ, Model Year: 2012, Model line: E-Class WAGON, Model: MERCEDES-BENZ E-Class WAGON 2012 W212Pages: 396, PDF Size: 17.07 MB
Page 8 of 396
C
California Important notice for retail
customers and lessees ....................23
Calling up a malfunction
see Display messages
Capacities
see Technical data
Car
see Vehicle
Care
Carpets .......................................... 320
Car wash ........................................ 314
Display ........................................... 318
Exterior lights ................................ 317
Gear or selector lever ....................319
Matte finish ................................... 316
Night View Assist Plus ...................318
Notes ............................................. 313
Paint .............................................. 316
Plastic trim .................................... 319
Power washer ................................ 315
Rear view camera .......................... 318
Roof lining ...................................... 320
Seat belt ........................................ 320
Seat cover ..................................... 320
Sensors ......................................... 317
Steering wheel ............................... 319
Tail pipes ....................................... 318
Trim pieces .................................... 319
Washing by hand ........................... 315
Wheels ........................................... 315
Windows ........................................ 317
Wiper blades .................................. 317
Wooden trim .................................. 319
Cargo compartment cover ............... 282
Cargo compartment enlargement ... 280
Cargo compartment floor ................. 286
Cargo net ........................................... 284
Attaching ....................................... 284
Cargo tie down rings ......................... 281
Car wash (care) ................................. 314
CD player/CD changer (on-board
computer) .......................................... 222
Cell phone see Mobile phone Center console
Lower section .................................. 33
Lower section (AMG vehicles) ..........34
Upper section .................................. 32
Central locking
Automatic locking (on-board
computer) ...................................... 228
Locking/unlocking (SmartKey) ........74
Changing bulbs
High-beam headlamps ...................123
Important safety notes ..................121
Infrared lamp ................................. 123
Low-beam headlamps ....................122
Overview of bulb types ..................122
Parking lamps ................................ 123
Standing lamps (front) ...................123
Turn signals (front) ......................... 124
Child-proof locks
Important safety notes ....................61
Rear doors ....................................... 61
Children
In the vehicle ................................... 56
Restraint systems ............................ 56
Child seat
LATCH-type (ISOFIX) child seat
anchors ............................................ 59
Special seat belt retractor ...............59
Top Tether ....................................... 60
Cigarette lighter ................................ 293
Climate control Automatic climate control (3-
zone) .............................................. 133
Controlling automatically ...............135
Cooling with air dehumidification ..134
Defrosting the windows .................138
Defrosting the windshield ..............138
Dual-zone automatic climate
control ........................................... 131
Important safety notes ..................130
Indicator lamp ................................ 135
Maximum cooling .......................... 138
Notes on using automatic climate
control ................................... 132, 134
Overview of systems ......................130
Problems with cooling with air
dehumidification ............................ 135
Problem with the rear window
defroster ........................................ 1396Index
Page 22 of 396
V
Vanity mirror (in sun visor) .............. 291
Vehicle Correct use ...................................... 25
Data acquisition ............................... 26
Display message ............................ 257
Equipment ....................................... 22
Individual settings ..........................226
Limited Warranty ............................. 26
Loading .......................................... 358
Locking (in an emergency) ...............84
Locking (SmartKey) .......................... 75
Lowering ........................................ 333
Maintenance .................................... 23
Parking for a long period ................ 169
Pulling away ................................... 147
Raising ........................................... 330
Reporting problems .........................25
Towing away .................................. 340
Transporting .................................. 342
Unlocking (in an emergency) ...........83
Unlocking (SmartKey) ......................75
Vehicle data ................................... 390
Vehicle battery
see Battery (vehicle)
Vehicle data ....................................... 390
see Technical data
Vehicle dimensions ........................... 390
Vehicle emergency locking ................ 84
Vehicle identification number see VIN
Vehicle identification plate .............. 381
Vehicle level AIRMATIC ...................................... 189
Vehicle level (display message) ....... 249
Vehicle tool kit .................................. 322
Video (DVD) ........................................ 222
VIN ...................................................... 381
W
Warning and indicator lamps ABS ................................................ 264
Brakes ........................................... 263
Check Engine ................................. 267
Coolant .......................................... 268
Cruise control ................................ 176
Distance warning ........................... 270
DISTRONIC PLUS ........................... 270
ESP ®
.............................................. 264
ESP ®
OFF ....................................... 265
Fuel tank ........................................ 267
LIM (DISTRONIC PLUS) ..................180
Overview .......................................... 30
PASSENGER AIRBAG OFF
indicator lamp .................................. 44
Reserve fuel ................................... 267
Seat belt ........................................ 261
SPORT handling mode ...................265
SRS ................................................ 266
Tire pressure monitor ....................271
Warranty ............................................ 381
Washer fluid Display message ............................ 259
see Windshield washer system
Wheel bolt tightening torque ........... 333
Wheel chock ...................................... 329
Wheels Changing a wheel .......................... 329
Checking ........................................ 347
Cleaning ......................................... 315
Important safety notes ..................346
Interchanging/changing ................370
Mounting a wheel .......................... 332
Removing a wheel ..........................331
Storing ........................................... 371
Tightening torque ........................... 333
Wheel size/tire size .......................371
Window curtain air bag
Display message ............................ 239
Operation ......................................... 44
Windows
Cleaning ......................................... 317
see Side windows
Windshield
Defrosting ...................................... 138
Windshield washer system .............. 311
Notes ............................................. 389
Windshield wipers
Problem (malfunction) ...................126
Rear window wiper ........................125
Replacing the wiper blades ............125
Switching on/off ........................... 12420Index
Page 23 of 396
Winter drivingImportant safety notes ..................348
Slippery road surfaces ...................175
Snow chains .......................... 174, 349
Winter operation
Radiator cover ............................... 309
Winter tires
M+S tires ............................... 174, 348
Wiper blades
Cleaning ......................................... 317
Important safety notes ..................125
Replacing (rear window) ................126
Replacing (windshield) ...................125
Wooden trim (cleaning
instructions) ...................................... 319Index21
Page 126 of 396
XInsert new bulb ; and turn it clockwise.XAlign housing cover : and turn it
clockwise until it engages.
Turn signal lamp (halogen headlamps)
Due to their location, have the bulbs in the
left-hand headlamp changed at a qualified
specialist workshop, e.g. an authorized
Mercedes-Benz Center.
XSwitch off the lights.XOpen the hood.XTurn bulb holder : counter-clockwise and
pull it out.XTurn the bulb counter-clockwise, applying
slight pressure, and remove it from bulb
holder :.XInsert the new bulb into bulb holder : and
turn it clockwise.XInsert bulb holder : into the lamp and turn
it clockwise.
Windshield wipers
Switching the windshield wipers on/
off
GWARNING
Wiper blades are components that are subject
to wear and tear. Replace the wiper blades
twice a year, preferably in the spring and fall.
Otherwise the windows will not be wiped
properly. As a result, you may not be able to
observe surrounding traffic conditions and
could cause an accident.
! Do not operate the windshield wipers
when the windshield is dry, as this could
damage the wiper blades. Moreover, dust
that has collected on the windshield can
scratch the glass if wiping takes place when
the windshield is dry.
! If the windshield wipers leave smears on
the windshield after the vehicle has been
washed in an automatic car wash, wax or
other residues may be the reason for this.
Clean the windshield using washer fluid
after washing the vehicle in an automatic
car wash.
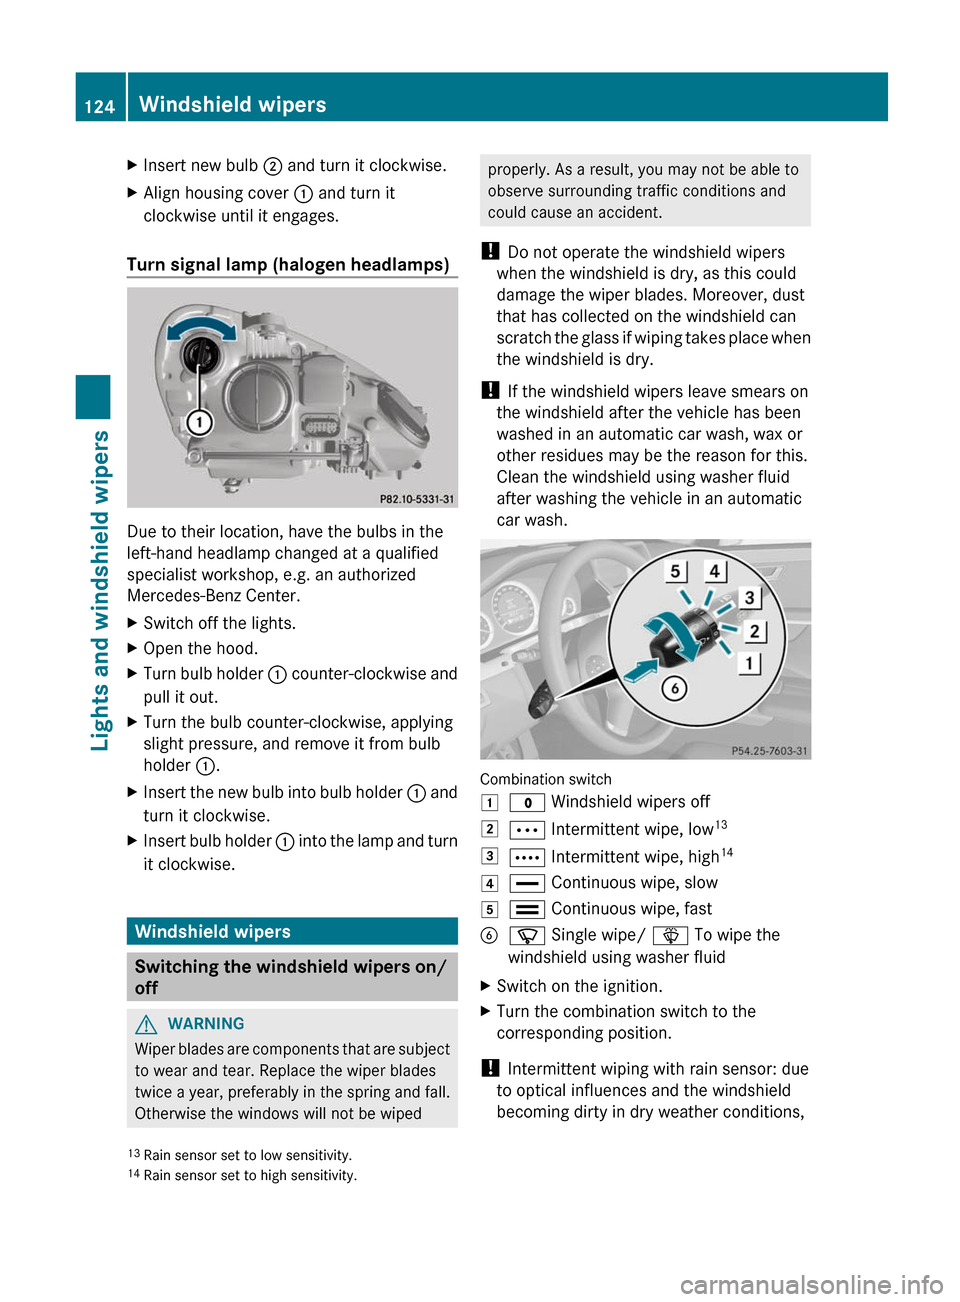
Combination switch
1$ Windshield wipers off2Ä Intermittent wipe, low 133Å
Intermittent wipe, high 144°
Continuous wipe, slow5¯ Continuous wipe, fastBí Single wipe/ î To wipe the
windshield using washer fluidXSwitch on the ignition.XTurn the combination switch to the
corresponding position.
! Intermittent wiping with rain sensor: due
to optical influences and the windshield
becoming dirty in dry weather conditions,
13 Rain sensor set to low sensitivity.
14 Rain sensor set to high sensitivity.124Windshield wipersLights and windshield wipers
Page 127 of 396
the windshield wipers may be activated
inadvertently. This could then damage the
windshield wiper blades or scratch the
windshield.
For this reason, you should always switch
off the windshield wipers in dry weather.
In the Ä or Å position, the appropriate
wiping frequency is set automatically
according to the intensity of the rain. In
the Å position, the rain sensor is more
sensitive than in the Ä position, causing
the windshield wipers to wipe more
frequently.
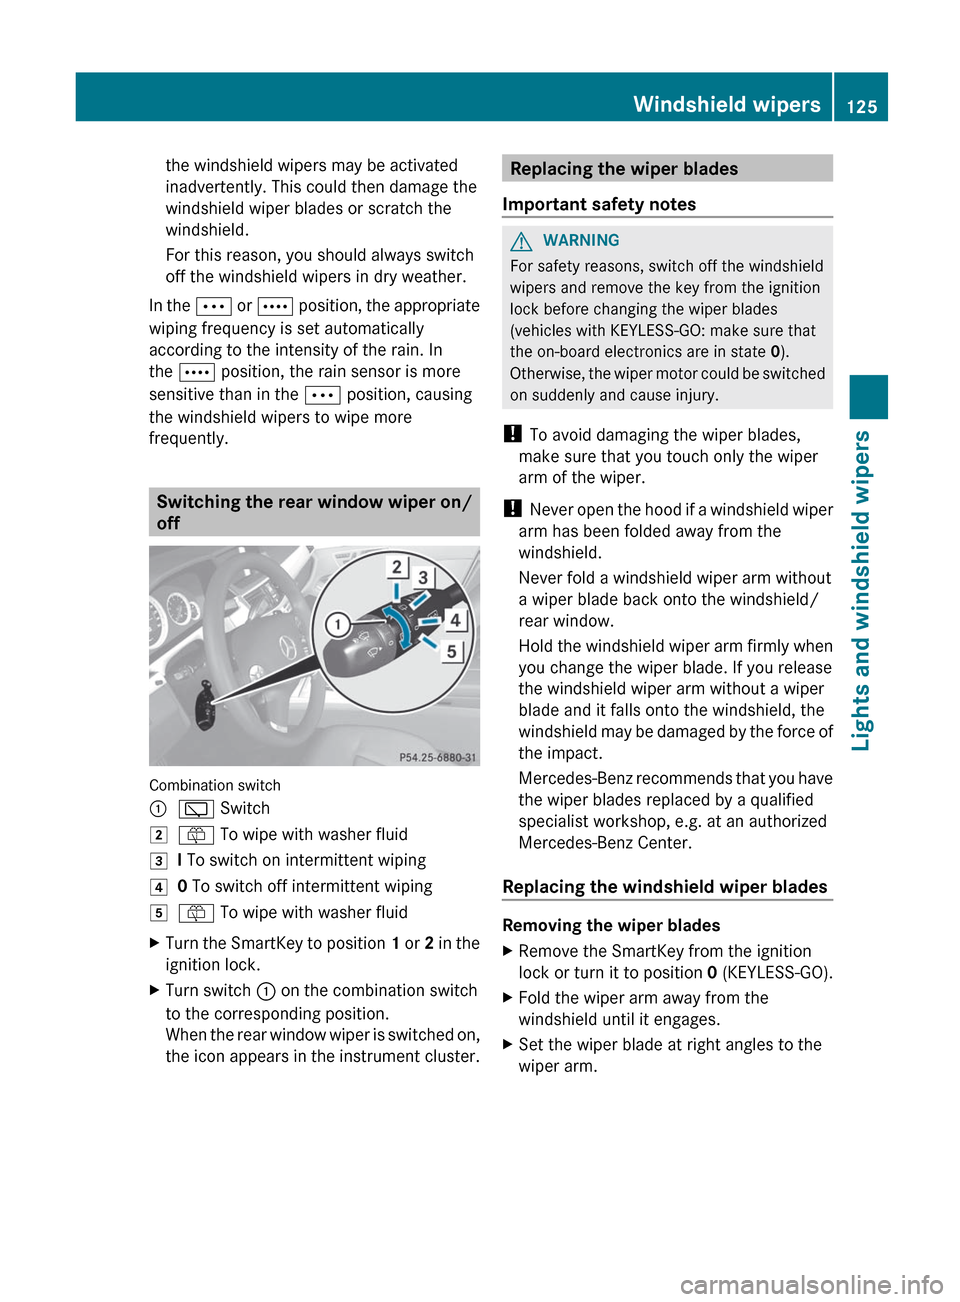
Switching the rear window wiper on/
off
Combination switch
:è Switch2ô To wipe with washer fluid3I To switch on intermittent wiping40 To switch off intermittent wiping5ô To wipe with washer fluidXTurn the SmartKey to position 1 or 2 in the
ignition lock.XTurn switch : on the combination switch
to the corresponding position.
When the rear window wiper is switched on,
the icon appears in the instrument cluster.Replacing the wiper blades
Important safety notesGWARNING
For safety reasons, switch off the windshield
wipers and remove the key from the ignition
lock before changing the wiper blades
(vehicles with KEYLESS-GO: make sure that
the on-board electronics are in state 0).
Otherwise, the wiper motor could be switched
on suddenly and cause injury.
! To avoid damaging the wiper blades,
make sure that you touch only the wiper
arm of the wiper.
! Never open the hood if a windshield wiper
arm has been folded away from the
windshield.
Never fold a windshield wiper arm without
a wiper blade back onto the windshield/
rear window.
Hold the windshield wiper arm firmly when
you change the wiper blade. If you release
the windshield wiper arm without a wiper
blade and it falls onto the windshield, the
windshield may be damaged by the force of
the impact.
Mercedes-Benz recommends that you have
the wiper blades replaced by a qualified
specialist workshop, e.g. at an authorized
Mercedes-Benz Center.
Replacing the windshield wiper blades
Removing the wiper blades
XRemove the SmartKey from the ignition
lock or turn it to position 0 (KEYLESS-GO).XFold the wiper arm away from the
windshield until it engages.XSet the wiper blade at right angles to the
wiper arm.Windshield wipers125Lights and windshield wipersZ
Page 128 of 396
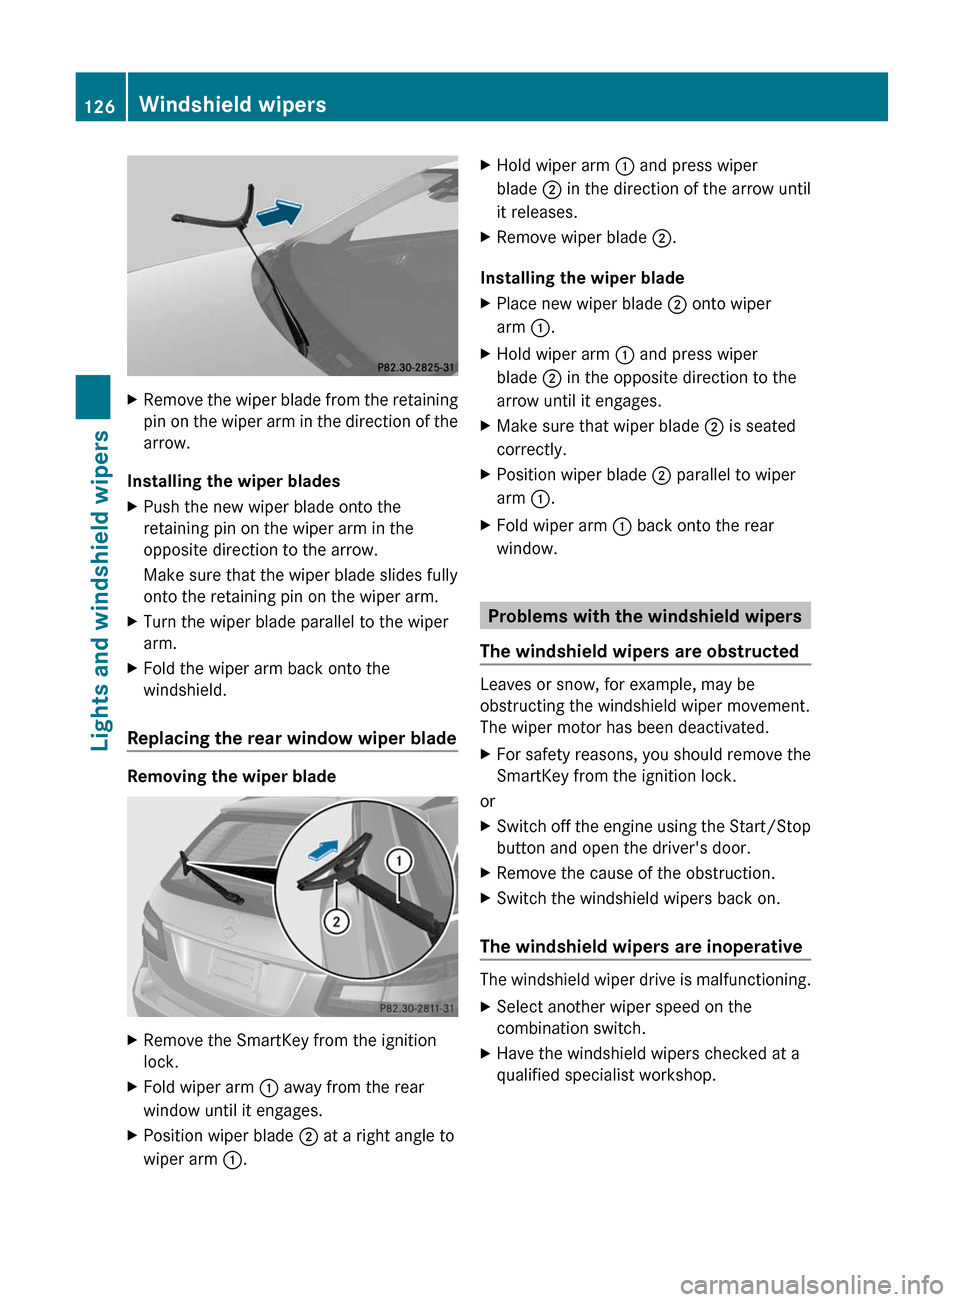
XRemove the wiper blade from the retaining
pin on the wiper arm in the direction of the
arrow.
Installing the wiper blades
XPush the new wiper blade onto the
retaining pin on the wiper arm in the
opposite direction to the arrow.
Make sure that the wiper blade slides fully
onto the retaining pin on the wiper arm.XTurn the wiper blade parallel to the wiper
arm.XFold the wiper arm back onto the
windshield.
Replacing the rear window wiper blade
Removing the wiper blade
XRemove the SmartKey from the ignition
lock.XFold wiper arm : away from the rear
window until it engages.XPosition wiper blade ; at a right angle to
wiper arm :.XHold wiper arm : and press wiper
blade ; in the direction of the arrow until
it releases.XRemove wiper blade ;.
Installing the wiper blade
XPlace new wiper blade ; onto wiper
arm :.XHold wiper arm : and press wiper
blade ; in the opposite direction to the
arrow until it engages.XMake sure that wiper blade ; is seated
correctly.XPosition wiper blade ; parallel to wiper
arm :.XFold wiper arm : back onto the rear
window.
Problems with the windshield wipers
The windshield wipers are obstructed
Leaves or snow, for example, may be
obstructing the windshield wiper movement.
The wiper motor has been deactivated.
XFor safety reasons, you should remove the
SmartKey from the ignition lock.
or
XSwitch off the engine using the Start/Stop
button and open the driver's door.XRemove the cause of the obstruction.XSwitch the windshield wipers back on.
The windshield wipers are inoperative
The windshield wiper drive is malfunctioning.
XSelect another wiper speed on the
combination switch.XHave the windshield wipers checked at a
qualified specialist workshop.126Windshield wipersLights and windshield wipers
Page 205 of 396

Problems with Night View Assist PlusProblemPossible causes/consequences and M SolutionsThe picture quality of
Night View Assist Plus
has deteriorated.The windshield wipers are smearing the windshield.XReplace the wiper blades ( Y page 125).The windshield is smeared after the vehicle has been cleaned in a
car wash.XClean the windshield ( Y page 317).There is windshield chip damage in the camera's field of vision.XReplace the windshield.The windshield is fogged up on the inside.XDefrost the windshield ( Y page 138).The windshield is iced up.XDe-ice the windshield ( Y page 138).There is dirt on the inside of the windshield.XClean the inside of the windshield ( Y page 317).Lane Tracking package
General notes
The Lane Tracking package consists of Blind
Spot Assist ( Y page 203) and Lane Keeping
Assist ( Y page 205).
Blind Spot Assist
Important safety notes
Blind Spot Assist uses a radar sensor system
to monitor the areas on both sides of your
vehicle. It supports you from speeds of
approximately 20 mph (30 km/h). A warning
display in the exterior mirrors draws your
attention to vehicles detected in the
monitored area. If you then switch on the
corresponding turn signal to change lane, you
will also receive an optical and audible
collision warning. Blind Spot Assist uses
sensors in the rear bumper for monitoring
purposes.
GWARNING
Blind Spot Assist is only an aid designed to
assist driving. It may fail to detect some
vehicles and is no substitute for attentive
driving.
Blind Spot Assist cannot detect road and
traffic conditions. It may fail to detect narrow
vehicles, such as motorcycles or bicycles, or
may only detect them too late.
Monitoring may be affected by dirty sensors,
strong spray or poor visibility caused by snow,
rain or mist, for example. In this case, vehicles
are detected late or not at all.
Always pay attention to traffic conditions and
your surroundings. Otherwise, you may fail to
recognize dangers in time, cause an accident
and injure yourself and others.
i USA only:
This device has been approved by the FCC
as a “Vehicular Radar System”. The radar
sensor is intended for use in an automotive
radar system only. Removal, tampering, or
Driving systems203Driving and parkingZ
Page 310 of 396

Useful information
i This Operator's Manual describes all
models and all standard and optional
equipment of your vehicle available at the
time of publication of the Operator's
Manual. Country-specific differences are
possible. Please note that your vehicle may
not be equipped with all features
described. This also applies to safety-
related systems and functions.
i Please read the information on qualified
specialist workshops ( Y page 25).
Engine compartment
Hood
Opening the hood
GWARNING
Do not pull the release lever while the vehicle
is in motion. Otherwise, the hood could be
forced open by passing air flow.
This could cause the hood to come loose and
injure you and/or others.
GWARNING
Do not open the hood when the engine is
overheated. You could be seriously injured.
Observe the coolant temperature gauge to
determine whether the engine may be
overheated. If you see flames or smoke
coming from the engine compartment, move
away from the vehicle. Wait until the engine
has cooled. If necessary, call the fire
department.
GWARNING
There is a risk of injury if the hood is open,
even if the engine is not running.
Some engine components can become very
hot.
To avoid the risk of burns, only touch those
components described in the Operator's
Manual and observe the relevant safety notes.
GWARNING
To help prevent personal injury, stay clear of
moving parts when the hood is open and the
engine is running.
The radiator fan may continue to run for
approximately 30 seconds or may even
restart after the engine has been turned off.
Stay clear of fan blades.
GWARNING
Vehicles with gasoline engine:
The engine is equipped with a transistorized
ignition system. Because of the high voltage
it is dangerous to touch any components
(ignition coils, spark plug sockets, diagnostic
socket) of the ignition system
R with the engine running
R while starting the engine
R when the ignition is switched on and the
engine is turned manually
GWARNING
Vehicles with diesel engine:
The engine is equipped with a high-voltage
electronic control unit for the injection
system. Because of the high voltage it is
dangerous to touch any components of the
injection system (injectors, electrical wires)
R with the engine running
R while starting the engine
R when the ignition is switched on
XMake sure that the windshield wipers are
switched off.GWARNING
The windshield wipers and wiper linkage
could be set in motion.
When the hood is open, you or others could
be injured by the wiper linkage.
Make sure that the windshield wipers are
switched off. Remove the SmartKey or make
sure that no ignition position has been
selected with KEYLESS-GO. All indicator
lamps must be off in the instrument cluster.
308Engine compartmentMaintenance and care
Page 317 of 396
Observe the following to make sure that the
automatic transmission stays in position N:XMake sure the vehicle is stationary and the
ignition is switched off.XTurn the SmartKey to position
2 (Y page 145) in the ignition lock.
Use the SmartKey instead of the Start/
Stop button on vehicles with KEYLESS-GO.XDepress and hold the brake pedal.XShift the automatic transmission to
position N.XRelease the brake pedal.XRelease the parking brake.XSwitch off the ignition and leave the
SmartKey in the ignition lock.
! Make sure that:
R the side windows and the sliding sunroof
are fully closed.
R the ventilation/heating is switched off
(the OFF button has been pressed).
R the windshield wiper switch is in position
0 .
Otherwise, the vehicle might be damaged.
After using an automatic car wash, wipe off
wax from the windshield and the wiper
blades. This will prevent smears and reduce
wiping noises caused by residue on the
windshield.
Washing by hand
Carefully remove all deposits of road salt as
soon as possible when driving in winter.
Also, clean the insides of the wheels when
washing the underbody of the vehicle.
XDo not use hot water and do not wash the
vehicle in direct sunlight.XUse a soft car sponge for cleaning.XUse a gentle cleaning agent, e.g. a
Mercedes-Benz approved car shampoo.XWash down the vehicle with a gentle water
jet.XDo not point the water jet directly at the air
inlets.XUse plenty of water and rinse the sponge
frequently.XRinse the vehicle with clean water and dry
it thoroughly with a chamois.XDo not allow the cleaning agent to dry on
the paintwork.
Power washers
GWARNING
Do not use power washers with circular-jet
nozzles (dirt grinders) to clean your vehicle, in
particular the tires. You could otherwise
damage the tires and cause an accident.
! Always maintain a distance of at least
11.8 in (30 cm) between the vehicle and the
power washer nozzle. Information about
the correct distance is available from the
equipment manufacturer.
Move the power washer nozzle around
when cleaning your vehicle.
Do not aim directly at any of the following:
R tires
R door gaps, roof gaps, joints etc.
R electrical components
R battery
R connectors
R lights
R seals
R trim elements
R ventilation slots
Damaged seals or electrical components
can lead to leaks or failures.
Cleaning the wheels
! Do not use acidic wheel cleaning products
to remove brake dust. This could damage
wheel bolts and brake components.
! Do not park the vehicle for an extended
period straight after cleaning it, particularly
after having cleaned the wheels with wheel
cleaner. Wheel cleaners could cause
increased corrosion of the brake discs and
Care315Maintenance and careZ
Page 319 of 396

Cleaning the windowsGWARNING
Before cleaning the windshield or wiper
blades, switch off the windshield wipers and
remove the SmartKey from the ignition lock.
On vehicles with KEYLESS-GO, press the
Start/Stop button repeatedly until all
indicator lamps in the instrument cluster have
gone out. The windshield wipers could
otherwise move and injure you.
XClean the inside and outside of the
windows with a damp cloth and a cleaning
agent that is recommended and approved
by Mercedes-Benz.
! Do not use dry cloths, abrasive products,
solvents or cleaning agents containing
solvents to clean the inside of the windows.
Do not touch the insides of the windows
with hard objects, e.g. an ice scraper or
ring. There is otherwise a risk of damaging
the windows.
! Clean the water drainage channels of the
windshield and the rear window at regular
intervals. Deposits such as leaves, petals
and pollen may under certain
circumstances prevent water from draining
away. This can lead to corrosion damage
and damage to electronic components.
Cleaning the wiper blades
GWARNING
Before cleaning the windshield or wiper
blades, switch off the windshield wipers and
remove the SmartKey from the ignition lock.
On vehicles with KEYLESS-GO, press the
Start/Stop button repeatedly until all
indicator lamps in the instrument cluster have
gone out. The windshield wipers could
otherwise move and injure you.
! Do not pull the wiper blade. Otherwise,
the wiper blade could be damaged.
! Do not clean wiper blades too often and
do not rub them too hard. Otherwise, the
graphite coating could be damaged. This
could cause wiper noise.XFold the wiper arms away from the
windshield.XCarefully clean the wiper blades with a
damp cloth.XFold the windshield wipers back again
before switching on the ignition.
! Hold the wiper arm securely when folding
back. The windshield could be damaged if
the wiper arm smacks against it suddenly.
Cleaning the exterior lighting
XClean the plastic lenses of the exterior
lights with a wet sponge and a mild cleaning
agent, e.g. Mercedes-Benz car shampoo or
cleaning cloths.
! Only use cleaning agents or cleaning
cloths which are suitable for plastic light
lenses. Unsuitable cleaning agents or
cleaning cloths could scratch or damage
the plastic light lenses.
Cleaning the sensors
XClean sensors : of the driving systems
with water, car shampoo and a soft cloth.Care317Maintenance and careZ