check engine MERCEDES-BENZ E-Class WAGON 2016 W213 User Guide
[x] Cancel search | Manufacturer: MERCEDES-BENZ, Model Year: 2016, Model line: E-Class WAGON, Model: MERCEDES-BENZ E-Class WAGON 2016 W213Pages: 350, PDF Size: 6.71 MB
Page 40 of 350
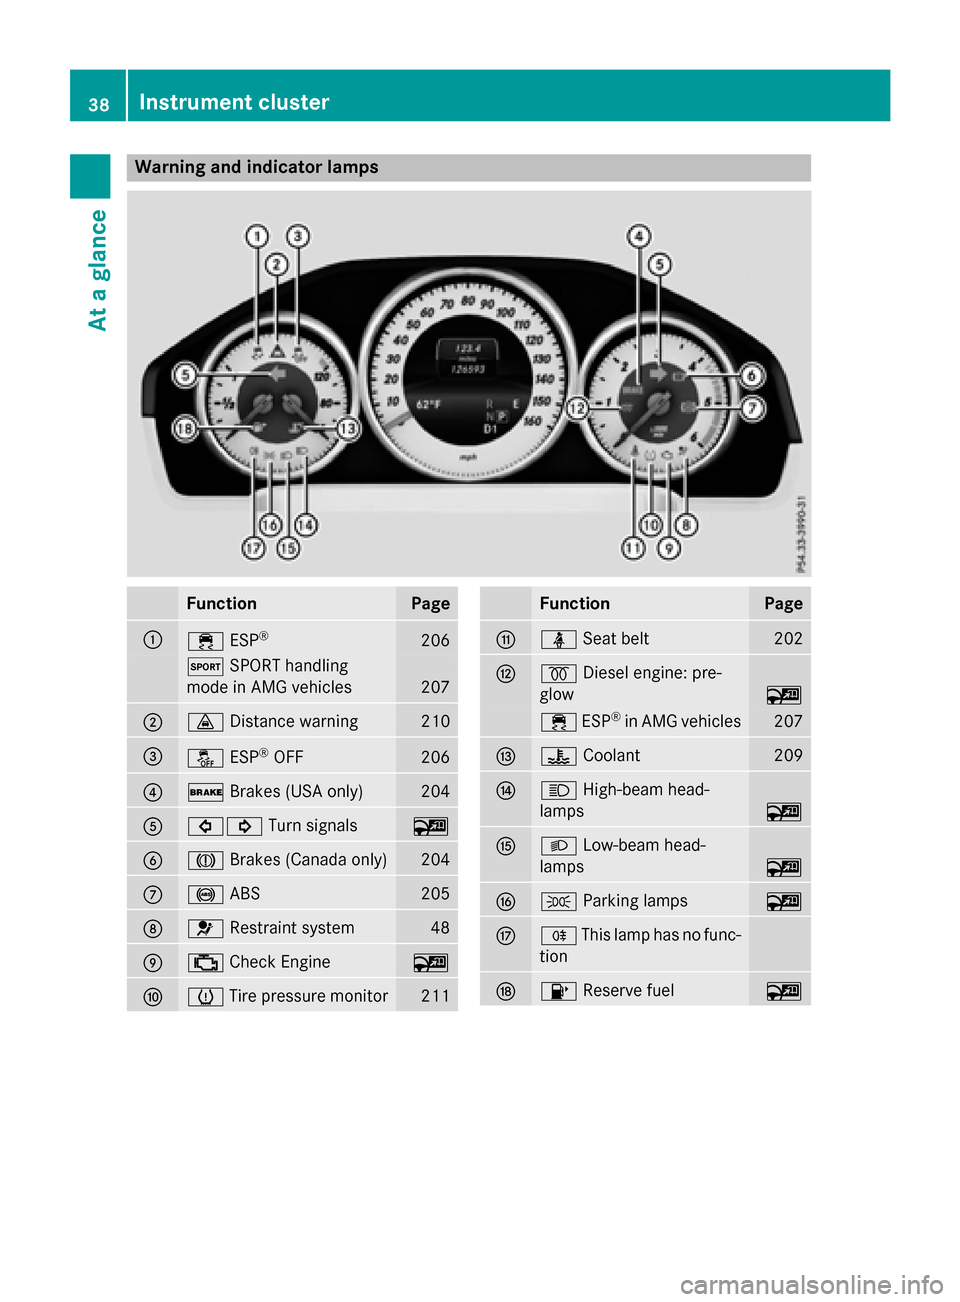
Warning and indicator lamps
FunctionPage
:÷ESP®206
MSPORT handling
mode in AMG vehicles
207
;· Distance warning210
=åESP®OFF206
?$Brakes (USA only)204
A#! Turn signals~
BJBrakes (Canada only)204
C!ABS205
D6Restraint system48
E;Check Engine~
Fh Tire pressure monitor211
FunctionPage
Gü Seat belt202
H%Diesel engine: pre-
glow
~
÷ ESP®in AMG vehicles207
I? Coolant209
JKHigh-beam head-
lamps
~
KL Low-beam head-
lamps
~
LT Parking lamps~
MRThis lamp has no func-
tion
N8 Reserve fuel~
38Instrument cluster
At a glance
Page 51 of 350
For more information about children traveling
with you in the vehicle and on child restraint
systems, see "Children in the vehicle"
(
Ypage 68).
Important safety notes
GWARNING
Modifications to the restraint system may
cause it to no longer work as intended. The
restraint system may then not perform its
intended protective function and may fail in an
accident or trigger unexpectedly, for example.
This poses an increased risk of injury or even fatal injury.
Never modify parts of the restraint system.
Never tamper with the wiring, the electronic
components or their software.
If it is necessary to modify an air bag system to
accommodate a person with disabilities, con-
tact an authorized Mercedes-Benz Center for
details. USA only: for further information con-
tact our Customer Assistance Center at
1-800-FOR-MERCedes (1‑800‑367 ‑6372).
Restraint system warning lamp
The functions of the restraint system are
checked after the ignition is switched on and
at regular intervals while the engine is run-
ning. Therefore, malfunctions can be detec-
ted in good time.
The 6 restraint system warning lamp in
the instrument cluster lights up when the igni-
tion is switched on. It goes out no later than a
few seconds after the vehicle is started. The
components of the restraint system are in
operational readiness.
A malfunction has occurred if the 6
restraint system warning lamp:
Rdoes not light up after the ignition is
switched on
Rdoes not go out after a few seconds with
the engine running
Rlights up again while the engine is running
GWARNING
If restraint system is malfunctioning, restraint
system components may be triggered unin-
tentionally or might not be triggered at all in
the event of an accident with a high rate of
vehicle deceleration. This can affect the Emer- gency Tensioning Device or air bag, for exam-
ple. This poses an increased risk of injury or
even fatal injury.
Have the restraint system checked and
repaired in a qualified specialist workshop as
soon as possible.
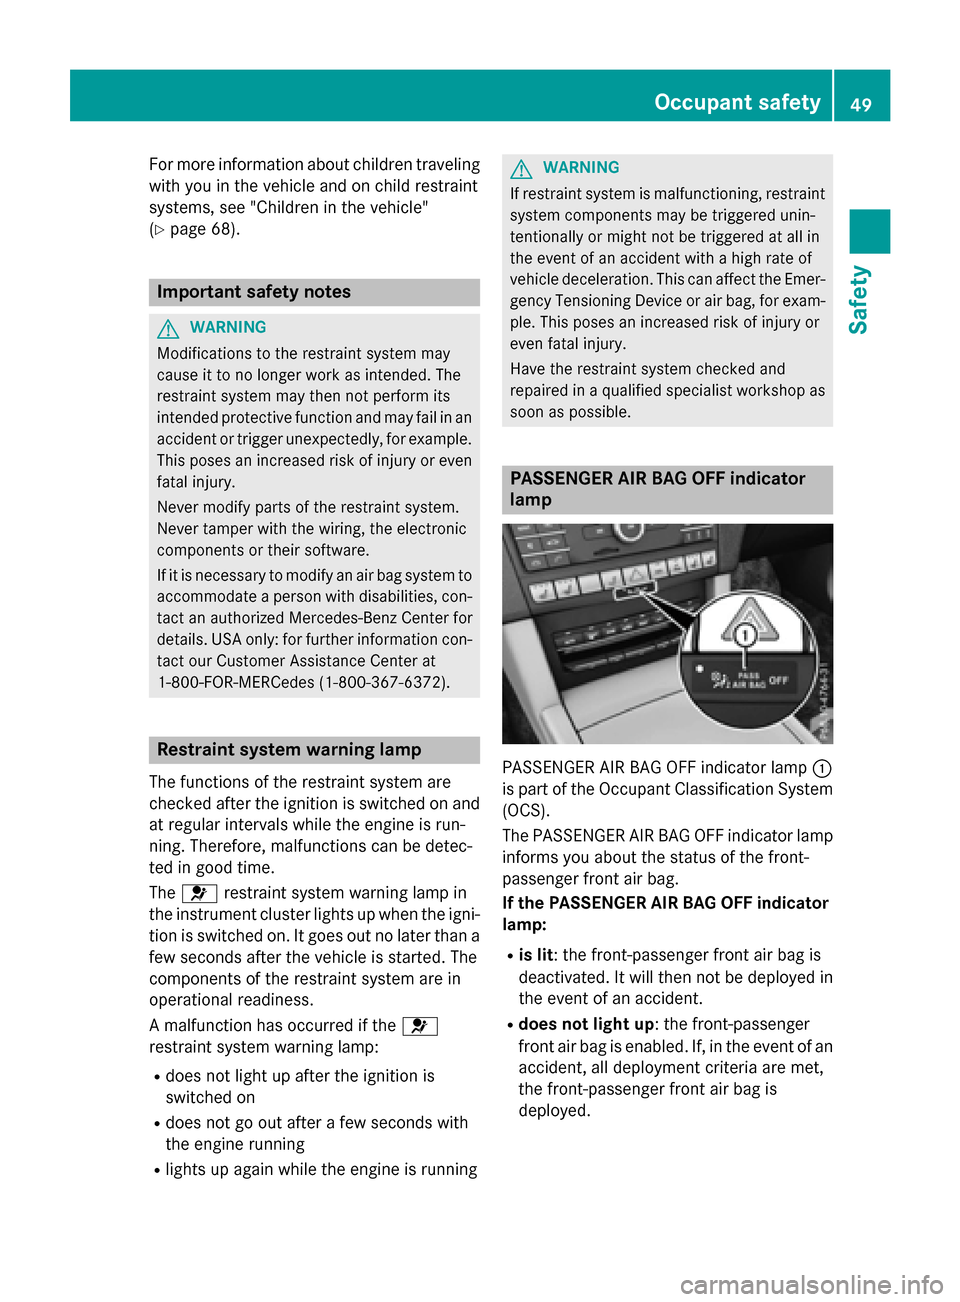
PASSENGER AIR BAG OFF indicator
lamp
PASSENGER AIR BAG OFF indicator lamp :
is part of the Occupant Classification System
(OCS).
The PASSENGER AIR BAG OFF indicator lamp
informs you about the status of the front-
passenger front air bag.
If the PASSENGER AIR BAG OFF indicator
lamp:
Ris lit: the front-passenger front air bag is
deactivated. It will then not be deployed in
the event of an accident.
Rdoes not light up: the front-passenger
front air bag is enabled. If, in the event of an
accident, all deployment criteria are met,
the front-passenger front air bag is
deployed.
Occupant safety49
Safety
Z
Page 83 of 350
or more wheels are braked to stabilize the
vehicle. The engine output is also modified to
keep the vehicle on the desired course within
physical limits. ESP
®assists the driver when
pulling away on wet or slippery roads. ESP®
can also stabilize the vehicle during braking.
ETS/4ETS (Electronic Traction System)
iObserve the "Important safety notes" sec-
tion (
Ypage 75).
ETS traction control is part of ESP
®. On vehi-
cles with 4MATIC, 4ETS is part of ESP®.
Traction control brakes the drive wheels indi-
vidually if they spin. This enables you to pull
away and accelerate on slippery surfaces, for
example if the road surface is slippery on one
side. In addition, more drive torque is trans-
ferred to the wheel or wheels with traction.
Traction control remains active, even if you
deactivate ESP
®.
Important safety notes
iObserve the "Important safety notes" sec-
tion (
Ypage 75).
GWARNING
If ESP
®is malfunctioning, ESP®is unable to
stabilize the vehicle. Additionally, further driv-
ing safety systems are deactivated. This
increases the risk of skidding and an accident.
Drive on carefully. Have ESP
®checked at a
qualified specialist workshop.
!Vehicles with 4MATIC: function or per-
formance tests may only be carried out on
a 2-axle dynamometer. Before you operate
the vehicle on such a dynamometer, please
consult a qualified workshop. You could
otherwise damage the drive train or the
brake system.
Vehicles without 4MATIC: observe the notes
on ESP
®(Ypage 283) when towing the vehi-
cle with a raised rear axle.
ESP
®is only deactivated if the åwarning
lamp is lit continuously. If the
÷ warning lamp and the åwarn-
ing lamp are lit continuously, ESP
®not avail-
able due to a malfunction.
Observe the information on warning lamps
(
Ypage 206) and display messages which
may be shown in the instrument cluster
(
Ypage 192).
iOnly use wheels with the recommended
tire sizes. Only then will ESP®function
properly.
Characteristics of ESP®
General information
If the ÷ ESP warning lamp goes out before
beginning the journey, ESP
®is automatically
active.
If ESP
®intervenes, the ÷ESP®warning
lamp flashes in the instrument cluster.
If ESP
®intervenes:
XDo not deactivate ESP®under any circum-
stances.
XOnly depress the accelerator pedal as far as
necessary when pulling away.
XAdapt your driving style to suit the prevail-
ing road and weather conditions.
ECO start/stop function
The ECO start/stop function switches the
engine off automatically when the vehicle
stops moving. The engine starts automati-
cally when the driver wants to pull away again.
ESP
®remains in its previously selected sta-
tus. Example: if ESP®was deactivated before
the engine was switched off, ESP®remains
deactivated when the engine is switched on
again.
Deactivating/activating ESP®(except
AMG vehicles)
Important safety notes
iObserve the "Important safety notes" sec-
tion (
Ypage 75).
Driving safety systems81
Safety
Z
Page 86 of 350
RPRE-SAFE®Brake is no longer available, it
is also not activated if you brake firmly and
ESP
®intervenes.
RESP®still provides support when you brake
firmly.
ESP®trailer stabilization
General information
If your vehicle/trailer combination begins to
swerve, ESP
®assists you in this situation.
ESP®slows the vehicle down by braking and
limiting the engine output until the vehicle/
trailer combination has stabilized.
Important safety notes
GWARNING
If road and weather conditions are poor,
trailer stabilization will not be able to prevent
the vehicle/trailer combination from swerv-
ing. Trailers with a high center of gravity can
tip over before ESP
®can detect this. There is
a risk of an accident.
Always adapt your driving style to the prevail-
ing road and weather conditions.
If your vehicle with trailer (vehicle/trailer
combination) begins to lurch, you can only
stabilize the vehicle/trailer combination by
depressing the brake firmly.
ESP
®trailer stabilization is active above
speeds of about 65 km/ h.
ESP
®trailer stabilization does not work if
ESP®is deactivated or disabled because of a
malfunction.
EBD (electronic brake force distribu-
tion)
General information
EBD monitors and controls the brake pres-
sure on the rear wheels to improve driving
stability while braking.
Important safety notes
iObserve the "Important safety notes" sec-
tion for driving safety systems (
Ypage 75).
GWARNING
If EBD is malfunctioning, the rear wheels can
lock, e.g. under full braking. This increases the
risk of skidding and an accident.
You should therefore adapt your driving style
to the different handling characteristics. Have
the brake system checked at a qualified spe-
cialist workshop.
Observe information regarding indicator and
warning lamps (
Ypage 205) as well as dis-
play messages (
Ypage 194).
ADAPTIVE BRAKE
i
Observe the "Important safety notes" sec-
tion (
Ypage 75).
ADAPTIVE BRAKE enhances braking safety
and offers increased braking comfort. In addi-
tion to the braking function, ADAPTIVE BRAKE
also has the HOLD function (
Ypage 165 )and
hill start assist (
Ypage 141).
PRE-SAFE®Brake
General information
iObserve the "Important safety notes" sec-
tion (
Ypage 75).
PRE‑SAFE
®Brake is only available for vehi-
cles with the Driving Assistance package.
For PRE-SAFE
®Brake to assist you when driv-
ing, the radar sensor system and the camera
system must be switched on and be opera-
tional.
With the help of the radar sensor system and
the camera system, PRE-SAFE
®Brake can
detect obstacles that are in front of your vehi-
cle for an extended period of time.
In addition, pedestrians in the path of your
vehicle can be detected.
84Driving safety systems
Safety
Page 93 of 350
signal can be activated and deactivated using
the on-board computer (
Ypage 190).
When it is dark, the surround lighting also
comes on if it is activated in the on-board
computer (
Ypage 190).
KEYLESS-GO
General notes
Bear in mind that the engine can be started by
any of the vehicle occupants if there is a KEY-
LESS-GO key in the vehicle.
Locking/unlocking centrally
You can start, lock or unlock the vehicle using
KEYLESS-GO. To do this, you only need carry
the SmartKey with you. You can combine the functions of KEYLESS-GO with those of a con-
ventional SmartKey. Unlock the vehicle by
using KEYLESS-GO, for instance, and lock it
using the &button on the SmartKey.
When locking or unlocking with KEYLESS-GO,
the distance between the SmartKey and the
corresponding door handle must not be
greater than 3 ft (1 m).
A check which periodically establishes a radio
connection between the vehicle and the
SmartKey determines whether a valid Smart-
Key is in the vehicle. This occurs, for example:
Rwhen the external door handles are
touched
Rwhen starting the engine
Rwhile the vehicle is in motion
XTo unlock the vehicle: touch the inner
surface of the door handle.
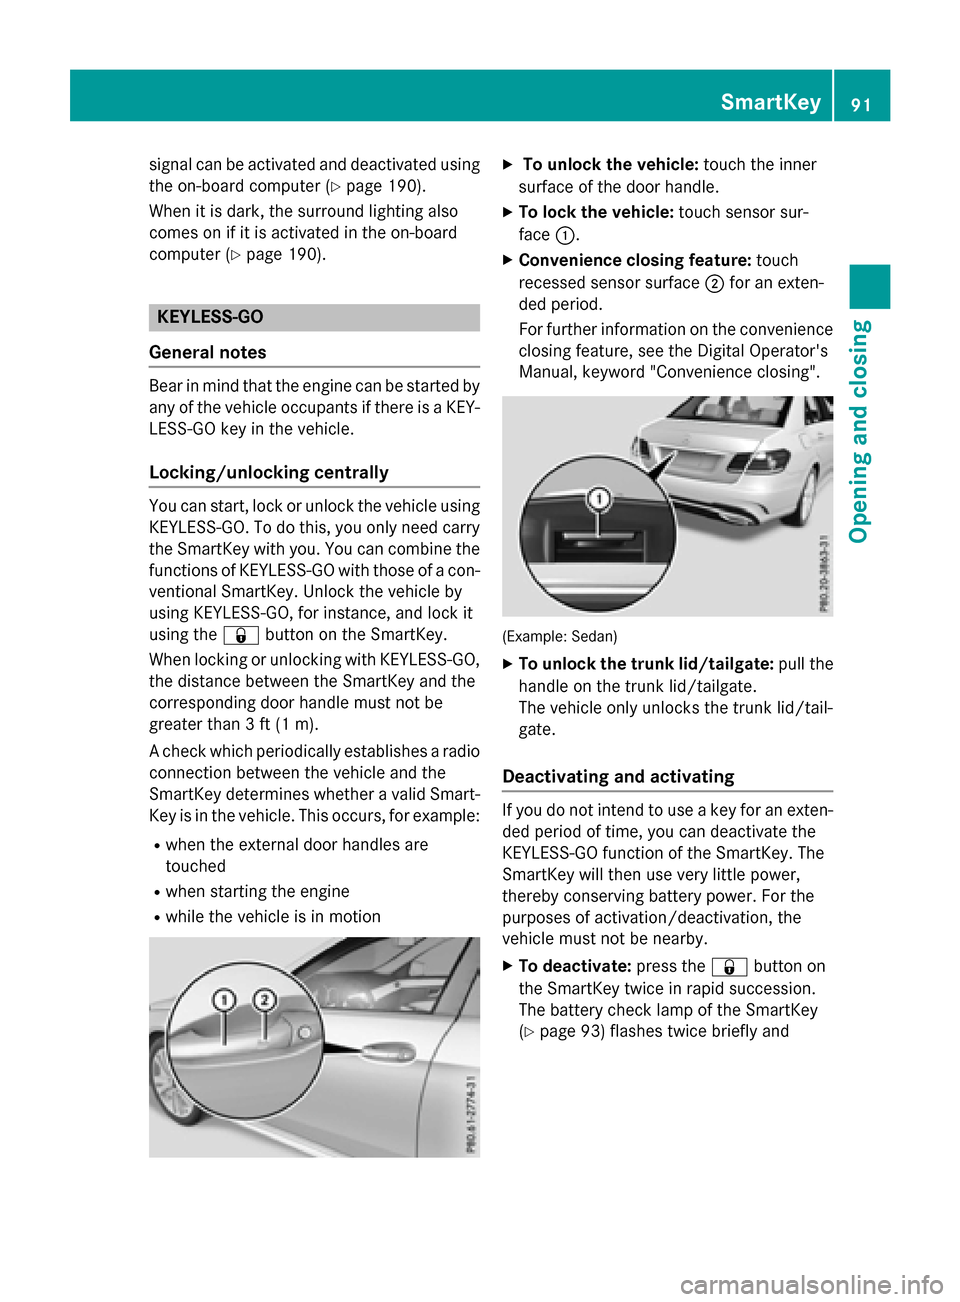
XTo lock the vehicle: touch sensor sur-
face :.
XConvenience closing feature: touch
recessed sensor surface ;for an exten-
ded period.
For further information on the convenience
closing feature, see the Digital Operator's
Manual, keyword "Convenience closing".
(Example: Sedan)
XTo unlock the trunk lid/tailgate: pull the
handle on the trunk lid/tailgate.
The vehicle only unlocks the trunk lid/tail-
gate.
Deactivating and activating
If you do not intend to use a key for an exten-
ded period of time, you can deactivate the
KEYLESS-GO function of the SmartKey. The
SmartKey will then use very little power,
thereby conserving battery power. For the
purposes of activation/deactivation, the
vehicle must not be nearby.
XTo deactivate: press the&button on
the SmartKey twice in rapid succession.
The battery check lamp of the SmartKey
(
Ypage 93) flashes twice briefly and
SmartKey91
Opening and closing
Z
Page 97 of 350
ProblemPossible causes/consequences andMSolutions
You have lost the
mechanical key.XReport the loss immediately to the vehicle insurers.
XIf necessary, have the locks changed as well.
The engine cannot be
started using the
SmartKey.the on-board voltage is too low.
XSwitch off non-essential consumers, e.g. seat heating or interior
lighting, and try to start the engine again.
If this does not work:
XCheck the starter battery and charge it if necessary
(
Ypage 278).
or
XJump-start the vehicle (Ypage 279).
or
XConsult a qualified specialist workshop.
The engine cannot be
started using KEYLESS-
GO. The SmartKey is in
the vehicle.The vehicle is locked.
XUnlock the vehicle and try to start the vehicle again.
There is interference from a powerful source of radio waves.
XStart your vehicle with the SmartKey in the ignition lock.
Doors
Important safety notes
GWARNING
If children are left unsupervised in the vehicle,
they could:
Ropen the doors, thus endangering other
people or road users.
Rget out and disrupt traffic.
Roperate the vehicle's equipment.
Additionally, children could set the vehicle in
motion if, for example, they:
Rrelease the parking brake.
Rshifting the automatic transmission out of
park position P
RStart the engine.
There is a risk of an accident and injury.
When leaving the vehicle, always take the
SmartKey with you and lock the vehicle. Never
leave children or animals unattended in the
vehicle. Always keep the SmartKey out of
reach of children.
Ideally, place luggage or loads in the trunk/
cargo compartment. Observe the loading
guidelines (
Ypage 238).
Information in the Digital Operator's
Manual
In the Digital Operator's Manual you will find
information on the following topics:
RUnlocking and opening doors from the
inside
RCentrally locking and unlocking the vehicle
from the inside
RAutomatic locking feature
Doors95
Opening and closing
Z
Page 98 of 350
Unlocking the driver's door (mechan-
ical key)
If the vehicle can no longer be unlocked with
the SmartKey, use the mechanical key.
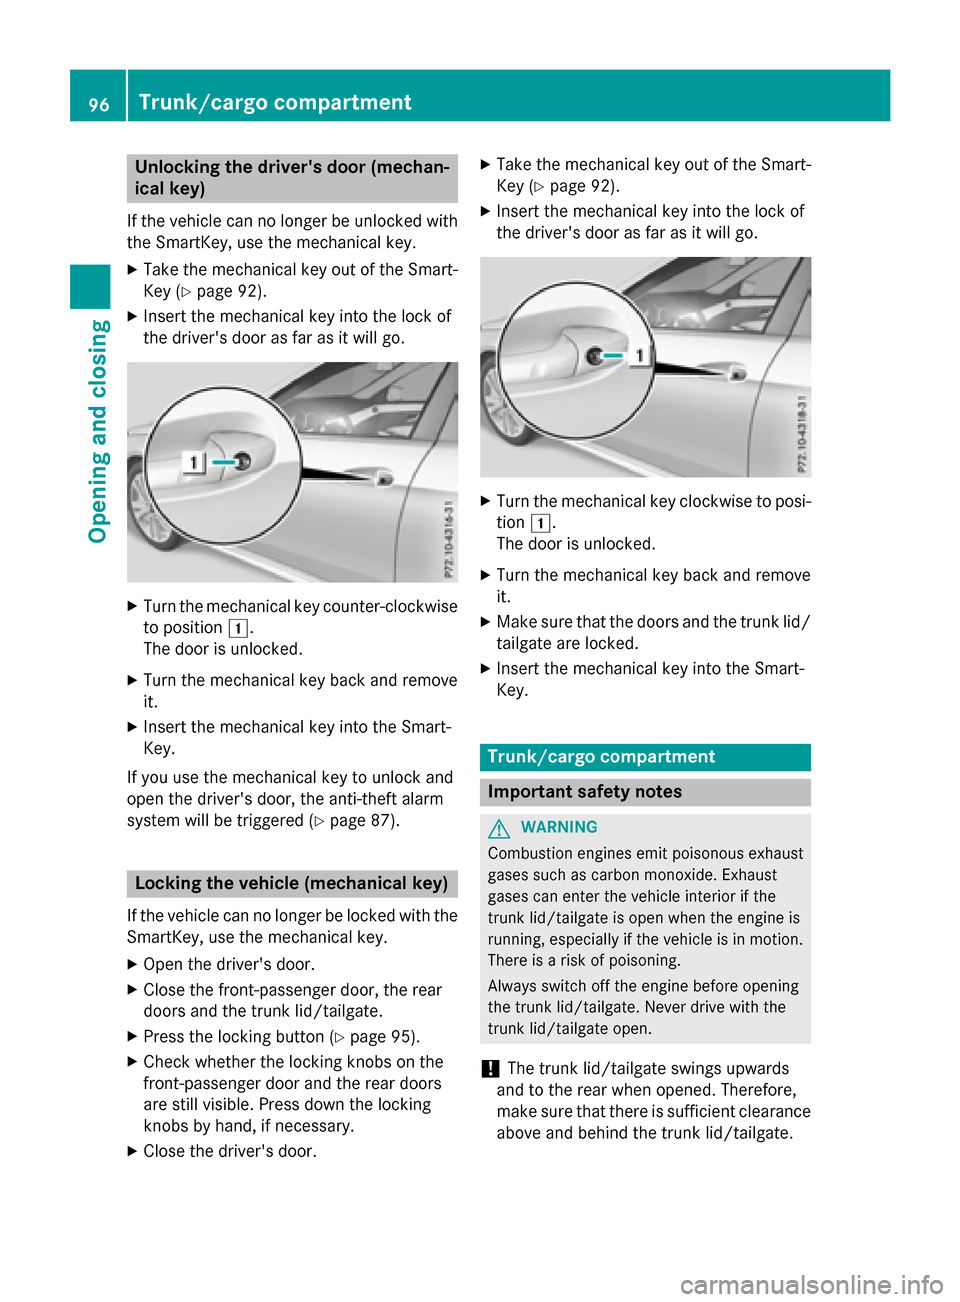
XTake the mechanical key out of the Smart-
Key (
Ypage 92).
XInsert the mechanical key into the lock of
the driver's door as far as it will go.
XTurn the mechanical key counter-clockwise
to position1.
The door is unlocked.
XTurn the mechanical key back and remove
it.
XInsert the mechanical key into the Smart-
Key.
If you use the mechanical key to unlock and
open the driver's door, the anti-theft alarm
system will be triggered (
Ypage 87).
Locking the vehicle (mechanical key)
If the vehicle can no longer be locked with the
SmartKey, use the mechanical key.
XOpen the driver's door.
XClose the front-passenger door, the rear
doors and the trunk lid/tailgate.
XPress the locking button (Ypage 95).
XCheck whether the locking knobs on the
front-passenger door and the rear doors
are still visible. Press down the locking
knobs by hand, if necessary.
XClose the driver's door.
XTake the mechanical key out of the Smart-
Key (
Ypage 92).
XInsert the mechanical key into the lock of
the driver's door as far as it will go.
XTurn the mechanical key clockwise to posi-
tion 1.
The door is unlocked.
XTurn the mechanical key back and remove
it.
XMake sure that the doors and the trunk lid/
tailgate are locked.
XInsert the mechanical key into the Smart-
Key.
Trunk/cargo compartment
Important safety notes
GWARNING
Combustion engines emit poisonous exhaust
gases such as carbon monoxide. Exhaust
gases can enter the vehicle interior if the
trunk lid/tailgate is open when the engine is
running, especially if the vehicle is in motion.
There is a risk of poisoning.
Always switch off the engine before opening
the trunk lid/tailgate. Never drive with the
trunk lid/tailgate open.
!The trunk lid/tailgate swings upwards
and to the rear when opened. Therefore,
make sure that there is sufficient clearance
above and behind the trunk lid/tailgate.
96Trunk/cargo compartment
Opening and closing
Page 116 of 350
Useful information
i
This Operator's Manual describes all
models and all standard and optional equip-
ment of your vehicle available at the time of
publication of the Operator's Manual.
Country-specific differences are possible.
Please note that your vehicle may not be
equipped with all features described. This
also applies to safety-related systems and
functions.
iRead the information on qualified special-
ist workshops (
Ypage 31).
Correct driver's seat position
GWARNING
You could lose control of your vehicle if you do the following while driving:
Radjust the driver's seat, head restraint,
steering wheel or mirrors
Rfasten the seat belt
There is a risk of an accident.
Adjust the driver's seat, head restraint, steer-
ing wheel and mirror and fasten your seat belt before starting the engine.
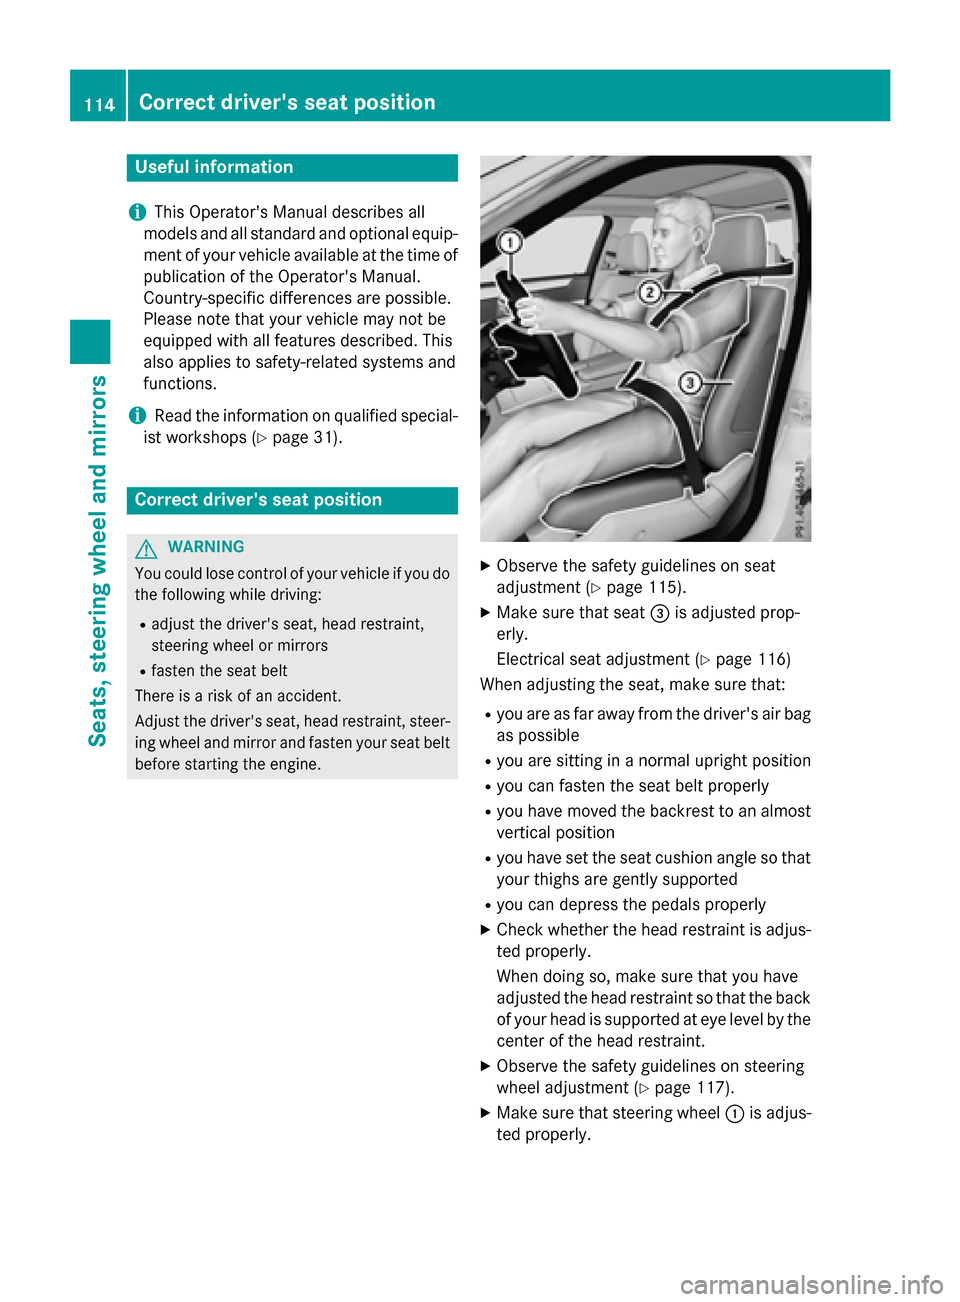
XObserve the safety guidelines on seat
adjustment (
Ypage 115).
XMake sure that seat =is adjusted prop-
erly.
Electrical seat adjustment (
Ypage 116)
When adjusting the seat, make sure that:
Ryou are as far away from the driver's air bag
as possible
Ryou are sitting in a normal upright position
Ryou can fasten the seat belt properly
Ryou have moved the backrest to an almost
vertical position
Ryou have set the seat cushion angle so that
your thighs are gently supported
Ryou can depress the pedals properly
XCheck whether the head restraint is adjus-
ted properly.
When doing so, make sure that you have
adjusted the head restraint so that the back
of your head is supported at eye level by the
center of the head restraint.
XObserve the safety guidelines on steering
wheel adjustment (
Ypage 117).
XMake sure that steering wheel :is adjus-
ted properly.
114Correct driver's seat position
Seats, steering wheel and mirrors
Page 117 of 350
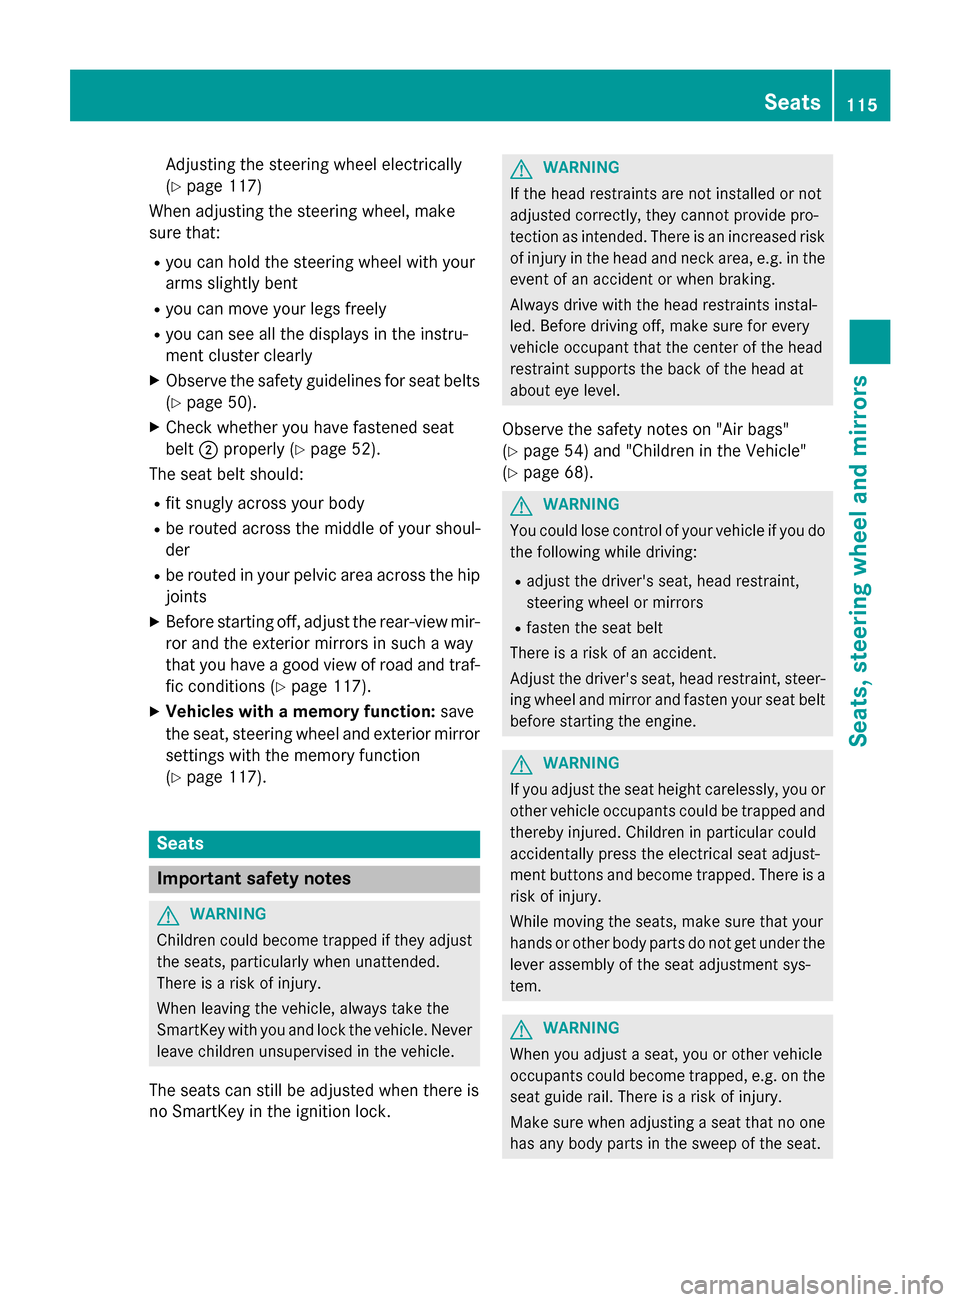
Adjusting the steering wheel electrically
(
Ypage 117)
When adjusting the steering wheel, make
sure that:
Ryou can hold the steering wheel with your
arms slightly bent
Ryou can move your legs freely
Ryou can see all the displays in the instru-
ment cluster clearly
XObserve the safety guidelines for seat belts
(
Ypage 50).
XCheck whether you have fastened seat
belt ;properly (
Ypage 52).
The seat belt should:
Rfit snugly across your body
Rbe routed across the middle of your shoul-
der
Rbe routed in your pelvic area across the hip
joints
XBefore starting off, adjust the rear-view mir-
ror and the exterior mirrors in such a way
that you have a good view of road and traf-
fic conditions (
Ypage 117).
XVehicles with a memory function: save
the seat, steering wheel and exterior mirror
settings with the memory function
(
Ypage 117).
Seats
Important safety notes
GWARNING
Children could become trapped if they adjust
the seats, particularly when unattended.
There is a risk of injury.
When leaving the vehicle, always take the
SmartKey with you and lock the vehicle. Never
leave children unsupervised in the vehicle.
The seats can still be adjusted when there is
no SmartKey in the ignition lock.
GWARNING
If the head restraints are not installed or not
adjusted correctly, they cannot provide pro-
tection as intended. There is an increased risk
of injury in the head and neck area, e.g. in the event of an accident or when braking.
Always drive with the head restraints instal-
led. Before driving off, make sure for every
vehicle occupant that the center of the head
restraint supports the back of the head at
about eye level.
Observe the safety notes on "Air bags"
(
Ypage 54) and "Children in the Vehicle"
(
Ypage 68).
GWARNING
You could lose control of your vehicle if you do the following while driving:
Radjust the driver's seat, head restraint,
steering wheel or mirrors
Rfasten the seat belt
There is a risk of an accident.
Adjust the driver's seat, head restraint, steer-
ing wheel and mirror and fasten your seat belt before starting the engine.
GWARNING
If you adjust the seat height carelessly, you or
other vehicle occupants could be trapped and
thereby injured. Children in particular could
accidentally press the electrical seat adjust-
ment buttons and become trapped. There is a
risk of injury.
While moving the seats, make sure that your
hands or other body parts do not get under the
lever assembly of the seat adjustment sys-
tem.
GWARNING
When you adjust a seat, you or other vehicle
occupants could become trapped, e.g. on the seat guide rail. There is a risk of injury.
Make sure when adjusting a seat that no one
has any body parts in the sweep of the seat.
Seats115
Seats, steering wheel and mirrors
Z
Page 140 of 350
iThe SmartKey can be turned in the igni-
tion lock even if it is not the correct Smart- Key for the vehicle. The ignition is not
switched on. The engine cannot be started.
KEYLESS-GO
General notes
Vehicles with KEYLESS-GO are equipped with
SmartKeys featuring the integrated KEYLESS-GO function and a detachable Start/Stop but-
ton.
The Start/Stop button must be inserted in the
ignition lock and the SmartKey must be in the vehicle.
When you insert the Start/Stop button into
the ignition lock, the system needs approx-
imately two seconds recognition time. You
can then use the Start/Stop button.
Pressing the Start/Stop button several times
in succession corresponds to the different
key positions in the ignition lock. This is only
the case if you are not depressing the brake
pedal.
If you depress the brake pedal and press the
Start/Stop button, the engine starts immedi-
ately.
A check which periodically establishes a radio
connection between the vehicle and the
SmartKey determines whether a valid Smart-
Key is in the vehicle. This occurs, for example,
when starting the engine.
To start the vehicle without actively using the
SmartKey:
Rthe Start/Stop button must be inserted in
the ignition lock.
Rthe SmartKey must be in the vehicle.
Rthe vehicle must not be locked with the
SmartKey or KEYLESS-GO (
Ypage 91).
Do not keep the KEYLESS-GO key:
Rwith electronic devices, e.g. a mobile
phone or another SmartKey.
Rwith metallic objects, e.g. coins or metal
foil.
Rinside metallic objects, e.g. a metal case. This can affect the functionality of KEYLESS-
GO.
If you lock the vehicle with the SmartKey's
remote control or with KEYLESS-GO, after a
short time:
Ryou will not be able to switch on the ignition
with the Start/Stop button.
Ryou will not be able to start the engine with
the Start/Stop button until the vehicle is
unlocked again.
If you lock the vehicle centrally using the but-
ton on the front door (
Ypage 95), you can
continue to start the engine with the Start/
Stop button.
The engine can be switched off while the vehi-
cle is in motion by pressing and holding the
Start/Stop button for three seconds. This
function operat
es independently of the ECO
start/stop automatic engine switch-off func-
tion.
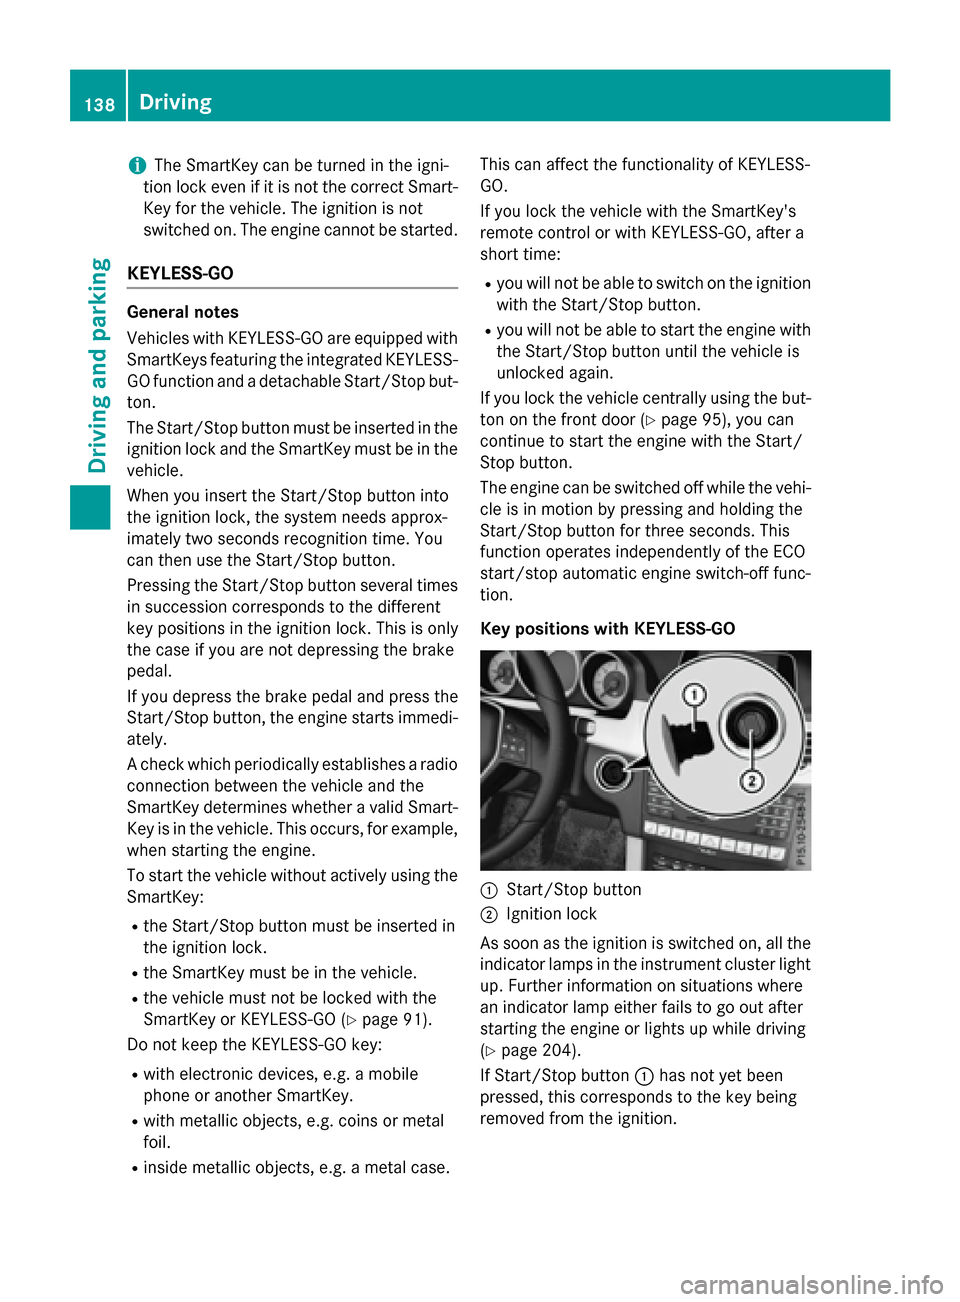
Key positions with KEYLESS-GO
:Start/Stop button
;Ignition lock
As soon as the ignition is switched on, all the
indicator lamps in the instrument cluster light
up. Further information on situations where
an indicator lamp either fails to go out after
starting the engine or lights up while driving
(
Ypage 204).
If Start/Stop button :has not yet been
pressed, this corresponds to the key being
removed from the ignition.
138Driving
Driving and parking