check engine light MERCEDES-BENZ E-Class WAGON 2016 W213 Owner's Manual
[x] Cancel search | Manufacturer: MERCEDES-BENZ, Model Year: 2016, Model line: E-Class WAGON, Model: MERCEDES-BENZ E-Class WAGON 2016 W213Pages: 350, PDF Size: 6.71 MB
Page 7 of 350
Anti-Theft Alarm systemsee ATA (Anti-Theft Alarm system)
Asht ray.............................................. .251
Assistance display (on-board com-
puter) ..................................................1 90
Assistance menu (on-board com-
puter) ..................................................1 90
ASSYST PLUS
Displaying a service message ........2 66
Hiding a service message .............. 266
Notes ............................................. 266
Resetting the service interval dis-
play ................................................ 266
Service message ............................ 266
Special service requirements ......... 266
ATA (Anti-Theft Alarm system)
Activating/deactivating ................... 87
Function ...........................................8 7
Switching off the alarm .................... 87
ATTENTION ASSIST
Activating/deactivating ................. 190
Display message ............................ 191
Function/notes ............................. 175
Audio 20
Components .................................. 216
Controller ...................................... 222
Display ........................................... 217
Functions ....................................... 216
Authorized Mercedes-Benz Center
see Qualified specialist workshop
Authorized workshop
see Qualified specialist workshop
AUTO lights
Display message ............................ 191
Automatic car wash (care) ............... 267
Automatic engine start (ECO start/
stop function) .................................... 141
Automatic engine switch-off (ECO
start/stop function) .......................... 141
Automatic headlamp mode .............. 121
Automatic transmission
Accelerator pedal position ............. 144
Automatic drive program ............... 144
Changing gear ............................... 144
DIRECT SELECT lever ..................... 142
Display message ............................ 191
Drive program display .................... 143 Driving tip
s .................................... 144
Eme
rgency running mode .............. 144
Engaging drive position .................. 143
Engaging neutral ............................ 143
Engaging park position (AMG vehi-
cles) ............................................... 142
Engaging park position automati-
cally ............................................... 143
Engaging reverse gear ................... 143
Engaging the park position ............ 143
Kickdown ....................................... 144
Manual drive program .................... 144
Manual drive program (AMG vehi-
cles) ............................................... 144
Overview ........................................ 142
Problem (malfunction) ................... 144
Program selector button ................ 144
Pulling away ................................... 140
Selector lever ................................ 142
Starting the engine ........................ 140
Steering wheel paddle shifters ...... 144
Transmission position display ........ 142
Transmission position display
(DIRECT SELECT lever) ................... 143
Transmission positions .................. 144
Automatic transmission emer-
gency mode ....................................... 144
B
Back button ....................................... 222
BAS (Brake Assist System) ................. 76
BAS PLUS (Brake Assist System
PLUS) with Cross-Traffic Assist
Function/notes ................................ 76
Important safety notes .................... 77
Battery (SmartKey)
Checking .......................................... 93
Replacing ......................................... 93
Battery (vehicle)
Charging ........................................ 278
Important safety notes .................. 275
Jump starting ................................. 279
Belt
see Seat belts
Blind Spot Assist
Activating/deactivating ................. 190
Index5
Page 10 of 350
Coolant (engine)Checking the level ........................ .265
Display message ............................ 199
Filling capacity ............................... 343
Important safety notes .................. 342
Temperature (on-board com-
puter) ............................................. 190
Temperature gauge ........................ 188
Warning lamp ................................. 209
Cooling
see Climate control
Copyright ............................................. 34
Cornering light function
Display message ............................ 191
Function/notes .............................1 21
Crash-responsive emergency light-
ing ....................................................... 123
Cruise control
Activation conditions ..................... 156
Cruise control lever ....................... 156
Deactivating ................................... 156
Display message ............................ 191
Driving system ............................... 155
Function/notes .............................1 55
Important safety notes .................. 155
Selecting ........................................ 156
Setting a speed .............................. 156
Storing and maintaining current
speed ............................................. 156
Cup holder
Center console .............................. 251
Important safety notes .................. 251
Rear compartment ......................... 251
Customer Assistance Center
(CAC) ..................................................... 32
Customer Relations Department ....... 32
D
Dashboard
see Instrument cluster
Data
see Technical data
Daytime running lamps
Display message ............................ 191
Switching on/off (on-board com-
puter) ............................................. 190
Switching on/off (switch) .............. 121 Declarations of conformity
................. 31
DEF
Adding ...........................................1 49
Filling capacity ............................... 341
Important safety notes .................. 341
Delayed switch-off
Exterior lighting (on-board com-
puter) ............................................. 190
Interior lighting .............................. 190
Diagnostics connection ......................31
Diesel .................................................. 33 9
Digital Operator's Manua l
Help ................................................ .25
Introduction .....................................2 5
Digital speedomete r........................ .190
DIRECT SELECT lever
Automatic transmission ................. 142
Display (cleaning instructions) ........268
Display messages
ASSYST PLUS ................................ 266
Calling up (on-board com-
puter) ............................................. 191
Driving systems .............................1 91
Engine ............................................ 199
General notes ................................ 191
Hiding (on-board computer) ........... 191
KEYLESS-GO .................................. 191
Lights ............................................. 191
Safety systems .............................. 192
SmartKey ....................................... 191
Tires ............................................... 200
Vehicle ...........................................2 01
Distance recorder .............................1 90
see Odometer
see Trip odometer
Distance warning (warning l
amp)
.... 210
Distance warning function
Function/notes ................................ 79
DISTRONIC PLUS
Activating ....................................... 158
Activation conditions ..................... 158
Deactivating ................................... 161
Display message ............................ 191
Displays in the multifunction dis-
play ................................................ 161
Function/notes ............................. 156
Important safety notes .................. 157
8Index
Page 13 of 350
Activating/deactivating (on-
board computer, except AMG
vehicles) ........................................ 190
AMG menu (on-board computer) ... 190
Characteristics ................................. 81
Deactivating/activating (button
in AMG vehicles) .............................. 82
Deactivating/activating (except
AMG vehicles) ................................ 190
Display message ............................ 192
ETS/4ETS ........................................ 81
Function/notes ................................ 80
General notes .................................. 80
Important safety information ........... 81
Trailer stabilization ........................... 84
Warning lamp ................................. 206
ETS/4ETS (Electronic Traction Sys-
tem) ...................................................... 81
Exhaust check ................................... 154
Exhaust tail pipe (cleaning instruc-
tions) .................................................. 268
Exterior lighting
Setting options .............................. 120
see Lights
Exterior mirrors
Adjusting ....................................... 117
Dipping (automatic) ....................... 117
Folding in when locking (on-board
computer) ...................................... 190
Folding in/out (automatically) ....... 117
Folding in/out (electrically) ........... 117
Setting ........................................... 117
Storing settings (memory func-
tion) ............................................... 117
Storing the parking position .......... 117
Eyeglasses compartment ................. 239
F
Favorites
Adding ........................................... 223
Deleting ......................................... 224
Displaying and calling up ............... 223
Moving ........................................... 224
Overview ........................................ 223
Renaming ....................................... 224
Filler cap
see Fuel filler flap Flat tire
MOExtended tires .......................... 272
Preparing the vehicle ..................... 271
TIREFIT kit ...................................... 273
see Emergency spare wheel
Floormats ........................................... 259
Frequencies
Mobile phone ................................. 334
Two-way radio ................................ 334
Front fog lamps
Display message ............................ 191
Fuel
Additives ........................................ 339
Consumption statistics .................. 190
Displaying the current consump-
tion ................................................ 190
Displaying the range ...................... 190
Driving tips .................................... 153
Flexible fuel vehicles ...................... 340
Fuel gauge ....................................... 37
Grade (gasoline) ............................ 338
Important safety notes .................. 337
Premium-grade unleaded gaso-
line ................................................. 338
Problem (malfunction) ................... 149
Quality (diesel) ............................... 339
Refueling ........................................ 145
Tank content/reserve fuel ............. 338
Fuel filler flap
Emergency release ........................ 147
Opening ......................................... 146
Fuel level
Calling up the range (on-board
computer) ...................................... 190
Fuel tank
Capacity ........................................ 338
Problem (malfunction) ................... 149
Fuse allocation chart (vehicle tool
kit) ...................................................... 270
Fuses
Allocation chart ............................. 284
Before changing ............................. 284
Fuse box in the cargo compart-
ment .............................................. 285
Fuse box in the engine compart-
ment .............................................. 285
Fuse box in the trunk ..................... 285
Important safety notes .................. 284
Index11
Page 22 of 350
Stowage areas................................... 238
Stowage compartments
Armrest (under) ............................. 239
Center console .............................. 239
Cup holders ................................... 251
Display message) ........................... 191
Eyeglasses compartment ............... 239
Glove box ....................................... 239
Important safety information ......... 239
Rear ............................................... 239
Stowage net ................................... 239
Under driver's seat/front-
passenger seat .............................. 239
Stowage net ....................................... 239
Stowage well beneath the trunk
floor ....................................................2 48
Summer tires ..................................... 290
Sun visor ............................................ 251
Surround lighting (on-board com-
puter) ..................................................1 90
Suspension tuning
AIRMATIC ...................................... 167
SETUP (on-board computer) .......... 190
Switching air-recirculation mode
on/off ................................................. 133
T
Tachometer ........................................ 188
Tail lamps
Display message ............................ 191
Tailgate
Display message ............................ 201
Emergency unlocking ..................... 103
Important safety notes .................... 96
Limiting the opening angle ............. 102
Opening dimensions ......................3 44
Opening/closing (automatically
from inside) ................................... 101
Opening/closing (automatically
from outside) ................................... 98
Opening/closing (from outside) ....... 97
Tank
see Fuel tank
Tank content
Fuel gauge ....................................... 37
Technical data
Capacities ...................................... 337 Emergency spare wheel ................. 332
Information ....................................3
34
Tires/wheels ................................. 314
Vehicle data ................................... 344
Telephone
Accepting a call ..................... 190, 231
Authorizing a mobile phone (con-
necting) ......................................... 229
Connecting a mobile phone (gen-
eral information) ............................ 227
De-authorizing (disconnecting) a
mobile phone ................................. 231
Ending an active call ......................2 32
Entering phone numbers ................ 232
Establishing the connection from
the mobile phone ........................... 230
Making a call ................................. 232
Menu (on-board computer) ............ 190
Number from the phone book ........1 90
Reconnecting a mobile phone
automatically ................................. 231
Redialing ........................................ 190
Rejecting a call .............................. 232
Rejecting/ending a call ................. 190
see also Digital Operator's Man-
ual ..................................................2 14
Switching between mobile
phones ...........................................2 31
Using the telephone ....................... 231
Telephone number
Entering ......................................... 232
Telescopic rod (EASY-PACK load-
securing kit) ....................................... 248
Te
mperature
Coolant .......................................... 188
Coolant (on-board computer) ......... 190
Engine oil (on-board computer) ...... 190
Outside temperature ......................1 88
Setting (climate control) ................ 133
Through-loading feature ................... 239
Timing (RACETIMER) ......................... 190
Tire pressure
Calling up (on-board computer) ..... 294
Checking manually ........................ 294
Display message ............................ 200
Maximum ....................................... 294
Not reached (TIREFIT) .................... 274
Notes ............................................. 292
20Index
Page 51 of 350
For more information about children traveling
with you in the vehicle and on child restraint
systems, see "Children in the vehicle"
(
Ypage 68).
Important safety notes
GWARNING
Modifications to the restraint system may
cause it to no longer work as intended. The
restraint system may then not perform its
intended protective function and may fail in an
accident or trigger unexpectedly, for example.
This poses an increased risk of injury or even fatal injury.
Never modify parts of the restraint system.
Never tamper with the wiring, the electronic
components or their software.
If it is necessary to modify an air bag system to
accommodate a person with disabilities, con-
tact an authorized Mercedes-Benz Center for
details. USA only: for further information con-
tact our Customer Assistance Center at
1-800-FOR-MERCedes (1‑800‑367 ‑6372).
Restraint system warning lamp
The functions of the restraint system are
checked after the ignition is switched on and
at regular intervals while the engine is run-
ning. Therefore, malfunctions can be detec-
ted in good time.
The 6 restraint system warning lamp in
the instrument cluster lights up when the igni-
tion is switched on. It goes out no later than a
few seconds after the vehicle is started. The
components of the restraint system are in
operational readiness.
A malfunction has occurred if the 6
restraint system warning lamp:
Rdoes not light up after the ignition is
switched on
Rdoes not go out after a few seconds with
the engine running
Rlights up again while the engine is running
GWARNING
If restraint system is malfunctioning, restraint
system components may be triggered unin-
tentionally or might not be triggered at all in
the event of an accident with a high rate of
vehicle deceleration. This can affect the Emer- gency Tensioning Device or air bag, for exam-
ple. This poses an increased risk of injury or
even fatal injury.
Have the restraint system checked and
repaired in a qualified specialist workshop as
soon as possible.
PASSENGER AIR BAG OFF indicator
lamp
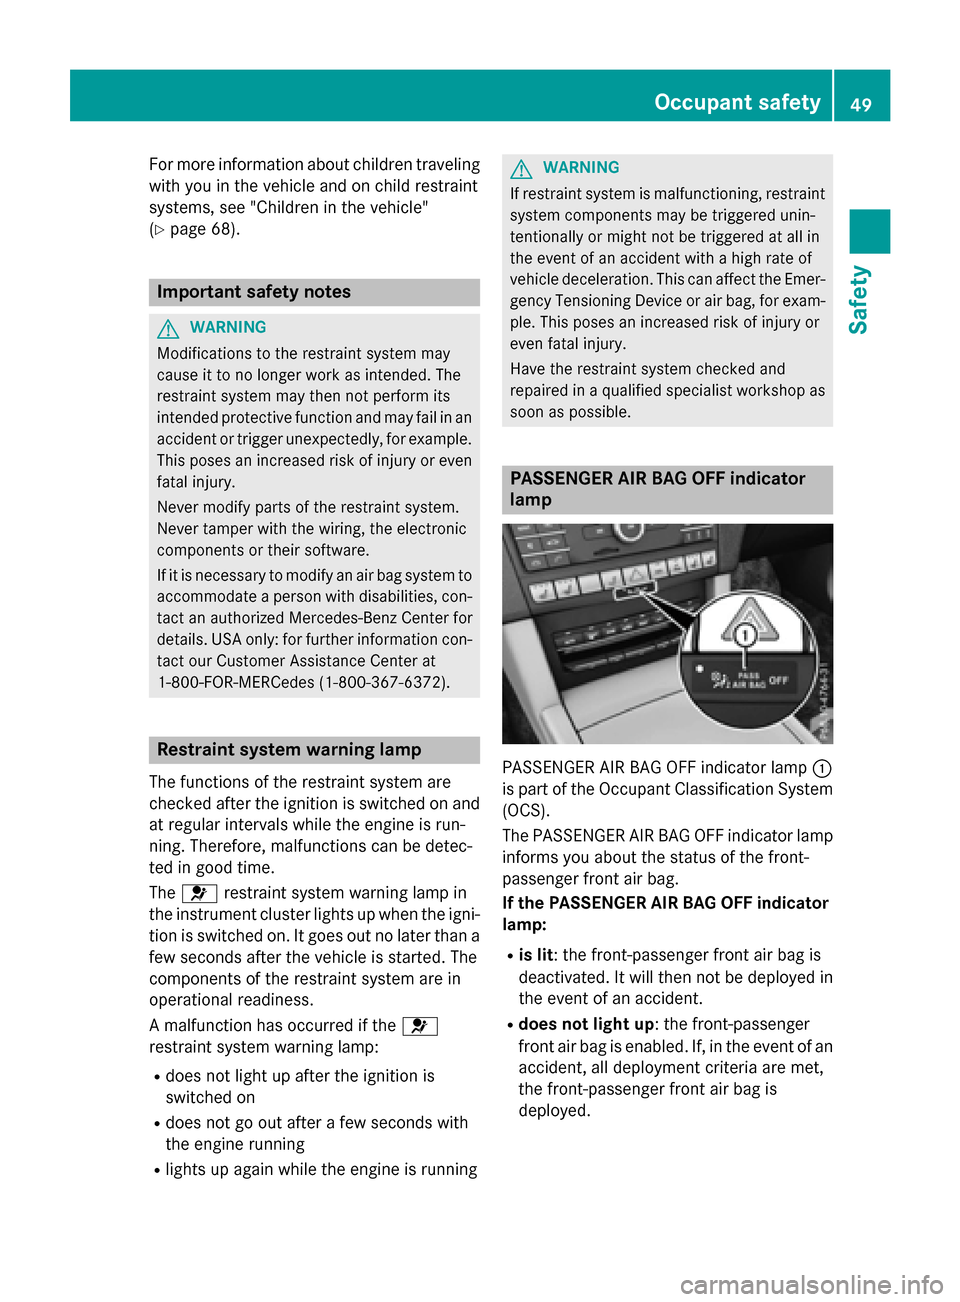
PASSENGER AIR BAG OFF indicator lamp :
is part of the Occupant Classification System
(OCS).
The PASSENGER AIR BAG OFF indicator lamp
informs you about the status of the front-
passenger front air bag.
If the PASSENGER AIR BAG OFF indicator
lamp:
Ris lit: the front-passenger front air bag is
deactivated. It will then not be deployed in
the event of an accident.
Rdoes not light up: the front-passenger
front air bag is enabled. If, in the event of an
accident, all deployment criteria are met,
the front-passenger front air bag is
deployed.
Occupant safety49
Safety
Z
Page 93 of 350
signal can be activated and deactivated using
the on-board computer (
Ypage 190).
When it is dark, the surround lighting also
comes on if it is activated in the on-board
computer (
Ypage 190).
KEYLESS-GO
General notes
Bear in mind that the engine can be started by
any of the vehicle occupants if there is a KEY-
LESS-GO key in the vehicle.
Locking/unlocking centrally
You can start, lock or unlock the vehicle using
KEYLESS-GO. To do this, you only need carry
the SmartKey with you. You can combine the functions of KEYLESS-GO with those of a con-
ventional SmartKey. Unlock the vehicle by
using KEYLESS-GO, for instance, and lock it
using the &button on the SmartKey.
When locking or unlocking with KEYLESS-GO,
the distance between the SmartKey and the
corresponding door handle must not be
greater than 3 ft (1 m).
A check which periodically establishes a radio
connection between the vehicle and the
SmartKey determines whether a valid Smart-
Key is in the vehicle. This occurs, for example:
Rwhen the external door handles are
touched
Rwhen starting the engine
Rwhile the vehicle is in motion
XTo unlock the vehicle: touch the inner
surface of the door handle.
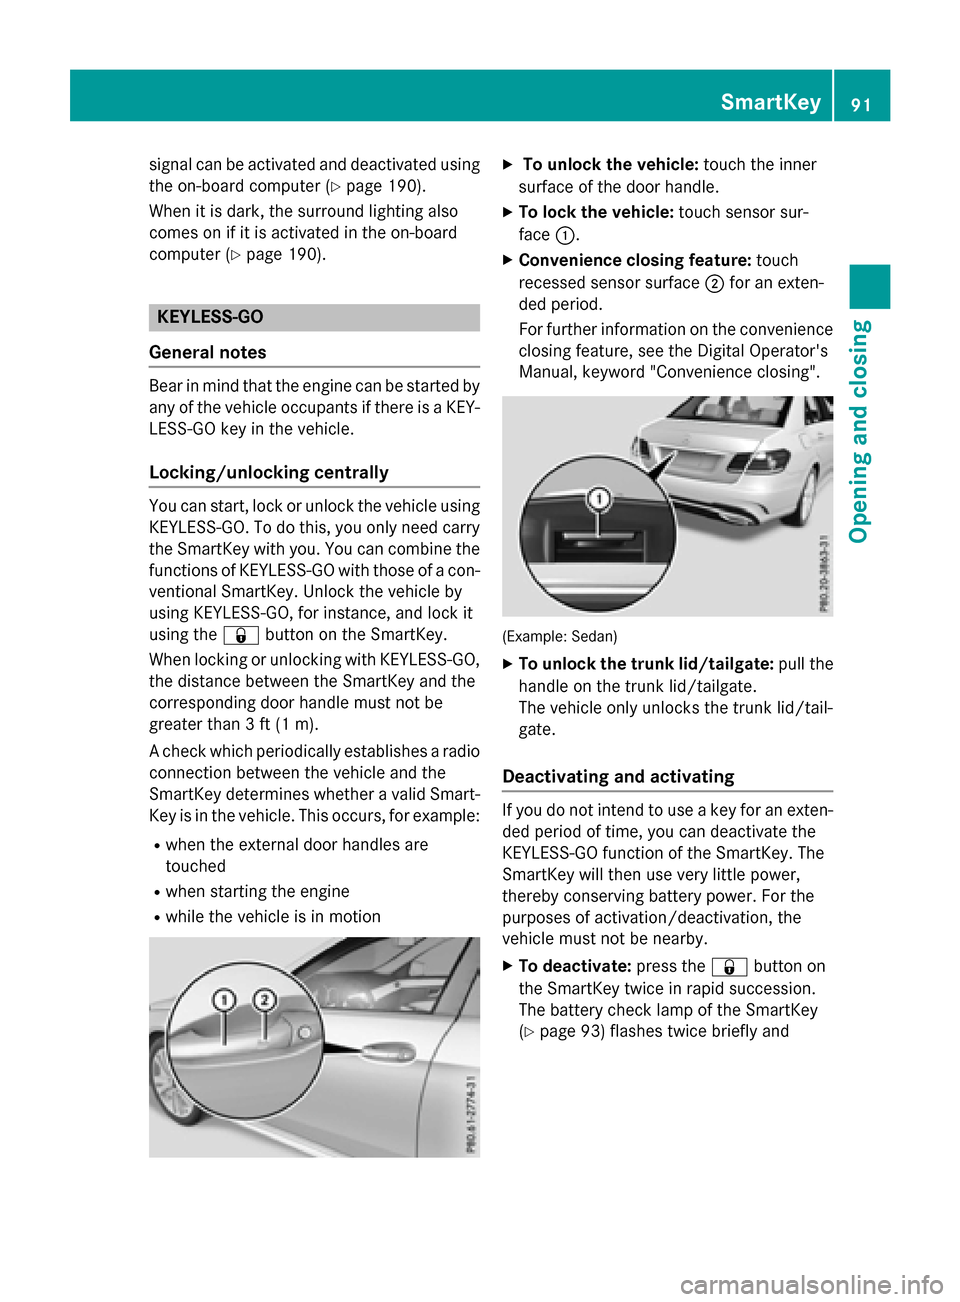
XTo lock the vehicle: touch sensor sur-
face :.
XConvenience closing feature: touch
recessed sensor surface ;for an exten-
ded period.
For further information on the convenience
closing feature, see the Digital Operator's
Manual, keyword "Convenience closing".
(Example: Sedan)
XTo unlock the trunk lid/tailgate: pull the
handle on the trunk lid/tailgate.
The vehicle only unlocks the trunk lid/tail-
gate.
Deactivating and activating
If you do not intend to use a key for an exten-
ded period of time, you can deactivate the
KEYLESS-GO function of the SmartKey. The
SmartKey will then use very little power,
thereby conserving battery power. For the
purposes of activation/deactivation, the
vehicle must not be nearby.
XTo deactivate: press the&button on
the SmartKey twice in rapid succession.
The battery check lamp of the SmartKey
(
Ypage 93) flashes twice briefly and
SmartKey91
Opening and closing
Z
Page 97 of 350
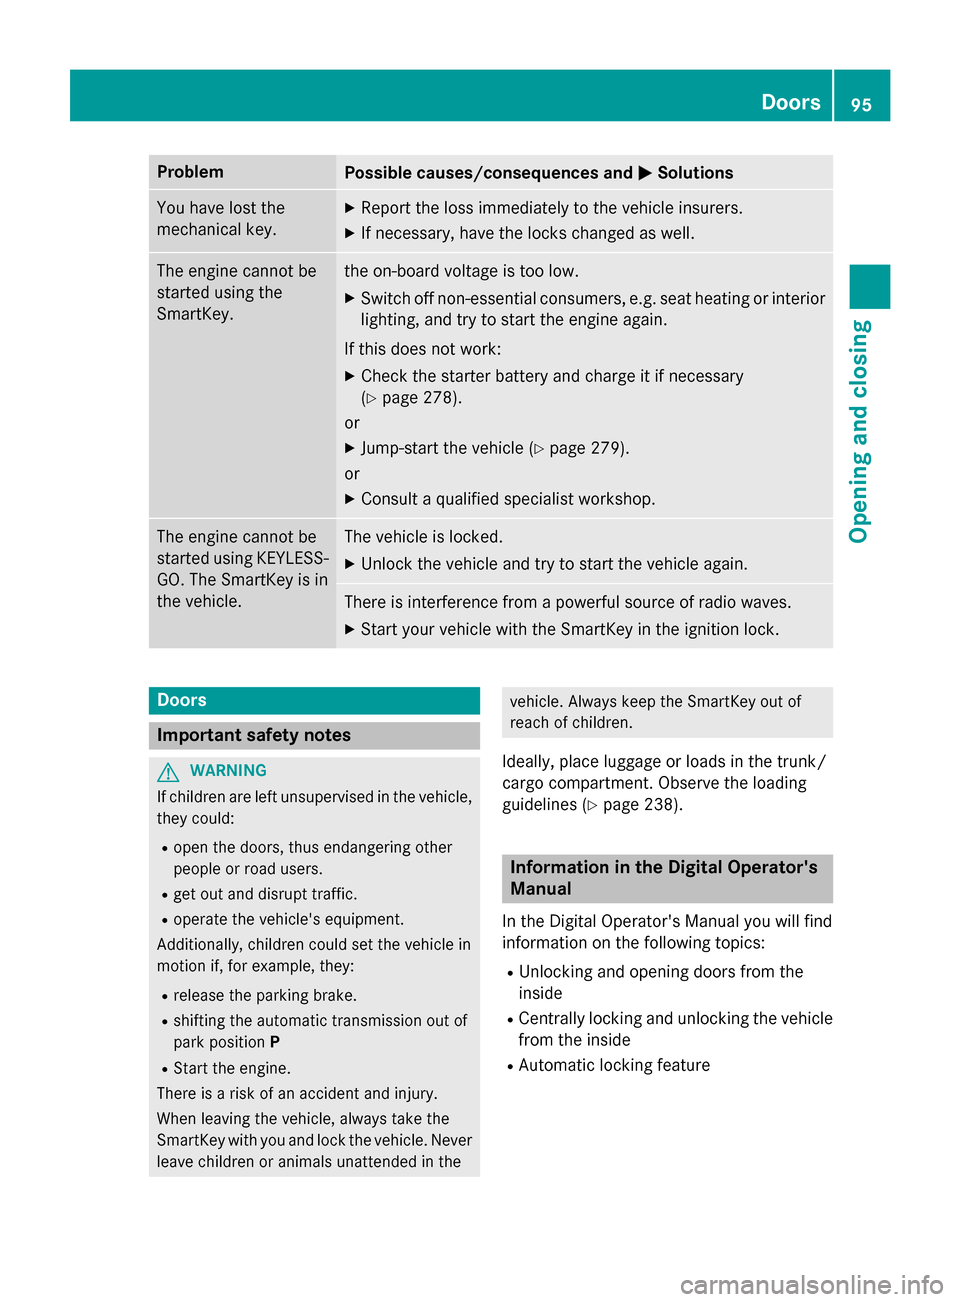
ProblemPossible causes/consequences andMSolutions
You have lost the
mechanical key.XReport the loss immediately to the vehicle insurers.
XIf necessary, have the locks changed as well.
The engine cannot be
started using the
SmartKey.the on-board voltage is too low.
XSwitch off non-essential consumers, e.g. seat heating or interior
lighting, and try to start the engine again.
If this does not work:
XCheck the starter battery and charge it if necessary
(
Ypage 278).
or
XJump-start the vehicle (Ypage 279).
or
XConsult a qualified specialist workshop.
The engine cannot be
started using KEYLESS-
GO. The SmartKey is in
the vehicle.The vehicle is locked.
XUnlock the vehicle and try to start the vehicle again.
There is interference from a powerful source of radio waves.
XStart your vehicle with the SmartKey in the ignition lock.
Doors
Important safety notes
GWARNING
If children are left unsupervised in the vehicle,
they could:
Ropen the doors, thus endangering other
people or road users.
Rget out and disrupt traffic.
Roperate the vehicle's equipment.
Additionally, children could set the vehicle in
motion if, for example, they:
Rrelease the parking brake.
Rshifting the automatic transmission out of
park position P
RStart the engine.
There is a risk of an accident and injury.
When leaving the vehicle, always take the
SmartKey with you and lock the vehicle. Never
leave children or animals unattended in the
vehicle. Always keep the SmartKey out of
reach of children.
Ideally, place luggage or loads in the trunk/
cargo compartment. Observe the loading
guidelines (
Ypage 238).
Information in the Digital Operator's
Manual
In the Digital Operator's Manual you will find
information on the following topics:
RUnlocking and opening doors from the
inside
RCentrally locking and unlocking the vehicle
from the inside
RAutomatic locking feature
Doors95
Opening and closing
Z
Page 117 of 350
Adjusting the steering wheel electrically
(
Ypage 117)
When adjusting the steering wheel, make
sure that:
Ryou can hold the steering wheel with your
arms slightly bent
Ryou can move your legs freely
Ryou can see all the displays in the instru-
ment cluster clearly
XObserve the safety guidelines for seat belts
(
Ypage 50).
XCheck whether you have fastened seat
belt ;properly (
Ypage 52).
The seat belt should:
Rfit snugly across your body
Rbe routed across the middle of your shoul-
der
Rbe routed in your pelvic area across the hip
joints
XBefore starting off, adjust the rear-view mir-
ror and the exterior mirrors in such a way
that you have a good view of road and traf-
fic conditions (
Ypage 117).
XVehicles with a memory function: save
the seat, steering wheel and exterior mirror
settings with the memory function
(
Ypage 117).
Seats
Important safety notes
GWARNING
Children could become trapped if they adjust
the seats, particularly when unattended.
There is a risk of injury.
When leaving the vehicle, always take the
SmartKey with you and lock the vehicle. Never
leave children unsupervised in the vehicle.
The seats can still be adjusted when there is
no SmartKey in the ignition lock.
GWARNING
If the head restraints are not installed or not
adjusted correctly, they cannot provide pro-
tection as intended. There is an increased risk
of injury in the head and neck area, e.g. in the event of an accident or when braking.
Always drive with the head restraints instal-
led. Before driving off, make sure for every
vehicle occupant that the center of the head
restraint supports the back of the head at
about eye level.
Observe the safety notes on "Air bags"
(
Ypage 54) and "Children in the Vehicle"
(
Ypage 68).
GWARNING
You could lose control of your vehicle if you do the following while driving:
Radjust the driver's seat, head restraint,
steering wheel or mirrors
Rfasten the seat belt
There is a risk of an accident.
Adjust the driver's seat, head restraint, steer-
ing wheel and mirror and fasten your seat belt before starting the engine.
GWARNING
If you adjust the seat height carelessly, you or
other vehicle occupants could be trapped and
thereby injured. Children in particular could
accidentally press the electrical seat adjust-
ment buttons and become trapped. There is a
risk of injury.
While moving the seats, make sure that your
hands or other body parts do not get under the
lever assembly of the seat adjustment sys-
tem.
GWARNING
When you adjust a seat, you or other vehicle
occupants could become trapped, e.g. on the seat guide rail. There is a risk of injury.
Make sure when adjusting a seat that no one
has any body parts in the sweep of the seat.
Seats115
Seats, steering wheel and mirrors
Z
Page 140 of 350
iThe SmartKey can be turned in the igni-
tion lock even if it is not the correct Smart- Key for the vehicle. The ignition is not
switched on. The engine cannot be started.
KEYLESS-GO
General notes
Vehicles with KEYLESS-GO are equipped with
SmartKeys featuring the integrated KEYLESS-GO function and a detachable Start/Stop but-
ton.
The Start/Stop button must be inserted in the
ignition lock and the SmartKey must be in the vehicle.
When you insert the Start/Stop button into
the ignition lock, the system needs approx-
imately two seconds recognition time. You
can then use the Start/Stop button.
Pressing the Start/Stop button several times
in succession corresponds to the different
key positions in the ignition lock. This is only
the case if you are not depressing the brake
pedal.
If you depress the brake pedal and press the
Start/Stop button, the engine starts immedi-
ately.
A check which periodically establishes a radio
connection between the vehicle and the
SmartKey determines whether a valid Smart-
Key is in the vehicle. This occurs, for example,
when starting the engine.
To start the vehicle without actively using the
SmartKey:
Rthe Start/Stop button must be inserted in
the ignition lock.
Rthe SmartKey must be in the vehicle.
Rthe vehicle must not be locked with the
SmartKey or KEYLESS-GO (
Ypage 91).
Do not keep the KEYLESS-GO key:
Rwith electronic devices, e.g. a mobile
phone or another SmartKey.
Rwith metallic objects, e.g. coins or metal
foil.
Rinside metallic objects, e.g. a metal case. This can affect the functionality of KEYLESS-
GO.
If you lock the vehicle with the SmartKey's
remote control or with KEYLESS-GO, after a
short time:
Ryou will not be able to switch on the ignition
with the Start/Stop button.
Ryou will not be able to start the engine with
the Start/Stop button until the vehicle is
unlocked again.
If you lock the vehicle centrally using the but-
ton on the front door (
Ypage 95), you can
continue to start the engine with the Start/
Stop button.
The engine can be switched off while the vehi-
cle is in motion by pressing and holding the
Start/Stop button for three seconds. This
function operat
es independently of the ECO
start/stop automatic engine switch-off func-
tion.
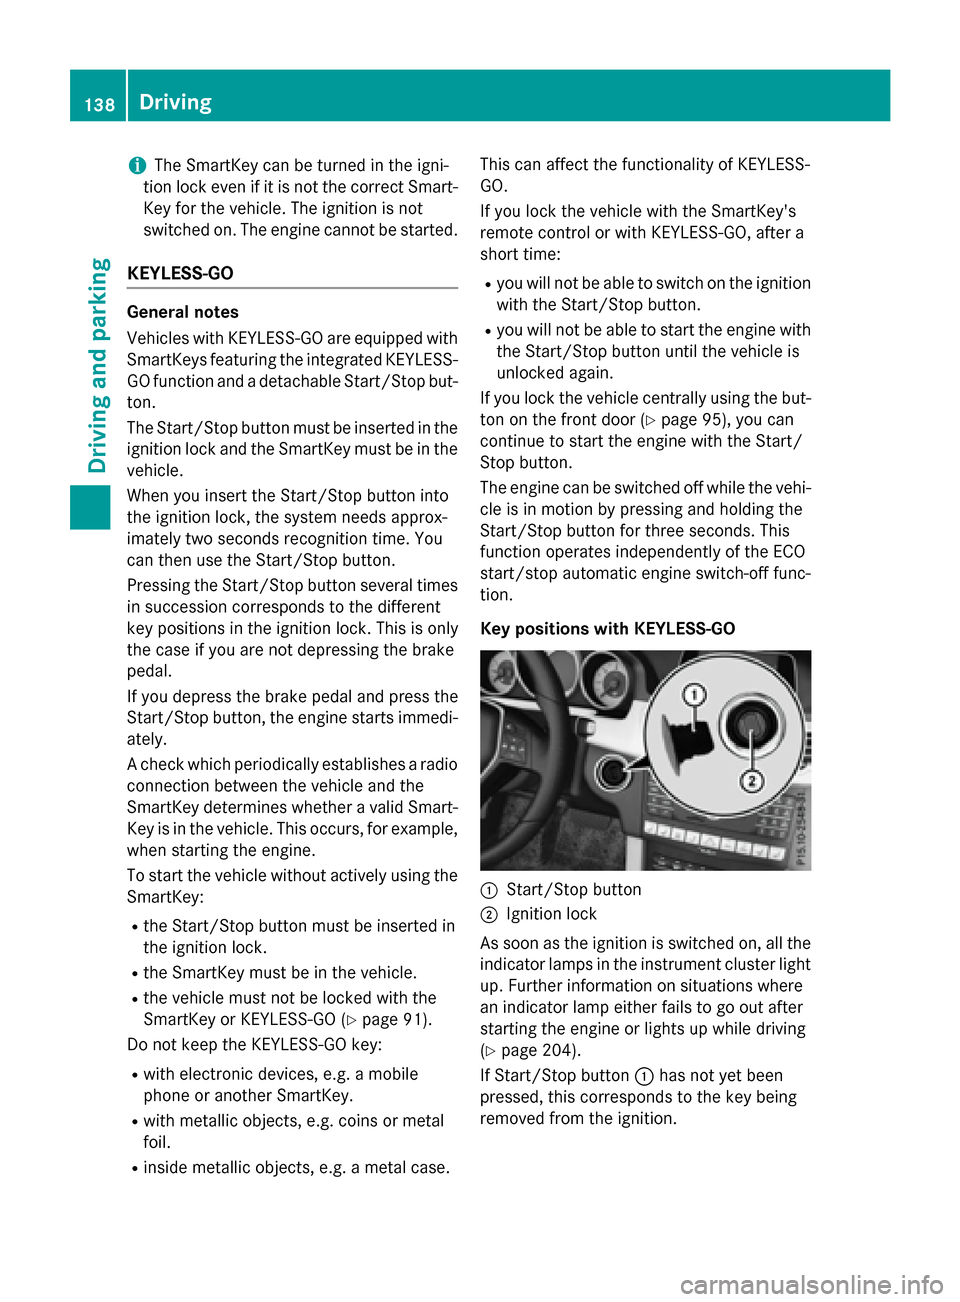
Key positions with KEYLESS-GO
:Start/Stop button
;Ignition lock
As soon as the ignition is switched on, all the
indicator lamps in the instrument cluster light
up. Further information on situations where
an indicator lamp either fails to go out after
starting the engine or lights up while driving
(
Ypage 204).
If Start/Stop button :has not yet been
pressed, this corresponds to the key being
removed from the ignition.
138Driving
Driving and parking
Page 174 of 350
Under the following circumstances, the rear
view camera will not function, or will function
in a limited manner:
Rif the trunk lid or tailgate is open
Rin heavy rain, snow or fog
Rat night or in very dark places
Rif the camera is exposed to very bright light
Rif the area is lit by fluorescent bulbs or LED
lighting (the display may flicker)
Rif there is a sudden change in temperature,
e.g. when driving into a heated garage in
winter
Rif the camera lens is dirty or obstructed.
Observe the notes on cleaning
(
Ypage 268)
Rif the rear of your vehicle is damaged. In this
event, have the camera position and setting
checked at a qualified specialist workshop
The field of vision and other functions of the
rear view camera may be restricted due to
additional accessories on the rear of the vehi-
cle (e.g. license plate holder, bicycle rack).
On vehicles with height-adjustable chassis,
leaving the standard height can result in inac-
curacies in the guide lines, depending on
technical conditions.
iThe rear view camera is protected from
raindrops and dust by means of a flap.
When the rear view camera is activated,
this flap opens.
The flap closes again when:
Ryou have finished the maneuvering proc-
ess
Ryou switch off the engine
Ryou open the trunk
Observe the notes on cleaning
(
Ypage 268).
For technical reasons, the flap may remain
open briefly after the rear view camera has
been deactivated.
!Objects not at ground level may appear to
be further away than they actually are, e.g.:
Rthe bumper of a parked vehicle
Rthe drawbar of a trailer
Rthe ball coupling of a trailer tow hitch
Rthe rear section of an HGV
Ra slanted post
Use the guidelines only for orientation.
Approach objects no further than the bot-
tom-most guideline.
The rear view camera may show a distorted
view of obstacles, show them incorrectly or
not at all. The rear view camera does not show
objects in the following positions:
Rvery close to the rear bumper
Runder the rear bumper
Rin the area immediately above the tailgate
handle
Activating/deactivating the rear view
camera
XTo activate: make sure that the SmartKey
is in position 2in the ignition lock.
XMake sure that the Activation by R
gearfunction is selected in Audio 20 or
COMAND, see the Digital Operator's Man-
ual.
XEngage reverse gear.
The rear view camera flap opens. The area
behind the vehicle is shown with guide lines
in the Audio 20 or COMAND display.
The image from the rear view camera is
available throughout the maneuvering
process.
To deactivate: the rear view camera deacti-
vates if you shift the transmission to Por after
driving forwards a short distance.
172Driving systems
Driving and parking