key MERCEDES-BENZ E-SEDAN 2014 Owners Manual
[x] Cancel search | Manufacturer: MERCEDES-BENZ, Model Year: 2014, Model line: E-SEDAN, Model: MERCEDES-BENZ E-SEDAN 2014Pages: 430, PDF Size: 5.8 MB
Page 369 of 430
X
Turn the SmartKey to position 2in the
ignition lock.
X Shift the automatic transmission to
position N.
As soon as the vehicle has been loaded:
X Prevent the vehicle from rolling away by
applying the parking brake.
X Shift the automatic transmission to
position P.
X Turn the SmartKey to position 0in the
ignition lock and remove the SmartKey
from the ignition lock.
X Secure the vehicle. Notes on 4MATIC vehicles
! Vehicles with 4MATIC must not be towed
with either the front or the rear axle raised,
as doing so will damage the transmission.
If the vehicle has transmission damage or
damage to the front or rear axle, have it
transported on a transporter or trailer.
In the event of damage to the electrical
system
If the battery is defective, the automatic
transmission will be locked in position P. To
shift the automatic transmission to position
N, you must provide power to the vehicle's
electrical system in the same way as when
jump-starting (Y page 362).
Have the vehicle transported on a transporter
or trailer. Tow-starting (emergency engine
starting)
! Vehicles with automatic transmission
must not be started by tow-starting. This
could otherwise damage the transmission.
You can find information on "Jump-starting"
under (Y page 362). Fuses
Important safety notes
G
WARNING
If you manipulate or bridge a faulty fuse or if
you replace it with a fuse with a higher
amperage, the electric cables could be
overloaded. This could result in a fire. There
is a risk of an accident and injury.
Always replace faulty fuses with the specified
new fuses having the correct amperage.
! Only use fuses that have been approved
for Mercedes-Benz vehicles and which
have the correct fuse rating for the system
concerned. Otherwise, components or
systems could be damaged.
The fuses in your vehicle serve to close down
faulty circuits. If a fuse blows, all the
components on the circuit and their functions
stop operating.
Blown fuses must be replaced with fuses of
the same rating, which you can recognize by
the color and value. The fuse ratings are listed
in the fuse allocation chart.
If a newly inserted fuse also blows, have the
cause traced and rectified at a qualified
specialist workshop, e.g. an authorized
Mercedes-Benz Center. Before changing a fuse
Observe the important safety notes
(Y page 367)
X Secure the vehicle against rolling away
(Y page 182).
X Switch off all electrical consumers.
X Turn the SmartKey to position 0in the
ignition lock and remove it (Y page 159).
or
X On vehicles with KEYLESS-GO, make sure
the ignition is switched off (Y page 159).
All indicator lamps in the instrument cluster
must be off. Fuses
367Breakdown assistance Z
ProCarManuals.com
Page 382 of 430
R
you adopt a very sporty driving style
(cornering at high speeds or driving with
high rates of acceleration).
R you are driving with a heavy load (in the
vehicle or on the roof).
Restarting the tire pressure loss
warning system Restart the tire pressure loss warning system
if you have:
R changed the tire pressure
R changed the wheels or tires
R mounted new wheels or tires
X Before restarting, make sure that the tire
pressures are set properly on all four tires
for the respective operating conditions.
The recommended tire pressure can be
found on the Tire and Loading Information
placard on the B-pillar on the driver's side.
Additionally, a tire pressure table is
attached to the fuel filler flap. The tire
pressure loss warning system can only give
reliable warnings if you have set the correct
tire pressure. If an incorrect tire pressure
is set, these incorrect values will be
monitored.
X Also observe the notes in the section on tire
pressures ( Ypage 376).
X Make sure that the SmartKey is in position
2 in the ignition lock (Y page 159).
X Press the =or; button on the
steering wheel to select the Service
Service
menu.
X Press the 9or: button on the
steering wheel to select the Tire
Tire
Pressure Pressure menu.
X Press the abutton.
The Run Flat Indicator Active
Run Flat Indicator Active
Press 'OK' to Restart
Press 'OK' to Restart message
appears in the multifunction display. If you wish to confirm the restart:
X
Press the abutton.
The Tire Pressure Now OK? Tire Pressure Now OK? message
appears in the multifunction display.
X Press the 9or: button to select
Yes
Yes .
X Press the abutton.
The Run Flat Indicator Restarted
Run Flat Indicator Restarted
message appears in the multifunction
display.
After a teach-in period, the tire pressure
loss warning system will monitor the set
tire pressures of all four tires.
If you wish to cancel the restart:
X Press the %button.
or
X When the Tire Pressure Now OK? Tire Pressure Now OK?
message appears, press the 9
or : button to select Cancel
Cancel.
X Press the abutton.
The tire pressure values stored at the last
restart will continue to be monitored. Tire pressure monitor
General notes If a tire pressure monitor is installed, the
vehicle's wheels have sensors that monitor
the tire pressures in all four tires. The tire
pressure monitor warns you if the pressure
drops in one or more of the tires. The tire
pressure monitor only functions if the correct
sensors are installed on all wheels.
Information on tire pressures is displayed in
the multifunction display. After a few minutes
of driving, the current tire pressure of each
tire is shown in the Service Servicemenu of the
multifunction display. 380
Ti
re pressureWhe els and tires
ProCarManuals.com
Page 384 of 430
vehicle to a halt by braking carefully. Avoid
abrupt steering maneuvers.
The tire pressure monitor has a yellow
warning lamp in the instrument cluster for
indicating a pressure loss or malfunction.
Whether the warning lamp flashes or lights up
indicates whether a tire pressure is too low or
the tire pressure monitor is malfunctioning:
R if the warning lamp is lit continuously, the
tire pressure on one or more tires is
significantly too low. The tire pressure
monitor is not malfunctioning.
R if the warning lamp flashes for around a
minute and then remains lit constantly, the
tire pressure monitor is malfunctioning.
i In addition to the warning lamp, a
message appears in the multifunction
display.
Further information can be found on
(Y page 280).
If the tire pressure monitor is malfunctioning,
it may take more than ten minutes for the tire
pressure warning lamp to inform you of the
malfunction by flashing for approximately one
minute and then remaining lit. When the
malfunction has been rectified, the tire
pressure warning lamp goes out after a few
minutes of driving.
The tire pressure values indicated by the on-
board computer may differ from those
measured at a gas station with a pressure
gauge. The tire pressures shown by the on-
board computer refer to those measured at
sea level. At high altitudes, the tire pressure
values indicated by a pressure gauge are
higher than those shown by the on-board
computer. In this case, do not reduce the tire
pressures.
The operation of the tire pressure monitor can
be affected by interference from radio
transmitting equipment (e.g. radio
headphones, two-way radios) that may be
being operated in or near the vehicle. Checking the tire pressure
electronically X
Make sure that the SmartKey is in position
2in the ignition lock (Y page 159).
X Press the =or; button on the
steering wheel to select the Service Service
menu.
X Press the 9or: button to select
Tire Pressure
Tire Pressure.
X Press the abutton.
The current tire pressure of each tire is
shown in the multifunction display.
If the vehicle has been parked for over
20 minutes, the Tire Tirepressures
pressures will
willbe
be
displayed after driving a few
displayed after driving a few
minutes minutes message appears.
After a teach-in process, the tire pressure
monitor automatically detects new wheels or
new sensors. As long as a clear allocation of
the tire pressure value to the individual
wheels is not possible, the Tire Pressure Tire Pressure
Monitor Active
Monitor Active display message is shown
instead of the tire pressure display. The tire
pressures are already being monitored.
i If an emergency spare wheel is mounted,
the system may continue to show the tire
pressure of the wheel that has been
removed for a few minutes. If this occurs,
note that the value displayed for the
position where the spare wheel is mounted
is not the same as the current tire pressure
of the emergency spare wheel.
Tire pressure monitor warning
messages If the tire pressure monitor detects a pressure
loss in one or more tires, a warning message
is shown in the multifunction display and the
yellow tire pressure monitor warning lamp
comes on.
R
If the Correct Tire Pressure Correct Tire Pressure message
appears in the multifunction display, the
tire pressure in at least one tire is too low 382
Tire pressureWheels and tires
ProCarManuals.com
Page 385 of 430
and must be corrected at the next
opportunity.
R If the Check
Check Tires
Tiresmessage appears in the
multifunction display, the tire pressure in
one or more tires has dropped significantly
and the tires must be checked.
R If the Warning Tire Malfunction
Warning Tire Malfunction
message appears in the multifunction
display, the tire pressure in one or more
tires has dropped suddenly and the tires
must be checked.
Observe the instructions and safety notes in
the display messages in the "Tires" section
(Y page 280).
i If the wheel positions on the vehicle are
rotated, the tire pressures may be
displayed for the wrong positions for a
short time. This is rectified after a few
minutes of driving, and the tire pressures
are displayed for the correct positions.
Restarting the tire pressure monitor When you restart the tire pressure monitor,
all existing warning messages are deleted and
the warning lamps go out. The monitor uses
the currently set tire pressures as the
reference values for monitoring. In most
cases, the tire pressure monitor will
automatically detect the new reference
values after you have changed the tire
pressure. However, you can also define
reference values manually as described here.
The tire pressure monitor then monitors the
new tire pressure values.
X Set the tire pressure to the value
recommended for the corresponding
driving situation on the Tire and Loading
Information placard on the driver's side
B-pillar (Y page 376).
Additional tire pressure values for different
loads can also be found on the tire pressure
table on the inside of the fuel filler flap
(Y page 376).
X Make sure that the tire pressure is correct
on all four wheels. X
Make sure that the SmartKey is in position
2in the ignition lock.
X Press the =or; button on the
steering wheel to select the Service
Service
menu.
X Press the 9or: button to select
Tire Pressure
Tire Pressure .
X Press the abutton.
The multifunction display shows the
current tire pressure for the individual tires
or the Tire pressures will be
Tire pressures will be
displayed after driving a few displayed after driving a few
minutes minutes message.
X Press the :button.
The Use Current Pressures as New
Use Current Pressures as New
Reference Values
Reference Values message appears in
the multifunction display.
If you wish to confirm the restart:
X Press the abutton.
The Tire Press. Monitor Restarted Tire Press. Monitor Restarted
message appears in the multifunction
display.
After driving for a few minutes, the system
checks whether the current tire pressures
are within the specified range. The new tire
pressures are then accepted as reference
values and monitored.
If you wish to cancel the restart:
X Press the %button.
The tire pressure values stored at the last
restart will continue to be monitored. Loading the vehicle
Instruction labels for tires and loads
G
WARNING
Overloaded tires can overheat, causing a
blowout. Overloaded tires can also impair the
steering and driving characteristics and lead
to brake failure. There is a risk of accident.
Observe the load rating of the tires. The load
rating must be at least half of the GAWR of Loading the vehicle
383Wheels and tires
Z
ProCarManuals.com
Page 398 of 430
Components damaged in this way may fail
unexpectedly. There is a risk of an accident.
Do not use power washers with circular jet
nozzles to clean the vehicle. Have damaged
tires or chassis components replaced
immediately. Mounting a wheel
Preparing the vehicle X
Stop the vehicle on solid, non-slippery and
level ground.
X Apply the parking brake.
X Bring the front wheels into the straight-
ahead position.
X Shift the transmission to position P.
X Vehicles with AIRMATIC: make sure that
"normal" level is selected (Y page 204).
X Switch off the engine.
X Vehicles without KEYLESS-GO: remove
the SmartKey from the ignition lock.
X Vehicles with KEYLESS-GO: open the
driver's door.
The on-board electronics now have status
0. This is the same as the SmartKey having
been removed.
X Vehicles with KEYLESS-GO: remove the
Start/Stop button from the ignition lock
(Y page 159).
X If included in the vehicle equipment,
remove the tire-change tool kit from the
vehicle (Y page 352).
X Secure the vehicle to prevent it from rolling
away. Securing the vehicle to prevent it from
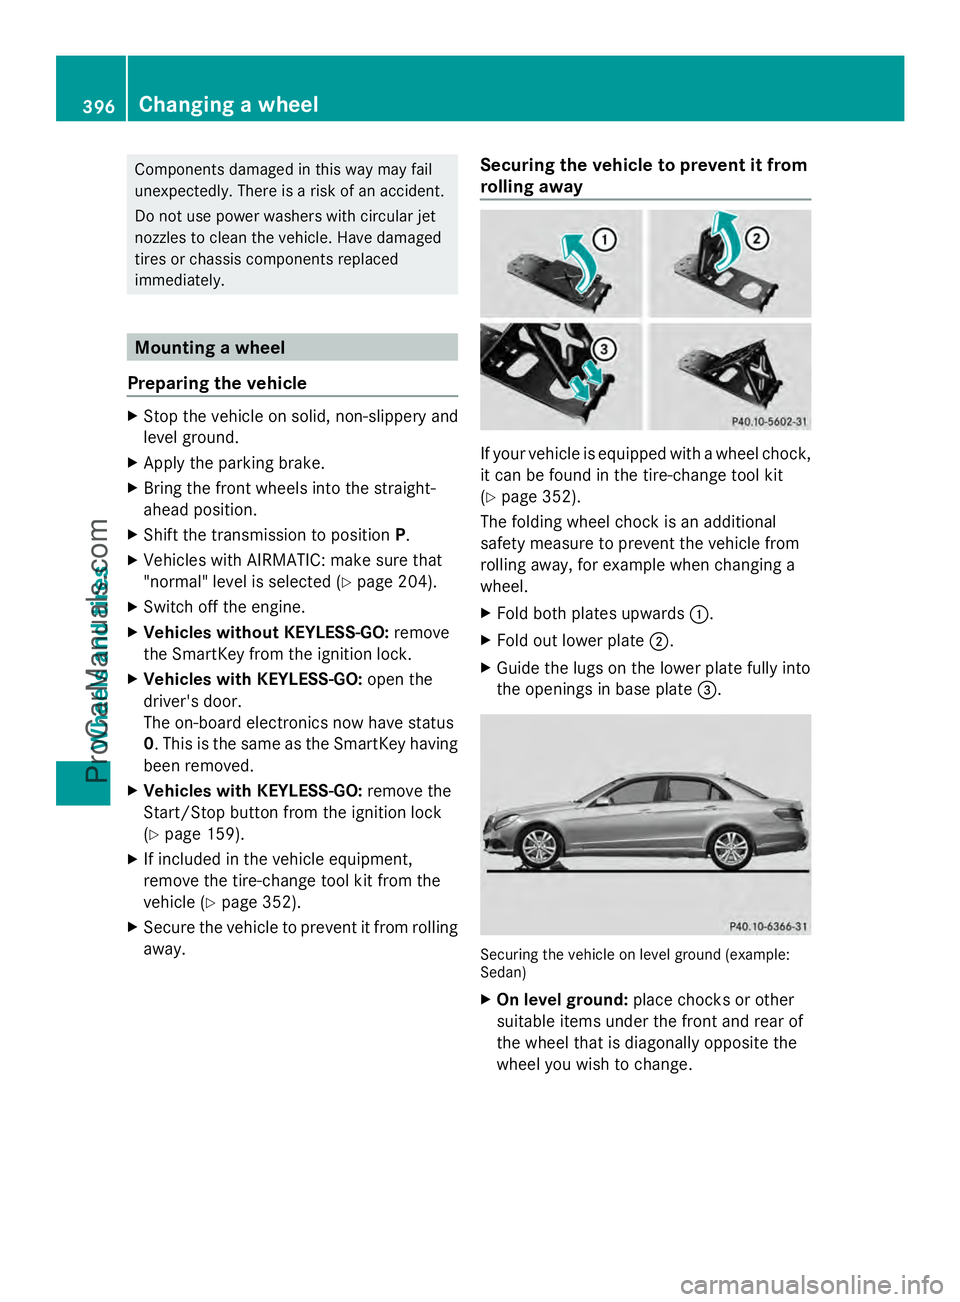
rolling away If your vehicle is equipped with a wheel chock,
it can be found in the tire-change tool kit
(Y
page 352).
The folding wheel chock is an additional
safety measure to prevent the vehicle from
rolling away, for example when changing a
wheel.
X Fold both plates upwards :.
X Fold out lower plate ;.
X Guide the lugs on the lower plate fully into
the openings in base plate =. Securing the vehicle on level ground (example:
Sedan)
X
On level ground: place chocks or other
suitable items under the front and rear of
the wheel that is diagonally opposite the
wheel you wish to change. 396
Changing a wheelWheels and tires
ProCarManuals.com
Page 414 of 430
Stowing a used collapsible spare
wheel
! Only place the collapsible spare wheel in
the vehicle when it is dry. Otherwise,
moisture may get into the vehicle.
Take the following steps to stow a used
collapsible spare wheel. It will not otherwise
install into the spare wheel well. Mercedes-
Benz recommends that you have this work
performed at a qualified specialist workshop,
e.g. at an authorized Mercedes-Benz Center.
X Unscrew the valve cap from the valve.
X Use the back of the valve cap to unscrew
the valve insert from the valve and release
the air.
i Fully deflating the tires can take a few
minutes.
X Screw the valve insert back into the valve.
X Screw the valve cap back on.
X Remove the protective sheet from the
vehicle tool kit and pull it over the
collapsible spare wheel.
X Stow the collapsible spare wheel in the
emergency spare wheel well under the
trunk. Inflating the collapsible spare wheel
! Inflate the collapsible spare wheel using
the tire inflation compressor before
lowering the vehicle. The wheel rim could
otherwise be damaged.
! Do not operate the tire inflation
compressor for longer than eight minutes
at a time without a break. It may otherwise
overheat.
The tire inflation compressor can be
operated again once it has cooled down. X
Mount the collapsible spare wheel as
described (Y page 395).
The collapsible spare wheel must be
mounted before it is inflated.
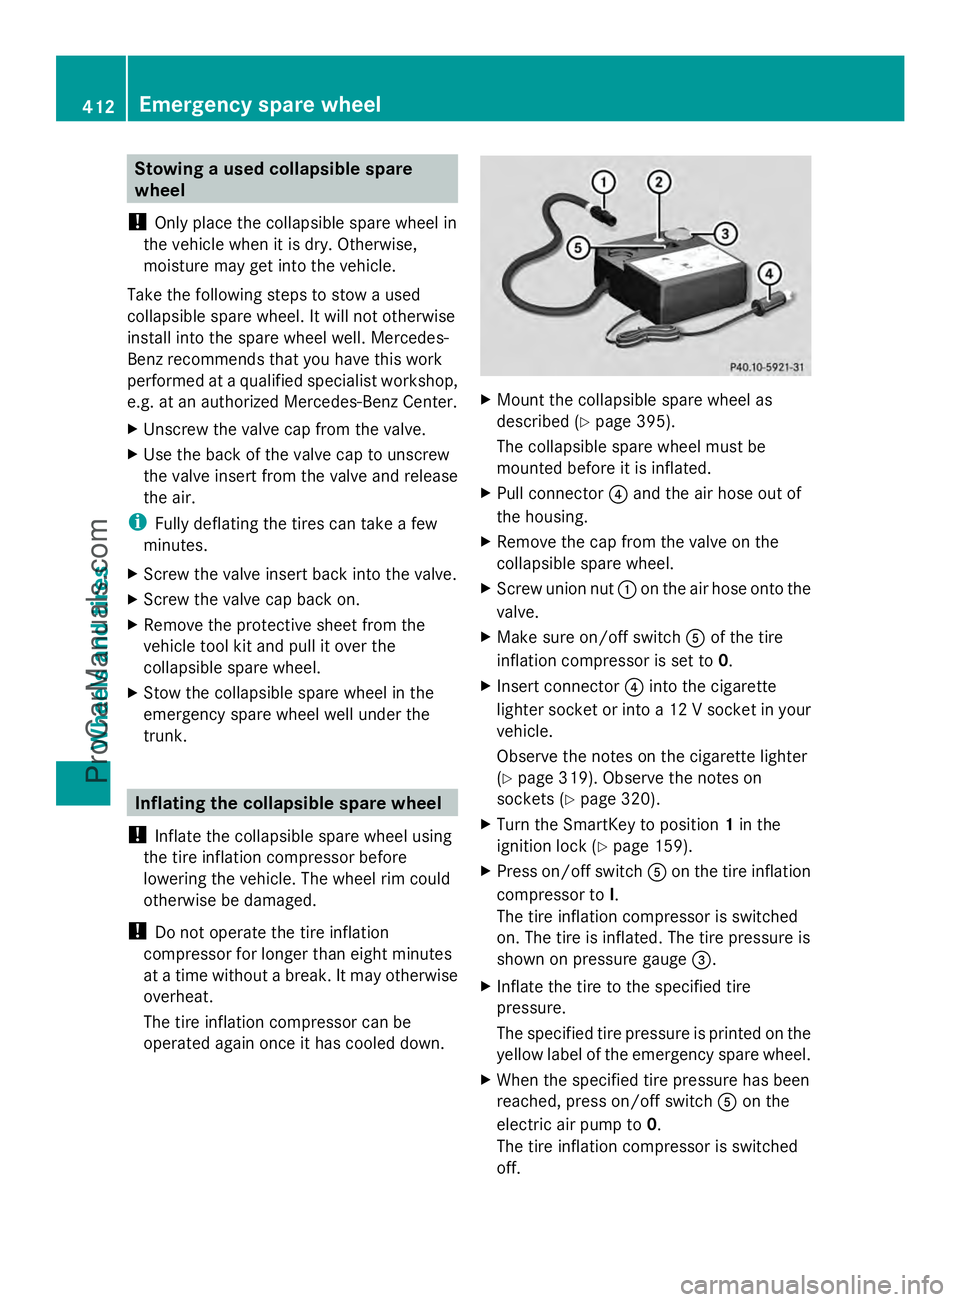
X Pull connector ?and the air hose out of
the housing.
X Remove the cap from the valve on the
collapsible spare wheel.
X Screw union nut :on the air hose onto the
valve.
X Make sure on/off switch Aof the tire
inflation compressor is set to 0.
X Insert connector ?into the cigarette
lighter socket or into a 12 V socket in your
vehicle.
Observe the notes on the cigarette lighter
(Y page 319). Observe the notes on
sockets (Y page 320).
X Turn the SmartKey to position 1in the
ignition lock (Y page 159).
X Press on/off switch Aon the tire inflation
compressor to I.
The tire inflation compressor is switched
on. The tire is inflated. The tire pressure is
shown on pressure gauge =.
X Inflate the tire to the specified tire
pressure.
The specified tire pressure is printed on the
yellow label of the emergency spare wheel.
X When the specified tire pressure has been
reached, press on/off switch Aon the
electric air pump to 0.
The tire inflation compressor is switched
off. 412
Emergency spare wheelWheels and tires
ProCarManuals.com
Page 415 of 430
X
Turn the SmartKey to position 0in the
ignition lock.
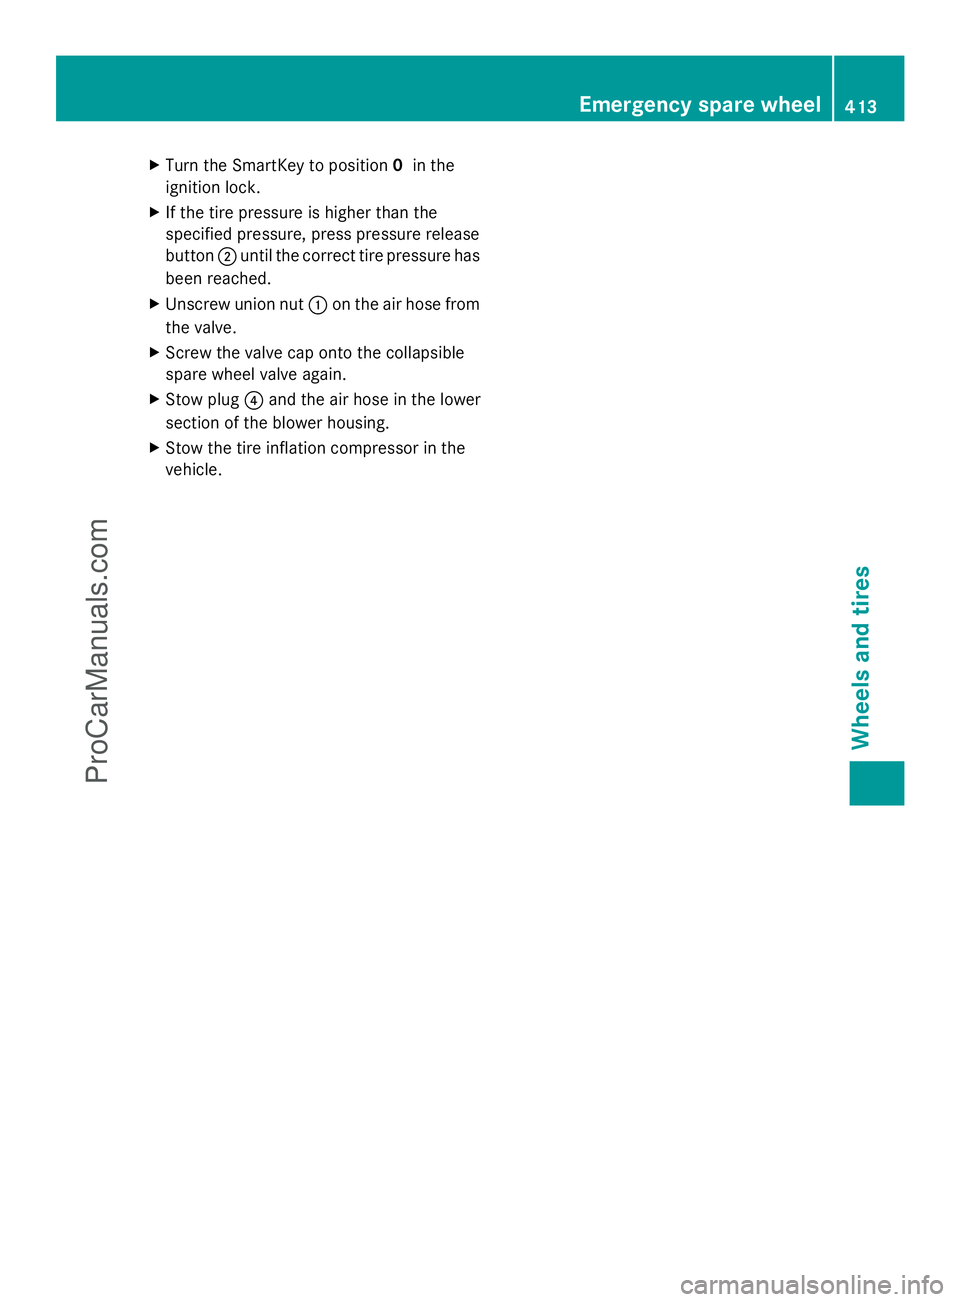
X If the tire pressure is higher than the
specified pressure, press pressure release
button ;until the correct tire pressure has
been reached.
X Unscrew union nut :on the air hose from
the valve.
X Screw the valve cap onto the collapsible
spare wheel valve again.
X Stow plug ?and the air hose in the lower
section of the blower housing.
X Stow the tire inflation compressor in the
vehicle. Emergency spare wheel
413Wheels and tires Z
ProCarManuals.com