open hood MERCEDES-BENZ E-SEDAN 2016 Owners Manual
[x] Cancel search | Manufacturer: MERCEDES-BENZ, Model Year: 2016, Model line: E-SEDAN, Model: MERCEDES-BENZ E-SEDAN 2016Pages: 350, PDF Size: 6.71 MB
Page 14 of 350
G
Garage door openerClearing the memory .....................2 59
General notes ................................ 256
Important safety notes .................. 257
Opening/closing the garage door .. 259
Programming (button in the rear-
view mirror) ................................... 257
Synchronizing the rolling code ....... 257
Gear indicator (on-board com-
puter) ..................................................1 90
Gear or selector lever (cleaning
guidelines) ......................................... 268
Genuine parts ...................................... 27
Glove box ...........................................2 39
Google™ Local Search
see also Digital Operator's Man-
ual ..................................................2 14
H
HANDS-FREE ACCESS.......................... 99
Hazard warning lamps ......................120
Head bags
Display message ............................ 196
Head restraints
Adjusting ....................................... 116
Adjusting (rear) .............................. 116
see NECK-PRO head restraints
see NECK-PRO luxury head restraints
Headlamps
Fogging up ..................................... 120
see Automatic headlamp mode
Heating
see Climate control
High-beam headlamps
Adaptive Highbeam Assist ............. 122
Changing bulbs .............................. 124
Display message ............................ 191
Switching on/off ........................... 121
Hill start assist .................................. 141
HOLD function
Activating ....................................... 165
Deactivating ................................... 166
Function/notes .............................1 65Home address
see also Digital Operator's Man-
ual ..................................................2 14
Hood
Closing ...........................................2 63
Display message ............................ 201
Important safety notes .................. 262
Opening ......................................... 262
Hydroplaning ..................................... 155
I
Ignition lock
see Key positions
Immobilizer .......................................... 87
Indicator and warning lamps
COLLISION PREVENTION ASSIST
PLUS .............................................. 210
Indicator lamps
see Warning and indicator lamps
Indicators
see Turn signals
Insect protection on the radiator .... 263
Instrument cluster
Overview .......................................... 37
Settings ......................................... 190
Warning and indicator lamps ........... 38
Instrument cluster lighting .............. 190
Interior lighting
Automatic control .......................... 123
Delayed switch-off (on-board
computer) ...................................... 190
Emergency lighting ........................ 123
Manual control ............................... 123
Overview ........................................ 123
Reading lamp ................................. 123
Setting the brightness of the
ambient lighting (on-board com-
puter) ............................................. 190
Setting the brightness of the dis-
play/switch (on-board computer) .. 190
Setting the color of the ambient
lighting (on-board computer) ......... 190
Internet
Selecting/setting access data ....... 232
Setting up an Internet connection .. 232
12Index
Page 38 of 350
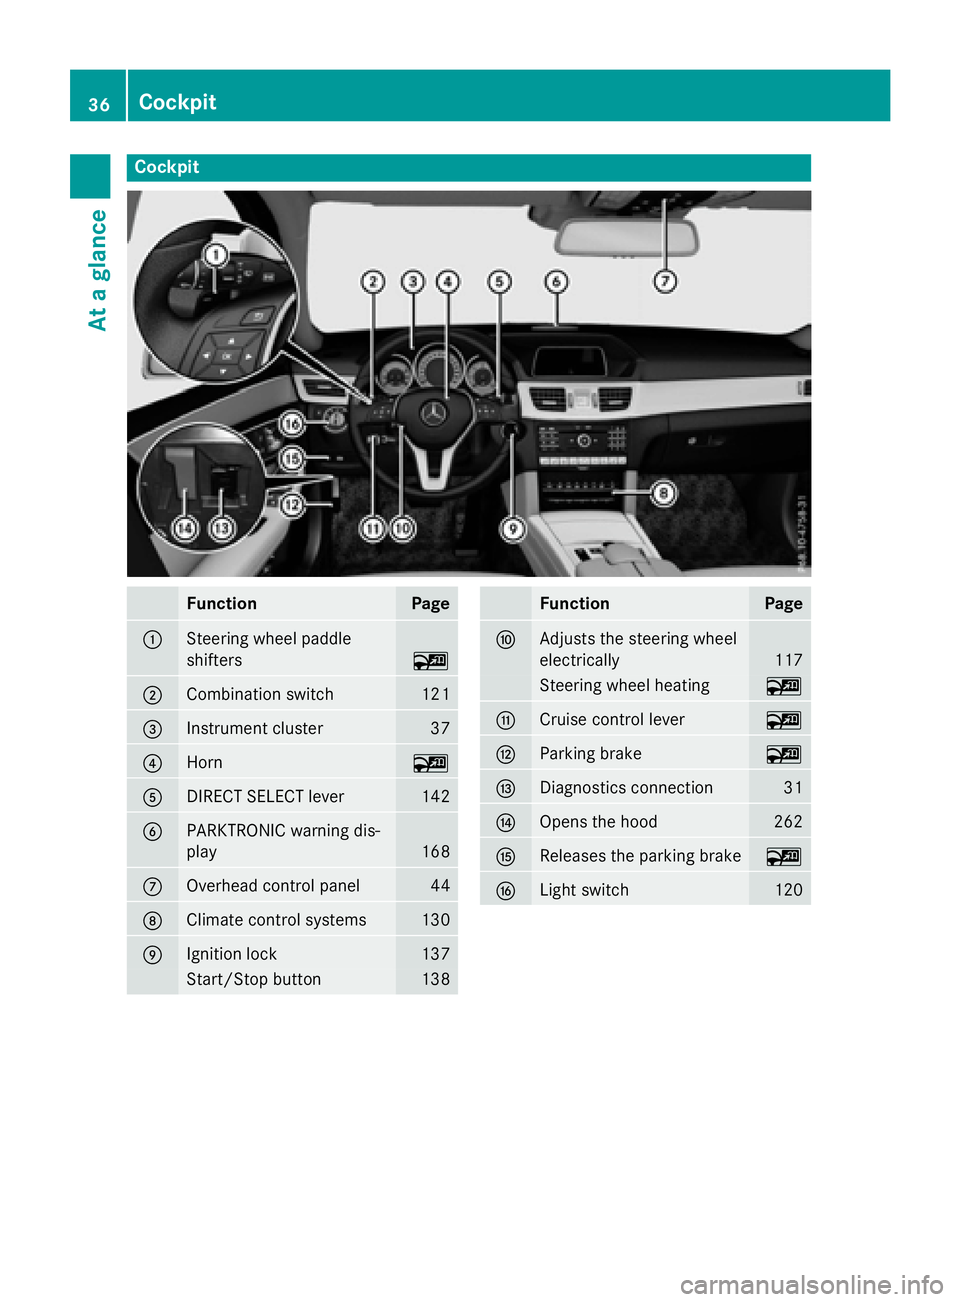
Cockpit
FunctionPage
:Steering wheel paddle
shifters
~
;Combination switch121
=Instrument cluster37
?Horn~
ADIRECT SELECT lever142
BPARKTRONIC warning dis-
play
168
COverhead control panel44
DClimate control systems130
EIgnition lock137
Start/Stop button138
FunctionPage
FAdjusts the steering wheel
electrically
117
Steering wheel heating~
GCruise control lever~
HParking brake~
IDiagnostics connection31
JOpens the hood262
KReleases the parking brake~
LLight switch120
36Cockpit
At a glance
Page 89 of 350
Important safety notes
iObserve the "Important safety notes" sec-
tion (
Ypage 75).
No steering support isprovided by STEER
CONTROL, if:
RESP®is malfunctioning.
Rthe lighting isfaulty.
Power steering will, however, continue to
function.
Protection against theft
Immobilizer
The immobili zer prevents your vehicle from
bein g started without the correct SmartKey.
XTo activate with the SmartKey: remove
the SmartKey from the ignition lock.
XTo activate with KEYLESS-GO: switch the
ignit ion off and open the driver's door.
XTo deactivate: switch on the ignition.
When leaving the vehicle, always take the
Sm artKey with you and lock the vehicle. Any-
one can start the engine ifa valid SmartKey
has been left inside the vehicle.
iThe immobilizer is always deactivated
when you start the engine.
In the event that the engine cannot be star-
ted (yet the vehicle's battery is charged),
the system isnot operational. Contact an
authorized Mercedes-Benz Center or call
1-800-FOR-M ERCedes (in the USA) or
1-800-387-0100 (in Canada).
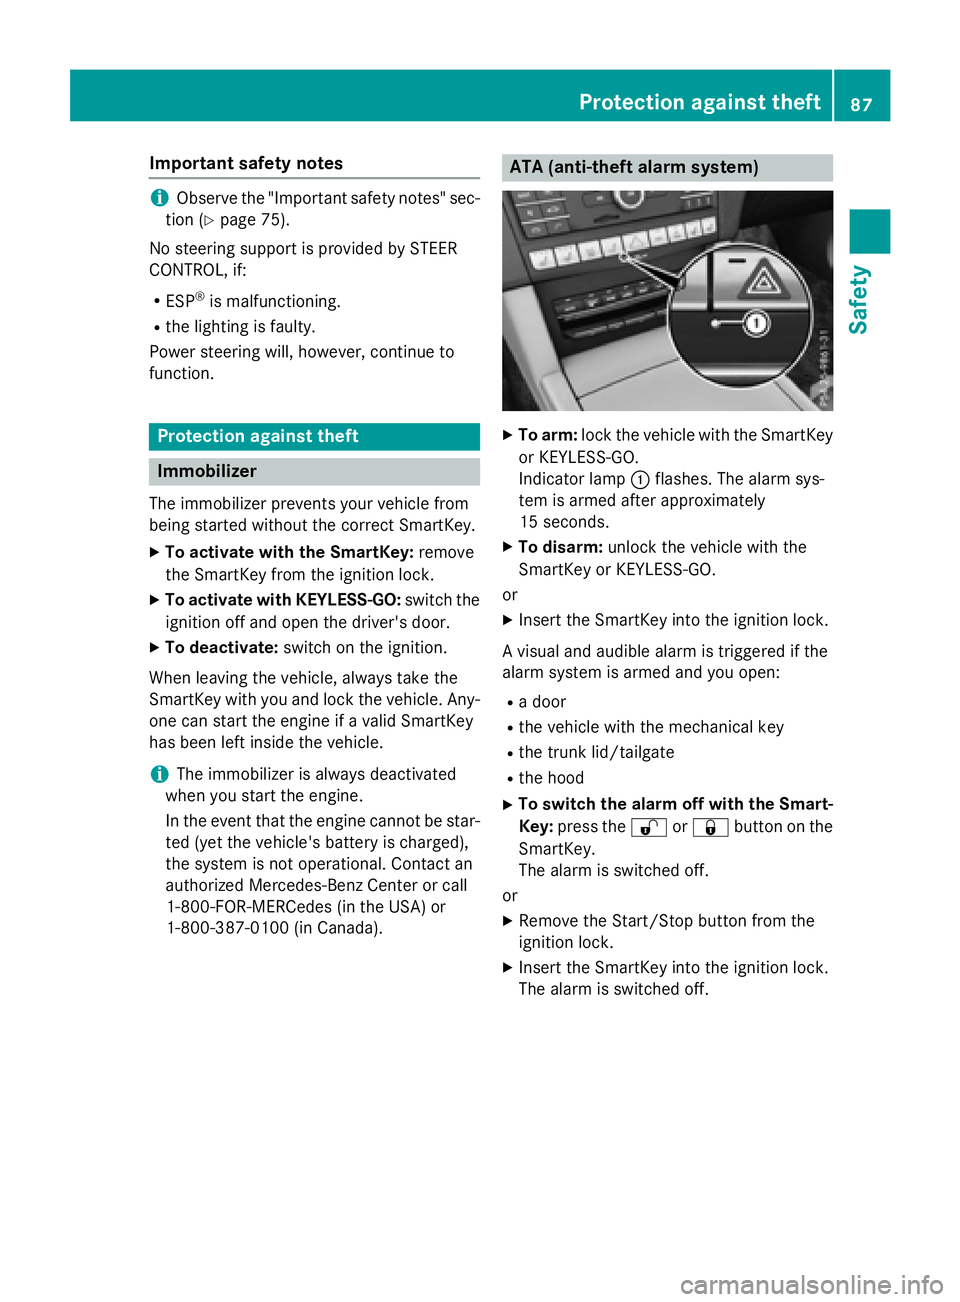
ATA (anti-theft alarm system)
XTo ar m:lock the vehicle with the SmartKey
or KEYLESS -GO.
In dicator lamp :flashes. The alarm sys-
tem isarmed after approximately
15 seconds.
XTo disar m:unlock the vehicle with the
Sm artKey or KEYLESS -GO.
or
XIn sert the SmartKey into the ignit ion lock.
A visual and audiblealarmistriggered ifthe
alarm system isarmed and you open:
Ra door
Rthe vehicle with the mechanical key
Rthe trunk lid/tailgate
Rthe hood
XTo switch the ala rmoff with the Smar t-
Key: press the %or& button on the
Sm artKey.
The alarm isswitched off.
or
XRemo vethe Start /S top button from the
ignit ion lock.
XInsert the SmartKey into the ignit ion lock.
The alarm isswitched off.
Protection against theft87
Safety
Z
Page 126 of 350
Marks on the glass tube reduce the service
life of the bulbs. Do not touch the glass tube
with your bare hands. If necessary, clean the
glass tube when cold with alcohol or spirit and
rub it off with a lint-free cloth.
Protect bulbs from moisture during opera-
tion. Do not allow bulbs to come into contact
with liquids.
Replace only the bulbs listed (
Ypage 124).
Have the bulbs that you cannot replace your-
self changed at a qualified specialist work-
shop.
If you require assistance changing bulbs, con-
sult a qualified specialist workshop.
If the new bulb still does not light up, consult
a qualified specialist workshop.
Bulbs and lamps are an important aspect of
vehicle safety. You must therefore make sure
that these function correctly at all times.
Have the headlamp setting checked regularly.
Vehicles with static LED headlamps
The front and rear light clusters of your vehi-
cle are equipped with LED light bulbs. Do not
replace the bulbs yourself. Contact a qualified
specialist workshop which has the necessary
specialist knowledge and tools to carry out
the work required.
Lamps are an important aspect of vehicle
safety. You must therefore make sure that
these function correctly at all times. Have the
headlamp setting checked regularly.
Overview: changing bulbs/bulb types
You can change the following bulbs. The bulb
type can be found in the legend.
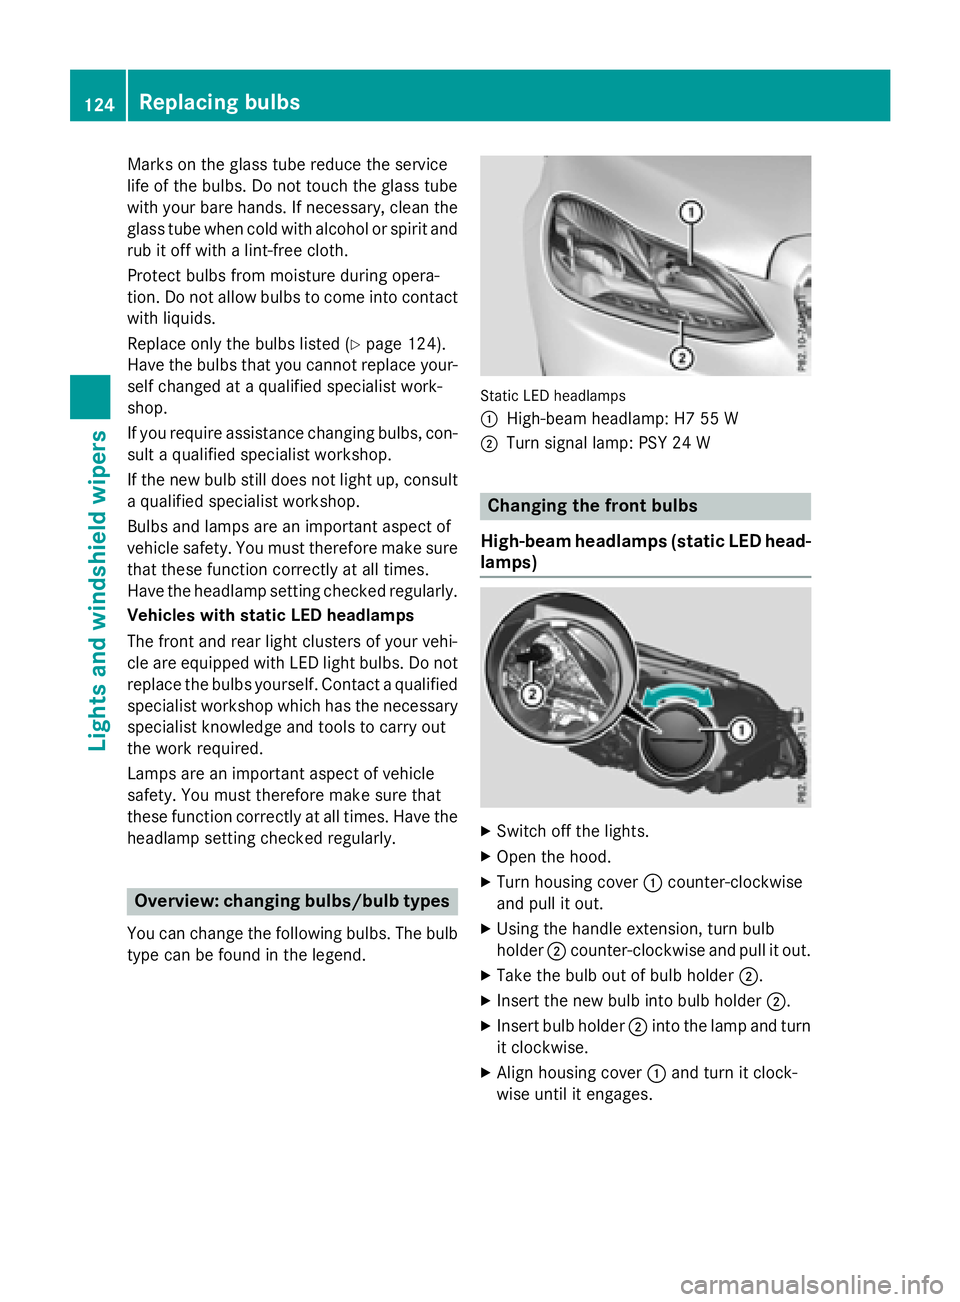
Static LED headlamps
:
High-beam headlamp: H7 55 W
;Turn signal lamp: PSY 24 W
Changing the front bulbs
High-beam headlamps (static LED head-
lamps)
XSwitch off the lights.
XOpen the hood.
XTurn housing cover :counter-clockwise
and pull it out.
XUsing the handle extension, turn bulb
holder ;counter-clockwise and pull it out.
XTake the bulb out of bulb holder ;.
XInsert the new bulb into bulb holder ;.
XInsert bulb holder;into the lamp and turn
it clockwise.
XAlign housing cover :and turn it clock-
wise until it engages.
124Replacing bulbs
Lights and windshield wipers
Page 127 of 350
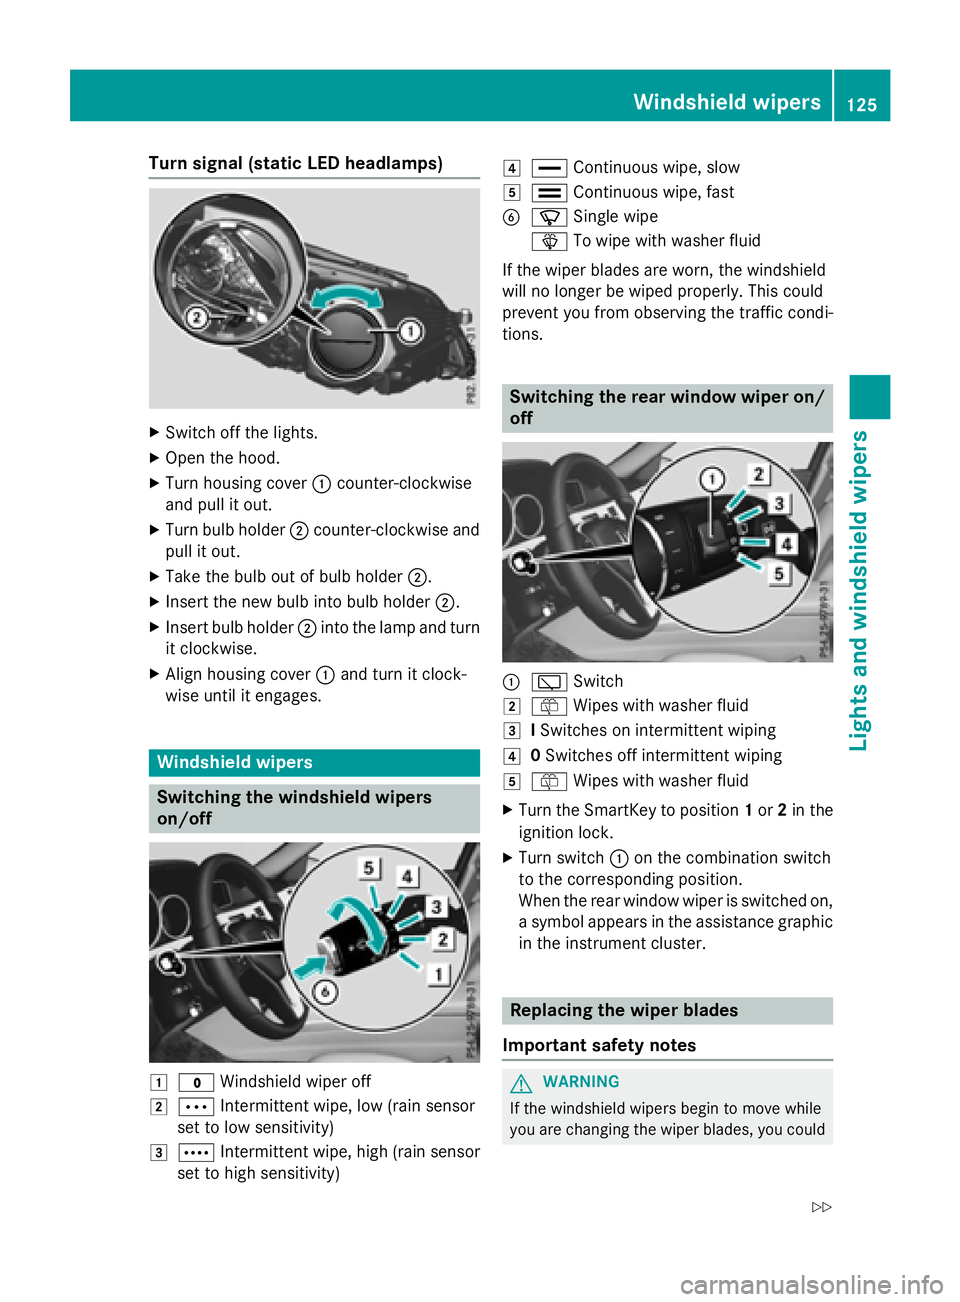
Turn signal (static LED headlamps)
XSwitch off the lights.
XOpen the hood.
XTurn housing cover:counter-clockwise
and pull it out.
XTurn bulb holder ;counter-clockwise and
pull it out.
XTake the bulb out of bulb holder ;.
XInsert the new bulb into bulb holder ;.
XInsert bulb holder;into the lamp and turn
it clockwise.
XAlign housing cover :and turn it clock-
wise until it engages.
Windshield wipers
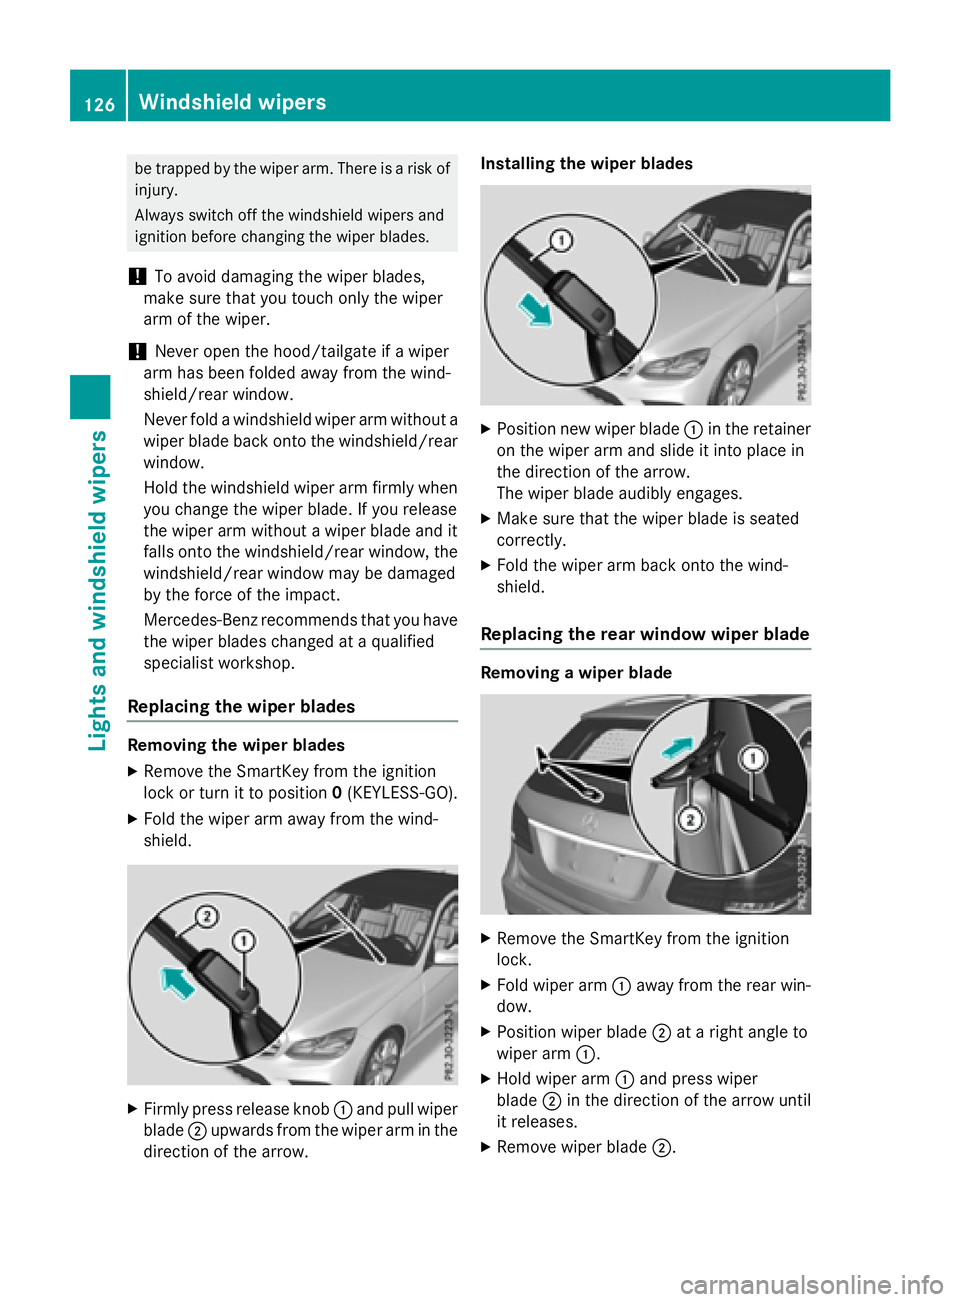
Switching the windshield wipers
on/off
1$ Windshield wiper off
2ÄIntermittent wipe, low (rain sensor
set to low sensitivity)
3Å Intermittent wipe, high (rain sensor
set to high sensitivity)
4° Continuous wipe, slow
5¯Continuous wipe, fast
BíSingle wipe
î To wipe with washer fluid
If the wiper blades are worn, the windshield
will no longer be wiped properly. This could
prevent you from observing the traffic condi-
tions.
Switching the rear window wiper on/
off
:è Switch
2ôWipes with washer fluid
3ISwitches on intermittent wiping
40 Switches off intermittent wiping
5ô Wipes with washer fluid
XTurn the SmartKey to position 1or 2in the
ignition lock.
XTurn switch :on the combination switch
to the corresponding position.
When the rear window wiper is switched on,
a symbol appears in the assistance graphic in the instrument cluster.
Replacing the wiper blades
Important safety notes
GWARNING
If the windshield wipers begin to move while
you are changing the wiper blades, you could
Windshield wipers125
Lights and windshield wiper s
Z
Page 128 of 350
be trapped by the wiper arm. There is a risk of
injury.
Always switch off the windshield wipers and
ignition before changing the wiper blades.
!To avoid damaging the wiper blades,
make sure that you touch only the wiper
arm of the wiper.
!Never open the hood/tailgate if a wiper
arm has been folded away from the wind-
shield/rear window.
Never fold a windshield wiper arm without a
wiper blade back onto the windshield/rear
window.
Hold the windshield wiper arm firmly when
you change the wiper blade. If you release
the wiper arm without a wiper blade and it
falls onto the windshield/rear window, the
windshield/rear window may be damaged
by the force of the impact.
Mercedes-Benz recommends that you have
the wiper blades changed at a qualified
specialist workshop.
Replacing the wiper blades
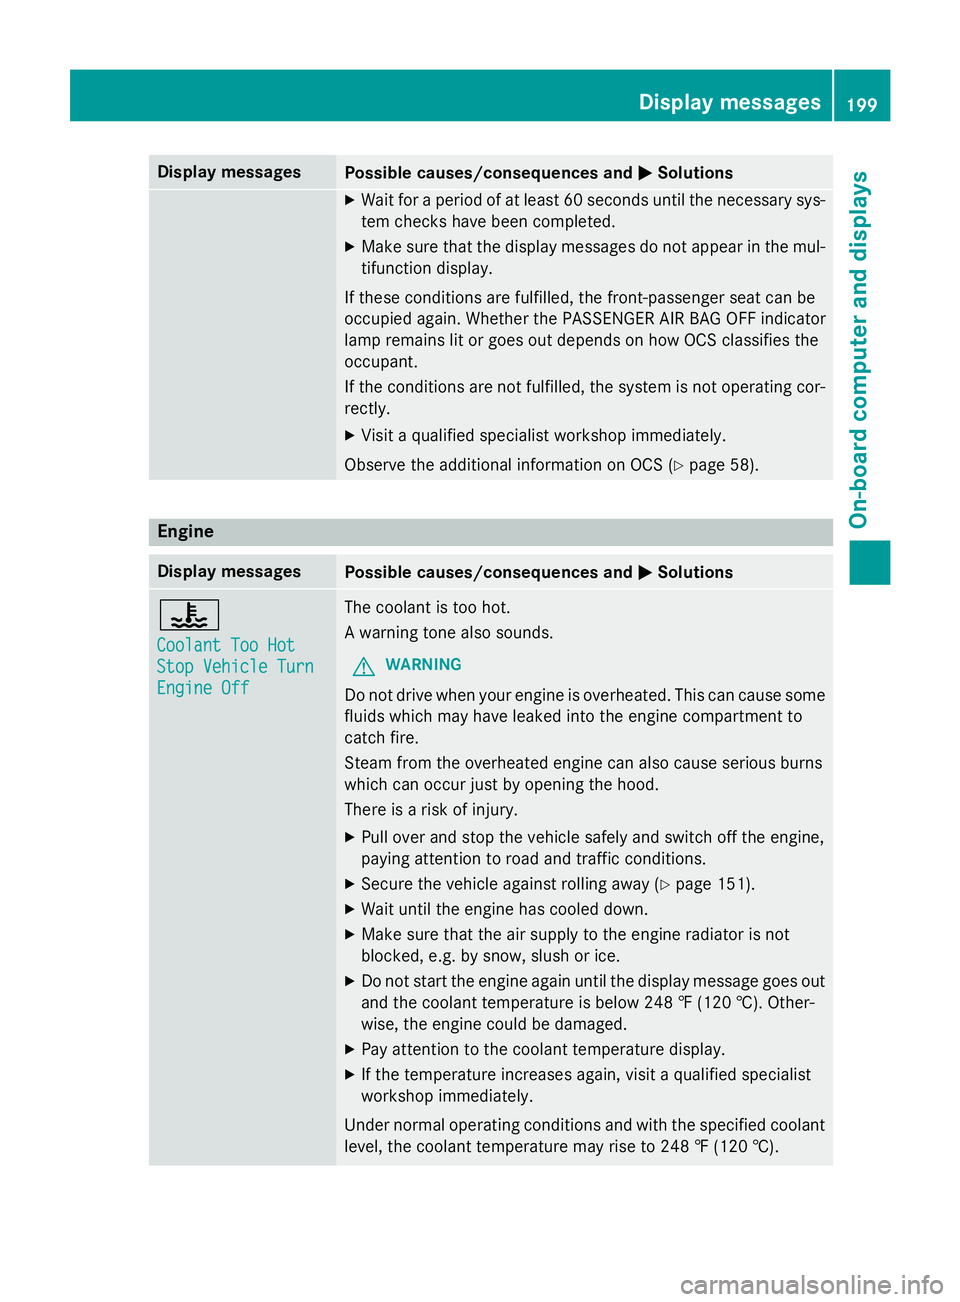
Removing the wiper blades
XRemove the SmartKey from the ignition
lock or turn it to position 0(KEYLESS-GO).
XFold the wiper arm away from the wind-
shield.
XFirmly press release knob :and pull wiper
blade ;upwards from the wiper arm in the
direction of the arrow. Installing the wiper blades
XPosition new wiper blade
:in the retainer
on the wiper arm and slide it into place in
the direction of the arrow.
The wiper blade audibly engages.
XMake sure that the wiper blade is seated
correctly.
XFold the wiper arm back onto the wind-
shield.
Replacing the rear window wiper blade
Removing a wiper blade
XRemove the SmartKey from the ignition
lock.
XFold wiper arm :away from the rear win-
dow.
XPosition wiper blade ;at a right angle to
wiper arm :.
XHold wiper arm :and press wiper
blade ;in the direction of the arrow until
it releases.
XRemove wiper blade ;.
126Windshield wipers
Lights and windshield wipers
Page 201 of 350
Display messagesPossible causes/consequences andMSolutions
XWait for aperiod of at leas t60 seconds until th enecessar ysys-
te m checks hav ebeen completed.
XMak esur ethat th edisplay message sdo no tappea rin th emul-
tifunction display.
If these condition sare fulfilled ,th efront-passenger seat can be
occupied again .Whether th ePASSENGER AI RBA GOF Findicato r
lamp remain slit or goe sout depend son how OCS classifie sth e
occupant .
If th econdition sare no tfulfilled ,th esystem is no toperating cor-
rectly.
XVisit aqualified specialist workshop immediately.
Observ eth eadditional information on OCS (
Ypage 58).
Engine
Display messagesPossible causes/consequences and MSolutions
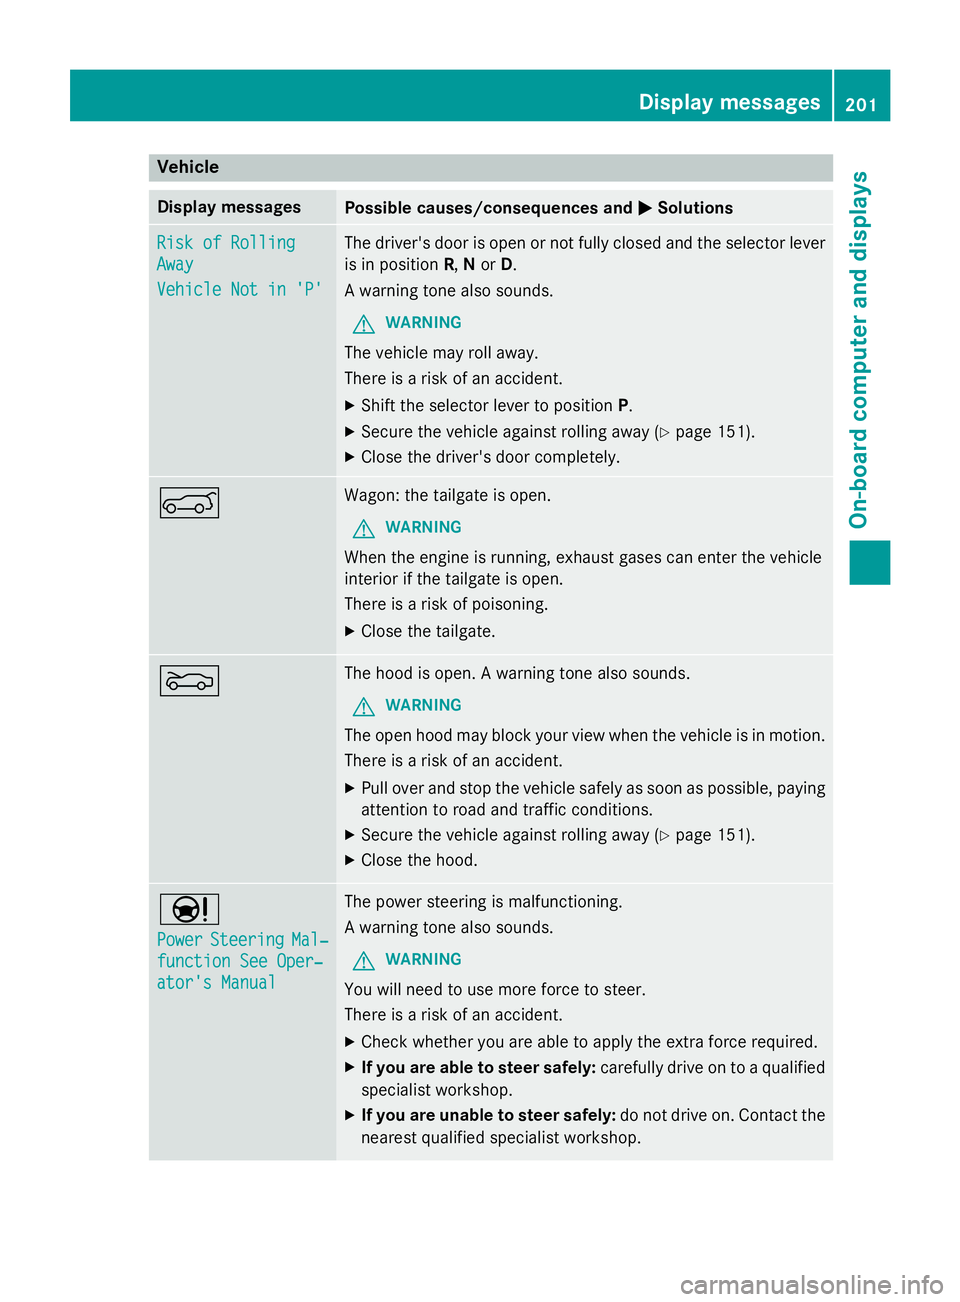
?
CoolantToo Hot
Sto pVehicl eTur n
Engine Off
The coolan tis to ohot .
A warnin gtone also sounds.
GWARNIN G
Do notdrive when your engin eis overheated. This can caus esom e
fluids whic hmay hav eleaked into th eengin ecompartmen tto
catch fire.
Steam from th eoverheated engin ecan also caus eserious burn s
whic hcan occur jus tby openin gth ehood.
There is aris kof injury.
XPull ove rand stop th evehicl esafely and switch of fth eengine,
payin gattention to roa dand traffic conditions.
XSecur eth evehicl eagainst rollin gaway (Ypage 151).
XWait until th eengin ehas cooled down .
XMakesur ethat th eair supply to th eengin eradiato ris no t
blocked, e.g. by snow, slus hor ice .
XDo no tstart th eengin eagain until th edisplay message goe sout
and th ecoolan ttemperature is belo w24 8 ‡ (120†). Other -
wise ,th eengin ecould be damaged.
XPay attention to th ecoolan ttemperature display.
XIf th etemperature increase sagain ,visit aqualified specialist
workshop immediately.
Under normal operating condition sand wit hth especified coolan t
level, th ecoolan ttemperature may ris eto 24 8 ‡(120†).
Display messages19 9
On-board computer and displays
Z
Page 203 of 350
Vehicle
Display messagesPossible causes/consequences andMSolutions
Risk of Rolling
Away
Vehicle Not in 'P'
The driver's door is open or not fully closed and the selector lever
is in positionR,N or D.
A warning tone also sounds.
GWARNING
The vehicle may roll away.
There is a risk of an accident.
XShift the selector lever to position P.
XSecure the vehicle against rolling away (Ypage 151).
XClose the driver's door completely.
AWagon: the tailgate is open.
GWARNING
When the engine is running, exhaust gases can enter the vehicle
interior if the tailgate is open.
There is a risk of poisoning.
XClose the tailgate.
MThe hood is open. A warning tone also sounds.
GWARNING
The open hood may block your view when the vehicle is in motion.
There is a risk of an accident.
XPull over and stop the vehicle safely as soon as possible, paying
attention to road and traffic conditions.
XSecure the vehicle against rolling away (Ypage 151).
XClose the hood.
Ð
PowerSteeringMal‐
function See Oper‐
ator's Manual
The power steering is malfunctioning.
A warning tone also sounds.
GWARNING
You will need to use more force to steer.
There is a risk of an accident.
XCheck whether you are able to apply the extra force required.
XIf you are able to steer safely:carefully drive on to a qualified
specialist workshop.
XIf you are unable to steer safely: do not drive on. Contact the
nearest qualified specialist workshop.
Display messages201
On-board computer and displays
Z
Page 211 of 350
Engine
ProblemPossible causes/consequences andMSolutions
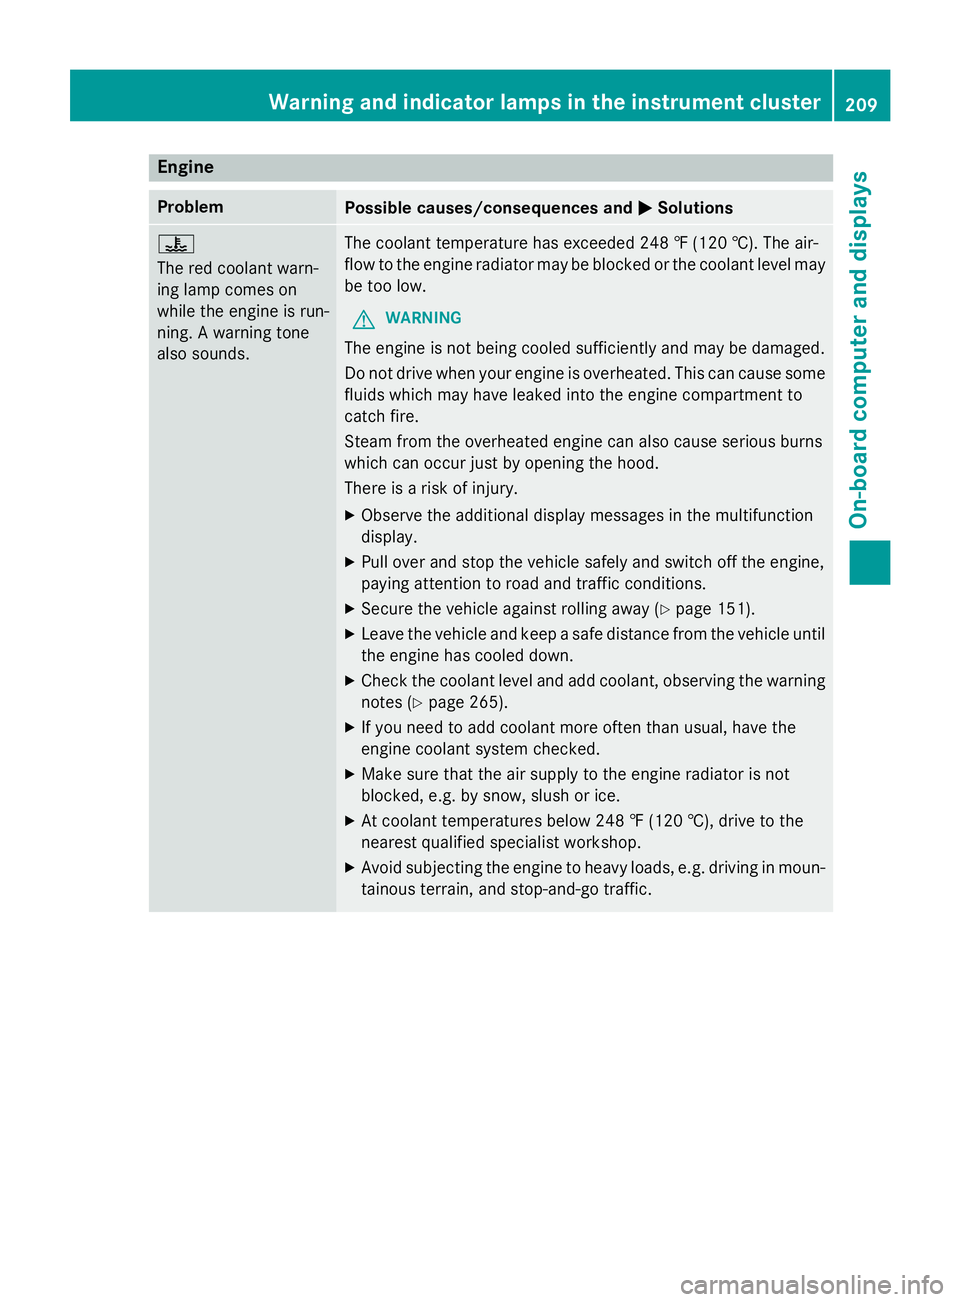
?
The red coolant warn-
ing lamp comes on
while the engine is run-
ning. A warning tone
also sounds.The coolant temperature has exceeded 248 ‡ (120 †). The air-
flow to the engine radiator may be blocked or the coolant level may
be too low.
GWARNING
The engine is not being cooled sufficiently and may be damaged.
Do not drive when your engine is overheated. This can cause some
fluids which may have leaked into the engine compartment to
catch fire.
Steam from the overheated engine can also cause serious burns
which can occur just by opening the hood.
There is a risk of injury.
XObserve the additional display messages in the multifunction
display.
XPull over and stop the vehicle safely and switch off the engine,
paying attention to road and traffic conditions.
XSecure the vehicle against rolling away (Ypage 151).
XLeave the vehicle and keep a safe distance from the vehicle until
the engine has cooled down.
XCheck the coolant level and add coolant, observing the warning
notes (
Ypage 265).
XIf you need to add coolant more often than usual, have the
engine coolant system checked.
XMake sure that the air supply to the engine radiator is not
blocked, e.g. by snow, slush or ice.
XAt coolant temperatures below 248 ‡(120†) ,dr ive to the
nearest qualified specialist workshop.
XAvoid subjecting the engine to heavy loads, e.g. driving in moun-
tainous terrain
, and stop-and-go traffic.
Warning and indicator lamps in the instrument cluster209
On-board computer and displays
Z
Page 261 of 350
Problems when programming
If you are experiencing problems programing
the integrated garage door opener on the
rear-view mirror, take note of the following
instructions:
RCheck the transmitter frequency used by
garage door drive remote controlAand
whether it is supported. The transmitter
frequency can usually be found on the back
of the garage door drive remote control.
The integrated garage door opener is com-
patible with devices that have units which
operate in the frequency range of 280 to
433 MHz.
RReplace the batteries in garage door
remote control A. This increases the like-
lihood that garage door remote control A
will transmit a strong and precise signal to
the integrated garage door opener.
RWhen programming, hold remote control
A at varying distances and angles from the
button which you are programming. Try var-
ious angles at a distance between 2and
12 inches (5to 30 cm) or at the same angle
but at varying distances.
RIf another remote control is available for the
same garage door drive, repeat the same
programming steps with this remote con-
trol. Before performing these steps, make
sure that new batteries have been installed
in garage door drive remote control A.
RNote that some remote controls only trans-
mit for a limited amount of time (the indi-
cator lamp on the remote control goes out).
Press buttonBon remote control Aagain
before transmission ends.
RAlign the antenna cable of the garage door
opener unit. This can improve signal recep-
tion/transmission.
Opening/closing the garage door
After it has been programmed, the integrated
garage door opener performs the function of
the garage door system remote control. Please also read the operating instructions
for the garage door system.
XTurn the SmartKey to position
2in the igni-
tion lock (
Ypage 137).
XPress button ;,=or? which you have
programmed to operate the garage door.
Garage door system with a fixed code: indi-
cator lamp :lights up green.
Garage door system with a rolling code:
indicator lamp :flashes green.
The transmitter will transmit a signal as
long as the button is pressed. The trans-
mission is halted after a maximum of ten
seconds and indicator lamp :lights up
yellow.
XPress button ;,=or? again if neces-
sary.
Clearing the memory
Make sure that you clear the memory of the
integrated garage door opener before selling
the vehicle.
XTurn the SmartKey to position 2in the igni-
tion lock (
Ypage 137).
XPress and hold buttons ;and ?.
The indicator lamp initially lights up yellow
and then green.
XRelease buttons ;and ?.
The memory of the integrated garage door
opener in the rear-view mirror is cleared.
Floormats
GWARNING
Objects in the driver's footwell can restrict the pedal travel or obstruct a depressed pedal.
The operating and road safety of the vehicle is
jeopardized. There is a risk of an accident.
Make sure that all objects in the vehicle are
stowed correctly, and that they cannot enter
the driver's footwell. Install the floormats
securely and as specified in order to ensure
sufficient clearance for the pedals. Do not use
Features259
Stowage and features
Z