engine MERCEDES-BENZ E320 2000 W210 Owner's Guide
[x] Cancel search | Manufacturer: MERCEDES-BENZ, Model Year: 2000, Model line: E320, Model: MERCEDES-BENZ E320 2000 W210Pages: 341, PDF Size: 15.07 MB
Page 118 of 341
115 Flexible service system
Te ch n ica l
data Instruments
and controlsOperationDrivingInstrument
cluster displayPractical hints Car care Index The service indicator disappears automatically after
30 seconds or if buttonJon the instrument cluster is
pressed.
Calling up service indicator manually:
Turn the electronic key in steering lock to position 1.
Call up the trip odometer and main odometer by
pressing button è or ÿ on the multifunction
steering wheel until the display appears. See page 96.
Press button j or k until the FSS indicator
appears.
Pressing the è or ÿ button displays the next or
previous system.
Important!
The FSS indicator is not an engine oil level indicator.
See page 117 for engine oil level indicator.Note:
When disconnecting vehicle battery for one or more
days at a time, such days will not be counted. Any such
days not counted by the FSS can be added by your
Mercedes-Benz Center.
The interval between services is determined by the type
of driving for which the vehicle is used. For example,
driving at extreme speeds, and cold starts combined
with short distance driving in which the engine does not
reach operating normal temperature, reduce the interval
between services.
Page 120 of 341
117 Engine oil level indicator
Te ch n ica l
data Instruments
and controlsOperationDrivingInstrument
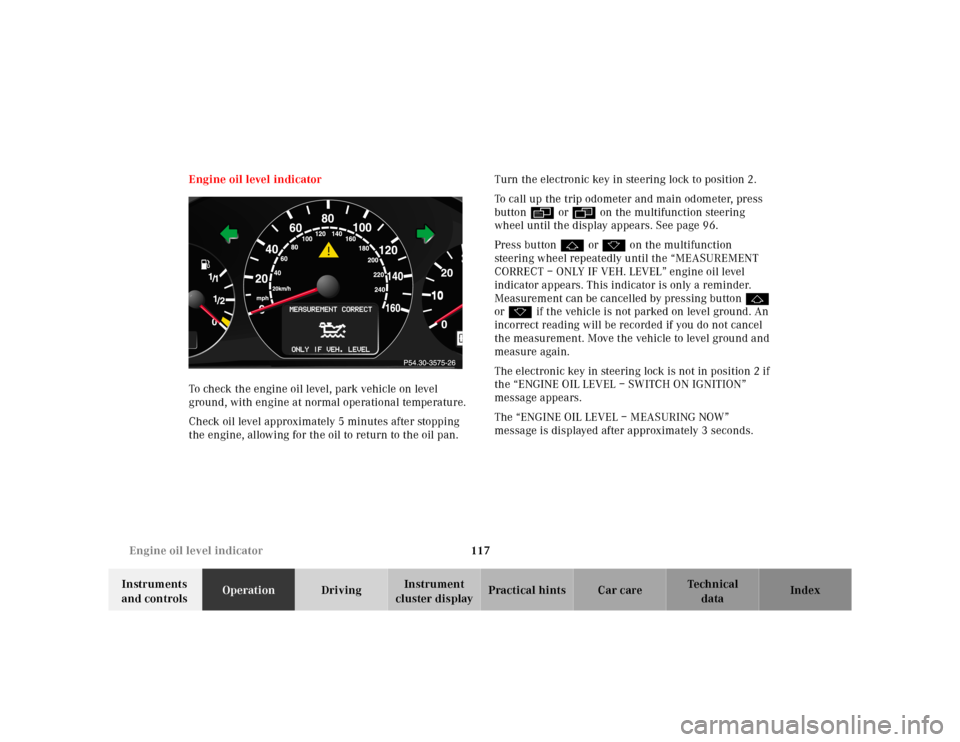
cluster displayPractical hints Car care Index Engine oil level indicator
To check the engine oil level, park vehicle on level
ground, with engine at normal operational temperature.
Check oil level approximately 5 minutes after stopping
the engine, allowing for the oil to return to the oil pan.Turn the electronic key in steering lock to position 2.
To call up the trip odometer and main odometer, press
button è or ÿ on the multifunction steering
wheel until the display appears. See page 96.
Press button j or k on the multifunction
steering wheel repeatedly until the “MEASUREMENT
CORRECT – ONLY IF VEH. LEVEL” engine oil level
indicator appears. This indicator is only a reminder.
Measurement can be cancelled by pressing button j
or k if the vehicle is not parked on level ground. An
incorrect reading will be recorded if you do not cancel
the measurement. Move the vehicle to level ground and
measure again.
The electronic key in steering lock is not in position 2 if
the “ENGINE OIL LEVEL – SWITCH ON IGNITION”
message appears.
The “ENGINE OIL LEVEL – MEASURING NOW”
message is displayed after approximately 3 seconds.
Page 121 of 341
118 Engine oil level indicator
Te ch n ica l
data Instruments
and controlsOperationDrivingInstrument
cluster displayPractical hints Car care Index
One of the following messages will subsequently appear
on the indicator:
“ENGINE OIL LEVEL – O.K.”
No oil needs to be added.
“ENGINE OIL LEVEL – ADD 1.0 QUART”
(Canada: 1.0 L)
“ENGINE OIL LEVEL – ADD 1.5 QUART”
(Canada: 1.5 L)
“ENGINE OIL LEVEL – ADD 2.0 QUART”
(Canada: 2.0 L)
See page 260 for instructions on adding engine oil.
“ENGINE OIL LEVEL – REDUCE OIL LEVEL”
Do not overfill the engine.
Excessive oil must be siphoned or drained off. It could
cause damage to the engine and catalytic converter not
covered by the Mercedes-Benz Limited Warranty.
The message “PERF. SERV. ON TIME” (perform service
[engine oil level check] on time) will be displayed if a
proper oil level check cannot be performed. The engine
oil level check can be repeated after a short time.Perform the engine oil level check with the dipstick, if it
cannot be completed via the multifunction display.
See page 260.
In this case we recommend that you have the system
checked at a Mercedes-Benz Center.
Note:
See “Malfunction and warning messages” on page 239
and page 250 if an engine oil level indicator appears on
the multifunction display when the engine is running.
The engine oil level cannot be checked while the engine
is running. The “ENGINE OIL LEVEL – NOT WHEN
ENGINE ON” message will appear.
Engine oil consumption
Engine oil consumption checks should only be made
after the break-in period. During the break-in period,
higher oil consumption may be noticed and is normal.
Frequent driving at high engine speeds results in
increased consumption.
Page 122 of 341
119 Exterior lamp switch
Te ch n ica l
data Instruments
and controlsOperationDrivingInstrument
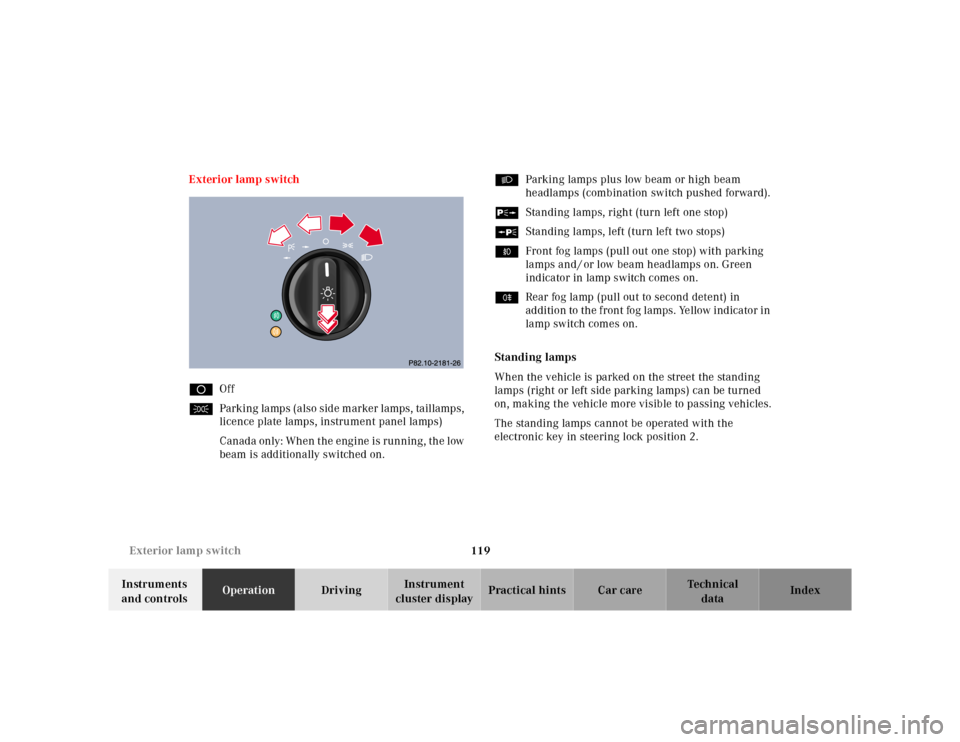
cluster displayPractical hints Car care Index Exterior lamp switch
DOff
CParking lamps (also side marker lamps, taillamps,
licence plate lamps, instrument panel lamps)
Canada only: When the engine is running, the low
beam is additionally switched on.BParking lamps plus low beam or high beam
headlamps (combination switch pushed forward).
ˆStanding lamps, right (turn left one stop)
‚Standing lamps, left (turn left two stops)
‡Front fog lamps (pull out one stop) with parking
lamps and / or low beam headlamps on. Green
indicator in lamp switch comes on.
†Rear fog lamp (pull out to second detent) in
addition to the front fog lamps. Yellow indicator in
lamp switch comes on.
Standing lamps
When the vehicle is parked on the street the standing
lamps (right or left side parking lamps) can be turned
on, making the vehicle more visible to passing vehicles.
The standing lamps cannot be operated with the
electronic key in steering lock position 2.
Page 123 of 341
120 Exterior lamp switch
Te ch n ica l
data Instruments
and controlsOperationDrivingInstrument
cluster displayPractical hints Car care Index
Note:
With the electronic key removed and the driver’s door
open, a warning sounds and the message “SWITCH OFF
LIGHTS!” in the multifunction indicator appears if the
vehicle’s exterior lamps (except standing lamps) are not
switched off.
Fog lamps will operate with the parking lamps and / or
the low beam headlamps on. Fog lamps should only be
used in conjunction with low beam headlamps. Consult
your State or Province Motor Vehicle Regulations
regarding allowable lamp operation.
Fog lamps are automatically switched off when the
exterior lamp switch is turned to position D.Daytime running lamps
(Canada only)
When the engine is running and the selector lever is in
a driving position, the low beam headlamps (includes
parking lamps, side marker lamps, taillamps and
license plate lamps) are automatically switched on.
When shifting from a driving position to position “N”
or “P”, the low beam switches off (2 seconds delay).
For nighttime driving the exterior lamp switch should
be turned to position B to permit activation of the
high beam headlamps.
Night security illumination
When exiting the vehicle after driving with the exterior
lamps on, they switch on again for added illumination
for approximately 30 seconds after closing the last door.
The lamp-on time period can be changed at your
Mercedes-Benz Center.
Page 130 of 341
127 Automatic climate control
Te ch n ica l
data Instruments
and controlsOperationDrivingInstrument
cluster displayPractical hints Car care Index 1Air volume control for center air outlets, turn wheel
up to open.
2Air volume control for side air outlet and side
window defroster outlet.
To open side air outlets:
Turn wheel to position i.
To open defroster outlets:
Turn wheel to position l.
3Center air outlets, adjustable
4Side air outlet, adjustable
5Side defroster outlet
6Display and controlsThe system is always at operational readiness, except
when manually switched off.
The automatic climate control only operates with the
engine running.
The temperature selector should be left at the desired
temperature setting. The temperature selected is
reached as quickly as possible.
The system will not heat or cool any quicker by setting a
higher or lower temperature.
The automatic climate control removes considerable
moisture from the air during operation in the cooling
mode. It is normal for water to drip on the ground
through ducts in the underbody.
The desired interior temperature can be selected
separately for the left and right side of the passenger
compartment.
Page 131 of 341
128 Automatic climate control
Te ch n ica l
data Instruments
and controlsOperationDrivingInstrument
cluster displayPractical hints Car care Index
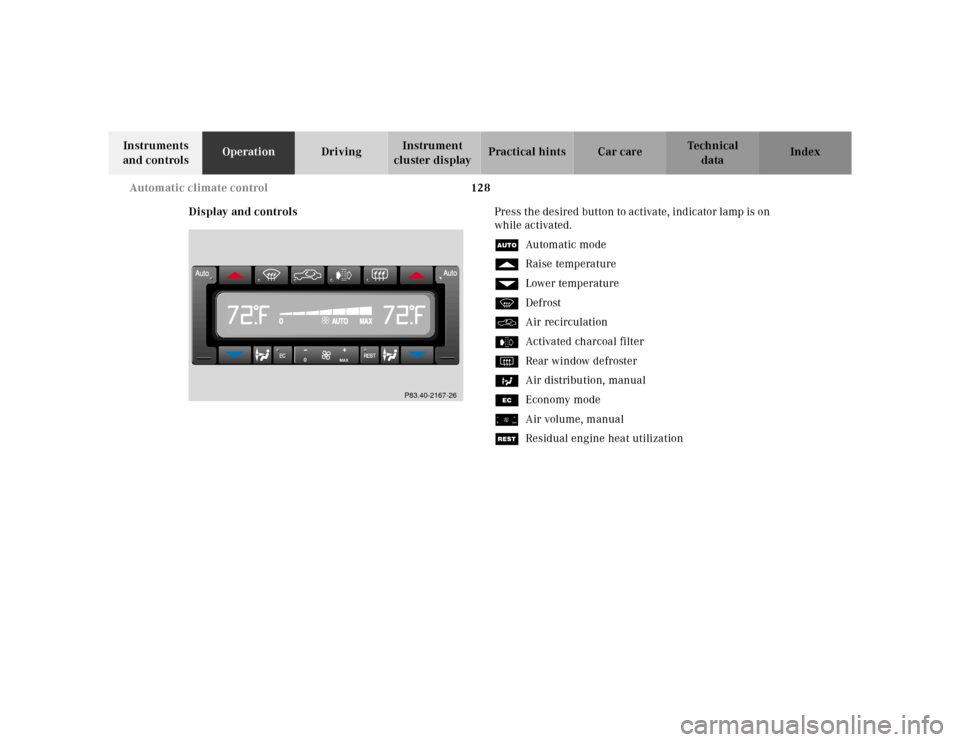
Display and controlsPress the desired button to activate, indicator lamp is on
while activated.
UAu tom atic mo de
fRaise temperature
gLower temperature
PDefrost
OAir recirculation
eActivated charcoal filter
FRear window defroster
bAir distribution, manual
SEconomy mode
ïAir volume, manual
TResidual engine heat utilization
0
MAX
P83.40-2167-26
Page 135 of 341
132 Automatic climate control
Te ch n ica l
data Instruments
and controlsOperationDrivingInstrument
cluster displayPractical hints Car care Index
Activated charcoal filter
An activated charcoal filter markedly reduces bad odors
and removes pollutants from the air entering the
passenger compartment.
To select, press e button.
To cancel, press e button again.
The blower speed is slightly increased to supply a
constant volume of air.
The system switches automatically to the air
recirculation mode, if the carbon monoxide (CO) or
nitric oxide (NO
X) of the outside air increases beyond a
predetermined level.
When pressing button P or S, the filter is also
switched off.
Notes:
The automatic air recirculation does not function when
selecting the Economy mode S, or the outside
temperature is below 45°F (7°C).
The activated charcoal filter should be switched off
when windows fog up on the inside, or if the passenger
compartment needs to be quickly heated or cooled
down.Residual engine heat utilization
With the engine switched off, it is possible to continue
heating the interior for a short while.
Air volume and distribution are controlled
automatically.
To select:
Turn electronic key in steering lock to position 1 or 0 or
remove electronic key. Close air outlet in rear passenger
compartment.
Press T button.
This function selection will not activate if the battery
charge level is insufficient.
To c a n c e l :
Press T button.
The system will automatically shut off
•If you turn electronic key in steering lock to
position 2,
•after approximately 30 minutes,
•if the battery voltage drops.
Page 169 of 341
166 Interior equipment
Te ch n ica l
data Instruments
and controlsOperationDrivingInstrument
cluster displayPractical hints Car care Index
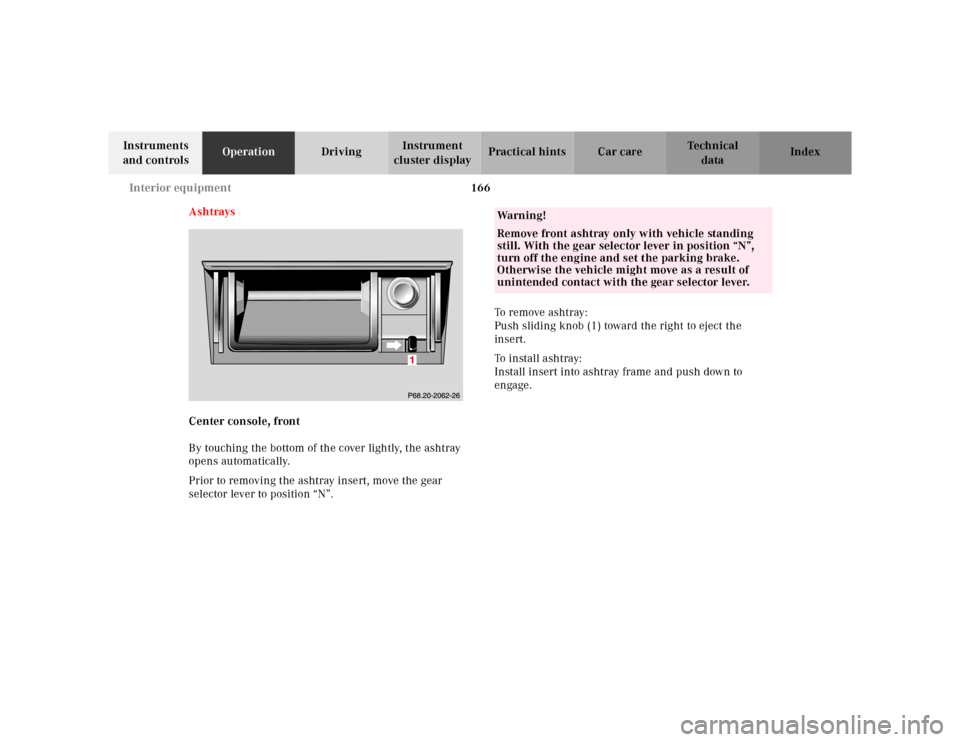
Ashtrays
Center console, front
By touching the bottom of the cover lightly, the ashtray
opens automatically.
Prior to removing the ashtray insert, move the gear
selector lever to position “N”.To remove ashtray:
Push sliding knob (1) toward the right to eject the
insert.
To i n st a l l a s h t r ay :
Install insert into ashtray frame and push down to
engage.
Wa r n i n g !
Remove front ashtray only with vehicle standing
still. With the gear selector lever in position “N”,
turn off the engine and set the parking brake.
Otherwise the vehicle might move as a result of
unintended contact with the gear selector lever.
Page 178 of 341
175 Contents - Driving
Te ch n ica l
data Instruments
and controlsOperationDrivingInstrument
cluster displayPractical hints Car care Index
DrivingControl and operation
of radio transmitters ................ 176
The first 1 000 miles
(1 500 km) ................................. 177
Maintenance ................................... 177
Tele Aid ........................................... 178
Catalytic converter ........................ 188
Emission control ............................ 189
Steering lock ................................... 190
Starting and turning off
the engine .................................. 192
Automatic transmission ............... 193
Parking brake .................................202Driving instructions ...................... 203
Drive sensibly - Save Fuel ........ 203
Drinking and driving ................ 203
Pedals .......................................... 203
Power assistance ........................ 204
Brakes .......................................... 204
Driving off ................................... 205
Parking ........................................ 205
Tires ............................................. 206
Snow chains ............................... 208
Winter driving
instructions ................................ 209
Block heater .................................210
Deep water ................................... 211
Passenger compartment ............ 211
Traveling abroad ......................... 211Cruise control ................................. 212
Brake assist system
(BAS) ........................................... 215
Antilock brake system
(ABS) ........................................... 217
Four Wheel Electronic Traction
System (4MATIC) ...................... 219
Electronic stability program
(ESP) ...........................................220
Parking assist
(Parktronic) ..............................224
What you should know
at the gas station .......................229
Check regularly and
before a long trip ...................... 231