Phone and radio MERCEDES-BENZ E320 2000 W210 Owner's Manual
[x] Cancel search | Manufacturer: MERCEDES-BENZ, Model Year: 2000, Model line: E320, Model: MERCEDES-BENZ E320 2000 W210Pages: 341, PDF Size: 15.07 MB
Page 5 of 341

2 Contents
Audio systems .................................. 97
Radio .............................................. 97
CD player ....................................... 98
Cassette player ............................. 99
Telephone ........................................ 100
Telephone book .......................... 100
Redialing ..................................... 102
Incoming call .............................. 104
Navigation system .......................... 105
Trip computer ................................. 106
Malfunction message
memory ...................................... 108
Individual settings ..........................110
Setting the audio volume ...............113
Flexible service system
(FSS) .............................................114
Engine oil level indicator ...............117
Engine oil consumption .................118
Exterior lamp switch ......................119
Night security illumination ......... 120
Headlamp cleaning system .......... 121
Combination switch ...................... 122
Hazard warning flasher
switch .......................................... 125Automatic climate control ............ 126
Display and controls ................. 128
Basic setting ............................... 129
Special settings .......................... 129
Defogging windows ................... 129
Defrosting ................................... 129
Rear window defroster ...............130
Air distribution ...........................130
Air volume ...................................130
Air recirculation ......................... 131
Dust filter .....................................131
Activated charcoal filter ............132
Residual engine
heat utilization ............................132
Front center console
compartment ventilation ...........133
Rear passenger compartment
adjustable air outlet ...................134
Audio and telephone,
operation .....................................135
Power windows ...............................154
Sliding / pop-up roof ......................156
Interior lighting ..............................159Entrance lamps, exit lamps
in doors ....................................... 159
Rear window sunshade ................. 160
Sun visors ....................................... 161
Illuminated vanity mirrors ........... 161
Interior ............................................ 162
Armrest, rear bench ...................... 162
Cup holder in
rear bench armrest ................... 162
Glove box ......................................... 163
Cup holder and coin holder
in glove box lid ........................... 163
Storage compartment above
ashtray in center console ........ 164
Storage compartments
in center console ....................... 164
Cup holder in center console ....... 165
Ashtrays .......................................... 166
Lighter ............................................. 168
Cargo tie-down hooks .................... 169
Parcel net in
front passenger footwell .......... 169
Cellular telephone ......................... 170
Page 25 of 341
22 Contents - Operation
Te ch n ica l
data Instruments
and controlsOperationDrivingInstrument
cluster displayPractical hints Car care Index
OperationVehicle keys ...................................... 24
Start lock-out .................................... 27
General notes on the
central locking system ............... 28
Central locking system ................... 29
Radio frequency and
infrared remote control ............... 29
Opening the trunk ....................... 32
Opening and closing
windows and sliding/pop-up
roof from outside .......................... 33
Panic button .................................. 34
Mechanical keys ........................... 34
Doors .................................................. 35
Central locking switch .................... 37
Automatic central locking .............. 38
Emergency unlocking
in case of accident ...................... 38
Trunk ................................................. 39
Trunk lid release switch ................. 41
Trunk lid emergency release ......... 42
Antitheft alarm system ................... 43Tow-away alarm ............................... 45
Power seats front ............................. 46
Front seat head restraints .............. 52
Rear seat head restraints ............... 53
Multicontour seat ............................ 54
Seat heater ........................................ 55
Seat ventilation ................................ 58
Seat belts and integrated
restraint system .......................... 60
Seat belts .......................................... 60
Seat belt nonusage
warning system ........................... 61
BabySmart
TM airbag
deactivation system ................... 67
Self-test BabySmart
TM
without special child
seat installed ................................ 67
Supplemental restraint
system (SRS) ............................... 68
Emergency tensioning
retractor (ETR) ............................ 69
Airbags .............................................. 70Safety guidelines for the
seat belt, emergency
tensioning retractor
and airbag .................................... 76
Infant and child
restraint systems ......................... 78
Steering wheel adjustment ............ 81
Rear view mirrors ............................ 82
Instrument cluster ........................... 86
Multifunction steering wheel,
multifunction display ................. 92
Trip and main odometer,
FSS and engine oil
level display ................................. 96
Audio systems .................................. 97
Radio .............................................. 97
CD player ....................................... 98
Cassette player ............................. 99
Telephone ........................................ 100
Telephone book .......................... 100
Redialing ..................................... 102
Incoming call .............................. 104
Navigation system .......................... 105
Trip computer ................................. 106
Page 96 of 341
93 Multifunction steering wheel, multifunction display
Te ch n ica l
data Instruments
and controlsOperationDrivingInstrument
cluster displayPractical hints Car care Index Depending on your vehicle’s equipment, you may use
the buttons on the multifunction steering wheel to call
up, control and set the following systems in the
multifunction display:
1Trip odometer and main odometer, see page 96
Vehicle speed, see page 96
Flexible service system (FSS), see page 114
Engine oil level indicator, see page 117
2Audio systems, see page 97
Radio, see page 97
CD player (optional), see page 98
Cassette player, see page 99
3Navigation system (if so equipped), see page 105
4Malfunction message memory, see page 108
5Individual settings, see page 110
6Trip computer, see page 106
After start
After reset
Fuel tank content
7Telephone (if so equipped), see page 100Press the è or ÿ button repeatedly until the
required system is displayed.
Pressing the è button advances the display to the
next system.
Pressing the Ăż button returns the display to the
previous system.
You may call up additional displays within some of these
categories by pressing the j or k button.
Wa r n i n g !
A driver’s attention to the road must always be his /
her primary focus when driving. For your safety and the safety of others, selecting
features through the multifunction steering wheel
should only be done by the driver when traffic and
road conditions permit it to be done safely.
Programming individual settings in the system can
only be made while the vehicle is at standstill.
Page 138 of 341
135 Audio system
Te ch n ica l
data Instruments
and controlsOperationDrivingInstrument
cluster displayPractical hints Car care Index Operation – audio and telephone
These instructions are intended to help you become
acquainted with your Mercedes- Benz car radio. They
contain useful tips and a detailed description of the user
functions.
The right to correct errors and make technical amendments is
reserved.
Operating safety1 Optional equipment
Dolby and the double-D symbol
Ă™
are trademarks of Dolby
laboratories Licensing Corporation. The Dolby noise reduction
system is manufactured under licence from Dolby Laboratories
Licensing Corporation.
Wa r n i n g !
In order to avoid distraction which could lead to an
accident, system settings should be entered with
the vehicle at standstill and systems should be
operated by the driver only when traffic conditions
permit. Always pay full attention to traffic
conditions first before operating system controls
while driving. Bear in mind that at a speed of just 30 mph
(approximately 50 km / h), your vehicle is covering
a distance of approximately 50 feet (approximately
14 m ) e v e r y s e c o n d .
Wa r n i n g !
Any alternations made to electronic components
can cause malfunctionsThe radio, cassette deck, CD changer
1 and
telephone
1 are interconnected. Therefore, when
one of the components is defective or has not been
removed / replaced properly this may impair the
function of other components.
These malfunctions might seriously impair the
operating safety of your vehicle.We recommend that you have any service work or
alternations on electronic components done in an
authorized Mercedes-Benz Center.
Page 139 of 341
136 Audio system
Te ch n ica l
data Instruments
and controlsOperationDrivingInstrument
cluster displayPractical hints Car care Index
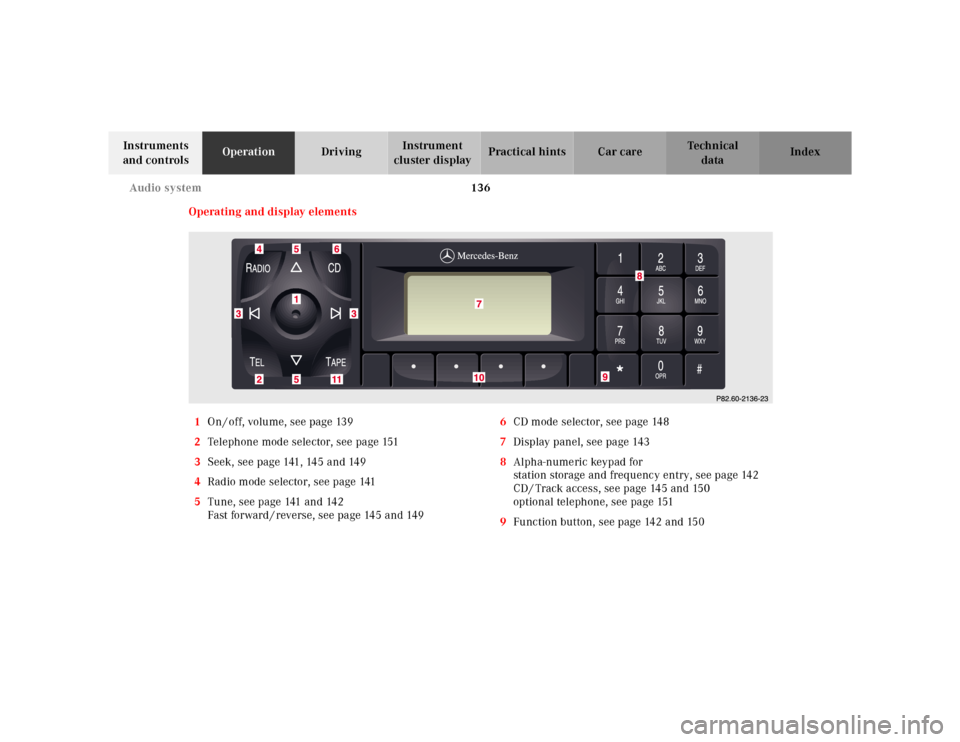
Operating and display elements
1On / off, volume, see page 139
2Telephone mode selector, see page 151
3Seek, see page 141, 145 and 149
4Radio mode selector, see page 141
5Tune, see page 141 and 142
Fast forward / reverse, see page 145 and 1496CD mode selector, see page 148
7Display panel, see page 143
8Alpha-numeric keypad for
station storage and frequency entry, see page 142
CD / Track access, see page 145 and 150
optional telephone, see page 151
9Function button, see page 142 and 150
Page 146 of 341
143 Audio system
Te ch n ica l
data Instruments
and controlsOperationDrivingInstrument
cluster displayPractical hints Car care Index Cassette mode
Note:
Vehicles equipped with the COMAND system do not
come with a factory installed cassette mechanism.
A standard 1/8” stereo phono plug for auxiliary audio
input (located in glove box) is provided for connection of
a portable battery operated cassette player or any other
portable device which uses a headphone output. Please
refer to the COMAND operating manual for information
concerning the activation of the audio input.Playing cassettes
Press the “TAPE” button. When the eject (EJ) key is
pressed, the display folds down and the cassette slot
becomes visible. Push the cassette into the slot until it
engages. The cassette will be pulled in automatically.
Notes:
Do not press directly on the radio display face.
Return the display panel to its normal position by
folding it back up and pressing gently on the display
frame to lock in place.
When playing mono recorded tapes (e.g. books) through
a stereo system the sound from one track might bleed to
the other track, despite setting the balance to the full
left or full right speakers.
Page 154 of 341
151 Audio system
Te ch n ica l
data Instruments
and controlsOperationDrivingInstrument
cluster displayPractical hints Car care Index Telephone operation
Various functions of the Mercedes-Benz integrated
cellular telephone
1 can be performed and displayed via
the car radio. Further instructions for operating the car
telephone can be found in the operation guide for the
cellular telephone1.
Switching the telephone on and off
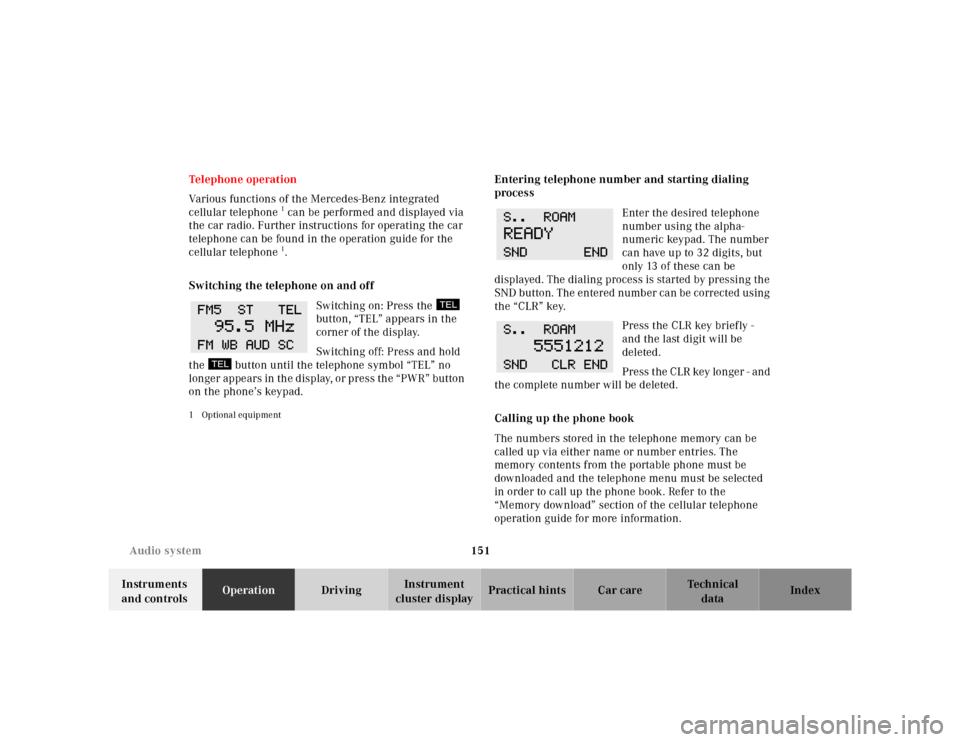
Switching on: Press the
button, “TEL” appears in the
corner of the display.
Switching off: Press and hold
the button until the telephone symbol “TEL” no
longer appears in the display, or press the “PWR” button
on the phone’s keypad.
1 Optional equipment
Entering telephone number and starting dialing
process
Enter the desired telephone
number using the alpha-
numeric keypad. The number
can have up to 32 digits, but
only 13 of these can be
displayed. The dialing process is started by pressing the
SND button. The entered number can be corrected using
the “CLR” key.
Press the CLR key briefly -
and the last digit will be
deleted.
Press the CLR key longer - and
the complete number will be deleted.
Calling up the phone book
The numbers stored in the telephone memory can be
called up via either name or number entries. The
memory contents from the portable phone must be
downloaded and the telephone menu must be selected
in order to call up the phone book. Refer to the
“Memory download” section of the cellular telephone
operation guide for more information.
Page 156 of 341
153 Audio system
Te ch n ica l
data Instruments
and controlsOperationDrivingInstrument
cluster displayPractical hints Car care Index Accepting incoming call in telephone mode
With an incoming call, the ringing tone will be heard
and the message “CALL” appears in the display. Press
the SND key to answer the call.
Accepting incoming call in tape, CD or radio mode
If the telephone is activated in the background
(telephone symbol in the display), then a switch is made
automatically to telephone when an incoming call is
received. The audio source is muted, the ringing tone is
heard and the message “CALL” appears. After the call
has been terminated, the previously selected audio
source is resumed.
Terminating call
A current call can be terminated by pressing the END
key.Component malfunctions
The radio, CD changer
1, and Mercedes-Benz integrated
cellular telephone
1 are part of a fiberoptic networked
system. Failure of one of the components can lead to
malfunctions of the other components. Please contact
your authorized Mercedes-Benz Center or call
1-800-FOR-MERCedes for more information in the event
of a malfunction.
1 Optional equipment
Page 179 of 341
176 Control and operation of radio transmitters
Te ch n ica l
data Instruments
and controlsOperationDrivingInstrument
cluster displayPractical hints Car care Index
Control and operation of radio transmitters
COMAND, radio and telephone
1 Observe all legal requirements.
Telephones and two-way radio
Radio transmitters, such as a portable telephone or a
citizens band unit should only be used inside the
vehicle if they are connected to an antenna that is
installed on the outside of the vehicle.
Refer to the radio transmitter operation instructions
regarding use of an external antenna.
Wa r n i n g !
Please do not forget that your primary
responsibility is to drive the vehicle. Only operate
the COMAND (Cockpit Management and Data
System), radio or telephone
1 if road and traffic
conditions permit.
Bear in mind that at a speed of just 30 mph
(approximately 50 km / h), your vehicle is covering
a distance of approximately 50 feet (approximately
14 m ) e v e r y s e c o n d .
Wa r n i n g !
Never operate radio transmitters equipped with a
built-in or attached antenna (i.e. without being
connected to an external antenna) from inside the
vehicle while the engine is running. Doing so could
lead to a malfunction of the vehicle’s electronic
system, possibly resulting in an accident and
personal injury.
Page 188 of 341
185 Tele Aid
Te ch n ica l
data Instruments
and controlsOperationDrivingInstrument
cluster displayPractical hints Car care Index Important!
If the indicator lamp continues to flash or the system
does not reset, contact the Response Center at
1-800-756-9018 (in the USA) or 1-888-923-8367 (in
Canada), or Mercedes-Benz Client Assistance at
1-800-FOR-MERCedes (1-800-367-6372) in the USA or
Customer Service at 1-800-387-0100 in Canada.
Notes:
The indicator lamp in the respective button f lashes until
the call is concluded. Calls can only be terminated by a
Response Center or Client Assistance Center
representative except Roadside Assistance and
Information calls, which can also be terminated by
pressing ìbutton on the multifunction steering
wheel.When a Tele Aid call has been initiated, the audio
system or the COMAND system audio (only vehicles
with COMAND) is muted and the selected mode (radio,
tape or CD) pauses. The optional cellular phone (if
installed) switches off. If you must use this phone, the
vehicle must be parked. Disconnect the coiled cord and
place the call. The navigation system (if engaged) will
continue to run. The display in the instrument cluster is
available for use and spoken commands are only
available by pressing the RPT button on the COMAND
unit. A pop-up window will appear in the COMAND
display to indicate that a Tele Aid call is in progress.