window MERCEDES-BENZ E350 4MATIC 2011 W212 Owner's Guide
[x] Cancel search | Manufacturer: MERCEDES-BENZ, Model Year: 2011, Model line: E350 4MATIC, Model: MERCEDES-BENZ E350 4MATIC 2011 W212Pages: 400, PDF Size: 16.3 MB
Page 95 of 400
XTurn the SmartKey to position 2 in the
ignition lock.XTo open: press the corresponding switch.XTo close: pull the corresponding switch.
i
If you press the switch beyond the point
of resistance, an automatic opening/
closing process is started in the
corresponding direction. You can stop
automatic operation by pressing again.
i You can continue to operate the side
windows after you switch off the engine.
This function remains active for five
minutes or until one of the front doors is
opened.
Convenience opening
You can ventilate the vehicle before you start
driving. To do this, you can use the key to
simultaneously:
R open the side windows
R open the tilt/sliding sunroof or the
panorama roof with power tilt/sliding
panel and the roller sunblinds
R switch on the seat ventilation of the driver's
seat
i The convenience opening feature can
only be operated using the key. The key
must be near the handle of the driver's
door.
XPoint the tip of the key at the driver's door
handle.XUnlock the vehicle by pressing the %
button.XPress and hold the % button until the
side windows and the tilt/sliding sunroof
or panorama roof with power tilt/sliding
panel are in the desired position.
If the roller sunblinds of the panorama roof
with power tilt/sliding panel are closed, the
roller sunblinds are opened first.
XPress and hold the % button again until
the panorama roof with power tilt/sliding
panel is in the desired position.XTo interrupt the convenience opening
procedure: release the % button.
Convenience closing
General information
When you lock the vehicle, you can
simultaneously:
R close the side windows
R close the tilt/sliding sunroof or the
panorama roof with power tilt/sliding
panel
On vehicles with a panorama roof with power
tilt/sliding panel, you can then close the
roller sunblinds.
GWarning!
When closing the door windows and the tilt/
sliding sunroof or panorama roof with power
tilt/sliding panel, make sure there is no
danger of anyone being harmed by the closing
procedure.
If potential danger exists, proceed as follows:
R Release button & to stop the closing
procedure. To open, press and hold button
% . To continue the closing procedure
after making sure that there is no danger of
anyone being harmed by the closing
procedure, press and hold button &.
Vehicles with KEYLESS-GO:
R Release the sensor surface on the outside
door handle to stop the closing procedure.
R Immediately pull on the same outside door
handle and hold firmly. The door windows
and the tilt/sliding sunroof or panorama
roof with power tilt/sliding panel will open
for as long as the door handle is held but
the door not opened.
Side windows93Opening and closingBA 212 USA, CA Edition B 2011; 1; 5, en-USdimargiVersion: 3.0.3.62010-05-20T13:33:46+02:00 - Seite 93Z
Page 96 of 400
Using the SmartKey
iThe key must be near the handle of the
driver's door.
XPoint the tip of the key at the driver's door
handle.
XPress and hold the & button until the
side windows and the tilt/sliding sunroof
or the panorama roof with power tilt/
sliding panel are fully closed.
XMake sure that all the side windows and the
tilt/sliding sunroof or panorama roof with
power tilt/sliding panel are closed.
On vehicles with a panorama roof with power
tilt/sliding panel:
XPress and hold the & button again until
the roller sunblinds of the panorama roof
with power tilt/sliding panel close.
XTo interrupt the convenience closing
procedure: release the & button.
Using KEYLESS-GO
The SmartKey with KEYLESS-GO must be
outside the vehicle but no more than 3 ft (1 m)
away from a door.
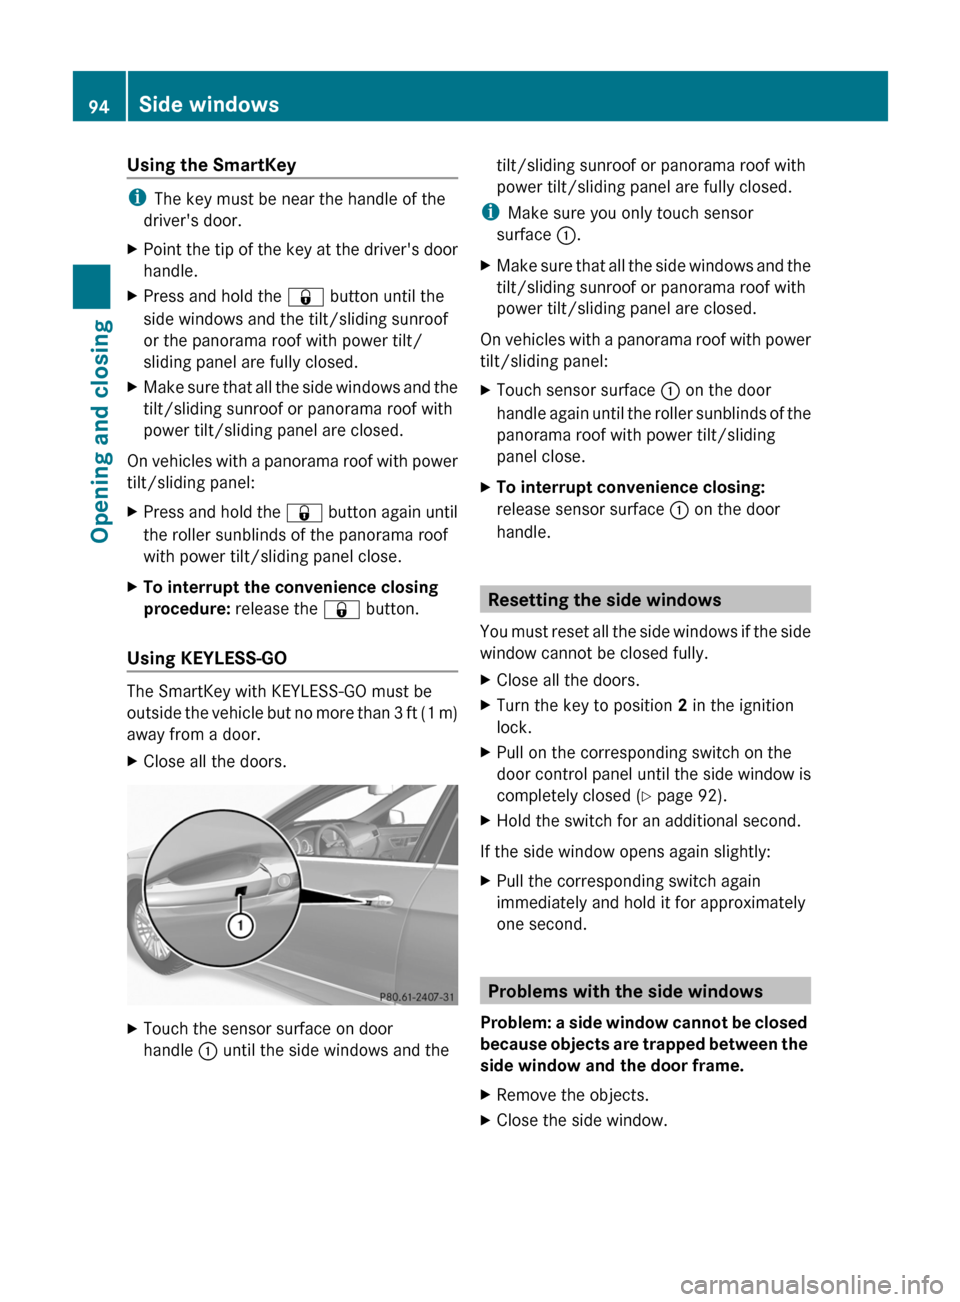
XClose all the doors.XTouch the sensor surface on door
handle : until the side windows and the
tilt/sliding sunroof or panorama roof with
power tilt/sliding panel are fully closed.
iMake sure you only touch sensor
surface :.
XMake sure that all the side windows and the
tilt/sliding sunroof or panorama roof with
power tilt/sliding panel are closed.
On vehicles with a panorama roof with power
tilt/sliding panel:
XTouch sensor surface : on the door
handle again until the roller sunblinds of the
panorama roof with power tilt/sliding
panel close.
XTo interrupt convenience closing:
release sensor surface : on the door
handle.
Resetting the side windows
You must reset all the side windows if the side
window cannot be closed fully.
XClose all the doors.XTurn the key to position 2 in the ignition
lock.
XPull on the corresponding switch on the
door control panel until the side window is
completely closed (Y page 92).
XHold the switch for an additional second.
If the side window opens again slightly:
XPull the corresponding switch again
immediately and hold it for approximately
one second.
Problems with the side windows
Problem: a side window cannot be closed
because objects are trapped between the
side window and the door frame.
XRemove the objects.XClose the side window.94Side windowsOpening and closing
BA 212 USA, CA Edition B 2011; 1; 5, en-USdimargiVersion: 3.0.3.62010-05-20T13:33:46+02:00 - Seite 94
Page 97 of 400
Problem: a side window cannot be closed
because objects in the guide rail are
preventing the window from being raised.XRemove the objects.XClose the side window.
Problem: a side window cannot be closed,
and you cannot see the cause.
GWarning!
Closing the side windows with increased force
or without the anti-entrapment feature could
lead to serious or even fatal injury. Make sure
that nobody can become trapped when
closing the side windows.
If a side window is obstructed during closing
and reopens again slightly:
XImmediately after the window blocks, pull
on the corresponding switch again until the
side window has closed.
The side window is closed with increased
force.
If a side window is obstructed again during
closing and reopens again slightly:
XImmediately after the window blocks, pull
on the corresponding switch again until the
side window has closed.
The side window is closed without the anti-
entrapment feature.GWarning!
Pulling and holding the switch to close the
door window immediately after it had been
blocked two times will cause the door window
to close without the anti-entrapment feature
for as long as you hold the switch.
Sliding sunroof
Important safety notes
GWarning!
When leaving the vehicle, always remove the
SmartKey from the starter switch. Always
take the SmartKey with you and lock the
vehicle. Do not leave children unattended in
the vehicle, even if they are secured in a child
restraint system, or with access to an
unlocked vehicle. A child's unsupervised
access to a vehicle could result in an accident
and/or serious personal injury. The children
could
R injure themselves on parts of the vehicle
R be seriously or fatally injured through
excessive exposure to extreme heat or cold
R injure themselves or cause an accident with
vehicle equipment that can be operated
even if the SmartKey is removed from the
starter switch or removed from the vehicle,
such as seat adjustment, steering wheel
adjustment, or the memory function
If children open a door, they could injure other
persons or get out of the vehicle and injure
themselves or be injured by following traffic.
Do not expose the child restraint system to
direct sunlight. The child restraint system's
metal parts, for example, could become very
hot, and the child could be burned by these
parts.
GWarning
Do not transport heavy and hard objects in the
vehicle interior or in the trunk/cargo
compartment if they are unsecured.
Unsecured or improperly stowed cargo
increases the risk of injury for a child in the
event of:
R strong braking maneuvers
R sudden changes of direction
R an accident
Sliding sunroof95Opening and closingBA 212 USA, CA Edition B 2011; 1; 5, en-USdimargiVersion: 3.0.3.62010-05-20T13:33:46+02:00 - Seite 95Z
Page 99 of 400
or open a side window slightly to reduce or
eliminate these noises.
Operating the tilt/sliding sunroof
Opening and closing
i You can still operate the tilt/sliding
sunroof even if you switch off the engine or
remove the SmartKey. This function
remains active for five minutes or until one
of the front doors is opened.
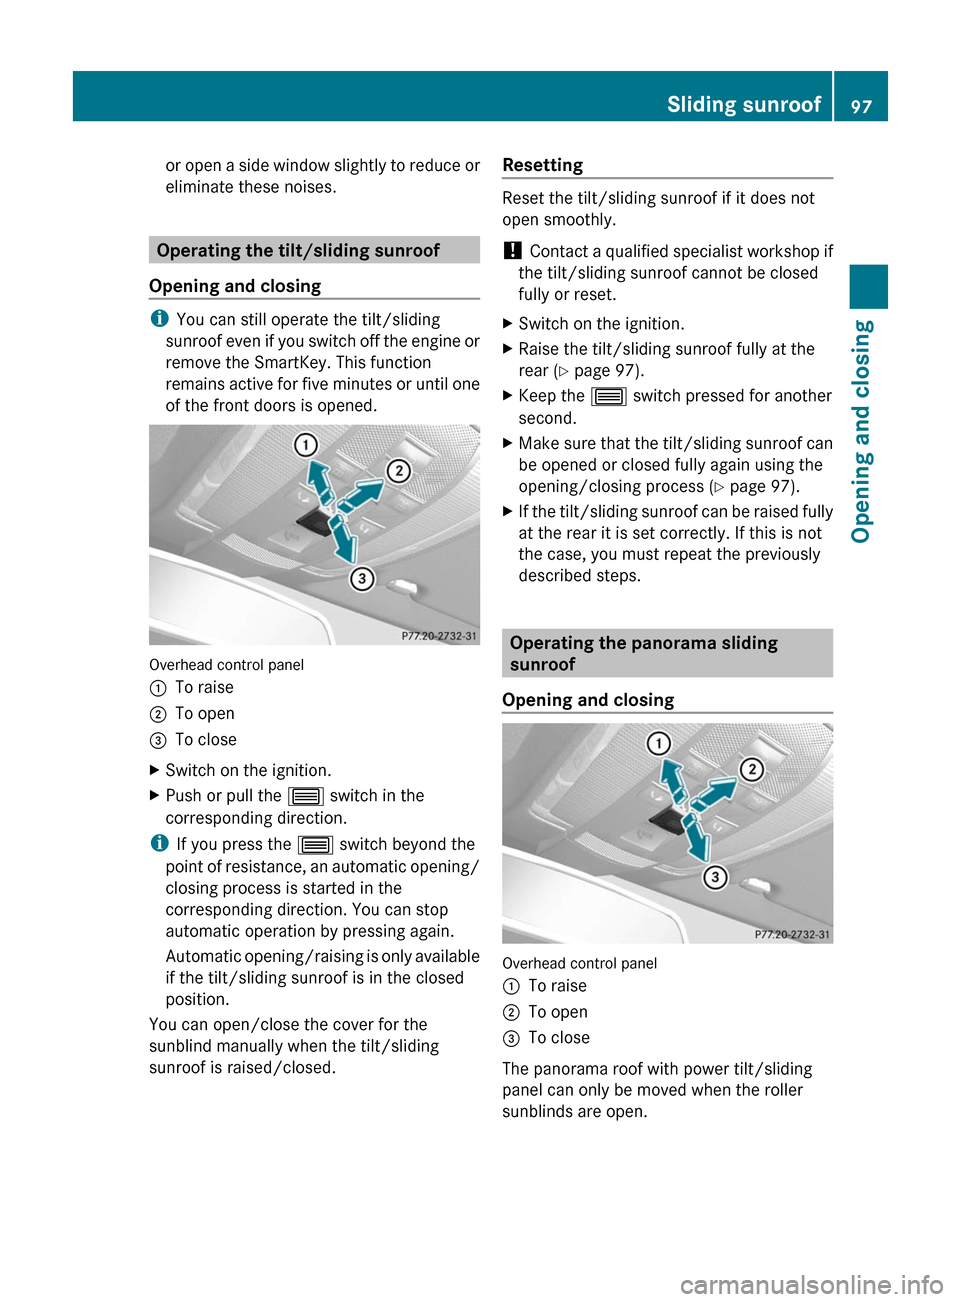
Overhead control panel
:To raise;To open=To closeXSwitch on the ignition.XPush or pull the 3 switch in the
corresponding direction.
i If you press the 3 switch beyond the
point of resistance, an automatic opening/
closing process is started in the
corresponding direction. You can stop
automatic operation by pressing again.
Automatic opening/raising is only available
if the tilt/sliding sunroof is in the closed
position.
You can open/close the cover for the
sunblind manually when the tilt/sliding
sunroof is raised/closed.
Resetting
Reset the tilt/sliding sunroof if it does not
open smoothly.
! Contact a qualified specialist workshop if
the tilt/sliding sunroof cannot be closed
fully or reset.
XSwitch on the ignition.XRaise the tilt/sliding sunroof fully at the
rear ( Y page 97).XKeep the 3 switch pressed for another
second.XMake sure that the tilt/sliding sunroof can
be opened or closed fully again using the
opening/closing process ( Y page 97).XIf the tilt/sliding sunroof can be raised fully
at the rear it is set correctly. If this is not
the case, you must repeat the previously
described steps.
Operating the panorama sliding
sunroof
Opening and closing
Overhead control panel
:To raise;To open=To close
The panorama roof with power tilt/sliding
panel can only be moved when the roller
sunblinds are open.
Sliding sunroof97Opening and closingBA 212 USA, CA Edition B 2011; 1; 5, en-USdimargiVersion: 3.0.3.62010-05-20T13:33:46+02:00 - Seite 97Z
Page 113 of 400
Problems with the seat heating
The seat heating has switched itself off
prematurely or cannot be switched on. The
vehicle's electrical system voltage is too low
because too many electrical consumers are
switched on.
XSwitch off electrical consumers which you
do not need, such as the rear window
defroster or interior lighting.
Switching the seat ventilation on/off
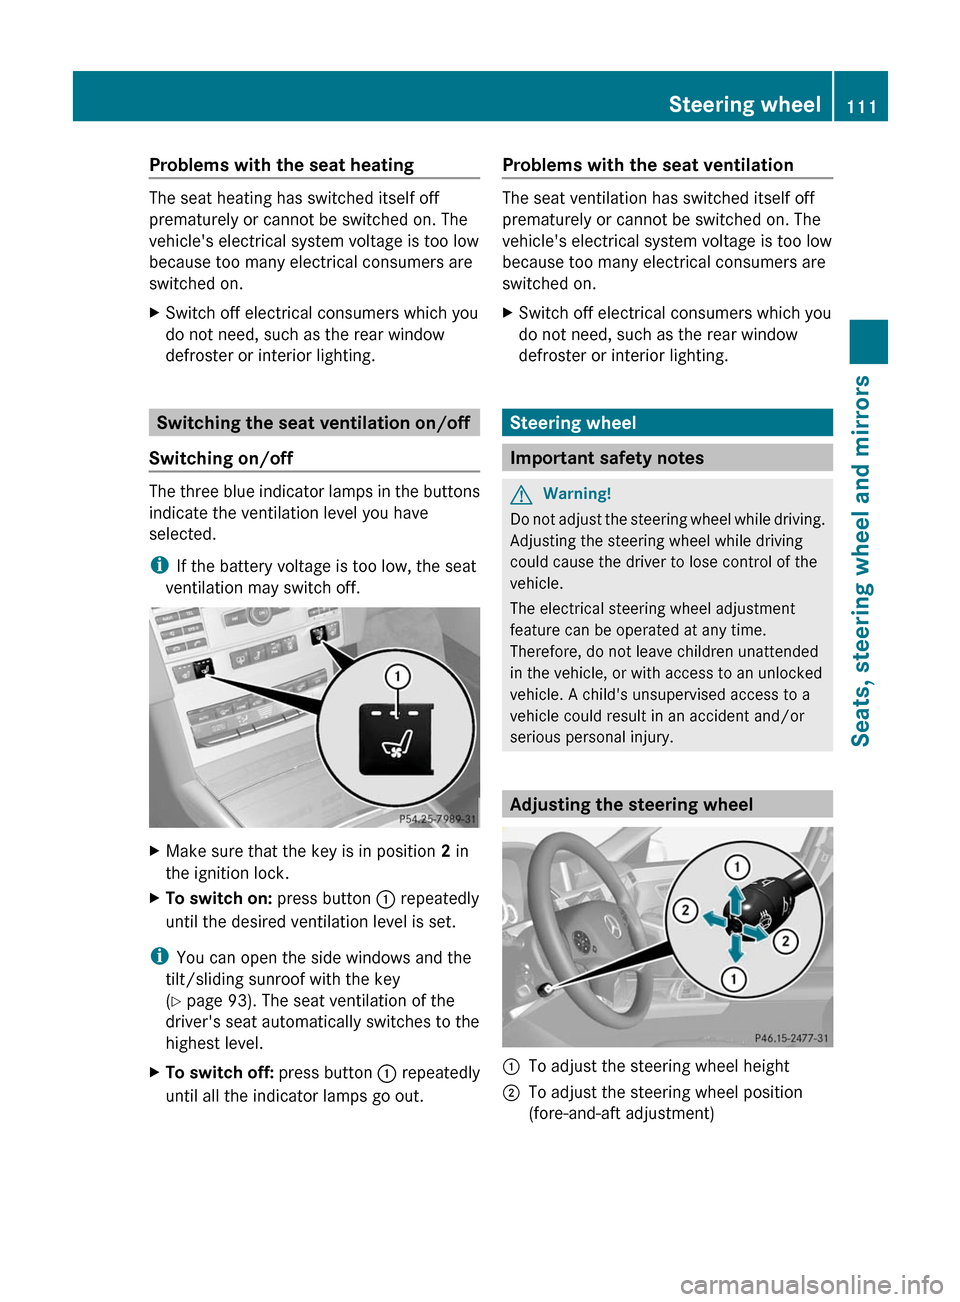
Switching on/off
The three blue indicator lamps in the buttons
indicate the ventilation level you have
selected.
iIf the battery voltage is too low, the seat
ventilation may switch off.
XMake sure that the key is in position 2 in
the ignition lock.
XTo switch on: press button : repeatedly
until the desired ventilation level is set.
iYou can open the side windows and the
tilt/sliding sunroof with the key
(Y page 93). The seat ventilation of the
driver's seat automatically switches to the
highest level.
XTo switch off: press button : repeatedly
until all the indicator lamps go out.
Problems with the seat ventilation
The seat ventilation has switched itself off
prematurely or cannot be switched on. The
vehicle's electrical system voltage is too low
because too many electrical consumers are
switched on.
XSwitch off electrical consumers which you
do not need, such as the rear window
defroster or interior lighting.
Steering wheel
Important safety notes
GWarning!
Do not adjust the steering wheel while driving.
Adjusting the steering wheel while driving
could cause the driver to lose control of the
vehicle.
The electrical steering wheel adjustment
feature can be operated at any time.
Therefore, do not leave children unattended
in the vehicle, or with access to an unlocked
vehicle. A child's unsupervised access to a
vehicle could result in an accident and/or
serious personal injury.
Adjusting the steering wheel
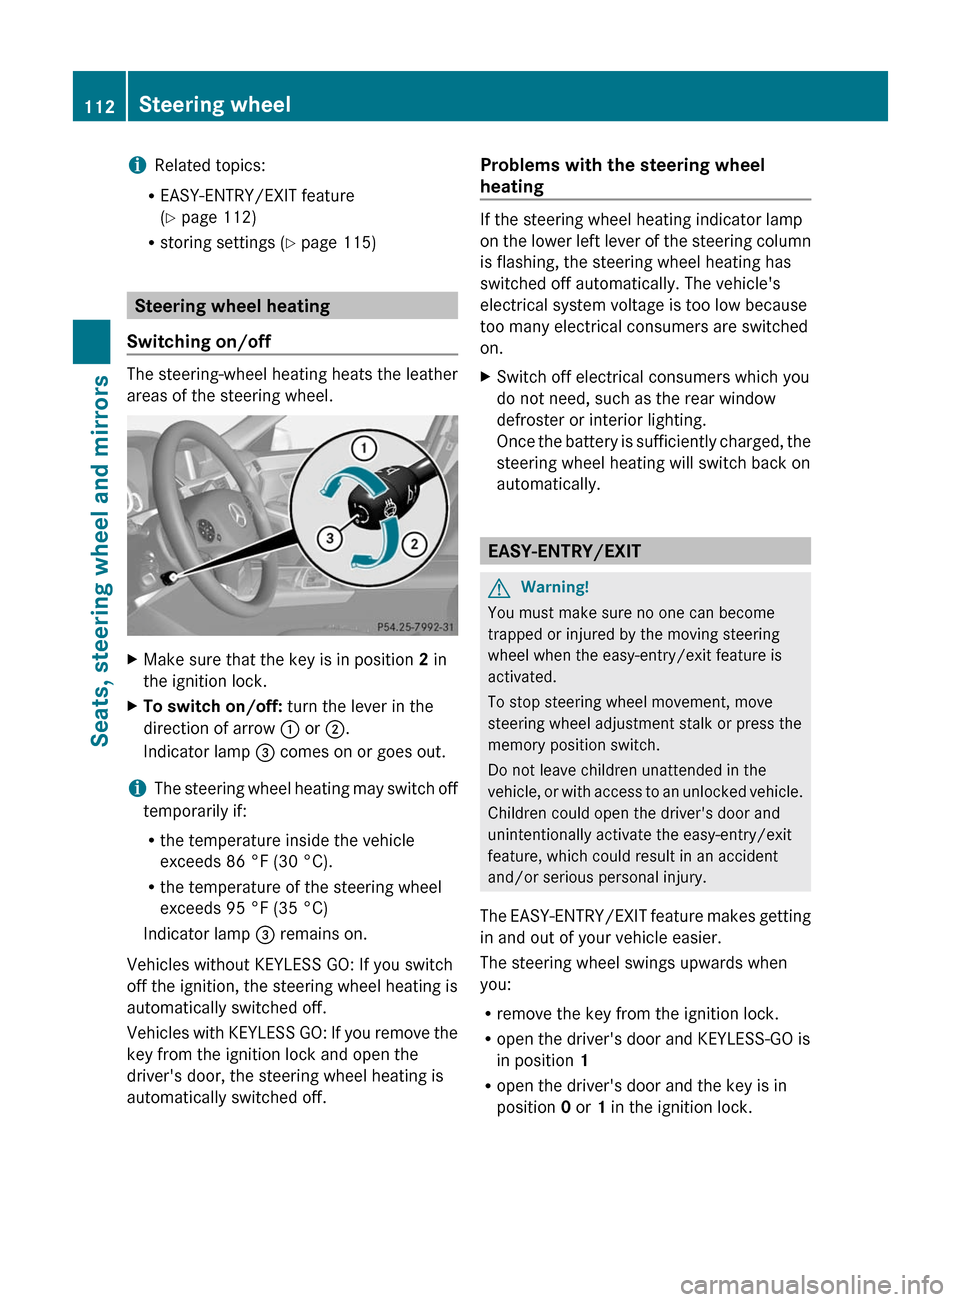
:To adjust the steering wheel height;To adjust the steering wheel position
(fore-and-aft adjustment)
Steering wheel111Seats, steering wheel and mirrorsBA 212 USA, CA Edition B 2011; 1; 5, en-USdimargiVersion: 3.0.3.62010-05-20T13:33:46+02:00 - Seite 111Z
Page 114 of 400
iRelated topics:
REASY-ENTRY/EXIT feature
(Y page 112)
Rstoring settings (Y page 115)
Steering wheel heating
Switching on/off
The steering-wheel heating heats the leather
areas of the steering wheel.
XMake sure that the key is in position 2 in
the ignition lock.
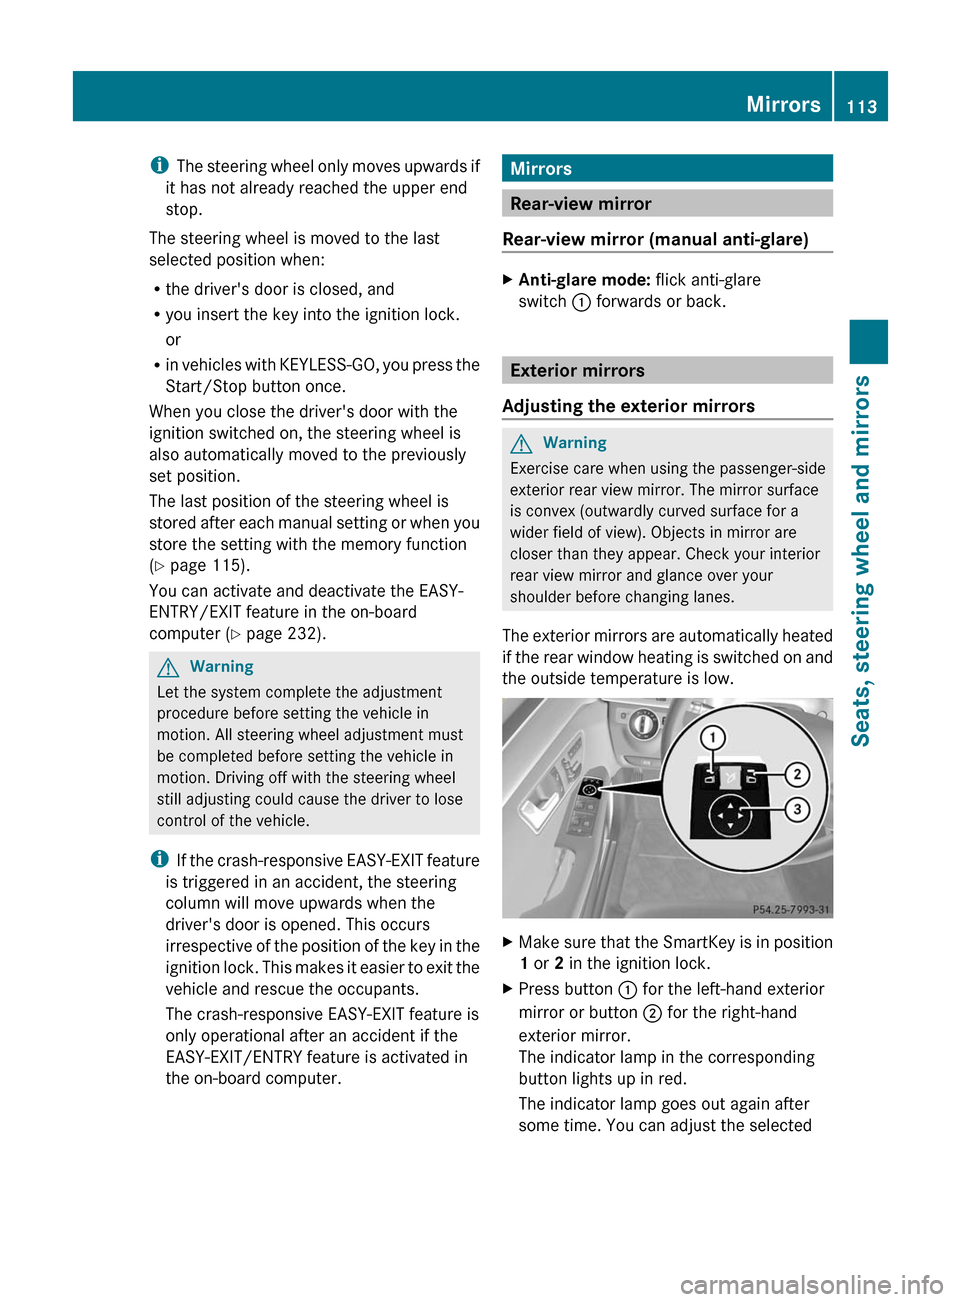
XTo switch on/off: turn the lever in the
direction of arrow : or ;.
Indicator lamp = comes on or goes out.
iThe steering wheel heating may switch off
temporarily if:
Rthe temperature inside the vehicle
exceeds 86 °F (30 °C).
Rthe temperature of the steering wheel
exceeds 95 °F (35 °C)
Indicator lamp = remains on.
Vehicles without KEYLESS GO: If you switch
off the ignition, the steering wheel heating is
automatically switched off.
Vehicles with KEYLESS GO: If you remove the
key from the ignition lock and open the
driver's door, the steering wheel heating is
automatically switched off.
Problems with the steering wheel
heating
If the steering wheel heating indicator lamp
on the lower left lever of the steering column
is flashing, the steering wheel heating has
switched off automatically. The vehicle's
electrical system voltage is too low because
too many electrical consumers are switched
on.
XSwitch off electrical consumers which you
do not need, such as the rear window
defroster or interior lighting.
Once the battery is sufficiently charged, the
steering wheel heating will switch back on
automatically.
EASY-ENTRY/EXIT
GWarning!
You must make sure no one can become
trapped or injured by the moving steering
wheel when the easy-entry/exit feature is
activated.
To stop steering wheel movement, move
steering wheel adjustment stalk or press the
memory position switch.
Do not leave children unattended in the
vehicle, or with access to an unlocked vehicle.
Children could open the driver's door and
unintentionally activate the easy-entry/exit
feature, which could result in an accident
and/or serious personal injury.
The EASY-ENTRY/EXIT feature makes getting
in and out of your vehicle easier.
The steering wheel swings upwards when
you:
Rremove the key from the ignition lock.
Ropen the driver's door and KEYLESS-GO is
in position 1
Ropen the driver's door and the key is in
position 0 or 1 in the ignition lock.
112Steering wheelSeats, steering wheel and mirrors
BA 212 USA, CA Edition B 2011; 1; 5, en-USdimargiVersion: 3.0.3.62010-05-20T13:33:46+02:00 - Seite 112
Page 115 of 400
iThe steering wheel only moves upwards if
it has not already reached the upper end
stop.
The steering wheel is moved to the last
selected position when:
Rthe driver's door is closed, and
Ryou insert the key into the ignition lock.
or
Rin vehicles with KEYLESS-GO, you press the
Start/Stop button once.
When you close the driver's door with the
ignition switched on, the steering wheel is
also automatically moved to the previously
set position.
The last position of the steering wheel is
stored after each manual setting or when you
store the setting with the memory function
(Y page 115).
You can activate and deactivate the EASY-
ENTRY/EXIT feature in the on-board
computer (Y page 232).
GWarning
Let the system complete the adjustment
procedure before setting the vehicle in
motion. All steering wheel adjustment must
be completed before setting the vehicle in
motion. Driving off with the steering wheel
still adjusting could cause the driver to lose
control of the vehicle.
iIf the crash-responsive EASY-EXIT feature
is triggered in an accident, the steering
column will move upwards when the
driver's door is opened. This occurs
irrespective of the position of the key in the
ignition lock. This makes it easier to exit the
vehicle and rescue the occupants.
The crash-responsive EASY-EXIT feature is
only operational after an accident if the
EASY-EXIT/ENTRY feature is activated in
the on-board computer.
Mirrors
Rear-view mirror
Rear-view mirror (manual anti-glare)
XAnti-glare mode: flick anti-glare
switch : forwards or back.
Exterior mirrors
Adjusting the exterior mirrors
GWarning
Exercise care when using the passenger-side
exterior rear view mirror. The mirror surface
is convex (outwardly curved surface for a
wider field of view). Objects in mirror are
closer than they appear. Check your interior
rear view mirror and glance over your
shoulder before changing lanes.
The exterior mirrors are automatically heated
if the rear window heating is switched on and
the outside temperature is low.
XMake sure that the SmartKey is in position
1 or 2 in the ignition lock.
XPress button : for the left-hand exterior
mirror or button ; for the right-hand
exterior mirror.
The indicator lamp in the corresponding
button lights up in red.
The indicator lamp goes out again after
some time. You can adjust the selected
Mirrors113Seats, steering wheel and mirrorsBA 212 USA, CA Edition B 2011; 1; 5, en-USdimargiVersion: 3.0.3.62010-05-20T13:33:46+02:00 - Seite 113Z
Page 116 of 400
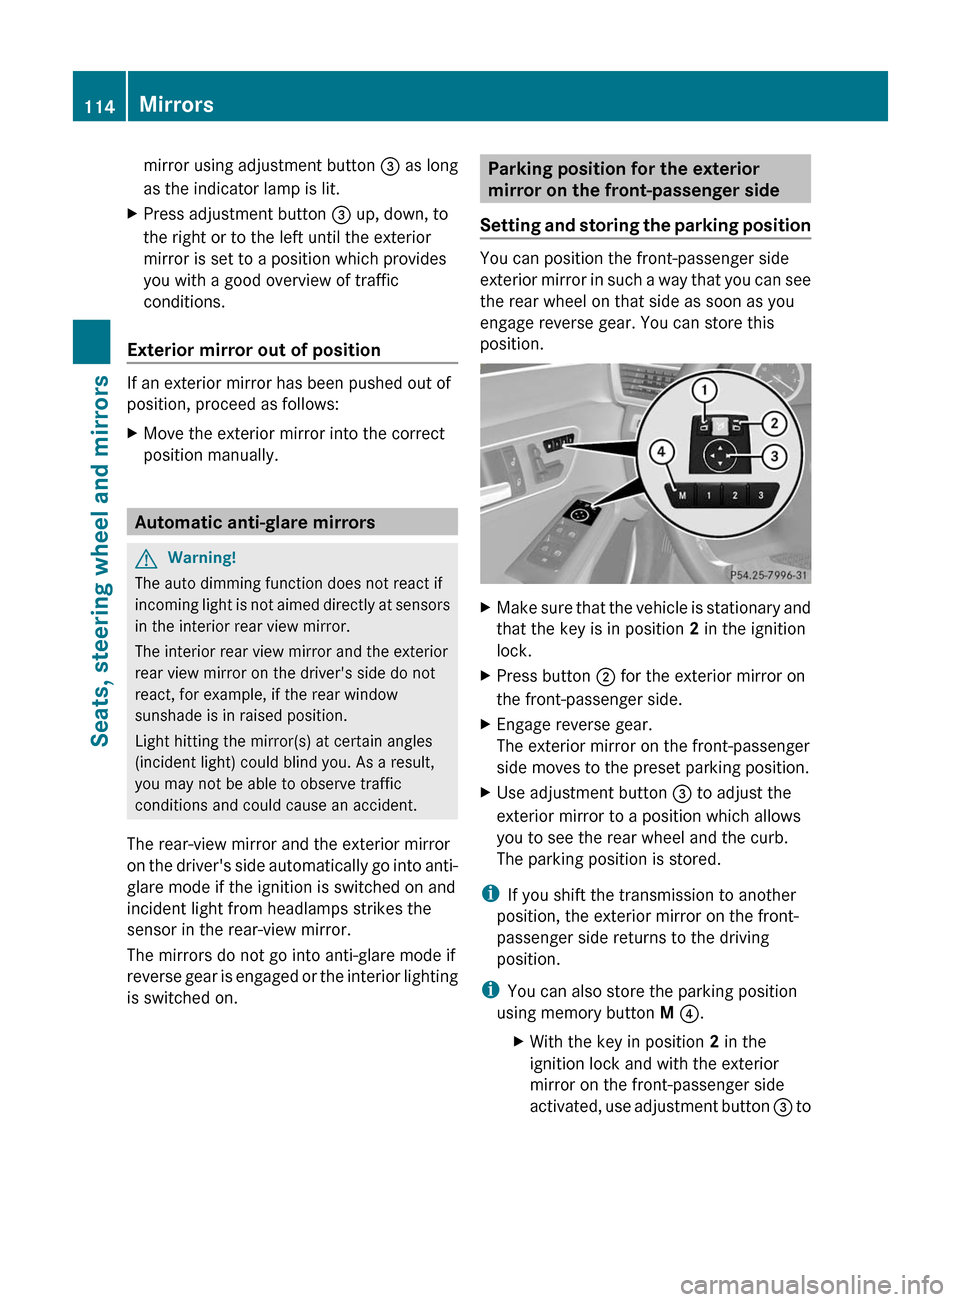
mirror using adjustment button = as long
as the indicator lamp is lit.
XPress adjustment button = up, down, to
the right or to the left until the exterior
mirror is set to a position which provides
you with a good overview of traffic
conditions.
Exterior mirror out of position
If an exterior mirror has been pushed out of
position, proceed as follows:
XMove the exterior mirror into the correct
position manually.
Automatic anti-glare mirrors
GWarning!
The auto dimming function does not react if
incoming light is not aimed directly at sensors
in the interior rear view mirror.
The interior rear view mirror and the exterior
rear view mirror on the driver's side do not
react, for example, if the rear window
sunshade is in raised position.
Light hitting the mirror(s) at certain angles
(incident light) could blind you. As a result,
you may not be able to observe traffic
conditions and could cause an accident.
The rear-view mirror and the exterior mirror
on the driver's side automatically go into anti-
glare mode if the ignition is switched on and
incident light from headlamps strikes the
sensor in the rear-view mirror.
The mirrors do not go into anti-glare mode if
reverse gear is engaged or the interior lighting
is switched on.
Parking position for the exterior
mirror on the front-passenger side
Setting and storing the parking position
You can position the front-passenger side
exterior mirror in such a way that you can see
the rear wheel on that side as soon as you
engage reverse gear. You can store this
position.
XMake sure that the vehicle is stationary and
that the key is in position 2 in the ignition
lock.
XPress button ; for the exterior mirror on
the front-passenger side.
XEngage reverse gear.
The exterior mirror on the front-passenger
side moves to the preset parking position.
XUse adjustment button = to adjust the
exterior mirror to a position which allows
you to see the rear wheel and the curb.
The parking position is stored.
iIf you shift the transmission to another
position, the exterior mirror on the front-
passenger side returns to the driving
position.
iYou can also store the parking position
using memory button M ?.
XWith the key in position 2 in the
ignition lock and with the exterior
mirror on the front-passenger side
activated, use adjustment button = to
114MirrorsSeats, steering wheel and mirrors
BA 212 USA, CA Edition B 2011; 1; 5, en-USdimargiVersion: 3.0.3.62010-05-20T13:33:46+02:00 - Seite 114
Page 129 of 400
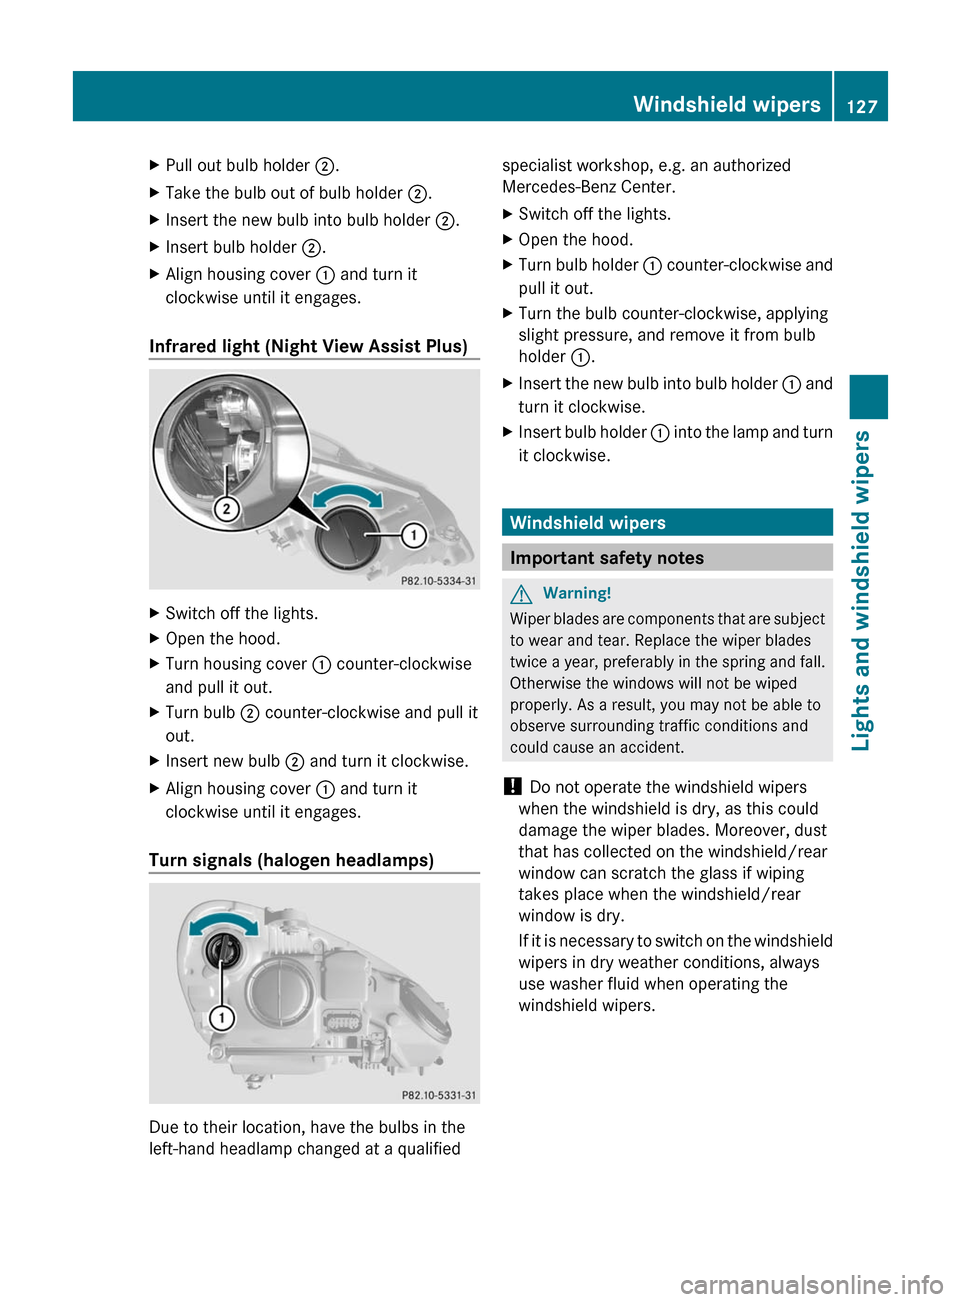
XPull out bulb holder ;.XTake the bulb out of bulb holder ;.XInsert the new bulb into bulb holder ;.XInsert bulb holder ;.XAlign housing cover : and turn it
clockwise until it engages.
Infrared light (Night View Assist Plus)
XSwitch off the lights.XOpen the hood.XTurn housing cover : counter-clockwise
and pull it out.
XTurn bulb ; counter-clockwise and pull it
out.
XInsert new bulb ; and turn it clockwise.XAlign housing cover : and turn it
clockwise until it engages.
Turn signals (halogen headlamps)
Due to their location, have the bulbs in the
left-hand headlamp changed at a qualified
specialist workshop, e.g. an authorized
Mercedes-Benz Center.
XSwitch off the lights.XOpen the hood.XTurn bulb holder : counter-clockwise and
pull it out.
XTurn the bulb counter-clockwise, applying
slight pressure, and remove it from bulb
holder :.
XInsert the new bulb into bulb holder : and
turn it clockwise.
XInsert bulb holder : into the lamp and turn
it clockwise.
Windshield wipers
Important safety notes
GWarning!
Wiper blades are components that are subject
to wear and tear. Replace the wiper blades
twice a year, preferably in the spring and fall.
Otherwise the windows will not be wiped
properly. As a result, you may not be able to
observe surrounding traffic conditions and
could cause an accident.
! Do not operate the windshield wipers
when the windshield is dry, as this could
damage the wiper blades. Moreover, dust
that has collected on the windshield/rear
window can scratch the glass if wiping
takes place when the windshield/rear
window is dry.
If it is necessary to switch on the windshield
wipers in dry weather conditions, always
use washer fluid when operating the
windshield wipers.
Windshield wipers127Lights and windshield wipersBA 212 USA, CA Edition B 2011; 1; 5, en-USdimargiVersion: 3.0.3.62010-05-20T13:33:46+02:00 - Seite 127Z
Page 130 of 400
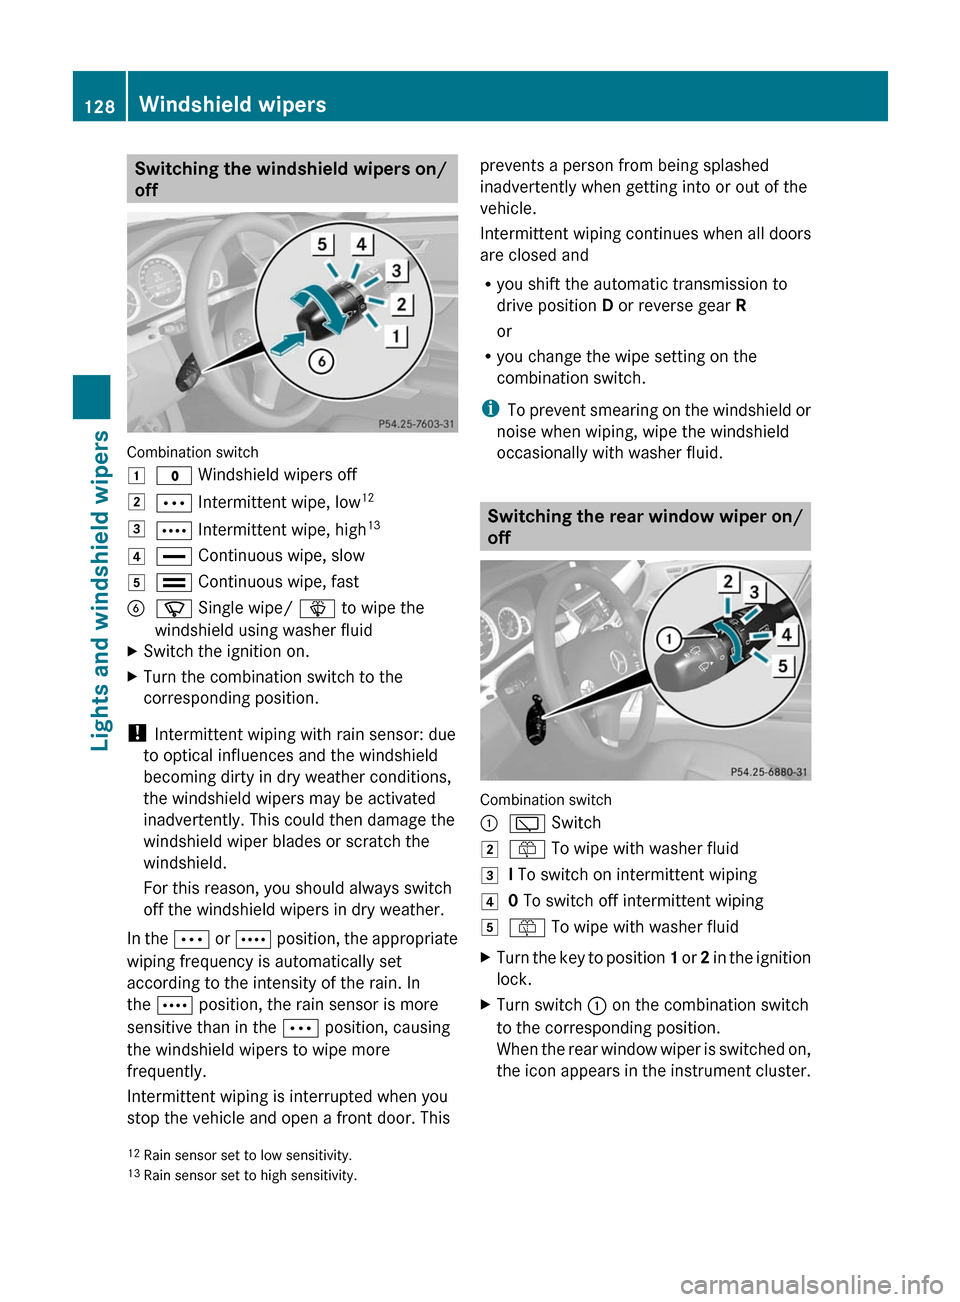
Switching the windshield wipers on/
off
Combination switch
1$ Windshield wipers off2Ä Intermittent wipe, low123Å Intermittent wipe, high134° Continuous wipe, slow5¯ Continuous wipe, fastBí Single wipe/ î to wipe the
windshield using washer fluid
XSwitch the ignition on.XTurn the combination switch to the
corresponding position.
! Intermittent wiping with rain sensor: due
to optical influences and the windshield
becoming dirty in dry weather conditions,
the windshield wipers may be activated
inadvertently. This could then damage the
windshield wiper blades or scratch the
windshield.
For this reason, you should always switch
off the windshield wipers in dry weather.
In the Ä or Å position, the appropriate
wiping frequency is automatically set
according to the intensity of the rain. In
the Å position, the rain sensor is more
sensitive than in the Ä position, causing
the windshield wipers to wipe more
frequently.
Intermittent wiping is interrupted when you
stop the vehicle and open a front door. This
prevents a person from being splashed
inadvertently when getting into or out of the
vehicle.
Intermittent wiping continues when all doors
are closed and
Ryou shift the automatic transmission to
drive position D or reverse gear R
or
Ryou change the wipe setting on the
combination switch.
iTo prevent smearing on the windshield or
noise when wiping, wipe the windshield
occasionally with washer fluid.
Switching the rear window wiper on/
off
Combination switch
:è Switch2ô To wipe with washer fluid3I To switch on intermittent wiping40 To switch off intermittent wiping5ô To wipe with washer fluidXTurn the key to position 1 or 2 in the ignition
lock.
XTurn switch : on the combination switch
to the corresponding position.
When the rear window wiper is switched on,
the icon appears in the instrument cluster.
12Rain sensor set to low sensitivity.13Rain sensor set to high sensitivity.
128Windshield wipersLights and windshield wipers
BA 212 USA, CA Edition B 2011; 1; 5, en-USdimargiVersion: 3.0.3.62010-05-20T13:33:46+02:00 - Seite 128