trunk release MERCEDES-BENZ E550 2010 W212 Owner's Manual
[x] Cancel search | Manufacturer: MERCEDES-BENZ, Model Year: 2010, Model line: E550, Model: MERCEDES-BENZ E550 2010 W212Pages: 372, PDF Size: 8.55 MB
Page 10 of 372
RACE START (E 63 AMG) ...............159
Safety systems ................................ 61
Systems ......................................... 146
Through standing water .................257
With DISTRONIC PLUS ...................157
Driving and parking
Safety notes .................................. 109
Driving off .................................. 111, 257
Driving safety systems ....................... 61
ABS .................................................. 62
Adaptive Brake ................................ 64
BAS .................................................. 63
BAS PLUS ........................................ 63
EBP .................................................. 64
ESC .................................................. 65
ETS/4-ETS ....................................... 65
PRE-SAFE ®
Brake ............................. 69
Driving systems
AIRMATIC (except E 63 AMG) ........163
All-wheel drive (4MATIC) ................ 161
AMG adaptive sport suspension
system (E 63 AMG) ........................164
ATTENTION ASSIST ........................178
Blind Spot Assist ............................ 175
Cruise control ................................ 146
DISTRONIC PLUS ........................... 149
Hill-start assist system ..................160
HOLD function ............................... 161
Lane Keeping Assist ......................177
Night View Assist Plus ...................172
Parking Guidance ........................... 168
Parktronic system ..........................165
RACE START (E 63 AMG) ...............159
Rear view camera .......................... 171
Driving tips, automatic
transmission ...................................... 119
E
Easy-entry/exit feature .............. 93, 145
EBP (Electronic Brake
Proportioning) ...................................... 64
Electrical system
Improper work on or
modifications ................................... 22
Power outlets ................................. 207
Electrical system (Technical data)
see Vehicle specification
Electronic Stability Control
see ESC
Electronic Traction System
see ETS/4-ETS
Emergency, in case of
First aid kit ..................................... 268
Flat tire .......................................... 323
Hazard warning flasher ..................101
Roadside Assistance ................ 21, 210
Towing the vehicle .........................340
Emergency calls
Tele Aid .......................................... 208
Emergency operations
Remote door lock (Tele Aid) ........... 212
Remote door unlock (Tele Aid) .......211
Trunk lid, emergency release ...........84
Emergency Tensioning Device
see ETD
Emission control ............................... 258
Information label ............................ 347
System warranties ...........................20
Engine
Break-in recommendations ............220
Cleaning ......................................... 261
Compartment ................................ 223
Malfunction indicator lamp ............310
Messages in the multifunction
display ........................................... 295
Number .......................................... 347
Starting .......................................... 109
Turning off ..................................... 113
Engine (Technical data)
see Vehicle specification
Engine compartment
Radiator ......................................... 224
Engine coolant
see Coolant
Engine oil
Adding ........................................... 225
Additives ........................................ 362
Checking level ............................... 224
Consumption ................................. 224
Messages in the multifunction
display ........................................... 298
Oil dipstick ..................................... 225
Recommended engine oils and oil
filter ............................................... 3618Index212_AKB; 2; 41, en-USd2ureepe,Version: 2.11.8.12009-07-17T09:14:21+02:00 - Seite 8
Page 20 of 372
Air pressure ................................... 229
Care and maintenance ...................242
Cleaning ......................................... 243
Direction of rotation, spinning .......241
Important notes on tire inflation
pressure ........................................ 230
Inflation pressure ........................... 231
Information placard .......................237
Inspection ...................................... 242
Labeling ......................................... 245
Load index ............................. 246, 250
Load rating .................................... 250
Messages in the multifunction
display ................................... 284, 304
MOExtended .................................. 353
Ply composition and material
used ............................................... 251
Problems under-/overinflation ......231
Retreads ........................................ 228
Rims and tires (technical data) ......353
Rotation ......................................... 244
Service life ..................................... 242
Sizes .............................................. 353
Snow chains .................................. 252
Speed rating .......................... 247, 251
Storing ........................................... 243
Temperature .......................... 230, 244
Terminology ................................... 249
TIREFIT (tire repair kit) ...................329
Tire Identification Number .............251
Tire pressure loss warning system . 232
TPMS low tire pressure/
malfunction telltale ........................312
Traction ................................. 244, 251
Tread ............................................. 251
Tread depth ........................... 242, 252
Treadwear ...................................... 243
Treadwear indicators .............242, 252
Vehicle maximum load on ..............252
Wear pattern .................................. 244
Winter tires ............................ 252, 353
Tire speed rating ....................... 247, 251
Top tether see Children in the vehicle
Total load limit ................................... 251
Towing
Towing eye bolt .............................. 341
Vehicle ........................................... 340Towing eye bolt ................................. 341
Traction ...................................... 244, 251
Transfer case ..................................... 124
Transmission see Automatic transmission
Transmission fluid level .................... 226
Transmission gear selector lever see Gear selector lever
Transmission positions .................... 118
Traveling abroad ............................... 257
Tread (tires) ....................................... 251
Tread depth (tires) .................... 242, 252
Treadwear .......................................... 243
Treadwear indicators (tires) .... 242, 252
Trip menu ........................................... 129
Trunk
Closing ............................................. 82
Fuse box ........................................ 343
Messages in the multifunction
display ........................................... 293
Opening ........................................... 82
Opening/closing system .................. 83
Tie-down rings ............................... 199
Trunk lid emergency release ............84
Unlocking manually .......................315
Valet locking .................................... 85
Turning off the engine ...................... 113
Turn signals ....................................... 100
Cleaning lenses ............................. 262
Indicator lamps ................................ 29
Messages in the multifunction
display ........................................... 303
Replacing bulbs ............................. 319
U
Uniform Tire Quality Grading
Standards .................................. 243, 252
Units
Selecting speedometer display
mode ............................................. 141
Unleaded gasoline, premium ........... 362
Unlocking the vehicle
KEYLESS-GO .................................... 77
Manually ........................................ 314
SmartKey ......................................... 76
Upholstery, cleaning ......................... 266
Useful features .................................. 203
18Index212_AKB; 2; 41, en-USd2ureepe,Version: 2.11.8.12009-07-17T09:14:21+02:00 - Seite 18
Page 58 of 372
Children in the vehicle
Safety notes
If an infant or child is traveling with you in the
vehicle:
XSecure the child using an infant or child
restraint appropriate to the age and size of
the child.XMake sure the infant or child is properly
secured at all times while the vehicle is in
motion.GWarning!
When leaving the vehicle, always remove the
SmartKey from the starter switch. Always
take the SmartKey with you and lock the
vehicle. Do not leave children unattended in
the vehicle, even if they are secured in a child
restraint system, or with access to an
unlocked vehicle. A child’s unsupervised
access to a vehicle could result in an accident
and/or serious personal injury. The children
could
R injure themselves on parts of the vehicle
R be seriously or fatally injured through
excessive exposure to extreme heat or cold
R injure themselves or cause an accident with
vehicle equipment that can be operated
even if the SmartKey is removed from the
starter switch or removed from the vehicle,
such as seat adjustment, steering wheel
adjustment, or the memory function
If children open a door, they could injure other
persons or get out of the vehicle and injure
themselves or be injured by following traffic.
Do not expose the child restraint system to
direct sunlight. The child restraint system’s
metal parts, for example, could become very
hot, and the child could be burned by these
parts.
GWarning!
Do not carry heavy or hard objects in the
passenger compartment or trunk unless they
are firmly secured in place.
Unsecured or improperly positioned cargo
increases a child’s risk of injury in the event
of
R strong braking maneuvers
R sudden changes of direction
R an accident
Infant and child restraint systemsGObserve Safety notes, see page 56.
We recommend all infants and children be
properly restrained at all times while the
vehicle is in motion.
Canada only:
Only use a BabySmart™ compatible child
restraint for the front passenger seat in this
vehicle.
All lap/shoulder belts except the driver’s seat
belt have special seat belt retractors for
secure fastening of child restraints.
To fasten a child restraint, follow the child
restraint manufacturer’s instructions for
mounting.
To activate the special seat belt retractor:
XPull the shoulder belt out completely and
let it retract.
During seat belt retraction, a ratcheting
sound can be heard to indicate that the
special seat belt retractor is activated.
The seat belt is now locked.XPush down on child restraint to take up any
slack.
To deactivate the special seat belt retractor:
XRelease the seat belt buckle and let the
seat belt retract completely.
The seat belt can then again be used in the
usual manner.
To deactivate the special seat belt retractor
for the front passenger seat, the front
passenger seat must be in the most backward
position.
56Occupant safetySafety and security
212_AKB; 2; 41, en-USd2ureepe,Version: 2.11.8.12009-07-17T09:14:21+02:00 - Seite 56
Page 74 of 372
ActivatingXWith SmartKey: Remove the SmartKey
from the starter switch.
XWith KEYLESS-GO: Turn off the engine and
open the driver’s door.
Deactivating
XSwitch on the ignition.
iStarting the engine will also deactivate
the immobilizer.
In the event that the engine cannot be
started (yet the vehicle’s battery is
charged), the system is not operational.
Contact an authorized Mercedes-Benz
Center or call 1-800-FOR-MERCedes (in the
USA) or 1-800-387-0100 (in Canada).
Anti-theft alarm system
Once the alarm system has been armed, a
visual and audible alarm is triggered when
someone opens
Ra door
Rthe trunk
Rthe hood
The alarm will stay on even if the activating
element, a door, for example, is closed
immediately.
The alarm system will also be triggered when
Rthe vehicle is opened with the mechanical
key
Ra door is opened from the inside
Rthe trunk is opened with the emergency
release button
To cancel the alarm after it has been
triggered, see “Canceling the alarm”
(Y page 73).
iIf the alarm stays on for more than
30 seconds, the Tele Aid system initiates a
call to the Customer Assistance Center
automatically. The Tele Aid system will
initiate the call provided that
Ryou have subscribed to the Tele Aid
service
Rthe Tele Aid service has been activated
properly
Rthe necessary mobile phone, power
supply and GPS coverage are available
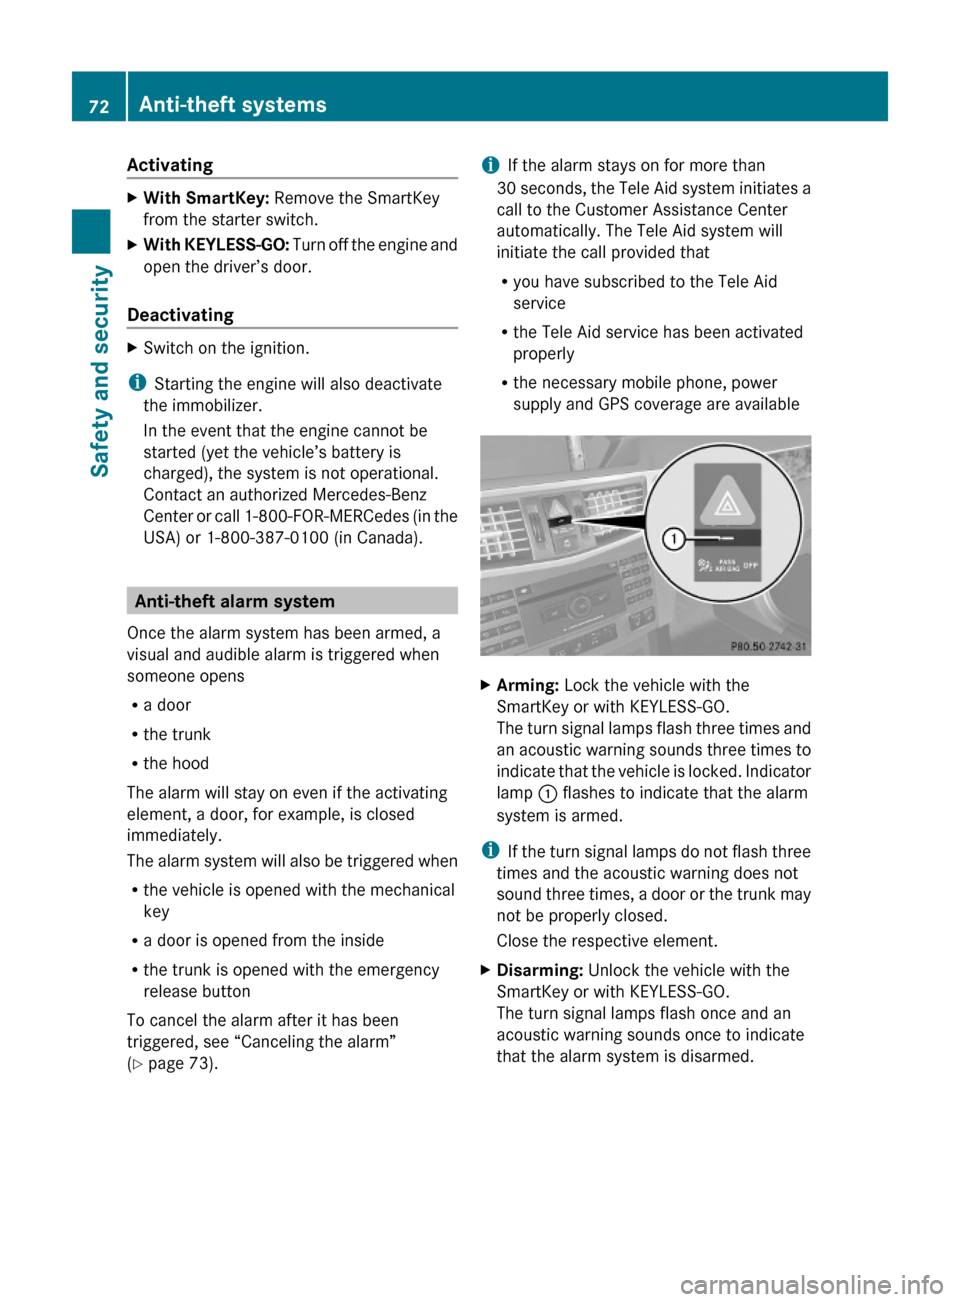
XArming: Lock the vehicle with the
SmartKey or with KEYLESS-GO.
The turn signal lamps flash three times and
an acoustic warning sounds three times to
indicate that the vehicle is locked. Indicator
lamp : flashes to indicate that the alarm
system is armed.
iIf the turn signal lamps do not flash three
times and the acoustic warning does not
sound three times, a door or the trunk may
not be properly closed.
Close the respective element.
XDisarming: Unlock the vehicle with the
SmartKey or with KEYLESS-GO.
The turn signal lamps flash once and an
acoustic warning sounds once to indicate
that the alarm system is disarmed.
72Anti-theft systemsSafety and security
212_AKB; 2; 41, en-USd2ureepe,Version: 2.11.8.12009-07-17T09:14:21+02:00 - Seite 72
Page 85 of 372
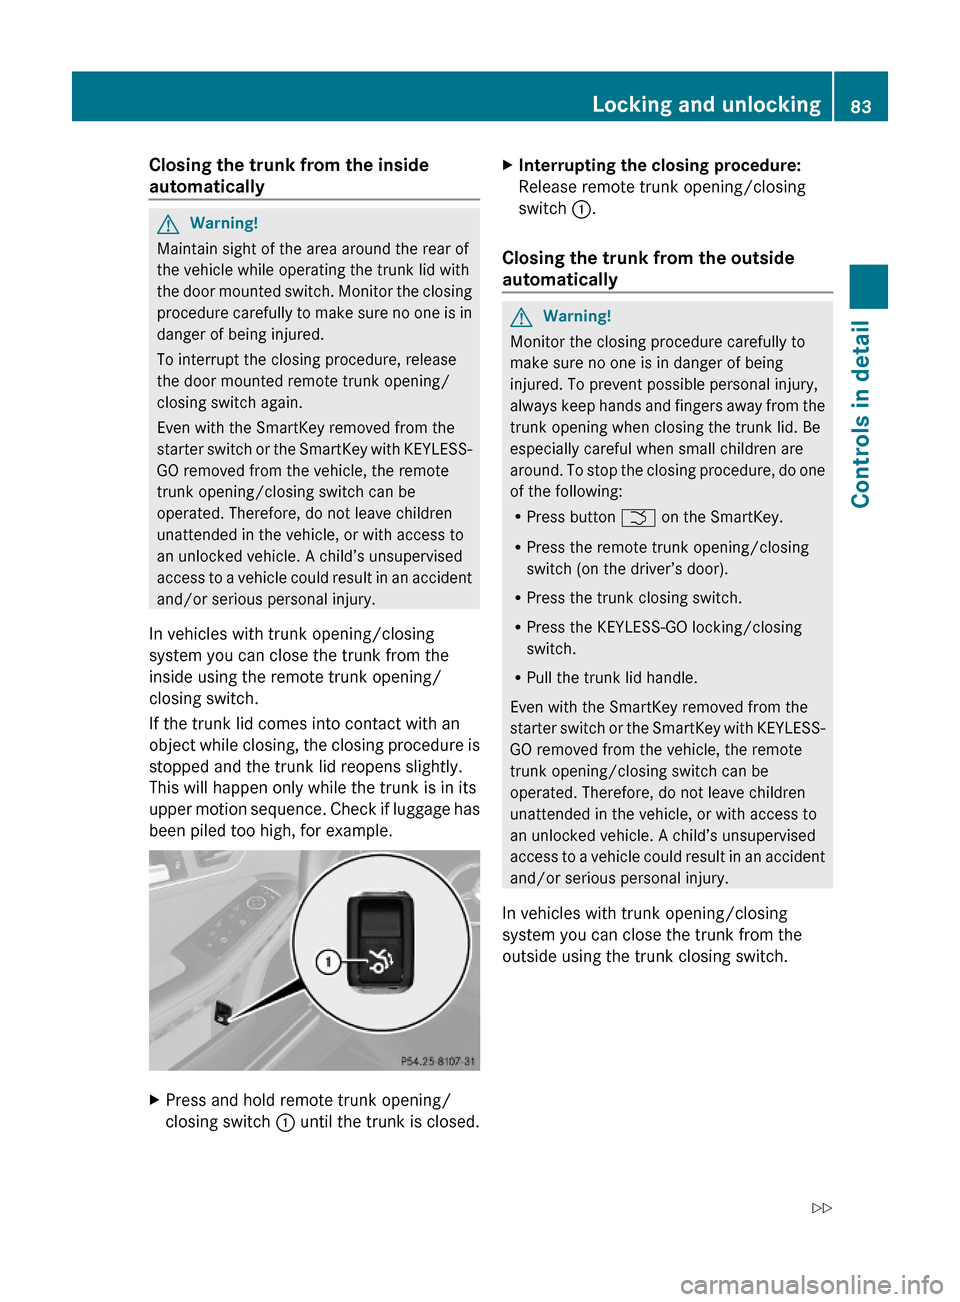
Closing the trunk from the inside
automatically
GWarning!
Maintain sight of the area around the rear of
the vehicle while operating the trunk lid with
the door mounted switch. Monitor the closing
procedure carefully to make sure no one is in
danger of being injured.
To interrupt the closing procedure, release
the door mounted remote trunk opening/
closing switch again.
Even with the SmartKey removed from the
starter switch or the SmartKey with KEYLESS-
GO removed from the vehicle, the remote
trunk opening/closing switch can be
operated. Therefore, do not leave children
unattended in the vehicle, or with access to
an unlocked vehicle. A child’s unsupervised
access to a vehicle could result in an accident
and/or serious personal injury.
In vehicles with trunk opening/closing
system you can close the trunk from the
inside using the remote trunk opening/
closing switch.
If the trunk lid comes into contact with an
object while closing, the closing procedure is
stopped and the trunk lid reopens slightly.
This will happen only while the trunk is in its
upper motion sequence. Check if luggage has
been piled too high, for example.
XPress and hold remote trunk opening/
closing switch : until the trunk is closed.
XInterrupting the closing procedure:
Release remote trunk opening/closing
switch :.
Closing the trunk from the outside
automatically
GWarning!
Monitor the closing procedure carefully to
make sure no one is in danger of being
injured. To prevent possible personal injury,
always keep hands and fingers away from the
trunk opening when closing the trunk lid. Be
especially careful when small children are
around. To stop the closing procedure, do one
of the following:
RPress button F on the SmartKey.
RPress the remote trunk opening/closing
switch (on the driver’s door).
RPress the trunk closing switch.
RPress the KEYLESS-GO locking/closing
switch.
RPull the trunk lid handle.
Even with the SmartKey removed from the
starter switch or the SmartKey with KEYLESS-
GO removed from the vehicle, the remote
trunk opening/closing switch can be
operated. Therefore, do not leave children
unattended in the vehicle, or with access to
an unlocked vehicle. A child’s unsupervised
access to a vehicle could result in an accident
and/or serious personal injury.
In vehicles with trunk opening/closing
system you can close the trunk from the
outside using the trunk closing switch.
Locking and unlocking83Controls in detail212_AKB; 2; 41, en-USd2ureepe,Version: 2.11.8.12009-07-17T09:14:21+02:00 - Seite 83Z
Page 86 of 372
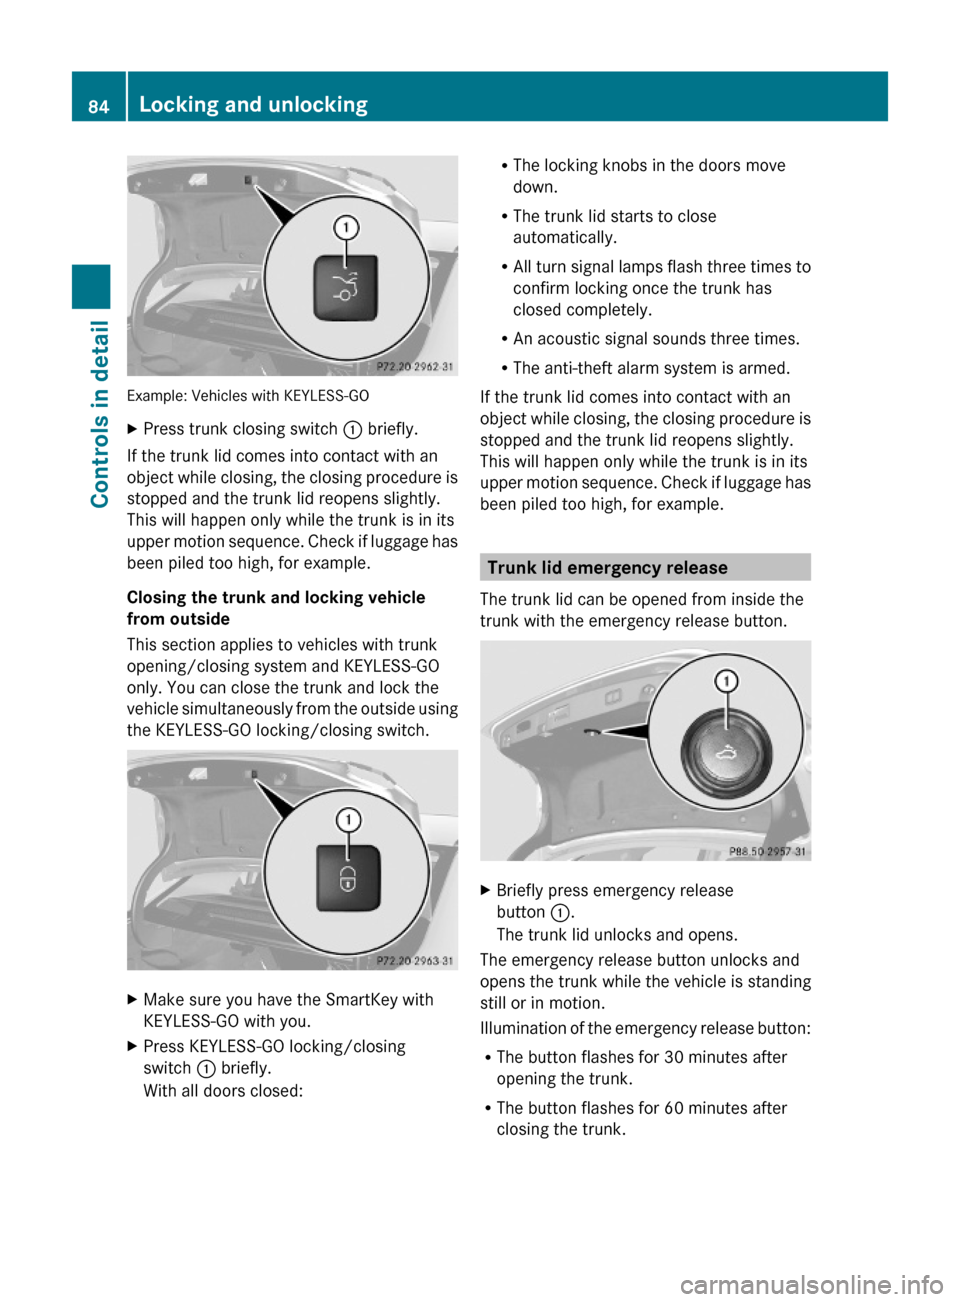
Example: Vehicles with KEYLESS-GO
XPress trunk closing switch : briefly.
If the trunk lid comes into contact with an
object while closing, the closing procedure is
stopped and the trunk lid reopens slightly.
This will happen only while the trunk is in its
upper motion sequence. Check if luggage has
been piled too high, for example.
Closing the trunk and locking vehicle
from outside
This section applies to vehicles with trunk
opening/closing system and KEYLESS-GO
only. You can close the trunk and lock the
vehicle simultaneously from the outside using
the KEYLESS-GO locking/closing switch.
XMake sure you have the SmartKey with
KEYLESS-GO with you.
XPress KEYLESS-GO locking/closing
switch : briefly.
With all doors closed:
RThe locking knobs in the doors move
down.
RThe trunk lid starts to close
automatically.
RAll turn signal lamps flash three times to
confirm locking once the trunk has
closed completely.
RAn acoustic signal sounds three times.
RThe anti-theft alarm system is armed.
If the trunk lid comes into contact with an
object while closing, the closing procedure is
stopped and the trunk lid reopens slightly.
This will happen only while the trunk is in its
upper motion sequence. Check if luggage has
been piled too high, for example.
Trunk lid emergency release
The trunk lid can be opened from inside the
trunk with the emergency release button.
XBriefly press emergency release
button :.
The trunk lid unlocks and opens.
The emergency release button unlocks and
opens the trunk while the vehicle is standing
still or in motion.
Illumination of the emergency release button:
RThe button flashes for 30 minutes after
opening the trunk.
RThe button flashes for 60 minutes after
closing the trunk.
84Locking and unlockingControls in detail
212_AKB; 2; 41, en-USd2ureepe,Version: 2.11.8.12009-07-17T09:14:21+02:00 - Seite 84
Page 87 of 372
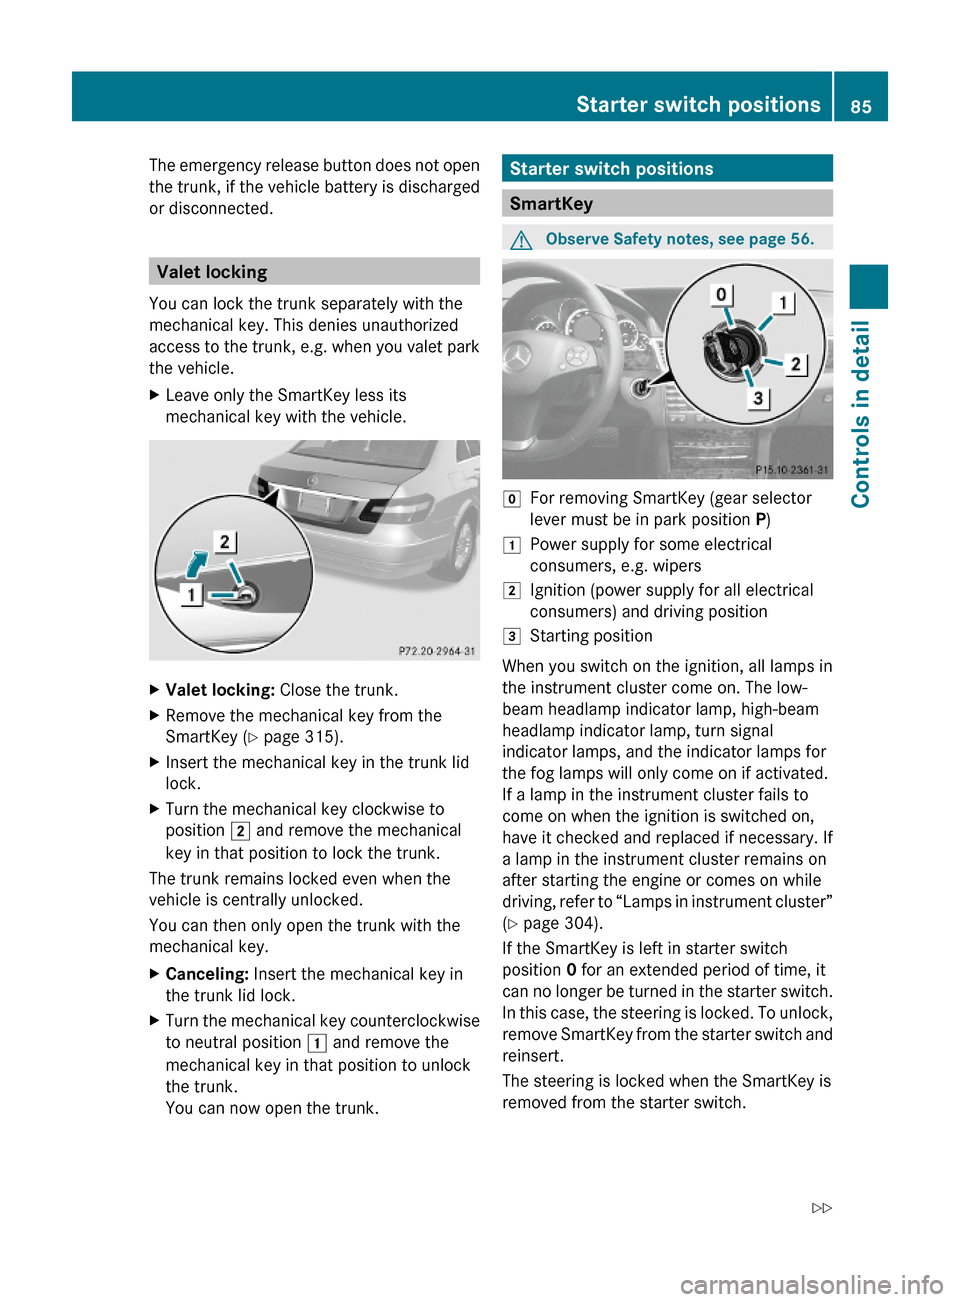
The emergency release button does not open
the trunk, if the vehicle battery is discharged
or disconnected.
Valet locking
You can lock the trunk separately with the
mechanical key. This denies unauthorized
access to the trunk, e.g. when you valet park
the vehicle.
XLeave only the SmartKey less its
mechanical key with the vehicle.
XValet locking: Close the trunk.XRemove the mechanical key from the
SmartKey (Y page 315).
XInsert the mechanical key in the trunk lid
lock.
XTurn the mechanical key clockwise to
position 2 and remove the mechanical
key in that position to lock the trunk.
The trunk remains locked even when the
vehicle is centrally unlocked.
You can then only open the trunk with the
mechanical key.
XCanceling: Insert the mechanical key in
the trunk lid lock.
XTurn the mechanical key counterclockwise
to neutral position 1 and remove the
mechanical key in that position to unlock
the trunk.
You can now open the trunk.
Starter switch positions
SmartKey
GObserve Safety notes, see page 56.gFor removing SmartKey (gear selector
lever must be in park position P)
1Power supply for some electrical
consumers, e.g. wipers
2Ignition (power supply for all electrical
consumers) and driving position
3Starting position
When you switch on the ignition, all lamps in
the instrument cluster come on. The low-
beam headlamp indicator lamp, high-beam
headlamp indicator lamp, turn signal
indicator lamps, and the indicator lamps for
the fog lamps will only come on if activated.
If a lamp in the instrument cluster fails to
come on when the ignition is switched on,
have it checked and replaced if necessary. If
a lamp in the instrument cluster remains on
after starting the engine or comes on while
driving, refer to “Lamps in instrument cluster”
(Y page 304).
If the SmartKey is left in starter switch
position 0 for an extended period of time, it
can no longer be turned in the starter switch.
In this case, the steering is locked. To unlock,
remove SmartKey from the starter switch and
reinsert.
The steering is locked when the SmartKey is
removed from the starter switch.
Starter switch positions85Controls in detail212_AKB; 2; 41, en-USd2ureepe,Version: 2.11.8.12009-07-17T09:14:21+02:00 - Seite 85Z
Page 200 of 372
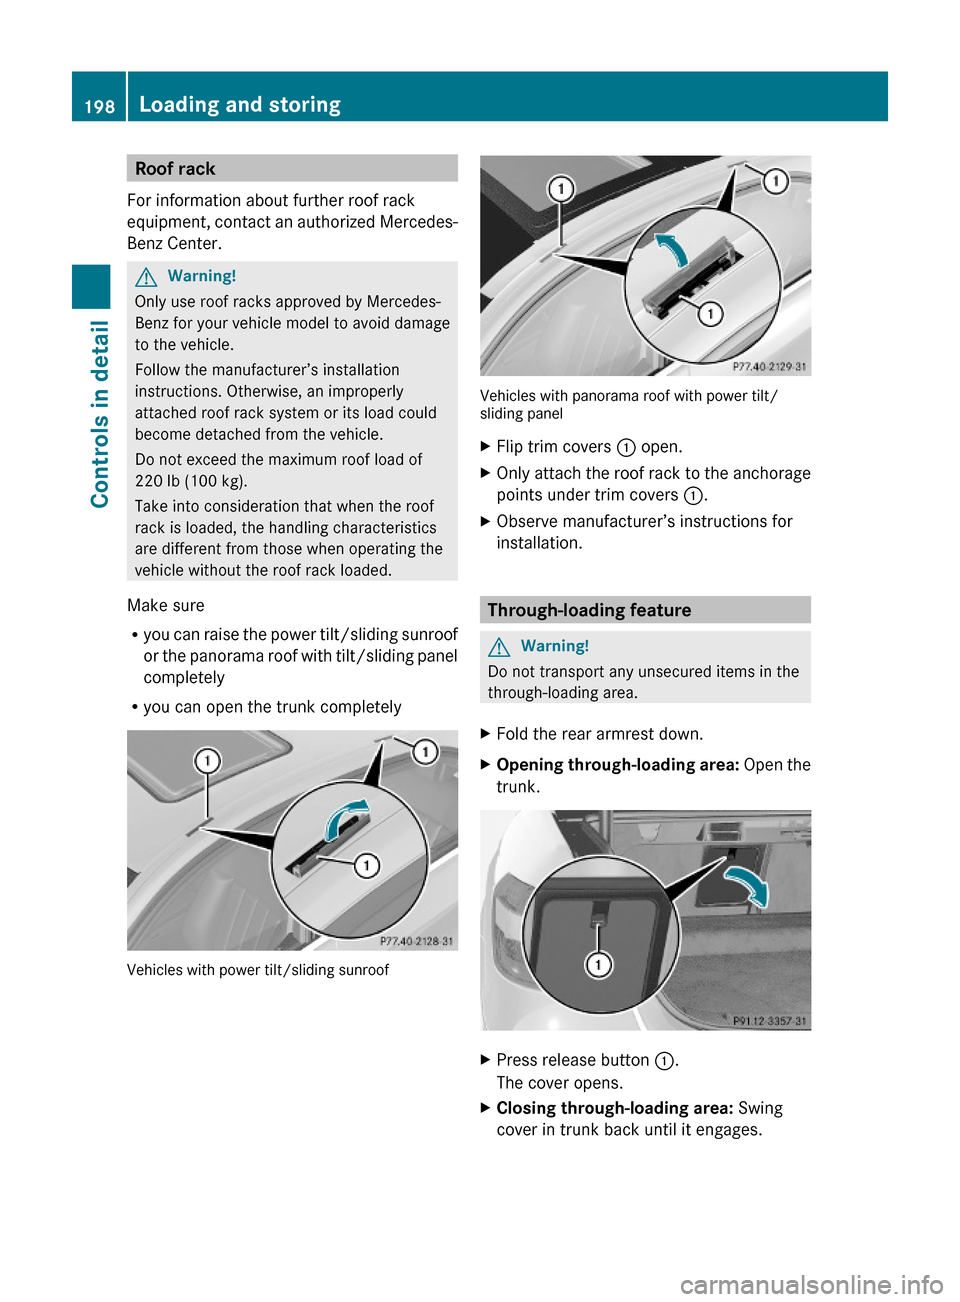
Roof rack
For information about further roof rack
equipment, contact an authorized Mercedes-
Benz Center.
GWarning!
Only use roof racks approved by Mercedes-
Benz for your vehicle model to avoid damage
to the vehicle.
Follow the manufacturer’s installation
instructions. Otherwise, an improperly
attached roof rack system or its load could
become detached from the vehicle.
Do not exceed the maximum roof load of
220 lb (100 kg).
Take into consideration that when the roof
rack is loaded, the handling characteristics
are different from those when operating the
vehicle without the roof rack loaded.
Make sure
Ryou can raise the power tilt/sliding sunroof
or the panorama roof with tilt/sliding panel
completely
Ryou can open the trunk completely
Vehicles with power tilt/sliding sunroof
Vehicles with panorama roof with power tilt/sliding panel
XFlip trim covers : open.XOnly attach the roof rack to the anchorage
points under trim covers :.
XObserve manufacturer’s instructions for
installation.
Through-loading feature
GWarning!
Do not transport any unsecured items in the
through-loading area.
XFold the rear armrest down.XOpening through-loading area: Open the
trunk.
XPress release button :.
The cover opens.
XClosing through-loading area: Swing
cover in trunk back until it engages.
198Loading and storingControls in detail
212_AKB; 2; 41, en-USd2ureepe,Version: 2.11.8.12009-07-17T09:14:21+02:00 - Seite 198
Page 202 of 372
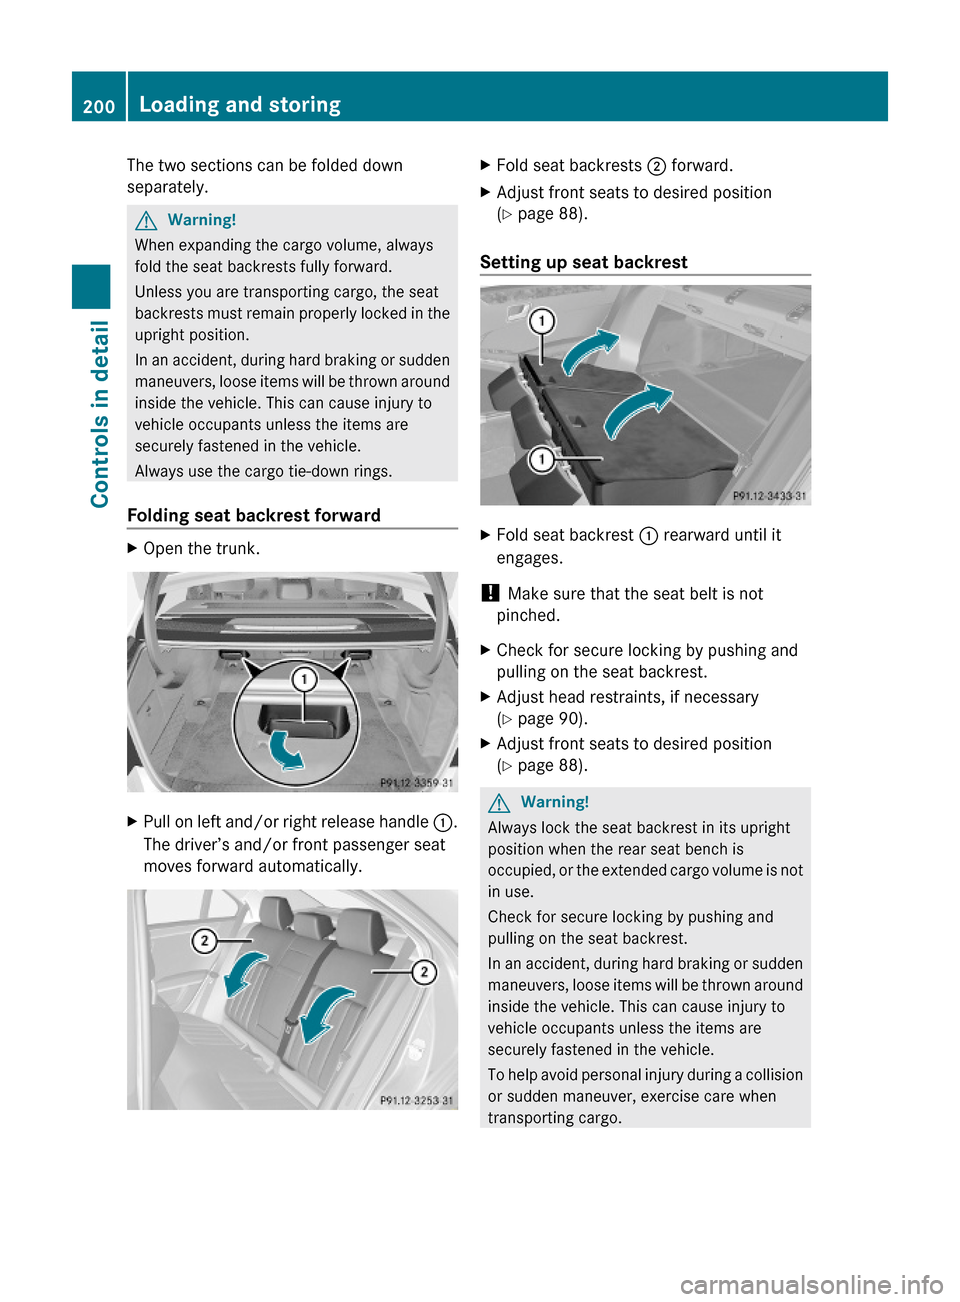
The two sections can be folded down
separately.
GWarning!
When expanding the cargo volume, always
fold the seat backrests fully forward.
Unless you are transporting cargo, the seat
backrests must remain properly locked in the
upright position.
In an accident, during hard braking or sudden
maneuvers, loose items will be thrown around
inside the vehicle. This can cause injury to
vehicle occupants unless the items are
securely fastened in the vehicle.
Always use the cargo tie-down rings.
Folding seat backrest forward
XOpen the trunk.XPull on left and/or right release handle :.
The driver’s and/or front passenger seat
moves forward automatically.
XFold seat backrests ; forward.XAdjust front seats to desired position
(Y page 88).
Setting up seat backrest
XFold seat backrest : rearward until it
engages.
! Make sure that the seat belt is not
pinched.
XCheck for secure locking by pushing and
pulling on the seat backrest.
XAdjust head restraints, if necessary
(Y page 90).
XAdjust front seats to desired position
(Y page 88).
GWarning!
Always lock the seat backrest in its upright
position when the rear seat bench is
occupied, or the extended cargo volume is not
in use.
Check for secure locking by pushing and
pulling on the seat backrest.
In an accident, during hard braking or sudden
maneuvers, loose items will be thrown around
inside the vehicle. This can cause injury to
vehicle occupants unless the items are
securely fastened in the vehicle.
To help avoid personal injury during a collision
or sudden maneuver, exercise care when
transporting cargo.
200Loading and storingControls in detail
212_AKB; 2; 41, en-USd2ureepe,Version: 2.11.8.12009-07-17T09:14:21+02:00 - Seite 200
Page 203 of 372
iTo prevent unauthorized persons from
access to the trunk, always lock the seat
backrests in its upright position.
Front storage compartments
GWarning!
To help avoid personal injury during a collision
or sudden maneuver, exercise care when
storing objects in the vehicle. Put luggage or
cargo in the trunk if possible.
Do not pile luggage or cargo higher than the
seat backrests.
Keep compartment lids closed. This will help
to prevent stored objects from being thrown
about and injuring vehicle occupants during
Rbraking
Rvehicle maneuvers
Ran accident
Glove box
Depending on vehicle equipment, an AUX
socket or a media interface is located in the
glove box. For information on Audio AUX
mode or on media interface, see separate
COMAND system operating instructions.
The glove box can be ventilated
(Y page 188).
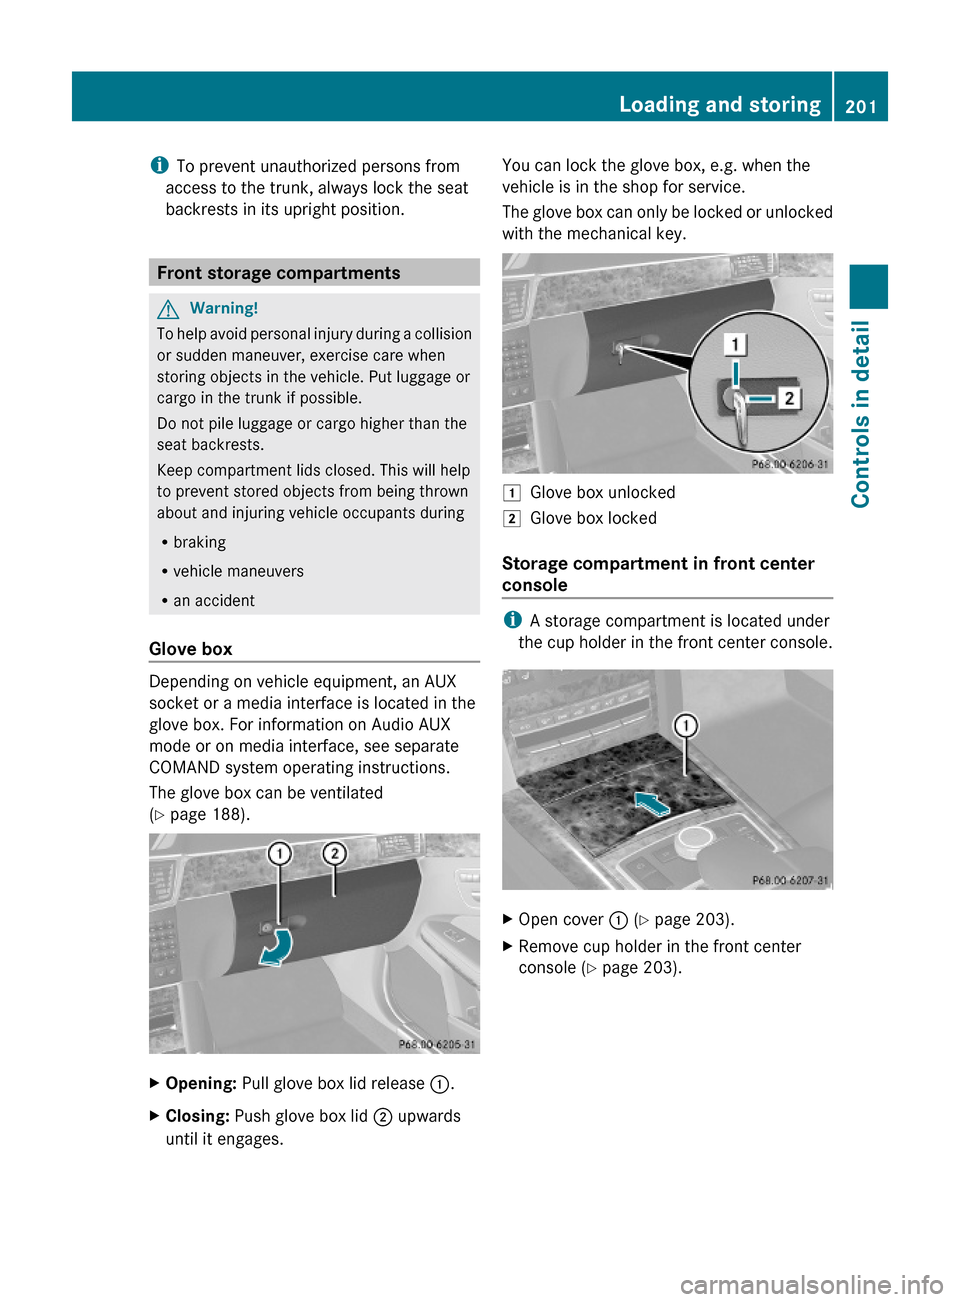
XOpening: Pull glove box lid release :.XClosing: Push glove box lid ; upwards
until it engages.
You can lock the glove box, e.g. when the
vehicle is in the shop for service.
The glove box can only be locked or unlocked
with the mechanical key.
1Glove box unlocked2Glove box locked
Storage compartment in front center
console
iA storage compartment is located under
the cup holder in the front center console.
XOpen cover : (Y page 203).XRemove cup holder in the front center
console (Y page 203).
Loading and storing201Controls in detail212_AKB; 2; 41, en-USd2ureepe,Version: 2.11.8.12009-07-17T09:14:21+02:00 - Seite 201Z