child lock MERCEDES-BENZ E550 4MATIC 2011 W212 Owner's Guide
[x] Cancel search | Manufacturer: MERCEDES-BENZ, Model Year: 2011, Model line: E550 4MATIC, Model: MERCEDES-BENZ E550 4MATIC 2011 W212Pages: 400, PDF Size: 16.3 MB
Page 97 of 400
Problem: a side window cannot be closed
because objects in the guide rail are
preventing the window from being raised.XRemove the objects.XClose the side window.
Problem: a side window cannot be closed,
and you cannot see the cause.
GWarning!
Closing the side windows with increased force
or without the anti-entrapment feature could
lead to serious or even fatal injury. Make sure
that nobody can become trapped when
closing the side windows.
If a side window is obstructed during closing
and reopens again slightly:
XImmediately after the window blocks, pull
on the corresponding switch again until the
side window has closed.
The side window is closed with increased
force.
If a side window is obstructed again during
closing and reopens again slightly:
XImmediately after the window blocks, pull
on the corresponding switch again until the
side window has closed.
The side window is closed without the anti-
entrapment feature.GWarning!
Pulling and holding the switch to close the
door window immediately after it had been
blocked two times will cause the door window
to close without the anti-entrapment feature
for as long as you hold the switch.
Sliding sunroof
Important safety notes
GWarning!
When leaving the vehicle, always remove the
SmartKey from the starter switch. Always
take the SmartKey with you and lock the
vehicle. Do not leave children unattended in
the vehicle, even if they are secured in a child
restraint system, or with access to an
unlocked vehicle. A child's unsupervised
access to a vehicle could result in an accident
and/or serious personal injury. The children
could
R injure themselves on parts of the vehicle
R be seriously or fatally injured through
excessive exposure to extreme heat or cold
R injure themselves or cause an accident with
vehicle equipment that can be operated
even if the SmartKey is removed from the
starter switch or removed from the vehicle,
such as seat adjustment, steering wheel
adjustment, or the memory function
If children open a door, they could injure other
persons or get out of the vehicle and injure
themselves or be injured by following traffic.
Do not expose the child restraint system to
direct sunlight. The child restraint system's
metal parts, for example, could become very
hot, and the child could be burned by these
parts.
GWarning
Do not transport heavy and hard objects in the
vehicle interior or in the trunk/cargo
compartment if they are unsecured.
Unsecured or improperly stowed cargo
increases the risk of injury for a child in the
event of:
R strong braking maneuvers
R sudden changes of direction
R an accident
Sliding sunroof95Opening and closingBA 212 USA, CA Edition B 2011; 1; 5, en-USdimargiVersion: 3.0.3.62010-05-20T13:33:46+02:00 - Seite 95Z
Page 105 of 400
Seats
Important safety notes
GWarning
In order to avoid possible loss of vehicle
control, all seat, head restraint, steering
wheel and rear view mirror adjustments, as
well as fastening of seat belts, must be done
before setting the vehicle in motion.
GWarning
Do not adjust the driver's seat while driving.
Adjusting the seat while driving could cause
the driver to lose control of the vehicle.
Never travel in a moving vehicle with the seat
backrest in an excessively reclined position as
this can be dangerous. You could slide under
the seat belt in a collision. If you slide under
it, the seat belt would apply force at the
abdomen or neck. This could cause serious or
fatal injuries. The seat backrest and seat belts
provide the best restraint when the wearer is
in a position that is as upright as possible and
seat belts are properly positioned on the
body.
GWarning
Your seat belt must be adjusted so that you
can correctly fasten your seat belt.
Observe the following points:
R adjust the seat backrest until your arms are
slightly angled when holding the steering
wheel.
R adjust the seat to a comfortable seating
position that still allows you to reach the
accelerator/brake pedal safely. The
position should be as far back as possible
with the driver still able to operate the
controls properly.
R adjust the head restraint so that it is as
close to the head as possible and the center
of the head restraint supports the back of
the head at eye level.
R never place hands under the seat or near
any moving parts while a seat is being
adjusted.
Failure to do so could result in an accident
and/or serious personal injury.GWarning
The electrically adjustable seats can be
operated at any time. Therefore, do not leave
children unattended in the vehicle, or with
access to an unlocked vehicle. A child's
unsupervised access to a vehicle could result
in an accident and/or serious personal injury.
GWarning!
According to accident statistics, children are
safer when properly restrained in the rear
seating positions than in the front seating
position. Thus, we strongly recommend that
children be placed in the rear seats whenever
possible. Regardless of seating position,
children 12 years old and under must be
seated and properly secured in an
appropriately sized infant restraint, toddler
restraint, or booster seat recommended for
the size and weight of the child. For additional
information, see "Children in the vehicle".
A child's risk of serious or fatal injuries is
significantly increased if the child restraints
are not properly secured in the vehicle and/
or the child is not properly secured in the child
restraint.
GWarning
For your protection, drive only with properly
positioned head restraints.
Adjust the head restraint so that it is as close
to the head as possible and the center of the
head restraint supports the back of the head
at eye level. This will reduce the potential for
injury to the head and neck in the event of an
accident or similar situation.
Seats103Seats, steering wheel and mirrorsBA 212 USA, CA Edition B 2011; 1; 5, en-USdimargiVersion: 3.0.3.62010-05-20T13:33:46+02:00 - Seite 103Z
Page 110 of 400
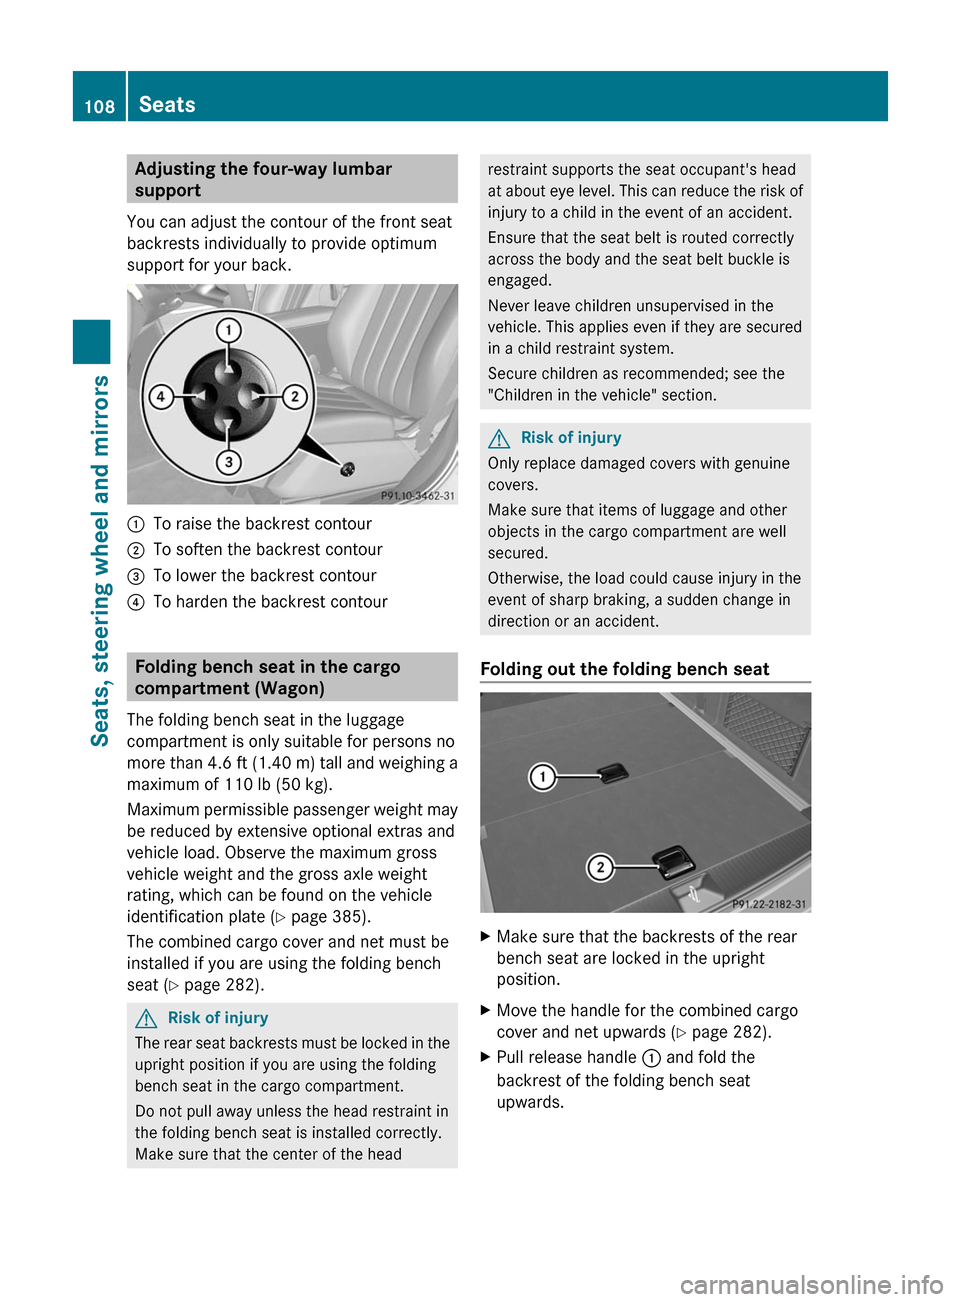
Adjusting the four-way lumbar
support
You can adjust the contour of the front seat
backrests individually to provide optimum
support for your back.
:To raise the backrest contour;To soften the backrest contour=To lower the backrest contour?To harden the backrest contour
Folding bench seat in the cargo
compartment (Wagon)
The folding bench seat in the luggage
compartment is only suitable for persons no
more than 4.6 ft (1.40 m) tall and weighing a
maximum of 110 lb (50 kg).
Maximum permissible passenger weight may
be reduced by extensive optional extras and
vehicle load. Observe the maximum gross
vehicle weight and the gross axle weight
rating, which can be found on the vehicle
identification plate (Y page 385).
The combined cargo cover and net must be
installed if you are using the folding bench
seat (Y page 282).
GRisk of injury
The rear seat backrests must be locked in the
upright position if you are using the folding
bench seat in the cargo compartment.
Do not pull away unless the head restraint in
the folding bench seat is installed correctly.
Make sure that the center of the head
restraint supports the seat occupant's head
at about eye level. This can reduce the risk of
injury to a child in the event of an accident.
Ensure that the seat belt is routed correctly
across the body and the seat belt buckle is
engaged.
Never leave children unsupervised in the
vehicle. This applies even if they are secured
in a child restraint system.
Secure children as recommended; see the
"Children in the vehicle" section.
GRisk of injury
Only replace damaged covers with genuine
covers.
Make sure that items of luggage and other
objects in the cargo compartment are well
secured.
Otherwise, the load could cause injury in the
event of sharp braking, a sudden change in
direction or an accident.
Folding out the folding bench seat
XMake sure that the backrests of the rear
bench seat are locked in the upright
position.
XMove the handle for the combined cargo
cover and net upwards (Y page 282).
XPull release handle : and fold the
backrest of the folding bench seat
upwards.
108SeatsSeats, steering wheel and mirrors
BA 212 USA, CA Edition B 2011; 1; 5, en-USdimargiVersion: 3.0.3.62010-05-20T13:33:46+02:00 - Seite 108
Page 113 of 400
Problems with the seat heating
The seat heating has switched itself off
prematurely or cannot be switched on. The
vehicle's electrical system voltage is too low
because too many electrical consumers are
switched on.
XSwitch off electrical consumers which you
do not need, such as the rear window
defroster or interior lighting.
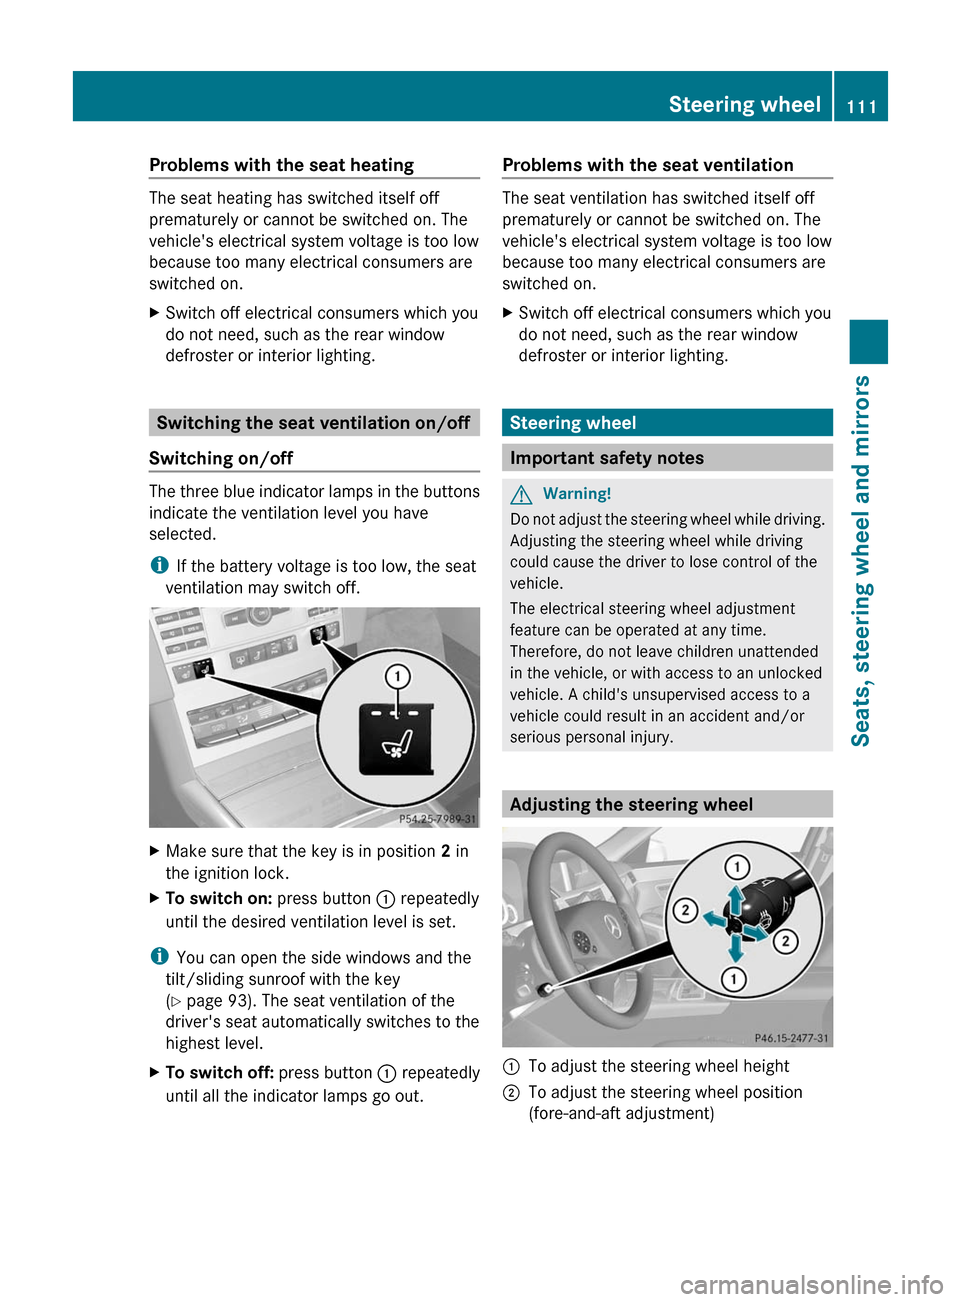
Switching the seat ventilation on/off
Switching on/off
The three blue indicator lamps in the buttons
indicate the ventilation level you have
selected.
iIf the battery voltage is too low, the seat
ventilation may switch off.
XMake sure that the key is in position 2 in
the ignition lock.
XTo switch on: press button : repeatedly
until the desired ventilation level is set.
iYou can open the side windows and the
tilt/sliding sunroof with the key
(Y page 93). The seat ventilation of the
driver's seat automatically switches to the
highest level.
XTo switch off: press button : repeatedly
until all the indicator lamps go out.
Problems with the seat ventilation
The seat ventilation has switched itself off
prematurely or cannot be switched on. The
vehicle's electrical system voltage is too low
because too many electrical consumers are
switched on.
XSwitch off electrical consumers which you
do not need, such as the rear window
defroster or interior lighting.
Steering wheel
Important safety notes
GWarning!
Do not adjust the steering wheel while driving.
Adjusting the steering wheel while driving
could cause the driver to lose control of the
vehicle.
The electrical steering wheel adjustment
feature can be operated at any time.
Therefore, do not leave children unattended
in the vehicle, or with access to an unlocked
vehicle. A child's unsupervised access to a
vehicle could result in an accident and/or
serious personal injury.
Adjusting the steering wheel
:To adjust the steering wheel height;To adjust the steering wheel position
(fore-and-aft adjustment)
Steering wheel111Seats, steering wheel and mirrorsBA 212 USA, CA Edition B 2011; 1; 5, en-USdimargiVersion: 3.0.3.62010-05-20T13:33:46+02:00 - Seite 111Z
Page 114 of 400
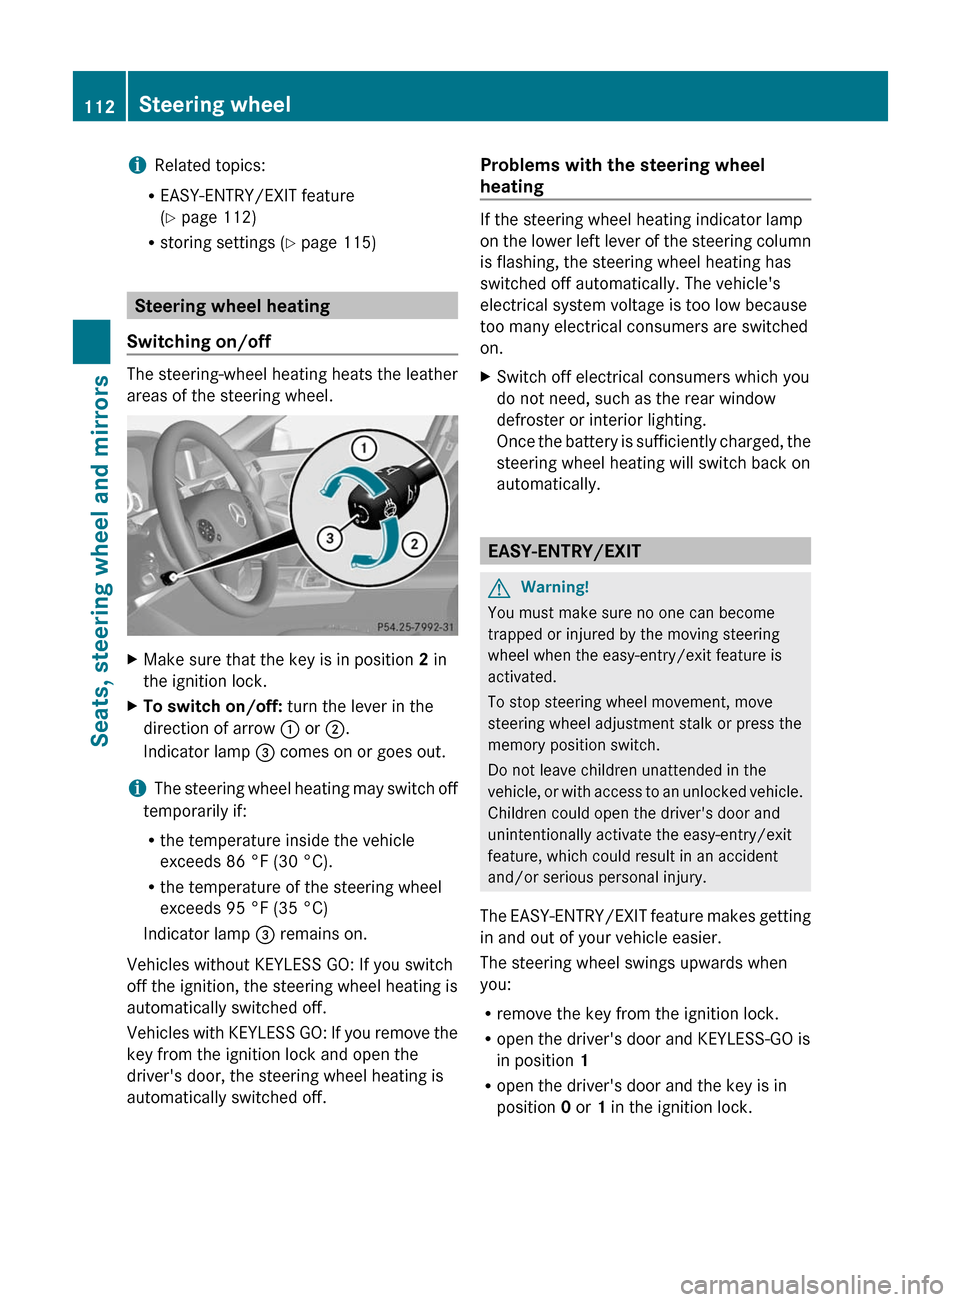
iRelated topics:
REASY-ENTRY/EXIT feature
(Y page 112)
Rstoring settings (Y page 115)
Steering wheel heating
Switching on/off
The steering-wheel heating heats the leather
areas of the steering wheel.
XMake sure that the key is in position 2 in
the ignition lock.
XTo switch on/off: turn the lever in the
direction of arrow : or ;.
Indicator lamp = comes on or goes out.
iThe steering wheel heating may switch off
temporarily if:
Rthe temperature inside the vehicle
exceeds 86 °F (30 °C).
Rthe temperature of the steering wheel
exceeds 95 °F (35 °C)
Indicator lamp = remains on.
Vehicles without KEYLESS GO: If you switch
off the ignition, the steering wheel heating is
automatically switched off.
Vehicles with KEYLESS GO: If you remove the
key from the ignition lock and open the
driver's door, the steering wheel heating is
automatically switched off.
Problems with the steering wheel
heating
If the steering wheel heating indicator lamp
on the lower left lever of the steering column
is flashing, the steering wheel heating has
switched off automatically. The vehicle's
electrical system voltage is too low because
too many electrical consumers are switched
on.
XSwitch off electrical consumers which you
do not need, such as the rear window
defroster or interior lighting.
Once the battery is sufficiently charged, the
steering wheel heating will switch back on
automatically.
EASY-ENTRY/EXIT
GWarning!
You must make sure no one can become
trapped or injured by the moving steering
wheel when the easy-entry/exit feature is
activated.
To stop steering wheel movement, move
steering wheel adjustment stalk or press the
memory position switch.
Do not leave children unattended in the
vehicle, or with access to an unlocked vehicle.
Children could open the driver's door and
unintentionally activate the easy-entry/exit
feature, which could result in an accident
and/or serious personal injury.
The EASY-ENTRY/EXIT feature makes getting
in and out of your vehicle easier.
The steering wheel swings upwards when
you:
Rremove the key from the ignition lock.
Ropen the driver's door and KEYLESS-GO is
in position 1
Ropen the driver's door and the key is in
position 0 or 1 in the ignition lock.
112Steering wheelSeats, steering wheel and mirrors
BA 212 USA, CA Edition B 2011; 1; 5, en-USdimargiVersion: 3.0.3.62010-05-20T13:33:46+02:00 - Seite 112
Page 117 of 400
set the exterior mirror such that the
rear wheel and curb are visible.
XPress memory button M ? and one of
the arrows on adjustment button =
within three seconds.
The parking position is stored if the
exterior mirror does not move.
If the mirror moves out of position, repeat
the steps.
Calling up a stored parking position
setting
XWith the key in position 2 in the ignition
lock and the exterior mirror on the front-
passenger side activated, engage reverse
gear.
The exterior mirror on the front-passenger
side moves to the stored parking position.
The exterior mirror on the front-passenger
side moves back to its original position:
Ras soon as you exceed a speed of 6 mph
(10 km/h)
Rabout ten seconds after you have
disengaged reverse gear
Rif you press button : for the exterior
mirror on the driver's side
Memory functions
Storing settings
With the memory function, you can store up
to three different settings, e.g. for three
different people.
The following settings are stored as a single
memory preset:
Rposition of the seat, backrest and head
restraint
Ractive multicontour seat: dynamic function
level
Rdriver's side: steering wheel position
Rdriver's side: position of the exterior
mirrors on the driver's and front-passenger
sides
GWarning!
The memory function can still be used when
the key has been removed. For this reason,
children should never be left unsupervised in
the vehicle. They could otherwise become
trapped when adjusting the seat or the
steering wheel.
GWarning!
Only use the memory function on the driver's
side when the vehicle is stationary. You could
otherwise be distracted from the traffic
conditions by the steering wheel and seat
moving of their own accord, and as a result
cause an accident.
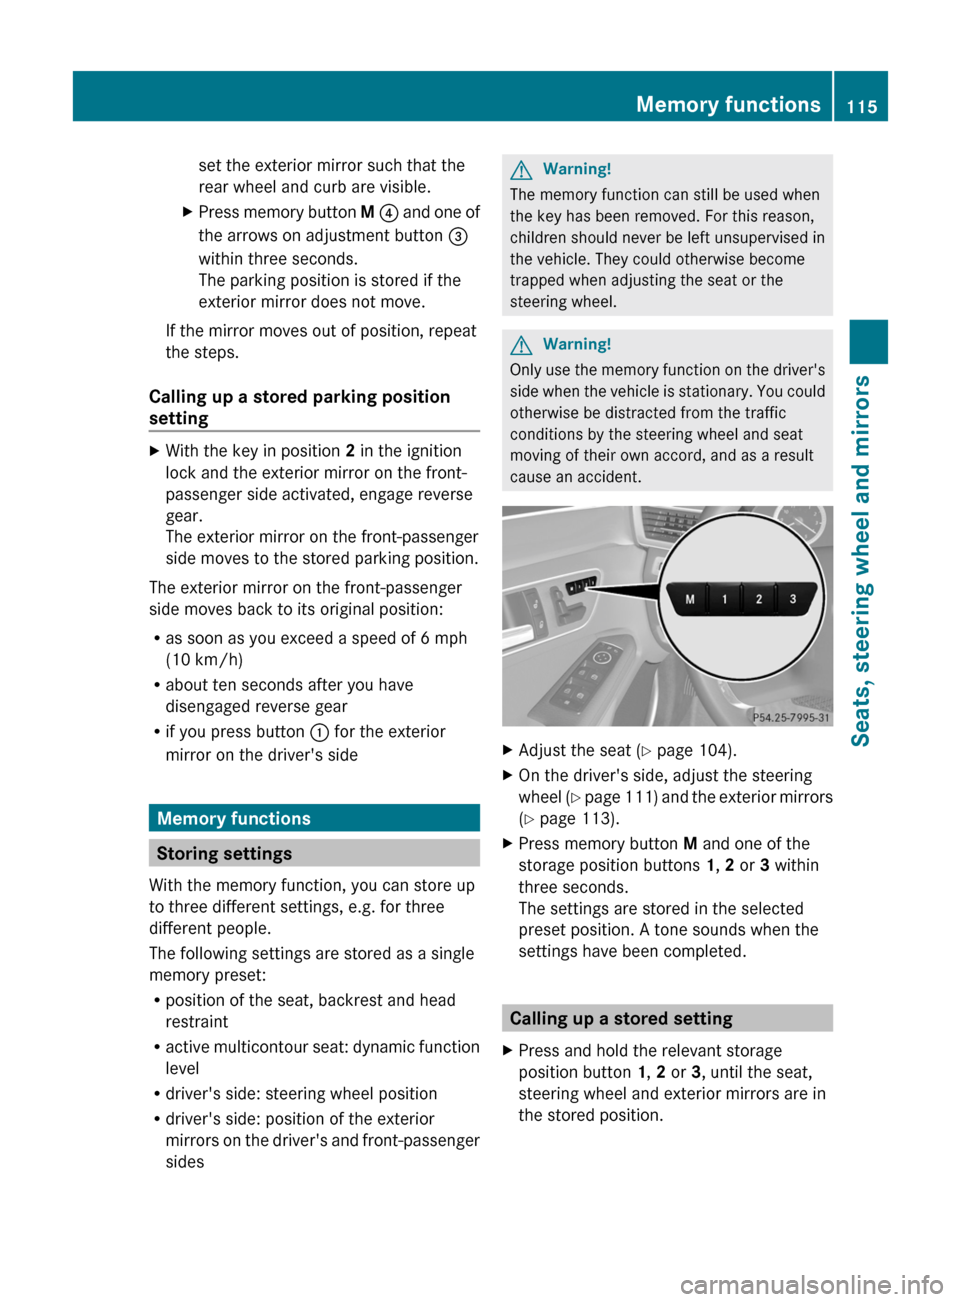
XAdjust the seat (Y page 104).XOn the driver's side, adjust the steering
wheel (Y page 111) and the exterior mirrors
(Y page 113).
XPress memory button M and one of the
storage position buttons 1, 2 or 3 within
three seconds.
The settings are stored in the selected
preset position. A tone sounds when the
settings have been completed.
Calling up a stored setting
XPress and hold the relevant storage
position button 1, 2 or 3, until the seat,
steering wheel and exterior mirrors are in
the stored position.
Memory functions115Seats, steering wheel and mirrorsBA 212 USA, CA Edition B 2011; 1; 5, en-USdimargiVersion: 3.0.3.62010-05-20T13:33:46+02:00 - Seite 115Z
Page 126 of 400
Interior lighting control
Important notes
In order to prevent the vehicle's battery from
discharging, the interior lighting functions are
automatically deactivated after some time
except for when the key is in position 2 in the
ignition lock.
Automatic interior lighting control
XTo switch on/off: press the | button.
When the automatic interior lighting
control is activated, the button is flush with
the overhead control panel.
The interior lighting automatically switches
on if you:
R unlock the vehicle
R open a door
R remove the key from the ignition lock
The interior light is activated for a short while
when the key is removed from the ignition
lock. You can activate this delayed switch-off
using the on-board computer ( Y page 231).
Manual interior lighting control
XTo switch the front interior lighting on/
off: press the c button.XTo switch the rear interior lighting on/
off: press the u button.XTo switch the reading lamps on/off:
press the p button.
Crash-responsive emergency lighting
If the interior lighting is set to automatic, the
interior lighting is activated automatically if
the vehicle is involved in an accident.
XTo switch off the crash-responsive
emergency lighting: press the hazard
warning lamp button.
or
XLock and then unlock the vehicle using the
key.Changing bulbs
Important safety notes
Xenon bulbs
If your vehicle is equipped with Xenon bulbs,
you can recognize this by the following: the
cone of light from the Xenon bulbs moves
from the top to the bottom and back again
when you start the engine. For this to be
observed, the lights must be switched on
before starting the engine.
GWarning!
Xenon bulbs carry a high voltage. You could
get an electric shock and be seriously or even
fatally injured if you touch the electric
contacts on Xenon bulbs. Therefore, never
remove the cover from Xenon bulbs.
Do not change Xenon bulbs yourself, but have
them replaced at a qualified specialist
workshop which has the necessary specialist
knowledge and tools to carry out the work
required.
Mercedes-Benz recommends that you use an
authorized Mercedes-Benz Center for this
purpose. In particular, work relevant to safety
or on safety-related systems must be carried
out at a qualified specialist workshop.
Bulbs and lamps are an important aspect of
vehicle safety. You must therefore make sure
that these function correctly at all times.
Have the headlamp setting checked regularly.
Other bulbs
GWarning!
Bulbs and lamps can be very hot. You should
therefore allow them to cool down before you
change them. Otherwise, you could be burned
if you touch them.
Keep bulbs out of the reach of children.
Otherwise, they could damage the bulbs, for
example, and injure themselves.
124Changing bulbsLights and windshield wipers
BA 212 USA, CA Edition B 2011; 1; 5, en-USdimargiVersion: 3.0.3.62010-05-20T13:33:46+02:00 - Seite 124
Page 153 of 400
indicator lamp does not go out after the
engine is started or if it lights up while the
vehicle is in motion, see ( Y page 263).
Starting the engine
Important safety notes
GWarning
Inhalation of exhaust gas is hazardous to your
health. All exhaust gas contains carbon
monoxide (CO), and inhaling it can cause
unconsciousness and possible death.
Do not run the engine in confined areas (such
as a garage) which are not properly ventilated.
If you think that exhaust gas fumes are
entering the vehicle while driving, have the
cause determined and corrected
immediately. If you must drive under these
conditions, drive only with at least one
window fully open at all times.
! Do not depress the accelerator pedal
when starting the engine.
Automatic transmission
XShift the transmission to position P.
i
The transmission position display in the
multifunction display shows P.
Starting procedure with the SmartKey
XTo start a gasoline engine: turn the
SmartKey to position 3 in the ignition lock
( Y page 149) and release it as soon as the
engine is running.XTo start a diesel engine: turn the
SmartKey to position 2 in the ignition lock
( Y page 149).
The % preglow indicator lamp in the
instrument cluster lights up.XWhen the % preglow indicator lamp
goes out, turn the SmartKey to position 3
( Y page 149) and release it as soon as the
engine is running.i You can start the engine without preglow
if the engine is warm.
Using KEYLESS-GO to start the engineGWarning!
As long as the SmartKey is in your vehicle, the
vehicle can be started. Therefore, never leave
children unattended in the vehicle, as they
could otherwise accidentally start the engine.
When leaving the vehicle, always take the
SmartKey with you and lock the vehicle. Do
not leave children unattended in the vehicle,
or with access to an unlocked vehicle. A
child's unsupervised access to a vehicle could
result in an accident and/or serious personal
injury.
i The Start/Stop button can be used to
start the vehicle without inserting the
SmartKey in the ignition lock. The
SmartKey must be in the vehicle.
XThe Start/Stop button must be inserted in
the ignition lock.
i To start the engine with the SmartKey
instead of with KEYLESS-GO, remove the
Start/Stop button from the ignition lock.
XDepress the brake pedal and keep it
depressed.XTo start a gasoline engine: press the
Start/Stop button ( Y page 150) once.
The engine starts.XTo start a diesel engine: press the Start/
Stop button ( Y page 150) once.
Preglow is activated and the engine starts.
i If the engine is warm, the preglow time is
shortened.
Pulling away
Automatic transmission
GWarning
It is dangerous to shift the automatic
transmission out of parking position P or
Driving151Driving and parkingBA 212 USA, CA Edition B 2011; 1; 5, en-USdimargiVersion: 3.0.3.62010-05-20T13:33:46+02:00 - Seite 151Z
Page 158 of 400

! If the engine speed is too high or the
vehicle is moving, do not shift the
automatic transmission directly from D to
R , from R to D or directly to P. The
automatic transmission could otherwise be
damaged.
HOLD function or DISTRONIC PLUS: if you
brake the vehicle using the HOLD function or
DISTRONIC PLUS, the automatic
transmission shifts to transmission position
P automatically. In addition, at least one of
the following conditions must be fulfilled:
R the engine is switched off.
R the driver's door is open and the seat belt
is not in the buckle.
Shifting to park position P in AMG
vehiclesXWhen the vehicle is stationary, press
button P : .
Engaging reverse gear R
!
Only shift the automatic transmission to
R when the vehicle is stationary.
XWhen the vehicle is stationary, depress the
brake pedal.XPush the DIRECT SELECT lever up past the
first point of resistance.Shifting to neutral NXWhen the vehicle is stationary, depress the
brake pedal.XPush the DIRECT SELECT lever up or down
to the first point of resistance.
When the engine is switched off, the
automatic transmission shifts to N
automatically.
Remaining in neutral N
If you wish to keep the automatic
transmission in neutral N, e.g. to wash the
vehicle in a car wash with a towing device,
observe the following:
GWarning!
When leaving the SmartKey in the starter
switch, do not leave children unattended in
the vehicle. It is possible for children to switch
on the ignition which could result in
unsupervised use of vehicle equipment.
Unsupervised use of vehicle equipment could
result in an accident and/or serious personal
injury.
Using the SmartKey:
R make sure the ignition is switched on.
R when the vehicle is stationary, depress the
brake pedal and keep it depressed.
R shift to neutral N.
R release the brake pedal.
R if applied, release the parking brake.
R switch off the ignition and leave the
SmartKey in the ignition lock.
Using KEYLESS-GO:
R make sure the ignition is switched on.
R when the vehicle is stationary, depress the
brake pedal and keep it depressed.
R shift to park position P.
R release the brake pedal.
R remove the Start/Stop button from the
ignition lock.
R insert the SmartKey into the ignition lock.
R switch on the ignition.
156Automatic transmissionDriving and parking
BA 212 USA, CA Edition B 2011; 1; 5, en-USdimargiVersion: 3.0.3.62010-05-20T13:33:46+02:00 - Seite 156
Page 170 of 400
specialist workshop, e.g. an authorized
Mercedes-Benz Center.
Use the special AdBlue ®
refill bottle when
adding between maintenance intervals. For
more information, please contact an
authorized Mercedes-Benz Center or
Roadside Assistance if applicable
( Y page 21).
Further information about BlueTEC exhaust
gas aftertreatment and AdBlue ®
is available
at any authorized Mercedes-Benz Center.
Adding AdBlue ®GWarning!
Make sure
R AdBlue ®
does not come into contact with
skin, eyes, or clothing
R to keep AdBlue ®
out of the reach of children
If you and/or others have come into contact
with AdBlue ®
:
R If AdBlue ®
has gotten into contact with
eyes, flush with plenty of water immediately
and seek medical help.
R Clean affected skin immediately with plenty
of water.
R If AdBlue ®
was swallowed, rinse mouth
immediately with plenty of water and drink
plenty of water. Consult a physician.
GWarning!
When opening the filler cap of the AdBlue ®
tank ammonia gas vapors may escape. Refill
AdBlue ®
in a well ventilated area only.
Ammonia gas vapors have a pungent odor and
are particularly irritating for your skin,
mucous membranes, and eyes. Inhaling
ammonia gas vapors will cause burning eyes,
nose, and throat, as well as coughing and
watering eyes.
! Only use AdBlue ®
that complies with
ISO 22241. Do not add any special
additives to AdBlue ®
and do not thin
AdBlue ®
with water. This could destroy the
BlueTEC exhaust gas aftertreatment.
! Rinse surfaces that have come into
contact with AdBlue ®
immediately with
water or remove AdBlue ®
using a damp
cloth and cold water. If the AdBlue ®
has
already crystallized, use a sponge and cold
water to clean it. AdBlue ®
residues
crystallize after time and contaminate the
affected surfaces.
! AdBlue ®
is not a additive and must not be
added to the diesel tank. If AdBlue ®
is
added to the diesel tank this could damage
the engine.
i If you are adding between maintenance
intervals, add approximately 1 gallon (3.8 l)
of AdBlue ®
to the AdBlue ®
tank. 1 gallon
(3.8 l) of AdBlue ®
is approximately
2 AdBlue ®
refill bottles.
Further information about
AdBlue ®
(Y page 390).
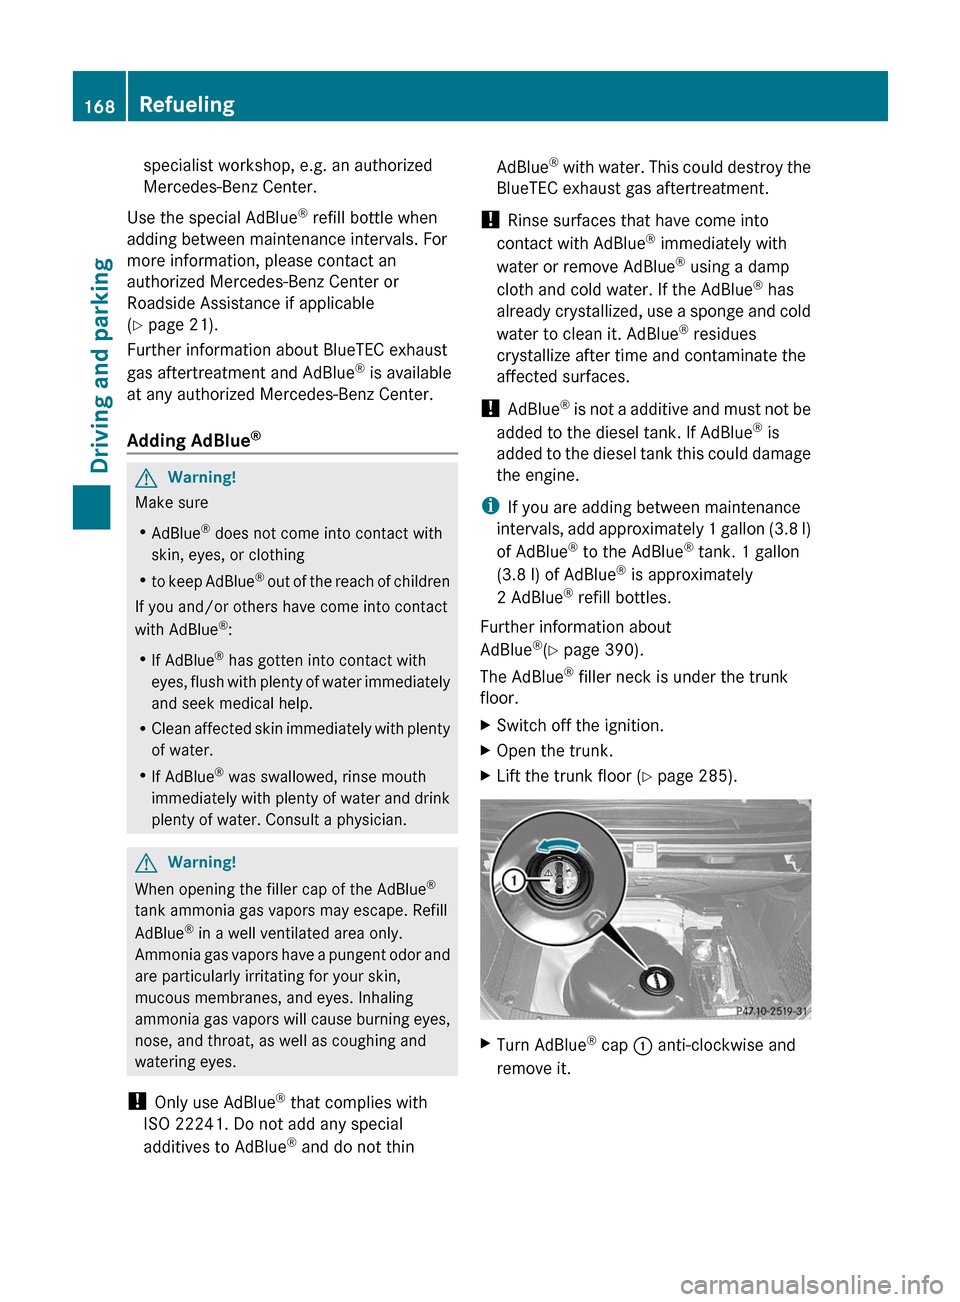
The AdBlue ®
filler neck is under the trunk
floor.XSwitch off the ignition.XOpen the trunk.XLift the trunk floor ( Y page 285).XTurn AdBlue ®
cap : anti-clockwise and
remove it.168RefuelingDriving and parking
BA 212 USA, CA Edition B 2011; 1; 5, en-USdimargiVersion: 3.0.3.62010-05-20T13:33:46+02:00 - Seite 168