glove box MERCEDES-BENZ E63AMG 2010 W212 Owner's Manual
[x] Cancel search | Manufacturer: MERCEDES-BENZ, Model Year: 2010, Model line: E63AMG, Model: MERCEDES-BENZ E63AMG 2010 W212Pages: 372, PDF Size: 8.55 MB
Page 12 of 372
Generatorsee Alternator
Global locking/unlocking
see Key, SmartKey
Glove box ........................................... 201
Gross Axle Weight Rating see GAWR
Gross Vehicle Weight
see GVW
Gross Vehicle Weight Rating
see GVWR
GVW (Gross Vehicle Weight) ............ 250
GVWR (Gross Vehicle Weight
Rating) ................................................ 250
H
Halogen headlamps see Headlamps
Hard plastic trim items, cleaning .... 265
Hazard warning flasher .................... 101
Headlamp cleaning system .............. 102
Headlamps
Active Bi-Xenon headlamps .............97
Adaptive Highbeam Assist .............100
Automatic headlamp mode ..............98
Bi-Xenon .................................. 97, 319
Cleaning lenses ............................. 262
Cleaning system ............................ 102
Daytime running lamp mode ............98
Delayed shut-off ............................ 142
Halogen ......................................... 319
High-beam flasher .........................101
High-beam headlamps ...................100
Low-beam headlamps ......................98
Messages in the multifunction
display ........................................... 299
Replacing bulbs ............................. 318
Switch .............................................. 97
Headliner and shelf below rear
window, cleaning and care of .......... 266
Head restraints .................................... 87
Adjustment ................................ 87, 89
Comfort head restraint ....................89
Folding back .................................... 89
NECK-PRO active front head
restraints ......................................... 54
Rear seat head restraints ................. 89
Heated steering wheel ........................ 94
Height adjustment
Seat belt outlet ................................ 51
Seats ............................................... 87
Vehicle level control ......................163
High-beam flasher ............................. 101
High-beam headlamps .............. 100, 319
Adaptive Highbeam Assist .............100
Indicator lamp .................................. 29
Replacing bulbs ............................. 319
High-performance brake system ..... 256
Hill-start assist system ..................... 160
HOLD function ................................... 161
Hood ................................................... 223
Messages in the multifunction
display ........................................... 293
Hydroplaning ..................................... 257
I
Identification labels .......................... 346
Identification number, vehicle
(VIN) ................................................... 346
Ignition ................................... 85, 86, 110
Immobilizer .......................................... 71
Indicator lamps see Lamps, indicator and warning
Infant and child restraint systems
see Children in the vehicle
Inflation pressure
see Tires, Inflation pressure
Inside door handle .............................. 80
Instrument cluster ...................... 28, 125
Illumination .................................... 125
Lamps ............................................ 304
Multifunction display .....................128
Instrument lighting
see Instrument cluster, Illumination
Instrument panel
see Instrument cluster
Instruments and controls
see Cockpit
Interior lighting
Delayed shut-off ............................ 143
Emergency lighting ........................103
Front .............................................. 103
Front reading lamps .......................103
10Index212_AKB; 2; 41, en-USd2ureepe,Version: 2.11.8.12009-07-17T09:14:21+02:00 - Seite 10
Page 29 of 372
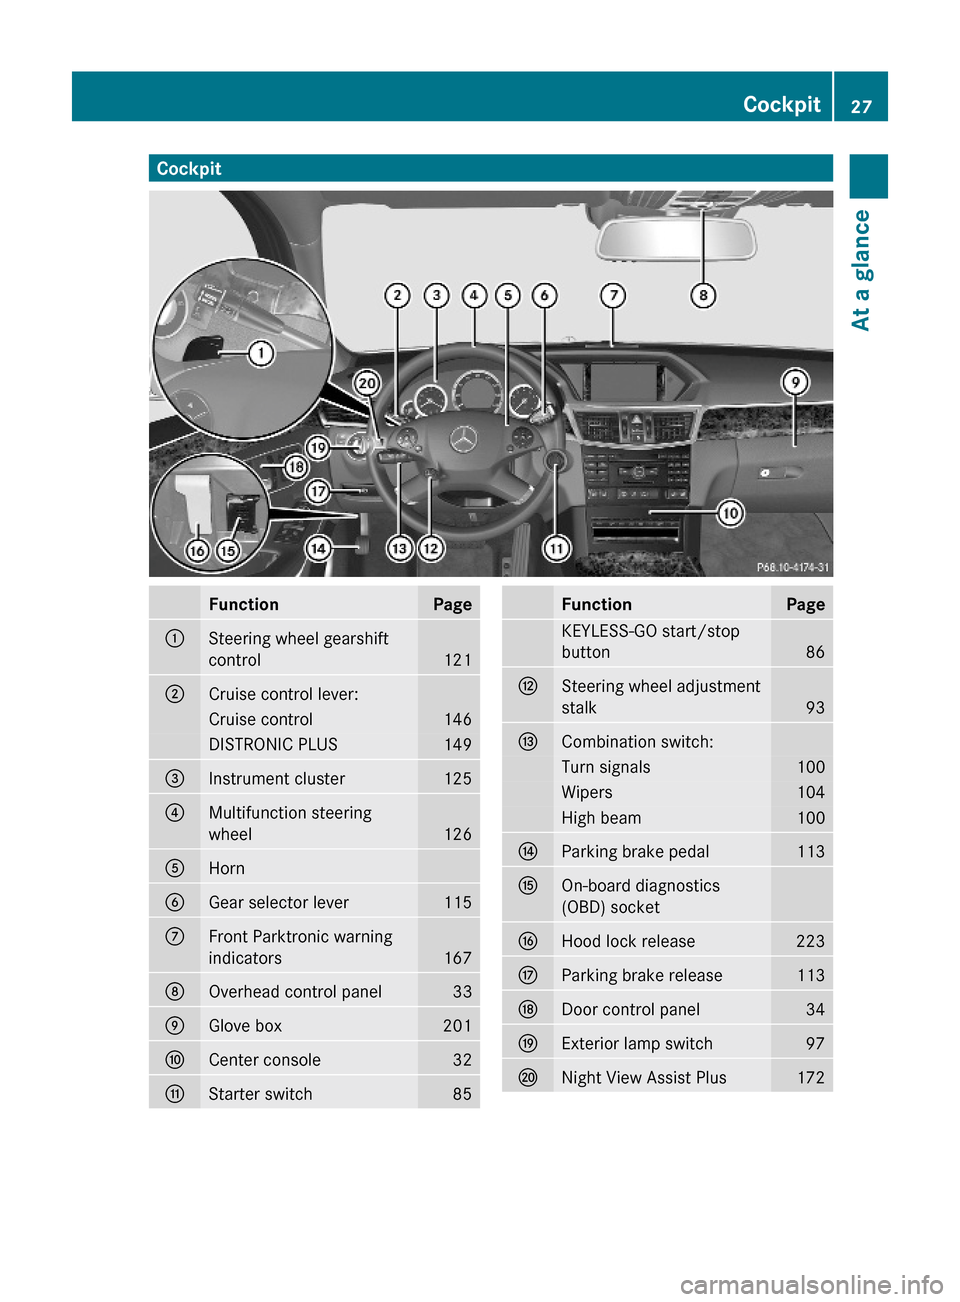
CockpitFunctionPage:Steering wheel gearshift
control121
;Cruise control lever:Cruise control146DISTRONIC PLUS149=Instrument cluster125?Multifunction steering
wheel126
AHornBGear selector lever115CFront Parktronic warning
indicators 167
DOverhead control panel33EGlove box201FCenter console32GStarter switch85FunctionPageKEYLESS-GO start/stop
button86
HSteering wheel adjustment
stalk93
ICombination switch:Turn signals100Wipers104High beam100JParking brake pedal113KOn-board diagnostics
(OBD) socket
LHood lock release223MParking brake release113NDoor control panel34OExterior lamp switch97PNight View Assist Plus172Cockpit27At a glance212_AKB; 2; 41, en-USd2ureepe,Version: 2.11.8.12009-07-17T09:14:21+02:00 - Seite 27Z
Page 190 of 372
Side air vents
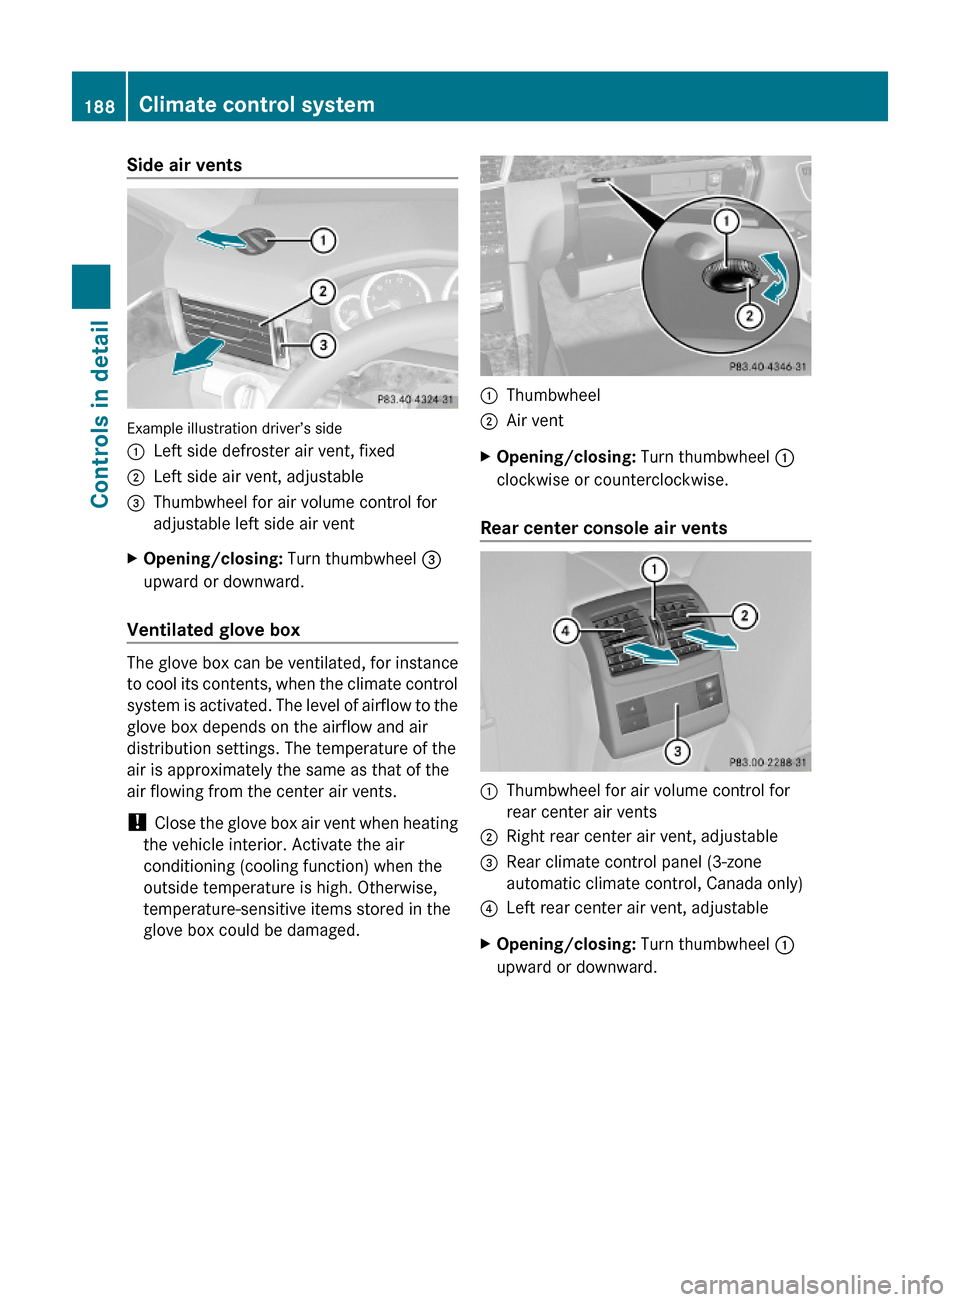
Example illustration driver’s side
:Left side defroster air vent, fixed;Left side air vent, adjustable=Thumbwheel for air volume control for
adjustable left side air vent
XOpening/closing: Turn thumbwheel =
upward or downward.
Ventilated glove box
The glove box can be ventilated, for instance
to cool its contents, when the climate control
system is activated. The level of airflow to the
glove box depends on the airflow and air
distribution settings. The temperature of the
air is approximately the same as that of the
air flowing from the center air vents.
! Close the glove box air vent when heating
the vehicle interior. Activate the air
conditioning (cooling function) when the
outside temperature is high. Otherwise,
temperature-sensitive items stored in the
glove box could be damaged.
:Thumbwheel;Air ventXOpening/closing: Turn thumbwheel :
clockwise or counterclockwise.
Rear center console air vents
:Thumbwheel for air volume control for
rear center air vents
;Right rear center air vent, adjustable=Rear climate control panel (3-zone
automatic climate control, Canada only)
?Left rear center air vent, adjustableXOpening/closing: Turn thumbwheel :
upward or downward.
188Climate control systemControls in detail
212_AKB; 2; 41, en-USd2ureepe,Version: 2.11.8.12009-07-17T09:14:21+02:00 - Seite 188
Page 203 of 372
iTo prevent unauthorized persons from
access to the trunk, always lock the seat
backrests in its upright position.
Front storage compartments
GWarning!
To help avoid personal injury during a collision
or sudden maneuver, exercise care when
storing objects in the vehicle. Put luggage or
cargo in the trunk if possible.
Do not pile luggage or cargo higher than the
seat backrests.
Keep compartment lids closed. This will help
to prevent stored objects from being thrown
about and injuring vehicle occupants during
Rbraking
Rvehicle maneuvers
Ran accident
Glove box
Depending on vehicle equipment, an AUX
socket or a media interface is located in the
glove box. For information on Audio AUX
mode or on media interface, see separate
COMAND system operating instructions.
The glove box can be ventilated
(Y page 188).
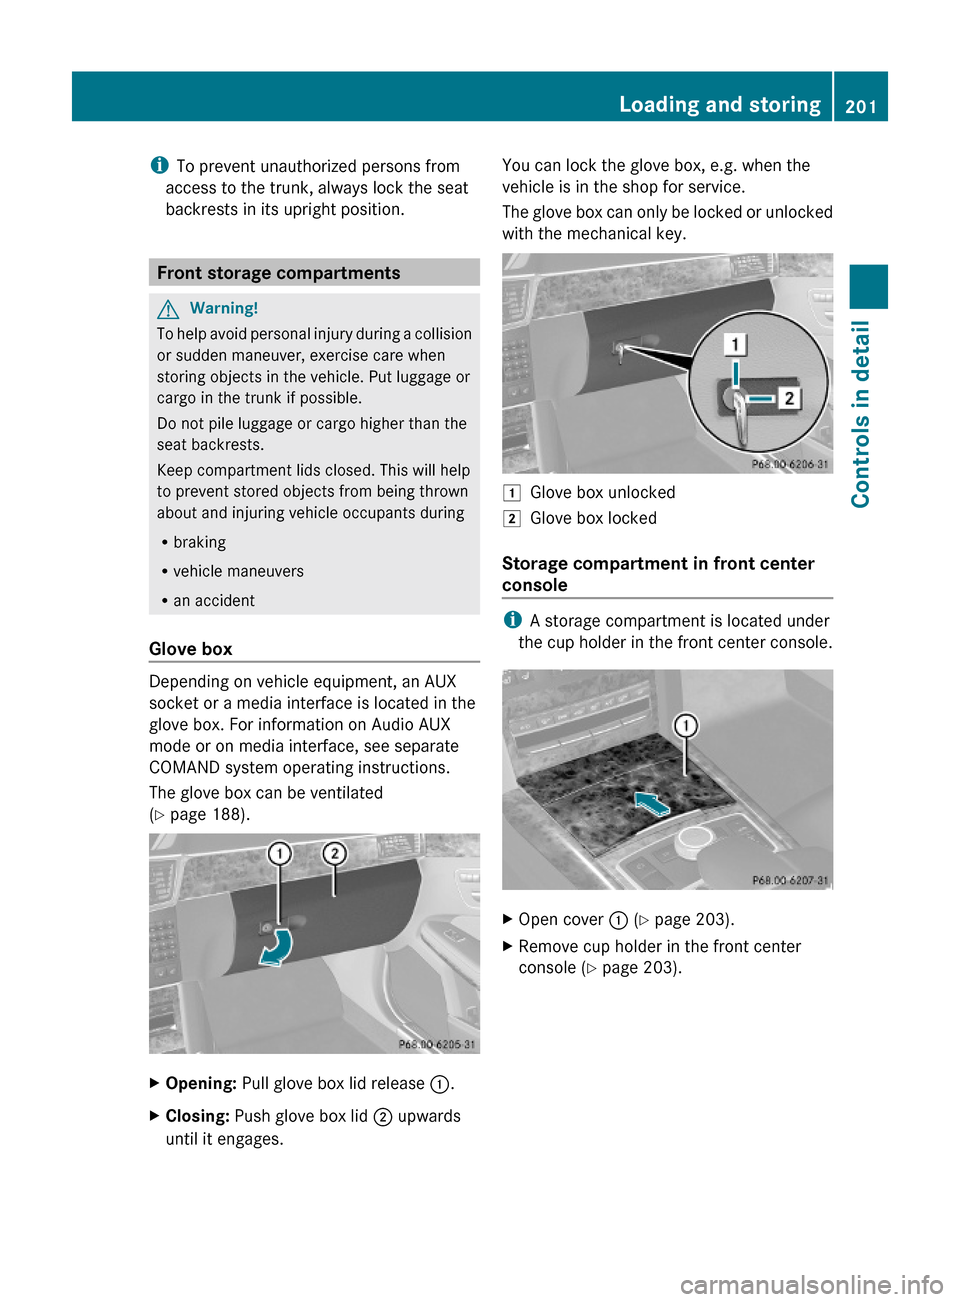
XOpening: Pull glove box lid release :.XClosing: Push glove box lid ; upwards
until it engages.
You can lock the glove box, e.g. when the
vehicle is in the shop for service.
The glove box can only be locked or unlocked
with the mechanical key.
1Glove box unlocked2Glove box locked
Storage compartment in front center
console
iA storage compartment is located under
the cup holder in the front center console.
XOpen cover : (Y page 203).XRemove cup holder in the front center
console (Y page 203).
Loading and storing201Controls in detail212_AKB; 2; 41, en-USd2ureepe,Version: 2.11.8.12009-07-17T09:14:21+02:00 - Seite 201Z
Page 209 of 372
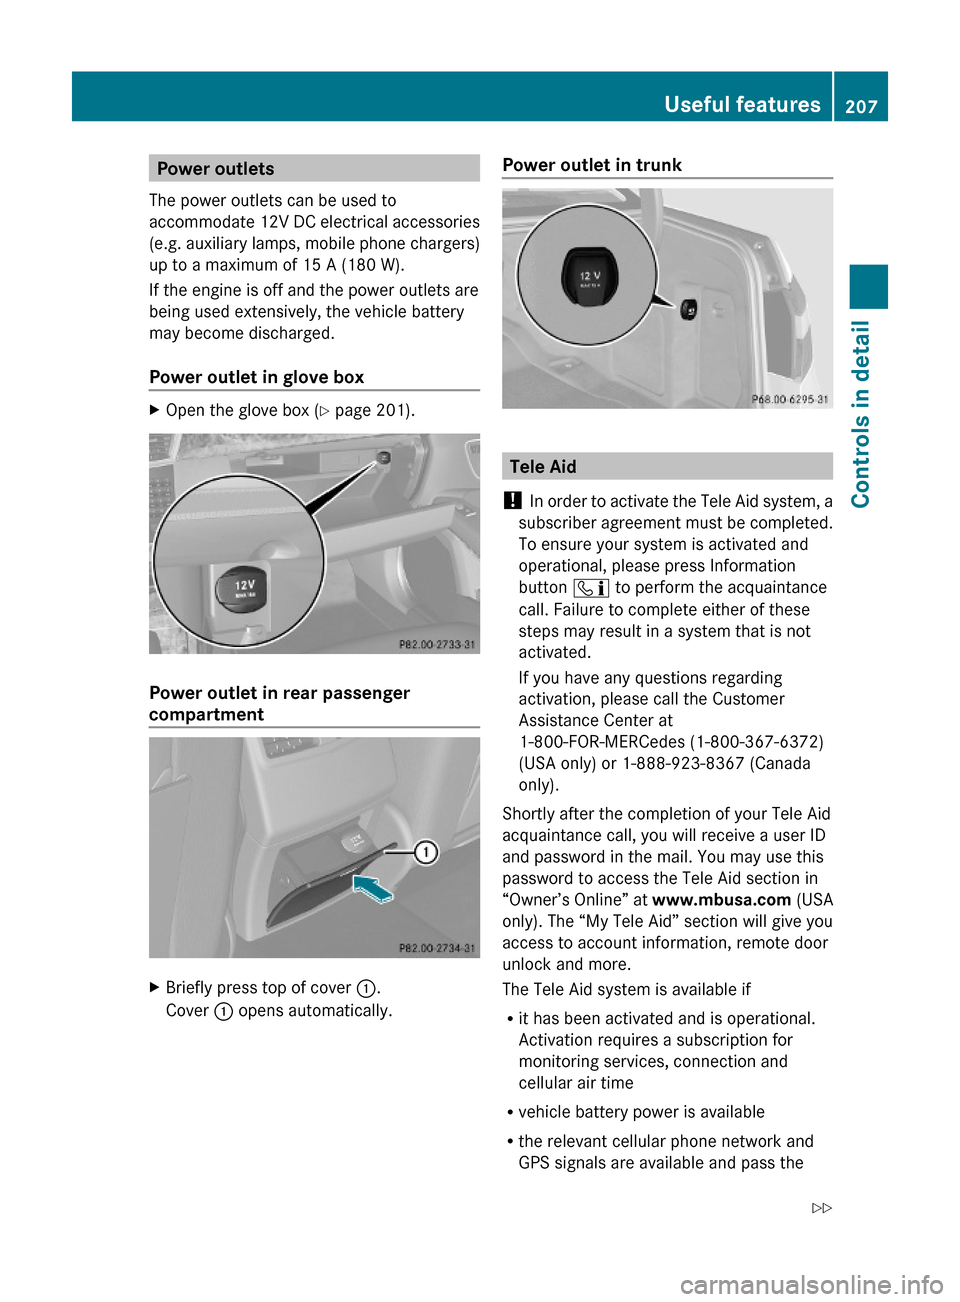
Power outlets
The power outlets can be used to
accommodate 12V DC electrical accessories
(e.g. auxiliary lamps, mobile phone chargers)
up to a maximum of 15 A (180 W).
If the engine is off and the power outlets are
being used extensively, the vehicle battery
may become discharged.
Power outlet in glove box
XOpen the glove box (Y page 201).
Power outlet in rear passenger
compartment
XBriefly press top of cover :.
Cover : opens automatically.
Power outlet in trunk
Tele Aid
! In order to activate the Tele Aid system, a
subscriber agreement must be completed.
To ensure your system is activated and
operational, please press Information
button ï to perform the acquaintance
call. Failure to complete either of these
steps may result in a system that is not
activated.
If you have any questions regarding
activation, please call the Customer
Assistance Center at
1-800-FOR-MERCedes (1-800-367-6372)
(USA only) or 1-888-923-8367 (Canada
only).
Shortly after the completion of your Tele Aid
acquaintance call, you will receive a user ID
and password in the mail. You may use this
password to access the Tele Aid section in
“Owner’s Online” at www.mbusa.com (USA
only). The “My Tele Aid” section will give you
access to account information, remote door
unlock and more.
The Tele Aid system is available if
Rit has been activated and is operational.
Activation requires a subscription for
monitoring services, connection and
cellular air time
Rvehicle battery power is available
Rthe relevant cellular phone network and
GPS signals are available and pass the
Useful features207Controls in detail212_AKB; 2; 41, en-USd2ureepe,Version: 2.11.8.12009-07-17T09:14:21+02:00 - Seite 207Z
Page 272 of 372
XRemoving vehicle tool kit box: Pull
tab : in direction of arrow ; and lift
vehicle tool kit box D.
XRemove vehicle tool kit box D from
luggage bowl E.
XOpening vehicle tool kit box cover: Pull
tab B in direction of arrow A and open
vehicle tool kit box cover =.
XClosing vehicle tool kit box cover: Push
vehicle tool kit box cover = downward
until it engages into vehicle tool kit box
D.
XInstalling vehicle tool kit box: Slide
vehicle tool kit box D into the recess of
luggage bowl E.
XPush vehicle tool kit box D downward until
it engages into luggage bowl E.
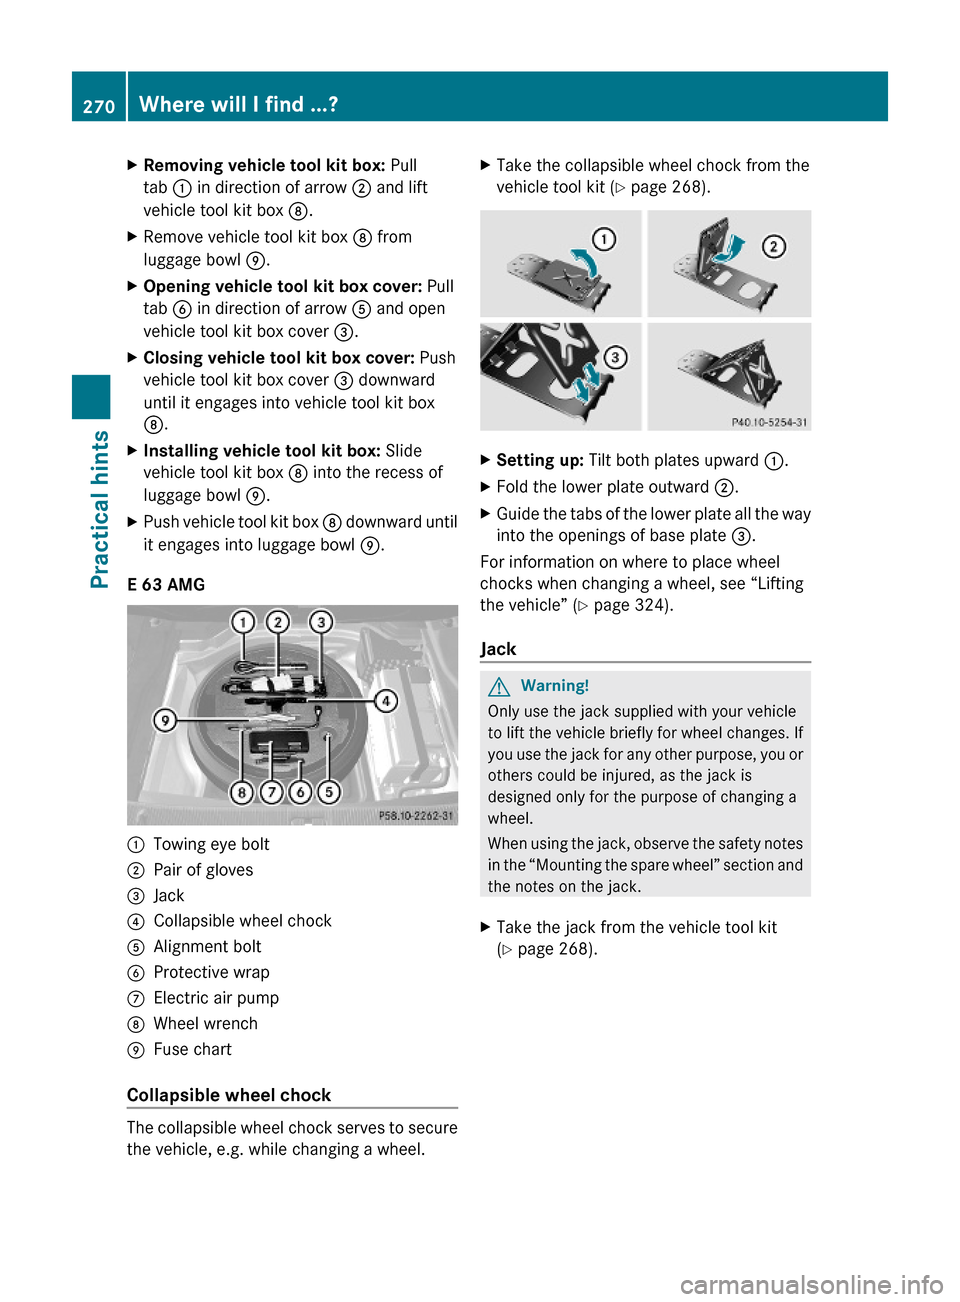
E 63 AMG
:Towing eye bolt;Pair of gloves=Jack?Collapsible wheel chockAAlignment boltBProtective wrapCElectric air pumpDWheel wrenchEFuse chart
Collapsible wheel chock
The collapsible wheel chock serves to secure
the vehicle, e.g. while changing a wheel.
XTake the collapsible wheel chock from the
vehicle tool kit (Y page 268).
XSetting up: Tilt both plates upward :.XFold the lower plate outward ;.XGuide the tabs of the lower plate all the way
into the openings of base plate =.
For information on where to place wheel
chocks when changing a wheel, see “Lifting
the vehicle” (Y page 324).
Jack
GWarning!
Only use the jack supplied with your vehicle
to lift the vehicle briefly for wheel changes. If
you use the jack for any other purpose, you or
others could be injured, as the jack is
designed only for the purpose of changing a
wheel.
When using the jack, observe the safety notes
in the “Mounting the spare wheel” section and
the notes on the jack.
XTake the jack from the vehicle tool kit
(Y page 268).
270Where will I find ...?Practical hints
212_AKB; 2; 41, en-USd2ureepe,Version: 2.11.8.12009-07-17T09:14:21+02:00 - Seite 270