run flat MERCEDES-BENZ E63AMG 2011 W212 User Guide
[x] Cancel search | Manufacturer: MERCEDES-BENZ, Model Year: 2011, Model line: E63AMG, Model: MERCEDES-BENZ E63AMG 2011 W212Pages: 400, PDF Size: 16.3 MB
Page 329 of 400
recommended that you additionally equip
your vehicle with the TIREFIT kit if you
mount tires that do not feature run-flat
properties, e.g. winter tires. You can obtain
a TIREFIT kit from an authorized Mercedes-
Benz Center, for example.
XVehicles with AIRMATIC: make sure that
"normal" level is selected (Y page 191).
XStop the vehicle as far away as possible
from traffic on solid, non-slippery and level
ground.
XSwitch on the hazard warning lamps.XFirmly depress the parking brake.XBring the front wheels into the straight-
ahead position.
XMove the selector lever/DIRECT SELECT
lever to P.
XSwitch off the engine.XVehicles without KEYLESS-GO: remove
the key from the ignition lock.
XVehicles with KEYLESS-GO: open the
driver's door.
The on-board electronics have status 0,
which is the same as the key having been
removed.
XVehicles with KEYLESS-GO: remove the
Start/Stop button from the ignition lock
(Y page 150).
XAll occupants must get out of the vehicle.
Make sure that they are not endangered as
they get out of the vehicle.
XMake sure that no one is near the danger
area whilst a wheel is being changed.
Anyone who is not directly assisting in the
wheel change should, for example, stand
behind the barrier.
XGet out of the vehicle. Pay attention to
traffic conditions when doing so.
XClose the driver's door.TIREFIT kit
Using the TIREFIT kit
You can use the TIREFIT kit to seal small
punctures, particularly those in the tire tread.
You can use TIREFIT at outside temperatures
down to -4 ‡ (-20 †).
GWarning
TIREFIT is a limited repair device. TIREFIT
cannot be used for cuts or punctures larger
than approximately 0.16 in (4 mm) and tire
damage caused by driving with extremely low
tire inflation pressure, or on a flat tire, or a
damaged wheel.
Do not drive the vehicle under such
circumstances.
Contact the nearest authorized Mercedes-
Benz Center for assistance or call roadside
assistance.
XDo not remove any foreign objects which
have penetrated the tire, e.g. screws or
nails.
XRemove the TIREFIT kit, the accompanying
"max. 80 km/h" sticker and the electric air
pump from the stowage well underneath
the trunk/trunk floor (Y page 324).
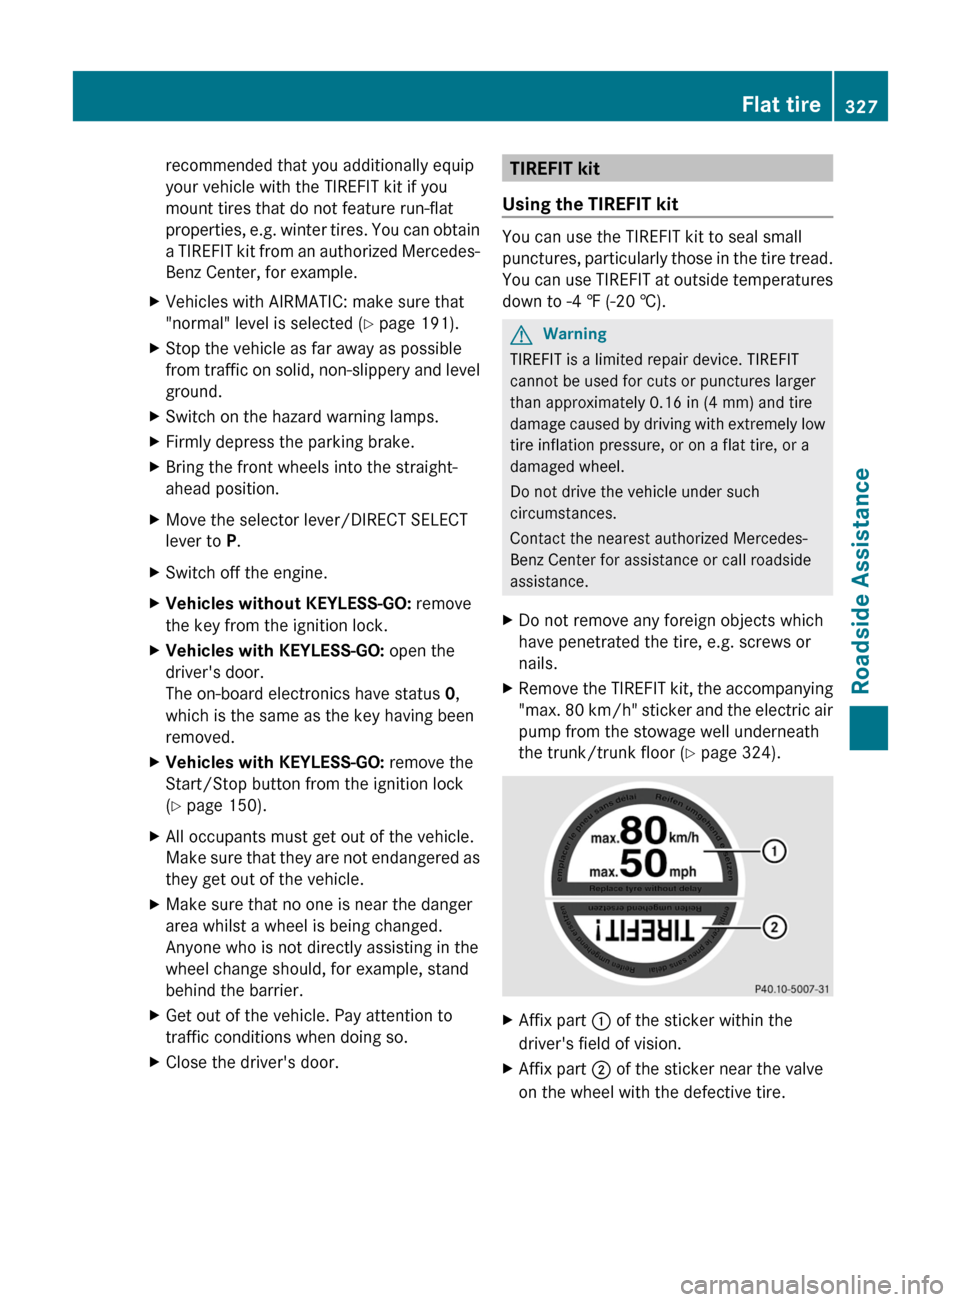
XAffix part : of the sticker within the
driver's field of vision.
XAffix part ; of the sticker near the valve
on the wheel with the defective tire.
Flat tire327Roadside AssistanceBA 212 USA, CA Edition B 2011; 1; 5, en-USdimargiVersion: 3.0.3.62010-05-20T13:33:46+02:00 - Seite 327Z
Page 331 of 400
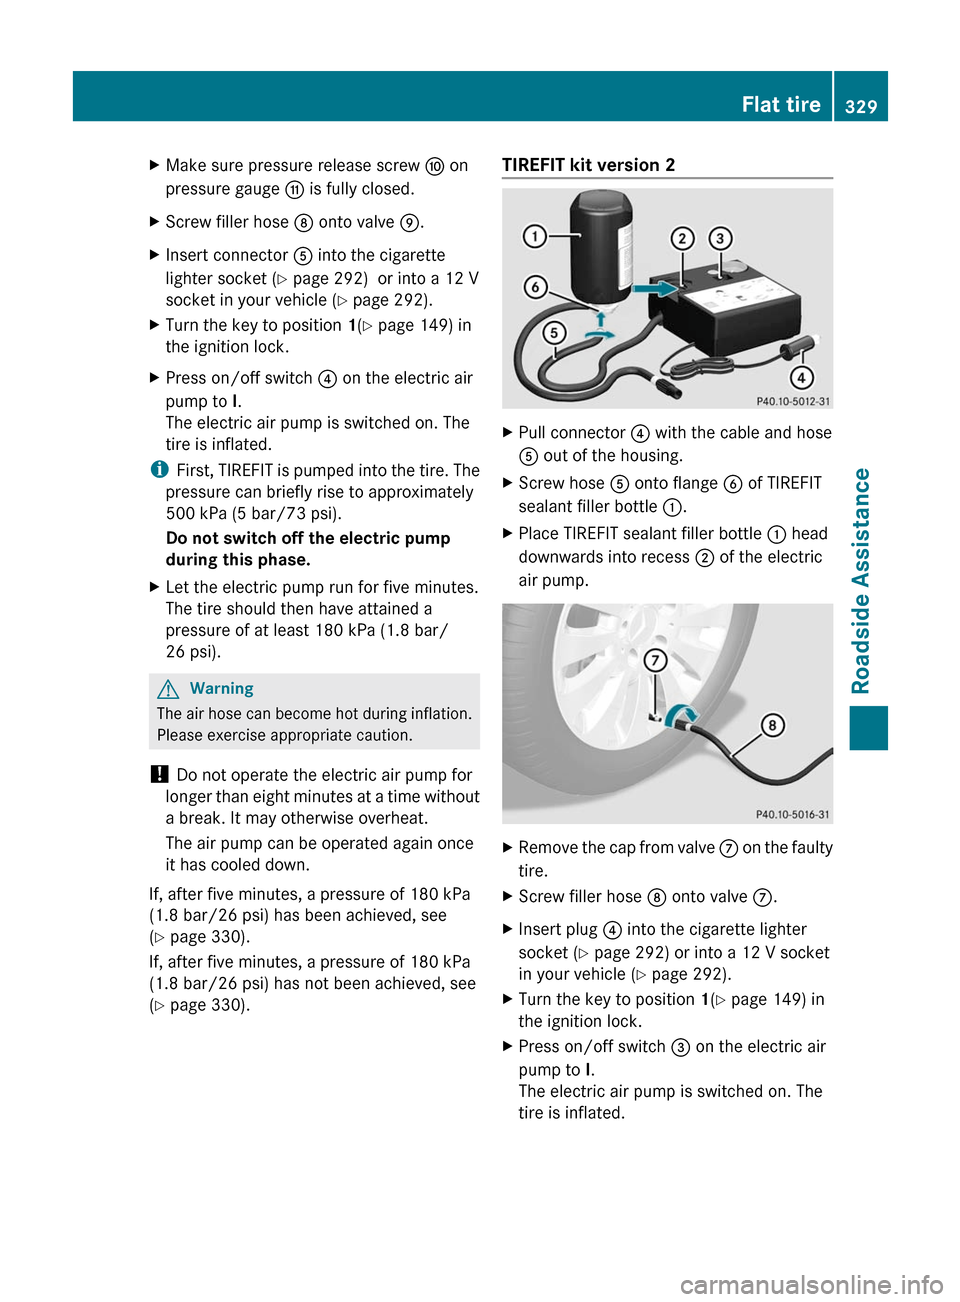
XMake sure pressure release screw F on
pressure gauge G is fully closed.
XScrew filler hose D onto valve E.XInsert connector A into the cigarette
lighter socket (Y page 292) or into a 12 V
socket in your vehicle (Y page 292).
XTurn the key to position 1(Y page 149) in
the ignition lock.
XPress on/off switch ? on the electric air
pump to I.
The electric air pump is switched on. The
tire is inflated.
iFirst, TIREFIT is pumped into the tire. The
pressure can briefly rise to approximately
500 kPa (5 bar/73 psi).
Do not switch off the electric pump
during this phase.
XLet the electric pump run for five minutes.
The tire should then have attained a
pressure of at least 180 kPa (1.8 bar/
26 psi).
GWarning
The air hose can become hot during inflation.
Please exercise appropriate caution.
! Do not operate the electric air pump for
longer than eight minutes at a time without
a break. It may otherwise overheat.
The air pump can be operated again once
it has cooled down.
If, after five minutes, a pressure of 180 kPa
(1.8 bar/26 psi) has been achieved, see
(Y page 330).
If, after five minutes, a pressure of 180 kPa
(1.8 bar/26 psi) has not been achieved, see
(Y page 330).
TIREFIT kit version 2XPull connector ? with the cable and hose
A out of the housing.
XScrew hose A onto flange B of TIREFIT
sealant filler bottle :.
XPlace TIREFIT sealant filler bottle : head
downwards into recess ; of the electric
air pump.
XRemove the cap from valve C on the faulty
tire.
XScrew filler hose D onto valve C.XInsert plug ? into the cigarette lighter
socket (Y page 292) or into a 12 V socket
in your vehicle (Y page 292).
XTurn the key to position 1(Y page 149) in
the ignition lock.
XPress on/off switch = on the electric air
pump to I.
The electric air pump is switched on. The
tire is inflated.
Flat tire329Roadside AssistanceBA 212 USA, CA Edition B 2011; 1; 5, en-USdimargiVersion: 3.0.3.62010-05-20T13:33:46+02:00 - Seite 329Z
Page 332 of 400
iFirst, TIREFIT is pumped into the tire. The
pressure can briefly rise to approximately
500 kPa (5 bar/73 psi).
Do not switch off the electric pump
during this phase.XLet the electric pump run for five minutes.
The tire should then have attained a
pressure of at least 180 kPa (1.8 bar/
26 psi).GWarning
The air hose can become hot during inflation.
Please exercise appropriate caution.
! Do not operate the electric air pump for
longer than eight minutes at a time without
a break. It may otherwise overheat.
The air pump can be operated again once
it has cooled down.
If, after five minutes, a pressure of 180 kPa
(1.8 bar/26 psi) has been achieved, see
( Y page 330).
If, after five minutes, a pressure of 180 kPa
(1.8 bar/26 psi) has not been achieved, see
( Y page 330).
Tire pressure of 180 kPa (1.8 bar/
26 psi) is not achieved
If after five minutes a pressure of 180 kPa
(1.8 bar/26 psi) has not been achieved:
XPress the on/off switch on the electric air
pump to 0.
The electric air pump is switched off.XUnscrew the filler hose from the valve.XVery slowly drive forwards or reverse
approximately 30 ft (10 m).XPump up the tire again.GWarning
If after five minutes a pressure of 180 kPa
(1.8 bar/26 psi) cannot be achieved, the tire
is too badly damaged to be repaired reliably
using TIREFIT.
In this case TIREFIT cannot seal the tire
properly.
Do not drive any further.
Contact the nearest authorized Mercedes-
Benz Center for assistance or call roadside
assistance.
Tire pressure of 180 kPa (1.8 bar/
26 psi) is achievedXPress the on/off switch on the electric air
pump to 0.
The electric air pump is switched off.XRemove the TIREFIT kit from the wheel.GWarning
The air hose may still be hot. Exercise proper
caution to avoid burning yourself when
detaching the electric air pump.
! After use, excess TIREFIT may run out of
the filler hose. This could cause stains.
Therefore, place the filler hose in the plastic
bag which contained the TIREFIT kit.
XStow the TIREFIT kit and the electric air
pump.XPull away immediately .GWarning
Do not exceed a vehicle speed of 50 mph
(80 km/h ). A TIREFIT repair is not designed to
operate at higher speeds.
The sticker must be attached on the
instrument cluster where it will be easily seen
by the driver.
Vehicle handling characteristics of a TIREFIT
repaired tire may change. Adapt your driving
accordingly.
XStop after driving for approximately ten
minutes and check the tire pressure with
the electric air pump.GWarning
If tire inflation pressure has fallen below
130 kPa (1.3 bar/26 psi) do not continue to
drive the vehicle.
330Flat tireRoadside Assistance
BA 212 USA, CA Edition B 2011; 1; 5, en-USdimargiVersion: 3.0.3.62010-05-20T13:33:46+02:00 - Seite 330
Page 334 of 400
and tools to carry out the work required.
Mercedes-Benz recommends that you use an
authorized Mercedes-Benz Center for this
purpose. In particular, work relevant to safety
or on safety-related systems must be carried
out at a qualified specialist workshop.
iVehicles without an emergency spare
wheel/spare wheel are not equipped with
wheel-changing tools at the factory. For
more information on which tools are
required to perform a wheel change on your
vehicle, e.g. wheel chock, alignment bolt or
lug wrench, consult an authorized
Mercedes-Benz Center.
XPrepare the vehicle as described
(Y page 326).
XRemove the following items from the
stowage well under the trunk/cargo
compartment floor:
Rthe emergency spare wheel35
Rthe lug wrench
Rthe folding wheel chock
Rthe jack
Rthe alignment bolt
Rthe electric air pump35
XSecure the vehicle to prevent it from rolling
away.
Securing the vehicle to prevent it from
rolling away
GWarning
Only jack up the vehicle on level ground or on
slight inclines/declines. The vehicle could
otherwise fall off the jack and injure you or
others.
If your vehicle is equipped with a wheel chock,
it can be found in the vehicle tool kit
(Y page 324).
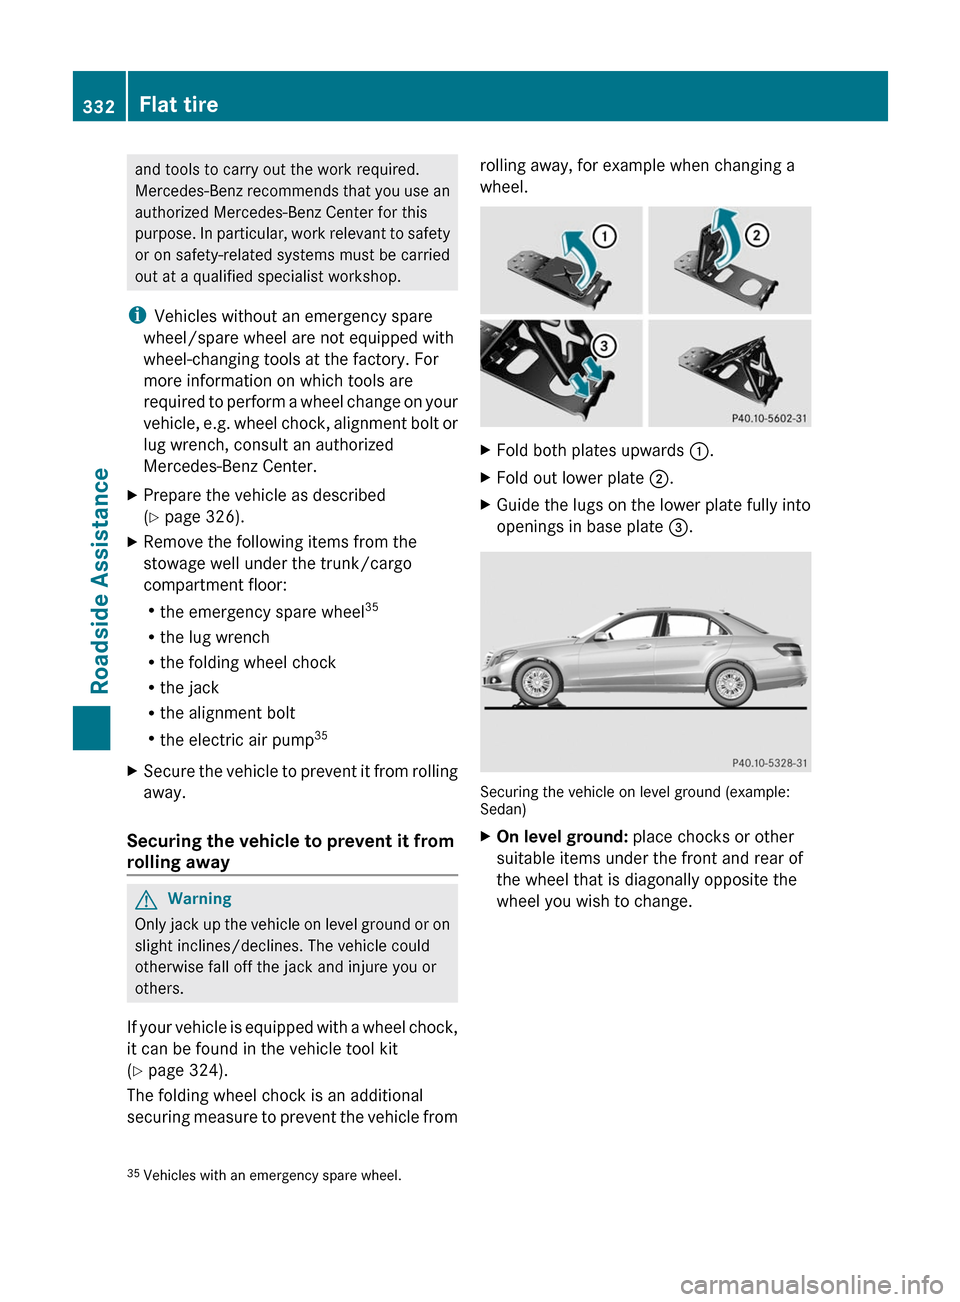
The folding wheel chock is an additional
securing measure to prevent the vehicle from
rolling away, for example when changing a
wheel.
XFold both plates upwards :.XFold out lower plate ;.XGuide the lugs on the lower plate fully into
openings in base plate =.
Securing the vehicle on level ground (example:Sedan)
XOn level ground: place chocks or other
suitable items under the front and rear of
the wheel that is diagonally opposite the
wheel you wish to change.
35Vehicles with an emergency spare wheel.332Flat tireRoadside Assistance
BA 212 USA, CA Edition B 2011; 1; 5, en-USdimargiVersion: 3.0.3.62010-05-20T13:33:46+02:00 - Seite 332
Page 339 of 400
XVersion 2: stow connector = and the air
hose in the lower section of the pump
housing.XStow the electric air pump in the
designated place in the vehicle.
Lowering the vehicle
GWarning!
Vehicles with spare wheel with collapsible tire
only: Inflate collapsible tire only after the
wheel is properly attached.
Inflate the collapsible tire using the electric
air pump before lowering the vehicle.
XTurn the crank of the jack counter-
clockwise until the vehicle is once again
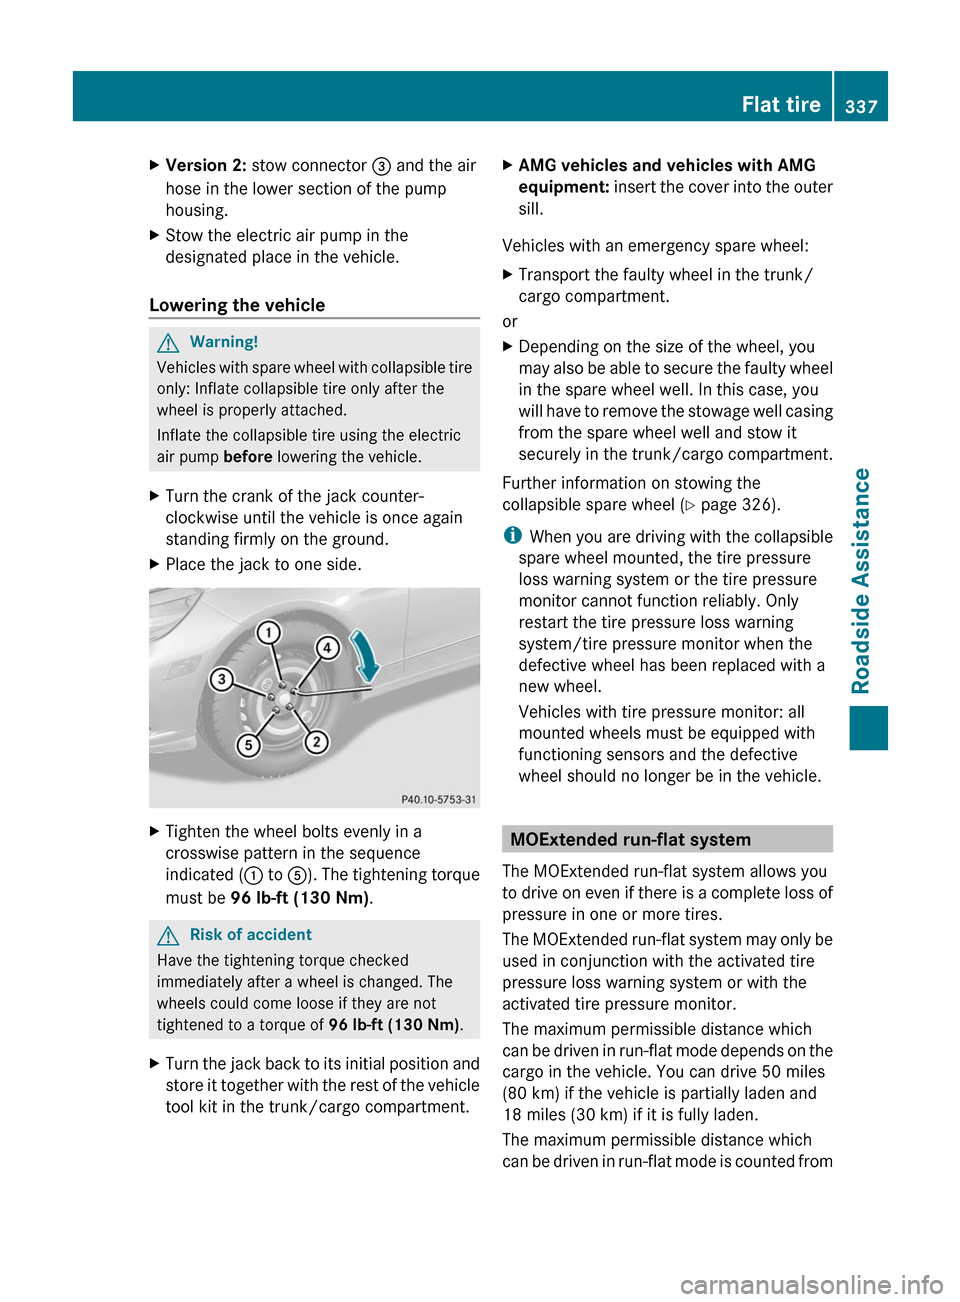
standing firmly on the ground.XPlace the jack to one side.XTighten the wheel bolts evenly in a
crosswise pattern in the sequence
indicated ( : to A). The tightening torque
must be 96 lb-ft (130 Nm) .GRisk of accident
Have the tightening torque checked
immediately after a wheel is changed. The
wheels could come loose if they are not
tightened to a torque of 96 lb-ft (130 Nm).
XTurn the jack back to its initial position and
store it together with the rest of the vehicle
tool kit in the trunk/cargo compartment.XAMG vehicles and vehicles with AMG
equipment: insert the cover into the outer
sill.
Vehicles with an emergency spare wheel:
XTransport the faulty wheel in the trunk/
cargo compartment.
or
XDepending on the size of the wheel, you
may also be able to secure the faulty wheel
in the spare wheel well. In this case, you
will have to remove the stowage well casing
from the spare wheel well and stow it
securely in the trunk/cargo compartment.
Further information on stowing the
collapsible spare wheel ( Y page 326).
i When you are driving with the collapsible
spare wheel mounted, the tire pressure
loss warning system or the tire pressure
monitor cannot function reliably. Only
restart the tire pressure loss warning
system/tire pressure monitor when the
defective wheel has been replaced with a
new wheel.
Vehicles with tire pressure monitor: all
mounted wheels must be equipped with
functioning sensors and the defective
wheel should no longer be in the vehicle.
MOExtended run-flat system
The MOExtended run-flat system allows you
to drive on even if there is a complete loss of
pressure in one or more tires.
The MOExtended run-flat system may only be
used in conjunction with the activated tire
pressure loss warning system or with the
activated tire pressure monitor.
The maximum permissible distance which
can be driven in run-flat mode depends on the
cargo in the vehicle. You can drive 50 miles
(80 km) if the vehicle is partially laden and
18 miles (30 km) if it is fully laden.
The maximum permissible distance which
can be driven in run-flat mode is counted from
Flat tire337Roadside AssistanceBA 212 USA, CA Edition B 2011; 1; 5, en-USdimargiVersion: 3.0.3.62010-05-20T13:33:46+02:00 - Seite 337Z
Page 340 of 400
the moment the tire pressure loss warning
appears in the multifunction display.
You must not exceed a maximum speed of
50 mph(80 km/h).GWarning!
The handling characteristics of your vehicle
deteriorate in run-flat mode, for example:
R when cornering
R when braking
R when accelerating rapidly
Adapt your driving style accordingly and avoid
sudden changes in direction and sudden
acceleration, as well as driving over obstacles
(i.e. curbs, potholes), and driving off-road.
This is particularly the case when the vehicle
is heavily laden.
The maximum permissible distance that can
be driven in run-flat mode depends to a large
extent on the loads placed on the vehicle. It
can be shorter due to high speeds, a heavy
cargo, sudden changes in direction, the road
surface condition, outside temperature, etc.,
or further if you drive carefully and
conservatively.
Do not continue to drive in run-flat mode if:
R you hear banging noises.
R the vehicle starts to shake.
R you see smoke and smell rubber.
R ESP ®
is intervening constantly.
R there are tears in the sidewalls of the tire.
After driving in run-flat mode, you must have
the wheel(s) checked for damage at a
qualified specialist workshop which has the
necessary specialist knowledge and tools to
carry out the work required. The faulty tire
must be replaced in every case.
Mercedes-Benz recommends that you use an
authorized Mercedes-Benz Center for this
purpose. In particular, work relevant to safety
or on safety-related systems must be carried
out at a qualified specialist workshop.
i When replacing one or all tires, make sure
that you only use tires marked
MOExtended and of the specified size for
the vehicle.
i Vehicles featuring the MOExtended run-
flat system are not equipped with TIREFIT
kit at the factory. It is therefore
recommended that you additionally equip
your vehicle with the TIREFIT kit if you
mount tires that do not feature run-flat
properties, e.g. winter tires. You can obtain
a TIREFIT kit from an authorized Mercedes-
Benz Center, for example.
Battery
Important safety notes
In order for the battery to achieve the
maximum possible service life, it must always
be sufficiently charged.
! Have the battery checked regularly at a
qualified specialist workshop, e.g. an
authorized Mercedes-Benz Center.
Observe the service intervals in the Service
Booklet or for further information consult a
qualified specialist workshop, e.g. an
authorized Mercedes-Benz Center.
Have the battery charge checked more
frequently if you use the vehicle mainly for
short trips or if you leave it standing idle for
a lengthy period.
To prevent damage from corrosion, only
replace the battery with one that has a central
ventilation cover.
Only replace a battery with a battery that has
been recommended by Mercedes-Benz.
Consult an authorized Mercedes-Benz Center
if you wish to leave your vehicle parked up for
a long period of time.
GWarning
Comply with safety precautions and take
protective measures when handling batteries.
338BatteryRoadside Assistance
BA 212 USA, CA Edition B 2011; 1; 5, en-USdimargiVersion: 3.0.3.62010-05-20T13:33:46+02:00 - Seite 338
Page 348 of 400
The fuses are located in various fuse boxes:
Rfuse box in the engine compartment on the
left-hand side of the vehicle, when viewed
in the direction of travel
Rfuse box in the trunk/cargo compartment
on the right-hand side of the vehicle, when
viewed in the direction of travel
The fuse allocation chart is located in the
vehicle tool kit (Y page 324) in the stowage
compartment under the trunk/trunk floor.
Fuse box in the engine compartment
XMake sure that the windshield wipers are
turned off.
GRisk of injury
Make sure that the windshield wipers are
turned off and the key is pulled out of the
ignition lock before you open the cover of the
fuse box. Otherwise, the windshield wipers
and the wiper rods above the cover could be
set in motion. This could lead to you or others
being injured by the wiper rods.
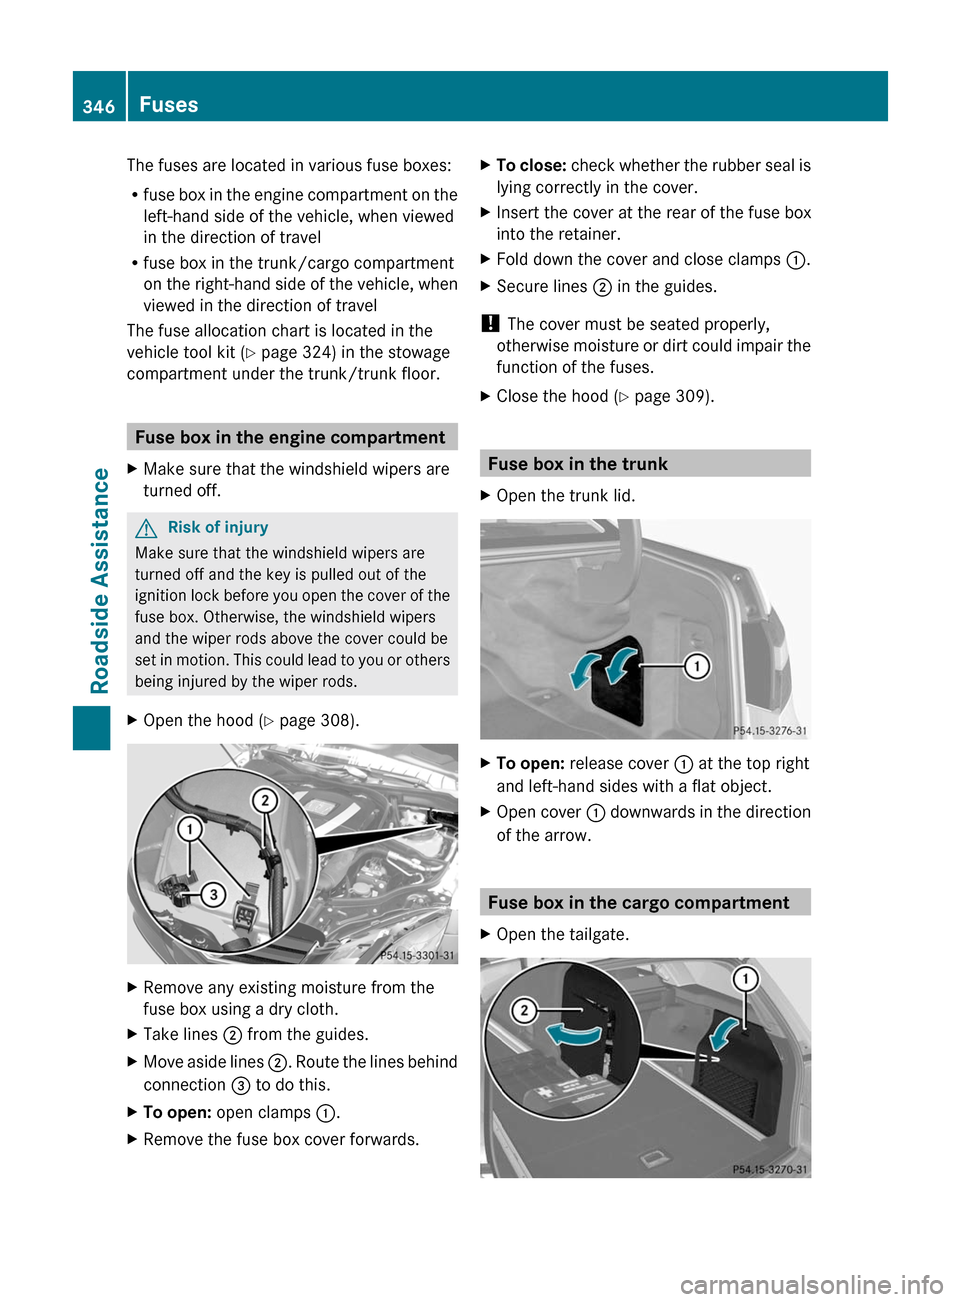
XOpen the hood (Y page 308).XRemove any existing moisture from the
fuse box using a dry cloth.
XTake lines ; from the guides.XMove aside lines ;. Route the lines behind
connection = to do this.
XTo open: open clamps :.XRemove the fuse box cover forwards.XTo close: check whether the rubber seal is
lying correctly in the cover.
XInsert the cover at the rear of the fuse box
into the retainer.
XFold down the cover and close clamps :.XSecure lines ; in the guides.
! The cover must be seated properly,
otherwise moisture or dirt could impair the
function of the fuses.
XClose the hood (Y page 309).
Fuse box in the trunk
XOpen the trunk lid.XTo open: release cover : at the top right
and left-hand sides with a flat object.
XOpen cover : downwards in the direction
of the arrow.
Fuse box in the cargo compartment
XOpen the tailgate.346FusesRoadside Assistance
BA 212 USA, CA Edition B 2011; 1; 5, en-USdimargiVersion: 3.0.3.62010-05-20T13:33:46+02:00 - Seite 346
Page 352 of 400
Vehicle equipment
i This manual describes all the standard
and optional equipment of your vehicle
which was available at the time of
purchase. Country-specific differences are
possible. Bear in mind that your vehicle
may not feature all functions described
here. This also refers to safety-related
systems and functions.
Important safety notes
Contact an authorized Mercedes-Benz Center
if you require information on tested and
recommended tires and wheels for summer
and winter driving. Advice on purchasing and
caring for tires is also available there.
GWarning
Replace rims or tires with the same
designation, manufacturer and type as shown
on the original part. For further information
contact an authorized Mercedes-Benz Center.
If incorrectly sized rims and tires are
mounted, the wheel brakes or suspension
components can be damaged. Also, the
operating clearance of the wheels and the
tires may no longer be correct.
GWarning
Worn, old tires can cause accidents. If the tire
tread is worn to minimum tread depth, or if
the tires have sustained damage, replace
them.
When replacing rims, only use genuine
Mercedes-Benz wheel bolts specified for the
particular rim type. Failure to do so can result
in the bolts loosening and possibly an
accident.
Retreaded tires are not tested or
recommended by Mercedes-Benz, since
previous damage cannot always be
recognized on retreads. The operating safety
of the vehicle cannot be assured when such
tires are used.
GWarning
If you feel a sudden significant vibration or
ride disturbance, or you suspect that possible
damage to your vehicle has occurred, you
should turn on the hazard warning flashers,
carefully slow down, and drive with caution to
an area which is a safe distance from the road.
Inspect the tires and the vehicle underbody
for possible damage. If the vehicle appears
unsafe, have the vehicle towed to the nearest
authorized Mercedes-Benz Center or tire
dealer for repairs.
GWarning
Do not drive with a flat tire. A flat tire affects
the ability to steer or brake the vehicle. You
might lose control of the vehicle. Continued
driving with a flat tire or driving at high speed
with a flat tire will cause excessive heat build-
up and possibly a fire.
! For safety reasons, Mercedes-Benz
recommends that you only use tires,
wheels and accessories which have been
approved by Mercedes-Benz specifically
for your vehicle. These tires have been
specially adapted for use with the control
systems, such as ABS or ESP ®
, and are
marked as follows:
R MO = Mercedes-Benz Original
R MOE = Mercedes-Benz Original Extended
(tires with run-flat characteristics)
R MO1 = Mercedes-Benz Original (AMG)
Only use Mercedes-Benz Original Extended
tires on wheels that have been specifically
approved by Mercedes-Benz.
If you use other tires, wheels and
accessories, Mercedes-Benz cannot
accept any responsibility for damage that
may result from this. Further information
about tires, wheels and approved
combinations can be obtained from any
authorized Mercedes-Benz Center.
i Further information about tires and
wheels can be obtained from any
authorized Mercedes-Benz Center.
350Important safety notesTires and wheels
BA 212 USA, CA Edition B 2011; 1; 5, en-USdimargiVersion: 3.0.3.62010-05-20T13:33:46+02:00 - Seite 350
Page 353 of 400
Directives to be observed
R Only mount tires and wheels of the same
type and make.
R Only mount tires of the correct size onto
the wheels.
R After mounting new tires, run them in at
moderate speeds for the first 60 miles
(100 km) as they only reach their full
performance after this distance.
R Do not use tires until they are excessively
worn as the tire traction on wet road
surfaces decreases significantly when the
tread depth is less than 1
/ 8 in (3 mm).
R If the vehicle is heavily laden, check the tire
pressure and adjust it if necessary.
R When parking your vehicle, make sure that
the tires do not get deformed by the curb
or other obstacles. If it is necessary to drive
over curbs, speed humps or similar
elevations, try to do so slowly and at an
obtuse angle. Otherwise, the tires,
particularly the sidewalls, can get
damaged.
Maintenance and care of wheels and
tires
Checking wheels and tires
GWarning
Regularly check the tires for damage.
Damaged tires can cause tire inflation
pressure loss. As a result, you could lose
control of your vehicle.
Worn, old tires can cause accidents. If the tire
tread is worn to minimum tread depth, or if
the tires have sustained damage, replace
them.
R Regularly check the wheels and tires of
your vehicle for damage (e.g. cuts,
punctures, tears, bulges on tires and
deformation or cracks or severe corrosion
on wheels), at least once a month, as well
as after driving off-road or on rough roads.
Damaged wheels can cause a loss of tire
pressure.
R Regularly check the tire tread depth and
the condition of the tread across the whole
width of the tire (Y page 351). If necessary,
turn the front wheels to full lock in order to
inspect the inner side of the tire surface.
R All wheels must have a valve cap to protect
the valve against dirt and moisture. Do not
install anything on the valve (such as tire
pressure monitoring systems) other than
the standard valve cap or other valve caps
approved by Mercedes-Benz for your
vehicle.
R Regularly check the pressure of all the tires
including the emergency spare wheel or the
spare wheel, particularly prior to long trips,
and correct the pressure as necessary
( Y page 352).
Service life of tires
The service life of tires depends on the
following factors amongst other things:
R driving style
R tire pressure
R mileage
Replace the tires after six years at the latest,
regardless of wear. This also applies to the
emergency spare wheel/spare wheel.
Tire tread
GWarning
Although the applicable federal motor vehicle
safety laws consider a tire to be worn when
the tread wear indicators (TWI) become
visible at approximately 1
/ 16 in (1.6 mm), we
recommend that you do not allow your tires
to wear down to that level. As tread depth
approaches 1
/ 8 in (3 mm), the adhesion
properties on a wet road are sharply reduced.
Maintenance and care of wheels and tires351Tires and wheelsBA 212 USA, CA Edition B 2011; 1; 5, en-USdimargiVersion: 3.0.3.62010-05-20T13:33:46+02:00 - Seite 351Z
Page 359 of 400
XPress the 9 or : button to select
Tire Pressure .XPress the a button.
The Run Flat Indicator Active
Press 'OK' to Restart message
appears in the multifunction display.
If you wish to confirm the restart:
XPress the a button.
The Tire Pressure Now OK? message
appears in the multifunction display.XPress 9 or : to select Yes.XPress the a button.
The Run Flat Indicator Restarted
message appears in the multifunction
display.
After a teach-in period, the tire pressure
loss warning system will monitor the set
tire pressures of all four tires.
If you wish to cancel the restart:
XPress the % button.
or
XIf the message: Tire Pressure now OK?
appears, use 9 or : to select
Cancel .XPress the a button.
The tire pressure values stored at the last
restart will continue to be monitored.
Tire pressure monitoring system
Important safety notes
If a tire pressure monitor is installed, the
vehicle's wheels have sensors installed that
monitor the tire pressures in all four tires. The
tire pressure monitor warns you when the
pressure drops in one or more of the tires. The
tire pressure monitor only functions if the
correct wheel electronics units are installed
in all wheels.
The tire pressure monitor has a yellow
warning lamp in the instrument cluster for
indicating pressure loss/malfunctions (USA)
or pressure loss (Canada). Depending on how
the warning lamp flashes or lights up, a tire
pressure that is too low or a malfunction in
the tire pressure monitor is displayed:
R if the warning lamp is lit continuously, the
tire pressure on one or more tires is
significantly too low. The tire pressure
monitor is not malfunctioning.
R USA only: if the warning lamp flashes for
60 seconds and then remains lit constantly,
the tire pressure monitor is malfunctioning.GWarning
Each tire, including the spare (if provided),
should be checked at least once a month
when cold and inflated to the inflation
pressure recommended by the vehicle
manufacturer on the Tire and Loading
Information placard on the driver’s door B-
pillar or the tire inflation pressure label on the
inside of the fuel filler flap. If your vehicle has
tires of a different size than the size indicated
on the Tire and Loading Information placard
or the tire inflation pressure label, you should
determine the proper tire inflation pressure
for those tires.
As an added safety feature, your vehicle has
been equipped with a tire pressure monitoring
system (TPMS) that illuminates a low tire
pressure telltale when one or more of your
tires are significantly underinflated.
Accordingly, when the low tire pressure
telltale illuminates, you should stop and check
your tires as soon as possible, and inflate
them to the proper pressure. Driving on a
significantly underinflated tire causes the tire
to overheat and can lead to tire failure.
Underinflation also reduces fuel efficiency
and tire tread life, and may affect the vehicle's
handling and stopping ability. Please note that
the TPMS is not a substitute for proper tire
maintenance, and it is the driver's
responsibility to maintain correct tire
pressure, even if underinflation has not
Tire pressures357Tires and wheelsBA 212 USA, CA Edition B 2011; 1; 5, en-USdimargiVersion: 3.0.3.62010-05-20T13:33:46+02:00 - Seite 357Z