windshield wipers MERCEDES-BENZ E63AMG 2011 W212 Owner's Guide
[x] Cancel search | Manufacturer: MERCEDES-BENZ, Model Year: 2011, Model line: E63AMG, Model: MERCEDES-BENZ E63AMG 2011 W212Pages: 400, PDF Size: 16.3 MB
Page 207 of 400
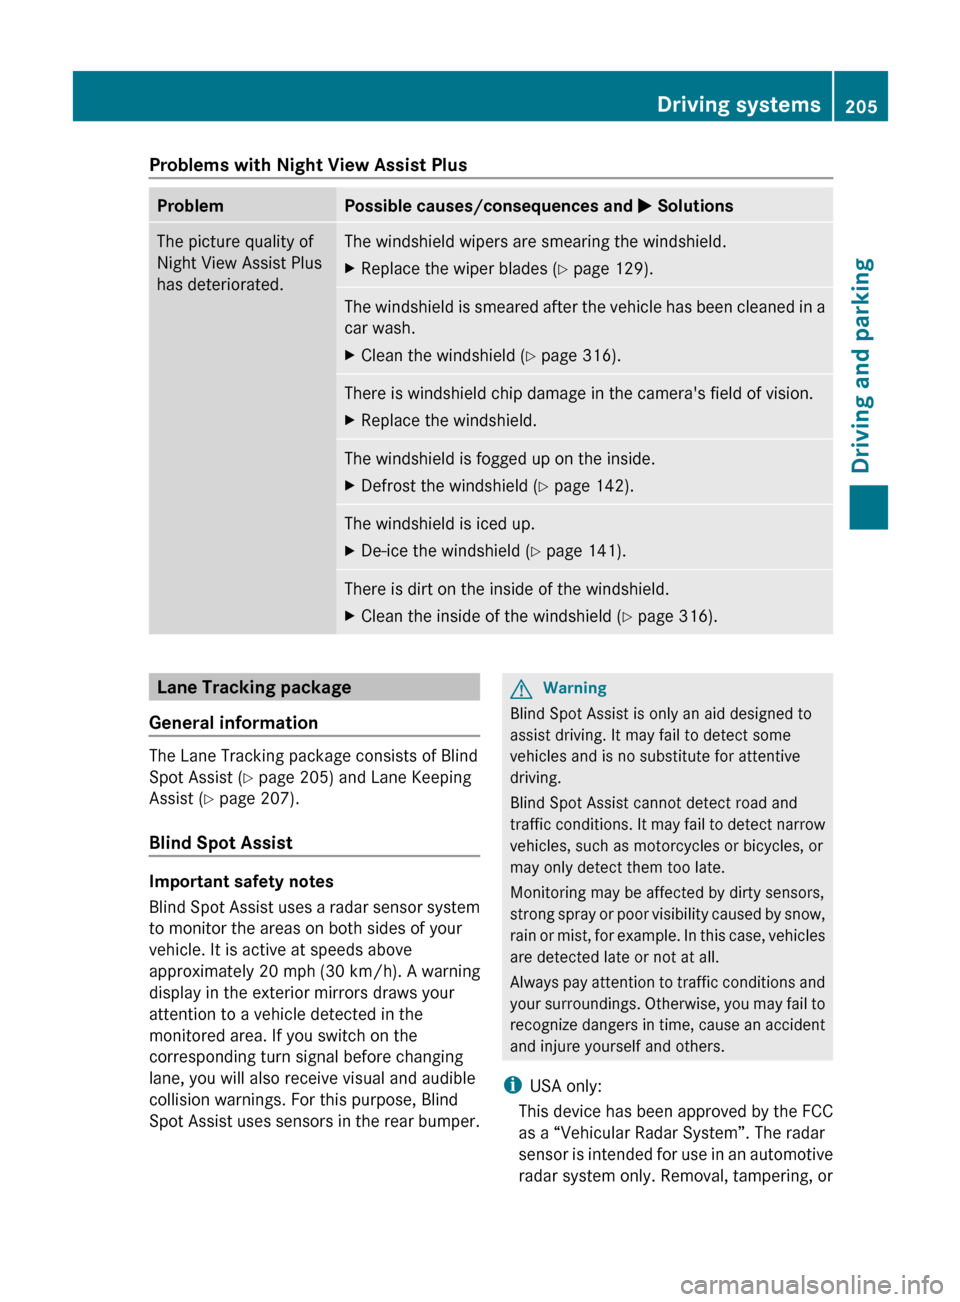
Problems with Night View Assist PlusProblemPossible causes/consequences and M SolutionsThe picture quality of
Night View Assist Plus
has deteriorated.The windshield wipers are smearing the windshield.XReplace the wiper blades ( Y page 129).The windshield is smeared after the vehicle has been cleaned in a
car wash.XClean the windshield ( Y page 316).There is windshield chip damage in the camera's field of vision.XReplace the windshield.The windshield is fogged up on the inside.XDefrost the windshield ( Y page 142).The windshield is iced up.XDe-ice the windshield ( Y page 141).There is dirt on the inside of the windshield.XClean the inside of the windshield ( Y page 316).Lane Tracking package
General information
The Lane Tracking package consists of Blind
Spot Assist ( Y page 205) and Lane Keeping
Assist ( Y page 207).
Blind Spot Assist
Important safety notes
Blind Spot Assist uses a radar sensor system
to monitor the areas on both sides of your
vehicle. It is active at speeds above
approximately 20 mph (30 km/h). A warning
display in the exterior mirrors draws your
attention to a vehicle detected in the
monitored area. If you switch on the
corresponding turn signal before changing
lane, you will also receive visual and audible
collision warnings. For this purpose, Blind
Spot Assist uses sensors in the rear bumper.
GWarning
Blind Spot Assist is only an aid designed to
assist driving. It may fail to detect some
vehicles and is no substitute for attentive
driving.
Blind Spot Assist cannot detect road and
traffic conditions. It may fail to detect narrow
vehicles, such as motorcycles or bicycles, or
may only detect them too late.
Monitoring may be affected by dirty sensors,
strong spray or poor visibility caused by snow,
rain or mist, for example. In this case, vehicles
are detected late or not at all.
Always pay attention to traffic conditions and
your surroundings. Otherwise, you may fail to
recognize dangers in time, cause an accident
and injure yourself and others.
i USA only:
This device has been approved by the FCC
as a “Vehicular Radar System”. The radar
sensor is intended for use in an automotive
radar system only. Removal, tampering, or
Driving systems205Driving and parkingBA 212 USA, CA Edition B 2011; 1; 5, en-USdimargiVersion: 3.0.3.62010-05-20T13:33:46+02:00 - Seite 205Z
Page 310 of 400

Vehicle equipment
i This manual describes all the standard
and optional equipment of your vehicle
which was available at the time of
purchase. Country-specific differences are
possible. Bear in mind that your vehicle
may not feature all functions described
here. This also refers to safety-related
systems and functions.
Engine compartment
Hood
Opening the hood
GWarning
Do not pull the release lever while the vehicle
is in motion. Otherwise, the hood could be
forced open by passing air flow.
This could cause the hood to come loose and
injure you and/or others.
GWarning
Do not open the hood when the engine is
overheated. You could be seriously injured.
Observe the coolant temperature gauge to
determine whether the engine may be
overheated. If you see flames or smoke
coming from the engine compartment, move
away from the vehicle. Wait until the engine
has cooled. If necessary, call the fire
department.
GWarning
There is a risk of injury if the hood is open,
even if the engine is not running.
Some engine components can become very
hot.
To avoid the risk of burns, only touch those
components described in the Operator's
Manual and observe the relevant safety notes.
GWarning
To help prevent personal injury, stay clear of
moving parts when the hood is open and the
engine is running.
The radiator fan may continue to run for
approximately 30 seconds or may even
restart after the engine has been turned off.
Stay clear of fan blades.
GWarning!
Vehicles with gasoline engine:
The engine is equipped with a transistorized
ignition system. Because of the high voltage
it is dangerous to touch any components
(ignition coils, spark plug sockets, diagnostic
socket) of the ignition system
R with the engine running
R while starting the engine
R when the ignition is switched on and the
engine is turned manually
GWarning!
Vehicles with diesel engine:
The engine is equipped with a high-voltage
electronic control unit for the injection
system. Because of the high voltage it is
dangerous to touch any components of the
injection system (injectors, electrical wires)
R with the engine running
R while starting the engine
R when the ignition is switched on
XMake sure that the windshield wipers are
switched off.GWarning
The windshield wipers and wiper linkage
could be set in motion.
When the hood is open, you or others could
be injured by the wiper linkage.
Make sure that the windshield wipers are
switched off. Remove the SmartKey or make
sure that no ignition position has been
selected with KEYLESS-GO. All indicator
lamps must be off in the instrument cluster.
308Engine compartmentMaintenance and care
BA 212 USA, CA Edition B 2011; 1; 5, en-USdimargiVersion: 3.0.3.62010-05-20T13:33:46+02:00 - Seite 308
Page 311 of 400
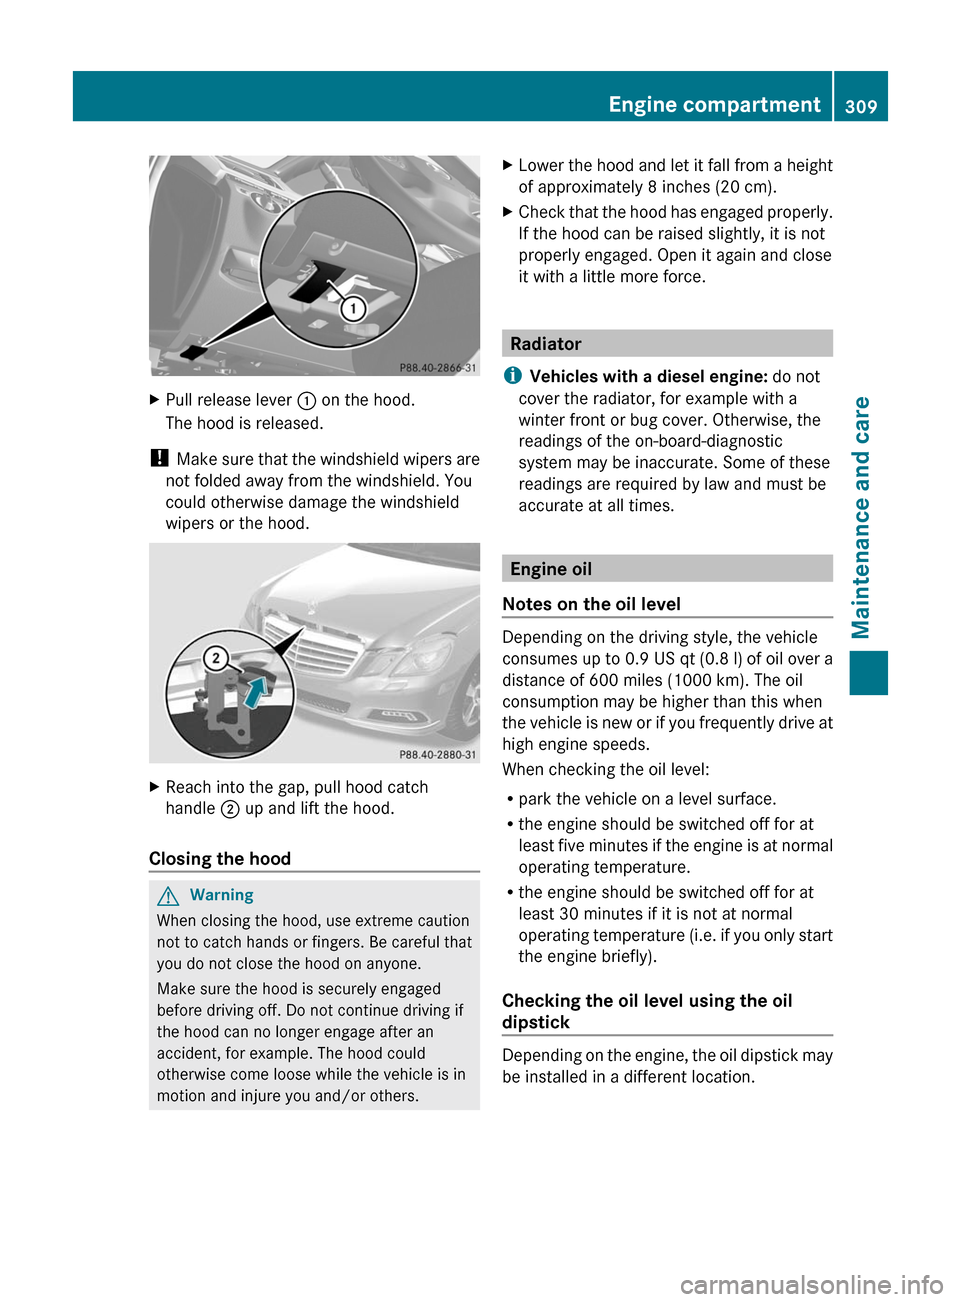
XPull release lever : on the hood.
The hood is released.
! Make sure that the windshield wipers are
not folded away from the windshield. You
could otherwise damage the windshield
wipers or the hood.
XReach into the gap, pull hood catch
handle ; up and lift the hood.
Closing the hood
GWarning
When closing the hood, use extreme caution
not to catch hands or fingers. Be careful that
you do not close the hood on anyone.
Make sure the hood is securely engaged
before driving off. Do not continue driving if
the hood can no longer engage after an
accident, for example. The hood could
otherwise come loose while the vehicle is in
motion and injure you and/or others.
XLower the hood and let it fall from a height
of approximately 8 inches (20 cm).
XCheck that the hood has engaged properly.
If the hood can be raised slightly, it is not
properly engaged. Open it again and close
it with a little more force.
Radiator
iVehicles with a diesel engine: do not
cover the radiator, for example with a
winter front or bug cover. Otherwise, the
readings of the on-board-diagnostic
system may be inaccurate. Some of these
readings are required by law and must be
accurate at all times.
Engine oil
Notes on the oil level
Depending on the driving style, the vehicle
consumes up to 0.9 US qt (0.8 l) of oil over a
distance of 600 miles (1000 km). The oil
consumption may be higher than this when
the vehicle is new or if you frequently drive at
high engine speeds.
When checking the oil level:
Rpark the vehicle on a level surface.
Rthe engine should be switched off for at
least five minutes if the engine is at normal
operating temperature.
Rthe engine should be switched off for at
least 30 minutes if it is not at normal
operating temperature (i.e. if you only start
the engine briefly).
Checking the oil level using the oil
dipstick
Depending on the engine, the oil dipstick may
be installed in a different location.
Engine compartment309Maintenance and careBA 212 USA, CA Edition B 2011; 1; 5, en-USdimargiVersion: 3.0.3.62010-05-20T13:33:46+02:00 - Seite 309Z
Page 318 of 400

cleaning. Braking heats the brake discs and
brake pads, thus drying them. The vehicle
can then be parked up.
Cleaning the paintwork
Scratches, corrosive deposits, areas affected
by corrosion and damage caused by
inadequate care cannot always be completely
repaired. In such cases, visit a qualified
specialist workshop immediately, e.g. an
authorized Mercedes-Benz Center.
XRemove impurities immediately, where
possible, whilst avoiding rubbing too hard.XSoak insect remains with insect remover
and rinse off the treated areas afterwards.XSoak bird droppings with water and rinse
off the treated areas afterwards.XRemove coolant, brake fluid, tree resin,
oils, fuels and greases by rubbing gently
with a cloth soaked in petroleum ether or
lighter fluid.XUse tar remover to remove tar stains.XUse silicone remover to remove wax.
! Do not affix:
R stickers
R films
R magnetic plates or similar items
to painted surfaces. You could otherwise
damage the paintwork.
If water no longer forms "beads" on the
painted surface, paint care products should
be used that have been approved and
recommended by Mercedes-Benz. This is the
case approximately every three to five
months, depending on climatic conditions
and the care product used.
If dirt has entered the paint surface or the
paintwork has become dull, a paint cleaner
should be used that has been approved and
recommended by Mercedes-Benz.
Never use such care products in direct
sunlight or on a hot hood.
XUse a suitable touch-up stick, e.g. MB
Touch Up stick, for quick, temporary repair
of damaged paintwork.
Matte finish care
If your vehicle has a clear matte finish,
observe the following instructions in order to
avoid damage to the paintwork due to
incorrect care.
! Never polish the vehicle. Polishing causes
the finish to shine.
! Do not use paintwork cleaner, grinding or
polishing products or gloss preservers such
as wax. These products are only suitable for
high-gloss surfaces. Using them on
vehicles with matte paintwork can cause
severe damage to the surface (shiny,
mottled patches).
Always have paintwork repairs performed
at a qualified specialist workshop, e.g. an
authorized Mercedes-Benz Center.
! Do not use wash programs with a hot wax
treatment under any circumstances.
i Use only insect remover and car shampoo
from the range of recommended and
approved Mercedes-Benz care products.
Cleaning the windows
GWarning
Switch off the windshield wipers and remove
the SmartKey from the ignition lock before
cleaning the windshield or the wiper blades.
On vehicles with KEYLESS-GO, press the
Start/Stop button repeatedly until all
indicator lamps in the instrument cluster have
gone off. The windshield wipers could
otherwise move and injure you.
XClean the inside and outside of the
windows with a damp cloth and a cleaning
agent that is recommended and approved
by Mercedes-Benz.316CareMaintenance and care
BA 212 USA, CA Edition B 2011; 1; 5, en-USdimargiVersion: 3.0.3.62010-05-20T13:33:46+02:00 - Seite 316
Page 319 of 400
! Do not use dry cloths, abrasive products,
solvents or cleaning agents containing
solvents to clean the inside of the windows.
Do not use hard objects to clean the insides
of the windows, e.g. an ice scraper or ring.
There is otherwise a risk of damaging the
windows.
! Clean the water drainage channels of the
windshield and the rear window at regular
intervals. Deposits such as leaves, petals
and pollen may under certain
circumstances prevent water from draining
away. This can lead to corrosion damage
and damage to electronic components.
Cleaning the wiper blades
GWarning
Switch off the windshield wipers and remove
the SmartKey from the ignition lock before
cleaning the windshield or the wiper blades.
On vehicles with KEYLESS-GO, press the
Start/Stop button repeatedly until all
indicator lamps in the instrument cluster have
gone off. The windshield wipers could
otherwise move and injure you.
! Do not pull the wiper blade. Otherwise,
the wiper blade could be damaged.
! Do not clean wiper blades too often and
do not rub them too hard. Otherwise, the
graphite coating could be damaged. This
could cause wiper noise.
XFold the wiper arms away from the
windshield.
XCarefully clean the wiper blades with a
damp cloth.
XFold the windshield wipers back again
before switching on the ignition.
! Hold the wiper arm securely when folding
back. The windshield could be damaged if
the wiper arm smacks against it suddenly.
Cleaning the headlampsXClean the plastic lamp lenses on the
headlamps using a wet sponge and a mild
cleaning agent, e.g. Mercedes-Benz car
shampoo or cleaning cloths.
! Only use cleaning agents or cleaning
cloths which are suitable for plastic
headlamp lenses. Unsuitable cleaning
agents or cleaning cloths could scratch or
damage the plastic headlamp lenses.
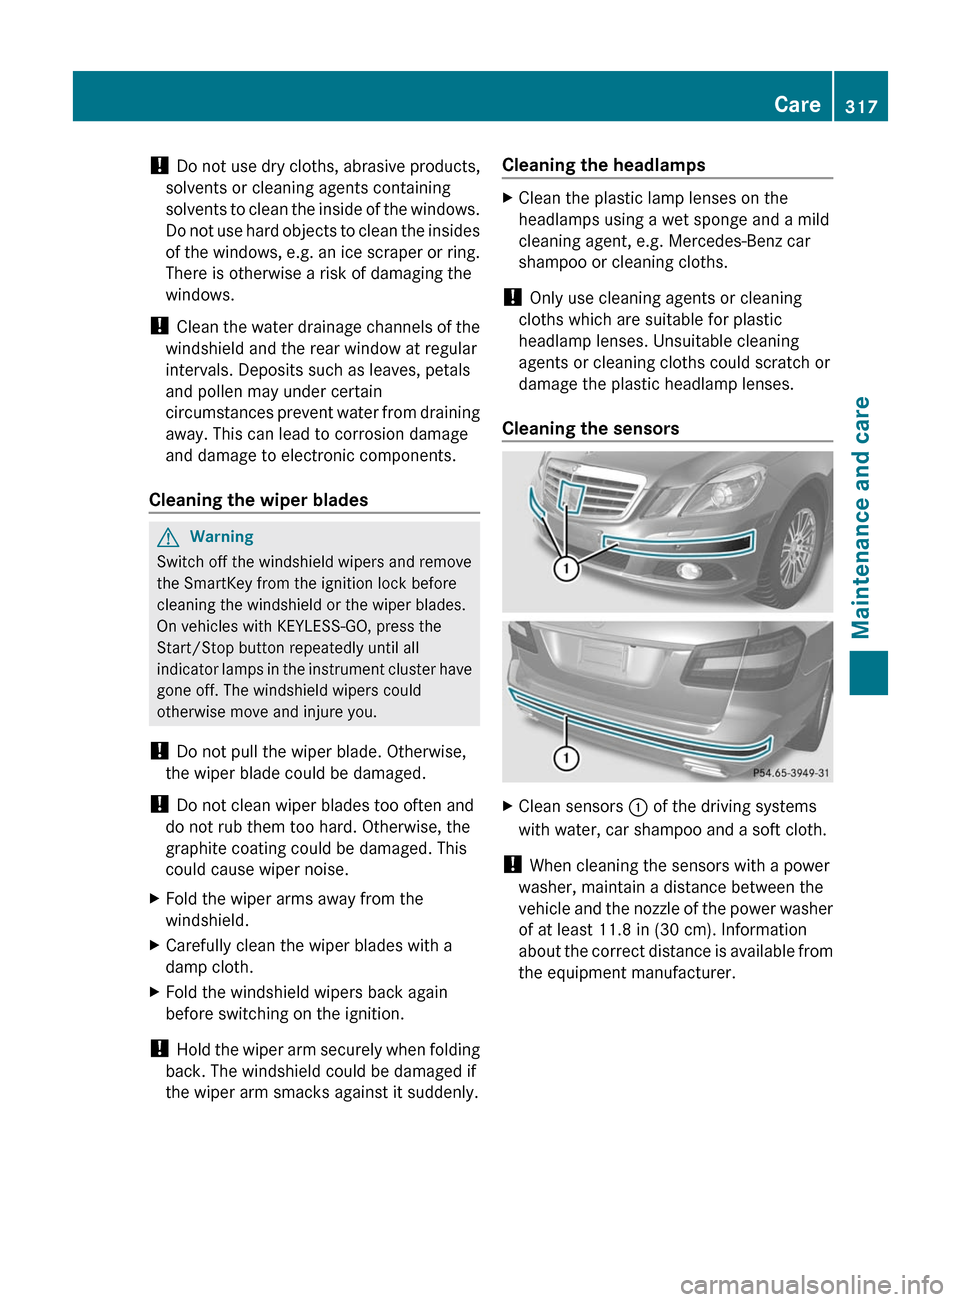
Cleaning the sensors
XClean sensors : of the driving systems
with water, car shampoo and a soft cloth.
! When cleaning the sensors with a power
washer, maintain a distance between the
vehicle and the nozzle of the power washer
of at least 11.8 in (30 cm). Information
about the correct distance is available from
the equipment manufacturer.
Care317Maintenance and careBA 212 USA, CA Edition B 2011; 1; 5, en-USdimargiVersion: 3.0.3.62010-05-20T13:33:46+02:00 - Seite 317Z
Page 348 of 400
The fuses are located in various fuse boxes:
Rfuse box in the engine compartment on the
left-hand side of the vehicle, when viewed
in the direction of travel
Rfuse box in the trunk/cargo compartment
on the right-hand side of the vehicle, when
viewed in the direction of travel
The fuse allocation chart is located in the
vehicle tool kit (Y page 324) in the stowage
compartment under the trunk/trunk floor.
Fuse box in the engine compartment
XMake sure that the windshield wipers are
turned off.
GRisk of injury
Make sure that the windshield wipers are
turned off and the key is pulled out of the
ignition lock before you open the cover of the
fuse box. Otherwise, the windshield wipers
and the wiper rods above the cover could be
set in motion. This could lead to you or others
being injured by the wiper rods.
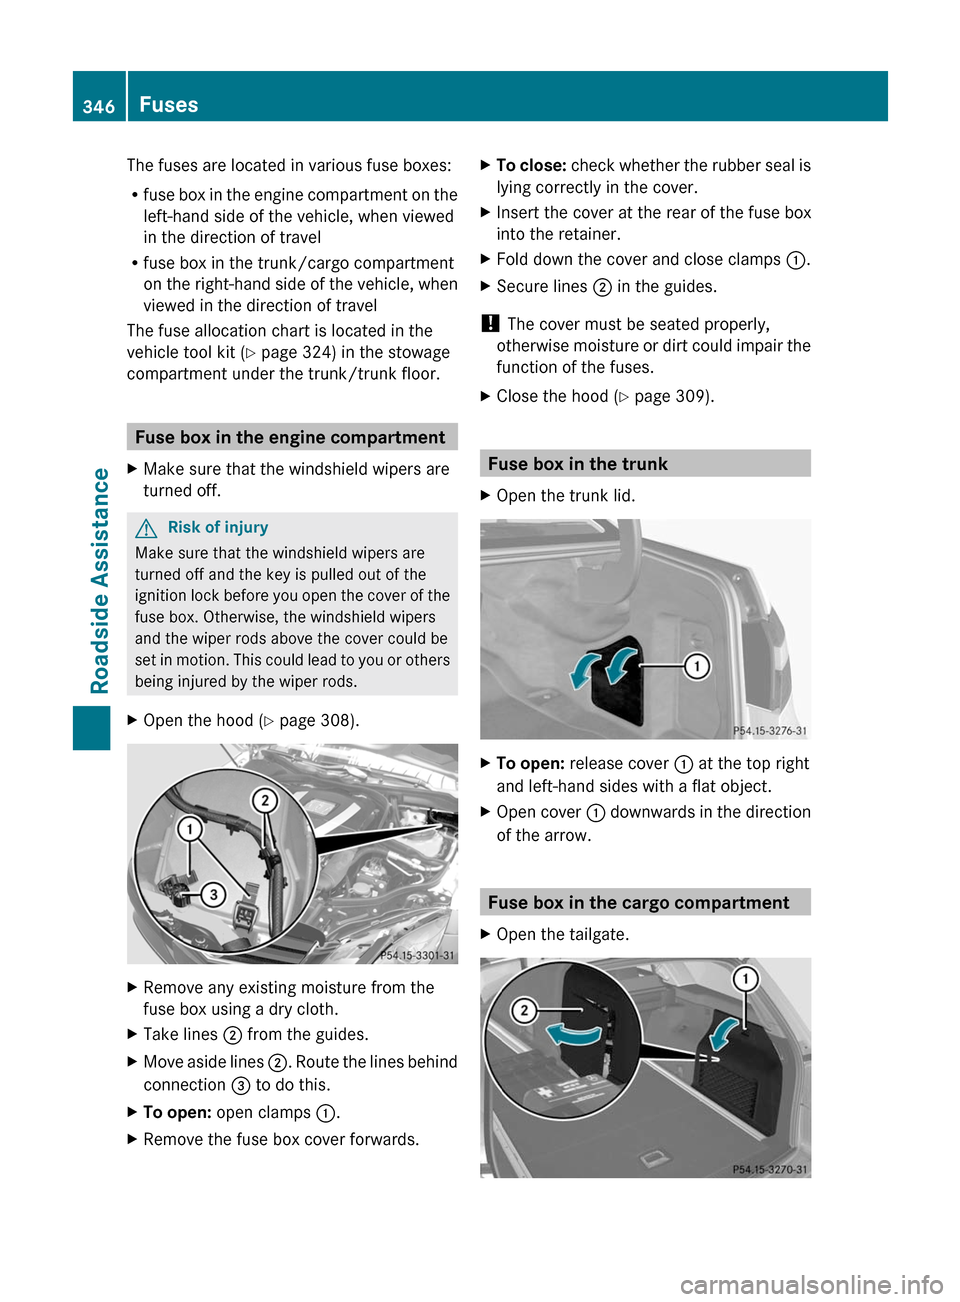
XOpen the hood (Y page 308).XRemove any existing moisture from the
fuse box using a dry cloth.
XTake lines ; from the guides.XMove aside lines ;. Route the lines behind
connection = to do this.
XTo open: open clamps :.XRemove the fuse box cover forwards.XTo close: check whether the rubber seal is
lying correctly in the cover.
XInsert the cover at the rear of the fuse box
into the retainer.
XFold down the cover and close clamps :.XSecure lines ; in the guides.
! The cover must be seated properly,
otherwise moisture or dirt could impair the
function of the fuses.
XClose the hood (Y page 309).
Fuse box in the trunk
XOpen the trunk lid.XTo open: release cover : at the top right
and left-hand sides with a flat object.
XOpen cover : downwards in the direction
of the arrow.
Fuse box in the cargo compartment
XOpen the tailgate.346FusesRoadside Assistance
BA 212 USA, CA Edition B 2011; 1; 5, en-USdimargiVersion: 3.0.3.62010-05-20T13:33:46+02:00 - Seite 346