towing MERCEDES-BENZ EQC SUV 2019 Owners Manual
[x] Cancel search | Manufacturer: MERCEDES-BENZ, Model Year: 2019, Model line: EQC SUV, Model: MERCEDES-BENZ EQC SUV 2019Pages: 629, PDF Size: 11.02 MB
Page 5 of 629
Symbols
........................................................ 5At
agl ance .................................................... 6
Cockpit ........................................................... 6
Indica tor and warning lamps .......................... .8
Overhead contro l panel ................................ 10
Door control panel and seat adjustment ....... 12
Emergencies and breakdowns ...................... 14Digital Owner's Manual
.............................16
Calling up the Digital Owner's Manual ..........16 Genera
l notes............................................. 17
Pr otection of the environment ......................17
Ta ke -ba ckof end-of-life vehicles ...................17
Mercedes-Benz Genuine Parts ......................17
Owner's Manual ............................................ 18
Operating saf ety .......................................... .19
Declaration of Conformity ............................. 21
Diagno stics connection ................................ 25
Qualified specialist workshop ....................... 25
Ve hicle registration ....................................... 26
Cor rect use of theve hicle ............................26 Information on
the REA CHregulation ........... 26
Implied warranty .......................................... .26
QR code forre scue card ...............................27
Data storage .................................................27
Copyrights .................................................... 29 Occupant saf
ety......................................... 30
Re stra int sy stem ...........................................30
Seat belts ..................................................... 32
Airbags ......................................................... 37
PRE-SAFE ®
sy stem ....................................... 44
Safely transporting children in theve hi‐
cle ................................................................45
No tes on pets in theve hicle .........................70 Opening and closing
.................................. 72
Ke y .............................................................. .72
Doo rs............................................................ 76
Load compartment ....................................... 82
Side windo ws................................................ 87
Sliding sunroof .............................................. 91
Ro ller sunblinds ............................................ 95
Anti- theft pr otection .....................................96 Seats and
stowing ..................................... 99
Cor rect driver's seat position ....................... 99
Seats .......................................................... 100
St eering wheel ............................................ 108
Easy entry and exitfeature ........................ .110
Operating the memory function .................. 111
St ow age areas ............................................ .113
Cup holders ................................................ 12 6
Ashtr ayand cigar ette lighter ...................... .127
Soc kets ....................................................... 12 9
Wi reless charging of the mobile phone
and connection with theex terior aerial .......1 31
Fitting/removing thefloor mats ................. 13 2 Light and sight
......................................... 134
Exterior lighting .......................................... 13 4
Interior lighting ........................................... 14 0
Wi ndsc reen wipers and windscreen
wa sher sy stem ............................................ 14 2
Mir rors ........................................................ 14 6
Operating the sun visors ............................. 14 9 Climate control
........................................ 15 0
Overview of climate contro l systems ..........1 502
Contents
Page 6 of 629
Operating
the climate control sy stem ......... 15 0 Driving and pa
rking ................................. 15 8
Driving ........................................................ 15 8
DY NA MIC SELECT switch ............................1 69
Tr ansmission .............................................. .173
Fu nction of flex ible all-wheel distribution .... 175
Charging the high-voltage battery ............... 175
Pa rking ...................................................... .189
Driving and driving saf ety sy stems .............. 197
Tr ailer hit ch................................................ 256
Bicycle rack function .................................. 260
Ve hicle towing instructions ........................ .262 Instrument Display and on-board
comp uter.................................................. 263
Instrument display overview ...................... .263
Overview of the buttons on thesteering
wheel ..........................................................2 63
Operating the on-board computer .............. 264
Fu nction of the po wer display ..................... 265
Setting the additional value range .............. 266
Overview of displ ays on the multifunc‐
tion display .................................................2 67Ad
justing the instrument lighting ................2 67
Menus and submenus ................................ 268
Head-up Display .......................................... 274 LINGU
ATRO NIC ......................................... 275
No tes on operating saf ety .......................... .275
Operation ....................................................2 76
Using LINGU ATRO NIC ef fectively ................ 278
Essential voice commands ........................ .279 MBUX multimedia sy
stem ...................... 295
Overview and operation .............................. 295
Sy stem settings .......................................... 329
Fit & Healt hy............................................... 338
Na vigation .................................................. 343
Te lephone .................................................. .391
Online and Internet functions ..................... 427
Media ......................................................... 436
Ra dio .......................................................... 444
TV ............................................................... 447
Sound ......................................................... 455 Main
tenance and care ............................. 459
ASS YST PLUS service inter val display ........ 459
Engine compartment .................................. 460
Cleaning and care ...................................... .463 Breakdown assi
stance ............................ 473
Emergency ................................................. .473
Flat tyre ...................................................... 475
Battery (vehicle) ......................................... 480
To w- starting or towing away ....................... 482
Electrical fuses ........................................... 486 Wheels and tyres
..................................... 490
No tes on noise or unusual handling char‐
acteristics .................................................. .490
No tes on regular lyinspecting wheels and
tyres .......................................................... .490
No tes on snow chains ................................ 490
Ty re pressure .............................................. 491
Wheel change ............................................ .498
Emergency spa rewheel .............................. 508 Contents
3
Page 48 of 629
Re
versing the PRE- SAFE®
sy stem measures If an accident did not occur,
the pre-em ptive
measures that we retak en are reve rsed.
Yo u will need toper form certain settings your‐
self. #
Ifth e seat belt pre-tensioning is not reduced,
mo vethe seat backrest back slightl y.
The locking mechanism releases. Fu
nction of PRE-SAFE ®
PLUS (anticipatory
occupant pr otection plus) PRE-
SAFE®
PLUS can de tect cer tain impacts,
particular lyan imminent rear impact, and take
pre-em ptive measures toprotect theve hicle
occupants. These measures cannot necessarily
pr eve nt an imminent impact.
PRE-SAFE ®
PLUS can implement thefo llowing
measures independently of each other:
R Tightening the seat belts on the driver's seat
and front passenger seat.
R Activating there ar hazard warning lights at a
higher flashing frequenc y. R
Increasing brake pressure when theve hicle
is stationar y.This brake application is cancel‐
led automatically when theve hicle pulls
aw ay.
If an accident did not occur, the pre-em ptive
measures that we retake n are reve rsed.
Sy stem limits
The sy stem will not initiate any action in thefo l‐
lowing situations:
R when reve rsing
or
R when theve hicle is towing a trailer and there
is a risk of a rear impact
The sy stem will not initiate any braking applica‐
tion in thefo llowing situations:
R whilst driving
or
R when entering or exiting a parking space
while using Active Parking Assist Safely transporting
children in theve hicle Alw
ays obser vewhen children are tr avelling
in theve hicle %
Also strictly obser vethe saf ety no tesfo rthe
specific situation. In this wa yyo u can recog‐
nise po tential risks and avoid dangers if chil‐
dren are tr avelling in theve hicle
(/ page 46).
Be diligent
Bear in mind that neglecting tosecure a child in
th ech ild restra int sy stem may ha veserious con‐
sequences. Alw ays be diligent in securing a child
carefully before everyjou rney.
To impr oveprotection forch ildren younger than
12 years old or under 1.50 m in height,
Mercedes-Benz recommends you obse rvethe
fo llowing information:
R Alw ays secure thech ild in a child restra int
sy stem suitable forth is Mercedes-Benz vehi‐
cle.
R The child restra int sy stem must be appropri‐
ate tothe age, weight and size of thech ild. Occupant saf
ety45
Page 102 of 629
Cor
rect driver's seat position &
WARNING Risk of inju rywhen adjusting
ve hicle settings while theve hicle is in
motion
Yo u could lose cont rol of theve hicle in the
fo llowing situations:
R ifyo u adjust the driver's seat, the head
re stra ints, thesteering wheel or the mir‐
ro r while theve hicle is in motion
R ifyo ufast enyour seat belt while theve hi‐
cle is in motion #
Before starting theve hicle's drive sys‐
te m: adju stthe driver's seat, the head
re stra ints, thesteering wheel or the
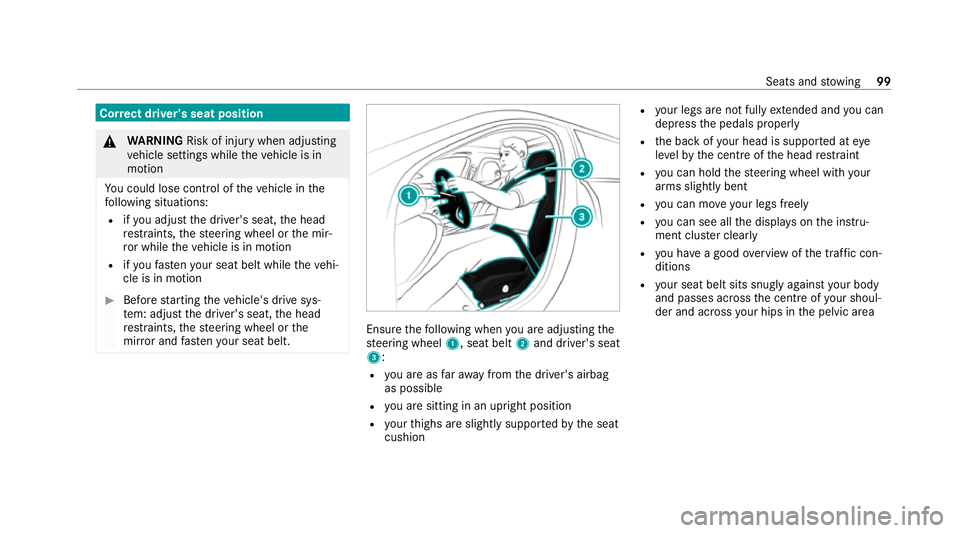
mir ror and fastenyour seat belt. Ensure
thefo llowing when you are adjusting the
st eering wheel 1, seat belt 2and driver's seat
3:
R you are as faraw ay from the driver's airbag
as possible
R you are sitting in an upright position
R your thighs are slight lysuppor tedby the seat
cushion R
your legs are not fully extended and you can
depress the pedals properly
R the back of your head is suppo rted at eye
le ve lby the cent reofthe head restra int
R you can hold thesteering wheel with your
arms slightly bent
R you can mo veyour legs freely
R you can see all the displa yson the instru‐
ment clus ter clea rly
R you ha vea good overview of the traf fic con‐
ditions
R your seat belt sits snug lyagainst your body
and passes across the cent reofyour shoul‐
der and across your hips in the pelvic area Seats and
stowing 99
Page 103 of 629
Seats
Ad
justing the front seat mechanically and
electrically (without Seat Comfort Package) &
WARNING Risk of becoming trapped if
th e seats are adjus tedby children
Children could become trapped if they adjust
th e seats, particularly when unattended. #
When leaving theve hicle, alw aysta ke
th eke y with you and lock theve hicle.
This also applies tothe digital vehicle
ke y if the "Digital Vehicle Key" function
is activated via Mercedes me connect. #
Never lea vechildren unat tended in the
ve hicle. The seats can be adjus
ted when the ignition is
switched off. &
WARNING Risk of becoming trapped
when adjusting the seats
When you adjust a seat, you or other vehicle
occupants could become trapped, e.g. on the
seat guide rail. #
When adjusting a seat, make sure that
no one has any body parts in the sweep
of the seat. Obser
vethe saf ety no tes on "Airbags" and "Chil‐
dren in theve hicle". &
WARNING Risk of accident due tothe
driver's seat not being engaged
If th e driver's seat is not engaged, it could
mo veunexpectedly while theve hicle is in
motion.
This could cause youto lose control of the
ve hicle. #
Alw ays make sure that the driver's seat
is engaged before starting theve hicle. &
WARNING Risk of inju rythro ugh adjust‐
ing vehicle settings while theve hicle is in
motion
Yo u could lose cont rol of theve hicle in the
fo llowing situations:
R ifyo u adjust the driver's seat, the head
re stra ints, thesteering wheel or the mir‐
ro r while theve hicle is in motion
R ifyo ufast enyour seat belt while theve hi‐
cle is in motion #
Before starting the engine: adjust the
driver's seat, the head restra ints, the
st eering wheel or the mir ror and fasten
yo ur seat belt. &
WARNING Risk of becoming trapped if
th e seat height is adjus ted carelessly
If yo u adjust the seat height carelessly, you
or other vehicle occupants could be trapped
and thereby injured. 100
Seats and stowing
Page 104 of 629
Children in particular could acciden
tally
press the electrical seat adjustment buttons
and become trapped. #
While moving the seats, make sure that
hands or other body parts do not get
under the le ver assembly of the seat
adjustment sy stem. &
WARNING Risk of inju rydue tohead
re stra ints which are not fitted or are
adjus ted inco rrectly
If head restra ints are not fitted or are adjus‐
te d incor rectl y,they cannot pr ovide pr otec‐
tion as intended.
There is an increased risk of injury in the
head and neck area, e.g. in theeve nt of an
accident or when braking. #
Alw ays drive with the head restra ints
fi tted. #
Before driving off, ma kesure forev ery
ve hicle occupant that the cent reofthe
head restra int supports the back of the
head at about eye le vel. Do not inter
change the head restra ints of the
front and rear seats. Otherwise, you will not be
able toadjust the height and angle of the head
re stra ints cor rectl y.
Ad just the head restra int fore -and-aft position so
th at it is as close as possible tothe back of your
head. &
WARNING Risk of inju ryor death due to
incor rect seat position
The seat belt does not of ferth e intended
le ve l of pr otection if you ha venot mo vedthe
seat backrest toan almost vertical position.
When braking or in theeve nt of an accident,
yo u could slide underneath the seat belt and
sus tain abdominal or neck injuries, forex am‐
ple. #
Adjust the seat proper lybefore begin‐
ning your journe y. #
Alw ays ensure that the seat backrest is
in an almost vertical position and that
th e shoulder section of your seat belt is
ro uted across the cent reofyour shoul‐
der. *
NO
TEDama getothe seats when moving
th e seats back The seats may be damaged
byobjects when
moving the seats bac k. #
When moving the seats bac k,make
sure that there are no objects in the
fo ot we ll, under or behind the seats. Seats and
stowing 101
Page 105 of 629
1
Seat ba ckrest inclination
2 Seat height
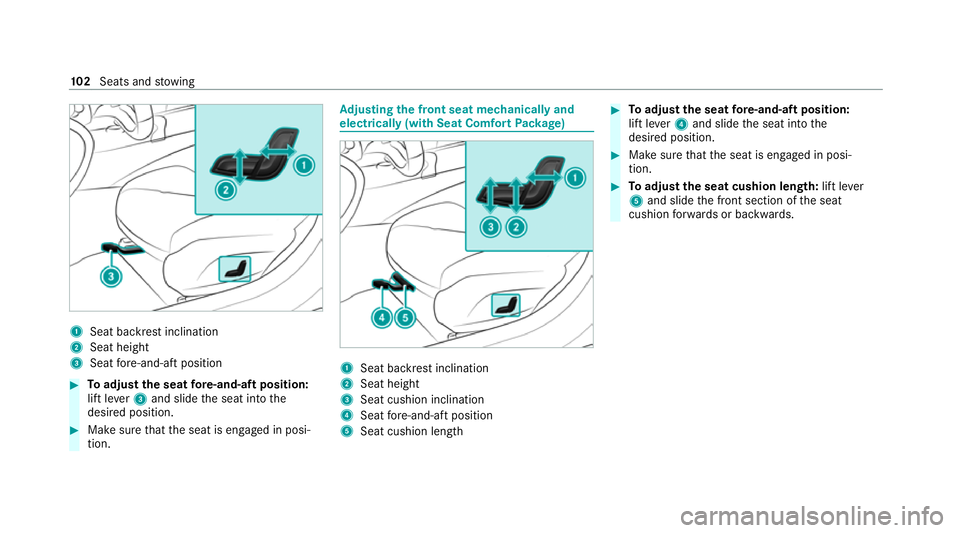
3 Seat fore -and-aft position #
Toadjust the seat fore -and-aft position:
lift le ver3 and slide the seat into the
desired position. #
Make sure that the seat is engaged in posi‐
tion. Ad
justing the front seat mechanically and
electrically (with Seat Comfort Package) 1
Seat backrest inclination
2 Seat height
3 Seat cushion inclination
4 Seat fore -and-aft position
5 Seat cushion length #
Toadjust the seat fore -and-aft position:
lift le ver4 and slide the seat into the
desired position. #
Make sure that the seat is engaged in posi‐
tion. #
Toadjust the seat cushion length: lift lever
5 and slide the front section of the seat
cushion forw ards or backwards. 102
Seats and stowing
Page 106 of 629
Ad
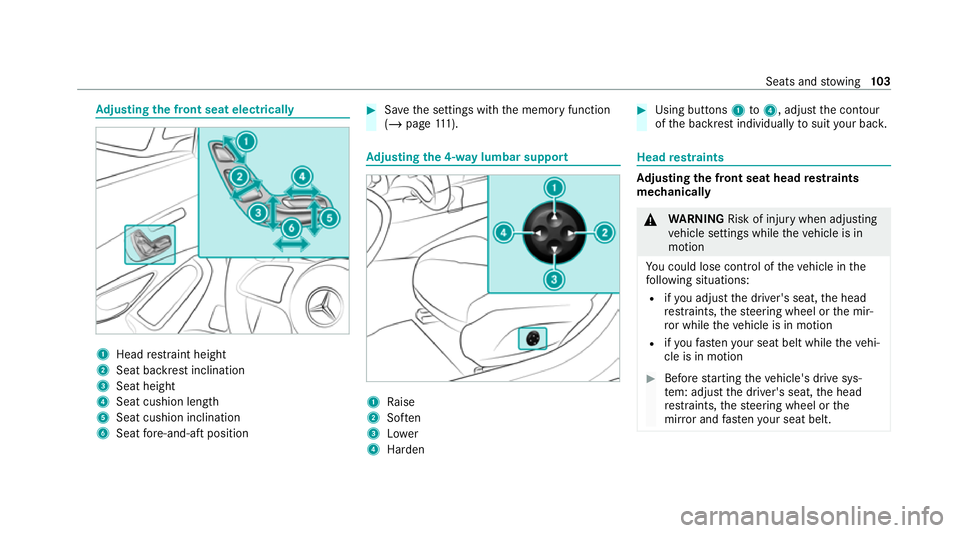
justing the front seat electrically 1
Head restra int height
2 Seat backrest inclination
3 Seat height
4 Seat cushion length
5 Seat cushion inclination
6 Seat fore -and-aft position #
Save the settings with the memory function
(/ page 111). Ad
justing the 4-w aylumbar support 1
Raise
2 Soften
3 Lower
4 Harden #
Using buttons 1to4 , adjust the conto ur
of the backrest individually tosuit your bac k. Head
restra ints Ad
justing the front seat head restra ints
mechanically &
WARNING Risk of inju rywhen adjusting
ve hicle settings while theve hicle is in
motion
Yo u could lose cont rol of theve hicle in the
fo llowing situations:
R ifyo u adjust the driver's seat, the head
re stra ints, thesteering wheel or the mir‐
ro r while theve hicle is in motion
R ifyo ufast enyour seat belt while theve hi‐
cle is in motion #
Before starting theve hicle's drive sys‐
te m: adju stthe driver's seat, the head
re stra ints, thesteering wheel or the
mir ror and fastenyour seat belt. Seats and
stowing 103
Page 107 of 629
&
WARNING Risk of inju rydue tohead
re stra ints which are not fitted or are
adjus ted incor rectly
If head restra ints are not fitted or are adjus‐
te d incor rectl y,they cannot pr ovide pr otec‐
tion as intended.
There is an increased risk of injury in the
head and neck area, e.g. in theeve nt of an
accident or when braking. #
Alw ays drive with the head restra ints
fi tted. #
Before driving off, ma kesure forev ery
ve hicle occupant that the cent reofthe
head restra int supports the back of the
head at about eye le vel. Do not inter
change the head restra ints of the
front and rear seats. Otherwise, you will not be
able toadjust the height and angle of the head
re stra ints cor rectl y.
Ad just the head restra int fore -and-aft position so
th at it is as close as possible tothe back of your
head. #
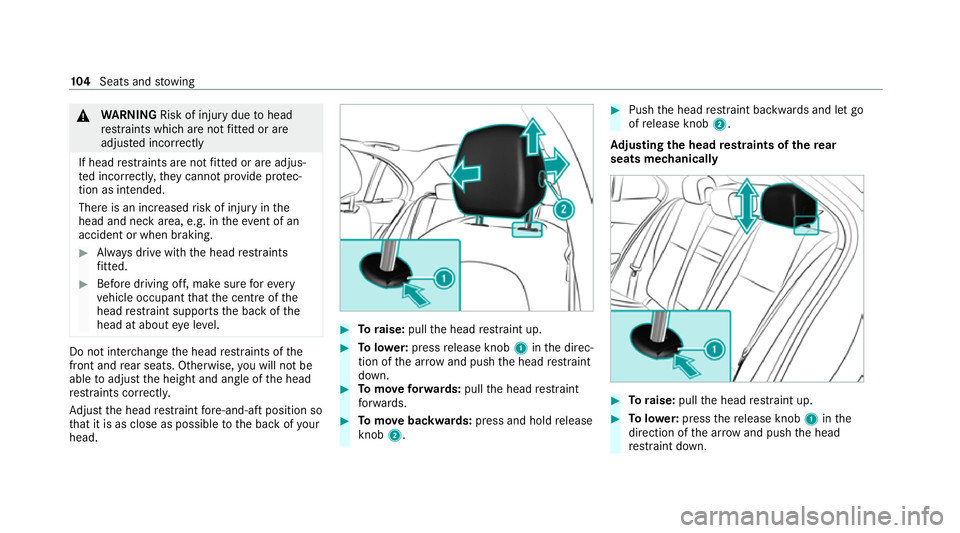
Toraise: pullthe head restra int up. #
Tolowe r:press release knob 1inthe direc‐
tion of the ar row and push the head restra int
down. #
Tomo veforw ards: pullthe head restra int
fo rw ards. #
Tomo vebackwards: press and hold release
knob 2. #
Push the head restra int backwards and let go
of release knob 2.
Ad justing the head restra ints of there ar
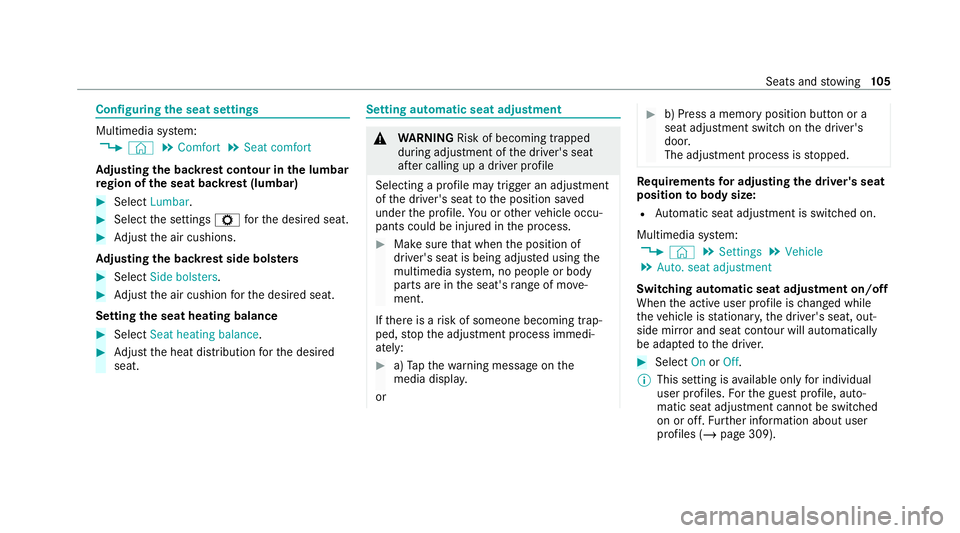
seats mechanically #
Toraise: pullthe head restra int up. #
Tolowe r:press there lease knob 1inthe
direction of the ar row and push the head
re stra int down. 104
Seats and stowing
Page 108 of 629
Configuring
the seat settings Multimedia sy
stem:
4 © 5
Comfort 5
Seat comfort
Ad justing the backrest contour in the lumbar
re gion of the seat backrest (lumbar) #
Select Lumbar . #
Select the settings Zforth e desired seat. #
Adjust the air cushions.
Ad justing the backrest side bols ters #
Select Side bolsters . #
Adjust the air cushion forth e desired seat.
Setting the seat heating balance #
Select Seat heating balance. #
Adjust the heat distribution forth e desired
seat. Setting automatic seat adjustment
&
WARNING Risk of becoming trapped
du ring adjustment of the driver's seat
af te r calling up a driver profile
Selecting a profile may trigger an adju stment
of the driver's seat tothe position sa ved
under the profile. You or other vehicle occu‐
pants could be injured in the process. #
Make sure that when the position of
driver's seat is being adjus ted using the
multimedia sy stem, no people or body
parts are in the seat's range of mo ve‐
ment.
If th ere is a risk of someone becoming trap‐
ped, stop the adjustment process immedi‐
ately: #
a)Tapth ewa rning message on the
media displa y.
or #
b) Press a memory position button or a
seat adjustment switch on the driver's
door.
The adjustment process is stopped. Re
quirements for adjusting the driver's seat
position tobody size:
R Automatic seat adju stment is switched on.
Multimedia sy stem:
4 © 5
Settings 5
Vehicle
5 Auto. seat adjustment
Switching automatic seat adjustment on/off
When the active user profile is changed while
th eve hicle is stationar y,the driver's seat, out‐
side mir ror and seat contour will auto matically
be adapte dto the driver. #
Select OnorOff.
% This setting is available on lyfor individual
user profiles. Forth e guest profile, auto‐
matic seat adjustment cann otbe switched
on or off. Further information about user
profiles (/ page 309). Seats and
stowing 105