instrument cluster MERCEDES-BENZ G-Class 2009 W463 Owner's Manual
[x] Cancel search | Manufacturer: MERCEDES-BENZ, Model Year: 2009, Model line: G-Class, Model: MERCEDES-BENZ G-Class 2009 W463Pages: 264, PDF Size: 6.98 MB
Page 25 of 264
Exterior view .......................................24
Cockpit .................................................25
Instrument cluster ..............................26
Multifunction steering wheel .............27
Center console ....................................28
Overhead control panel ......................30
Door control panel ..............................30
23At a glance463_AKB; 2; 52, en-USd2ureepe,Version: 2.11.7.12008-12-02T10:52:11+01:00 - Seite 23
Page 27 of 264
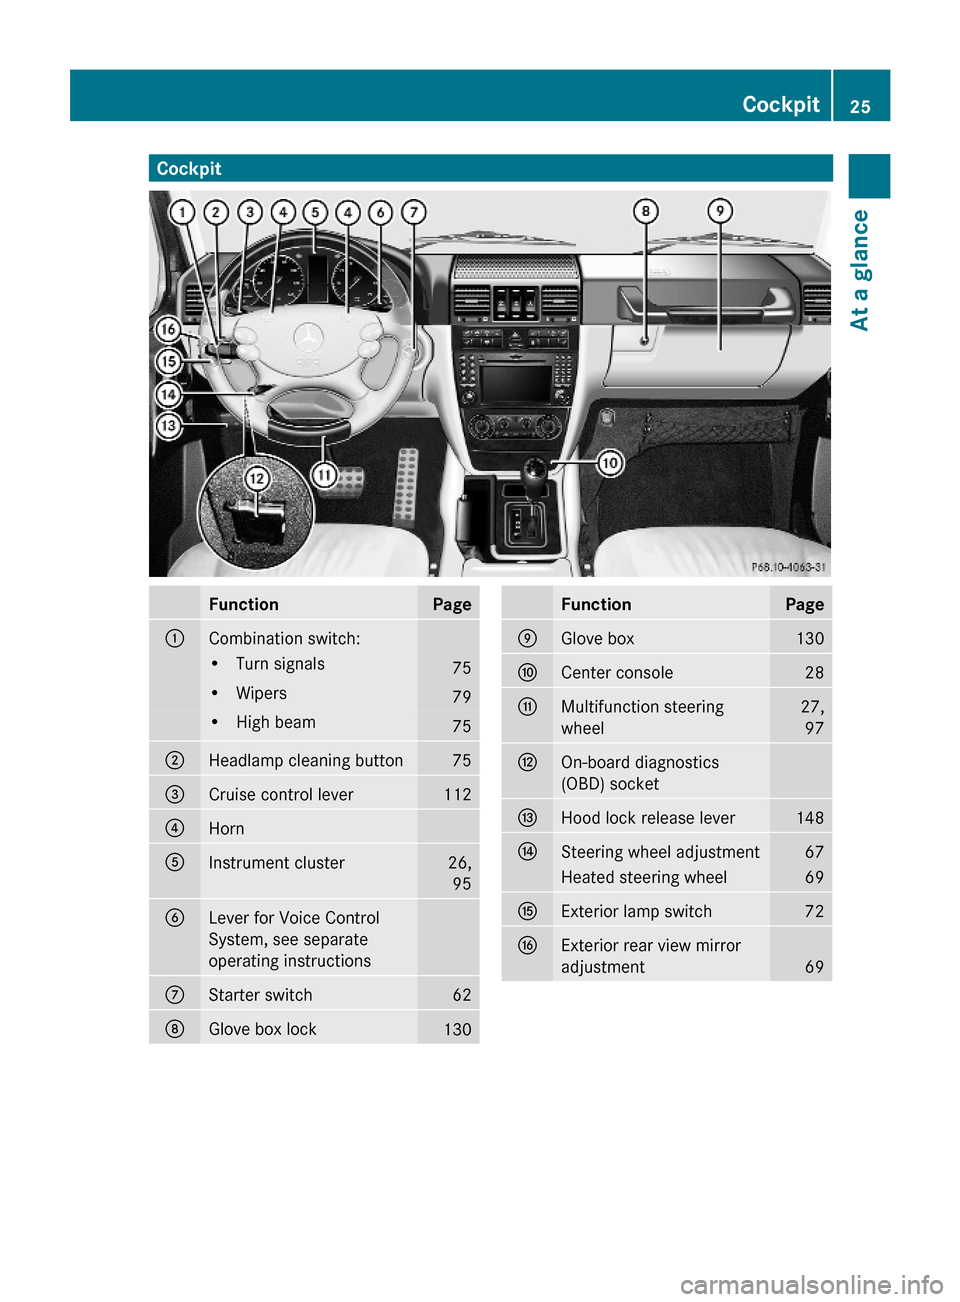
CockpitFunctionPage:Combination switch:•Turn signals75•Wipers79•High beam75;Headlamp cleaning button75=Cruise control lever112?Horn AInstrument cluster26,
95
BLever for Voice Control
System, see separate
operating instructions
CStarter switch62DGlove box lock130FunctionPageEGlove box130FCenter console28GMultifunction steering
wheel
27,
97
HOn-board diagnostics
(OBD) socket
IHood lock release lever148JSteering wheel adjustment67Heated steering wheel69KExterior lamp switch72LExterior rear view mirror
adjustment69
Cockpit25At a glance463_AKB; 2; 52, en-USd2ureepe,Version: 2.11.7.12008-12-02T10:52:11+01:00 - Seite 25Z
Page 28 of 264
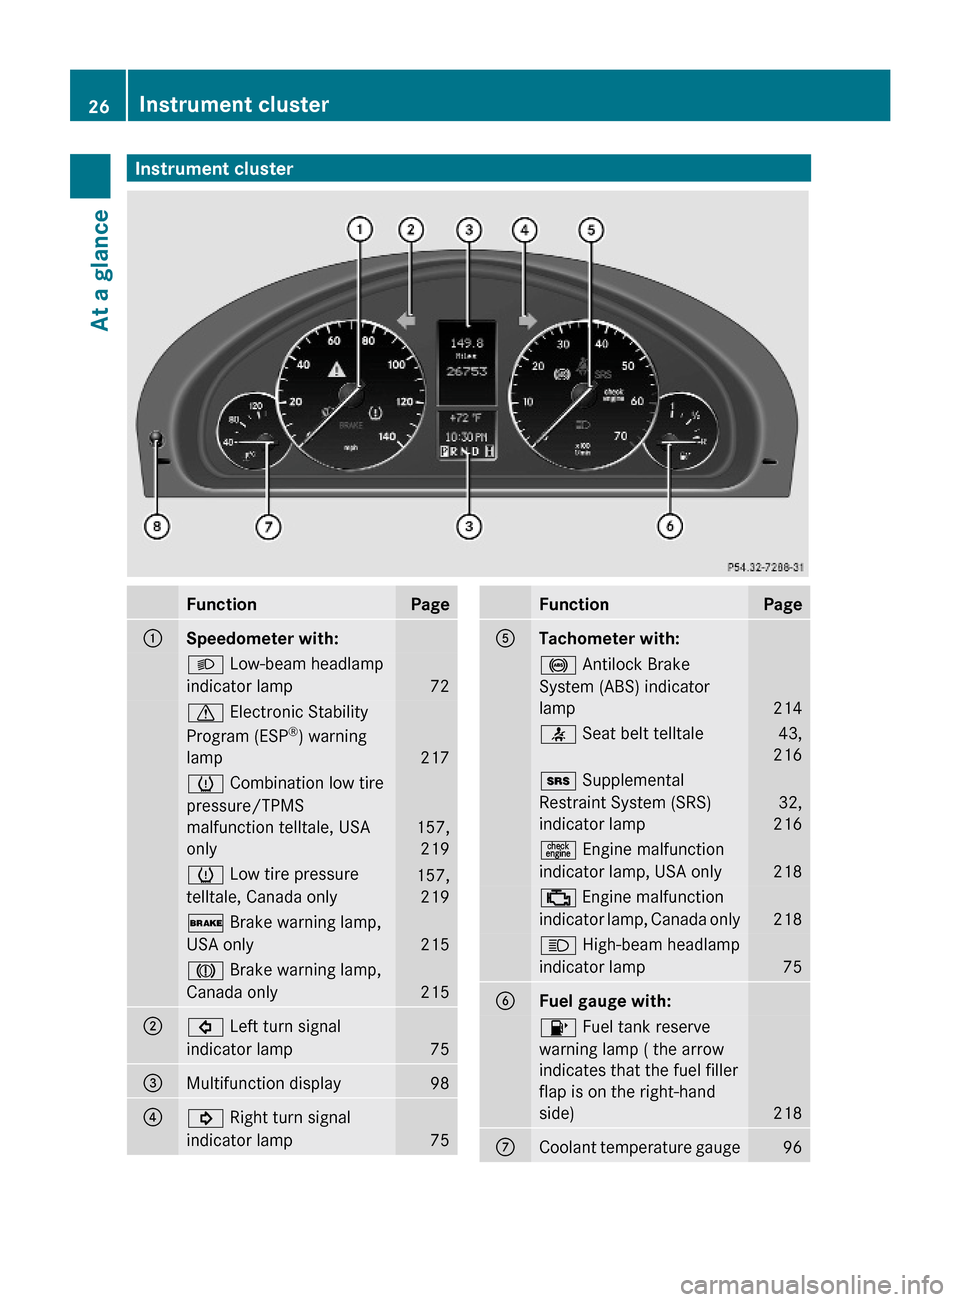
Instrument clusterFunctionPage:Speedometer with:L Low-beam headlamp
indicator lamp72
d Electronic Stability
Program (ESP®) warning
lamp 217
h Combination low tire
pressure/TPMS
malfunction telltale, USA
only
157,
219
h Low tire pressure
telltale, Canada only
157,
219
$ Brake warning lamp,
USA only215
J Brake warning lamp,
Canada only215
;# Left turn signal
indicator lamp 75
=Multifunction display98?! Right turn signal
indicator lamp75
FunctionPageATachometer with: ! Antilock Brake
System (ABS) indicator
lamp 214
7 Seat belt telltale43,
216
+ Supplemental
Restraint System (SRS)
indicator lamp
32,
216
= Engine malfunction
indicator lamp, USA only 218
; Engine malfunction
indicator lamp, Canada only218
K High-beam headlamp
indicator lamp75
BFuel gauge with:8 Fuel tank reserve
warning lamp ( the arrow
indicates that the fuel filler
flap is on the right-hand
side) 218
CCoolant temperature gauge9626Instrument clusterAt a glance
463_AKB; 2; 52, en-USd2ureepe,Version: 2.11.7.12008-12-02T10:52:11+01:00 - Seite 26
Page 29 of 264
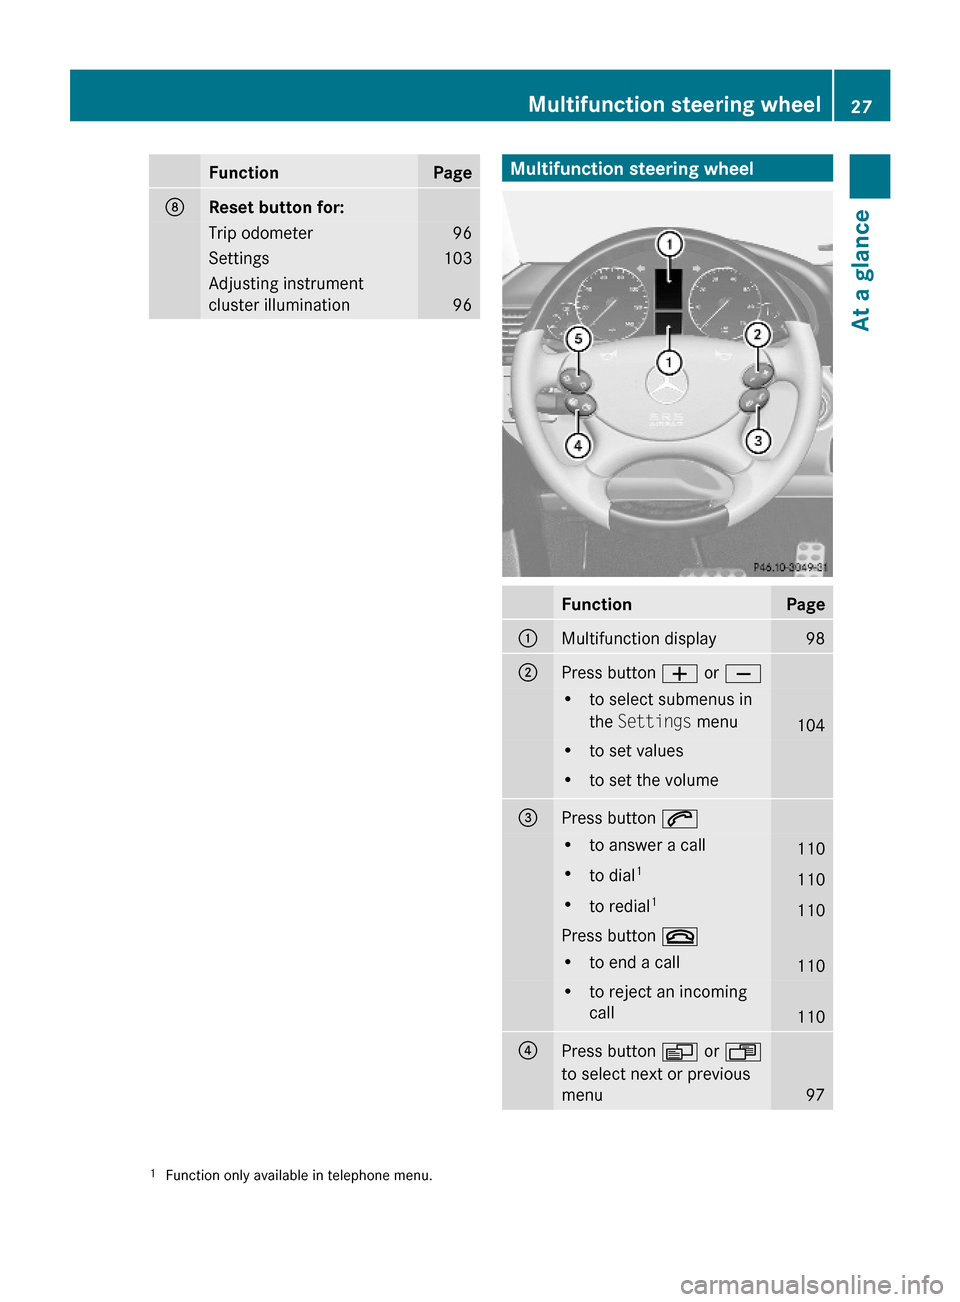
FunctionPageDReset button for: Trip odometer96Settings103Adjusting instrument
cluster illumination96Multifunction steering wheelFunctionPage:Multifunction display98;Press button W or X•to select submenus in
the Settings menu104
•to set values•to set the volume=Press button 6•to answer a call110•to dial1110•to redial1110Press button ~•to end a call110•to reject an incoming
call110
?Press button V or U
to select next or previous
menu97
1Function only available in telephone menu.Multifunction steering wheel27At a glance463_AKB; 2; 52, en-USd2ureepe,Version: 2.11.7.12008-12-02T10:52:11+01:00 - Seite 27Z
Page 55 of 264
Electronic Traction System (4-ETS)
GObserve Safety notes, see page 50.
The 4-ETS (four-wheel Electronic Traction
System) is a component of the ESP®. The
4-ETS improves the vehicle’s ability to utilize
available traction, especially under slippery
road conditions by applying the brakes to a
spinning wheel. In addition, more power is
transferred to the wheel(s) with traction.
The 4-ETS function is available between
vehicle speeds of 0 mph (km/h) and 37 mph
(60 km/h).
When you switch off the ESP®, the 4-ETS is
still enabled.
Switching off the ESP®
GWarning!
The ESP® should not be switched off during
normal driving other than in the
circumstances described below. Disabling
the system will reduce vehicle stability in
driving maneuvers.
To improve the vehicle’s traction, switch off
the ESP® in driving situations in which it
would be advantageous to have the drive
wheels spin and thus cut into surfaces for
better grip such as:
Rwhen driving with snow chains
Rin deep snow
Rin sand or gravel
Rwhen driving off-road
GWarning!
Switch on the ESP® immediately if the
aforementioned circumstances do not apply
anymore. Otherwise the ESP® will not
stabilize the vehicle when it is starting to skid
or a wheel is spinning.
When you switch off the ESP®,
Rthe ESP® does not stabilize the vehicle
Rthe engine output is not limited, which
allows the drive wheels to spin and thus cut
into surfaces for better grip
Rthe ESP® continues to operate when you
are braking
Rthe 4-ETS will still apply the brakes to a
spinning wheel at vehicle speeds up to
approximately 37 mph (60 km/h)
Rthe cruise control cannot be activated
Rthe cruise control switches off if activated
iWhen the ESP® is switched off and one or
more drive wheels are spinning, the ESP®
warning lamp d in the instrument
cluster flashes. However, the ESP® will
then not stabilize the vehicle.
iWhen the ESP® is switched off, it will be
switched on again automatically when
exceeding a vehicle speed of 37 mph (60
km/h) or exceeding a severity threshold of
side acceleration.
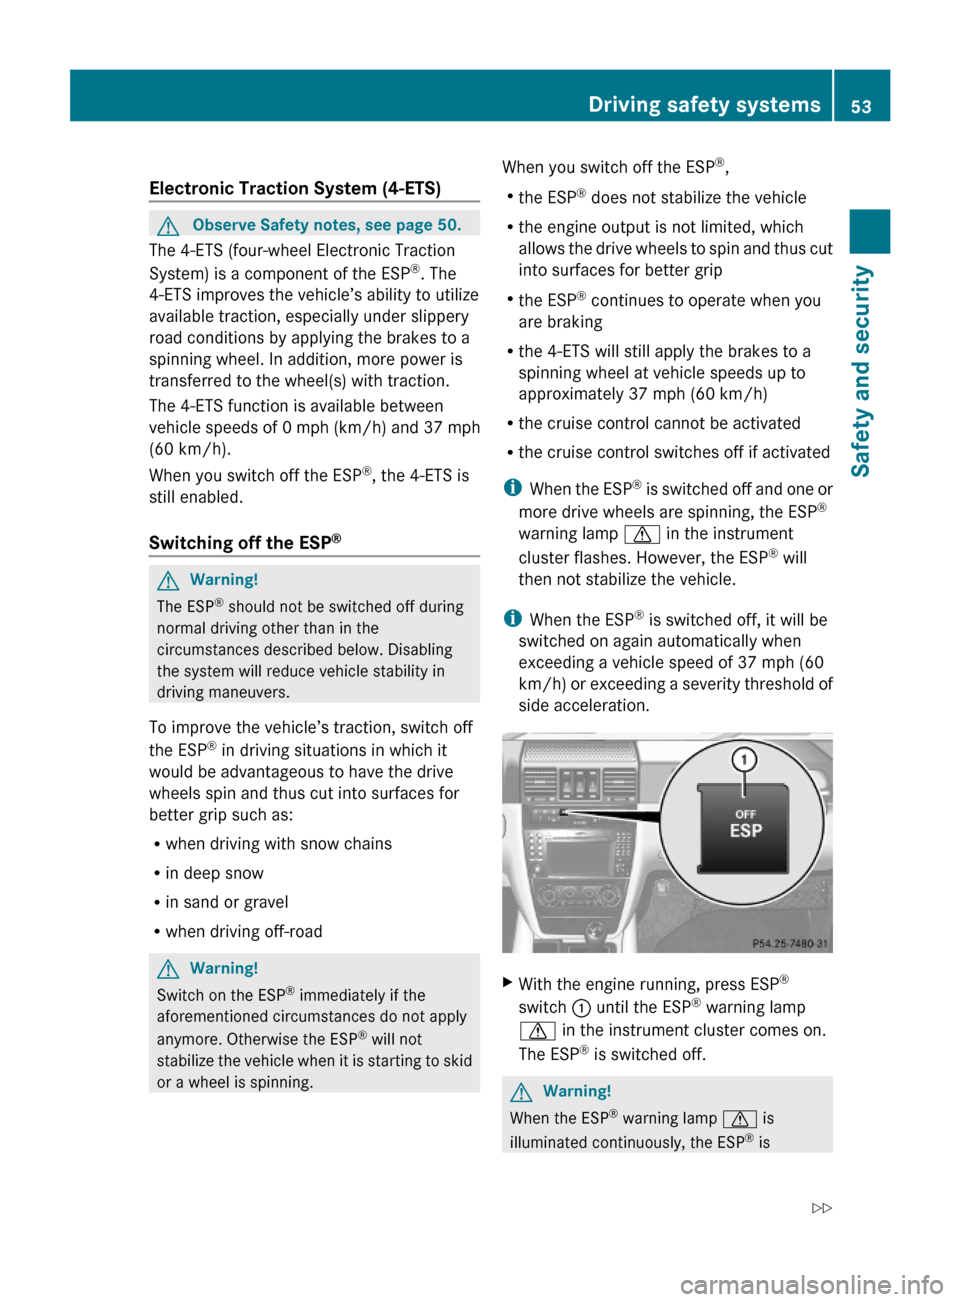
XWith the engine running, press ESP®
switch : until the ESP® warning lamp
d in the instrument cluster comes on.
The ESP® is switched off.
GWarning!
When the ESP® warning lamp d is
illuminated continuously, the ESP® is
Driving safety systems53Safety and security463_AKB; 2; 52, en-USd2ureepe,Version: 2.11.7.12008-12-02T10:52:11+01:00 - Seite 53Z
Page 56 of 264
switched off or is not operational due to a
malfunction. Vehicle stability in standard
driving maneuvers is reduced.
Adapt your speed and driving to the prevailing
road conditions and to the non-operating
status of the ESP®.
! Avoid spinning of a drive wheel for an
extended period with the ESP® switched
off. This may cause serious damage to the
drivetrain which is not covered by the
Mercedes-Benz Limited Warranty.
Switching on the ESP®
XPress ESP® switch : until the ESP®
warning lamp d in the instrument
cluster goes out.
You are now again in normal driving mode
with the ESP® switched on.
Anti-theft systems
Immobilizer
The immobilizer prevents unauthorized
persons from starting your vehicle.
When leaving the vehicle, always take the
SmartKey with you and lock the vehicle. The
engine can be started by anyone with a valid
SmartKey that is left inside the vehicle.
Activating
XRemove the SmartKey from the starter
switch.
Deactivating
XSwitch on the ignition.
iStarting the engine will also deactivate
the immobilizer.
In the event that the engine cannot be
started (yet the vehicle’s battery is
charged), the system is not operational.
Contact an authorized Mercedes-Benz
Center or call 1-800-FOR-MERCedes (in the
USA), or 1-800-387-0100 (in Canada).
Anti-theft alarm system
Once the alarm system has been armed, a
visual and audible alarm is triggered when
someone opens
Ra door
Rthe tailgate
Rthe hood
The alarm will stay on even if the activating
element (a door, for example) is immediately
closed.
The alarm system will also be triggered when
Rthe vehicle is opened with the mechanical
key
Ra door is opened from the inside
Rthe tailgate is opened from the inside
To cancel the alarm after it has been
triggered, see “Canceling the alarm”
(Y page 55).
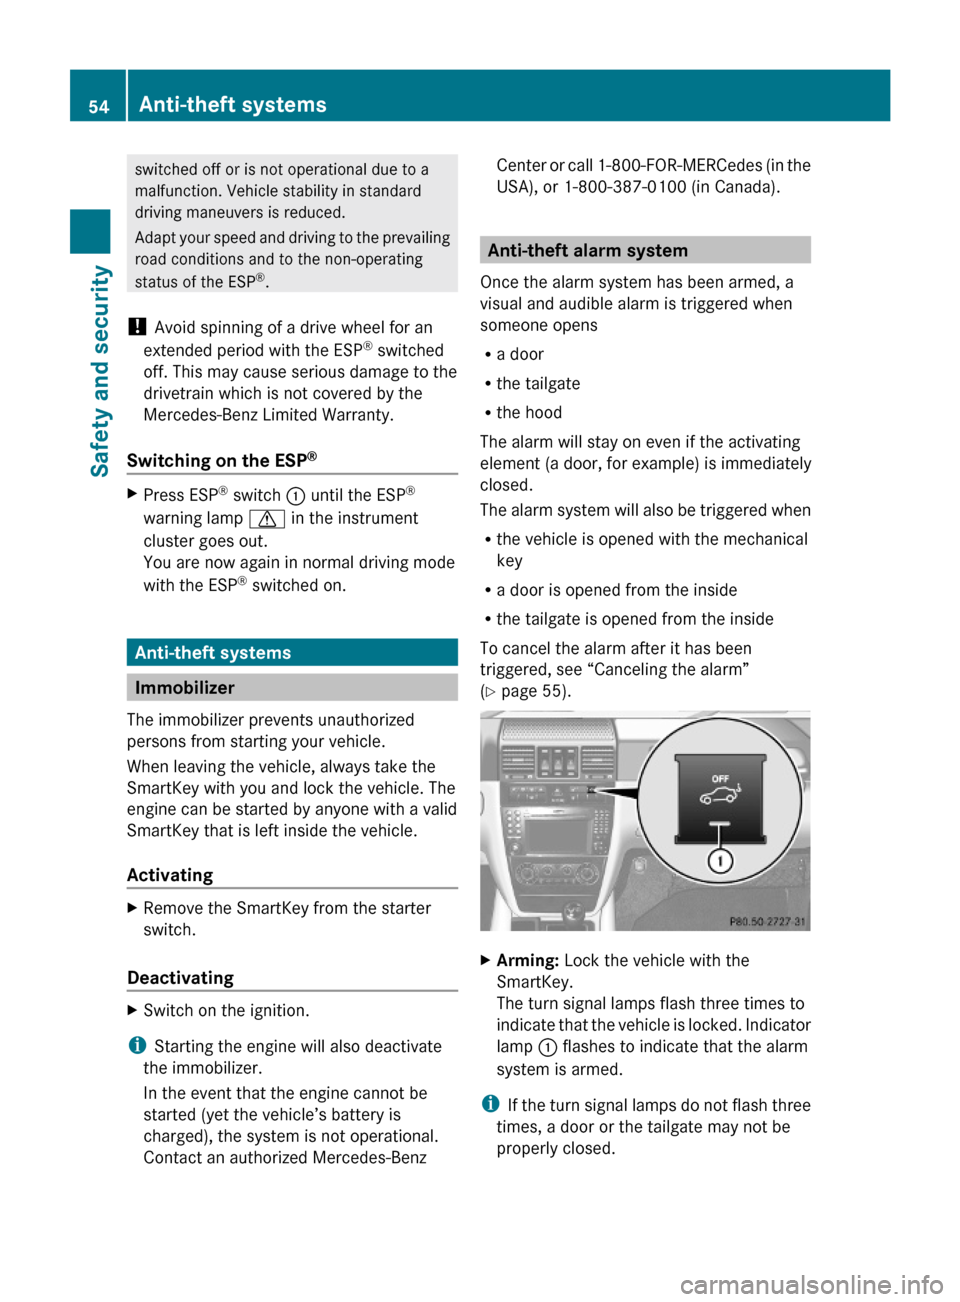
XArming: Lock the vehicle with the
SmartKey.
The turn signal lamps flash three times to
indicate that the vehicle is locked. Indicator
lamp : flashes to indicate that the alarm
system is armed.
iIf the turn signal lamps do not flash three
times, a door or the tailgate may not be
properly closed.
54Anti-theft systemsSafety and security
463_AKB; 2; 52, en-USd2ureepe,Version: 2.11.7.12008-12-02T10:52:11+01:00 - Seite 54
Page 59 of 264
Vehicle equipment ..............................58
Locking and unlocking .......................58
Starter switch positions .....................62
Seats ....................................................62
Multifunction steering wheel .............67
Mirrors .................................................69
Memory function .................................70
Lighting ................................................72
Wipers ..................................................79
Power windows ...................................81
Driving and parking ............................82
Automatic transmission .....................87
Transfer case .......................................91
Differential locks .................................93
Instrument cluster ..............................95
Control system ....................................97
Driving systems ................................112
Climate control system ....................119
Front windshield defroster ..............124
Rear window defroster .....................125
Power tilt/sliding sunroof ...............125
Loading and storing ..........................126
Useful features .................................131
57Controls in detail463_AKB; 2; 52, en-USd2ureepe,Version: 2.11.7.12008-12-02T10:52:11+01:00 - Seite 57
Page 64 of 264
XInsert the mechanical key in the lock
cylinder.
XTurn the mechanical key clockwise to
position 2 and remove the mechanical
key in that position to lock the tailgate.
The tailgate remains locked even when the
vehicle is centrally unlocked.
You can only cancel the separate tailgate
locking mode by means of the mechanical
key.
XUnlocking: Remove the mechanical key
from the SmartKey (Y page 221).
XInsert the mechanical key in the lock
cylinder.
XTurn the mechanical key counterclockwise
to neutral position 1 and remove the
mechanical key in that position to unlock
the tailgate.
You can now open the tailgate.
Starter switch positions
SmartKey
GObserve Safety notes, see page 44.
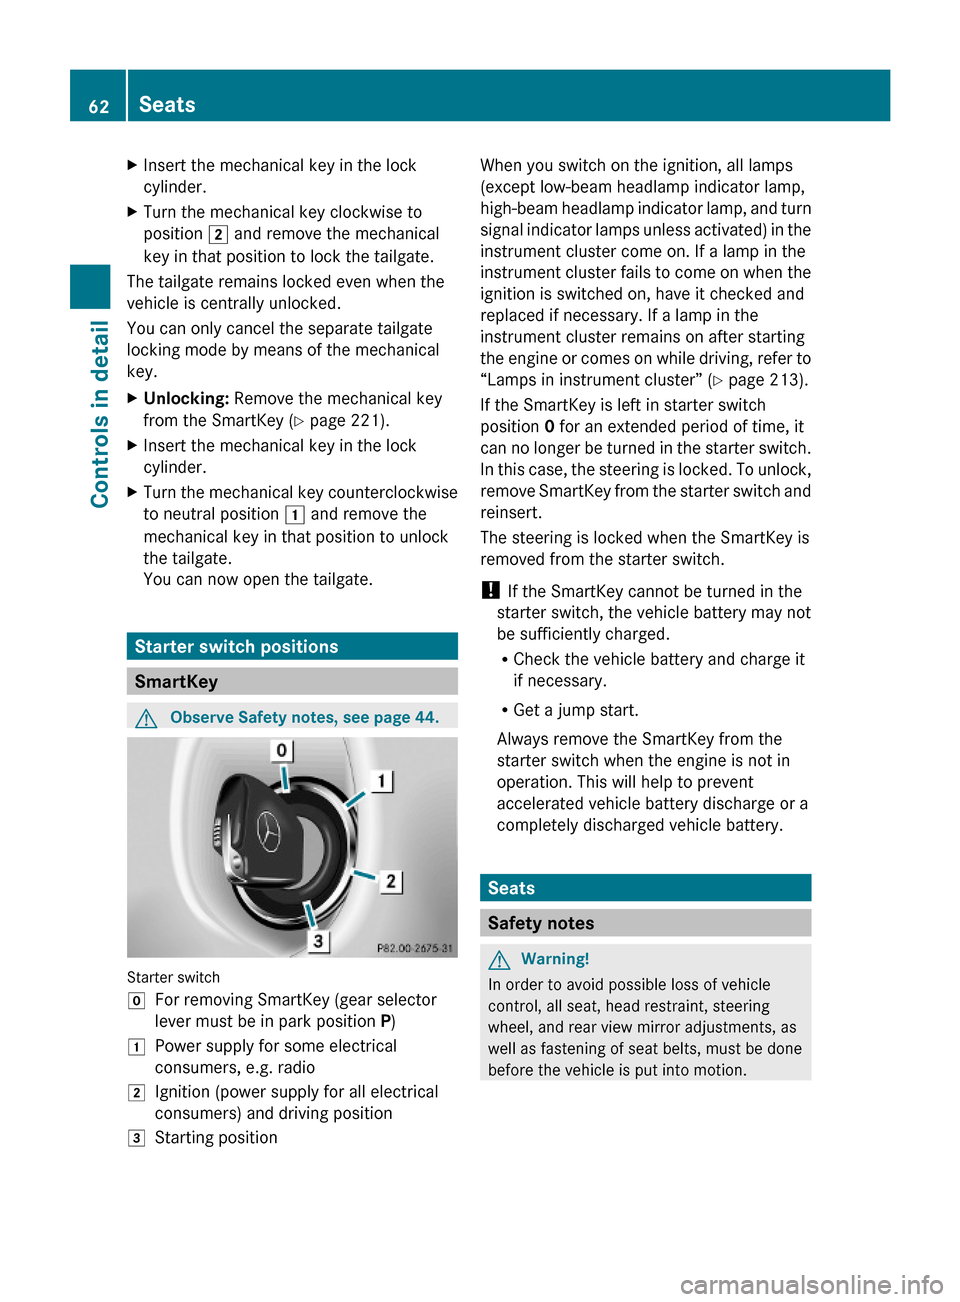
Starter switch
gFor removing SmartKey (gear selector
lever must be in park position P)
1Power supply for some electrical
consumers, e.g. radio
2Ignition (power supply for all electrical
consumers) and driving position
3Starting positionWhen you switch on the ignition, all lamps
(except low-beam headlamp indicator lamp,
high-beam headlamp indicator lamp, and turn
signal indicator lamps unless activated) in the
instrument cluster come on. If a lamp in the
instrument cluster fails to come on when the
ignition is switched on, have it checked and
replaced if necessary. If a lamp in the
instrument cluster remains on after starting
the engine or comes on while driving, refer to
“Lamps in instrument cluster” (Y page 213).
If the SmartKey is left in starter switch
position 0 for an extended period of time, it
can no longer be turned in the starter switch.
In this case, the steering is locked. To unlock,
remove SmartKey from the starter switch and
reinsert.
The steering is locked when the SmartKey is
removed from the starter switch.
! If the SmartKey cannot be turned in the
starter switch, the vehicle battery may not
be sufficiently charged.
RCheck the vehicle battery and charge it
if necessary.
RGet a jump start.
Always remove the SmartKey from the
starter switch when the engine is not in
operation. This will help to prevent
accelerated vehicle battery discharge or a
completely discharged vehicle battery.
Seats
Safety notes
GWarning!
In order to avoid possible loss of vehicle
control, all seat, head restraint, steering
wheel, and rear view mirror adjustments, as
well as fastening of seat belts, must be done
before the vehicle is put into motion.
62SeatsControls in detail
463_AKB; 2; 52, en-USd2ureepe,Version: 2.11.7.12008-12-02T10:52:11+01:00 - Seite 62
Page 69 of 264
If one or more of the indicator lamps in
respective seat heating button : are
flashing, there is insufficient voltage available
since too many electrical consumers are
turned on. The seat heating switches off
automatically.
The seat heating will switch back on again
automatically as soon as sufficient voltage is
available.
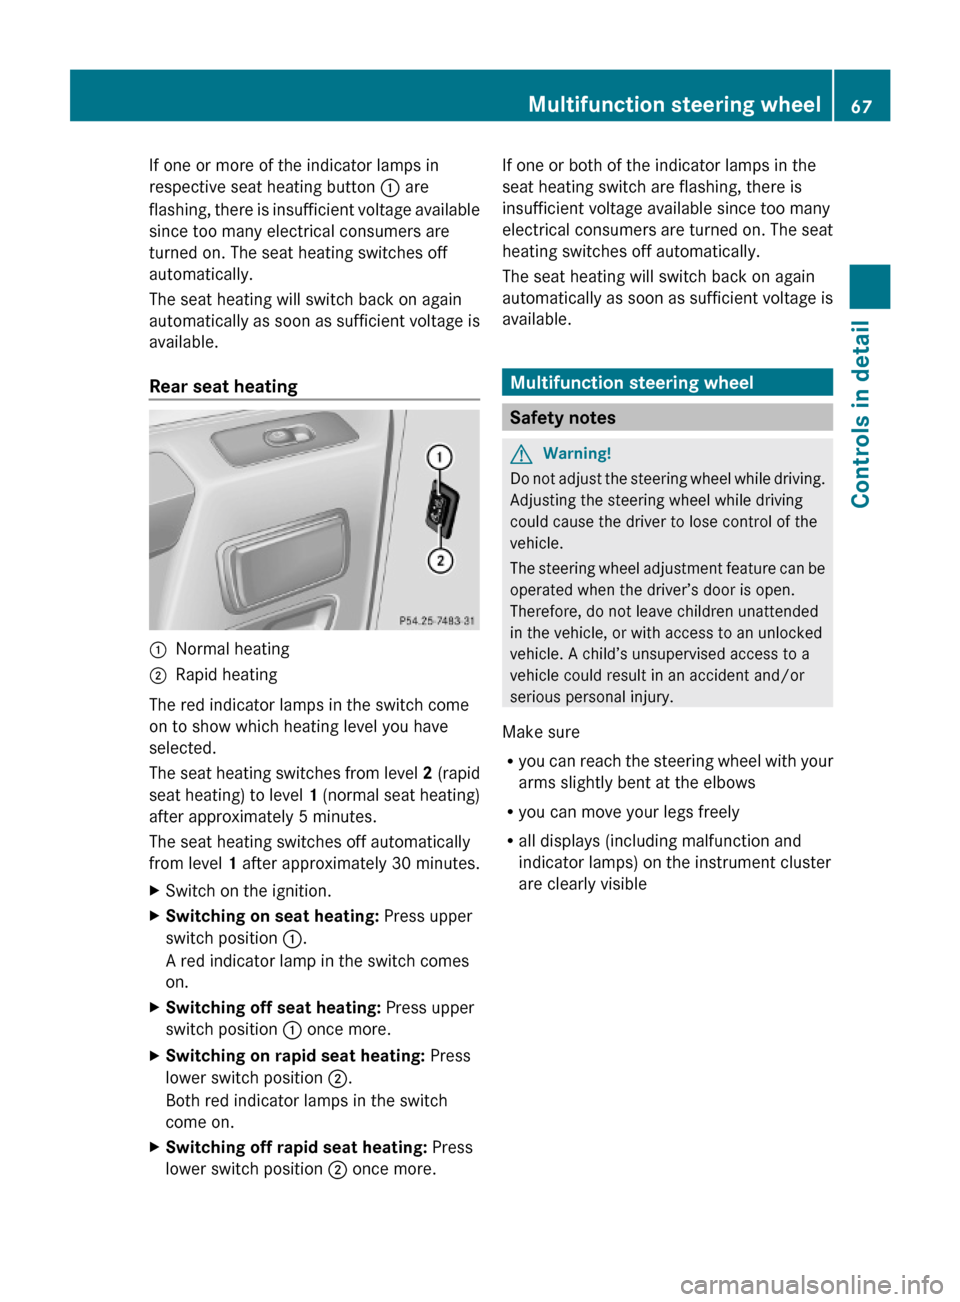
Rear seat heating
:Normal heating;Rapid heating
The red indicator lamps in the switch come
on to show which heating level you have
selected.
The seat heating switches from level 2 (rapid
seat heating) to level 1 (normal seat heating)
after approximately 5 minutes.
The seat heating switches off automatically
from level 1 after approximately 30 minutes.
XSwitch on the ignition.XSwitching on seat heating: Press upper
switch position :.
A red indicator lamp in the switch comes
on.
XSwitching off seat heating: Press upper
switch position : once more.
XSwitching on rapid seat heating: Press
lower switch position ;.
Both red indicator lamps in the switch
come on.
XSwitching off rapid seat heating: Press
lower switch position ; once more.
If one or both of the indicator lamps in the
seat heating switch are flashing, there is
insufficient voltage available since too many
electrical consumers are turned on. The seat
heating switches off automatically.
The seat heating will switch back on again
automatically as soon as sufficient voltage is
available.
Multifunction steering wheel
Safety notes
GWarning!
Do not adjust the steering wheel while driving.
Adjusting the steering wheel while driving
could cause the driver to lose control of the
vehicle.
The steering wheel adjustment feature can be
operated when the driver’s door is open.
Therefore, do not leave children unattended
in the vehicle, or with access to an unlocked
vehicle. A child’s unsupervised access to a
vehicle could result in an accident and/or
serious personal injury.
Make sure
Ryou can reach the steering wheel with your
arms slightly bent at the elbows
Ryou can move your legs freely
Rall displays (including malfunction and
indicator lamps) on the instrument cluster
are clearly visible
Multifunction steering wheel67Controls in detail463_AKB; 2; 52, en-USd2ureepe,Version: 2.11.7.12008-12-02T10:52:11+01:00 - Seite 67Z
Page 74 of 264
XPress memory button ?.XWithin 3 seconds, press bottom of
adjustment button :.
The parking position is stored if the mirror
does not move.
iIf the mirror does move, repeat the above
steps. After the setting is stored, you can
move the mirror again.
Lighting
Notes
iIf you drive in countries where vehicles
drive on the other side of the road than the
country where the vehicle is registered, you
must have the headlamps modified for
symmetrical low beams. Relevant
information can be obtained at any
authorized Mercedes-Benz Center.
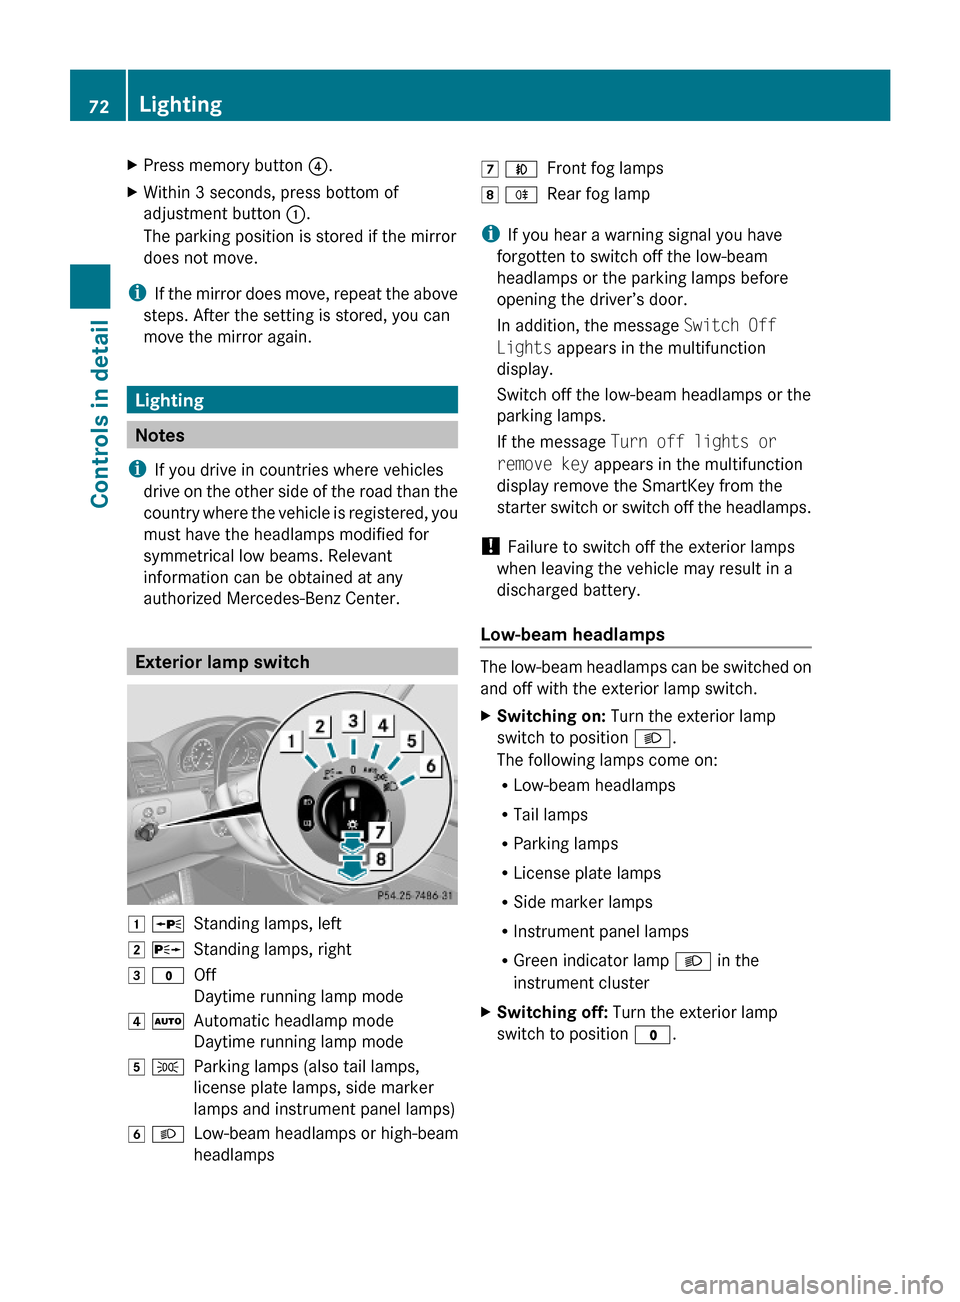
Exterior lamp switch
1 WStanding lamps, left2 XStanding lamps, right3 $Off
Daytime running lamp mode
4 ÃAutomatic headlamp mode
Daytime running lamp mode
5 TParking lamps (also tail lamps,
license plate lamps, side marker
lamps and instrument panel lamps)
6 LLow-beam headlamps or high-beam
headlamps
7 NFront fog lamps8 RRear fog lamp
iIf you hear a warning signal you have
forgotten to switch off the low-beam
headlamps or the parking lamps before
opening the driver’s door.
In addition, the message Switch Off
Lights appears in the multifunction
display.
Switch off the low-beam headlamps or the
parking lamps.
If the message Turn off lights or
remove key appears in the multifunction
display remove the SmartKey from the
starter switch or switch off the headlamps.
! Failure to switch off the exterior lamps
when leaving the vehicle may result in a
discharged battery.
Low-beam headlamps
The low-beam headlamps can be switched on
and off with the exterior lamp switch.
XSwitching on: Turn the exterior lamp
switch to position L.
The following lamps come on:
RLow-beam headlamps
RTail lamps
RParking lamps
RLicense plate lamps
RSide marker lamps
RInstrument panel lamps
RGreen indicator lamp L in the
instrument cluster
XSwitching off: Turn the exterior lamp
switch to position $.
72LightingControls in detail
463_AKB; 2; 52, en-USd2ureepe,Version: 2.11.7.12008-12-02T10:52:11+01:00 - Seite 72