key MERCEDES-BENZ G-Class 2012 W463 Service Manual
[x] Cancel search | Manufacturer: MERCEDES-BENZ, Model Year: 2012, Model line: G-Class, Model: MERCEDES-BENZ G-Class 2012 W463Pages: 284, PDF Size: 9.4 MB
Page 94 of 284
X
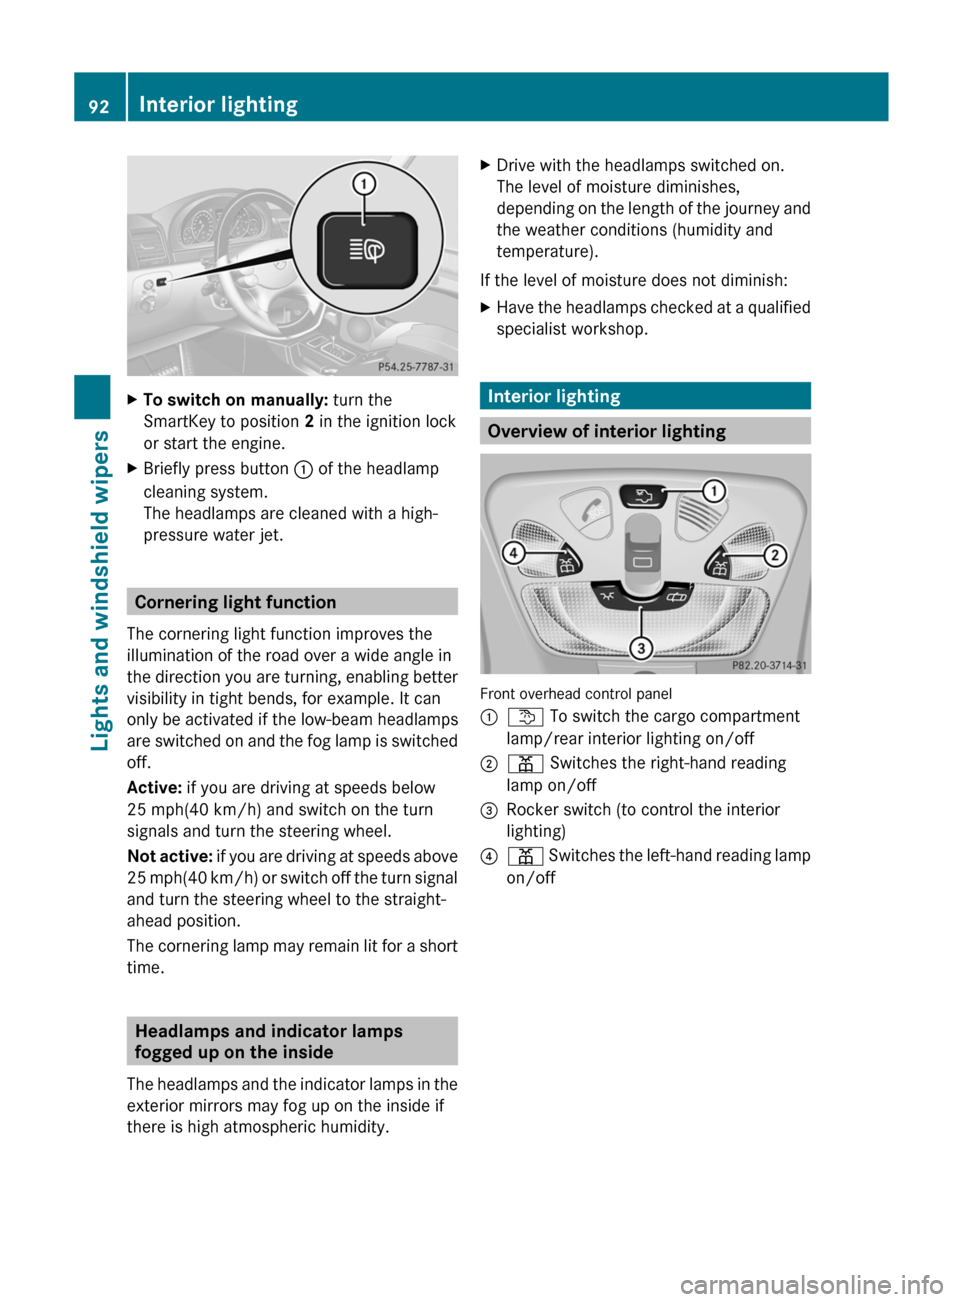
To switch on manually: turn the
SmartKey to position 2 in the ignition lock
or start the engine.
X Briefly press button : of the headlamp
cleaning system.
The headlamps are cleaned with a high-
pressure water jet. Cornering light function
The cornering light function improves the
illumination of the road over a wide angle in
the direction
you are turning, enabling better
visibility in tight bends, for example. It can
only be activated if the low-beam headlamps
are switched on and the fog lamp is switched
off.
Active: if you are driving at speeds below
25 mph(40 km/h) and switch on the turn
signals and turn the steering wheel.
Not active: if you are driving at speeds above
25 mph(40 km/h) or switch off the turn signal
and turn the steering wheel to the straight-
ahead position.
The cornering lamp may remain lit for a short
time. Headlamps and indicator lamps
fogged up on the inside
The headlamps
and the indicator lamps in the
exterior mirrors may fog up on the inside if
there is high atmospheric humidity. X
Drive with the headlamps switched on.
The level of moisture diminishes,
depending on
the length of the journey and
the weather conditions (humidity and
temperature).
If the level of moisture does not diminish:
X Have the headlamps checked at a qualified
specialist workshop. Interior lighting
Overview of interior lighting
Front overhead control panel
:
t To switch the cargo compartment
lamp/rear interior lighting on/off
; p Switches the right-hand reading
lamp on/off
= Rocker switch (to control the interior
lighting)
? p Switches the left-hand reading lamp
on/off 92
Interior lighting
Lights and windshield wipers
Page 95 of 284
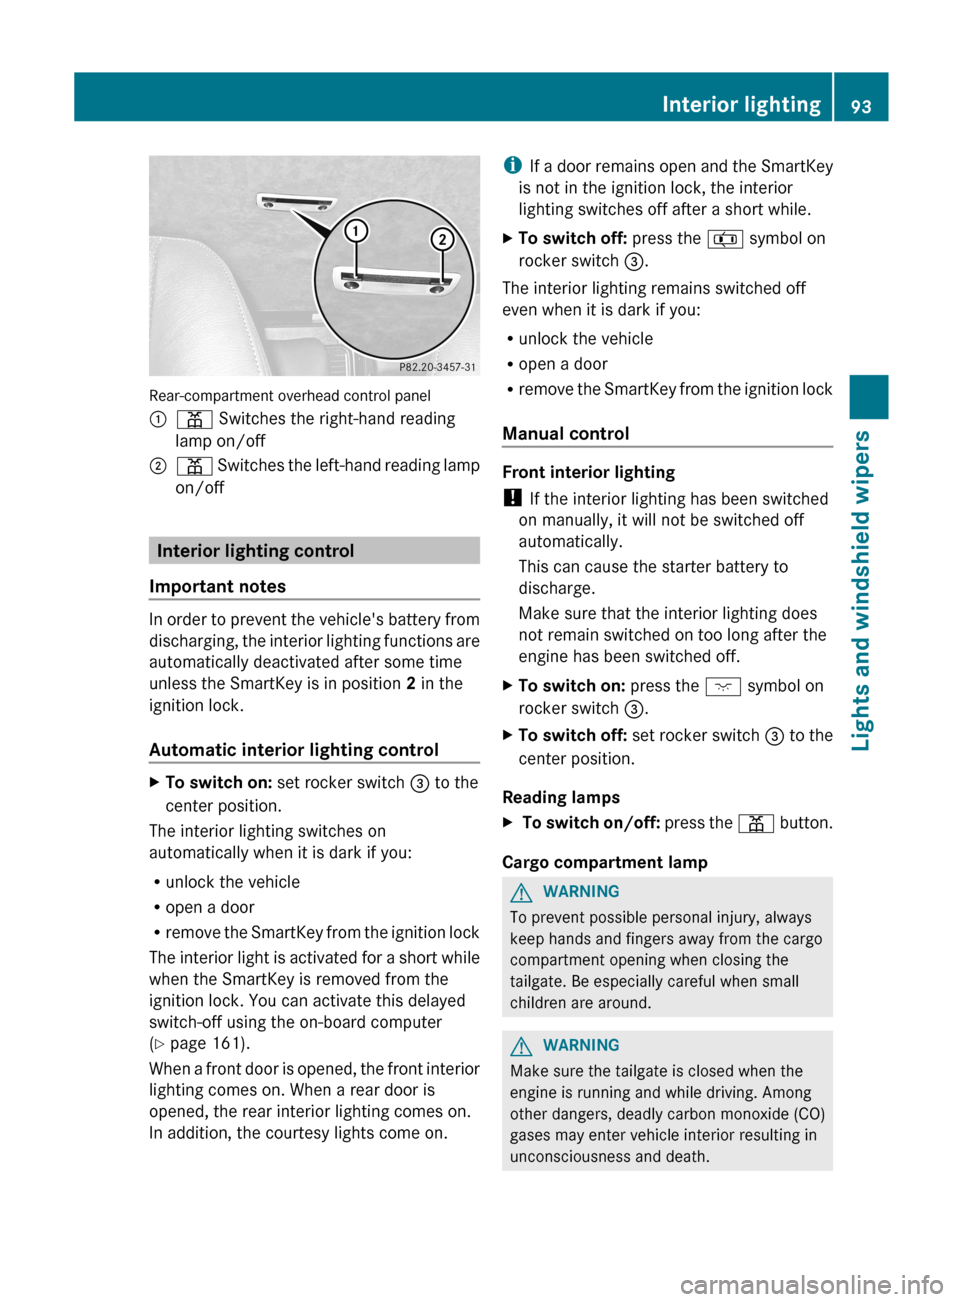
Rear-compartment overhead control panel
:
p Switches the right-hand reading
lamp on/off
; p Switches the left-hand reading lamp
on/off Interior lighting control
Important notes In order to prevent the vehicle's battery from
discharging,
the
interior lighting functions are
automatically deactivated after some time
unless the SmartKey is in position 2 in the
ignition lock.
Automatic interior lighting control X
To switch on: set rocker switch = to the
center position.
The interior lighting switches on
automatically when it is dark if you:
R unlock the vehicle
R open a door
R remove the
SmartKey from the ignition lock
The interior light is activated for a short while
when the SmartKey is removed from the
ignition lock. You can activate this delayed
switch-off using the on-board computer
(Y page 161).
When a front door is opened, the front interior
lighting comes on. When a rear door is
opened, the rear interior lighting comes on.
In addition, the courtesy lights come on. i
If a
door remains open and the SmartKey
is not in the ignition lock, the interior
lighting switches off after a short while.
X To switch off: press the z symbol on
rocker switch =.
The interior lighting remains switched off
even when it is dark if you:
R unlock the vehicle
R open a door
R remove the
SmartKey from the ignition lock
Manual control Front interior lighting
!
If the interior lighting has been switched
on manually, it will not be switched off
automatically.
This can cause the starter battery to
discharge.
Make sure that the interior lighting does
not remain switched on too long after the
engine has been switched off.
X To switch on: press the c symbol on
rocker switch =.
X To switch off: set rocker switch = to the
center position.
Reading lamps
X To switch on/off: press the p
button.
Cargo compartment lamp G
WARNING
To prevent possible personal injury, always
keep hands and fingers away from the cargo
compartment opening when closing the
tailgate. Be especially careful when small
children are around. G
WARNING
Make sure the tailgate is closed when the
engine is running and while driving. Among
other dangers, deadly carbon monoxide (CO)
gases may enter vehicle interior resulting in
unconsciousness and death. Interior lighting
93
Lights and windshield wipers Z
Page 102 of 284
Switching the windshield wipers on/
off
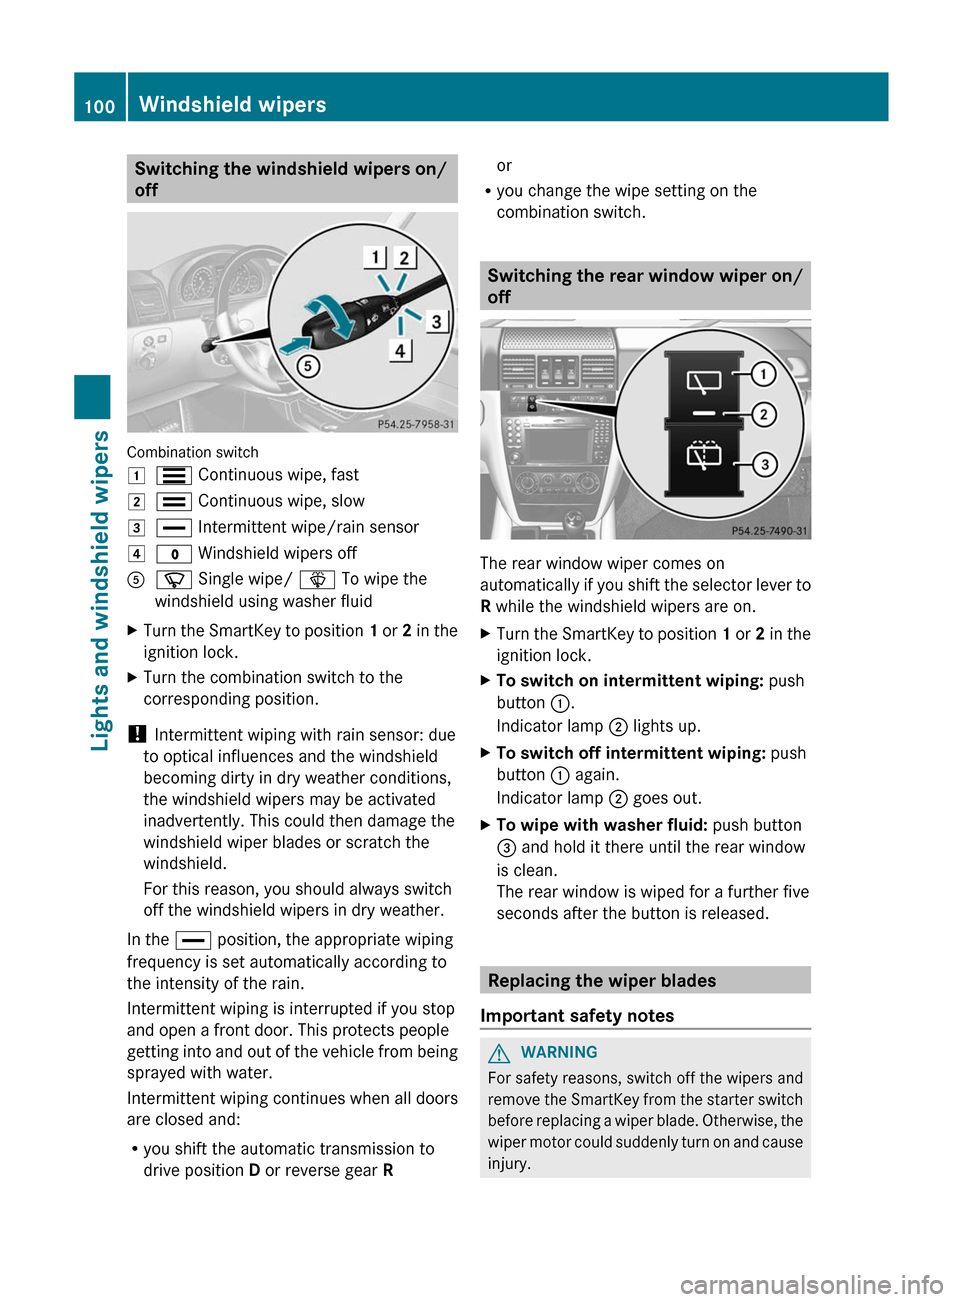
Combination switch
1
S Continuous wipe, fast
2 ¯ Continuous wipe, slow
3 ° Intermittent wipe/rain sensor
4 $ Windshield wipers off
A í Single wipe/ î To wipe the
windshield using washer fluid
X Turn the SmartKey to position 1 or 2
in the
ignition lock.
X Turn the combination switch to the
corresponding position.
! Intermittent wiping with rain sensor: due
to optical influences and the windshield
becoming dirty in dry weather conditions,
the windshield wipers may be activated
inadvertently. This could then damage the
windshield wiper blades or scratch the
windshield.
For this reason, you should always switch
off the windshield wipers in dry weather.
In the ° position, the appropriate wiping
frequency is set automatically according to
the intensity of the rain.
Intermittent wiping is interrupted if you stop
and open a front door. This protects people
getting into
and out of the vehicle from being
sprayed with water.
Intermittent wiping continues when all doors
are closed and:
R you shift the automatic transmission to
drive position D or reverse gear Ror
R you change the wipe setting on the
combination switch. Switching
the rear window wiper on/
off The rear window wiper comes on
automatically
if
you shift the selector lever to
R while the windshield wipers are on.
X Turn the SmartKey to position 1 or 2
in the
ignition lock.
X To switch on intermittent wiping: push
button :.
Indicator lamp ; lights up.
X To switch off intermittent wiping: push
button : again.
Indicator lamp ; goes out.
X To wipe with washer fluid: push button
= and hold it there until the rear window
is clean.
The rear window is wiped for a further five
seconds after the button is released. Replacing the wiper blades
Important safety notes G
WARNING
For safety reasons, switch off the wipers and
remove the
SmartKey from the starter switch
before replacing a wiper blade. Otherwise, the
wiper motor could suddenly turn on and cause
injury. 100
Windshield wipers
Lights and windshield wipers
Page 103 of 284
!
To avoid damaging the wiper blades,
make sure that you touch only the wiper
arm of the wiper.
! Never open
the hood if a windshield wiper
arm has been folded away from the
windshield.
Never fold a windshield wiper arm without
a wiper blade back onto the windshield/
rear window.
Hold the windshield wiper arm firmly when
you change the wiper blade. If you release
the windshield wiper arm without a wiper
blade and it falls onto the windshield, the
windshield may be damaged by the force of
the impact.
Mercedes-Benz recommends that you have
the wiper blades changed at a qualified
specialist workshop.
Removing the wiper blade X
Remove the SmartKey from the ignition
lock.
X Fold the windshield wiper arm away from
the windshield until it engages.
X Position the wiper blade at right angles. X
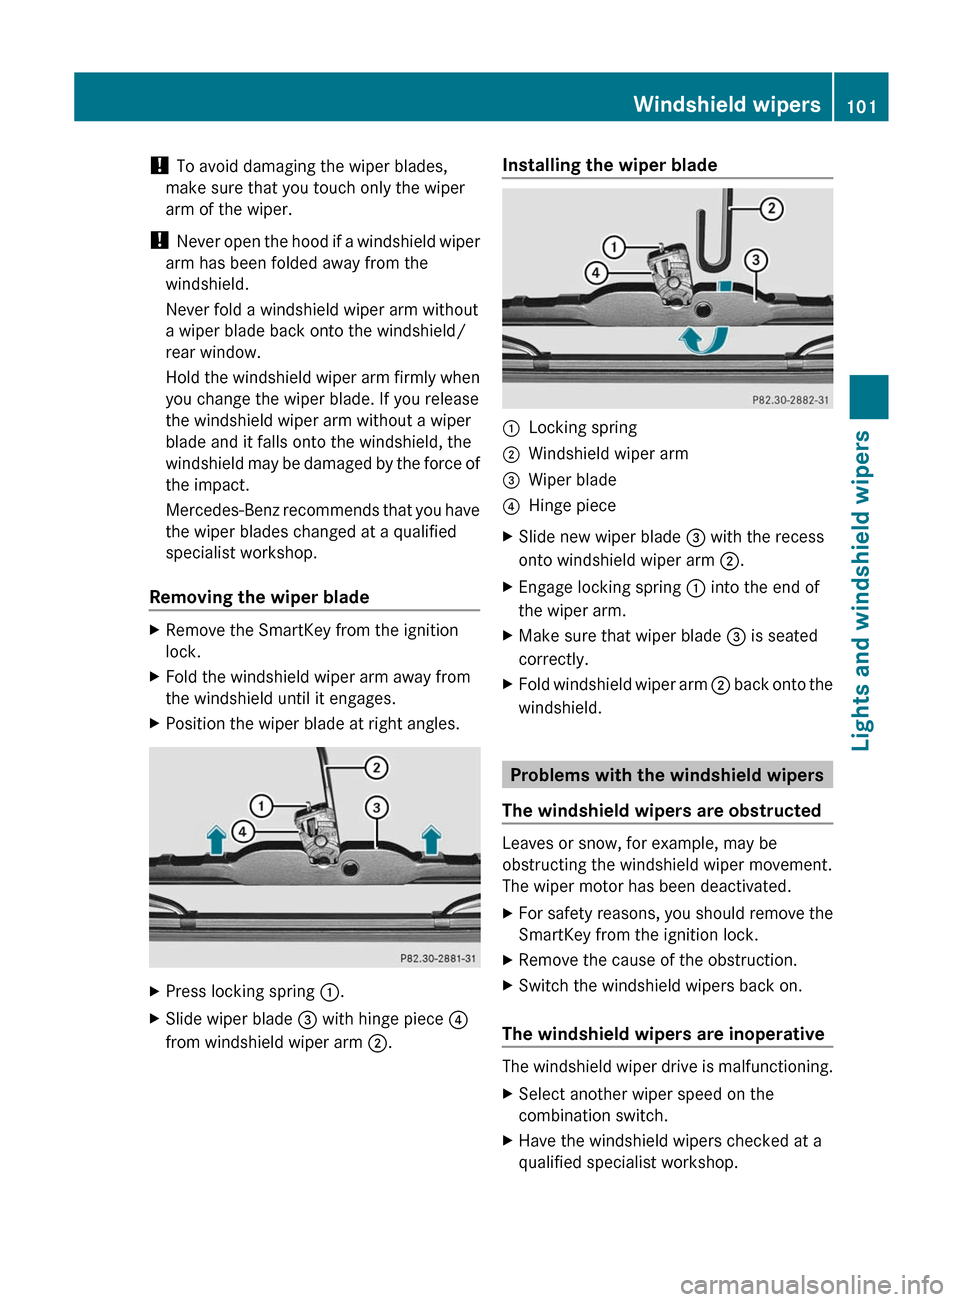
Press locking spring :.
X Slide wiper blade = with hinge piece ?
from windshield wiper arm ;.Installing the wiper blade
:
Locking spring
; Windshield wiper arm
= Wiper blade
? Hinge piece
X Slide new wiper blade = with the recess
onto windshield wiper arm ;.
X Engage locking spring : into the end of
the wiper arm.
X Make sure that wiper blade = is seated
correctly.
X Fold windshield wiper arm ; back
onto the
windshield. Problems with the windshield wipers
The windshield wipers are obstructed Leaves or snow, for example, may be
obstructing the windshield wiper movement.
The wiper motor has been deactivated.
X
For safety reasons, you should remove the
SmartKey from the ignition lock.
X Remove the cause of the obstruction.
X Switch the windshield wipers back on.
The windshield wipers are inoperative The windshield wiper drive is malfunctioning.
X
Select another wiper speed on the
combination switch.
X Have the windshield wipers checked at a
qualified specialist workshop. Windshield wipers
101
Lights and windshield wipers Z
Page 108 of 284
otherwise fog up as, in air-recirculation
mode,
no
fresh air is drawn into the vehicle.
R Use the residual heat function if you want
to heat or ventilate the vehicle interior
when the ignition is switched off. The
"residual heat" function can only be
activated or deactivated with the ignition
switched off.
R At very low temperatures, the rear window
defroster is only switched on once the
vehicle interior has warmed up. Activating/deactivating climate
control
Important information G
WARNING
When the climate control system is
deactivated, the outside air supply and
circulation are also deactivated. Only choose
this setting for a short time. Otherwise the
windows could
fog up, impairing visibility and
endangering you and others.
i Switch on climate control primarily using
the à button ( Y page 107).
Activating/deactivating X
Turn the SmartKey to position 2 in the
ignition lock.
X To switch on:
turn
control : clockwise to
the desired position (except position 0)
(Y page 105).
X The previously selected settings come into
effect again.
X To switch off: turn control : counter-
clockwise to position 0(Y page 105). Activating/deactivating the cooling
with air dehumidification function
Important information The cooling with air dehumidification function
is only available when the engine is running.
The air inside the vehicle is cooled and
dehumidified according to the temperature
selected.
G
WARNING
If you switch off the cooling function, the
vehicle will not be cooled when weather
conditions are
warm. The windows can fog up
more quickly. Window fogging may impair
visibility and endanger you and others.
Condensation may drip from the underside of
the vehicle when it is in cooling mode. This is
normal and not a sign that there is a
malfunction.
i The cooling with air dehumidification
function uses refrigerant R134a. This
coolant does not contain
chlorofluorocarbons, and therefore does
not damage the ozone layer.
Activating/deactivating !
If the cooling with air dehumidification
does not switch on, it is possible that the
climate control system has lost coolant.
Have the cooling with air dehumidification
checked at
a qualified specialist workshop.
X To activate: press the Á button.
The indicator
lamp in the Á button lights
up.
X To switch off: press the Á button.
The indicator
lamp in the Á button goes
out. The cooling with air dehumidification
function has a delayed switch-off feature. 106
Operating the climate control system
Climate control
Page 109 of 284
Problems with the cooling with air
dehumidification function
If the indicator lamp in the
Á button does
not go out or flashes when switched on, the
cooling with air dehumidification function is
switched off
due to a malfunction. You can no
longer switch on the cooling with air
dehumidification function.
X Consult a qualified specialist workshop. Setting climate control to automatic
G
WARNING
If you switch off the cooling function, the
vehicle will not be cooled when weather
conditions are
warm. The windows can fog up
more quickly. Window fogging may impair
visibility and endanger you and others.
In automatic mode, the set temperature is
maintained automatically at a constant level.
The system automatically regulates the
temperature of the dispensed air, the airflow
and the air distribution.
Automatic mode will achieve optimal
operation if cooling with air dehumidification
is also activated. If desired, cooling with air
dehumidification can be deactivated.
X Turn the SmartKey to position 2 in the
ignition lock.
X Set the desired temperature.
X To switch on: press the à button.
The indicator
lamp in the à button lights
up. Automatic air distribution and airflow
are activated.
X To switch off: press the à button.
The indicator
lamp in the à button goes
out. Automatic air distribution and airflow
are deactivated. Setting the temperature
Different temperatures can be set for the
driver's and front-passenger sides. X
Turn the SmartKey to position 2 in the
ignition lock.
X To increase/reduce: turn controls ;
and
= clockwise or counterclockwise
(Y page 105).
Only change the temperature setting in
small increments. Start at 72 ‡ (22 †).
i If you
turn the temperature control on one
side of the vehicle fully clockwise or
counterclockwise, you will increase or
reduce the temperature on the other side
of the vehicle at the same time. Setting the air distribution
You can set the air distribution for the entire
vehicle.
The symbols for the air distribution have the
following meanings: Symbol Meaning
M
Directs the airflow through the
defroster vents to the
windshield and side windows
Q
Directs the airflow to the entire
vehicle interior
O
Directs the airflow through the
footwell and side air vents
P
Directs the airflow through the
center and side air vents
X
Turn the SmartKey to position 2 in the
ignition lock.
X Press the à button.
The indicator
lamp in the à button goes
out.
X Turn control ?(Y page 105) to the
corresponding symbol. The control can
also be turned to the area between two
symbols. Operating the climate control system
107
Climate control Z
Page 110 of 284
Setting the airflow
X Turn the SmartKey to position 2 in the
ignition lock.
X Press the à button.
The indicator
lamp in the à button goes
out.
X To increase/reduce: turn control :
clockwise or counterclockwise
(Y page 105).
i The airflow from the rear-compartment
vents and the center vents is the same. Defrosting the windshield
You can use this function to defrost the
windshield or to defrost the inside of the
windshield and the side windows.
i You should only select the defrosting
function until
the windshield is clear again.
i When you switch on the "defrosting"
function using the ¥5
or z 6
button,
you cannot adjust any of the other settings.
X Turn the SmartKey to position 2 in the
ignition lock.
X To switch on: press the ¥ 5
or z 6
button.
The indicator lamp in the ¥5
or z 6
button comes on.
The climate
control system switches to the
following functions:
R cooling with air dehumidification on
R high airflow
R high temperature
R air distribution to the windshield and
front side windows
R air-recirculation mode off
i If necessary,
also activate the windshield
defroster (Y page 108). X
To deactivate: press the ¥5
or z 6
button.
The indicator lamp in the ¥5
or z 6
button goes off. The previously selected
settings come into effect again.
or
X Press the à button.
The indicator
lamp in the à button lights
up. The indicator lamp in the z button
goes out. Airflow and air distribution are set
to automatic mode. Defrosting the windows
Windows fogged up on the inside X
Activate the defrosting function.
X If necessary, activate the windshield
heating (
Y page 108).
i You should only select this setting until
the windshield is clear again.
Windows fogged up on the outside X
Activate the windshield wipers.
X Close the center air vents.
When automatic air distribution is switched
off:
X Turn the air distribution thumbwheel to the
O or P symbol.
i You should only select this setting until
the windshield is clear again.
X If necessary, activate the windshield
heating (Y page 108). Switching the windshield defroster
on/off
G
WARNING
Any accumulation of snow and ice should be
removed from the windshield before driving.
5 USA only.
6 Canada only.108
Operating the climate control system
Climate control
Page 111 of 284
Otherwise, your vision may be impaired,
which could endanger you or others.
i
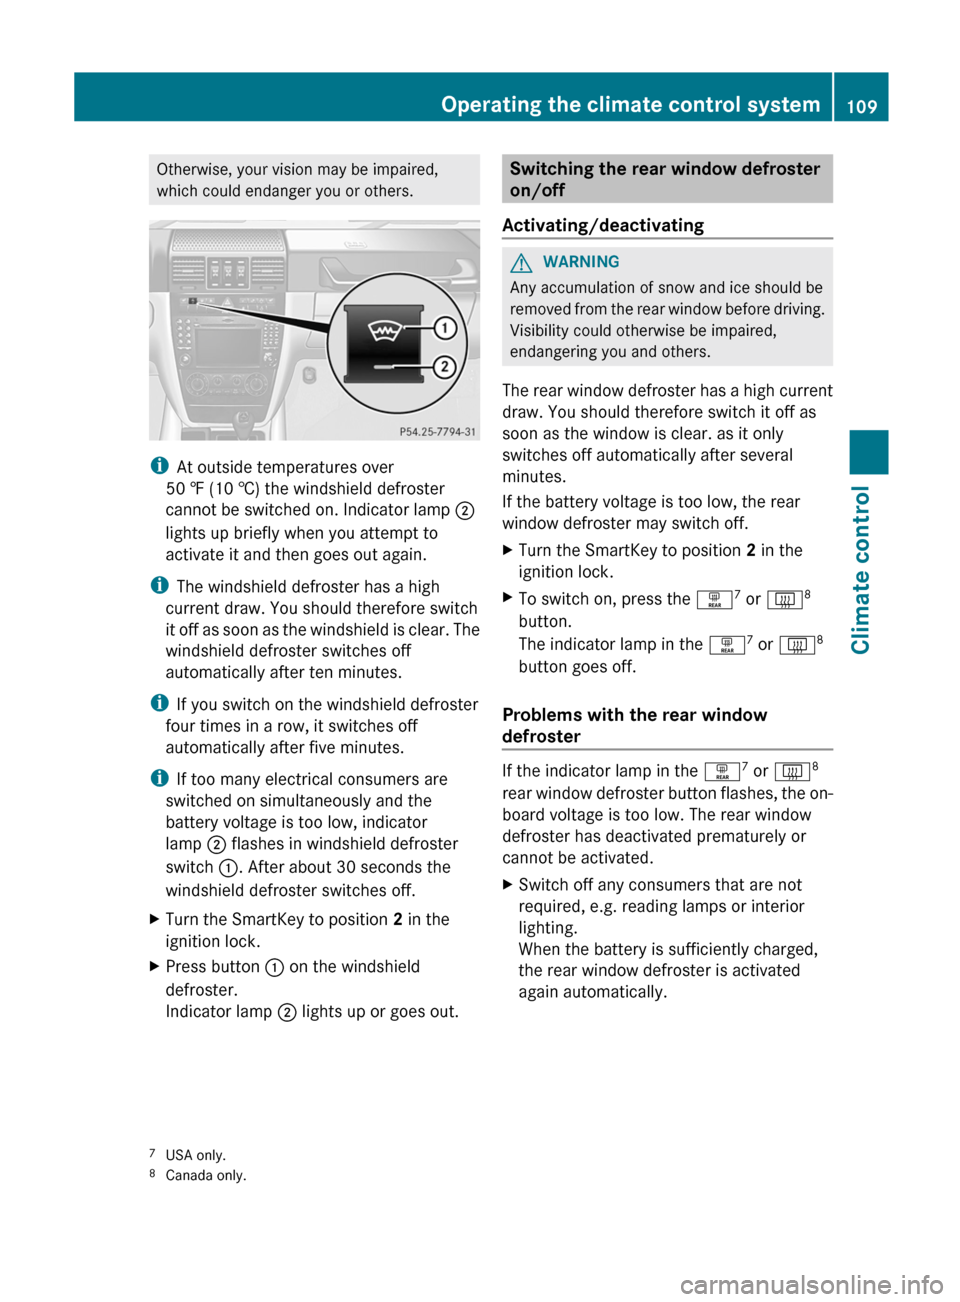
At outside temperatures over
50 ‡ (10 † ) the windshield defroster
cannot be switched on. Indicator lamp ;
lights up briefly when you attempt to
activate it and then goes out again.
i The windshield defroster has a high
current draw. You should therefore switch
it
off as soon as the windshield is clear. The
windshield defroster switches off
automatically after ten minutes.
i If you switch on the windshield defroster
four times in a row, it switches off
automatically after five minutes.
i If too many electrical consumers are
switched on simultaneously and the
battery voltage is too low, indicator
lamp ; flashes in windshield defroster
switch :. After about 30 seconds the
windshield defroster switches off.
X Turn the SmartKey to position 2 in the
ignition lock.
X Press button : on the windshield
defroster.
Indicator lamp ; lights up or goes out. Switching the rear window defroster
on/off
Activating/deactivating G
WARNING
Any accumulation of snow and ice should be
removed from
the rear window before driving.
Visibility could otherwise be impaired,
endangering you and others.
The rear window defroster has a high current
draw. You should therefore switch it off as
soon as the window is clear. as it only
switches off automatically after several
minutes.
If the battery voltage is too low, the rear
window defroster may switch off.
X Turn the SmartKey to position 2 in the
ignition lock.
X To switch on, press the ª 7
or £ 8
button.
The indicator lamp in the ª7
or £ 8
button goes off.
Problems with the rear window
defroster If the indicator lamp in the
ª
7
or £ 8
rear window
defroster button flashes, the on-
board voltage is too low. The rear window
defroster has deactivated prematurely or
cannot be activated.
X Switch off any consumers that are not
required, e.g. reading lamps or interior
lighting.
When the battery is sufficiently charged,
the rear window defroster is activated
again automatically.
7 USA only.
8 Canada only. Operating the climate control system
109
Climate control Z
Page 112 of 284
Activating/deactivating air-
recirculation mode
You can deactivate the flow of fresh air if
unpleasant odors are entering the vehicle
from outside. The air already inside the
vehicle will then be recirculated. G
WARNING
Fogged windows impair visibility,
endangering you and others. If the windows
begin to fog on the inside, switching off the
air recirculation mode immediately should
clear interior window fogging. If interior
window fogging persists, make sure the air
conditioning is activated, or press button
z or ¥.
X Turn the SmartKey to position 2 in the
ignition lock.
X To switch on: press the g button.
The indicator
lamp in the g button lights
up.
i Air-recirculation mode is activated
automatically at high outside
temperatures. When
air-recirculation mode
is activated automatically, the indicator
lamp in the g button is not lit.
Outside air is added after about 30
minutes.
X To switch off: press the g button.
The indicator
lamp in the g button goes
out.
i Air-recirculation mode switches off
automatically:
R after approximately five minutes if
outside temperatures
are less than about
41 ‡ (5 †)
R after approximately five minutes if
cooling with air dehumidification is
deactivated
R after approximately 30 minutes if outside
temperatures are over about
41 ‡ (5 †) Activating/deactivating the residual
heat function
It is
possible to make use of the residual heat
of the engine to continue heating the
stationary vehicle for up to 30 minutes after
the engine has been switched off. The heating
time depends on the coolant temperature and
on the interior temperature that has been set.
i The blower will run at a low speed
regardless of the airflow setting.
i If you activate the residual heat function
at high temperatures, only the ventilation
will be activated.
X Turn the SmartKey to position 0 in the
ignition lock or remove it.
X To activate: press the Á button.
The indicator
lamp in the Á button lights
up.
X To switch off: press the Á button.
The indicator
lamp in the Á button goes
out.
i Residual heat is deactivated
automatically:
R after about 30 minutes
R when the ignition is switched on
R if the battery voltage drops
R if the coolant temperature is too low Setting the air vents
Important safety notes
G
WARNING
When operating the climate control, the air
that enters the passenger compartment
through the air vents can be very hot or very
cold (depending
on the set temperature). This
could cause burns or frostbite to unprotected
skin in the immediate area of the air vents.
Always keep sufficient distance between
unprotected parts of the body and the air
vents. If necessary, use the air distribution 110
Setting the air vents
Climate control
Page 117 of 284
on the brake pedal, the vehicle could
accelerate quickly forward or in reverse. You
could lose control of the vehicle and hit
someone or something. Only shift into gear
when the engine is idling normally and when
your right foot is firmly on the brake pedal.
! Warm up the engine quickly. Do not use
the engine's full performance until it has
reached operating temperature.
Only shift the automatic transmission to
the desired
drive position when the vehicle
is stationary.
Where possible, avoid spinning the drive
wheels when pulling away on slippery
roads. You could otherwise damage the
drive train.
! Avoid high engine speeds when the
engine is cold. The engine's service life
could otherwise be significantly shortened.
Do not use the engine's full performance
until it has reached operating temperature. SmartKey positions
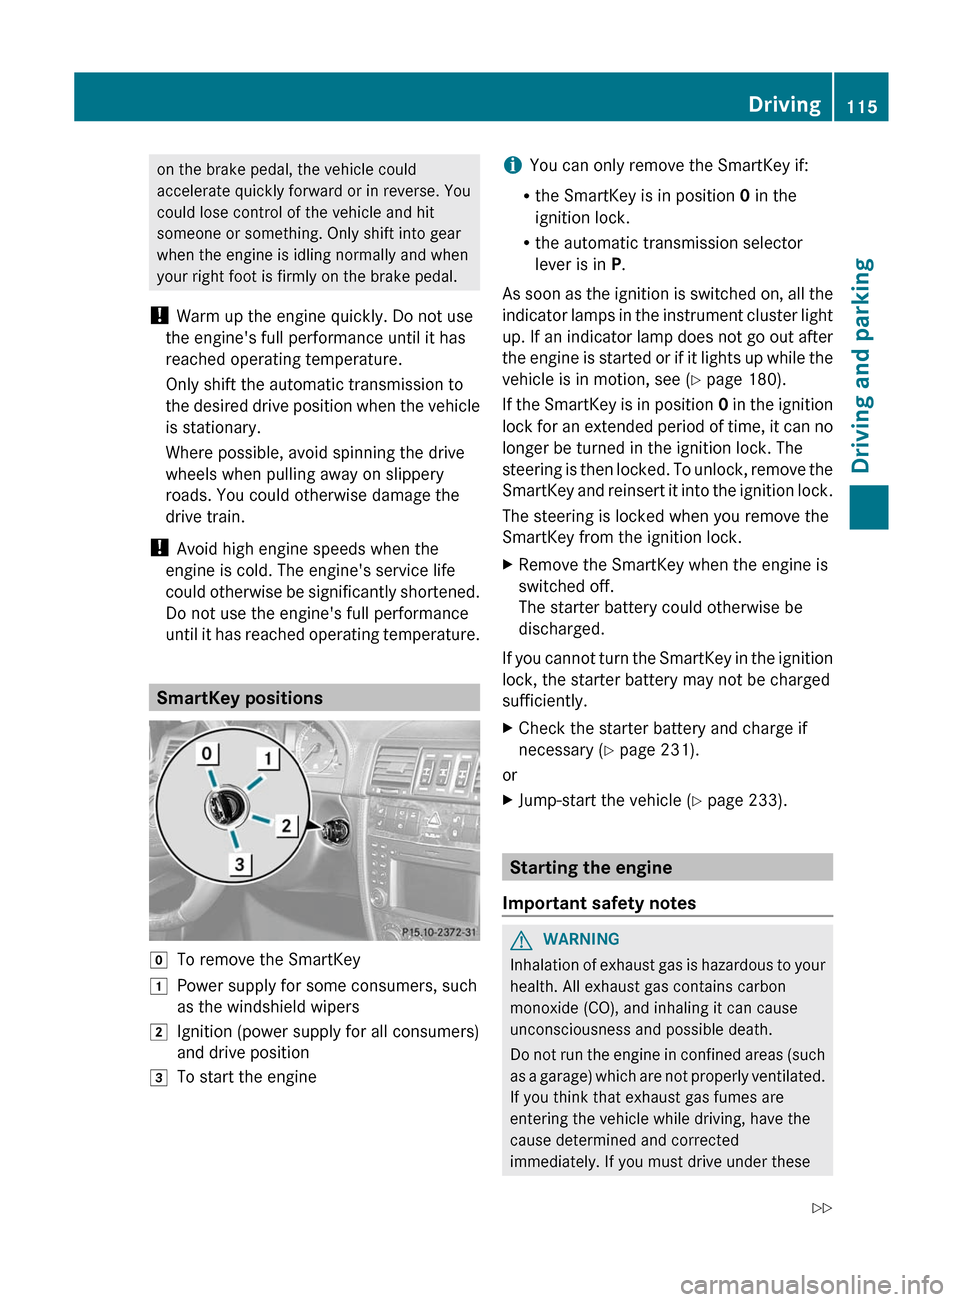
g
To remove the SmartKey
1 Power supply for some consumers, such
as the windshield wipers
2 Ignition (power supply for all consumers)
and drive position
3 To start the engine i
You can only remove the SmartKey if:
R the SmartKey is in position
0 in the
ignition lock.
R the automatic transmission selector
lever is in P.
As soon
as the ignition is switched on, all the
indicator lamps in the instrument cluster light
up. If an indicator lamp does not go out after
the engine is started or if it lights up while the
vehicle is in motion, see ( Y page 180).
If the SmartKey is in position 0 in the ignition
lock for an extended period of time, it can no
longer be turned in the ignition lock. The
steering is then locked. To unlock, remove the
SmartKey and reinsert it into the ignition lock.
The steering is locked when you remove the
SmartKey from the ignition lock.
X Remove the SmartKey when the engine is
switched off.
The starter battery could otherwise be
discharged.
If you cannot turn the SmartKey in the ignition
lock, the starter battery may not be charged
sufficiently.
X Check the starter battery and charge if
necessary ( Y page 231).
or
X Jump-start the vehicle (Y page 233). Starting the engine
Important safety notes G
WARNING
Inhalation
of exhaust gas is hazardous to your
health. All exhaust gas contains carbon
monoxide (CO), and inhaling it can cause
unconsciousness and possible death.
Do not
run the engine in confined areas (such
as a garage) which are not properly ventilated.
If you think that exhaust gas fumes are
entering the vehicle while driving, have the
cause determined and corrected
immediately. If you must drive under these Driving
115
Driving and parking
Z