steering wheel MERCEDES-BENZ G-Class 2012 W463 Repair Manual
[x] Cancel search | Manufacturer: MERCEDES-BENZ, Model Year: 2012, Model line: G-Class, Model: MERCEDES-BENZ G-Class 2012 W463Pages: 284, PDF Size: 9.4 MB
Page 223 of 284
Cleaning the plastic trim
G
WARNING
When cleaning the steering wheel boss and
dashboard, do not use cockpit sprays or
cleaning agents
containing solvents. Cleaning
agents containing solvents cause the surface
to become porous, and as a result, plastic
parts may break away and be thrown around
the interior when an air bag is deployed, which
may result in severe injuries.
! Do not affix the following to plastic
surfaces:
R stickers
R films
R scented oil bottles or similar items
You can otherwise damage the plastic.
! Do not allow cosmetics, insect repellent
or sunscreen to come into contact with the
plastic trim. This maintains the high-quality
look of the surfaces.
X Wipe the plastic trim with a damp, lint-free
cloth, e.g. a microfiber cloth.
X Heavy soiling: use car care and cleaning
products recommended and approved by
Mercedes-Benz.
The surface
may change color temporarily.
Wait until the surface is dry again.
Cleaning the steering wheel and gear or
selector lever X
Thoroughly wipe with a damp cloth or use
leather care agents that have been
recommended and
approved by Mercedes-
Benz.
Cleaning wooden trim and trim strips X
Wipe the wooden trim and trim strips with
a damp, lint-free cloth, e.g. a microfiber
cloth.
X Heavy soiling: use car care and cleaning
products recommended and approved by
Mercedes-Benz. !
Do not
use solvent-based cleaning agents
such as tar remover, wheel cleaners,
polishes or waxes. There is otherwise a risk
of damaging the surface.
! Do not use chrome polish for trim strips.
The trim strips have a chrome look but are
mostly made of anodized aluminum and
can lose their shine if chrome polish is
used. Use a damp, lint-free cloth instead
when cleaning the trim strips.
If the chrome-plated trim strips are very
dirty, you can use a chrome polish. If you
are unsure as to whether the trim strips are
chrome-plated or not, consult an
authorized Mercedes-Benz Center.
Cleaning the seat covers !
Do not use microfiber cloths to clean
genuine leather or artificial leather covers,
as these are too aggressive and, if used
often, may damage the cover.
! Observe the following when cleaning:
R clean genuine leather covers carefully
with a damp cloth and then wipe the
covers down
with a dry cloth. Make sure
that the leather does not become
soaked. It may otherwise become rough
and cracked. Only use leather care
agents that have been tested and
approved by Mercedes-Benz. You can
obtain these from a qualified specialist
workshop.
R clean artificial leather covers with a cloth
moistened with a solution containing 1%
detergent (e.g. dishwashing liquid).
R clean cloth covers with a microfiber cloth
moistened with a solution containing 1%
detergent (e.g. dishwashing liquid). Rub
carefully and always wipe entire seat
sections to avoid leaving visible lines.
Leave the seat to dry afterwards.
Cleaning results depend on the type of
dirt and how long it has been there. Care
221
Maintenance and care Z
Page 237 of 284
Towing and tow-starting
Important safety notes
G
WARNING
If circumstances require towing the vehicle
with all
wheels on the ground, always tow with
a tow bar if:
R the engine will not run
R there is a malfunction in the brake system
R there is a malfunction in the power supply
or the vehicle's electrical system
This is necessary to adequately control the
towed vehicle.
Prior to towing the vehicle with all wheels on
the ground, make sure the SmartKey is in
starter switch position 2.
If the SmartKey is left in starter switch
position 0 for an extended period of time, it
can no longer be turned in the switch. In this
case, the steering is locked. To unlock,
remove SmartKey from starter switch and
reinsert.
It is better to have the vehicle transported
than to have it towed.
! You may only tow the vehicle a maximum
distance of 30 miles (50 km). A towing
speed of 30 mph (50 km/h) must not be
exceeded.
For towing distances over 30 miles
(50 km), the vehicle must loaded onto a
transporter.
! Only secure the tow cable or tow bar to
the towing eyes. You could otherwise
damage the vehicle.
! Do not tow with sling-type equipment.
This could damage the vehicle.
! Do not use the towing eyes for recovery
purposes as this could damage the vehicle.
If in doubt, recover the vehicle with a crane.
! When towing, pull away slowly and
smoothly. If the tractive power is too high,
the vehicles could be damaged. !
Your vehicles is equipped with an
automatic transmission. Therefore, you
must not
have the vehicle tow-started. The
transmission may otherwise be damaged.
If the transfer case can be shifted into neutral
N, you can tow the vehicle.
If the transfer case cannot be shifted into
neutral N, you can tow the vehicle with one
axle raised. Please bear the following in mind:
R remove the propeller shaft between the
transfer case and the rolling axle.
R turn the SmartKey to position 1 in the
ignition lock.
The battery must be connected and charged.
Otherwise, you:
R cannot turn the SmartKey to position 2 in
the ignition lock
R cannot shift the automatic transmission to
position N
i Deactivate the automatic locking feature
(Y page 161) You could otherwise be
locked out when pushing or towing the
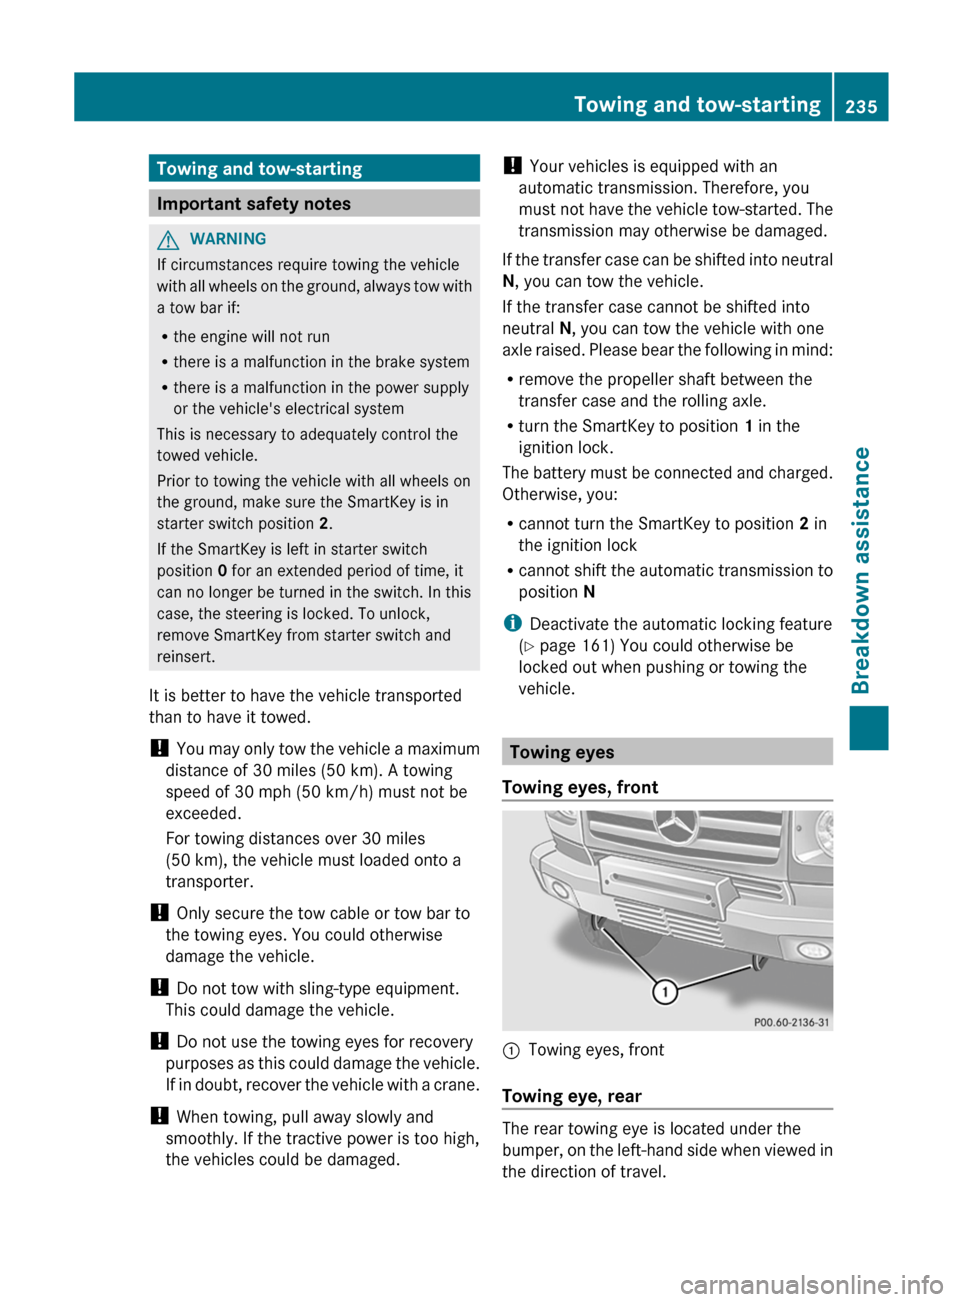
vehicle. Towing eyes
Towing eyes, front :
Towing eyes, front
Towing eye, rear The rear towing eye is located under the
bumper,
on
the left-hand side when viewed in
the direction of travel. Towing and tow-starting
235
Breakdown assistance Z
Page 238 of 284
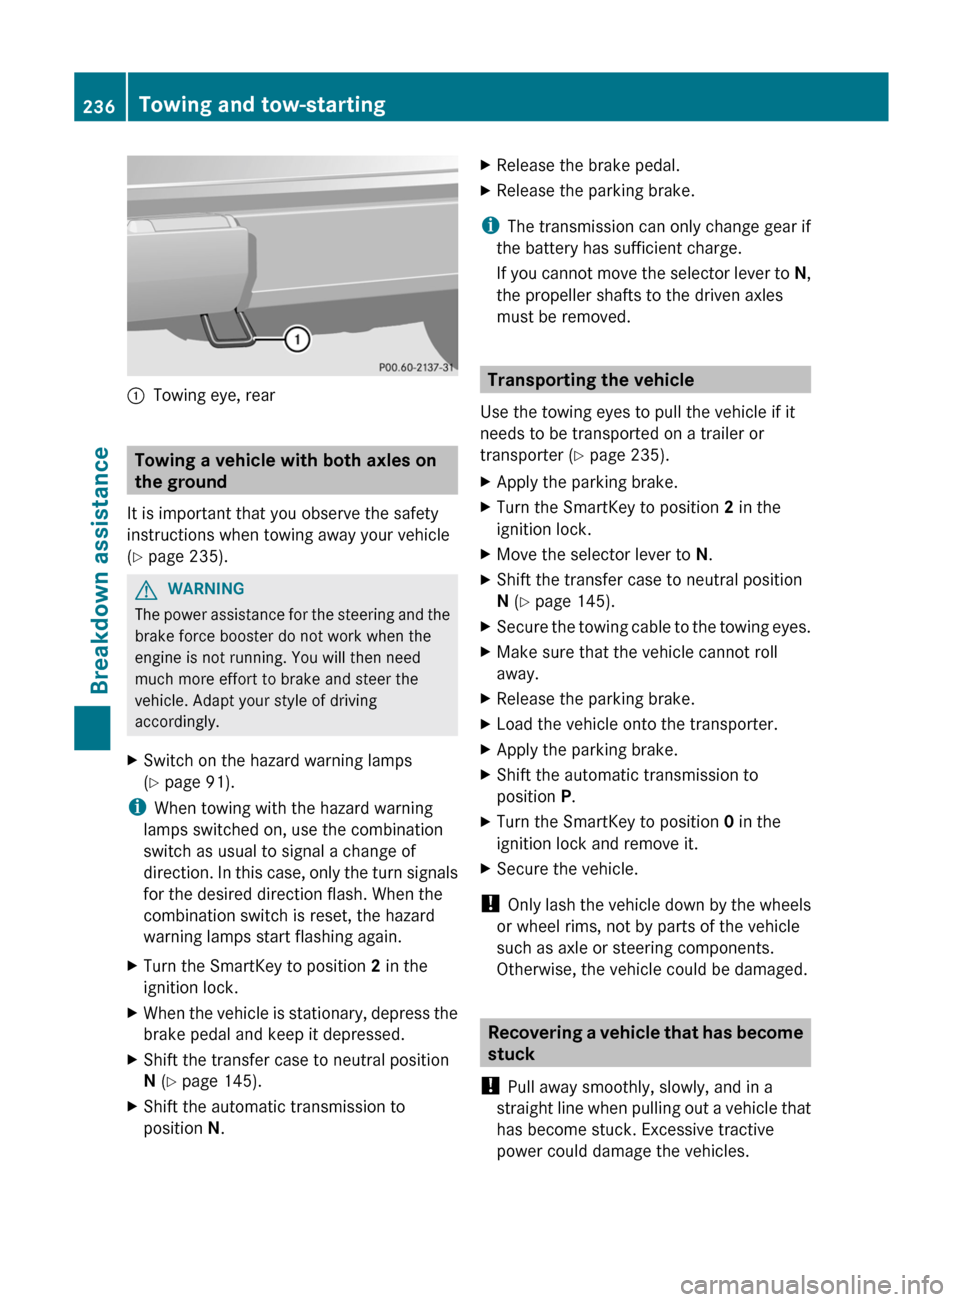
:
Towing eye, rear Towing a vehicle with both axles on
the ground
It is important that you observe the safety
instructions when towing away your vehicle
(Y page 235). G
WARNING
The power assistance for the steering and the
brake force booster do not work when the
engine is not running. You will then need
much more effort to brake and steer the
vehicle. Adapt your style of driving
accordingly.
X Switch on the hazard warning lamps
(Y page 91).
i When towing with the hazard warning
lamps switched on, use the combination
switch as usual to signal a change of
direction. In
this case, only the turn signals
for the desired direction flash. When the
combination switch is reset, the hazard
warning lamps start flashing again.
X Turn the SmartKey to position 2 in the
ignition lock.
X When the vehicle is stationary, depress the
brake pedal and keep it depressed.
X Shift the transfer case to neutral position
N (Y page 145).
X Shift the automatic transmission to
position N. X
Release the brake pedal.
X Release the parking brake.
i The transmission can only change gear if
the battery has sufficient charge.
If you
cannot move the selector lever to N,
the propeller shafts to the driven axles
must be removed. Transporting the vehicle
Use the towing eyes to pull the vehicle if it
needs to be transported on a trailer or
transporter ( Y page 235).
X Apply the parking brake.
X Turn the SmartKey to position 2 in the
ignition lock.
X Move the selector lever to N.
X Shift the transfer case to neutral position
N (Y page 145).
X Secure the towing cable to the towing eyes.
X Make sure that the vehicle cannot roll
away.
X Release the parking brake.
X Load the vehicle onto the transporter.
X Apply the parking brake.
X Shift the automatic transmission to
position P.
X Turn the SmartKey to position 0 in the
ignition lock and remove it.
X Secure the vehicle.
! Only lash
the vehicle down by the wheels
or wheel rims, not by parts of the vehicle
such as axle or steering components.
Otherwise, the vehicle could be damaged. Recovering a vehicle that has become
stuck
! Pull away smoothly, slowly, and in a
straight line
when pulling out a vehicle that
has become stuck. Excessive tractive
power could damage the vehicles. 236
Towing and tow-starting
Breakdown assistance
Page 247 of 284
Snow chains
For safety reasons, Mercedes-Benz
recommends that you only use snow chains
that have been specially approved for your
vehicle by Mercedes-Benz, or are of a
corresponding standard of quality.
! Information about the use of snow chain
compatible AMG winter tires is applicable
for AMG tires. Use of snow chains is only
permissible with these tires.
! There is not enough space for snow
chains on some wheel sizes. Observe the
information under
"Tires and wheels" in the
"Technical Data" section to avoid damage
to the vehicle or the wheels.
R only use snow chains when driving on roads
completely covered by snow. Do not
exceed the maximum permissible speed of
30 mph (50 km/h). Remove the snow
chains as soon as possible when you are no
longer driving on snow-covered roads.
R local regulations may restrict the use of
snow chains. Applicable regulations must
be observed if you wish to mount snow
chains.
If you intend to mount snow chains, please
bear the following points in mind:
R you may not attach snow chains to all
wheel-tire combinations (Y page 266).
R mount snow chains only in pairs and only
on the rear wheels. Observe the
manufacturer's installation instructions.
! If snow chains are mounted on the front
wheels, the snow chains could grind
against the bodywork or components of the
chassis. This could result in damage to the
vehicle or the tires.
i You may wish to deactivate
ESP ®
(Y page 55) when pulling away with
snow chains mounted. This way you can
allow the wheels to spin in a controlled
manner, achieving an increased driving
force (cutting action). Tire pressure
Tire pressure specifications
G
WARNING
Follow
recommended tire inflation pressures.
Do not underinflate tires. Underinflated tires
wear excessively and/or unevenly, adversely
affect handling and fuel economy, and are
more likely to fail from being overheated.
Do not
overinflate tires. Overinflated tires can
adversely affect handling and ride comfort,
wear unevenly, increase stopping distance,
and result in sudden deflation (blowout)
because they are more likely to become
punctured or damaged by road debris,
potholes etc.
Do not overload the tires by exceeding the
specified load limit as indicated on the Tire
and Loading Information placard on the
driver's door B-pillar. Overloading the tires
can overheat them, possibly causing a
blowout. Overloading the tires can also result
in handling or steering problems, or brake
failure.
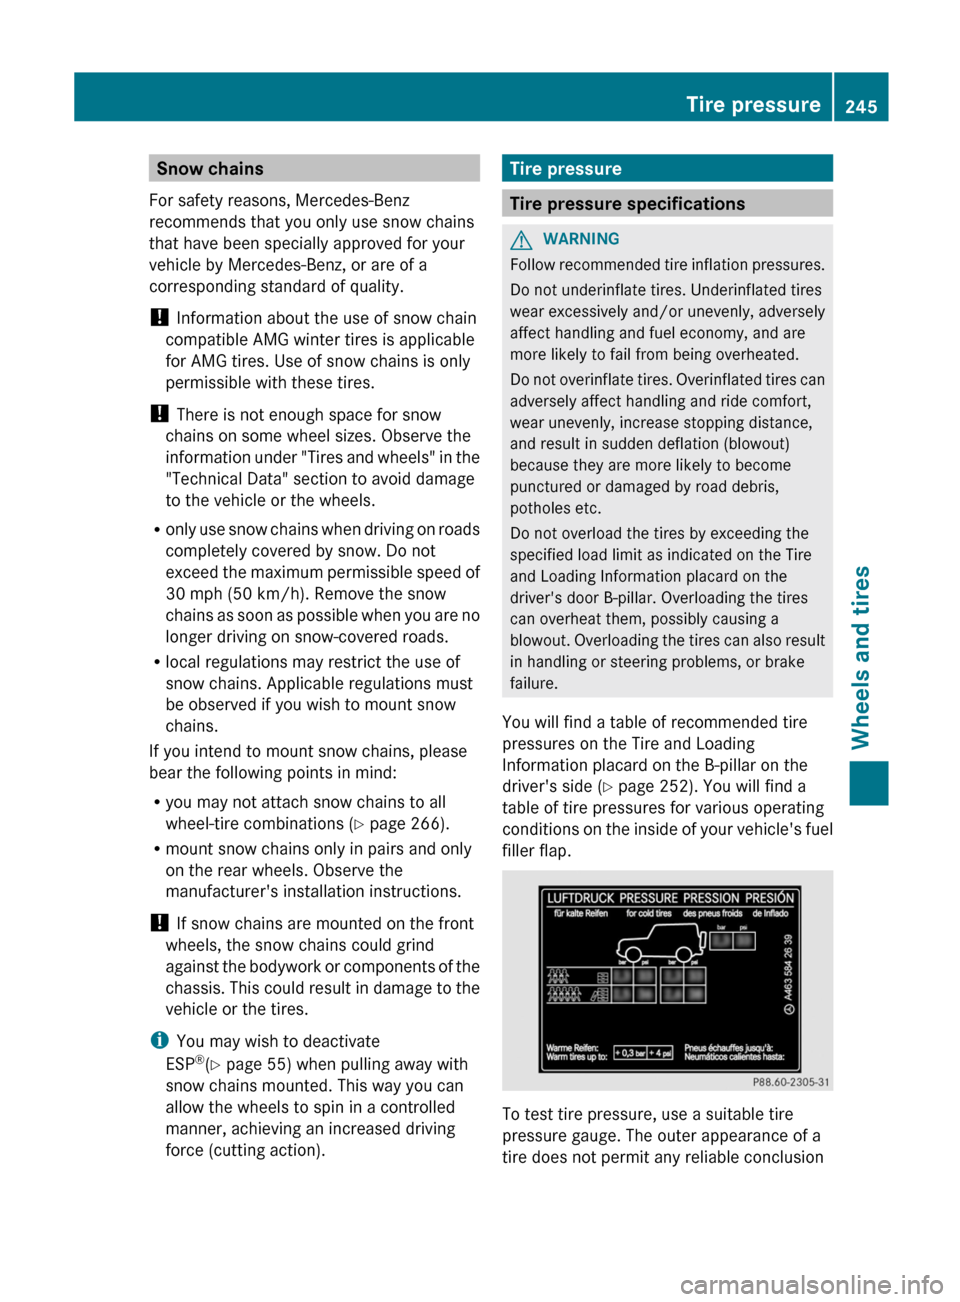
You will find a table of recommended tire
pressures on the Tire and Loading
Information placard on the B-pillar on the
driver's side ( Y page 252). You will find a
table of tire pressures for various operating
conditions on the inside of your vehicle's fuel
filler flap. To test tire pressure, use a suitable tire
pressure gauge. The outer appearance of a
tire does not permit any reliable conclusion Tire pressure
245
Wheels and tires Z
Page 250 of 284
Overinflation
G
WARNING
Follow recommended tire inflation pressures.
Do not
overinflate tires. Overinflated tires can
adversely affect handling and ride comfort,
wear unevenly, increase stopping distance,
and result in sudden deflation (blowout)
because they are more likely to become
punctured or damaged by road debris,
potholes etc.
Overinflated tires may:
R have an adverse effect on handling
characteristics
R wear quickly and unevenly
R be more susceptible to damage
R have an adverse effect on ride comfort
R increase the braking distance
Maximum tire pressure G
WARNING
Never exceed the maximum tire inflation
pressure. Follow recommended tire inflation
pressures.
Do not underinflate tires. Underinflated tires
wear excessively and/or unevenly, adversely
affect handling and fuel economy, and are
more likely to fail from being overheated.
Do not
overinflate tires. Overinflated tires can
adversely affect handling and ride comfort,
wear unevenly, increase stopping distance,
and result in sudden deflation (blowout)
because they are more likely to become
punctured or damaged by road debris,
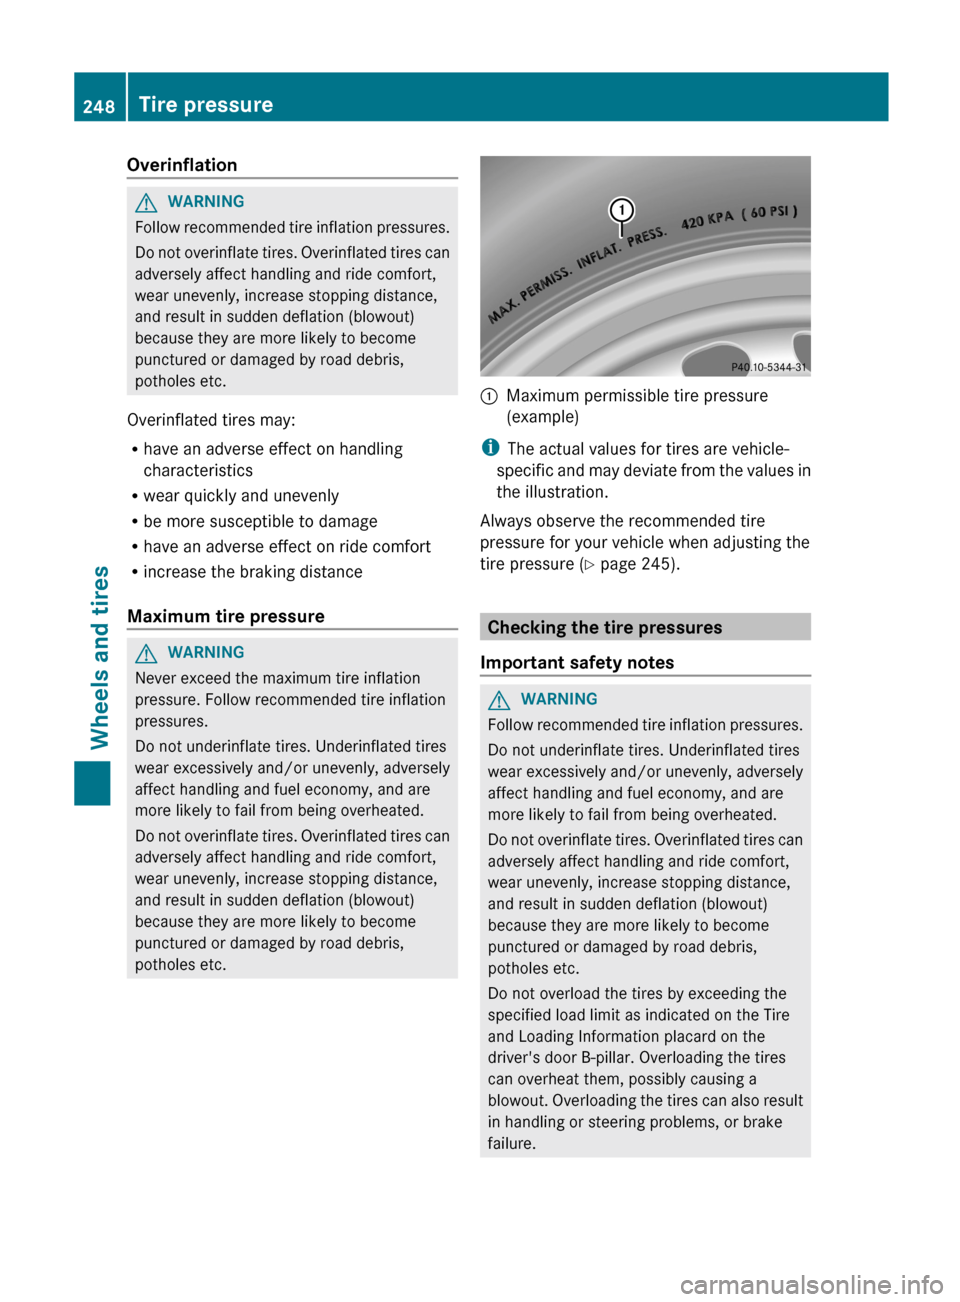
potholes etc. :
Maximum permissible tire pressure
(example)
i The actual values for tires are vehicle-
specific and
may deviate from the values in
the illustration.
Always observe the recommended tire
pressure for your vehicle when adjusting the
tire pressure ( Y page 245). Checking the tire pressures
Important safety notes G
WARNING
Follow recommended tire inflation pressures.
Do not underinflate tires. Underinflated tires
wear excessively and/or unevenly, adversely
affect handling and fuel economy, and are
more likely to fail from being overheated.
Do not
overinflate tires. Overinflated tires can
adversely affect handling and ride comfort,
wear unevenly, increase stopping distance,
and result in sudden deflation (blowout)
because they are more likely to become
punctured or damaged by road debris,
potholes etc.
Do not overload the tires by exceeding the
specified load limit as indicated on the Tire
and Loading Information placard on the
driver's door B-pillar. Overloading the tires
can overheat them, possibly causing a
blowout. Overloading the tires can also result
in handling or steering problems, or brake
failure. 248
Tire pressure
Wheels and tires
Page 251 of 284
Check the tire pressures at least once a
month.
Only check and correct tire pressures when
the tires are cold (
Y page 245).
Checking tire pressures manually To determine and set the correct tire
pressure, proceed as follows:
X
Remove the valve cap of the tire that is to
be checked.
X Press the tire pressure gauge securely onto
the valve.
X Read the tire pressure and compare it with
the recommended value on the Tire and
Loading Information placard on the
B-pillar on
the driver's side of your vehicle.
X If necessary, increase the tire pressure to
the recommended value ( Y page 245).
X If the tire pressure is too high, release air
by pressing
down the metal pin in the valve
using the tip of a pen, for example. Then,
check the tire pressure again using the tire
pressure gauge.
X Screw the valve cap onto the valve.
X Repeat these steps for the other tires. Tire pressure monitor
Important safety notes If a tire pressure monitor system is installed,
the vehicle's wheels have sensors that
monitor
the
tire pressures in all four tires. The
tire pressure monitor warns you when the
pressure drops in one or more of the tires. The
tire pressure monitor only functions if the
correct wheel electronics units are installed
on all wheels. The tire pressure monitor has a yellow
warning lamp in the instrument cluster for
indicating pressure loss/malfunctions (USA)
or pressure loss (Canada). Whether the
warning lamp flashes or lights up indicates
whether a tire pressure is too low or the tire
pressure monitoring system is
malfunctioning:
R
if the warning lamp is lit continuously, the
tire pressure on one or more tires is
significantly too low. The tire pressure
monitor is not malfunctioning.
R USA only: if the warning lamp flashes for
60 seconds
and then remains lit constantly,
the tire pressure monitor is malfunctioning. G
WARNING
The TPMS does not indicate a warning for
wrongly selected inflation pressures. Always
adjust tire
inflation pressure according to the
Tire and Loading Information placard or the
supplemental tire inflation pressure
information on the inside of the fuel filler flap.
The TPMS is not able to issue a warning due
to a sudden dramatic loss of pressure (e.g. tire
blowout caused by a foreign object). In this
case bring the vehicle to a halt by carefully
applying the brakes and avoiding abrupt
steering maneuvers. G
WARNING
Each tire, including the spare (if provided),
should be checked at least once a month
when cold and inflated to the pressure
recommended by the vehicle manufacturer
on the Tire and Loading Information placard
on the driver's door B-pillar or the tire
pressure label on the inside of the fuel filler
flap. If
your vehicle has tires of a different size
than the size indicated on the Tire and Loading
Information placard or the tire pressure label,
you should determine the proper tire pressure
for those tires.
As an added safety feature, your vehicle has
been equipped with a tire pressure monitoring
system (TPMS) that illuminates a low tire
pressure telltale when one or more of your Tire pressure
249
Wheels and tires
Z
Page 253 of 284
2. this device must accept any interference
received, including interference that may
cause undesired operation of the device.
Any unauthorized modification to this
device could void the user’s authority to
operate the equipment.
Checking tire pressure electronically X
Make sure that the SmartKey is in position
2(Y page 115) in the ignition lock.
X Press and hold the V or U button on
the multifunction steering wheel until the
standard display appears in the
multifunction display ( Y page 156).
X Press and hold the & or * button
until the current tire pressure of each tire
is shown in the multifunction display.
If the vehicle has been parked for over 20
minutes, the Tire pressure displayed
only after driving for a few
minutes message appears.
i If a spare wheel is mounted, the system
may continue to show the tire pressure of
the wheel
that has been removed for a few
minutes. If this occurs, note that the value
displayed for the position where the spare
wheel is mounted is not the same as the
spare wheel's current tire pressure.
Tire pressure monitor warning
messages If the tire pressure monitor detects a
significant
pressure
loss on one or more tires,
a warning message is shown in the
multifunction display. A warning tone also
sounds and the tire pressure warning lamp
lights up in the instrument cluster.
Each tire that is affected by a significant loss
of pressure is highlighted by a red rectangle.
i If the wheel positions on the vehicle are
interchanged, the tire pressures may be
displayed for the wrong positions for a
short time. This is rectified after a few minutes of driving, and the tire pressures
are displayed for the correct positions.
Restarting the tire pressure monitor G
WARNING
It is the driver's responsibility to set the tire
pressure to the recommended cold tire
pressure. Underinflated
tires affect the ability
to steer or brake the vehicle. You might lose
control over the vehicle.
When you restart the tire pressure monitor,
all existing warning messages are deleted and
the warning lamps go out. The monitor uses
the currently set tire pressures as the
reference values for monitoring.
The tire pressure monitor must be restarted
when you set the tire pressure to a new value
(as a result of changed drive or load
characteristics, for example). The tire
pressure monitor then monitors the new tire
pressure values.
i Canada only: in most cases, the tire
pressure monitor recognizes the new
reference values automatically. However,
you can also define reference values
manually as described here.
Restart the tire pressure monitor after you
have set the tire pressure to the value
recommended for the desired driving
situation ( Y page 245). Only correct tire
pressures on cold tires. Comply with the
recommended tire pressures on the tire and
loading information table on the B-pillar on
the driver's side. Additional tire pressure
values for driving at high speeds or with heavy
loads can be found in the tire pressure table
on the inside of the fuel filler flap.
X Make sure that the tire pressure is correct
on all four wheels.
X Make sure that the SmartKey is in position
2 in the ignition lock.
X Press and hold the V
or U
button on
the multifunction steering wheel until the Tire pressure
251
Wheels and tires Z
Page 254 of 284
standard display appears in the
multifunction display
(Y
page 156).
X Press and hold the & or * button
until the
tire pressure of each wheel or the
Tire pressure displayed only after
driving for a few minutes message
appears.
X Press the reset button on the instrument
cluster (Y page 25).
The Restart Tire Pres. Monitor?
message appears in the multifunction
display.
If you wish to confirm the restart:
X Press the W button.
The Tire Pres. Monitor Restarted
message appears in the multifunction
display.
After driving
for a few minutes, the system
checks whether the current tire pressures
are within the specified range. The new tire
pressures are then accepted as reference
values and monitored.
If you wish to cancel the restart:
X Press the X button.
The tire pressure values stored at the last
restart will continue to be monitored. Loading the vehicle
Instruction labels for tires and loads
G
WARNING
Do not overload the tires by exceeding the
specified load limit as indicated on the Tire
and Loading Information placard on the
driver's door B-pillar . Overloading the tires
can overheat them, possibly causing a
blowout.
Overloading the tires can also result
in handling or steering problems, or brake
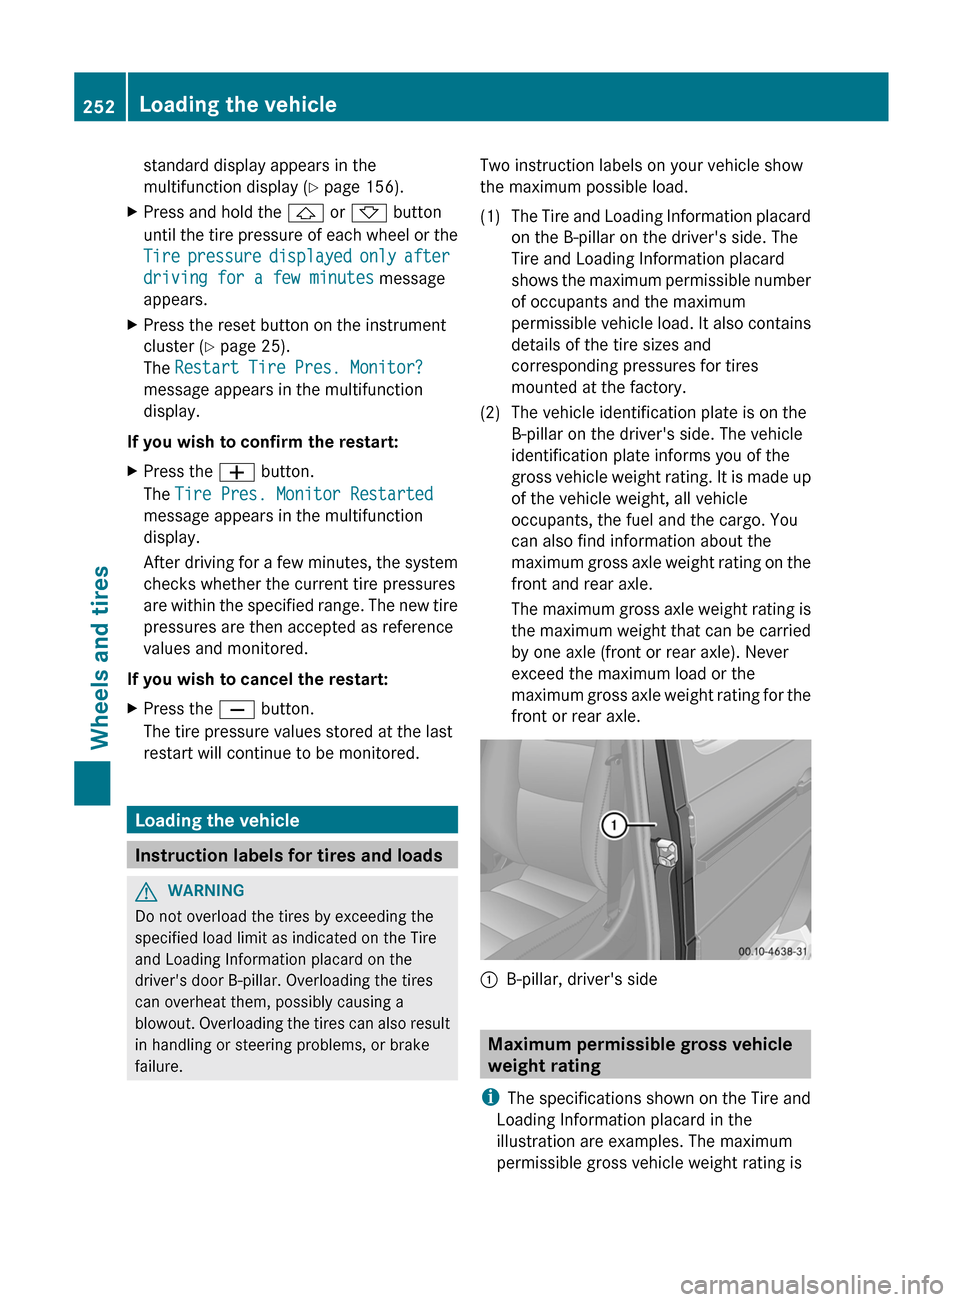
failure. Two instruction labels on your vehicle show
the maximum possible load.
(1) The Tire and Loading Information placard
on the B-pillar on the driver's side. The
Tire and Loading Information placard
shows the
maximum permissible number
of occupants and the maximum
permissible vehicle load. It also contains
details of the tire sizes and
corresponding pressures for tires
mounted at the factory.
(2) The vehicle identification plate is on the B-pillar on the driver's side. The vehicle
identification plate informs you of the
gross vehicle
weight rating. It is made up
of the vehicle weight, all vehicle
occupants, the fuel and the cargo. You
can also find information about the
maximum gross axle weight rating on the
front and rear axle.
The maximum gross axle weight rating is
the maximum weight that can be carried
by one axle (front or rear axle). Never
exceed the maximum load or the
maximum gross axle weight rating for the
front or rear axle. :
B-pillar, driver's side Maximum permissible gross vehicle
weight rating
i The specifications shown on the Tire and
Loading Information placard in the
illustration are examples. The maximum
permissible gross vehicle weight rating is 252
Loading the vehicle
Wheels and tires
Page 258 of 284
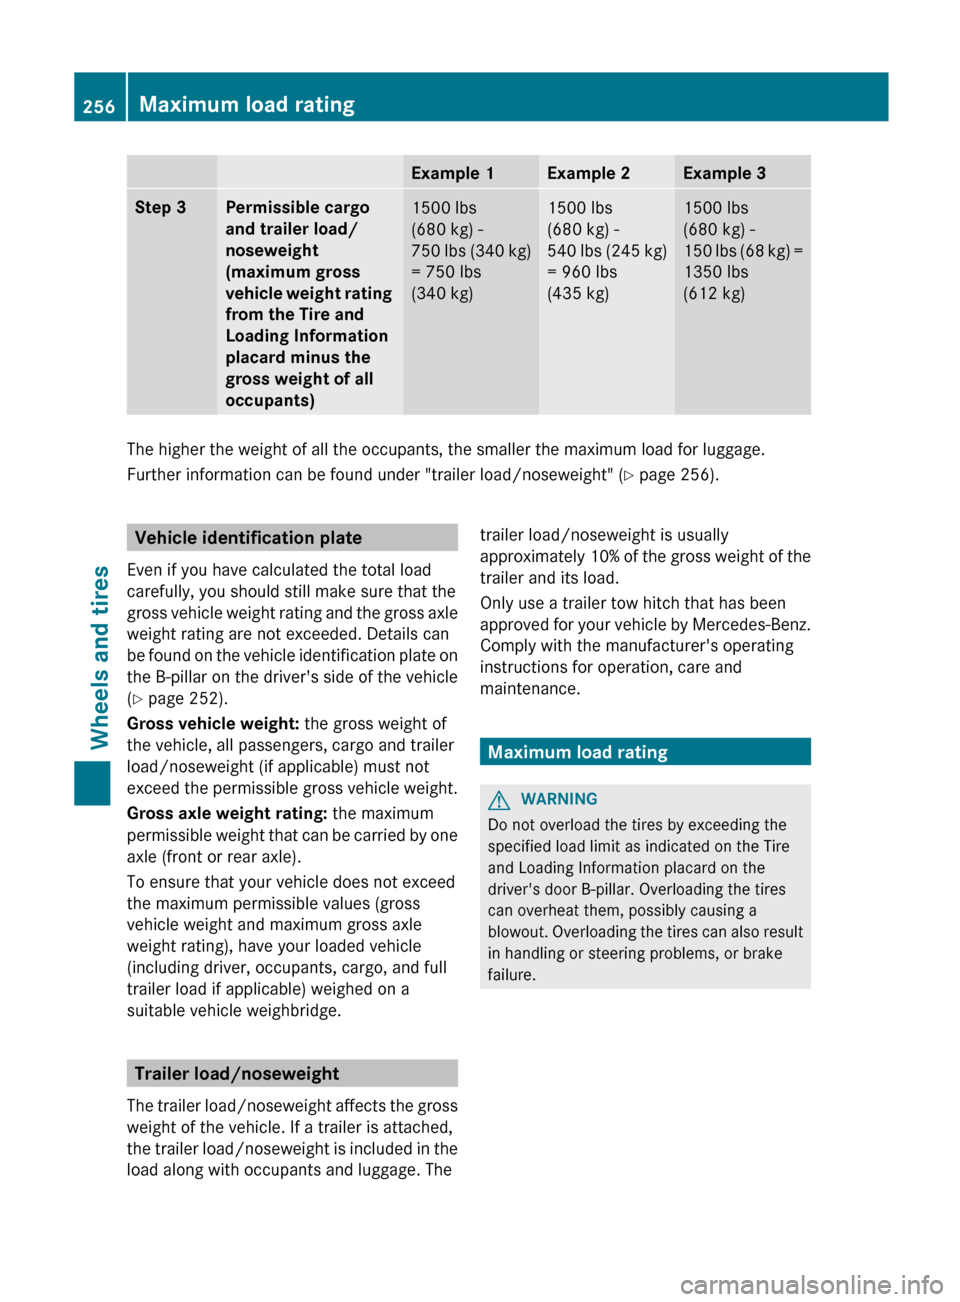
Example 1 Example 2 Example 3
Step 3 Permissible cargo
and trailer load/
noseweight
(maximum gross
vehicle
weight
rating
from the Tire and
Loading Information
placard minus the
gross weight of all
occupants) 1500 lbs
(680 kg) -
750
lbs
(340 kg)
= 750 lbs
(340 kg) 1500 lbs
(680 kg) -
540
lbs
(245 kg)
= 960 lbs
(435 kg) 1500 lbs
(680 kg) -
150
lbs
(68 kg) =
1350 lbs
(612 kg) The higher the weight of all the occupants, the smaller the maximum load for luggage.
Further information can be found under "trailer load/noseweight"
(Y
page 256).Vehicle identification plate
Even if you have calculated the total load
carefully, you should still make sure that the
gross vehicle
weight rating and the gross axle
weight rating are not exceeded. Details can
be found on the vehicle identification plate on
the B-pillar on the driver's side of the vehicle
(Y page 252).
Gross vehicle weight: the gross weight of
the vehicle, all passengers, cargo and trailer
load/noseweight (if applicable) must not
exceed the permissible gross vehicle weight.
Gross axle weight rating: the maximum
permissible weight that can be carried by one
axle (front or rear axle).
To ensure that your vehicle does not exceed
the maximum permissible values (gross
vehicle weight and maximum gross axle
weight rating), have your loaded vehicle
(including driver, occupants, cargo, and full
trailer load if applicable) weighed on a
suitable vehicle weighbridge. Trailer load/noseweight
The trailer
load/noseweight affects the gross
weight of the vehicle. If a trailer is attached,
the trailer load/noseweight is included in the
load along with occupants and luggage. The trailer load/noseweight is usually
approximately
10%
of the gross weight of the
trailer and its load.
Only use a trailer tow hitch that has been
approved for your vehicle by Mercedes-Benz.
Comply with the manufacturer's operating
instructions for operation, care and
maintenance. Maximum load rating
G
WARNING
Do not overload the tires by exceeding the
specified load limit as indicated on the Tire
and Loading Information placard on the
driver's door B-pillar . Overloading the tires
can overheat them, possibly causing a
blowout.
Overloading the tires can also result
in handling or steering problems, or brake
failure. 256
Maximum load rating
Wheels and tires
Page 261 of 284
D
Load index ( Y page 261)
E Tire name
i Tire data is vehicle-specific and may
deviate from the data in the example. Tire size designation, load-bearing
capacity and speed rating
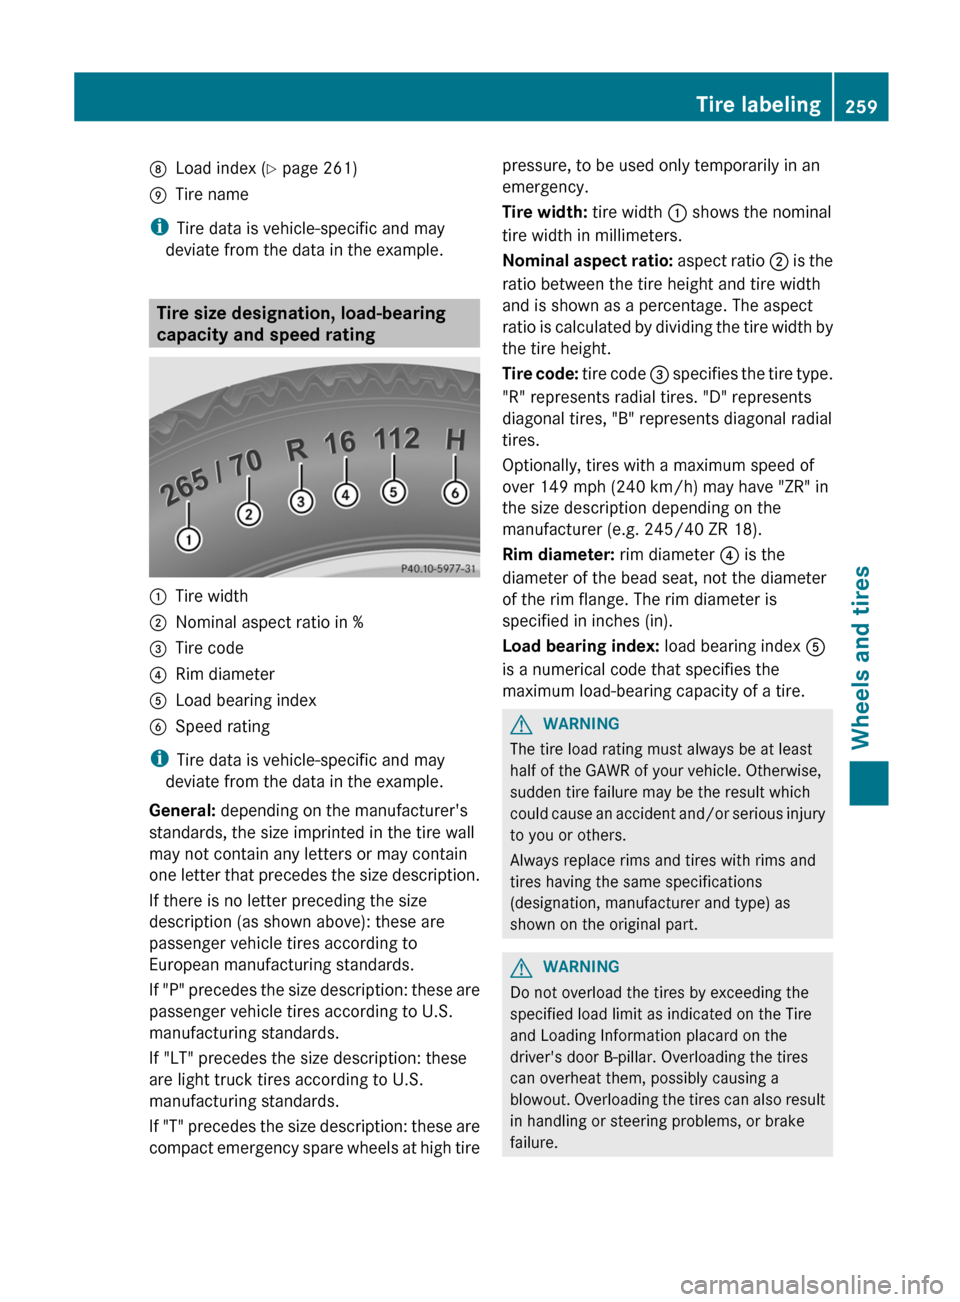
:
Tire width
; Nominal aspect ratio in %
= Tire code
? Rim diameter
A Load bearing index
B Speed rating
i Tire data is vehicle-specific and may
deviate from the data in the example.
General: depending on the manufacturer's
standards, the size imprinted in the tire wall
may not contain any letters or may contain
one letter
that precedes the size description.
If there is no letter preceding the size
description (as shown above): these are
passenger vehicle tires according to
European manufacturing standards.
If "P" precedes the size description: these are
passenger vehicle tires according to U.S.
manufacturing standards.
If "LT" precedes the size description: these
are light truck tires according to U.S.
manufacturing standards.
If "T" precedes the size description: these are
compact emergency spare wheels at high tire pressure, to be used only temporarily in an
emergency.
Tire width:
tire width : shows the nominal
tire width in millimeters.
Nominal aspect
ratio: aspect ratio ; is the
ratio between the tire height and tire width
and is shown as a percentage. The aspect
ratio is calculated by dividing the tire width by
the tire height.
Tire code: tire code = specifies the tire type.
"R" represents radial tires. "D" represents
diagonal tires, "B" represents diagonal radial
tires.
Optionally, tires with a maximum speed of
over 149 mph (240 km/h) may have "ZR" in
the size description depending on the
manufacturer (e.g. 245/40 ZR 18).
Rim diameter: rim diameter ? is the
diameter of the bead seat, not the diameter
of the rim flange. The rim diameter is
specified in inches (in).
Load bearing index: load bearing index A
is a numerical code that specifies the
maximum load-bearing capacity of a tire. G
WARNING
The tire load rating must always be at least
half of the GAWR of your vehicle. Otherwise,
sudden tire failure may be the result which
could cause
an accident and/or serious injury
to you or others.
Always replace rims and tires with rims and
tires having the same specifications
(designation, manufacturer and type) as
shown on the original part. G
WARNING
Do not overload the tires by exceeding the
specified load limit as indicated on the Tire
and Loading Information placard on the
driver's door B-pillar . Overloading the tires
can overheat them, possibly causing a
blowout.
Overloading the tires can also result
in handling or steering problems, or brake
failure. Tire labeling
259
Wheels and tires Z