Lug MERCEDES-BENZ G-Class 2013 W463 Owner's Manual
[x] Cancel search | Manufacturer: MERCEDES-BENZ, Model Year: 2013, Model line: G-Class, Model: MERCEDES-BENZ G-Class 2013 W463Pages: 364, PDF Size: 11.52 MB
Page 13 of 364
L
Lap time (RACETIMER) ......................222
LATCH-type (ISOFIX) child seat
anchors ................................................ 57
License plate lamp (display
message) ............................................ 233
Lights Activating/deactivating the
interior lighting delayed switch-off
. 220
Automatic headlamp mode ............ 100
Cornering light function .................104
Driving abroad ................................. 98
Fog lamps ...................................... 101
Hazard warning lamps ................... 104
High beam flasher .......................... 104
High-beam headlamps ...................103
Light switch ..................................... 98
Low-beam headlamps ...................... 99
Parking lamps ................................ 102
Rear fog lamp ................................ 101
Standing lamps .............................. 102
Switching the daytime running
lamps on/off (on-board
computer) ...................................... 219
Switching the daytime running
lamps on/off (switch) ...................... 99
Switching the exterior lighting
delayed switch-off on/off (on-
board computer) ............................ 219
Switching the surround lighting
on/off (on-board computer) ..........219
Turn signals ................................... 103
see Changing bulbs
see Interior lighting
Light sensor (display message) .......234
LIM indicator lamp Cruise control ................................ 170
DISTRONIC PLUS ........................... 179
Variable SPEEDTRONIC .................175
Limit speed
Variable SPEEDTRONIC .................174
Load anchorage ................................. 266
Loading guidelines ............................262Locking
Emergency locking ........................... 76
From inside the vehicle (central
locking button) ................................. 74
see Central locking
Locking (doors)
Automatic ........................................ 75
Locking centrally
see Central locking
Locking verification signal (on-
board computer) ............................... 221
Low-beam headlamps Display message ............................ 231
Setting for driving abroad
(symmetrical) ................................... 98
Switching on/off .............................. 99
LOW RANGE off-road gear ................199
Luggage compartment
enlargement
Overview ........................................ 264
Lumbar support
Adjusting the 4-way lumbar
support ............................................ 89
Luxury head restraints .......................87 M
M+S tires ............................................ 320
Malfunction message see Display messages
Matte finish (cleaning
instructions) ...................................... 296
mbrace Call priority .................................... 276
Display message ............................ 229
Downloading destinations
(COMAND) ..................................... 277
Downloading routes .......................279
Emergency call .............................. 274
Geo fencing ................................... 280
Important safety notes .................. 272
Locating a stolen vehicle ............... 278
MB info call button ........................ 276
Remote vehicle locking .................. 277
Roadside Assistance button .......... 275
Self-test ......................................... 273
Speed alert .................................... 279
System .......................................... 273 Index
11
Page 17 of 364
Side windows
Convenience opening feature .......... 78
Important safety information
...........78
Opening/closing .............................. 78
Overview .......................................... 78
Troubleshooting ............................... 79
Ski rack .............................................. 267
Sliding sunroof Important safety notes .................... 79
Opening/closing .............................. 80
Operating manually ..........................80
Problem (malfunction) .....................81
SmartKey
Changing the battery ....................... 71
Changing the programming ............. 69
Checking the battery ....................... 70
Convenience opening feature .......... 78
Display message ............................ 247
Door central locking/unlocking ....... 68
Important safety notes .................... 68
Loss ................................................. 72
Malfunction ...................................... 72
Mechanical key ................................ 70
Overview .......................................... 68
Problem (malfunction) .....................72
Starting the engine ........................ 140
Snow chains ...................................... 321
Sockets Front-passenger footwell ...............271
Luggage compartment ................... 271
Rear compartment ......................... 271
SOS
see mbrace
Spare fuses ........................................ 313
Spare wheel Mounting ....................................... 340
Notes/data .................................... 346
Spare wheel bracket at the rear ....303
Stainless-steel spare hub cap ........ 304
Specialist workshop ............................ 23
Special seat belt retractor .................. 52
Speed, controlling see Cruise control
Speedometer
Digital ............................................ 213
In the Instrument cluster ............... 209Segments
...................................... 210
Selecting the unit of
measurement ................................ 219
see Instrument cluster
SPEEDTRONIC
Display message ............................ 241
Selecting ........................................ 175
Variable ......................................... 174
SRS
see SRS (Supplemental Restraint
System)
SRS (Supplemental Restraint
System)
Display message ............................ 229
Introduction ..................................... 39
Warning lamp ................................. 255
Warning lamp (function) ................... 39
Standing lamps
Display message ............................ 233
Switching on/off ........................... 102
Starting the engine
Important safety notes .................. 140
Steering (display message) ..............246
Steering wheel Adjusting (electrically) .....................91
Buttons (on-board computer) ......... 210
Cleaning ......................................... 299
Important safety notes .................... 90
Paddle shifters ............................... 150
Steering wheel heating .................... 91
Storing settings (memory
function) .......................................... 95
Steering wheel heating
Indicator lamp (malfunction) ............ 91
Steering wheel paddle shifters ........150
Stopwatch (RACETIMER) ................... 222
Stowage areas ................................... 263
Stowage compartments Armrest (under) ............................. 263
Cup holders ................................... 268
Glove box ....................................... 263
Important safety information ......... 263
Stowage pockets ........................... 264
Summer tires ..................................... 320
Sun visor ............................................ 268 Index
15
Page 82 of 364
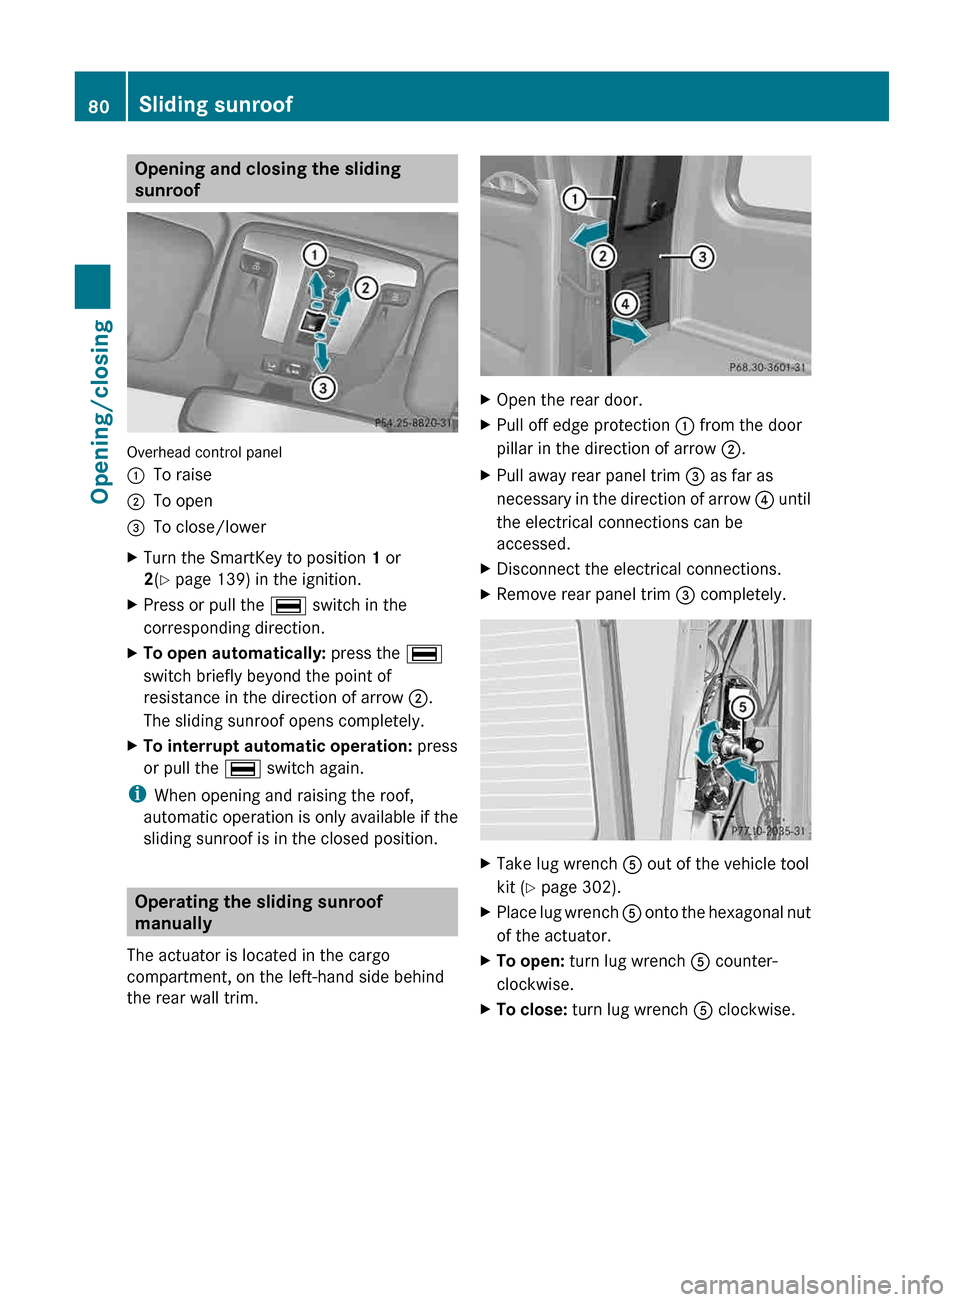
Opening and closing the sliding
sunroof
Overhead control panel
:
To raise
; To open
= To close/lower
X Turn the SmartKey to position 1 or
2(Y page 139) in the ignition.
X Press or pull the ¡ switch in the
corresponding direction.
X To open automatically: press the ¡
switch briefly beyond the point of
resistance in the direction of arrow ;.
The sliding sunroof opens completely.
X To interrupt automatic operation: press
or pull the ¡ switch again.
i When opening and raising the roof,
automatic operation is only available if the
sliding sunroof is in the closed position. Operating the sliding sunroof
manually
The actuator is located in the cargo
compartment, on the left-hand side behind
the rear wall trim. X
Open the rear door.
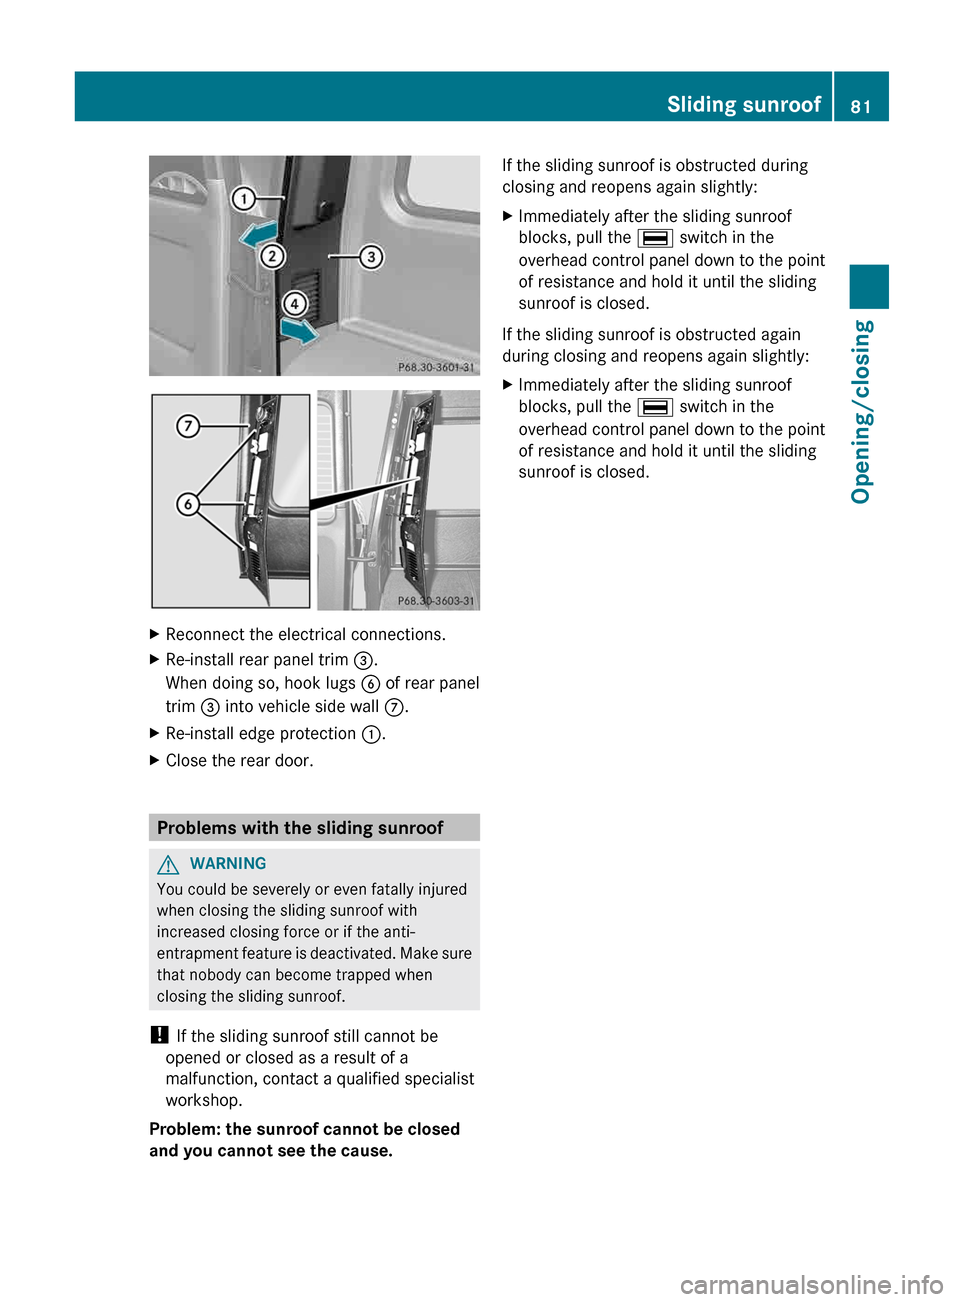
X Pull off edge protection : from the door
pillar in the direction of arrow ;.
X Pull away rear panel trim = as far as
necessary in the direction of arrow ? until
the electrical connections can be
accessed.
X Disconnect the electrical connections.
X Remove rear panel trim = completely. X
Take lug wrench A out of the vehicle tool
kit ( Y page 302).
X Place lug wrench A
onto the hexagonal nut
of the actuator.
X To open: turn lug wrench A counter-
clockwise.
X To close: turn lug wrench A clockwise.80
Sliding sunroof
Opening/closing
Page 83 of 364
X
Reconnect the electrical connections.
X Re-install rear panel trim =.
When doing so, hook lugs B of rear panel
trim = into vehicle side wall C.
X Re-install edge protection :.
X Close the rear door. Problems with the sliding sunroof
G
WARNING
You could be severely or even fatally injured
when closing the sliding sunroof with
increased closing force or if the anti-
entrapment
feature is deactivated. Make sure
that nobody can become trapped when
closing the sliding sunroof.
! If the sliding sunroof still cannot be
opened or closed as a result of a
malfunction, contact a qualified specialist
workshop.
Problem: the sunroof cannot be closed
and you cannot see the cause. If the sliding sunroof is obstructed during
closing and reopens again slightly:
X
Immediately after the sliding sunroof
blocks, pull the ¡ switch in the
overhead control panel down to the point
of resistance and hold it until the sliding
sunroof is closed.
If the sliding sunroof is obstructed again
during closing and reopens again slightly:
X Immediately after the sliding sunroof
blocks, pull the ¡ switch in the
overhead control panel down to the point
of resistance and hold it until the sliding
sunroof is closed. Sliding sunroof
81
Opening/closing Z
Page 96 of 364
"Fold in mirrors when locking" function in the
on-board computer (Y page 221).
X
Make sure that the SmartKey is in position
1(Y page 139) in the ignition lock.
X Briefly press button :.
Folding the exterior mirrors in/out
automatically If the "Fold in mirrors when locking" function
is activated in the on-board computer
(Y page 221):
R
the
exterior mirrors fold in automatically as
soon as you lock the vehicle from the
outside.
R the exterior mirrors fold out again
automatically as soon as you unlock the
vehicle and then open the driver's or front-
passenger door.
Exterior mirror out of position X
Press button : repeatedly until you hear
the mirror engage in position.
The mirror housing is engaged again and
you
can adjust the exterior mirrors as usual
(Y page 93). Automatic anti-glare mirrors
G
WARNING
If incident light from headlamps is prevented
from striking the sensor in the rear-view
mirror,
for instance, by luggage piled too high
in the vehicle, the mirror's automatic anti-
glare function will not operate.
Incident light could then blind you. This may
distract you from the traffic conditions and,
as a result, you may cause an accident.
The rear-view mirror and the exterior mirror
on the driver's side automatically go into anti-
glare mode if:
R the ignition is switched on and
R incident light from headlamps strikes the
sensor in the rear-view mirror. i
The
mirrors do not go into anti-glare mode
if reverse gear is engaged or if the interior
lighting is switched on. Parking position for the exterior
mirror on the front-passenger side
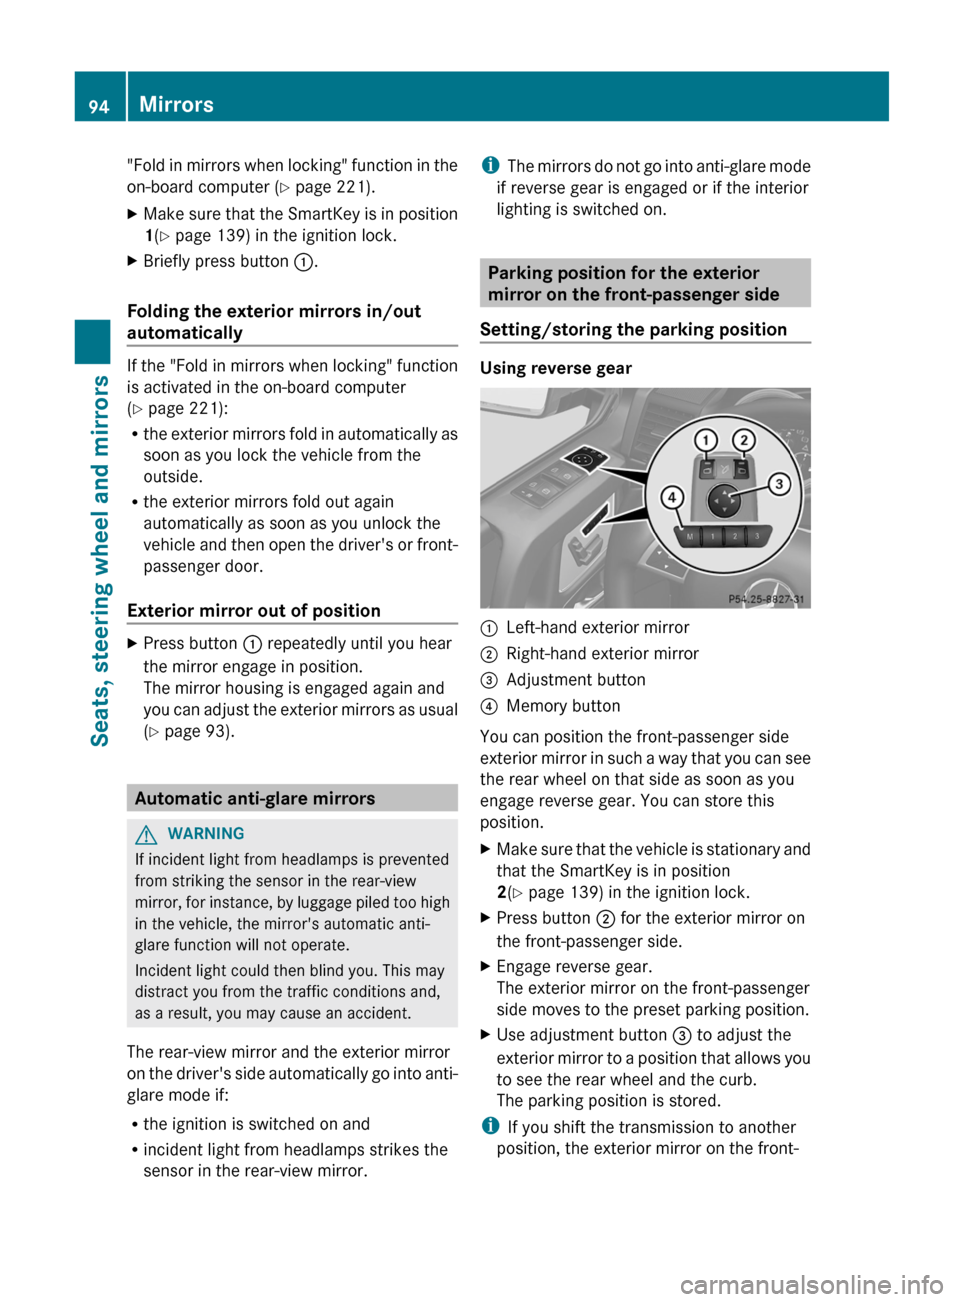
Setting/storing the parking position Using reverse gear
:
Left-hand exterior mirror
; Right-hand exterior mirror
= Adjustment button
? Memory button
You can position the front-passenger side
exterior
mirror in such a way that you can see
the rear wheel on that side as soon as you
engage reverse gear. You can store this
position.
X Make sure that the vehicle is stationary and
that the SmartKey is in position
2(Y page 139) in the ignition lock.
X Press button ; for the exterior mirror on
the front-passenger side.
X Engage reverse gear.
The exterior mirror on the front-passenger
side moves to the preset parking position.
X Use adjustment button = to adjust the
exterior
mirror to a position that allows you
to see the rear wheel and the curb.
The parking position is stored.
i If you shift the transmission to another
position, the exterior mirror on the front- 94
Mirrors
Seats, steering wheel and mirrors
Page 167 of 364
The following driving systems are specially
adapted to off-road driving:
R
4ETS ( Y page 62)
R Transfer case (Y page 198)
R Differential locks ( Y page 201)
Observe the following notes:
R stop
your vehicle and, if necessary, shift the
transfer case to LOW
RANGE(Y page 199) before driving off-
road.
R AMG vehicles: to shift the transfer case to
LOW RANGE, deactivate the ECO start/
stop function (Y page 142).
R engage the differential locks, if necessary
(Y page 201)
i ABS, 4ETS, ESP ®
and BAS are deactivated
when the differential locks are activated.
This allows the front wheels to lock briefly,
so that these can dig into a loose surface.
However, please note that locked wheels
skid and can no longer steer.
R Check that items of luggage and loads are
stowed safely and are well secured
(Y page 267).
R To avoid damaging the vehicle, make sure
there is always sufficient ground clearance.
R Always keep the engine running and in gear
when driving on a downhill gradient.
R Always keep the engine running and in gear
when driving on a slope.
R Drive slowly and evenly, if necessary at a
walking pace.
R Ensure that the wheels are in contact with
the ground at all times.
R Drive with extreme care on unknown off-
road routes where visibility is poor. For
safety reasons, get out of the vehicle first
and survey the off-road route.
R Check the depth of water before fording
rivers and streams.
R When fording, do not stop and do not
switch off the engine. R
Look out for obstacles such as rocks, holes,
tree stumps and furrows.
R Always keep the doors, rear door, side
windows and the sliding sunroof closed
while the vehicle is in motion.
R Switch off cruise control.
R Do not stray from marked routes or paths.
R Adapt your speed to the terrain. The
rougher, steeper or more ruts on the
terrain, the slower your speed should be.
R Drive slowly and at an even speed through
the water. Ensure that a bow wave does not
form as you drive.
R On sand, drive quickly to overcome the
rolling resistance. Otherwise, the vehicle
could dig itself into the sand.
R Do not jump with the vehicle as this will
interrupt the vehicle's propulsion.
R Avoid high engine speeds. Drive at
appropriate engine speeds (maximum
3,000 rpm).
R Do not shift the automatic transmission to
transmission position N.
R Always check the vehicle for damage after
off-road driving.
i Information about retrofitting special all-
terrain tires is available from any qualified
specialist workshop.
i Do not use the HOLD function when
driving off-road, on steep uphill or downhill
gradients or on slippery or loose surfaces.
The HOLD function cannot hold the vehicle
on such surfaces.
Checklist before driving off-road !
If the engine oil warning lamp lights up
while the vehicle is in motion, stop the
vehicle
in a safe place as soon as possible.
Check the engine oil level. The engine oil
warning lamp warning must not be ignored.
Continuing the journey while the symbol is
displayed could lead to engine damage. Driving tips
165
Driving and parking Z
Page 168 of 364
X
Engine oil level: check the engine oil level
and add oil if necessary.
Only then does the engine receive enough
oil when the vehicle is standing on a steep
incline.
X Tire-changing tool kit:
check that the jack
is working and make sure you have the lug
wrench, a robust tow cable and a folding
spade in the vehicle.
X Wheels and tires: check the tire tread
depth and tire pressure.
X Check for damage and remove any foreign
objects, e.g. small stones, from the
wheels/tires.
X Replace any missing valve caps.
X Replace dented or damaged wheels.
X Carry a sound spare wheel.
Checklist after driving off-road Driving over rough terrain places greater
demands on your vehicle than driving on
normal roads. After driving off-road, check
the
vehicle. This allows you to detect damage
promptly and reduce the risk of an accident
to yourself and other road users.
X Shift the transfer case to HIGH
RANGE(Y page 199).
X Disengage the differential locks
(Y page 201).
X Clean the headlamps and rear lights and
check for damage.
X Clean the front and rear license plates.
X Clean the wheels and tires with a water jet
and remove any foreign objects.
X Clean the wheels, tires, wheel housings and
the vehicle underside with a water jet;
check
for any foreign objects and damage.
X Check whether twigs or other parts of
plants have become trapped. These
increase the risk of fire and can damage
fuel pipes, brake hoses or the rubber
bellows of the axle joints and propeller
shafts. X
After the trip, examine without fail the
entire
undercarriage, wheels, tires, brakes,
bodywork structure, steering, chassis and
exhaust system for damage.
X After driving for extended periods across
sand,
mud, gravel, water or in similarly dirty
conditions, have the brake discs, wheels,
brake pads/linings and axle joints checked
and cleaned.
X If you notice strong vibrations after off-road
driving, check for foreign objects in the
wheels and drive train and, if necessary,
remove them. Foreign objects can disturb
the balance and cause vibrations.
X Test the brakes.
Driving on sand Observe the following rules when driving on
sand:
R
Shift the transfer case to LOW
RANGE(Y page 199).
R Avoid high engine speeds.
R Limit the shift range of the automatic
transmission according to the off-road
conditions.
R Drive quickly to overcome the rolling
resistance.
Otherwise, the vehicle could dig
itself into the sand.
R Drive in the tracks of other vehicles if
possible. Make sure that the ruts are not
too deep, that the sand is firm enough and
that your vehicle has sufficient ground
clearance.
Tire ruts and gravel roads !
Check that the ruts are not too deep and
that your vehicle has sufficient clearance.
Otherwise, your vehicle could be damaged
or bottom out and get stuck.
Observe the following rules when driving
along
ruts in off-road terrain or on roads with
loose gravel: 166
Driving tips
Driving and parking
Page 208 of 364
This will use the braking effect of the engine,
so that less braking will be required to
maintain the speed. which relieves the load
on
the brake system and prevents the brakes
from overheating and wearing too quickly. If
you need additional braking, depress the
brake pedal repeatedly rather than
continuously.
Driving tips If the trailer swings from side to side:
X
Do not accelerate.
X Do not counter-steer.
X Brake if necessary.
R Maintain a greater distance from the
vehicle
in front than when driving without a
trailer.
R Avoid braking abruptly. If possible, brake
gently at first to allow the trailer to run on.
Then, increase the braking force rapidly.
R The values given for gradient-climbing
capabilities from a standstill refer to sea
level. When driving in mountainous areas,
note that the power output of the engine,
and consequently the vehicle's gradient-
climbing capability, decrease with
increasing altitude. Trailer power supply
! You can connect accessories with a
maximum
power consumption of 180 W to
the permanent power supply.
You must not charge a trailer battery using
the power supply.
The trailer socket of your vehicle is equipped
at the factory with a permanent power supply.
The permanent power supply is supplied via
trailer socket pin 9.
A qualified specialist workshop can provide
more information about installing the trailer
electrics. Trailer with 7-pin connector
General notes You can make a connection to the 13-pin
socket on the ball coupling using an adapter
or, if necessary, an adapter cable. Both can
be obtained in a qualified specialist
workshop.
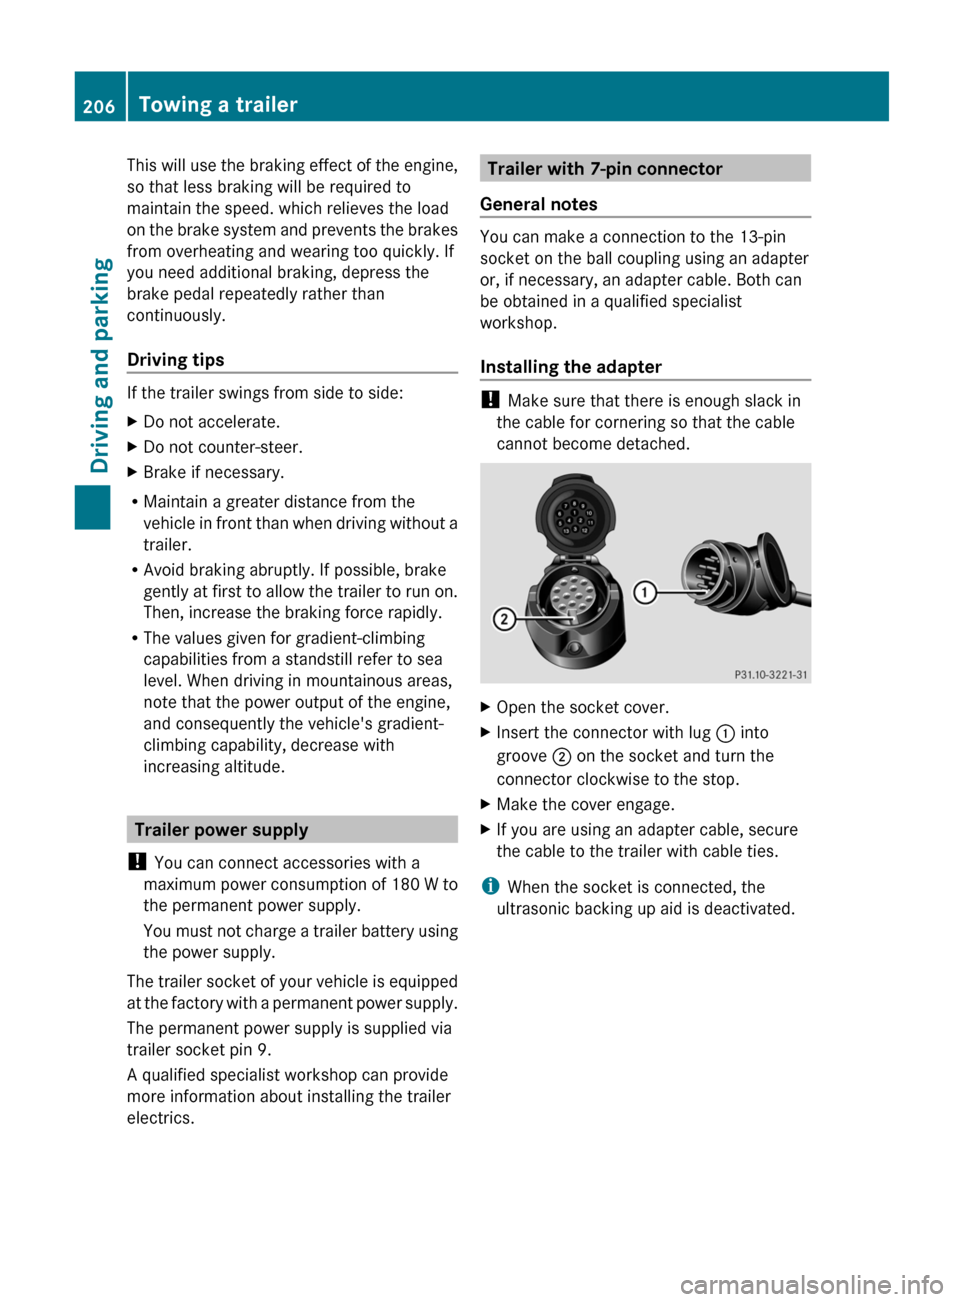
Installing the adapter
!
Make sure that there is enough slack in
the cable for cornering so that the cable
cannot become detached. X
Open the socket cover.
X Insert the connector with lug : into
groove ; on the socket and turn the
connector clockwise to the stop.
X Make the cover engage.
X If you are using an adapter cable, secure
the cable to the trailer with cable ties.
i When the socket is connected, the
ultrasonic backing up aid is deactivated. 206
Towing a trailer
Driving and parking
Page 264 of 364
Useful information
i This Operator's Manual describes all
models and all standard and optional
equipment of your vehicle available at the
time of publication of the Operator's
Manual. Country-specific differences are
possible.
Please note that your vehicle may
not be equipped with all features
described. This also applies to safety-
related systems and functions.
i Read the information on qualified
specialist workshops: ( Y page 23).Loading guidelines
G
WARNING
Always fasten items being carried as securely
as possible using cargo tie-down rings and
fastening
materials appropriate for the weight
and size of the load.
In an accident, during hard braking or sudden
maneuvers, loose items will be thrown around
inside the vehicle. This can cause injury to
vehicle occupants unless the items are
securely fastened in the vehicle.
To help avoid personal injury during a collision
or sudden maneuver, exercise care when
transporting cargo. Do not pile luggage or
cargo higher than the seat backrests.
Never drive a vehicle with the tailgate open.
Deadly carbon monoxide (CO) gases may
enter vehicle interior resulting in
unconsciousness and death. The handling characteristics of a laden
vehicle are dependent on the distribution of
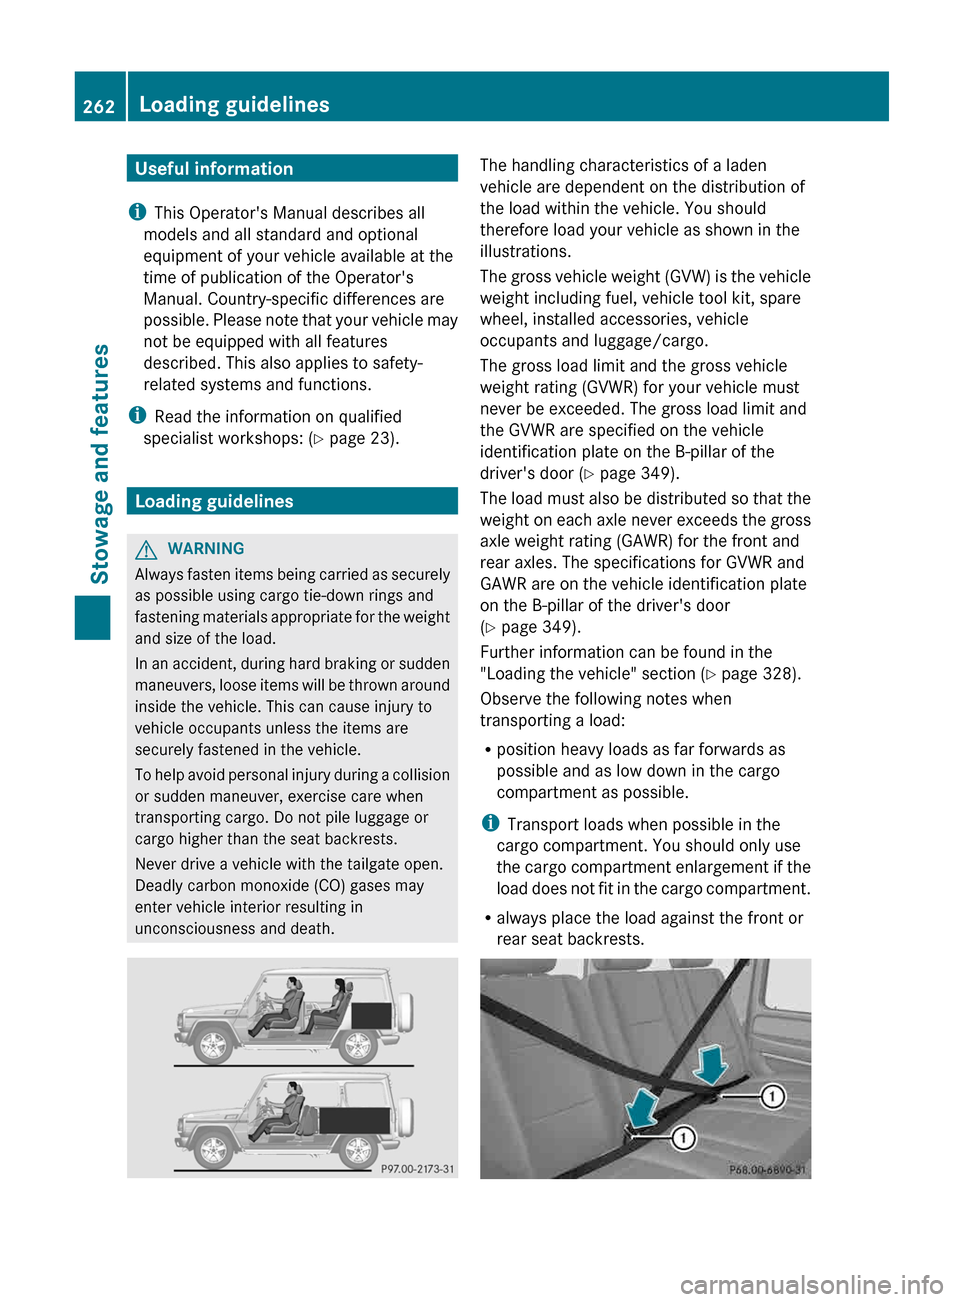
the load within the vehicle. You should
therefore load your vehicle as shown in the
illustrations.
The
gross vehicle weight (GVW) is the vehicle
weight including fuel, vehicle tool kit, spare
wheel, installed accessories, vehicle
occupants and luggage/cargo.
The gross load limit and the gross vehicle
weight rating (GVWR) for your vehicle must
never be exceeded. The gross load limit and
the GVWR are specified on the vehicle
identification plate on the B-pillar of the
driver's door ( Y page 349).
The load must also be distributed so that the
weight on each axle never exceeds the gross
axle weight rating (GAWR) for the front and
rear axles. The specifications for GVWR and
GAWR are on the vehicle identification plate
on the B-pillar of the driver's door
(Y page 349).
Further information can be found in the
"Loading the vehicle" section ( Y page 328).
Observe the following notes when
transporting a load:
R position heavy loads as far forwards as
possible and as low down in the cargo
compartment as possible.
i Transport loads when possible in the
cargo compartment. You should only use
the cargo compartment enlargement if the
load does not fit in the cargo compartment.
R always place the load against the front or
rear seat backrests.262
Loading guidelines
Stowage and features
Page 265 of 364
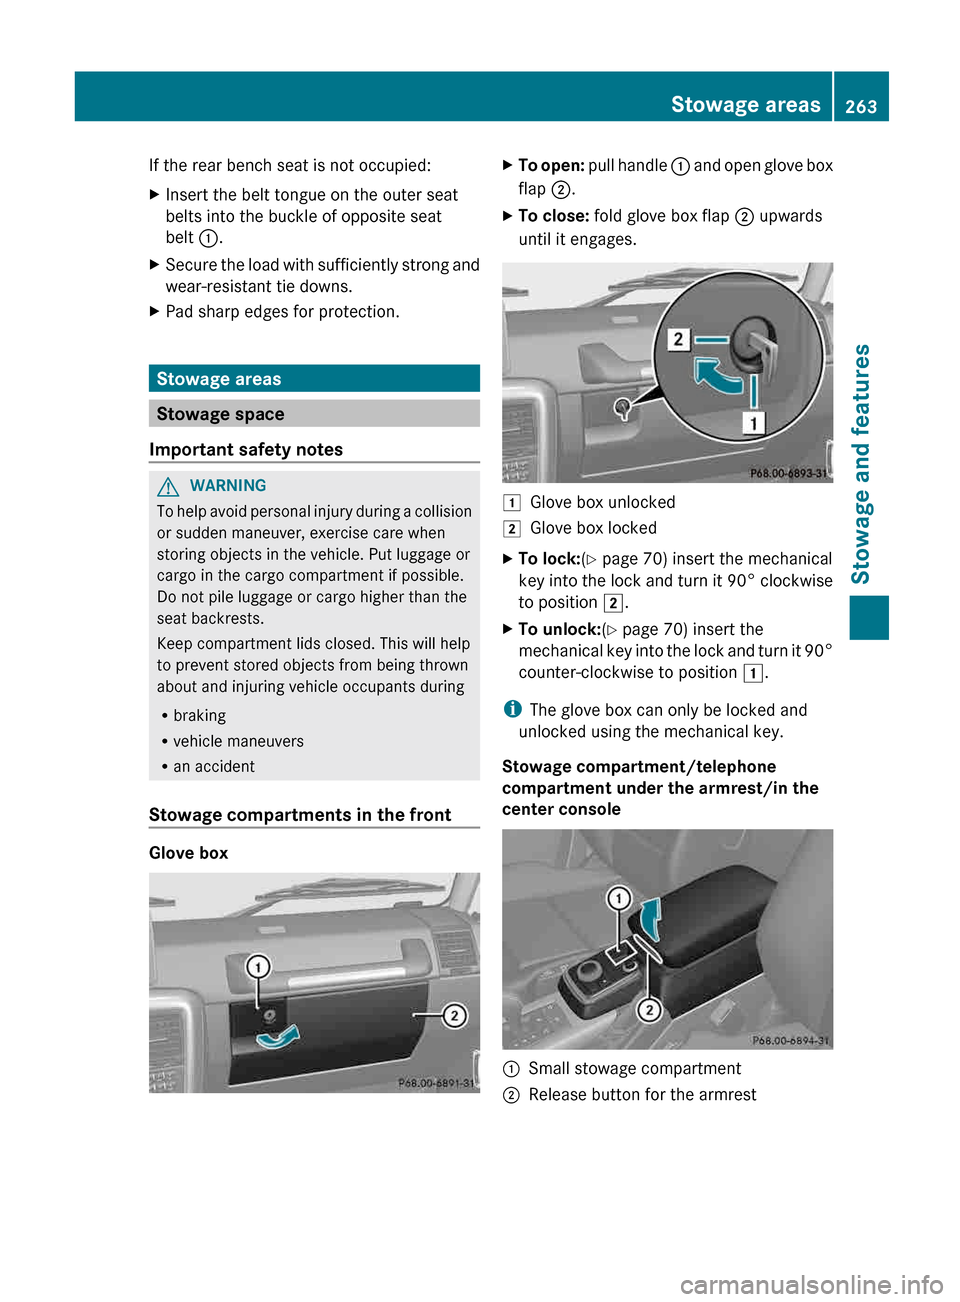
If the rear bench seat is not occupied:
X
Insert the belt tongue on the outer seat
belts into the buckle of opposite seat
belt :.
X Secure the load with sufficiently strong and
wear-resistant tie downs.
X Pad sharp edges for protection. Stowage areas
Stowage space
Important safety notes G
WARNING
To help avoid personal injury during a collision
or sudden maneuver, exercise care when
storing objects in the vehicle. Put luggage or
cargo in the cargo compartment if possible.
Do not pile luggage or cargo higher than the
seat backrests.
Keep compartment lids closed. This will help
to prevent stored objects from being thrown
about and injuring vehicle occupants during
R braking
R vehicle maneuvers
R an accident
Stowage compartments in the front Glove box X
To open: pull handle : and open glove box
flap ;.
X To close: fold glove box flap ; upwards
until it engages. 1
Glove box unlocked
2 Glove box locked
X To lock:(Y page 70) insert the mechanical
key
into the lock and turn it 90° clockwise
to position 2.
X To unlock:(Y page 70) insert the
mechanical
key into the lock and turn it 90°
counter-clockwise to position 1.
i The glove box can only be locked and
unlocked using the mechanical key.
Stowage compartment/telephone
compartment under the armrest/in the
center console :
Small stowage compartment
; Release button for the armrest Stowage areas
263
Stowage and features Z