wheel MERCEDES-BENZ G-Class 2014 W463 Comand Manual
[x] Cancel search | Manufacturer: MERCEDES-BENZ, Model Year: 2014, Model line: G-Class, Model: MERCEDES-BENZ G-Class 2014 W463Pages: 274, PDF Size: 5.76 MB
Page 137 of 274
Using the telephone basic menu
X
Call up the telephone basic menu
(Y page 133).
X Selec tthe digits one by one by turning
003C0012003D and sliding 003600120008the COMAND
controller and press 0037to confirm.
X To make a call: select°in the character
bar and press 0037to confirm.
or
X Press the 0016button on COMAND or on
the multifunction steering wheel.
Redialing X
Call up the telephone basic menu
(Y page 133).
X Select °in the character bar and press
0037 to confirm.
or
X If the telephone basic menu is displayed,
press the 0016button on COMAND.
In both cases, the calls dialed list appears.
The most recently dialed number is at the
top.
X To selectac all:turn 003C0012003D the COMAND
controller.
X To connect the call: press0037the
COMAND controller.
Using the call lis torCOMAND phone
book X
Open a call list and select an entry
(Y page 143).
or
X Call up the COMAND phone book and
select an entry (Y page 140).
X To make a call: press0037the COMAND
controller or the 0016button. Making a call via speed dial The speed dial list contains stored entries
from the phone book (Y
page 145).
Option 1:
X Hold down one of the number keys for
longer than two seconds.
The telephone basic menu displays the
selected entry. This initiates dialing.
Option 2:
X Call up the telephone basic menu
(Y page 133).
X Select Call Lists by sliding
00120008and
turning 003C0012003Dthe COMAND controller and
press 0037to confirm.
Am enu appears.
X Select Speed Dial Preset List by
turning 003C0012003Dthe COMAND controller and
press 0037to confirm.
The speed dial list appears.
X Select preset and press 0037to confirm.
The telephone basic menu displays the
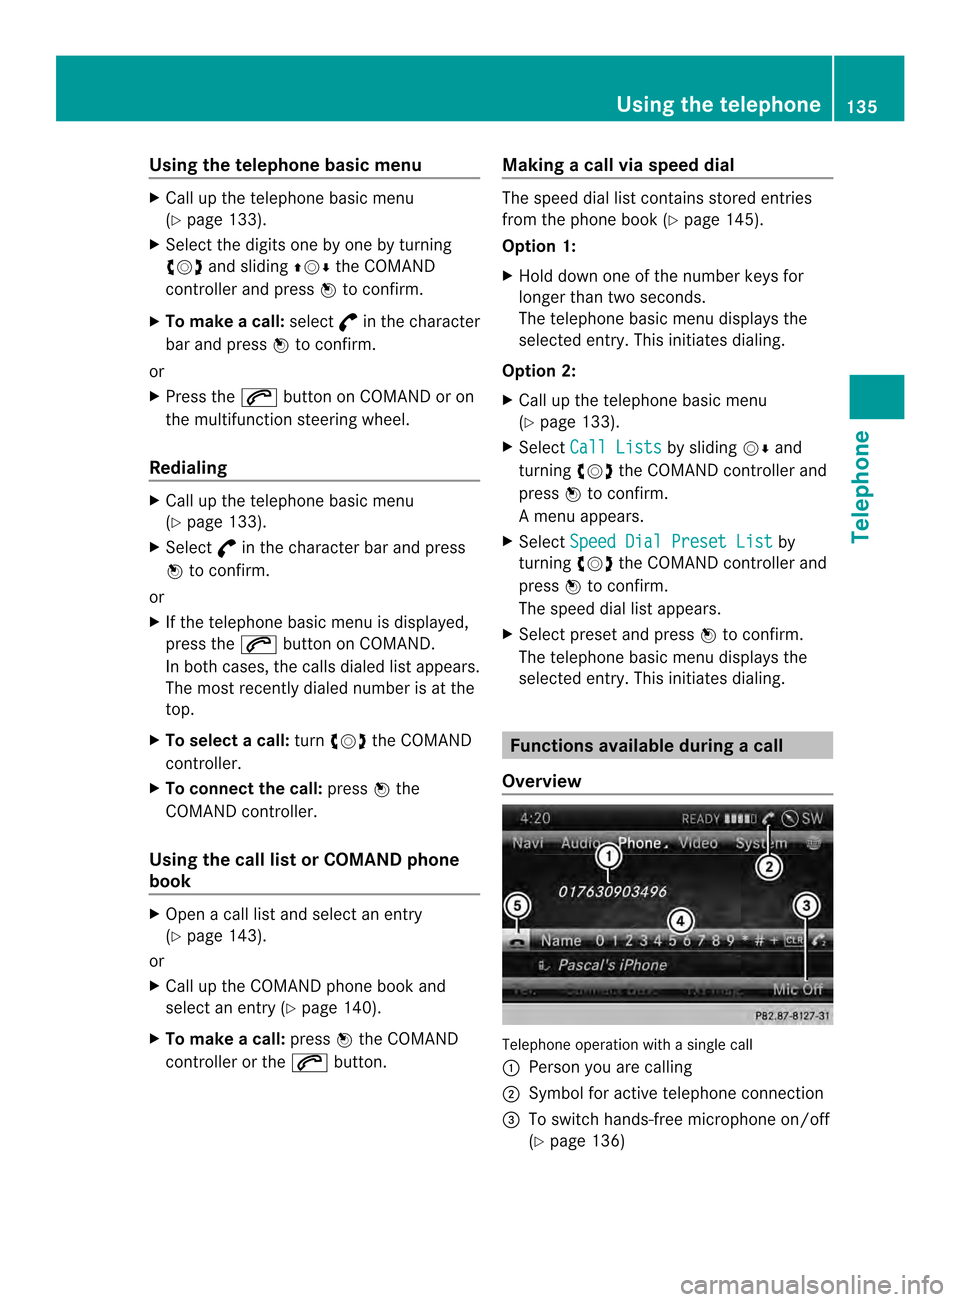
selected entry. This initiates dialing. Functions available during
acall
Overview Telephone operatio
nwith a single call
0001 Perso nyou are calling
0002 Symbol for active telephone connection
0014 To switch hands-free microphone on/off
(Ypage 136) Using the telephone
135Telephone Z
Page 139 of 274
X
To reject: selectReject and press
0037to
confirm.
or
X Press the 003Abutton on COMAND or on
the multifunctio nsteering wheel.
X To accept: selectAccept and press
0037to
confirm.
or
X Press the 0016button on COMAND or on
the multifunctio nsteering wheel.
The syste mbehavior after accepting the
incoming call depends on your mobile phone.
R The mobile phone supports the call waiting
function (via Bluetooth ®
) when:
the previously active call is held. You can
then switch back and forth between both
calls (toggling) (Y page 137).
R The mobile phone does not support the call
waiting function (via Bluetooth ®
) when:
the previously active call is ended.
This is also the case if you accept the
waiting call using the Voice Control System
(see the separate operating instructions).
The COMAND display changes .Ifyou
continue to operate functions on the mobile
phone, the COMAND display may differ from
that of the mobile phone.
Making asecond call If the following requirements are met, you can
make another call while on the phone with
someone else:
R the function has to be supported by the
mobile phone network.
R the mobile phone has to suppor tthe
connection of a further call via Bluetooth ®
.
This action puts the previous call on hold if
the mobile phone supports this function.
R the appropriate setting has to be activated
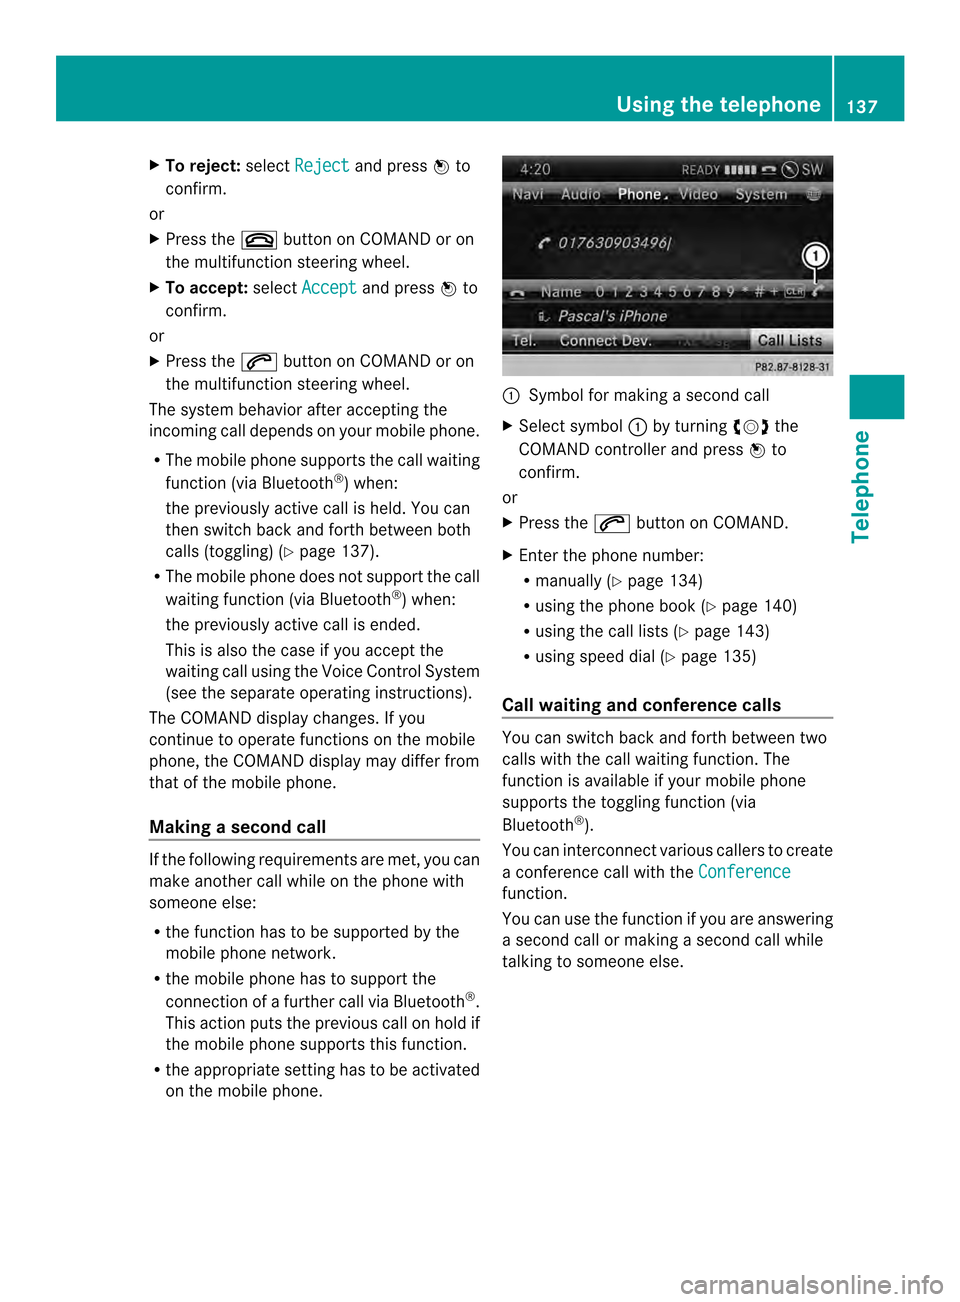
on the mobile phone. 0001
Symbol for making a second call
X Select symbol 0001by turning 003C0012003Dthe
COMAND controller and press 0037to
confirm.
or
X Press the 0016button on COMAND.
X Enter the phone number:
R
manually (Y page 134)
R using the phone book (Y page 140)
R using the call lists (Y page 143)
R using speed dial (Y page 135)
Call waiting and conference calls You can switch back and forth between two
calls with the call waiting function. The
function is available if your mobile phone
supports the toggling function (via
Bluetooth
®
).
You can interconnectv arious callers to create
a conference call with the Conference function.
You can use the function if you are answering
a second call or making a second call while
talking to someone else. Using the telephone
137Telephone Z
Page 140 of 274
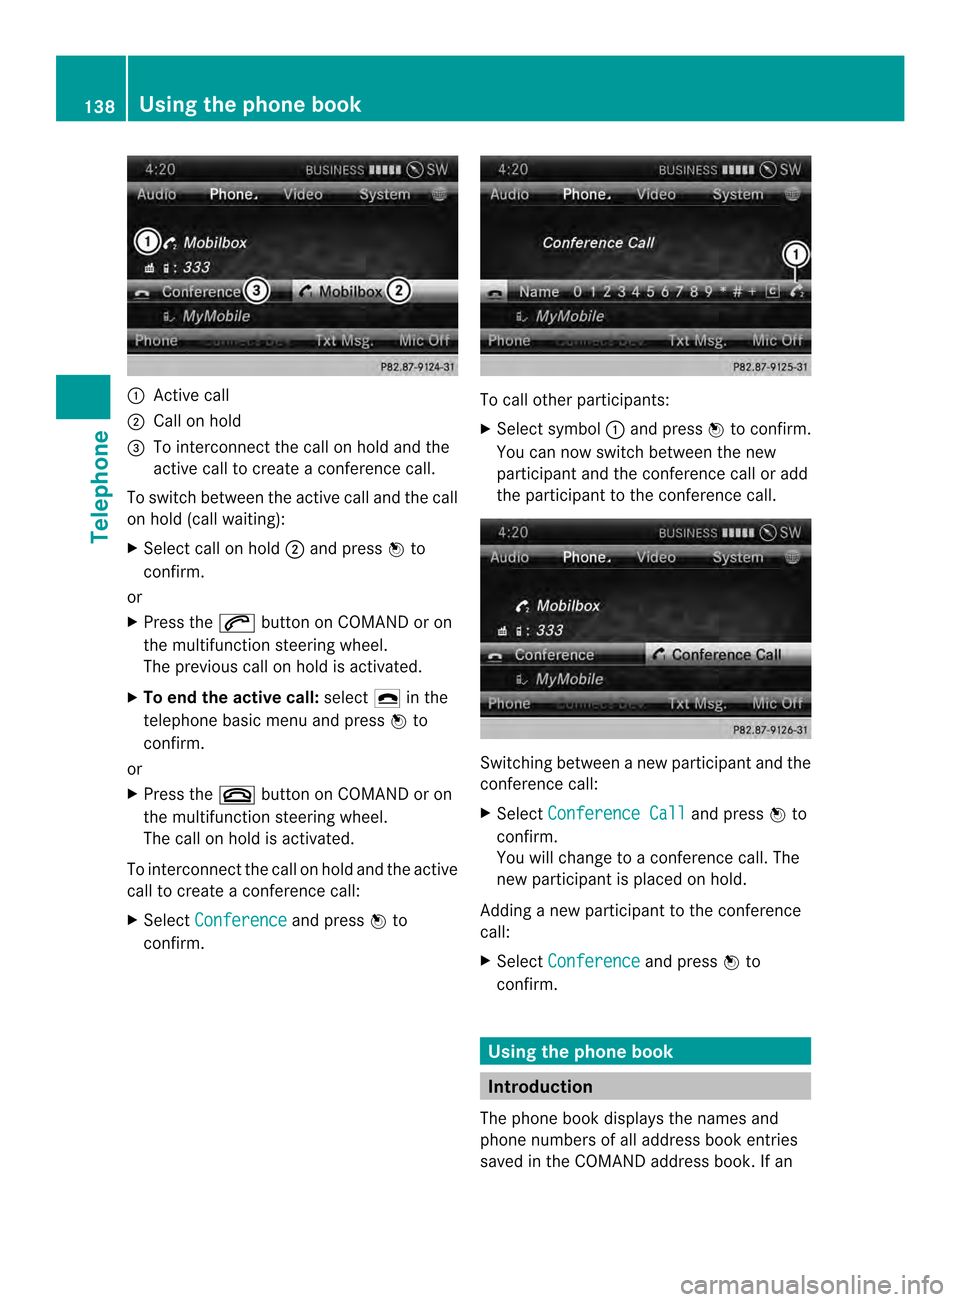
0001
Active call
0002 Call on hold
0014 To interconnect the call on hold and the
active call to create a conference call.
To switch between the active call and the call
on hold (call waiting):
X Select call on hold 0002and press 0037to
confirm.
or
X Press the 0016button on COMAND or on
the multifunctio nsteering wheel.
The previous call on hold is activated.
X To end the active call: select0025in the
telephone basi cmenu and press 0037to
confirm.
or
X Press the 003Abutton on COMAND or on
the multifunction steering wheel.
The call on hold is activated.
To interconnectt he call on hold and the active
call to create a conference call:
X Select Conference and press
0037to
confirm. To call other participants:
X
Select symbol 0001and press 0037to confirm.
You can now switch between the new
participant and the conference call or add
the participant to the conference call. Switching between a new participant and the
conference call:
X
Select Conference Call and press
0037to
confirm.
You will change to a conference call. The
new participant is placed on hold.
Adding a new participant to the conference
call:
X Select Conference and press
0037to
confirm. Using the phone book
Introduction
The phone book displays the names and
phone numbers of all address book entries
saved in the COMAND address book. If an 138
Using the phone bookTelephone
Page 141 of 274
address book entry does no
thave a
telephone number, it does no tappear in the
phone book.
The phone book of the mobile phone is
automatically downloaded to COMAND after
connection.
In the telephone book, you can:
R save phone numbers (Y page 141)
R search for entries (Y page 140)
R delete entries (Y page 141)
R import contact s(Ypage 154)
R delete contacts (Y page 156)
R receive vCards ( Ypage 155)
i The stored phone book and the vCards
remain in COMAND even if you use
COMAND with another mobile phone. The
entries can be viewed without a mobile
phone. For this reason, you should delete
any phone book entries before handing
over or selling the vehicle. Calling up the phone book
Opening the phone book X
Press the 000Ffunction button.
X Select Name in the telephone basic menu
by turning 003C0012003Dthe COMAND controller
and press 0037to confirm.
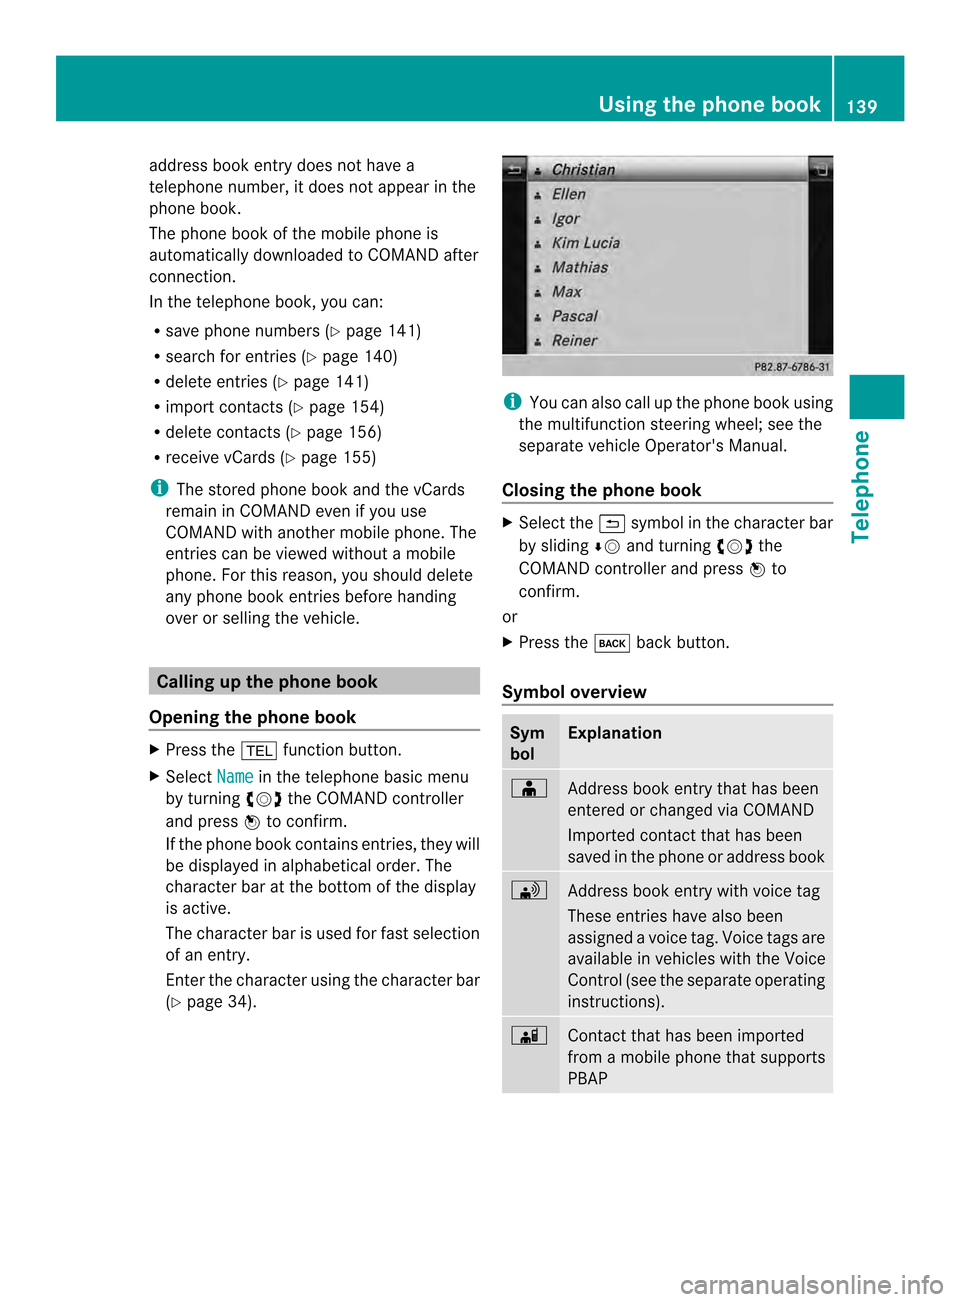
If the phone book contains entries, they will
be displayed in alphabetical order. The
character bar at the bottom of the display
is active.
The character bar is used for fast selection
of an entry.
Enter the character using the character bar
(Y page 34). i
You can also call up the phone book using
the multifunction steering wheel; see the
separate vehicle Operator's Manual.
Closing the phone book X
Select the 0024symbol in the character bar
by sliding 00080012and turning 003C0012003Dthe
COMAND controller and press 0037to
confirm.
or
X Press the 000Aback button.
Symbol overview Sym
bol Explanation
000F
Address book entry that has been
entered or changed via COMAND
Imported contact that has been
saved in the phone or address book 0033
Address book entry with voice tag
These entries have also been
assigned a voice tag. Voice tags are
available in vehicles with the Voice
Control (see the separate operating
instructions). 0023
Contact that has been imported
from a mobile phone that supports
PBAP Using the phone book
139Telephone Z
Page 163 of 274

X
For both options, press 0037the COMAND
controller.
The Internet connectio nis established.An
active Internet connection is identified with
symbol 0001.The example shows the menu in
the Google™ Local Search( Ypage 161)
function.
X To cancel the connection: while the
connection is being established, confirm
Cancel by pressing
0037.
or
X Press the 003Abutton on COMAND or on
the multifunction steering wheel. Ending the connection
You cannot end the connection yourself.
The Internet connection is automatically
terminated if the system does not recognize
any user input within a five-minute time
period.
i The 003A button is inoperative. Google™ local search
Calling up the local search menu
X
Select the 000Cicon in the main function bar
by turning 003C0012003Dthe COMAND controller
and press 0037to confirm.
The carousel view appears.
X Bring the Mercedes-Benz Apps panel to
the front by turning 003C0012003Dthe COMAND
controller and pressing 0037to confirm.
The Mercedes-Ben zApps menu is
displayed.
X Bring the Google Local Search panel to
the front and press 0037to confirm.
X To exit the menu: selectBack by sliding
00120008 and turning 003C0012003Dthe COMAND
controller and press 0037to confirm. Search
Entr yrestriction It is only possible to enter a search term in
the input menu when th
evehicle is stationary. Google™ local search
161Online and Internet functions
Page 191 of 274
R
locations inside or nex tto buildings
R locations in the vicinit yofother
structures
i SIRIUS XM Radio offers more than 130
radio stations in digital quality, for example
100% commercial-free music, sports, news
and entertainment.
SIRIUS XM Radio employs a flee tofhigh-
performance satellites to broadcast around
the clock in the contiguous USA and
Canada.
The satellite radio program is available for
a monthly fee. Details are available from
the SIRIUS XM Service Center and at
http://www.sirius.com (USA) or
http://www.siriuscanada.com
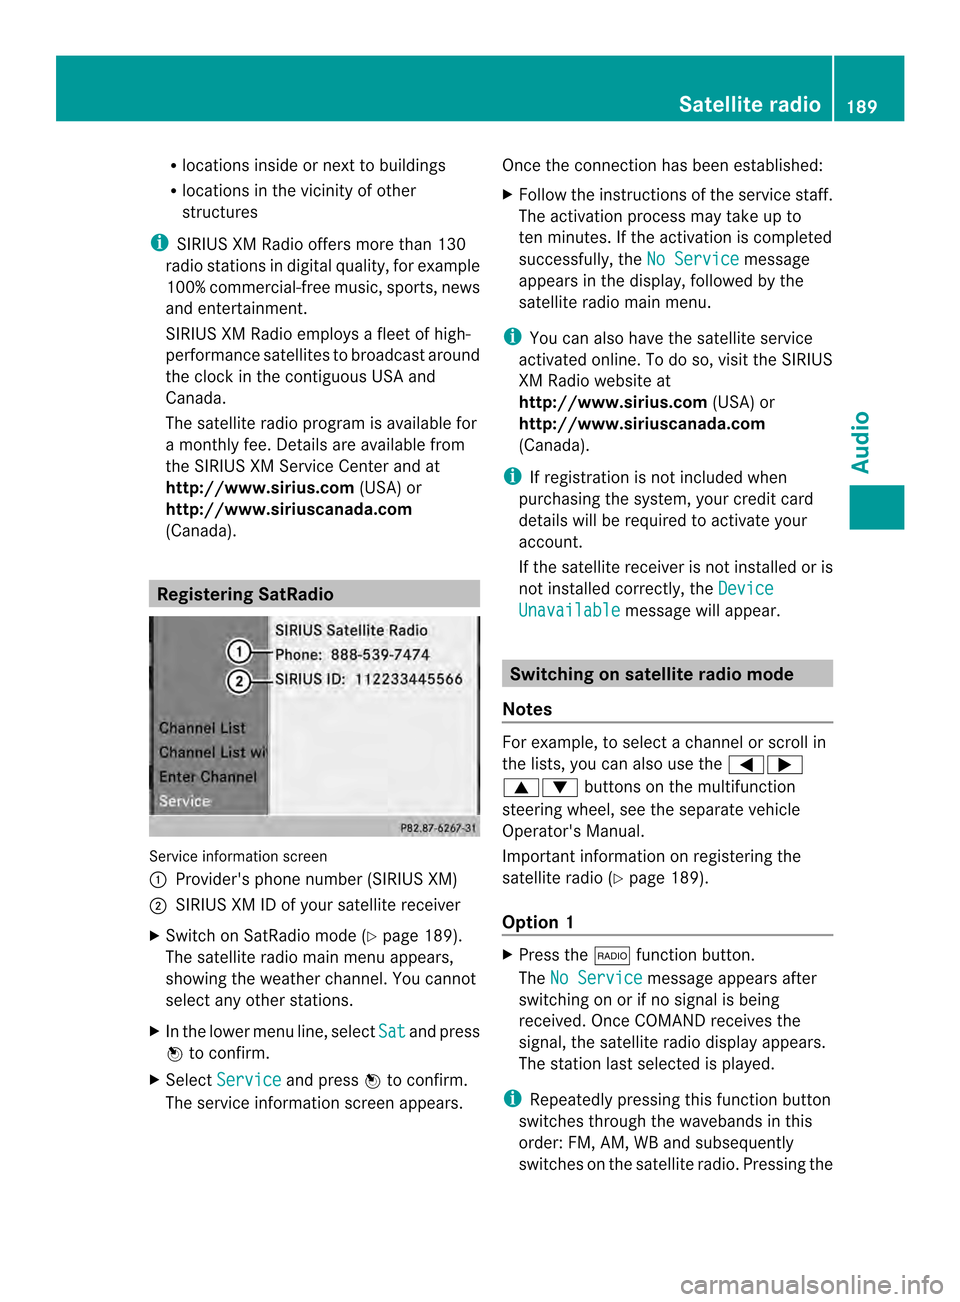
(Canada). Registering SatRadio
Service information screen
0001
Provider's phone number (SIRIUS XM)
0002 SIRIUS XM ID of your satellite receiver
X Switch on SatRadio mode (Y page 189).
The satellite radio main men uappears,
showing the weather channel. You cannot
select any other stations.
X In the lower menu line, select Sat and press
0037 to confirm.
X Select Service and press
0037to confirm.
The service information scree nappears. Once the connection has been established:
X
Follow the instructions of the service staff.
The activation process may take up to
ten minutes. If the activation is completed
successfully, the No Service message
appears in the display, followed by the
satellite radio main menu.
i You can also have the satellite service
activated online. To do so, visit the SIRIUS
XM Radio website at
http://www.sirius.com (USA) or
http://www.siriuscanada.com
(Canada).
i If registration is not included when
purchasing the system, your credit card
details will be required to activate your
account.
If the satellite receiver is not installed or is
not installed correctly, the Device Unavailable message will appear.
Switching on satellite radio mode
Notes For example, to select
achannel or scroll in
the lists, you can also use the 0006000A
00080009 buttons on the multifunction
steering wheel, see the separate vehicle
Operator's Manual.
Important information on registering the
satellite radio (Y page 189).
Option 1 X
Press the 0006function button.
The No Service message appears after
switching on or if no signal is being
received. Once COMAND receives the
signal, the satellite radio display appears.
The station last selected is played.
i Repeatedly pressing this function button
switches through the wavebands in this
order: FM, AM, WB and subsequently
switches on the satellite radio. Pressing the Satellite radio
189Audio
Page 220 of 274
Restarting playback after stopping
During the search for mobile phones, the
connection with the Bluetooth
®
audio device
is terminated (Y page 129). In the
Bluetooth ®
audio basic display (Y page 217),
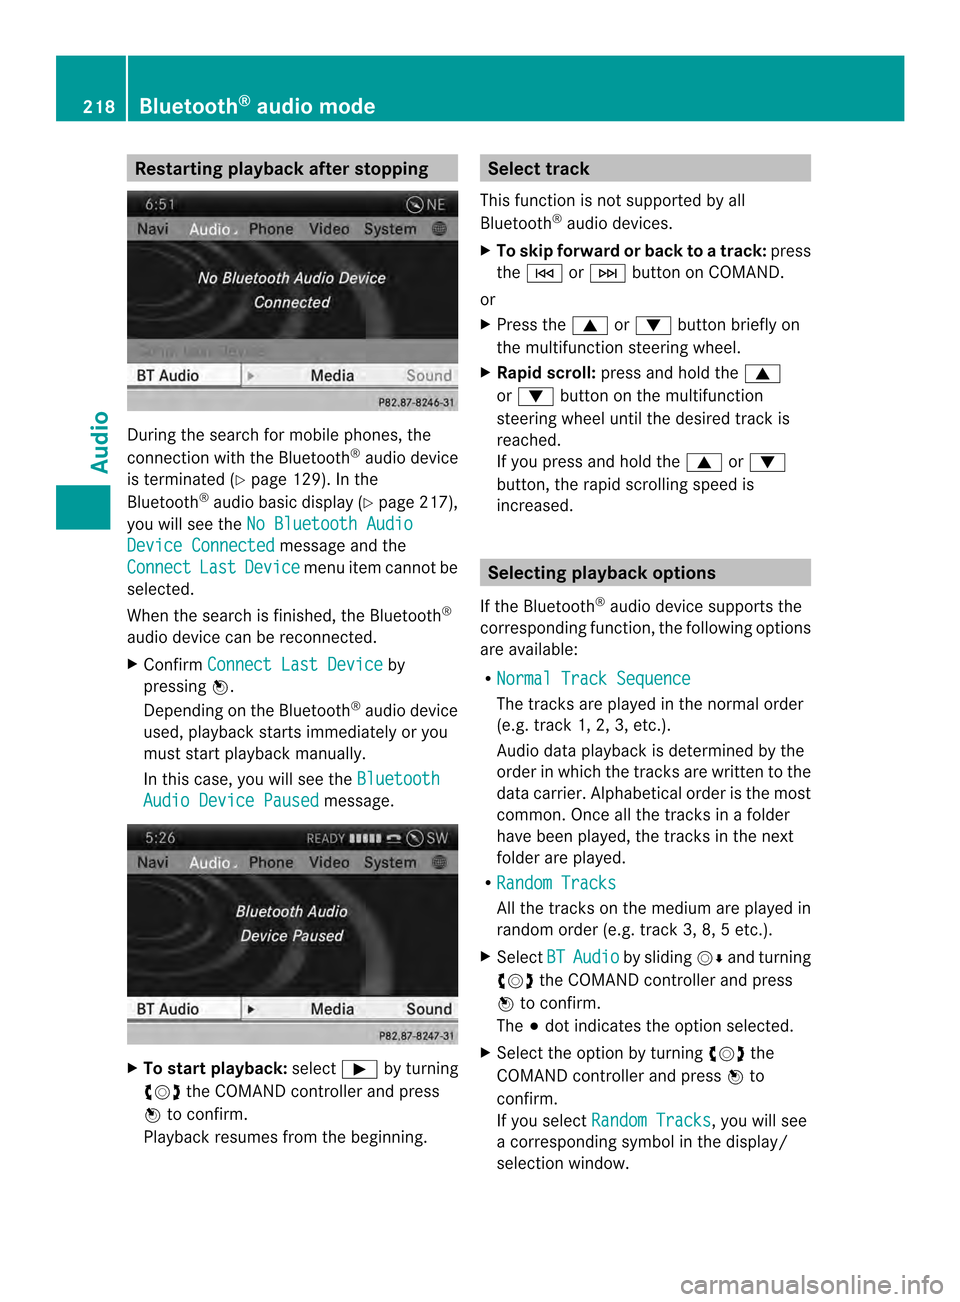
you will see the No Bluetooth Audio Device Connected message and the
Connect Last Device menu item cannot be
selected.
Whe nthe search is finished, the Bluetooth ®
audio device can be reconnected.
X Confirm Connect Last Device by
pressing 0037.
Depending on the Bluetooth ®
audio device
used, playback starts immediately or you
must start playback manually.
In this case, you will see the BluetoothAudio Device Paused message.
X
To start playback: select0004by turning
003C0012003D the COMAND controller and press
0037 to confirm.
Playback resumes from the beginning. Selectt
rack
This functio nis not supported by all
Bluetooth ®
audio devices.
X To skip forward or back to a track: press
the 0001 or0002 button on COMAND.
or
X Press the 0008or0009 button briefly on
the multifunction steering wheel.
X Rapid scroll: press and hold the 0008
or 0009 button on the multifunction
steering wheel until the desired track is
reached.
If you press and hold the 0008or0009
button, the rapid scrolling speed is
increased. Selecting playback options
If the Bluetooth ®
audio device supports the
corresponding function, the following options
are available:
R Normal Track Sequence The tracks are played in the normal order
(e.g. track 1, 2, 3, etc.).
Audio data playback is determined by the
order in which the tracks are written to the
data carrier. Alphabetical order is the most
common. Once all the tracks in a folder
have been played, the tracks in the next
folder are played.
R Random Tracks All the tracks on the medium are played in
random order (e.g. track 3, 8, 5 etc.).
X Select BT Audio by sliding
00120008and turning
003C0012003D the COMAND controller and press
0037 to confirm.
The 000Fdot indicates the option selected.
X Select the option by turning 003C0012003Dthe
COMAND controller and press 0037to
confirm.
If you select Random Tracks , you will see
a corresponding symbol in the display/
selection window. 218
Bluetooth ®
audio modeAudio
Page 241 of 274
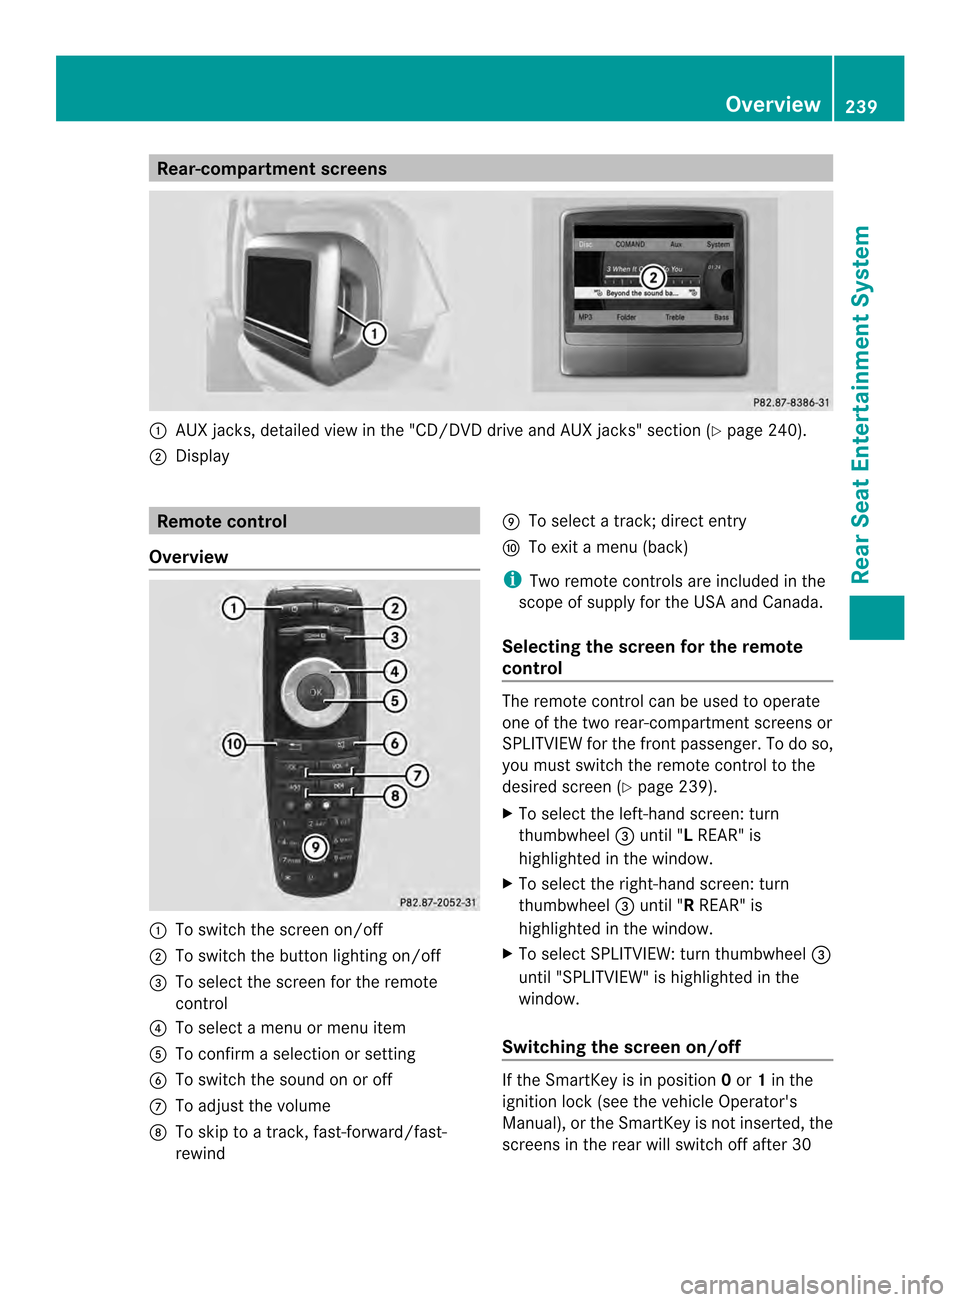
Rear-compartment screens
0001
AUX jacks, detailed view in the "CD/DVD drive and AUX jacks" section (Y page 240).
0002 Display Remote control
Overview 0001
To switch the screen on/off
0002 To switch the button lighting on/off
0014 To select the screen for the remote
control
0013 To select a menu or menu item
0011 To confirm a selection or setting
0012 To switch the sound on or off
0005 To adjust the volume
0006 To skip to a track, fast-forward/fast-
rewind 0007
To select a track; direct entry
0008 To exi tamenu (back)
i Two remote controls are included in the
scope of supply for the USA and Canada.
Selecting the screen for the remote
control The remote control can be used to operate
one of the two rear-compartment screens or
SPLITVIEW for the front passenger. To do so,
you must switch the remote control to the
desired screen (Y
page 239).
X To select the left-hand screen: turn
thumbwheel 0014until "L REAR" is
highlighted in the window.
X To select the right-hand screen: turn
thumbwheel 0014until "R REAR" is
highlighted in the window.
X To select SPLITVIEW: turn thumbwheel 0014
until "SPLITVIEW" is highlighted in the
window.
Switching the screen on/off If the SmartKey is in position
0or 1in the
ignitio nlock (see the vehicle Operator's
Manual), or the SmartKey is not inserted, the
screens in the rear will switch off after 30 Overview
239Rear Seat Entertainment System Z
Page 261 of 274
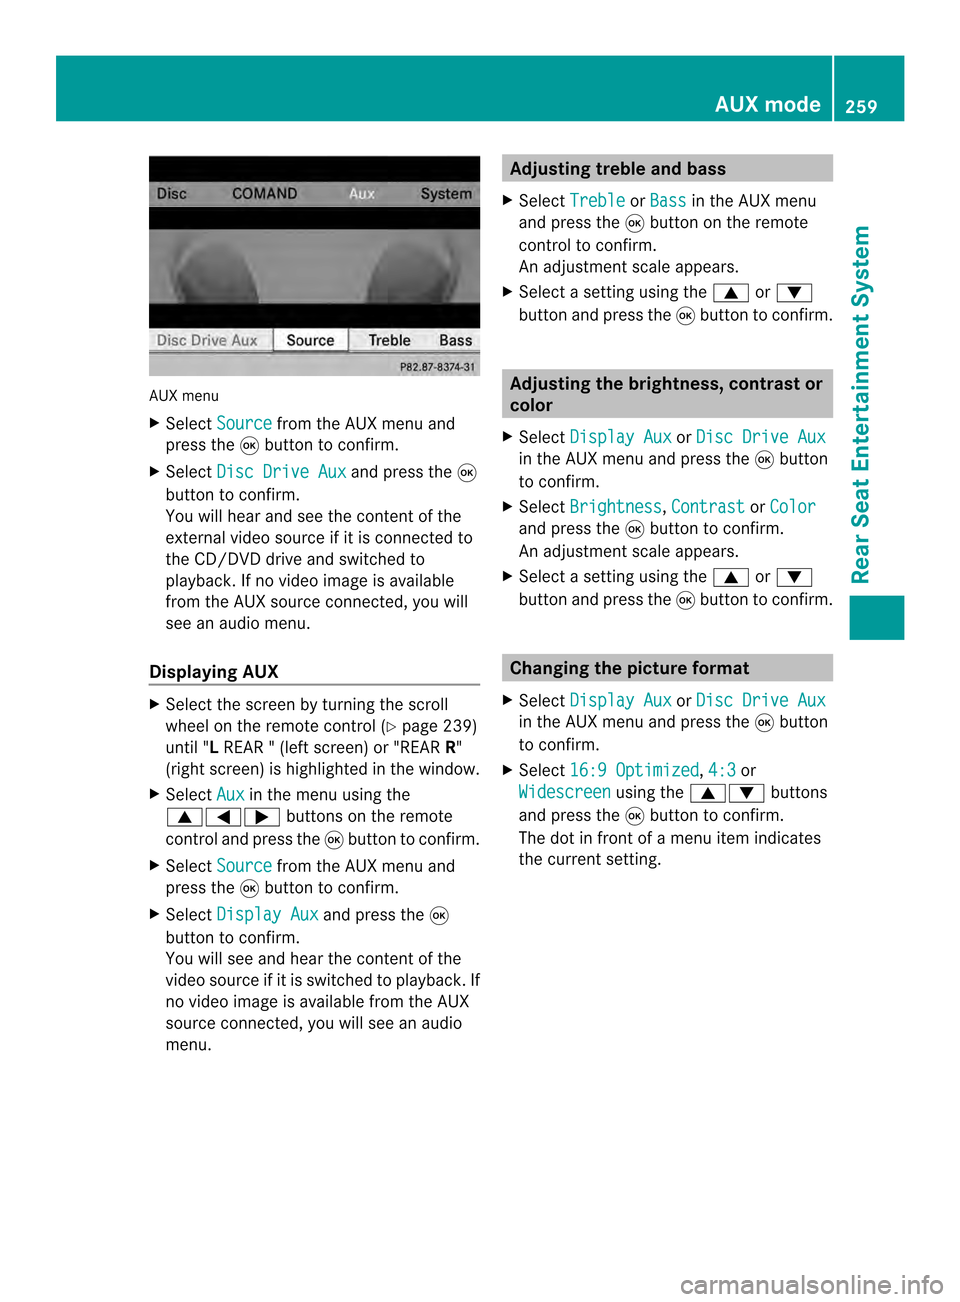
AUX menu
X
Select Source from the AUX menu and
press the 0016button to confirm.
X Select Disc Drive Aux and press the
0016
button to confirm.
You will hea rand see the content of the
external video source if it is connected to
the CD/DVD drive and switched to
playback. If no video image is available
from the AUX source connected, you will
see an audio menu.
Displaying AUX X
Select the screen by turning the scroll
wheel on the remote control ( Ypage 239)
until "L REAR " (left screen) or "REAR R"
(right screen) is highlighted in the window.
X Select Aux in the menu using the
00080006000A buttons on the remote
control and press the 0016button to confirm.
X Select Source from the AUX menu and
press the 0016button to confirm.
X Select Display Aux and press the
0016
button to confirm.
You will see and hea rthe content of the
video source if it is switched to playback. If
no video image is available from the AUX
source connected, you will see an audio
menu. Adjusting treble and bass
X Select Treble or
Bass in the AUX menu
and press the 0016button on the remote
control to confirm.
An adjustment scale appears.
X Select a setting using the 0008or0009
button and press the 0016button to confirm. Adjusting the brightness, contrast or
color
X Select Display Aux or
Disc Drive Aux in the AUX menu and press the
0016button
to confirm.
X Select Brightness ,
Contrast or
Color and press the
0016button to confirm.
An adjustment scale appears.
X Select a setting using the 0008or0009
button and press the 0016button to confirm. Changing the picture format
X Select Display Aux or
Disc Drive Aux in the AUX menu and press the
0016button
to confirm.
X Select 16:9 Optimized ,
4:3 or
Widescreen using the
00080009 buttons
and press the 0016button to confirm.
The dot in front of a menu item indicates
the current setting. AUX mode
259Rear Seat Entertainment System Z