clock MERCEDES-BENZ G-Class 2015 W463 Owner's Manual
[x] Cancel search | Manufacturer: MERCEDES-BENZ, Model Year: 2015, Model line: G-Class, Model: MERCEDES-BENZ G-Class 2015 W463Pages: 350, PDF Size: 6.44 MB
Page 77 of 350
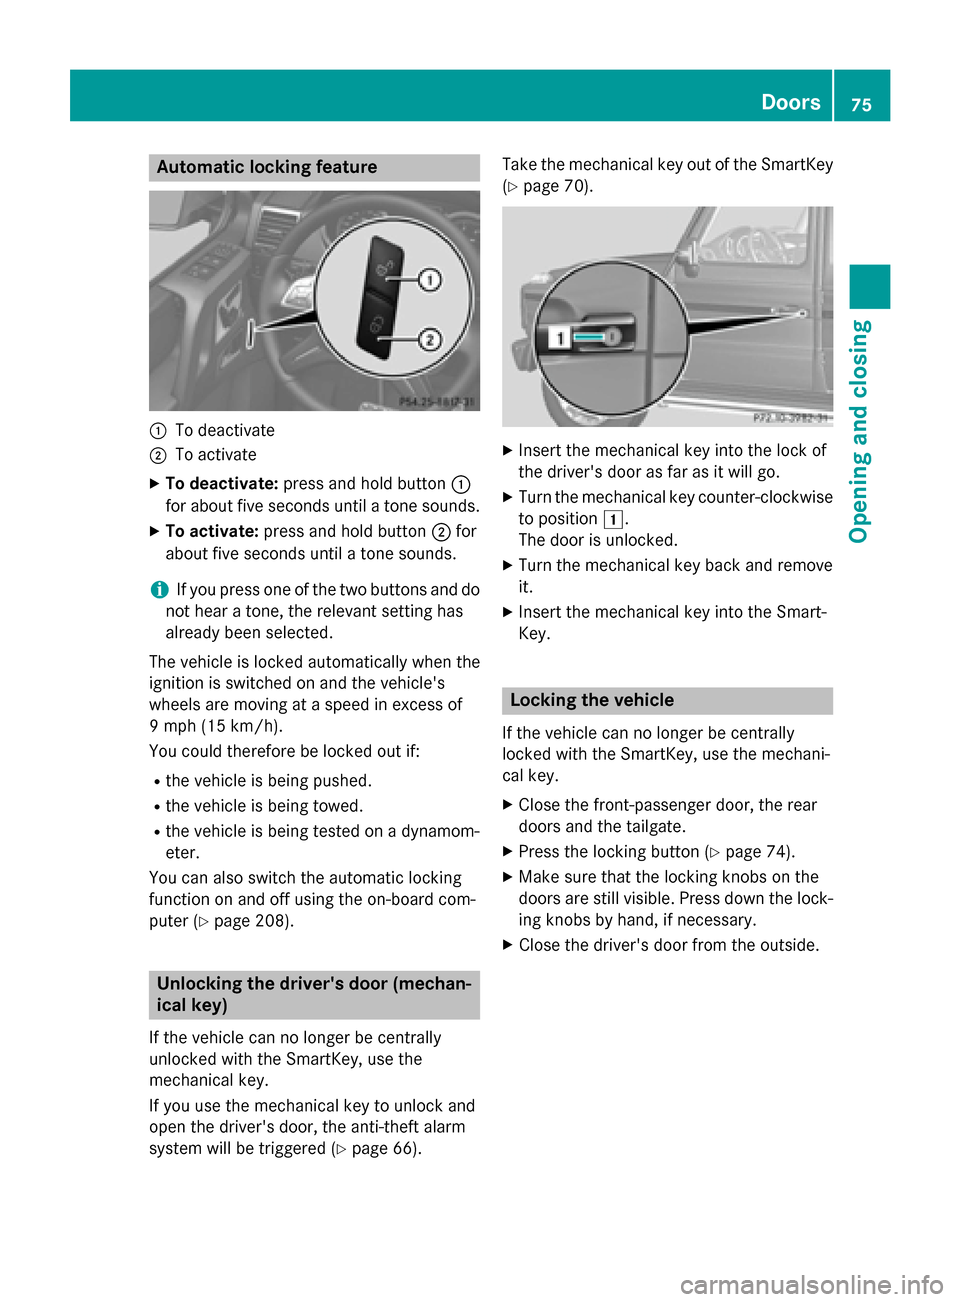
Automatic locking feature
:
To deactivate
; To activate
X To deactivate: press and hold button :
for about five seconds until a tone sounds.
X To activate: press and hold button ;for
about five seconds until a tone sounds.
i If you press one of the two buttons and do
not hear a tone, the relevant setting has
already been selected.
The vehicle is locked automatically when the
ignition is switched on and the vehicle's
wheels are moving at a speed in excess of
9 mph (15 km/h).
You could therefore be locked out if:
R the vehicle is being pushed.
R the vehicle is being towed.
R the vehicle is being tested on a dynamom-
eter.
You can also switch the automatic locking
function on and off using the on-board com-
puter (Y page 208). Unlocking the driver's door (mechan-
ical key)
If the vehicle can no longer be centrally
unlocked with the SmartKey, use the
mechanical key.
If you use the mechanical key to unlock and
open the driver's door, the anti-theft alarm
system will be triggered (Y page 66).Take the mechanical key out of the SmartKey
(Y page 70). X
Insert the mechanical key into the lock of
the driver's door as far as it will go.
X Turn the mechanical key counter-clockwise
to position 1.
The door is unlocked.
X Turn the mechanical key back and remove
it.
X Insert the mechanical key into the Smart-
Key. Locking the vehicle
If the vehicle can no longer be centrally
locked with the SmartKey, use the mechani-
cal key. X Close the front-passenger door, the rear
doors and the tailgate.
X Press the locking button (Y page 74).
X Make sure that the locking knobs on the
doors are still visible. Press down the lock-
ing knobs by hand, if necessary.
X Close the driver's door from the outside. Doors
75Opening and closing Z
Page 78 of 350
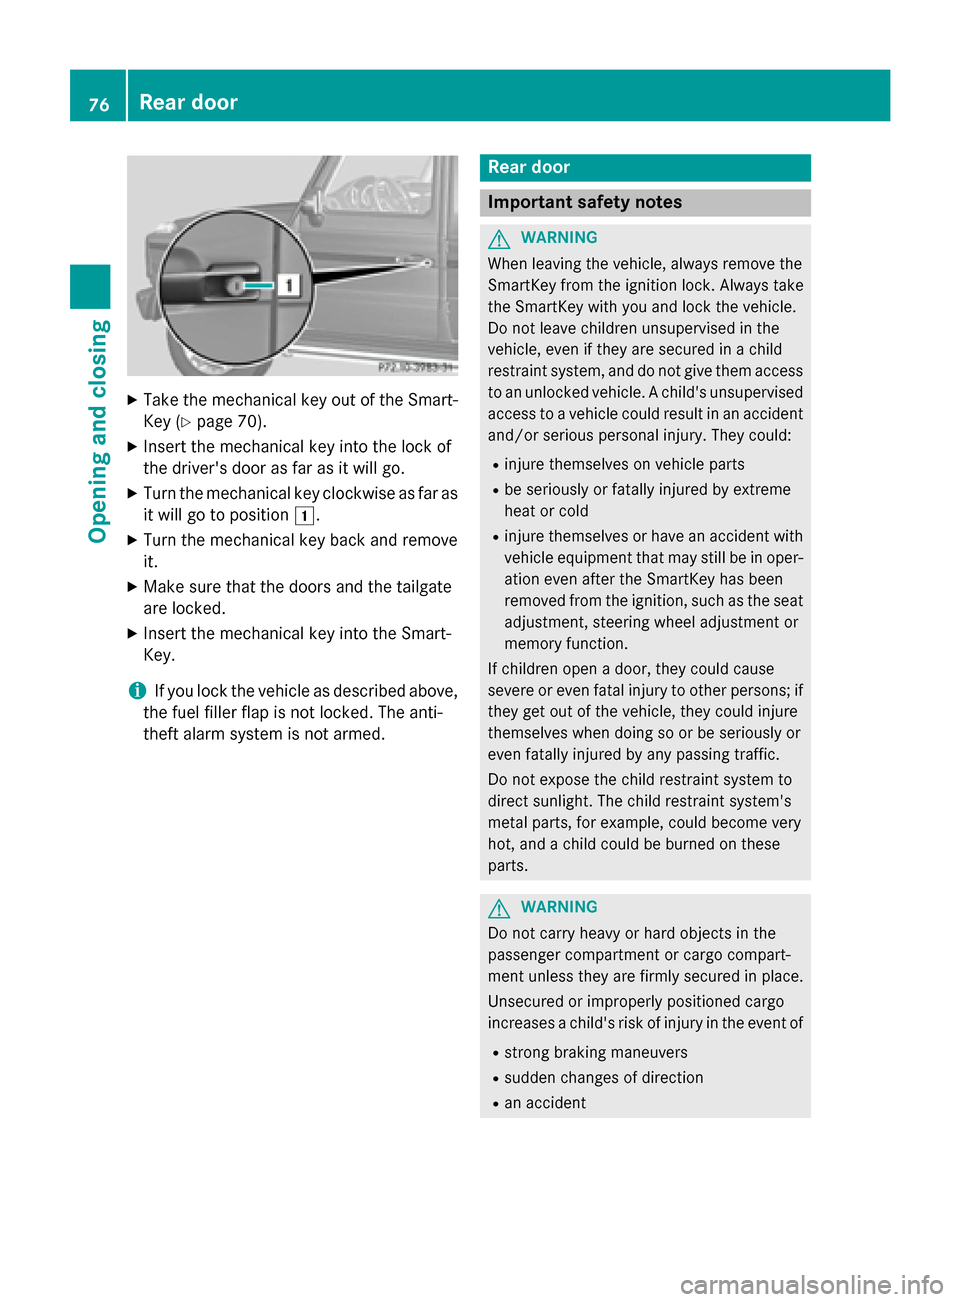
X
Take the mechanical key out of the Smart-
Key (Y page 70).
X Insert the mechanical key into the lock of
the driver's door as far as it will go.
X Turn the mechanical key clockwise as far as
it will go to position 1.
X Turn the mechanical key back and remove
it.
X Make sure that the doors and the tailgate
are locked.
X Insert the mechanical key into the Smart-
Key.
i If you lock the vehicle as described above,
the fuel filler flap is not locked. The anti-
theft alarm system is not armed. Rear door
Important safety notes
G
WARNING
When leaving the vehicle, always remove the
SmartKey from the ignition lock. Always take
the SmartKey with you and lock the vehicle.
Do not leave children unsupervised in the
vehicle, even if they are secured in a child
restraint system, and do not give them access to an unlocked vehicle. A child's unsupervised
access to a vehicle could result in an accident
and/or serious personal injury. They could:
R injure themselves on vehicle parts
R be seriously or fatally injured by extreme
heat or cold
R injure themselves or have an accident with
vehicle equipment that may still be in oper-
ation even after the SmartKey has been
removed from the ignition, such as the seat
adjustment, steering wheel adjustment or
memory function.
If children open a door, they could cause
severe or even fatal injury to other persons; if they get out of the vehicle, they could injure
themselves when doing so or be seriously or
even fatally injured by any passing traffic.
Do not expose the child restraint system to
direct sunlight. The child restraint system's
metal parts, for example, could become very
hot, and a child could be burned on these
parts. G
WARNING
Do not carry heavy or hard objects in the
passenger compartment or cargo compart-
ment unless they are firmly secured in place.
Unsecured or improperly positioned cargo
increases a child's risk of injury in the event of
R strong braking maneuvers
R sudden changes of direction
R an accident 76
Rear doorOpening and closing
Page 82 of 350
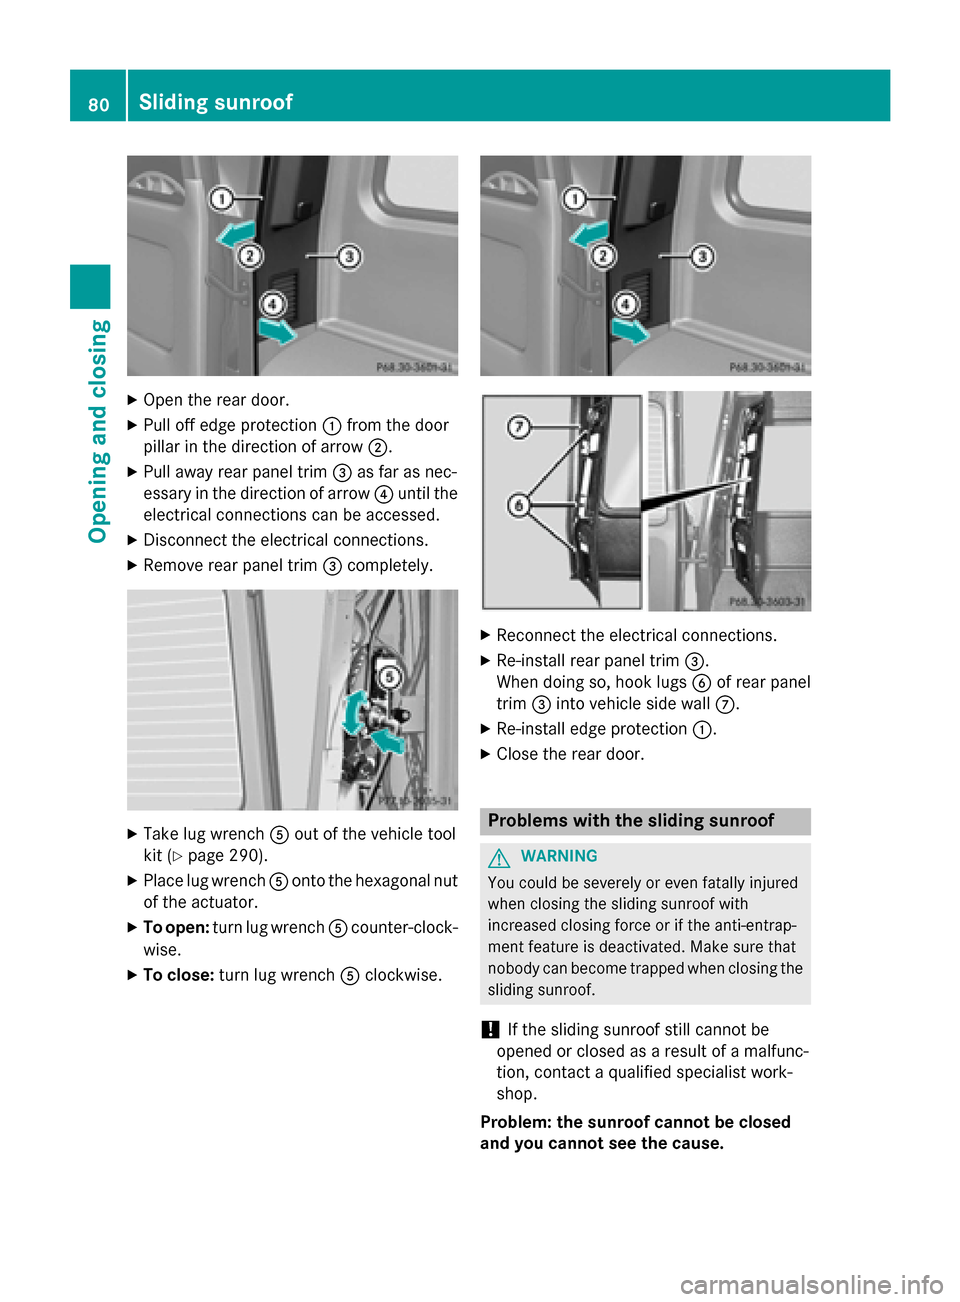
X
Open the rear door.
X Pull off edge protection :from the door
pillar in the direction of arrow ;.
X Pull away rear panel trim =as far as nec-
essary in the direction of arrow ?until the
electrical connections can be accessed.
X Disconnect the electrical connections.
X Remove rear panel trim =completely. X
Take lug wrench Aout of the vehicle tool
kit (Y page 290).
X Place lug wrench Aonto the hexagonal nut
of the actuator.
X To open: turn lug wrench Acounter-clock-
wise.
X To close: turn lug wrench Aclockwise. X
Reconnect the electrical connections.
X Re-install rear panel trim =.
When doing so, hook lugs Bof rear panel
trim =into vehicle side wall C.
X Re-install edge protection :.
X Close the rear door. Problems with the sliding sunroof
G
WARNING
You could be severely or even fatally injured
when closing the sliding sunroof with
increased closing force or if the anti-entrap-
ment feature is deactivated. Make sure that
nobody can become trapped when closing the sliding sunroof.
! If the sliding sunroof still cannot be
opened or closed as a result of a malfunc-
tion, contact a qualified specialist work-
shop.
Problem: the sunroof cannot be closed
and you cannot see the cause. 80
Sliding sunroofOpening and closing
Page 113 of 350
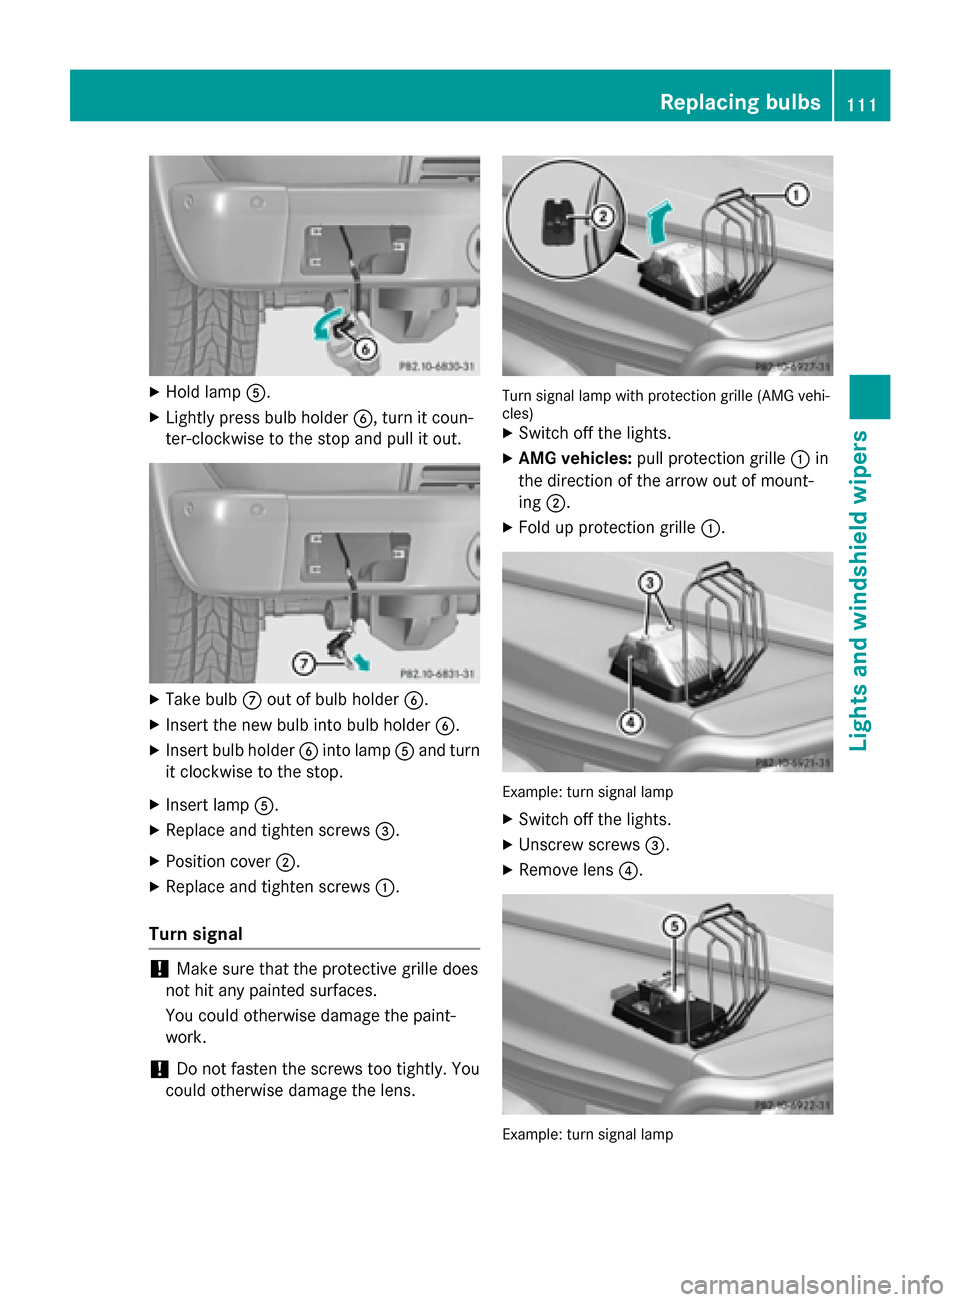
X
Hold lamp A.
X Lightly press bulb holder B, turn it coun-
ter-clockwise to the stop and pull it out. X
Take bulb Cout of bulb holder B.
X Insert the new bulb into bulb holder B.
X Insert bulb holder Binto lamp Aand turn
it clockwise to the stop.
X Insert lamp A.
X Replace and tighten screws =.
X Position cover ;.
X Replace and tighten screws :.
Turn signal !
Make sure that the protective grille does
not hit any painted surfaces.
You could otherwise damage the paint-
work.
! Do not fasten the screws too tightly. You
could otherwise damage the lens. Turn signal lamp with protection grille (AMG vehi-
cles)
X Switch off the lights.
X AMG vehicles: pull protection grille :in
the direction of the arrow out of mount-
ing ;.
X Fold up protection grille :. Example: turn signal lamp
X Switch off the lights.
X Unscrew screws =.
X Remove lens ?. Example: turn signal lamp Replacing bulbs
111Lights and windshield wipers Z
Page 114 of 350
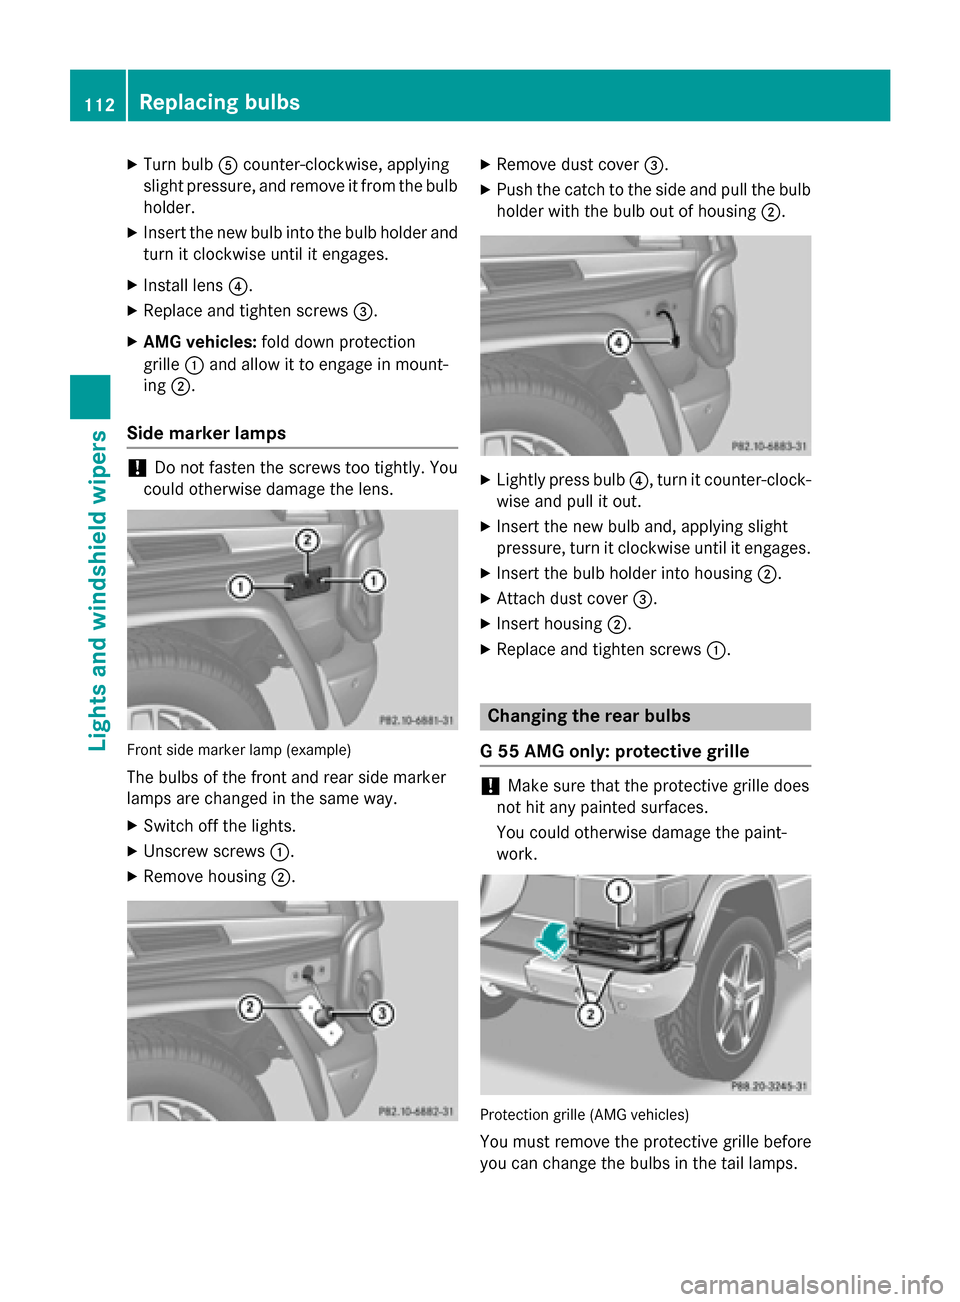
X
Turn bulb Acounter-clockwise, applying
slight pressure, and remove it from the bulb holder.
X Insert the new bulb into the bulb holder and
turn it clockwise until it engages.
X Install lens ?.
X Replace and tighten screws =.
X AMG vehicles: fold down protection
grille :and allow it to engage in mount-
ing ;.
Side marker lamps !
Do not fasten the screws too tightly. You
could otherwise damage the lens. Front side marker lamp (example)
The bulbs of the front and rear side marker
lamps are changed in the same way.
X Switch off the lights.
X Unscrew screws :.
X Remove housing ;. X
Remove dust cover =.
X Push the catch to the side and pull the bulb
holder with the bulb out of housing ;. X
Lightly press bulb ?, turn it counter-clock-
wise and pull it out.
X Insert the new bulb and, applying slight
pressure, turn it clockwise until it engages.
X Insert the bulb holder into housing ;.
X Attach dust cover =.
X Insert housing ;.
X Replace and tighten screws :. Changing the rear bulbs
G 55 AMG only: protective grille !
Make sure that the protective grille does
not hit any painted surfaces.
You could otherwise damage the paint-
work. Protection grille (AMG vehicles)
You must remove the protective grille before
you can change the bulbs in the tail lamps. 112
Replacing bulbsLights and windshield wipers
Page 115 of 350
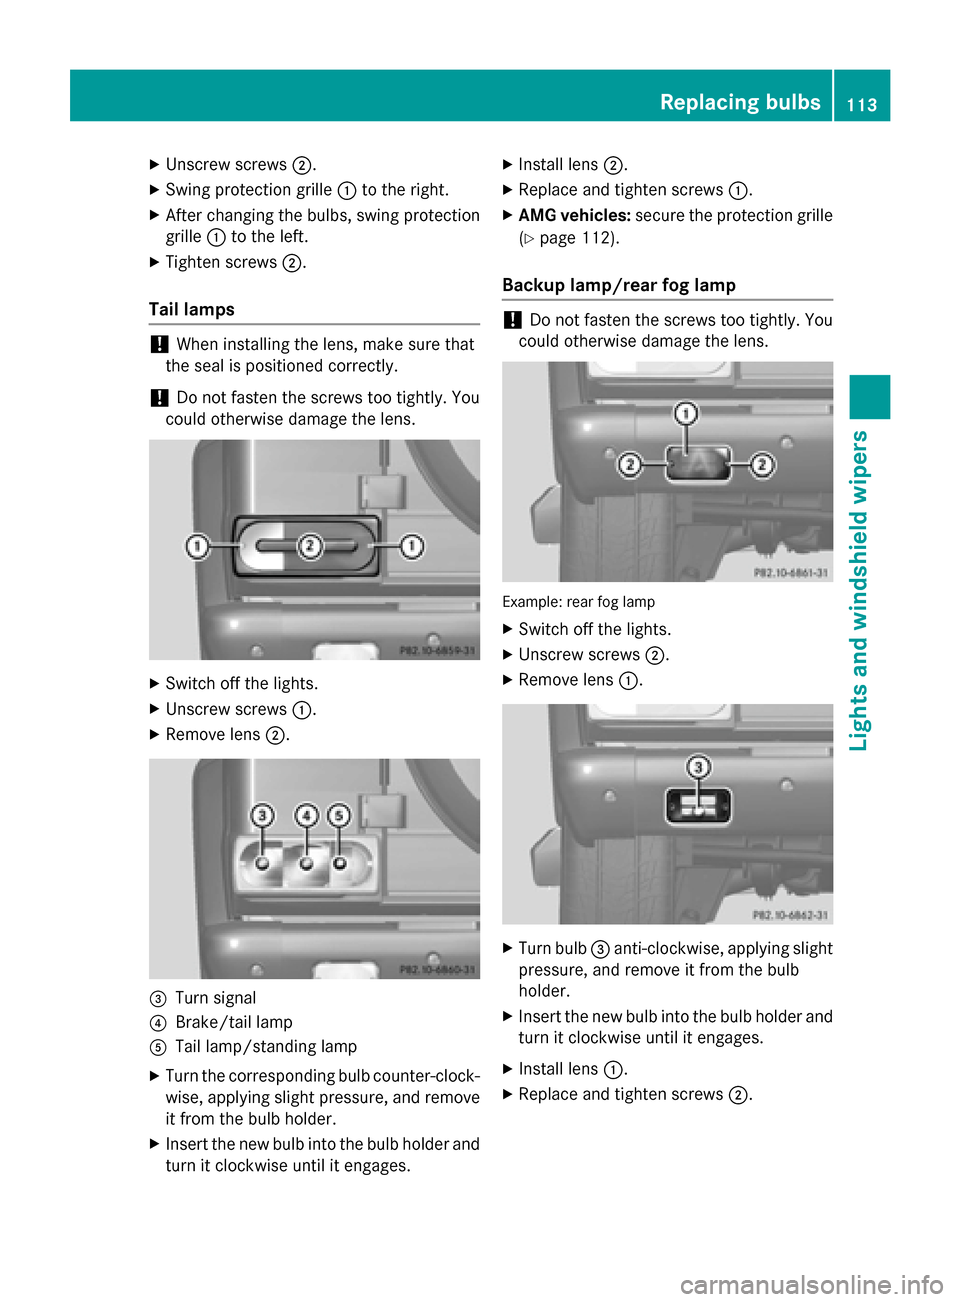
X
Unscrew screws ;.
X Swing protection grille :to the right.
X After changing the bulbs, swing protection
grille :to the left.
X Tighten screws ;.
Tail lamps !
When installing the lens, make sure that
the seal is positioned correctly.
! Do not fasten the screws too tightly. You
could otherwise damage the lens. X
Switch off the lights.
X Unscrew screws :.
X Remove lens ;. =
Turn signal
? Brake/tail lamp
A Tail lamp/standing lamp
X Turn the corresponding bulb counter-clock-
wise, applying slight pressure, and remove
it from the bulb holder.
X Insert the new bulb into the bulb holder and
turn it clockwise until it engages. X
Install lens ;.
X Replace and tighten screws :.
X AMG vehicles: secure the protection grille
(Y page 112).
Backup lamp/rear fog lamp !
Do not fasten the screws too tightly. You
could otherwise damage the lens. Example: rear fog lamp
X Switch off the lights.
X Unscrew screws ;.
X Remove lens :. X
Turn bulb =anti-clockwise, applying slight
pressure, and remove it from the bulb
holder.
X Insert the new bulb into the bulb holder and
turn it clockwise until it engages.
X Install lens :.
X Replace and tighten screws ;. Replacing bulbs
113Lights and windshield wipers Z
Page 127 of 350
Switching the ZONE function on/off
X To switch on: press theábutton.
The indicator lamp in the ábutton lights
up.
i The temperature setting for the driver's
side is not adopted for the front-passenger side and the rear compartment. The tem-
perature for the front-passenger side and
the rear compartment must be set sepa-
rately.
X To switch off: press buttoná.
The indicator lamp in the ábutton goes
out.
i The temperature setting for the driver's
side is adopted for the front-passenger side and the rear compartment. Defrosting the windshield
You can use this function to defrost the wind-
shield or to defrost the inside of the wind-
shield and the side windows.
i You should only select the defrosting
function until the windshield is clear again.
X Turn the SmartKey to position
2(Y page 133) in the ignition lock.
X To activate: press the¬button.
The indicator lamp in the ¬button lights
up.
The climate control system switches to the
following functions:
R cooling with air dehumidification (only
with engine running)
R high airflow (depending on the outside
temperature)
R high temperature (depending on the out-
side temperature)
R air distribution to the windshield and
front side windows
R air-recirculation mode off
X To deactivate: press the¬button.
The indicator lamp in the ¬button goes
out. The previously selected settings are restored. The cooling with air dehumidifi-
cation function remains on. Air-recircula-
tion mode remains deactivated.
or
X Press the Ãbutton.
The indicator lamp in the ¬button goes
out. Airflow and air distribution are set to
automatic mode.
or X Turn controls :orB clockwise or coun-
ter-clockwise (Y page 119).
or
X Press the KorI button. Activating/deactivating MAX COOL
maximum cooling
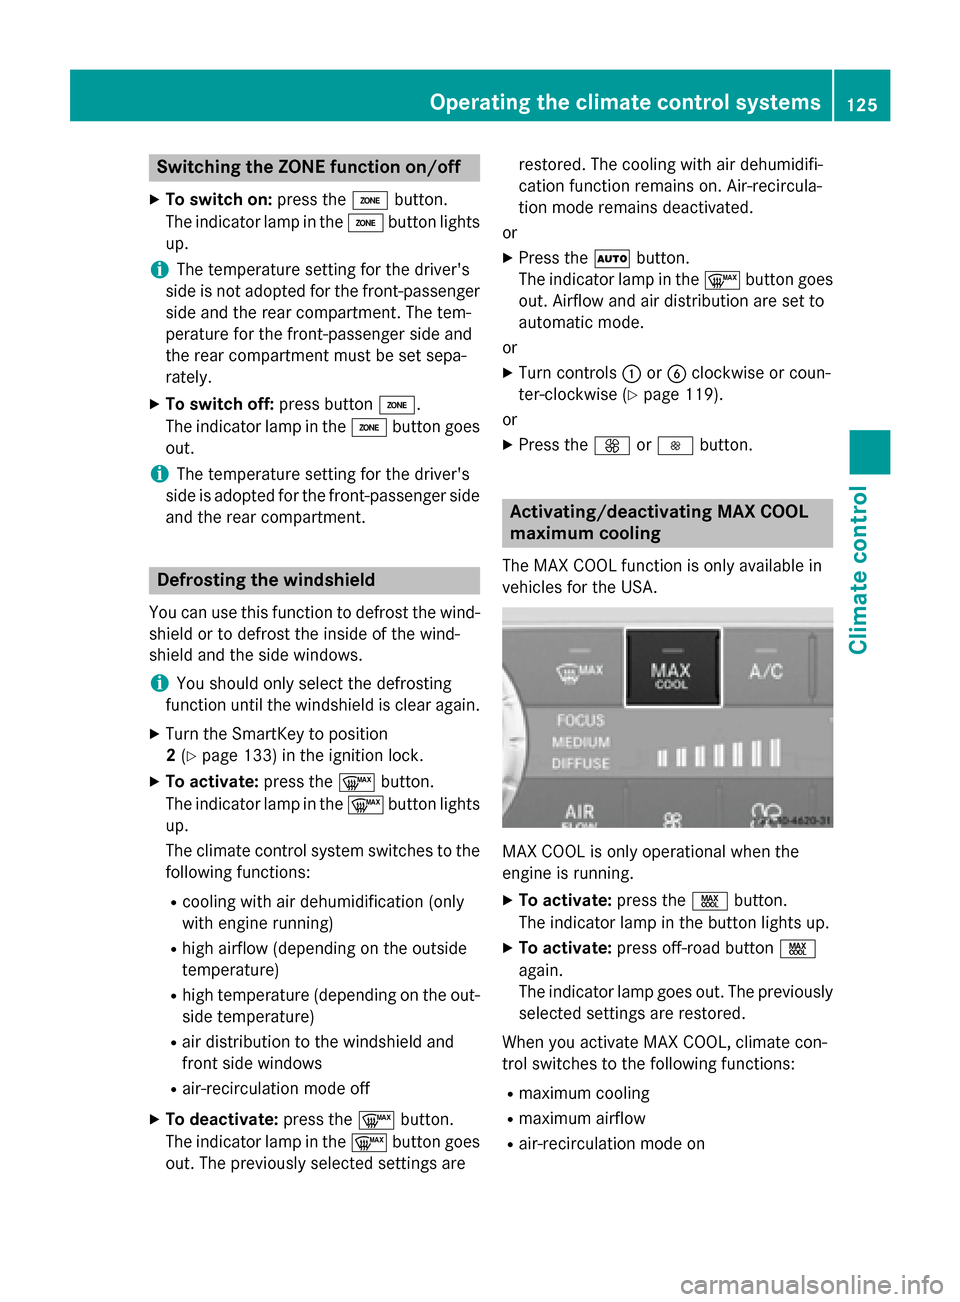
The MAX COOL function is only available in
vehicles for the USA. MAX COOL is only operational when the
engine is running.
X To activate: press theÙbutton.
The indicator lamp in the button lights up.
X To activate: press off-road button Ù
again.
The indicator lamp goes out. The previously
selected settings are restored.
When you activate MAX COOL, climate con-
trol switches to the following functions:
R maximum cooling
R maximum airflow
R air-recirculation mode on Operating the climate control systems
125Climate control Z
Page 150 of 350
a qualified specialist workshop and have
the fuel tank and fuel lines drained com-
pletely.
! Overfilling the fuel tank could damage the
fuel system.
! Take care not to spill any fuel on painted
surfaces. You could otherwise damage the
paintwork.
! Use a filter when refueling from a fuel can.
Otherwise, the fuel lines and/or injection
system could be blocked by particles from
the fuel can.
If you overfill the fuel tank, pressure may build up in the fuel tank. This could cause fuel to
spray out when the fuel pump nozzle is
removed. There is a risk of injury. The fuel
tank is full when the fuel pump nozzle first
switches off. End the refueling process.
For further information on fuel and fuel quality
(Y page 337). Refueling
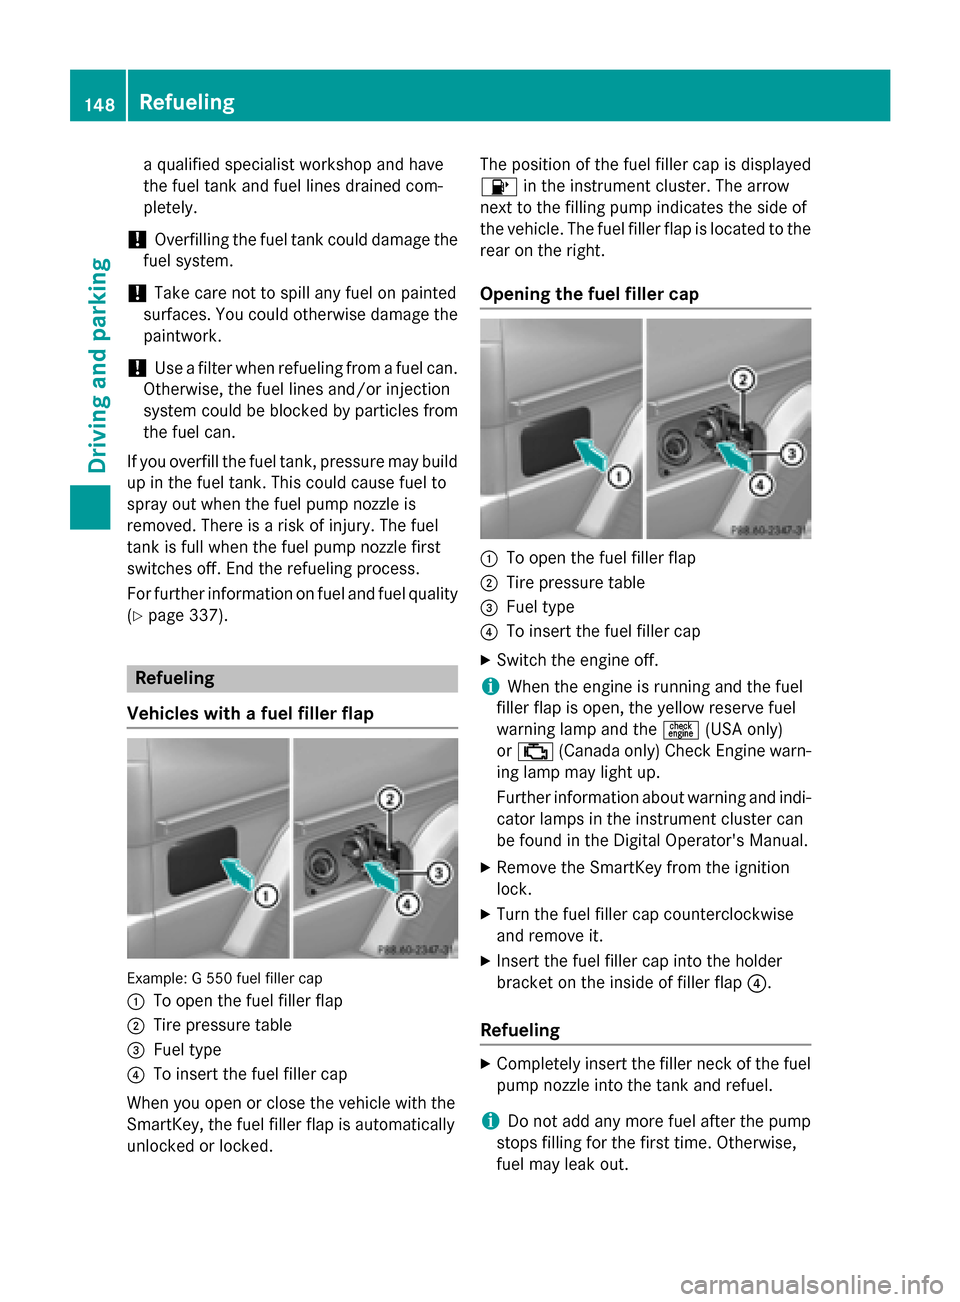
Vehicles with a fuel filler flap Example: G 550 fuel filler cap
:
To open the fuel filler flap
; Tire pressure table
= Fuel type
? To insert the fuel filler cap
When you open or close the vehicle with the
SmartKey, the fuel filler flap is automatically
unlocked or locked. The position of the fuel filler cap is displayed
8 in the instrument cluster. The arrow
next to the filling pump indicates the side of
the vehicle. The fuel filler flap is located to the
rear on the right.
Opening the fuel filler cap :
To open the fuel filler flap
; Tire pressure table
= Fuel type
? To insert the fuel filler cap
X Switch the engine off.
i When the engine is running and the fuel
filler flap is open, the yellow reserve fuel
warning lamp and the =(USA only)
or ; (Canada only) Check Engine warn-
ing lamp may light up.
Further information about warning and indi-
cator lamps in the instrument cluster can
be found in the Digital Operator's Manual.
X Remove the SmartKey from the ignition
lock.
X Turn the fuel filler cap counterclockwise
and remove it.
X Insert the fuel filler cap into the holder
bracket on the inside of filler flap ?.
Refueling X
Completely insert the filler neck of the fuel
pump nozzle into the tank and refuel.
i Do not add any more fuel after the pump
stops filling for the first time. Otherwise,
fuel may leak out. 148
RefuelingDriving and parking
Page 151 of 350
Closing
X
Replace the fuel filler cap and turn it clock-
wise. The fuel filler cap audibly engages.
X Close the fuel filler flap.
i Close the fuel filler flap before locking the
vehicle. A locking pin otherwise prevents
the fuel filler flap from closing after the
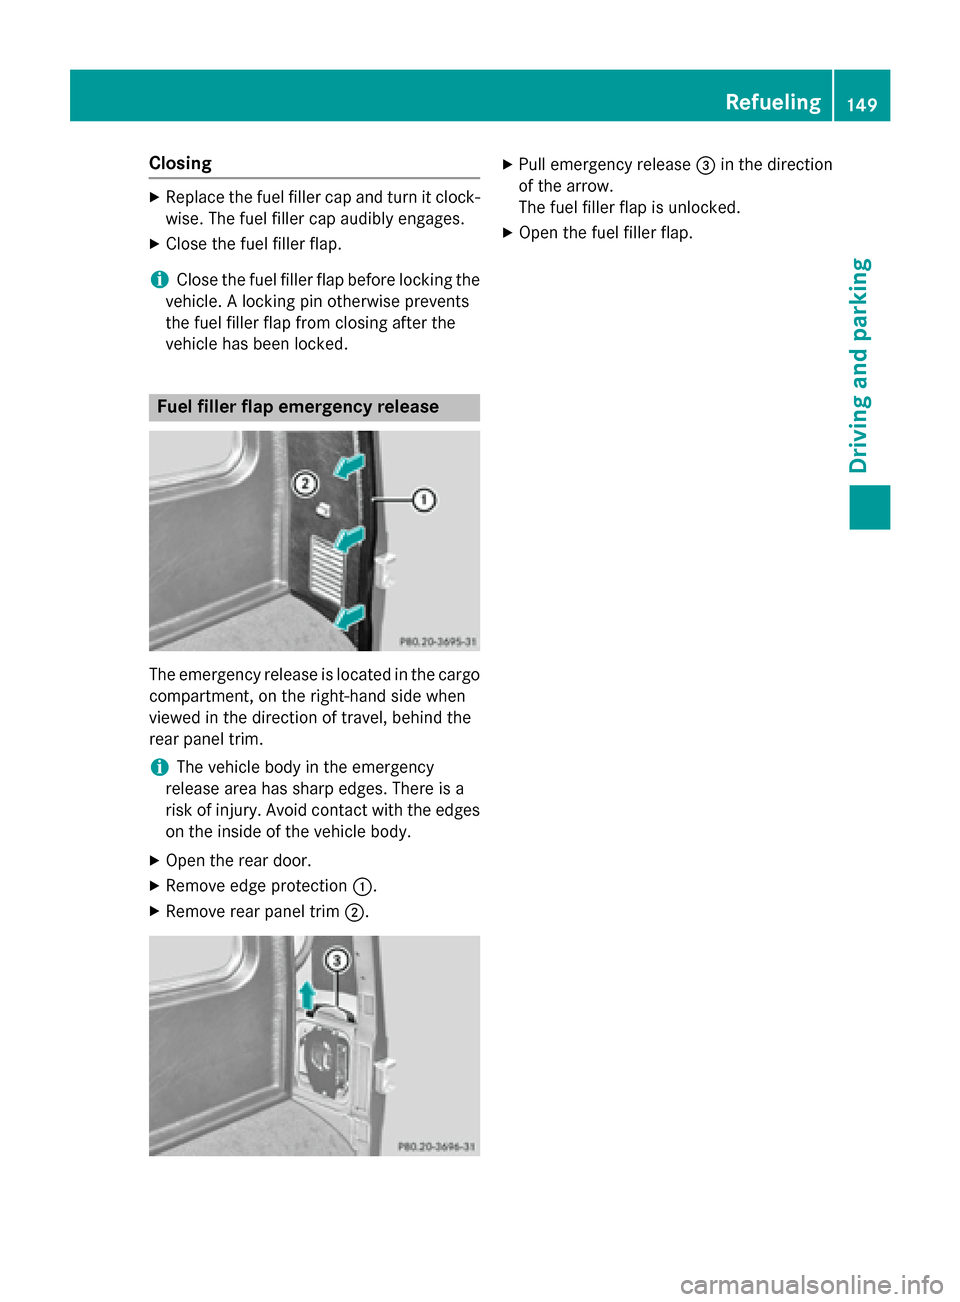
vehicle has been locked. Fuel filler flap emergency release
The emergency release is located in the cargo
compartment, on the right-hand side when
viewed in the direction of travel, behind the
rear panel trim.
i The vehicle body in the emergency
release area has sharp edges. There is a
risk of injury. Avoid contact with the edges on the inside of the vehicle body.
X Open the rear door.
X Remove edge protection :.
X Remove rear panel trim ;. X
Pull emergency release =in the direction
of the arrow.
The fuel filler flap is unlocked.
X Open the fuel filler flap. Refueling
149Driving and parking Z
Page 196 of 350
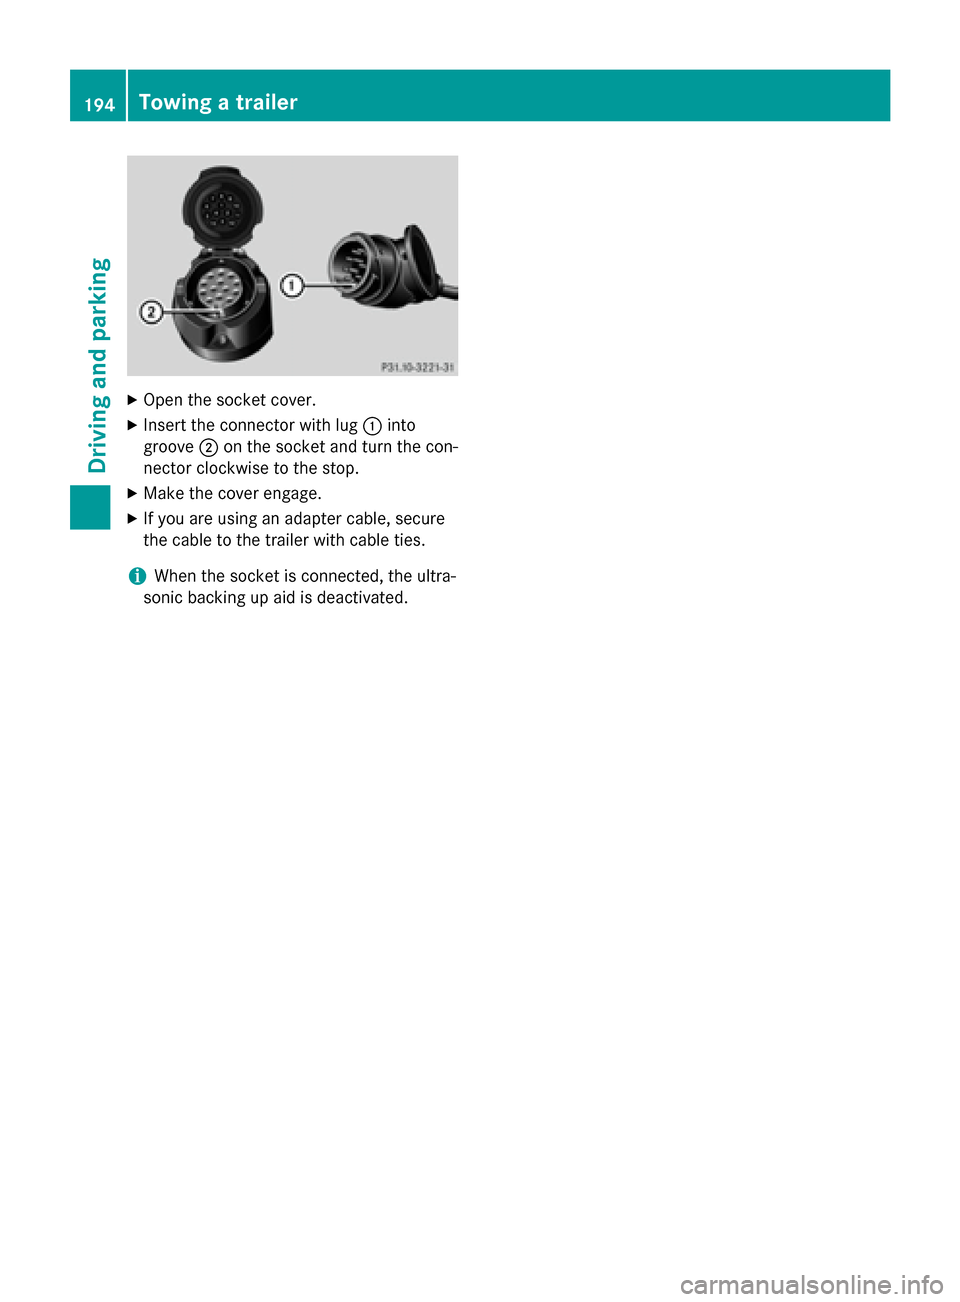
X
Open the socket cover.
X Insert the connector with lug :into
groove ;on the socket and turn the con-
nector clockwise to the stop.
X Make the cover engage.
X If you are using an adapter cable, secure
the cable to the trailer with cable ties.
i When the socket is connected, the ultra-
sonic backing up aid is deactivated. 194
Towing a trailerDriving and parking