reset MERCEDES-BENZ G-Class 2015 W463 Owner's Manual
[x] Cancel search | Manufacturer: MERCEDES-BENZ, Model Year: 2015, Model line: G-Class, Model: MERCEDES-BENZ G-Class 2015 W463Pages: 350, PDF Size: 6.44 MB
Page 12 of 350
Dashboard ....................................
.302
Front-passenger footwell .............. .302
Transmission tunnel ....................... 302
Fuse extractor ................................... 301
Fuses
Allocation chart ............................ .301
Before changing ............................ .301
Dashboard fuse box ....................... 302
Fuse allocation chart ..................... 301
Fuse box in the front-passenger
footwell .......................................... 302
Fuse box in the transmission tun-
nel ................................................. 302
Important safety notes .................. 301
In the battery case ......................... 303 G
Garage door opener Clearing the memory ..................... 270
General notes ................................ 266
Important safety notes .................. 267
Opening/closing the garage door .. 270
Programming the remote control ... 267
Gasoline ............................................. 338
Gear indicator (on-board com-
puter) ................................................. .209
Gear or selector lever (cleaning
guidelines) ......................................... 286
Genuine parts ...................................... 20
Genuine wood trim and trim strips
(cleaning instructions) ......................286
Glove box .......................................... .249
Gradient-climbing capability (max-
imum) ................................................. 161
GTW (Gross Trailer Weight) (defini-
tion) .................................................... 325 H
Hazard warning lamps ......................104
Head restraints
Adjusting ......................................... 86
Adjusting (rear) ................................ 87
Installing/removing (rear) ................ 88
Luxury .............................................. 87
Resetting (front) ............................... 87
see NECK-PRO head restraints see NECK-PRO luxury head restraints
Headlamps
Adding fluid to cleaning system ..... 278
Cleaning ......................................... 284
Cleaning system (function) ............ 103
Cleaning system (notes) ................ 343
Fogging up ..................................... 105
Protective grille .............................. 112
see Automatic headlamp mode
Heating
see Climate control
High-beam headlamps
Display message ............................ 219
Switching on/off ........................... 103
Hill start assist .................................. 135
HOLD function
Function/notes ............................ .180
Hood
Closing .......................................... .275
Display message ............................ 233
Important safety notes .................. 274
Opening ......................................... 275
Horn ...................................................... 30
Hydroplaning ..................................... 156 I
Immobilizer .......................................... 65
Instrument cluster
Overview ........................................ 197
Warning and indicator lamps ......... 234
Instrument cluster lighting .............. 197
Interior lighting
Automatic control .......................... 106
Cargo compartment lamp .............. 107
Delayed switch-off (on-board
computer) ...................................... 208
Manual control ............................... 106
Overview ........................................ 105
Reading lamp ................................. 105
Rear interior lighting ..................... .108 J
Jack Pump lever ..................................... 329
Storage location ............................ 290
Using ............................................. 328 10
Index
Page 14 of 350
Roadside Assistance butto
n ..........261
Self-test ......................................... 259
Speed alert ................................... .265
System .......................................... 259
Triggering the vehicle alarm ........... 266
Vehicle remote malfunction diag-
nosis .............................................. 264
Vehicle remote unlocking .............. 263
Mechanical key
Function/notes ................................ 69
General notes .................................. 69
Removing ......................................... 70
Memory card (audio) ......................... 203
Memory function ................................. 95
Message memory (on-board com-
puter) ................................................. .212
Messages
see Display messages
Mirrors
Sun visor ........................................ 255
see Exterior mirrors
see Rear-view mirror
Mobile phone
Menu (on-board computer) ............ 204
Mounting wheels
Mounting a new wheel ................... 330
Raising the vehicle ......................... 328
Removing a wheel .......................... 330
Securing the vehicle against roll-
ing away ........................................ 328
MP3
Operation ....................................... 203
see separate operating instructions
Multifunction display
Function/notes ............................ .199
Permanent display ......................... 207
Multifunction steering wheel
Back button ................................... 199
Operating the on-board computer .. 198
Overview .......................................... 33 N
Navigation Menu (on-board computer) ............ 201
see separate operating instructions
NECK-PRO head restraints
Operation ......................................... 51 Resetting triggered .......................... 51
NECK-PRO luxury head restraints
Important safety notes .................... 51
Operation ......................................... 51
Resetting when triggered ................. 52
Notes on breaking-in a new vehi-
cle ....................................................... 132 O
Occupant safety Automatic measures after an acci-
dent ................................................. 52
BabySmart™ air bag deactivation
system ............................................. 56
Children in the vehicle ..................... 52
Important safety notes .................... 41
Pets in the vehicle ........................... 61
Off-road
Differential locks ............................ 188
Off-road ABS ................................... .62
Off-road driving
Checklist ........................................1 59
Driving on sand .............................. 160
Important safety notes .................. 158
Traveling uphill ............................... 161
Off-road fording ................................. 156
Off-road system
Permanent all-wheel drive ............. 181
Oil
see Engine oil
On-board computer
AMG menu ..................................... 209
Assistance menu ........................... 205
Audio menu ................................... 203
Convenience submenu .................. 208
Display messages .......................... 211
DISTRONIC PLUS ........................... 174
Factory settings submenu ............. 209
Important safety notes .................. 196
Instrument cluster submenu .......... 206
Lighting submenu .......................... 207
Menu overview .............................. 200
Message memory .......................... 212
Navigation menu ............................ 201
Operation ....................................... 198
RACETIMER ................................... 210
Service menu ................................. 206 12
Index
Page 15 of 350
Settings menu ............................... 206
Standard display ............................ 200
Telephone menu ............................ 204
Trip menu ...................................... 200
Vehicle submenu ........................... 208
Video DVD operation ..................... 203
Operating safety
Declaration of conformity ................ 24
Important safety notes .................... 23
Operating system
see On-board computer
Outside temperature display ........... 198
Overhead control panel ...................... 36
Override feature
Rear side window s........................... 60 P
Paint code number ............................ 336
Paintwork (cleaning instructions) ... 282
Panic alarm .......................................... 40
Parcel net ........................................... 250
Parking
Engaging park position .................. 140
Important safety notes .................. 150
Position of exterior mirror, front-
passenger side ................................. 94
see PARKTRONIC
Parking aid
see Exterior mirrors
see PARKTRONIC
Parking brake
Applying ......................................... 151
Display message ............................ 215
Warning lamp ................................. 242
Parking lamps
Switching on/of f........................... 102
PARKTRONIC
Deactivating/activating ................. 184
Driving system ............................... 182
Function/note s............................. 182
Important safety notes .................. 182
Problem (malfunction) ................... 185
Range of the sensors ..................... 182
Trailer towing ................................. 184
Warning display ............................. 183
PASSENGER AIR BAG OFF
Indicator lamp .................................. 42 Problems (malfunctions) .................. 59
Pedals ................................................. 153
Permanent all-wheel drive
Off-road system ............................. 181
Pets in the vehicle ............................... 61
Plastic trim (cleaning instruc-
tions) .................................................. 286
Power supply (trailer) ....................... 193
Power washers .................................. 282
Program selector button .................. 143
Programming
SmartKey ......................................... 69
Pulling away
Automatic transmission ................. 134 Q
Qualified specialist workshop ........... 24 R
RACETIMER Deleting all laps ............................. 211
Displaying and starting .................. 210
Displaying the intermediate time ... 210
Resetting the current lap ............... 211
Starting a new lap .......................... 210
Stopping ........................................ 210
RACETIMER (on-board computer) .... 210
Radio
Selecting a station ......................... 203
see separate operating instructions
Radio-wave reception/transmis-
sion in the vehicle
Declaration of conformity ................ 24
Reading lamp ..................................... 105
Rear bench seat
Folding forward .............................. 252
Rear compartment
Setting the air vents ...................... 129
Rear door
Closing ............................................. 77
Display message ............................ 233
Important safety notes .................... 76
Opening ........................................... 77
Opening/closing .............................. 76
Rear fog lamp
Display message ............................ 220 Index
13
Page 20 of 350
Trailer
7-pin connector ............................. 193
Power supply ................................. 193
Trailer coupling (cleaning instruc-
tions) .................................................. 285
Trailer loads
Technical data ............................... 347
Trailer tow hitch
Ball position ................................... 347
Trailer towing
ESP® .............................................. .65
PARKTRONIC ................................. 184
Transfer case
General notes ................................ 186
Shift range .....................................1 86
Shifting .......................................... 186
Shifting (general notes) .................. 187
Shifting (important safety notes) ... 186
Shifting to neutra l.......................... 188
Switching off the off-road gear
ratio ............................................... 187
Switching on the off-road gear
ratio ............................................... 187
Transmission
see Automatic transmission
Transmission positions .................... 142
Transporting the vehicle .................. 300
Traveling uphill
Brow of hill ..................................... 162
Trip computer (on-board com-
puter) .................................................. 200
Trip odometer
Calling up ....................................... 200
Resetting (on-board computer) ...... 201
Turn signals
Changing bulbs (front) ................... 111
Display message ............................ 219
Switching on/of f........................... 103
TWR (Tongue Weight Rating) (defi-
nition) ................................................. 327
Type identification plate
see Vehicle identification plate U
Unlocking Emergency unlocking ....................... 75 From inside the vehicle (central
unlocking button) ............................. 74 V
Vanity mirror Sun visor ........................................ 255
Variable SPEEDTRONIC
Function/note s............................. 166
Vehicle
Correct use ...................................... 25
Data acquisition ............................... 26
Display message ............................ 232
Emergency locking ........................... 75
Emergency unlocking ....................... 75
Equipment ....................................... 21
Individual settings .......................... 206
Limited Warranty ............................. 25
Loading .......................................... 316
Locking (SmartKey ).......................... 68
Lowering ........................................ 330
Maintenance .................................... 22
Parking for a long period ................ 152
Pulling away ................................... 134
Raising ........................................... 328
Reporting problems ......................... 25
Securing from rolling away ............ 328
Tow-starting ................................... 298
Towing away .................................. 298
Transporting .................................. 300
Unlocking (SmartKey )...................... 68
Vehicle data ................................... 344
Vehicle data ....................................... 344
Vehicle data (off-road driving)
Approach/departure angle ............ 346
Fording depth ................................ 345
Maximum gradient climbing abil-
ity .................................................. 346
Vehicle dimensions ........................... 344
Vehicle identification number
see VIN
Vehicle identification plate .............. 336
Vehicle tool kit .................................. 290
Ventilation
Setting the airflow ......................... 124
Video
Operating the DVD ......................... 203
VIN ...................................................... 336 18
Index
Page 53 of 350
seat belt and independently of whether the
front-passenger seat is occupied
R Window curtain air bags on the driver's and
front-passenger side in certain situations
when the vehicle rolls over, if the system
determines that deployment can offer addi-
tional protection to that provided by the
seat belt
i Not all air bags are deployed in an acci-
dent. The different air bag systems work
independently of each other.
How the air bag system works is deter-
mined by the severity of the accident detec- ted, especially the vehicle deceleration or
acceleration and the apparent type of acci-
dent:
R frontal collision
R side impact
R rollover NECK-PRO head restraints/NECK-
PRO luxury head restraints
Important safety notes G
WARNING
The function of the head restraint may be
impaired if you:
R attach objects such as coat hangers to the
head restraints, for example
R use head restraint covers
If you do so, the head restraints cannot fulfill
their intended protective function in the event of an accident. In addition, objects attached
to the head restraints could endanger other
vehicle occupants. There is an increased risk
of injury.
Do not attach any objects to the head
restraints and do not use head restraint cov-
ers. Method of operation NECK-PRO head restraints/NECK-PRO luxury
head restraints offer additional protection
against head and neck injuries. In the event of a rear collision of a certain severity, the NECK-
PRO head restraints/NECK-PRO luxury head
restraints on the driver's and front-passenger
seats are moved forwards and upwards. This
provides better head support.
If the NECK-PRO head restraints/NECK-PRO
luxury head restraints have been triggered in
an accident, reset the NECK-PRO head
restraints/NECK-PRO luxury head restraints
on the driver's seat and the front-passenger
seat (Y page 51). Otherwise, the additional
protection will not be available in the event of
another rear-end collision. You can see that a NECK-PRO head restraint/NECK-PRO luxury
head restraint has been triggered if it is tiltedforward and can no longer be adjusted.
Mercedes-Benz recommends that you have
the functionality of the NECK-PRO head
restraints/NECK-PRO luxury head restraints
checked at a qualified specialist workshop
after a rear-end collision.
Resetting a triggered NECK-PRO head
restraint/NECK-PRO luxury head
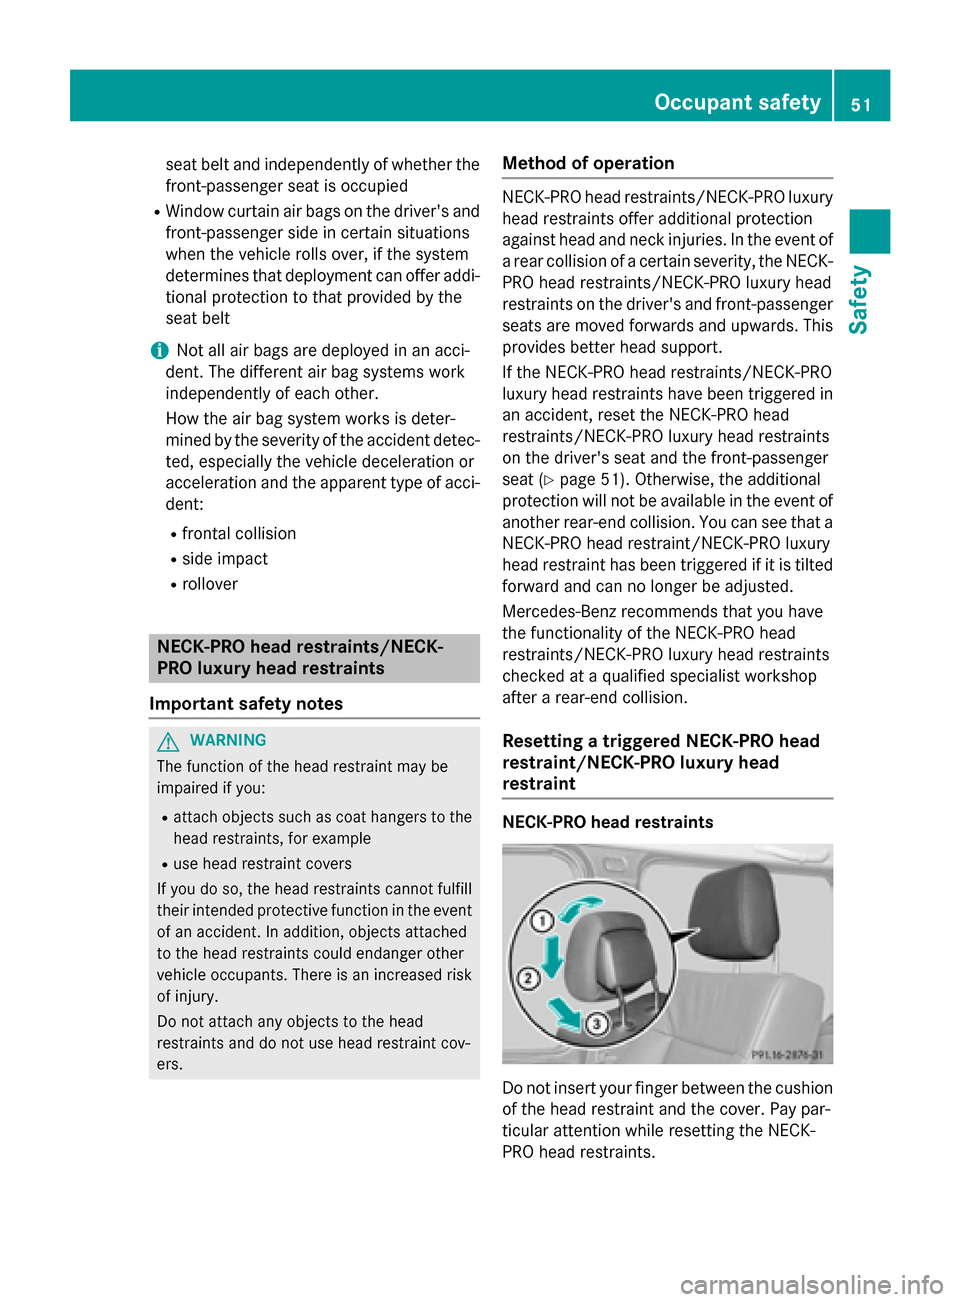
restraint NECK-PRO head restraints
Do not insert your finger between the cushion
of the head restraint and the cover. Pay par-
ticular attention while resetting the NECK-
PRO head restraints. Occupant safety
51Safety Z
Page 54 of 350
X
Tilt the top of the NECK-PRO head restraint
cushion forwards in the direction of
arrow :.
X Push the NECK-PRO head restraint cushion
down as far as it will go in the direction of
arrow ;.
X With your hand flat, firmly push the NECK-
PRO head restraint cushion backwards in
the direction of arrow =until it engages.
X Repeat this procedure for the second
NECK-PRO head restraint.
i Resetting the NECK-PRO head restraints
requires a lot of strength. If you have diffi-
culty resetting the NECK-PRO head
restraints, have this work carried out at a
qualified specialist workshop.
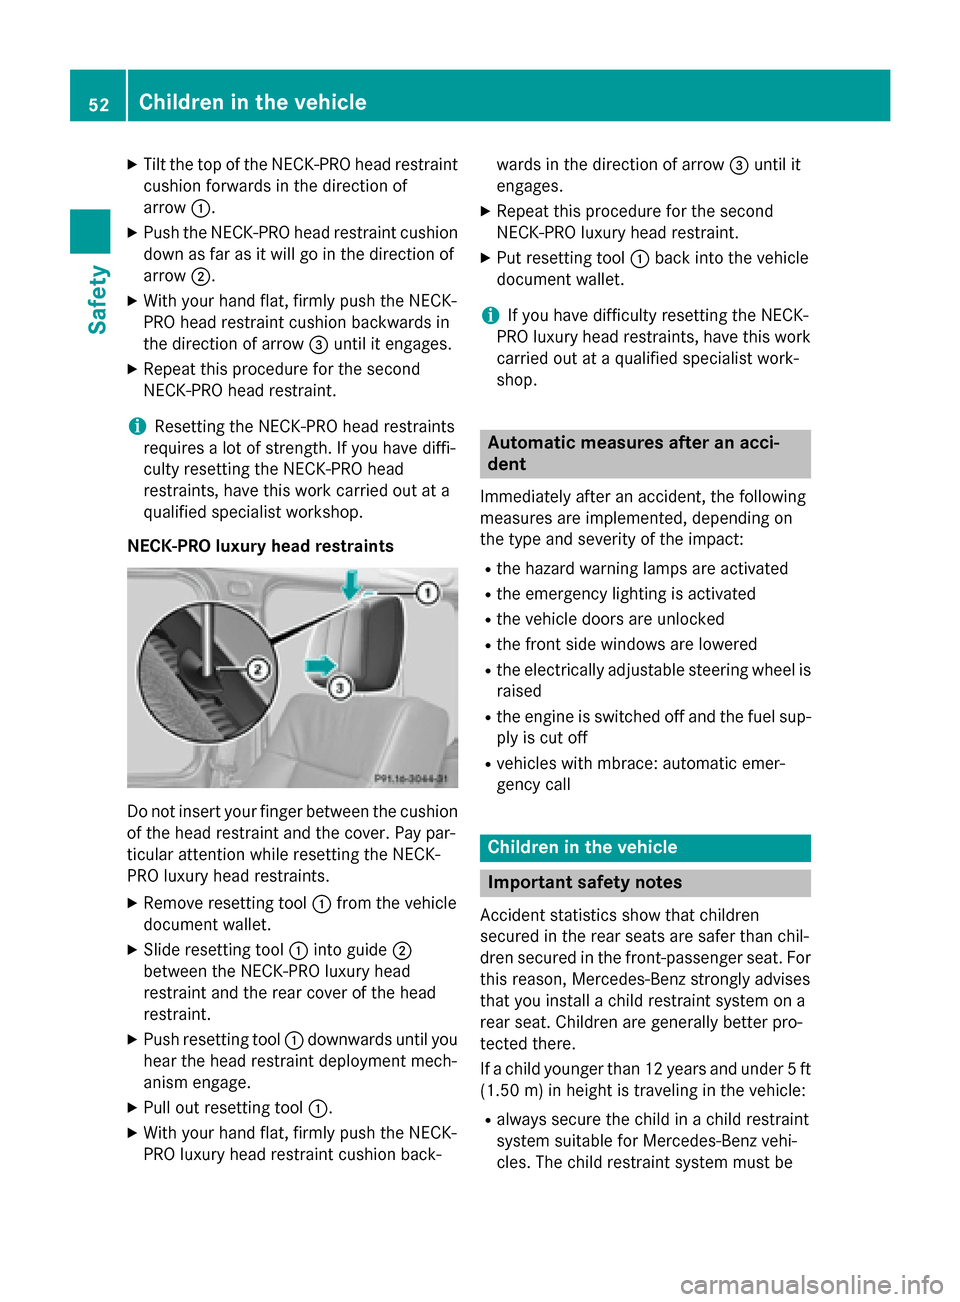
NECK-PRO luxury head restraints Do not insert your finger between the cushion
of the head restraint and the cover. Pay par-
ticular attention while resetting the NECK-
PRO luxury head restraints.
X Remove resetting tool :from the vehicle
document wallet.
X Slide resetting tool :into guide ;
between the NECK-PRO luxury head
restraint and the rear cover of the head
restraint.
X Push resetting tool :downwards until you
hear the head restraint deployment mech-
anism engage.
X Pull out resetting tool :.
X With your hand flat, firmly push the NECK-
PRO luxury head restraint cushion back- wards in the direction of arrow
=until it
engages.
X Repeat this procedure for the second
NECK-PRO luxury head restraint.
X Put resetting tool :back into the vehicle
document wallet.
i If you have difficulty resetting the NECK-
PRO luxury head restraints, have this work carried out at a qualified specialist work-
shop. Automatic measures after an acci-
dent
Immediately after an accident, the following
measures are implemented, depending on
the type and severity of the impact:
R the hazard warning lamps are activated
R the emergency lighting is activated
R the vehicle doors are unlocked
R the front side windows are lowered
R the electrically adjustable steering wheel is
raised
R the engine is switched off and the fuel sup-
ply is cut off
R vehicles with mbrace: automatic emer-
gency call Children in the vehicle
Important safety notes
Accident statistics show that children
secured in the rear seats are safer than chil-
dren secured in the front-passenger seat. For this reason, Mercedes-Benz strongly advises
that you install a child restraint system on a
rear seat. Children are generally better pro-
tected there.
If a child younger than 12 years and under 5 ft
(1.50 m)in height is traveling in the vehicle:
R always secure the child in a child restraint
system suitable for Mercedes-Benz vehi-
cles. The child restraint system must be 52
Children in the vehicleSafety
Page 89 of 350
Observe the following when adjusting the
head restraints:
X Do not rotate the head restraints of the
front and rear seats.
Otherwise, you cannot adjust the height
and angle of the head restraints correctly.
X Adjust the head restraint so that it is as
close as possible to your head.
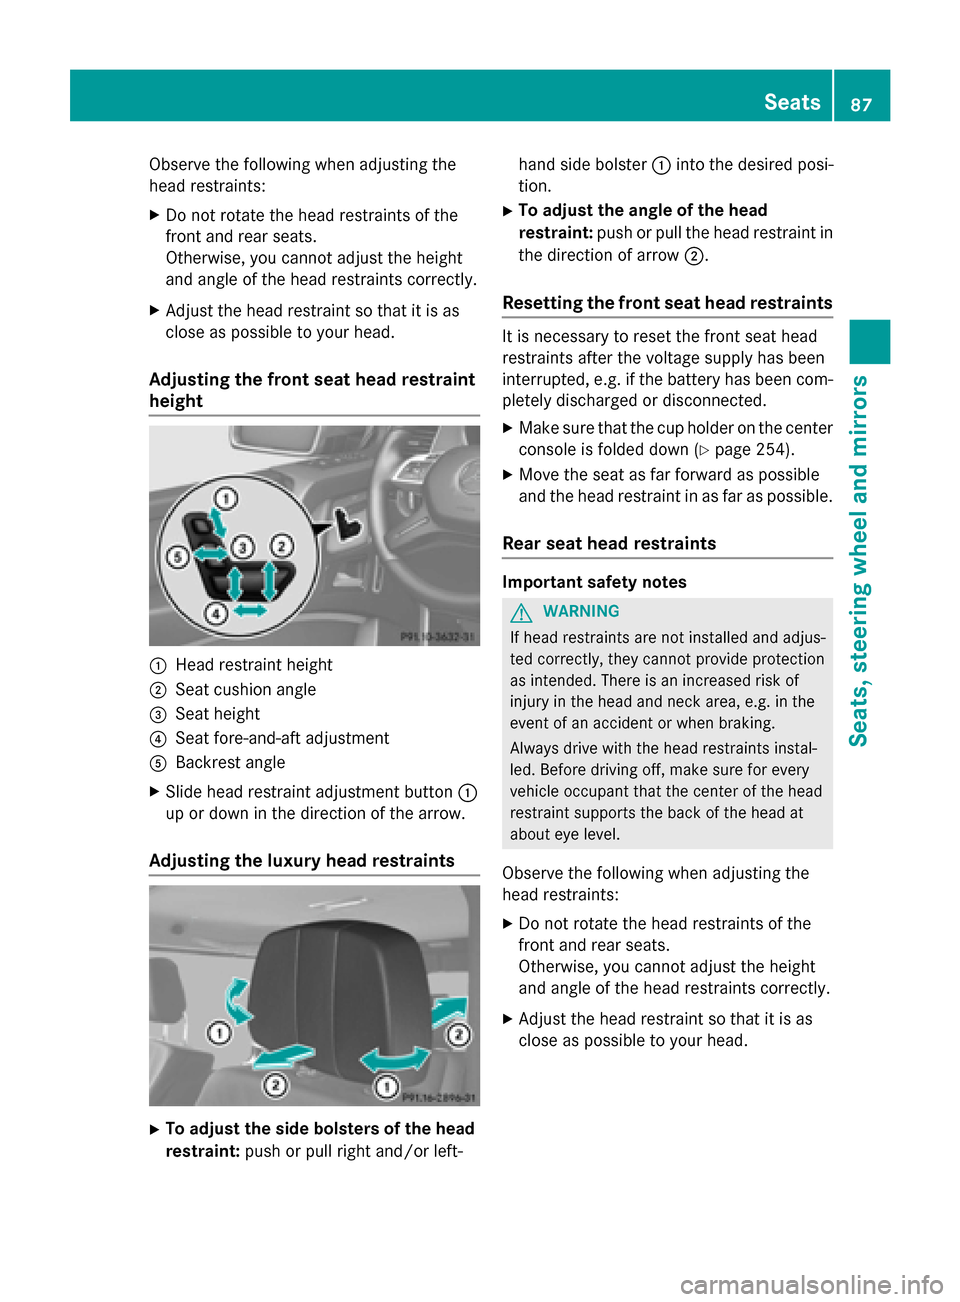
Adjusting the front seat head restraint
height :
Head restraint height
; Seat cushion angle
= Seat height
? Seat fore-and-aft adjustment
A Backrest angle
X Slide head restraint adjustment button :
up or down in the direction of the arrow.
Adjusting the luxury head restraints X
To adjust the side bolsters of the head
restraint: push or pull right and/or left- hand side bolster
:into the desired posi-
tion.
X To adjust the angle of the head
restraint: push or pull the head restraint in
the direction of arrow ;.
Resetting the front seat head restraints It is necessary to reset the front seat head
restraints after the voltage supply has been
interrupted, e.g. if the battery has been com-
pletely discharged or disconnected.
X Make sure that the cup holder on the center
console is folded down (Y page 254).
X Move the seat as far forward as possible
and the head restraint in as far as possible.
Rear seat head restraints Important safety notes
G
WARNING
If head restraints are not installed and adjus-
ted correctly, they cannot provide protection
as intended. There is an increased risk of
injury in the head and neck area, e.g. in the
event of an accident or when braking.
Always drive with the head restraints instal-
led. Before driving off, make sure for every
vehicle occupant that the center of the head
restraint supports the back of the head at
about eye level.
Observe the following when adjusting the
head restraints: X Do not rotate the head restraints of the
front and rear seats.
Otherwise, you cannot adjust the height
and angle of the head restraints correctly.
X Adjust the head restraint so that it is as
close as possible to your head. Seats
87Seats, steering wheel and mirrors Z
Page 95 of 350
Exterior mirrors
Adjusting the exterior mirrors G
WARNING
The exterior mirror on the front-passenger
side reduces the size of the image. Visible
objects are actually closer than they appear.
This means that you could misjudge the dis-
tance from road users traveling behind, e.g.
when changing lane. There is a risk of an acci-
dent.
For this reason, always make sure of the
actual distance from the road users traveling
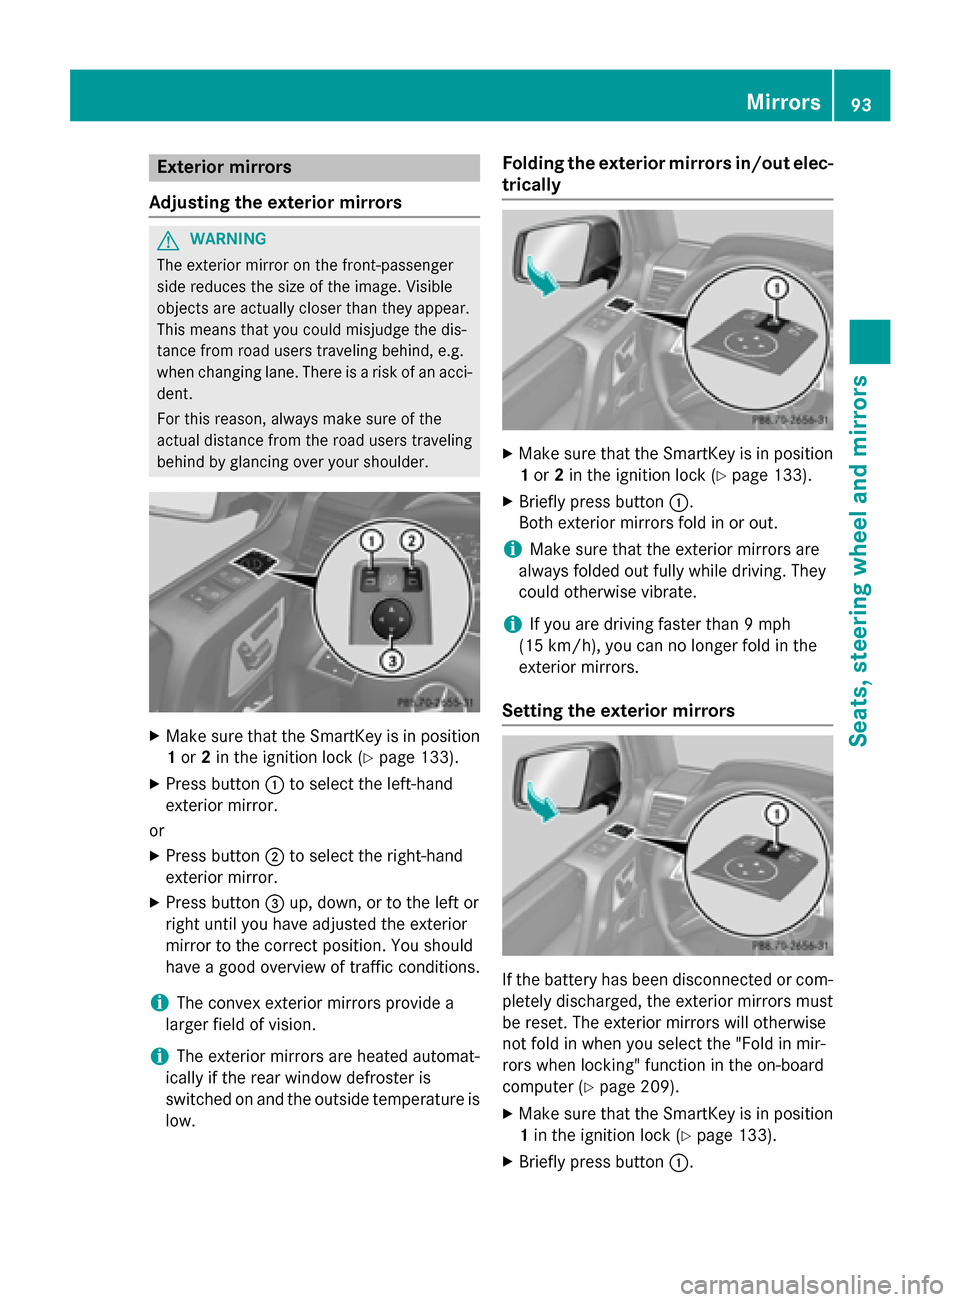
behind by glancing over your shoulder. X
Make sure that the SmartKey is in position
1 or 2in the ignition lock (Y page 133).
X Press button :to select the left-hand
exterior mirror.
or
X Press button ;to select the right-hand
exterior mirror.
X Press button =up, down, or to the left or
right until you have adjusted the exterior
mirror to the correct position. You should
have a good overview of traffic conditions.
i The convex exterior mirrors provide a
larger field of vision.
i The exterior mirrors are heated automat-
ically if the rear window defroster is
switched on and the outside temperature is
low. Folding the exterior mirrors in/out elec-
trically X
Make sure that the SmartKey is in position
1 or 2in the ignition lock (Y page 133).
X Briefly press button :.
Both exterior mirrors fold in or out.
i Make sure that the exterior mirrors are
always folded out fully while driving. They
could otherwise vibrate.
i If you are driving faster than 9 mph
(15 km/ h), you can no longer fold in the
exterior mirrors.
Setting the exterior mirrors If the battery has been disconnected or com-
pletely discharged, the exterior mirrors must
be reset. The exterior mirrors will otherwise
not fold in when you select the "Fold in mir-
rors when locking" function in the on-board
computer (Y page 209).
X Make sure that the SmartKey is in position
1 in the ignition lock (Y page 133).
X Briefly press button :. Mirrors
93Seats, steering wheel and mirrors Z
Page 96 of 350
Folding the exterior mirrors in/out
automatically If the "Fold in mirrors when locking" function
is activated in the on-board computer
(Y page 209):
R the exterior mirrors fold in automatically as
soon as you lock the vehicle from the out-
side.
R the exterior mirrors fold out again automat-
ically as soon as you unlock the vehicle and
then open the driver's or front-passenger
door.
Exterior mirror pushed out of position X
Press button :repeatedly until you hear
the mirror engage in position.
The mirror housing is engaged again and
you can adjust the exterior mirrors as usual
(Y page 93). Automatic anti-glare mirrors
The rear-view mirror and the exterior mirror
on the driver's side automatically go into anti- glare mode if:
R the ignition is switched on and
R incident light from headlamps strikes the
sensor in the rear-view mirror
i The mirrors do not go into anti-glare mode
if reverse gear is engaged or if the interior
lighting is switched on. Parking position for the exterior mir-
ror on the front-passenger side
Setting/storing the parking position Using reverse gear
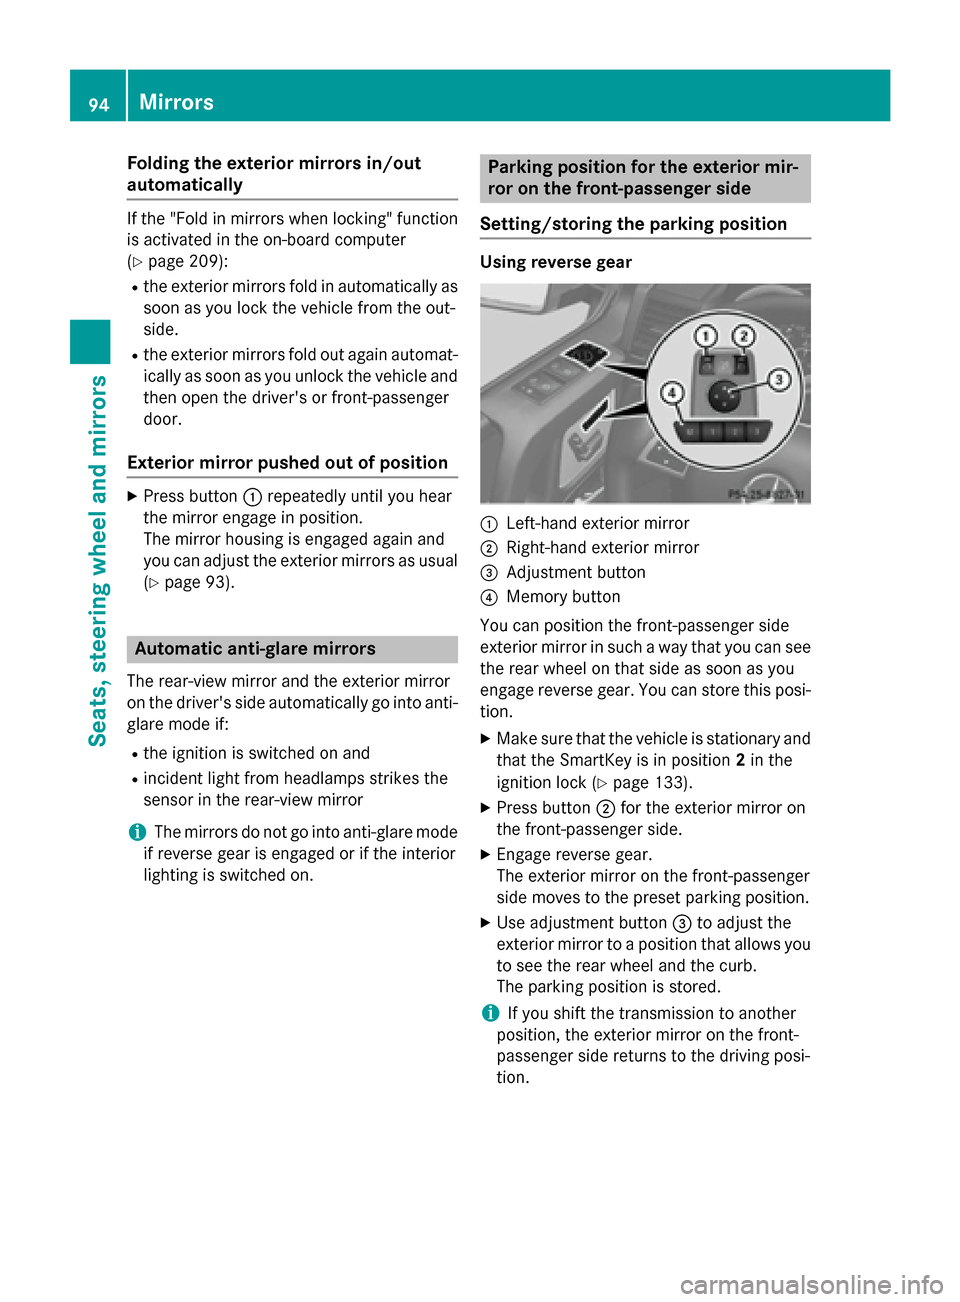
:
Left-hand exterior mirror
; Right-hand exterior mirror
= Adjustment button
? Memory button
You can position the front-passenger side
exterior mirror in such a way that you can see
the rear wheel on that side as soon as you
engage reverse gear. You can store this posi- tion.
X Make sure that the vehicle is stationary and
that the SmartKey is in position 2in the
ignition lock (Y page 133).
X Press button ;for the exterior mirror on
the front-passenger side.
X Engage reverse gear.
The exterior mirror on the front-passenger
side moves to the preset parking position.
X Use adjustment button =to adjust the
exterior mirror to a position that allows you to see the rear wheel and the curb.
The parking position is stored.
i If you shift the transmission to another
position, the exterior mirror on the front-
passenger side returns to the driving posi-
tion. 94
MirrorsSeats, steering wheel and
mirrors
Page 98 of 350
G
WARNING
When the memory function adjusts the seat or steering wheel, you and other vehicle occu-
pants – particularly children – could become
trapped. There is a risk of injury.
While the memory function is making adjust-
ments, make sure that no one has any body
parts in the sweep of the seat or steering
wheel. If somebody becomes trapped, imme-
diately release the memory function position
button. The adjustment process is stopped. G
WARNING
Children could become trapped if they acti-
vate the memory function, particularly when
unattended. There is a risk of injury.
When leaving the vehicle, always take the
SmartKey with you and lock the vehicle. Never leave children unsupervised in the vehicle.
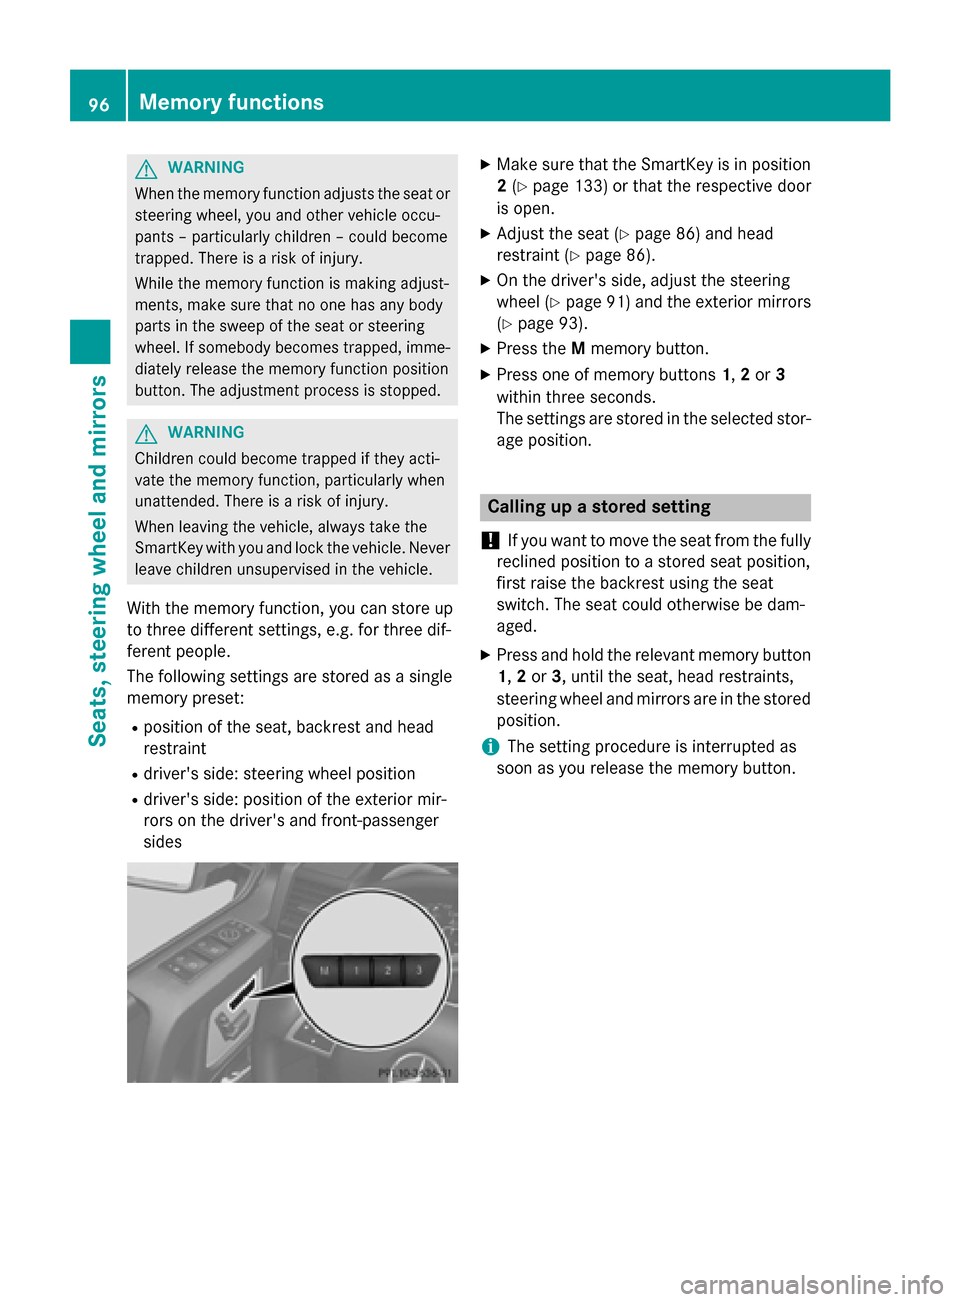
With the memory function, you can store up
to three different settings, e.g. for three dif-
ferent people.
The following settings are stored as a single
memory preset:
R position of the seat, backrest and head
restraint
R driver's side: steering wheel position
R driver's side: position of the exterior mir-
rors on the driver's and front-passenger
sides X
Make sure that the SmartKey is in position
2 (Y page 133) or that the respective door
is open.
X Adjust the seat (Y page 86) and head
restraint (Y page 86).
X On the driver's side, adjust the steering
wheel (Y page 91) and the exterior mirrors
(Y page 93).
X Press the Mmemory button.
X Press one of memory buttons 1,2or 3
within three seconds.
The settings are stored in the selected stor- age position. Calling up a stored setting
! If you want to move the seat from the fully
reclined position to a stored seat position,
first raise the backrest using the seat
switch. The seat could otherwise be dam-
aged.
X Press and hold the relevant memory button
1, 2or 3, until the seat, head restraints,
steering wheel and mirrors are in the stored position.
i The setting procedure is interrupted as
soon as you release the memory button. 96
Memory functionsSeats, steering wheel and mirrors