sunroof MERCEDES-BENZ G-Class 2015 W463 Owner's Manual
[x] Cancel search | Manufacturer: MERCEDES-BENZ, Model Year: 2015, Model line: G-Class, Model: MERCEDES-BENZ G-Class 2015 W463Pages: 350, PDF Size: 6.44 MB
Page 17 of 350
Service menu (on-board com-
puter)
.................................................. 206
Service products
Brake fluid .....................................3 42
Coolant (engine) ............................ 342
Engine oil ....................................... 340
Fuel ................................................ 337
Important safety notes .................. 337
Notes ............................................. 337
Refrigerant (air-conditioning sys-
tem) ............................................... 341
Washer fluid ................................... 343
Setting a speed limit
see SPEEDTRONIC
Setting the air distribution ...............124
Settings
Calling up a stored setting .............. .96
Factory (on-board computer) ......... 209
On-board computer ....................... 206
SETUP (on-board computer) ............. 210
Shift ranges ....................................... 145
Side marker lamp (display mes-
sage) ................................................... 220
Side marker lamps (changing
bulbs) ................................................ .112
Side windows
Convenience opening feature .......... 78
Important safety information ........... 77
Opening/closing .............................. 77
Overview .......................................... 77
Troubleshooting ............................... 78
Ski rack .............................................. 254
Sliding sunroof
Important safety notes .................... 79
Opening/closing .............................. 79
Operating manually .......................... 79
Problem (malfunction) ..................... 80
SmartKey
Changing the battery ....................... 70
Changing the programming ............. 69
Checking the battery ....................... 70
Convenience opening feature .......... 78
Display message ............................ 234
Door central locking/unlocking ....... 68
Important safety notes .................... 68
Loss ................................................. 72
Malfunction ...................................... 72 Mechanical key ................................ 69
Overview .......................................... 68
Problem (malfunction) ..................... 72
Starting the engine ........................ 134
Snow chains ...................................... 309
Sockets
Front-passenger footwell .............. .257
Luggage compartment ................... 257
Rear compartment ......................... 257
SOS
see mbrace
Spare fuses ........................................ 301
Spare wheel
Mounting ....................................... 327
Notes/data ................................... .333
Spare wheel bracket at the rear .... 291
Stainless-steel spare hub cap ....... .291
Special seat belt retractor .................. 53
Specialist workshop ............................ 24
Speed, controlling
see Cruise control
Speedometer
Digital ............................................ 201
In the Instrument cluster .............. .197
Segments ...................................... 198
Selecting the unit of measure-
ment .............................................. 206
see Instrument cluster
SPEEDTRONIC
Display message ............................ 228
Selecting ........................................ 167
Variabl e......................................... 166
Standing lamps
Display message ............................ 220
Switching on/of f........................... 102
Starting the engine
Important safety notes .................. 134
Steering (display message) .............. 233
Steering wheel
Adjusting (electrically) ..................... 91
Buttons (on-board computer) ......... 198
Cleaning ......................................... 286
Important safety notes .................... 90
Paddle shifters ............................... 144
Steering wheel heating .................... 91
Storing settings (memory func-
tion) ................................................. 95 Index
15
Page 18 of 350
Steering wheel heating
Indicator lamp (malfunction) ............ 91
Steering wheel paddle shifters ........ 144
Stopwatch (RACETIMER) ...................210
Stowage areas ................................... 249
Stowage compartment
Door stowage compartment .......... 250
Stowage compartments
Armrest (under) ............................ .250
Cup holders ................................... 254
Glove box ....................................... 249
Important safety information ......... 249
Stowage pockets ........................... 250
Summer tires ..................................... 308
Sun visor ............................................ 254
Surround lighting (on-board com-
puter) ................................................. .207
SUV
(Sport Utility Vehicle) ....................... 23
Switching air-recirculation mode
on/off ................................................. 127
Switching off the alarm (ATA) ............ 66T
Tachometer ........................................ 198
Tail lamps
Display message ............................ 220
see Lights
Tank content
Fuel gauge ..................................... 197
Technical data
Capacities ...................................... 337
Tires ............................................... 331
Tires/wheels ................................. 331
Trailer loads ................................... 347
Vehicle data ................................... 344
Wheels .......................................... .331
TELEAID
Call priority ................................... .262
Downloading destinations
(COMAND) ..................................... 263
Downloading routes ....................... 265
Emergency call .............................. 260
Geo fencing ................................... 265
Important safety notes .................. 258
Locating a stolen vehicle .............. .264
MB info call button ........................ 262 Remote vehicle locking .................. 263
Roadside Assistance button .......... 261
Self-test ......................................... 259
Speed alert ...................................
.265
System .......................................... 259
Triggering the vehicle alarm ........... 266
Vehicle remote malfunction diag-
nosis .............................................. 264
Vehicle remote unlocking .............. 263
Telephone
Accepting a call ............................ .204
Display message ............................ 234
Menu (on-board computer) ............ 204
Number from the phone book ....... .204
Redialing ........................................ 205
Rejecting/ending a call ................. 204
Telephone compartment .................. 250
Temperature
Coolant .......................................... 197
Coolant (on-board computer) ......... 209
Engine oil (on-board computer) ...... 209
Outside temperature ..................... .198
Setting (climate control) ................ 124
Theft deterrent systems
ATA (Anti-Theft Alarm system) ......... 66
Immobilizer ...................................... 65
Tilt/sliding sunroof
see Sliding sunroof
Time
see separate operating instructions
Timing (RACETIMER) ......................... 210
Tire pressure
Calling up (on-board computer) ..... 313
Checking manually ........................ 312
Display message ............................ 229
Maximum ....................................... 312
Notes ............................................. 311
Recommended ............................... 309
Table (single tires) ......................... 310
Tire pressure monitor
Checking the tire pressure elec-
tronically ........................................ 314
Function/notes ............................ .313
Restarting ...................................... 315
Warning lamp ................................. 246
Warning message .......................... 315
Tires
Aspect ratio (definition) ................. 326 16
Index
Page 38 of 350
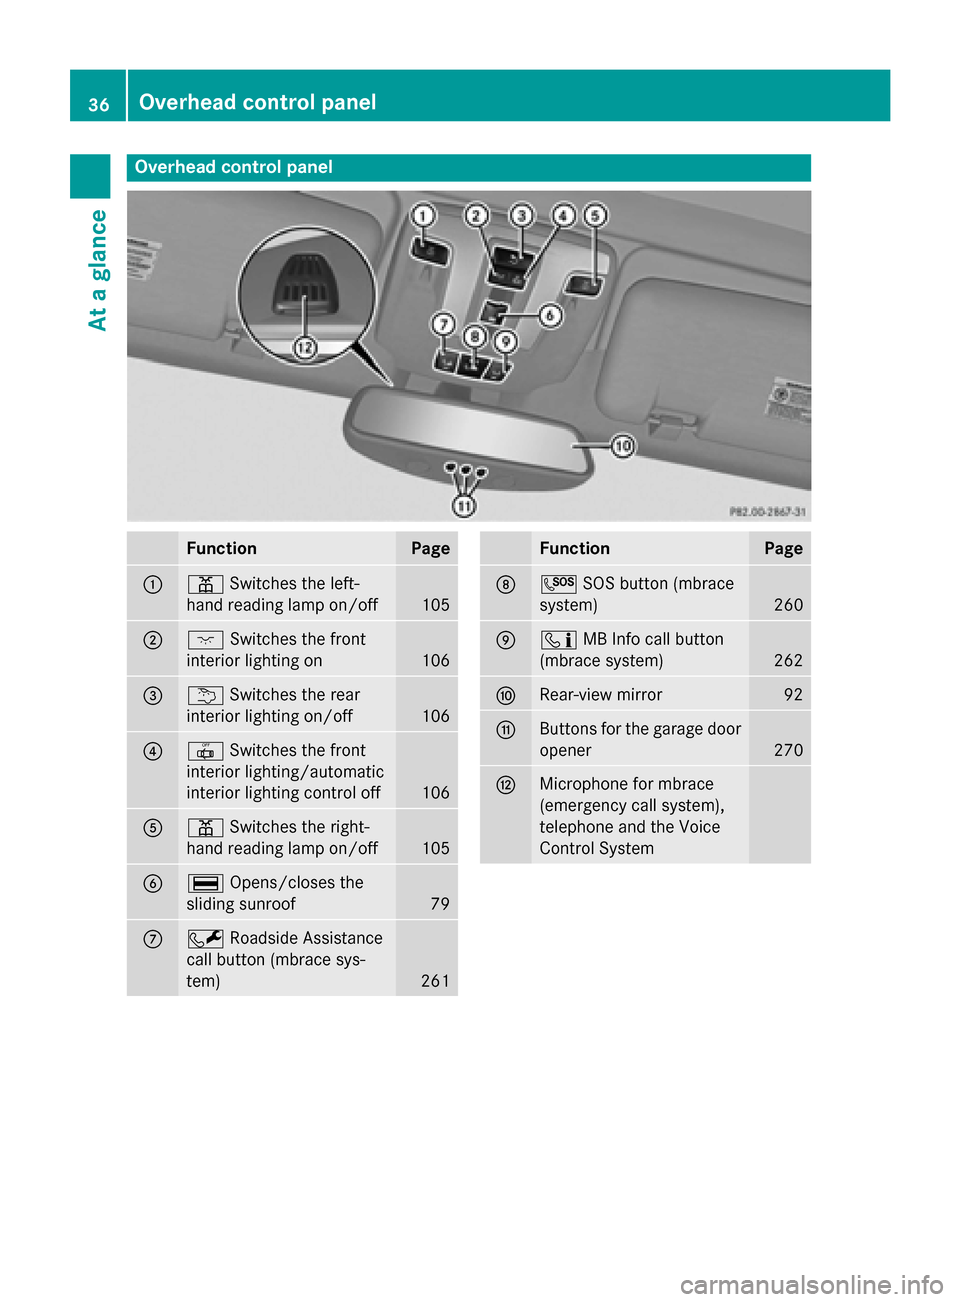
Overhead control panel
Function Page
:
p
Switches the left-
hand reading lamp on/off 105
;
c
Switches the front
interior lighting on 106
=
u
Switches the rear
interior lighting on/off 106
?
|
Switches the front
interior lighting/automatic
interior lighting control off 106
A
p
Switches the right-
hand reading lamp on/off 105
B
¡
Opens/closes the
sliding sunroof 79
C
F
Roadside Assistance
call button (mbrace sys-
tem) 261 Function Page
D
G
SOS button (mbrace
system) 260
E
ï
MB Info call button
(mbrace system) 262
F
Rear-view mirror 92
G
Buttons for the garage door
opener 270
H
Microphone for mbrace
(emergency call system),
telephone and the Voice
Control System36
Overhead control panelAt a glance
Page 69 of 350
Useful information
..............................68
SmartKey ............................................. 68
Doors .................................................... 73
Rear door ............................................. 76
Side windows ...................................... 77
Sliding sunroof .................................... 79 67Opening and closing
Page 80 of 350
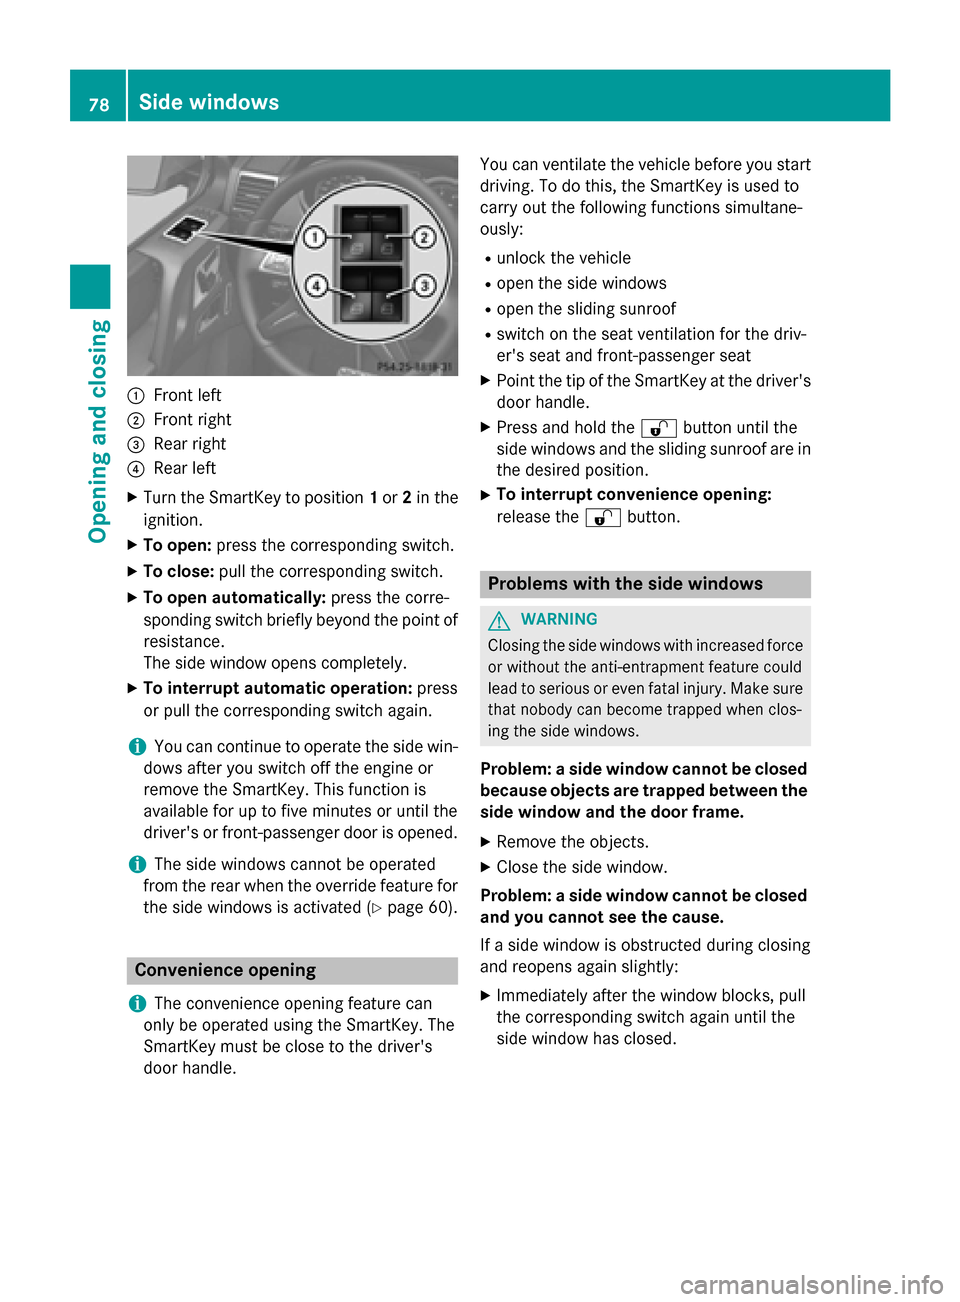
:
Front left
; Front right
= Rear right
? Rear left
X Turn the SmartKey to position 1or 2in the
ignition.
X To open: press the corresponding switch.
X To close: pull the corresponding switch.
X To open automatically: press the corre-
sponding switch briefly beyond the point of
resistance.
The side window opens completely.
X To interrupt automatic operation: press
or pull the corresponding switch again.
i You can continue to operate the side win-
dows after you switch off the engine or
remove the SmartKey. This function is
available for up to five minutes or until the
driver's or front-passenger door is opened.
i The side windows cannot be operated
from the rear when the override feature for
the side windows is activated (Y page 60).Convenience opening
i The convenience opening feature can
only be operated using the SmartKey. The
SmartKey must be close to the driver's
door handle. You can ventilate the vehicle before you start
driving. To do this, the SmartKey is used to
carry out the following functions simultane-
ously:
R unlock the vehicle
R open the side windows
R open the sliding sunroof
R switch on the seat ventilation for the driv-
er's seat and front-passenger seat
X Point the tip of the SmartKey at the driver's
door handle.
X Press and hold the %button until the
side windows and the sliding sunroof are in the desired position.
X To interrupt convenience opening:
release the %button. Problems with the side windows
G
WARNING
Closing the side windows with increased force
or without the anti-entrapment feature could
lead to serious or even fatal injury. Make sure that nobody can become trapped when clos-
ing the side windows.
Problem: a side window cannot be closed because objects are trapped between the
side window and the door frame.
X Remove the objects.
X Close the side window.
Problem: a side window cannot be closed
and you cannot see the cause.
If a side window is obstructed during closing
and reopens again slightly:
X Immediately after the window blocks, pull
the corresponding switch again until the
side window has closed. 78
Side windowsOpening and closing
Page 81 of 350
If a side window is obstructed again during
closing and reopens again slightly:
X Immediately after the window blocks, pull
the corresponding switch again until the
side window has closed.
i If a side window no longer opens or closes
due to a malfunction, contact a qualified
specialist workshop. Sliding sunroof
Important safety notes
! Only open the sliding sunroof if it is free of
snow and ice. Otherwise, malfunctions may
occur.
Do not allow anything to protrude from the sliding sunroof. Otherwise, the seals could
be damaged.
! If the sliding sunroof still cannot be
opened or closed as a result of a malfunc-
tion, contact a qualified specialist work-
shop.
! The weather can change abruptly. It could
start to rain or snow. Make sure that the
sliding sunroof is closed when you leave the
vehicle. The vehicle electronics can be
damaged if water enters the vehicle inte-
rior.
i Resonance noises can occur in addition to
the usual airflow noises when the sliding
sunroof is open. They are caused by minor
pressure fluctuations in the vehicle interior.
Change the position of the sliding sunroof
or open a side window slightly to reduce or
eliminate these noises. Opening and closing the sliding sun-
roof
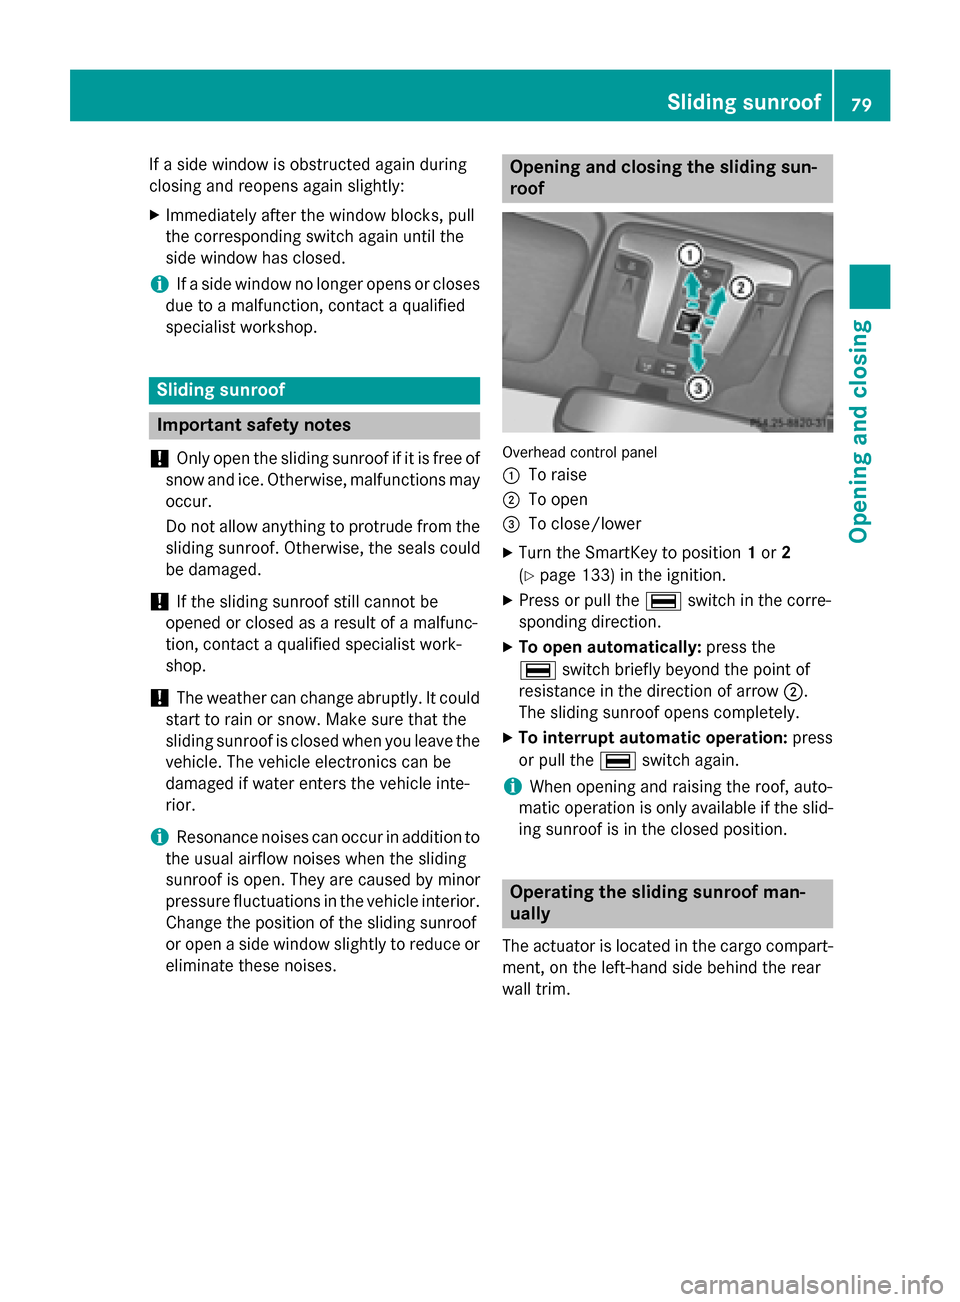
Overhead control panel
:
To raise
; To open
= To close/lower
X Turn the SmartKey to position 1or 2
(Y page 133) in the ignition.
X Press or pull the ¡switch in the corre-
sponding direction.
X To open automatically: press the
¡ switch briefly beyond the point of
resistance in the direction of arrow ;.
The sliding sunroof opens completely.
X To interrupt automatic operation: press
or pull the ¡switch again.
i When opening and raising the roof, auto-
matic operation is only available if the slid- ing sunroof is in the closed position. Operating the sliding sunroof man-
ually
The actuator is located in the cargo compart-
ment, on the left-hand side behind the rear
wall trim. Sliding sunroof
79Opening and closing Z
Page 82 of 350
X
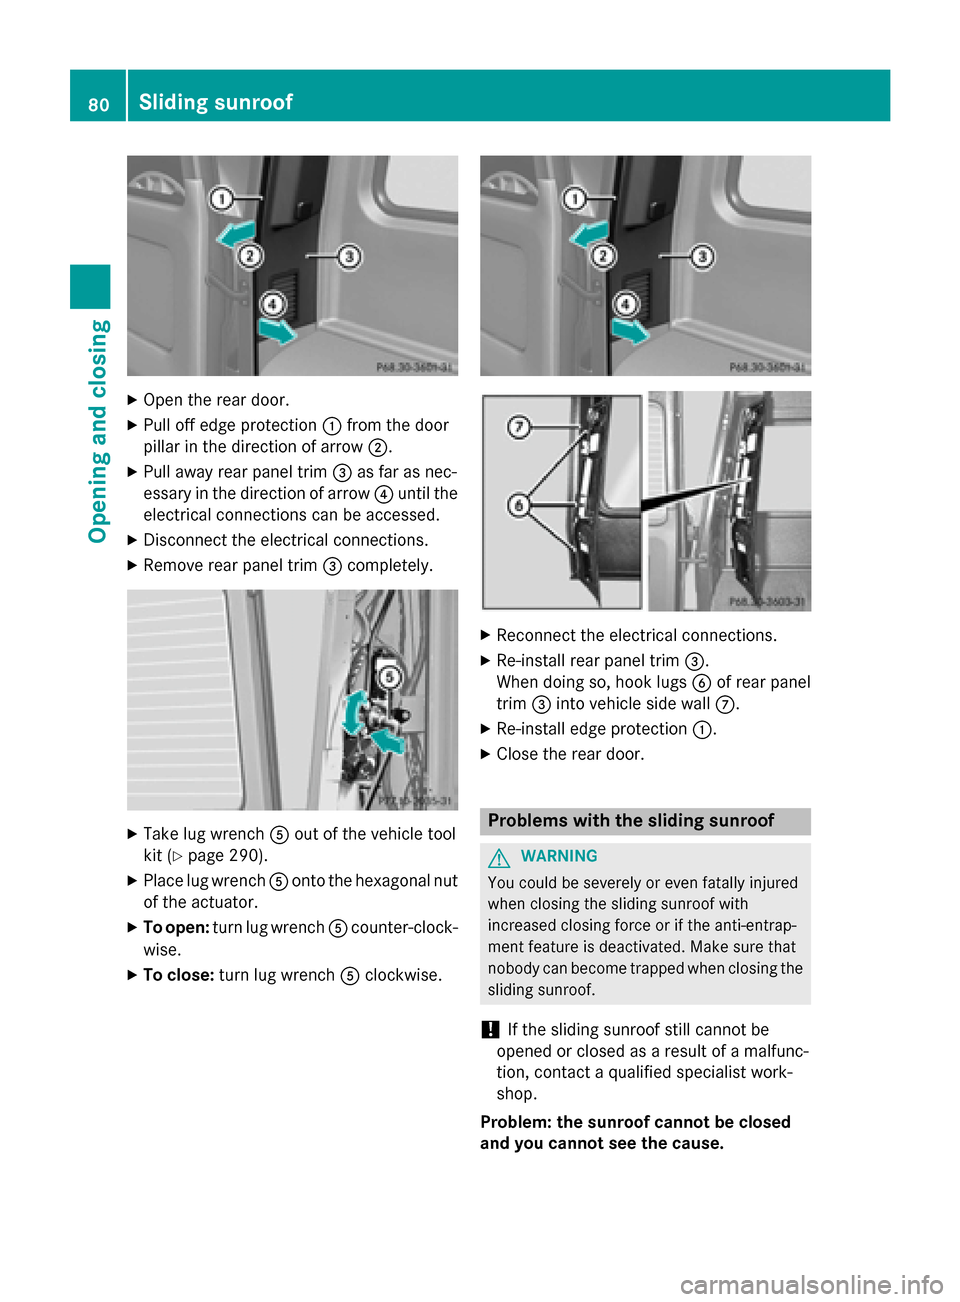
Open the rear door.
X Pull off edge protection :from the door
pillar in the direction of arrow ;.
X Pull away rear panel trim =as far as nec-
essary in the direction of arrow ?until the
electrical connections can be accessed.
X Disconnect the electrical connections.
X Remove rear panel trim =completely. X
Take lug wrench Aout of the vehicle tool
kit (Y page 290).
X Place lug wrench Aonto the hexagonal nut
of the actuator.
X To open: turn lug wrench Acounter-clock-
wise.
X To close: turn lug wrench Aclockwise. X
Reconnect the electrical connections.
X Re-install rear panel trim =.
When doing so, hook lugs Bof rear panel
trim =into vehicle side wall C.
X Re-install edge protection :.
X Close the rear door. Problems with the sliding sunroof
G
WARNING
You could be severely or even fatally injured
when closing the sliding sunroof with
increased closing force or if the anti-entrap-
ment feature is deactivated. Make sure that
nobody can become trapped when closing the sliding sunroof.
! If the sliding sunroof still cannot be
opened or closed as a result of a malfunc-
tion, contact a qualified specialist work-
shop.
Problem: the sunroof cannot be closed
and you cannot see the cause. 80
Sliding sunroofOpening and closing
Page 83 of 350
If the sliding sunroof is obstructed during
closing and reopens again slightly:
X Immediately after the sliding sunroof
blocks, pull the ¡switch in the over-
head control panel down to the point of
resistance and hold it until the sliding sun-
roof is closed.
If the sliding sunroof is obstructed again dur-
ing closing and reopens again slightly:
X Immediately after the sliding sunroof
blocks, pull the ¡switch in the over-
head control panel down to the point of
resistance and hold it until the sliding sun-
roof is closed. Sliding sunroof
81Opening and closing Z
Page 92 of 350
automatically. If the seat heating is not
switched on automatically:
X Switch on the seat heating manually
(Y page 89) Switching the seat ventilation on/off
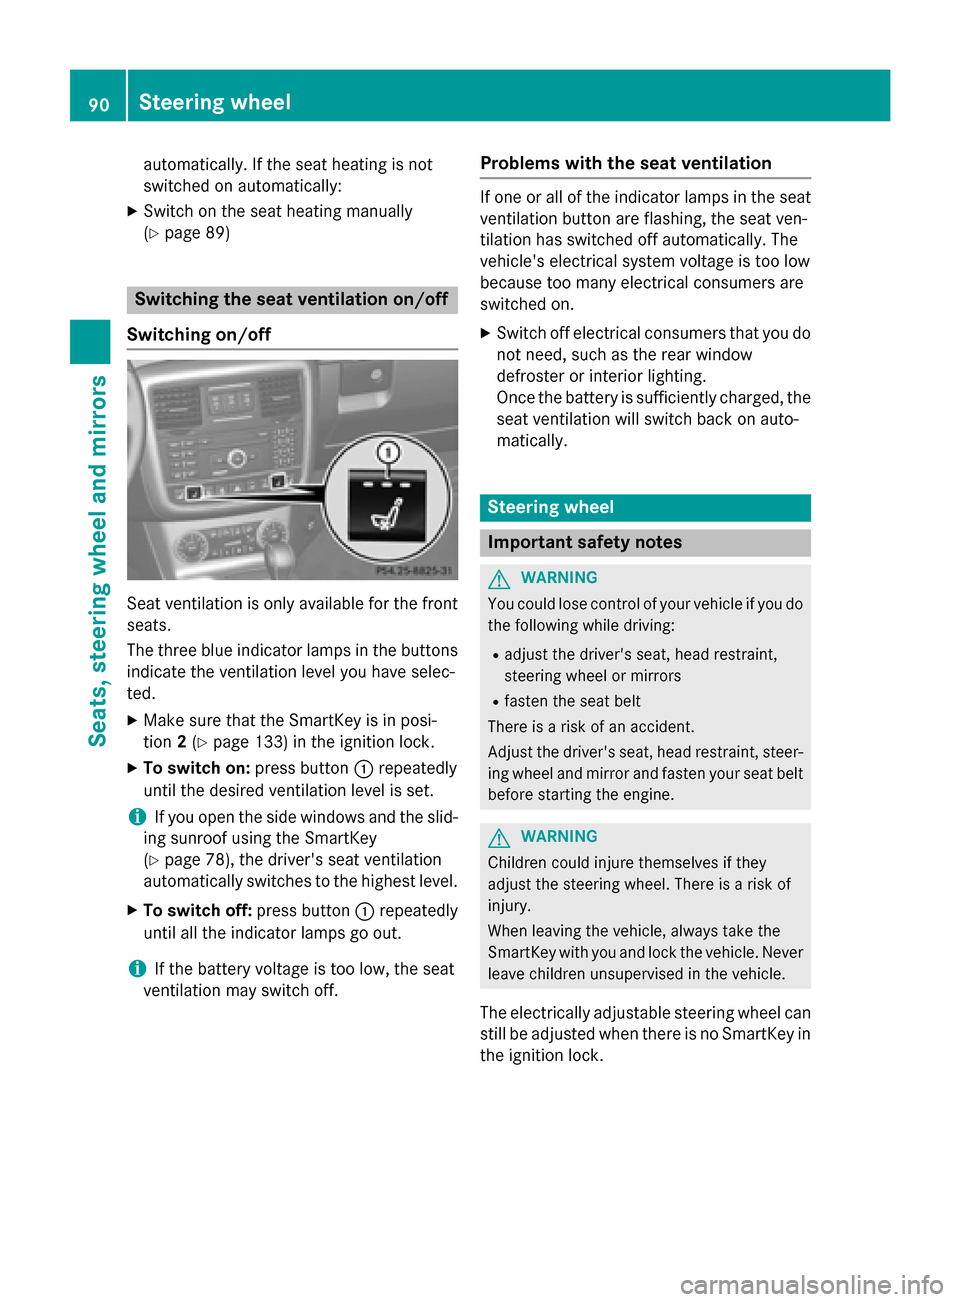
Switching on/off Seat ventilation is only available for the front
seats.
The three blue indicator lamps in the buttons
indicate the ventilation level you have selec-
ted.
X Make sure that the SmartKey is in posi-
tion 2(Y page 133) in the ignition lock.
X To switch on: press button:repeatedly
until the desired ventilation level is set.
i If you open the side windows and the slid-
ing sunroof using the SmartKey
(Y page 78), the driver's seat ventilation
automatically switches to the highest level.
X To switch off: press button:repeatedly
until all the indicator lamps go out.
i If the battery voltage is too low, the seat
ventilation may switch off. Problems with the seat ventilation If one or all of the indicator lamps in the seat
ventilation button are flashing, the seat ven-
tilation has switched off automatically. The
vehicle's electrical system voltage is too low
because too many electrical consumers are
switched on.
X Switch off electrical consumers that you do
not need, such as the rear window
defroster or interior lighting.
Once the battery is sufficiently charged, the seat ventilation will switch back on auto-
matically. Steering wheel
Important safety notes
G
WARNING
You could lose control of your vehicle if you do the following while driving:
R adjust the driver's seat, head restraint,
steering wheel or mirrors
R fasten the seat belt
There is a risk of an accident.
Adjust the driver's seat, head restraint, steer-
ing wheel and mirror and fasten your seat belt before starting the engine. G
WARNING
Children could injure themselves if they
adjust the steering wheel. There is a risk of
injury.
When leaving the vehicle, always take the
SmartKey with you and lock the vehicle. Never leave children unsupervised in the vehicle.
The electrically adjustable steering wheel can
still be adjusted when there is no SmartKey in
the ignition lock. 90
Steering wheelSeats, steering wheel and
mirrors
Page 120 of 350
Useful information
i This Operator's Manual describes all
models and all standard and optional equip- ment of your vehicle available at the time of
publication of the Operator's Manual.
Country-specific differences are possible.
Please note that your vehicle may not be
equipped with all features described. This
also applies to safety-related systems and
functions.
i Read the information on qualified special-
ist workshops: (Y page 24). Overview of climate control systems
Important safety notes
Observe the settings recommended on the
following pages. The windows could other-
wise fog up. This could prevent you from
observing the traffic conditions, thereby
causing an accident.
Climate control regulates the temperature
and the humidity in the vehicle interior and
filters undesirable substances from the air.
Dual-zone automatic climate control is only
operational when the engine is running. Opti-
mum operation is only achieved if you drive
with the side windows and sliding sunroof
closed.
The climatic comfort deteriorates whilst the
sliding sunroof is open. The automatic climate control cannot maintain the set temperature
with the sliding sunroof open. You have to
adjust the climate control manually.
i The residual heat function can only be
activated or deactivated with the ignition
switched off (Y page 127).
i Ventilate the vehicle for a brief period
during warm weather, e.g. using the con-
venience opening feature (Y page 78). This
will speed up the cooling process and the
desired vehicle interior temperature will be reached more quickly. i
The integrated filter can filter out most
particles of dust, and completely filters out pollen. A clogged filter reduces the amount
of air supplied to the vehicle interior. For
this reason, you should always observe the interval for replacing the filter, which is
specified in the Maintenance Booklet. As it depends on environmental conditions, e.g. heavy air pollution, the interval may be
shorter than stated in the Maintenance
Booklet. 118
Overview of climate control systemsClimate control