fuel reserve MERCEDES-BENZ G-Class 2016 W463 Owner's Manual
[x] Cancel search | Manufacturer: MERCEDES-BENZ, Model Year: 2016, Model line: G-Class, Model: MERCEDES-BENZ G-Class 2016 W463Pages: 302, PDF Size: 7.04 MB
Page 10 of 302
EngineCheck Engine warning lamp .......... .210
Display message ............................ 192
ECO start/stop function ................ 114
Engine number ............................... 289
Irregular running ............................ 117
Jump-starting ................................. 254
Starting problems .......................... 117
Starting the engine with the
SmartKey ....................................... 113
Switching off .................................. 131
Tow-starting (vehicle) ..................... 259
Engine electronics
Problem (malfunction) ................... 117
Engine oil
Adding ...........................................2 37
Additives ........................................ 292
Checking the oil level ..................... 236
Checking the oil level using the
dipstick .......................................... 236
Display message ............................ 193
Filling capacity ............................... 292
Notes about oil grades ................... 292
Temperature (on-board com-
puter) ............................................. 182
Viscosity ........................................ 292
Environmental protection
Note ................................................. 19
ESP
®(Electronic Stability Pro-
gram)
AMG menu (on-board computer) ... 182
Deactivating/activating ................... 57
Display message ............................ 185
Function/notes ................................ 57
Important safety information ........... 57
Trailer stabilization ........................... 58
Warning lamp ................................. 207
Exhaust check ................................... 133
Exhaust tail pipe (cleaning instruc-
tions) ..................................................2 44
Exterior lighting
see Lights
Exterior mirrors
Adjusting ......................................... 80
Dipping (automatic) ......................... 81
Folding in when locking (on-board
computer) ...................................... 181 Folding in/out (automatically) ......... 81
Folding in/out (electrically) ............. 80
Out
of p
osition (troubleshooting) ..... 81
Setting ............................................. 81
Storing settings (memory func-
tion) ................................................. 82
Storing the parking position ............. 81
F
Filler cap
see Refueling
First-aid kit ......................................... 248
Flat tire
Preparing the vehicle ..................... 250
Folding the seat backrest (rear)
forwards/back .................................. 217
Fuel
Additives ........................................ 291
Consumption information .............. 291
Consumption statistics .................. 173
Displaying the range ...................... 174
Fuel gauge ..................................... 171
Grade (gasoline) ............................ 290
Important safety notes .................. 290
Notes for AMG vehicles ................. 291
Premium-grade unleaded gaso-
line ................................................. 290
Problem (malfunction) ................... 130
Refueling ........................................ 127
Tank content/reserve fuel ............. 290
Fuel consumption
Notes ............................................. 132
Fuel filler flap
Emergency release ........................ 129
Opening/closing ............................ 128
Fuel level
Calling up the range (on-board
computer) ...................................... 174
Fuel tank
Capacity ........................................ 290
Problem (malfunction) ................... 130
Fuel/water separator
Service ........................................... 241
Fuse allocation chart ........................ 259
Fuse box
Battery case ................................... 260
Dashboard ..................................... 259
8Index
Page 15 of 302
Switching on/off .............................. 86
Rear lamps
see Lights
Rear seat bench
Folding into an upright position ..... 218
Rear view camera
Function/notes ............................. 161
Rear view camera (cleaning
instructions) ...................................... 244
Rear window defroster
Problem (malfunction) ................... 107
Switching on/off ........................... 107
Rear window wiper
Switching on/off .............................. 97
Rear-view mirror
Dipping (automatic) ......................... 81
Refrigerant (air-conditioning sys-
tem)
Important safety notes .................. 293
Refueling
Fuel gauge ..................................... 171
Important safety notes .................. 127
Refueling process .......................... 128
see Fuel
Remote control
Programming (garage door
opener) .......................................... 231
Replacing bulbs
Important safety notes .................... 92
Overview of bulb types .................... 93
Reporting safety defects .................... 23
Rescue card ......................................... 24
Reserve (fuel tank)
see Fuel
Reserve fuel
Display message ............................ 194
Warning lamp ................................. 210
see Fuel
Residual heat
Switching on/off ........................... 108
Restraint system
Display message ............................ 187
Introduction ..................................... 34
Warning lamp ................................. 209
Warning lamp (function) ................... 35
Reversing lamps (display mes-
sage) ................................................... 191 Roadside Assistance (breakdown)
.... 21
Roof lining and carpets (cleaning
guidelines) ......................................... 247
Route (navigation)
see Route guidance (navigation)
Route guidance (navigation) ............ 174
S
Safety
Children in the vehicle ..................... 46
Safety system
see Driving safety systems
Seat backrest
Folding back .................................. 217
Seat belts
Adjusting the height ......................... 38
center rear-compartment seat ......... 38
Cleaning ......................................... 246
Correct usage .................................. 37
Fastening ......................................... 38
Important safety guidelines ............. 36
Introduction ..................................... 36
Releasing ......................................... 39
Warning lamp ................................. 204
Warning lamp (function) ................... 40
Seat heating
Indicator lamp (malfunction) ............ 77
Seat ventilation
Indicator lamp (malfunction) ............ 77
Seats
Adjusting (electrically) ..................... 74
Adjusting the 4-way lumbar sup-
port .................................................. 76
Adjusting the head restraint ............ 74
Cleaning the cover ......................... 246
Correct driver's seat position ........... 72
Important safety notes .................... 72
Overview .......................................... 72
Storing settings (memory func-
tion) ................................................. 82
Switching seat heating on/off ......... 76
Switching seat ventilation on/off .... 77
Sensors (cleaning instructions) ....... 244
Service interval display
Displaying a service message (on-
board computer) ............................ 240
Index13
Page 20 of 302
VentilationSetting the airflow ......................... 105
Video
Operating the DVD ......................... 176
VIN ...................................................... 288
W
Warning and indicator lamps
ABS ................................................ 206
Brakes ........................................... 205
Check Engine ................................. 210
Coolant .......................................... 210
Cruise control ................................ 142
Distance warning ........................... 212
DISTRONIC PLUS ........................... 212
ESP
®.............................................. 207
ESP®OFF ....................................... 208
Fuel tank ........................................ 210
LIM (DISTRONIC PLUS) .................. 149
LIM (variable SPEEDTRONIC) ......... 145
Overview .................................. 28, 202
Parking brake ................................ 209
PASSENGER AIR BAG OFF ............... 35
Reserve fuel ................................... 210
Restraint system ............................ 209
Seat belt ........................................ 204
Tire pressure monitor .................... 213
Warning triangle ................................ 248
Warranty .............................................. 20
Washer fluid
Display message ............................ 202
Wheel bolt tightening torque ........... 284
Wheels
Changing a wheel .......................... 281
Checking ........................................ 262
Cleaning ......................................... 242
Important safety notes .................. 262
Interchanging/changing ................ 281
Mounting a new wheel ................... 284
Mounting a wheel .......................... 282
Overview ........................................ 262
Removing a wheel .......................... 283
Storing ........................................... 282
Technical data ............................... 284
Tightening torque ........................... 284
Wheel size/tire size ....................... 284 Window curtain air bag
Display message ............................ 188
Operation ......................................... 43
Windows
see Side windows
Windows (cleaning instructions) ..... 243
Windshield
Defrosting ...................................... 105
Windshield heating ........................... 106
Windshield washer fluid
see Windshield washer system
Windshield washer system
Adding washer fluid ....................... 239
Notes ............................................. 295
Windshield wipers
Problem (malfunction) ..................... 98
Rear window wiper .......................... 97
Replacing the wiper blades .............. 97
Switching on/off .............................. 96
Winter
Driving in winter ............................. 136
Winter o
peration ............................ 264
Winter driving
Snow chains .................................. 264
Winter operation
Overview ........................................ 264
Winter tires
M+S tires ....................................... 264
Wiper blades
Cleaning ......................................... 244
Important safety notes .................... 97
Replacing ......................................... 97
18Index
Page 30 of 302
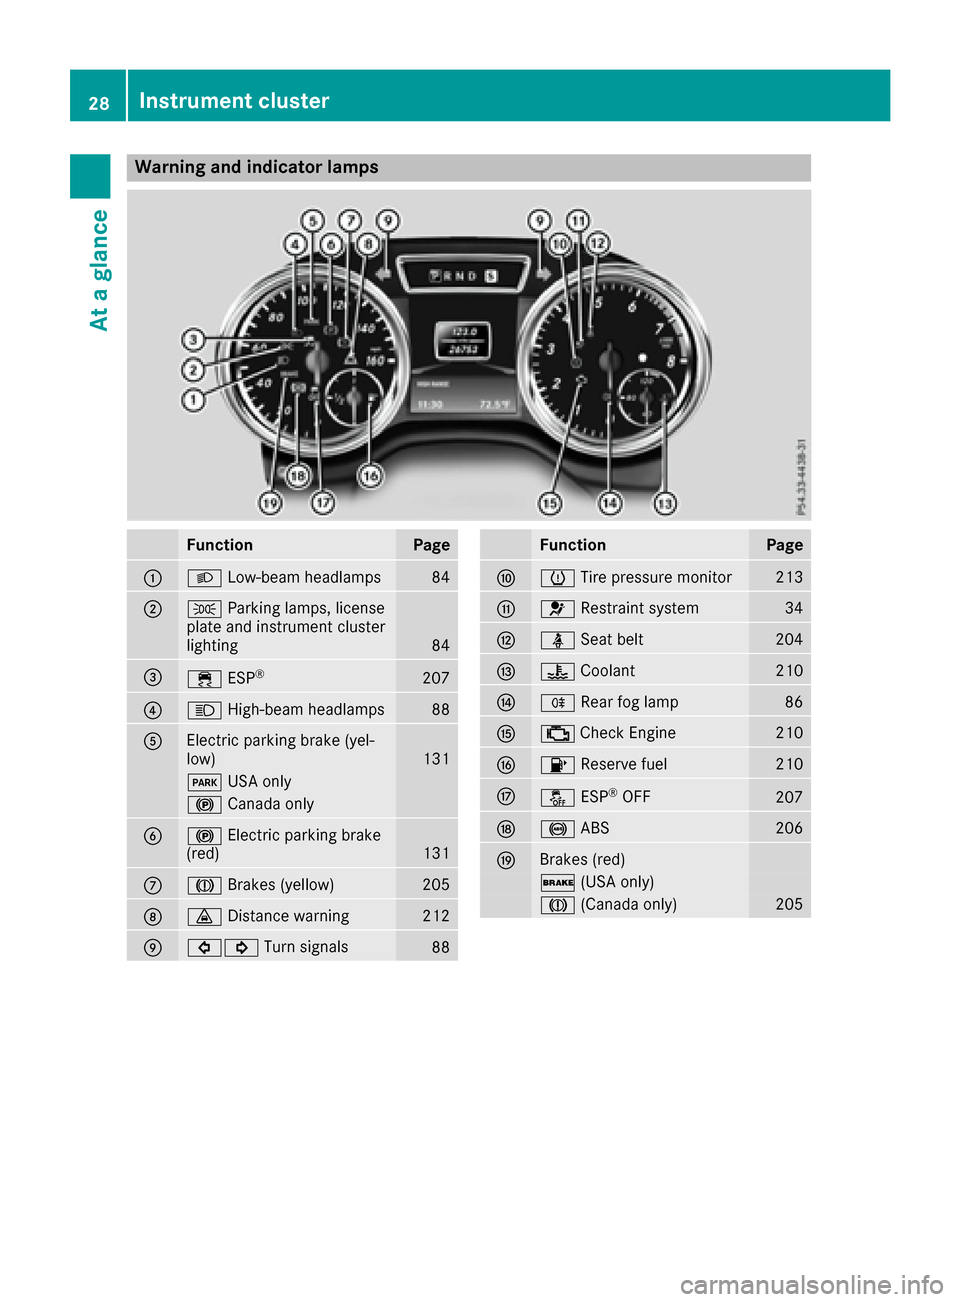
Warning and indicator lamps
FunctionPage
:LLow-beam headlamps84
;TParking lamps, license
plate and instrument cluster
lighting
84
=÷ ESP®207
?KHigh-beam headlamps88
AElectric parking brake (yel-
low)131
FUSA only
!Canada only
B!Electric parking brake
(red)131
CJ Brakes (yellow)205
D·Distance warning212
E#! Turn signals88
FunctionPage
FhTire pressure monitor213
G6Restraint system34
HüSeat belt204
I?Coolant210
JRRear fog lamp86
K;Check Engine210
L8 Reserve fuel210
MåESP®OFF207
N!ABS206
OBrakes (red)
$(USA only)
J(Canada only)205
28Instrument cluster
At a glance
Page 119 of 302
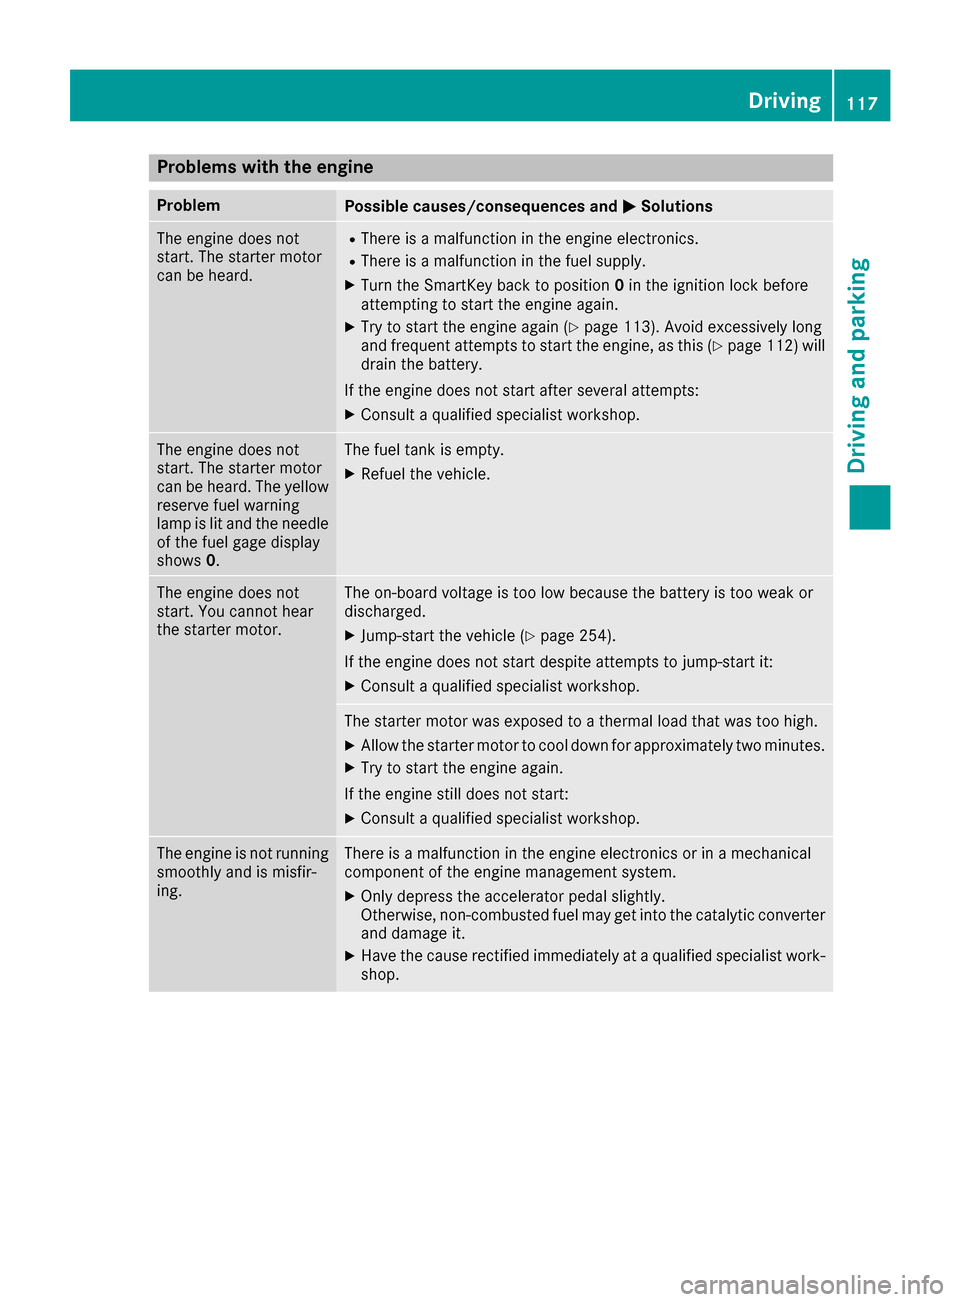
Problems with the engine
ProblemPossible causes/consequences andMSolutions
The engine does not
start. The starter motor
can be heard.RThere is a malfunction in the engine electronics.
RThere is a malfunction in the fuel supply.
XTurn the SmartKey back to position0in the ignition lock before
attempting to start the engine again.
XTry to start the engine again (Ypage 113). Avoid excessively long
and frequent attempts to start the engine, as this (Ypage 112) will
drain the battery.
If the engine does not start after several attempts:
XConsult a qualified specialist workshop.
The engine does not
start. The starter motor
can be heard. The yellow
reserve fuel warning
lamp is lit and the needle
of the fuel gage display
shows 0.The fuel tank is empty.
XRefuel the vehicle.
The engine does not
start. You cannot hear
the starter motor.The on-board voltage is too low because the battery is too weak or
discharged.
XJump-start the vehicle (Ypage 254).
If the engine does not start despite attempts to jump-start it:
XConsult a qualified specialist workshop.
The starter motor was exposed to a thermal load that was too high.
XAllow the starter motor to cool down for approximately two minutes.
XTry to start the engine again.
If the engine still does not start:
XConsult a qualified specialist workshop.
The engine is not running
smoothly and is misfir-
ing.There is a malfunction in the engine electronics or in a mechanical
component of the engine management system.
XOnly depress the accelerator pedal slightly.
Otherwise, non-combusted fuel may get into the catalytic converter
and damage it.
XHave the cause rectified immediately at a qualified specialist work-
shop.
Driving117
Driving and parking
Z
Page 130 of 302
!Overfilling the fuel tank could damage the
fuel system.
!Take care not to spill any fuel on painted
surfaces. You could otherwise damage the
paintwork.
!Use a filter when refueling from a fuel can.
Otherwise, the fuel lines and/or injection sys-
tem could be blocked by particles from the
fuel can.
If you overfill the fuel tank, pressure may build
up in the fuel tank. This could cause fuel to spray
out when the fuel pump nozzle is removed.
There is a risk of injury. The fuel tank is full when
the fuel pump nozzle first switches off. End the
refueling process.
For further information on fuel and fuel quality
(
Ypage 289).
Refueling
Vehicles with a fuel filler flap
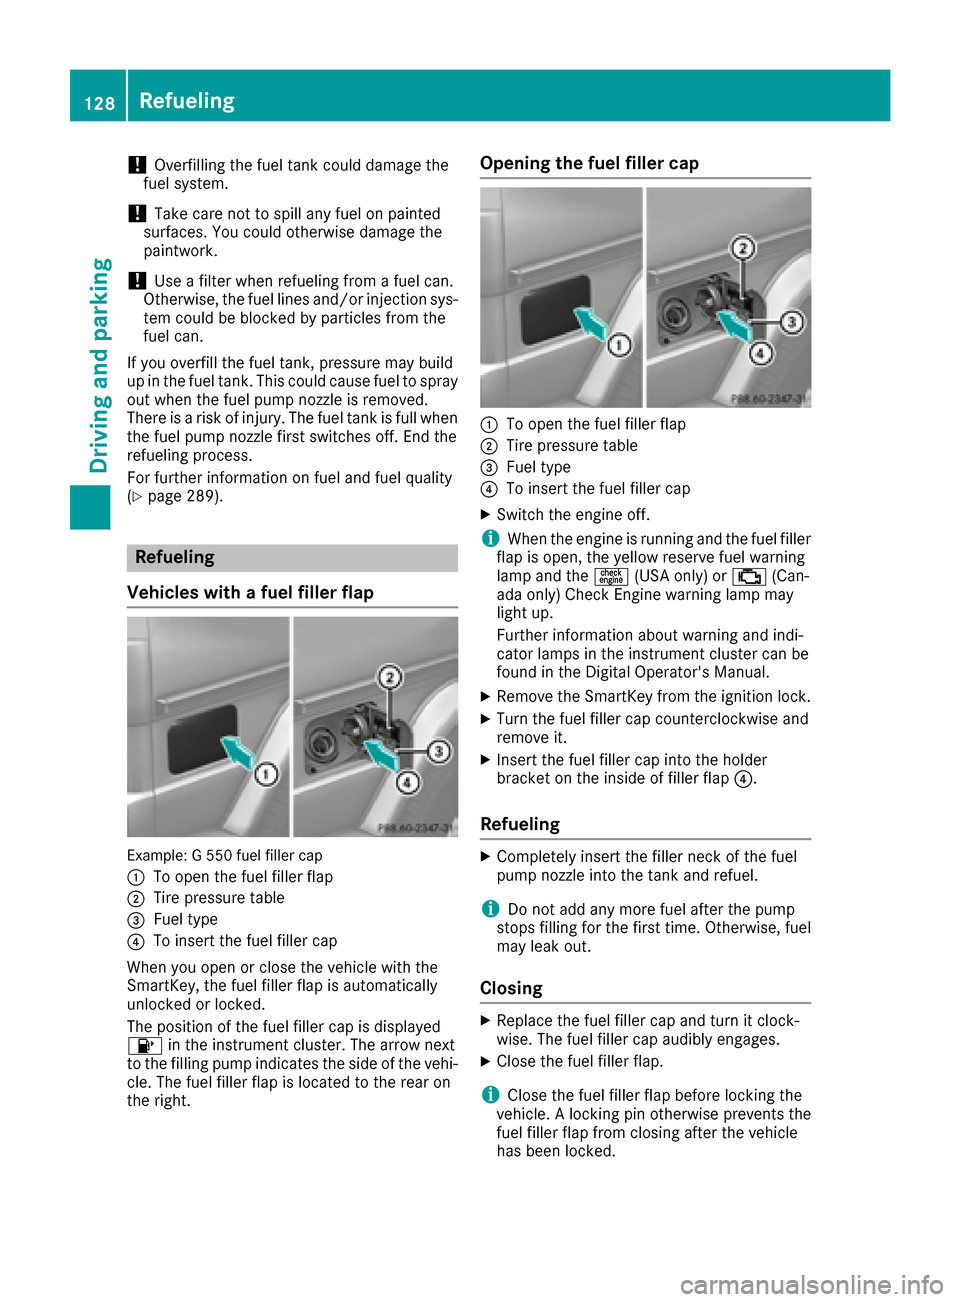
Example: G 550 fuel filler cap
:
To open the fuel filler flap
;Tire pressure table
=Fuel type
?To insert the fuel filler cap
When you open or close the vehicle with the
SmartKey, the fuel filler flap is automatically
unlocked or locked.
The position of the fuel filler cap is displayed
8 in the instrument cluster. The arrow next
to the filling pump indicates the side of the vehi-
cle. The fuel filler flap is located to the rear on
the right.
Opening the fuel filler cap
:To open the fuel filler flap
;Tire pressure table
=Fuel type
?To insert the fuel filler cap
XSwitch the engine off.
iWhen the engine is running and the fuel filler
flap is open, the yellow reserve fuel warning
lamp and the =(USA only) or ;(Can-
ada only) Check Engine warning lamp may
light up.
Further information about warning and indi-
cator lamps in the instrument cluster can be
found in the Digital Operator's Manual.
XRemove the SmartKey from the ignition lock.
XTurn the fuel filler cap counterclockwise and
remove it.
XInsert the fuel filler cap into the holder
bracket on the inside of filler flap ?.
Refueling
XCompletely insert the filler neck of the fuel
pump nozzle into the tank and refuel.
iDo not add any more fuel after the pump
stops filling for the first time. Otherwise, fuel
may leak out.
Closing
XReplace the fuel filler cap and turn it clock-
wise. The fuel filler cap audibly engages.
XClose the fuel filler flap.
iClose the fuel filler flap before locking the
vehicle. A locking pin otherwise prevents the
fuel filler flap from closing after the vehicle
has been locked.
128Refueling
Driving and parking
Page 205 of 302
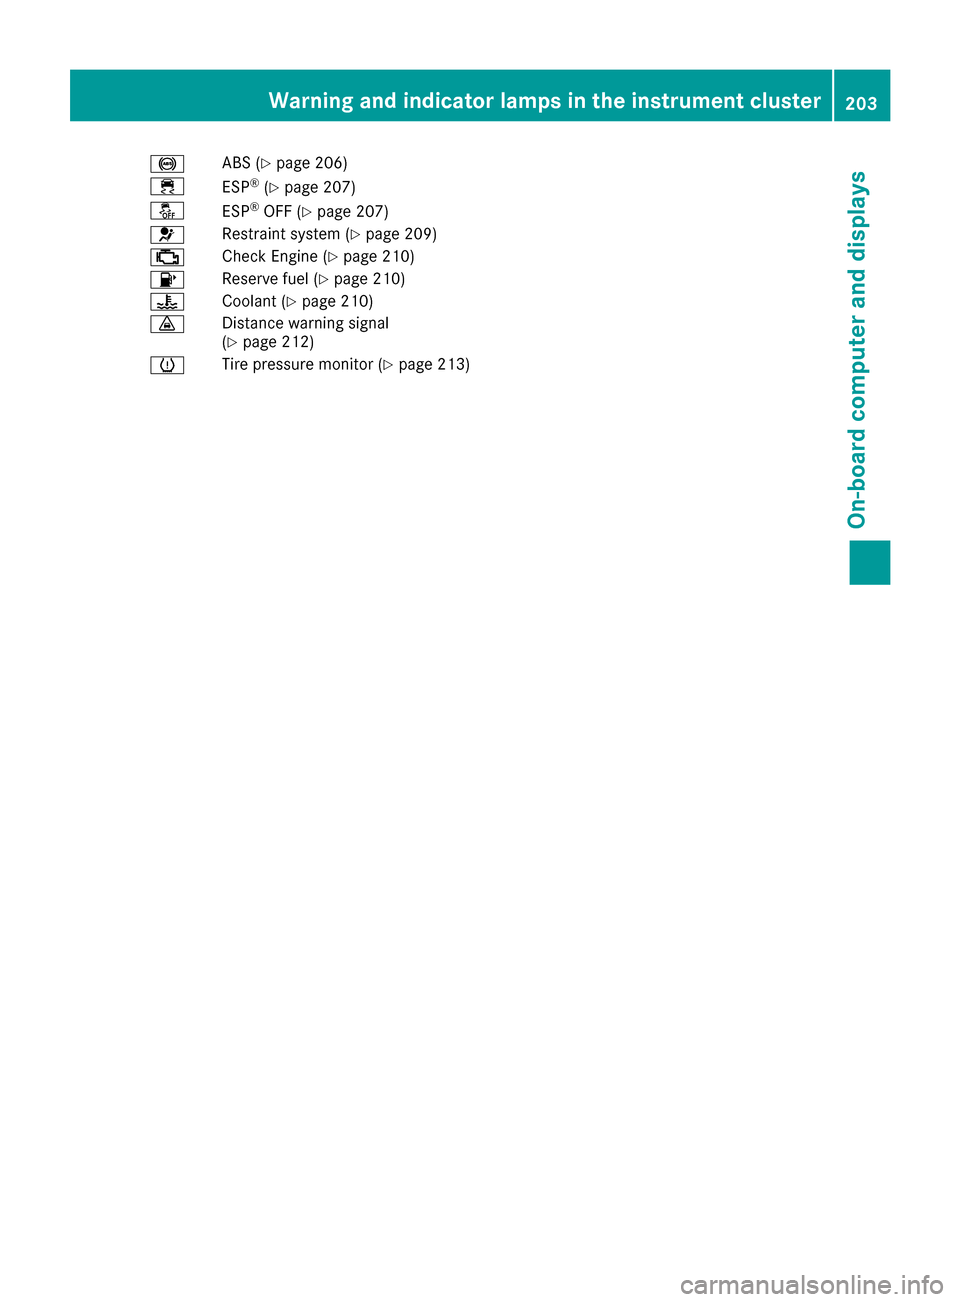
!ABS (Ypage 206)
÷ ESP®(Ypage 207)
å ESP®OFF (Ypage 207)
6 Restraint system (
Ypage 209)
; Check Engine (
Ypage 210)
8 Reserve fuel (
Ypage 210)
? Coolant (
Ypage 210)
· Distance warning signal
(
Ypage 212)
h Tire pressure monitor (
Ypage 213)
Warning and indicator lamps in the instrument cluster203
On-board computer and displays
Z
Page 212 of 302
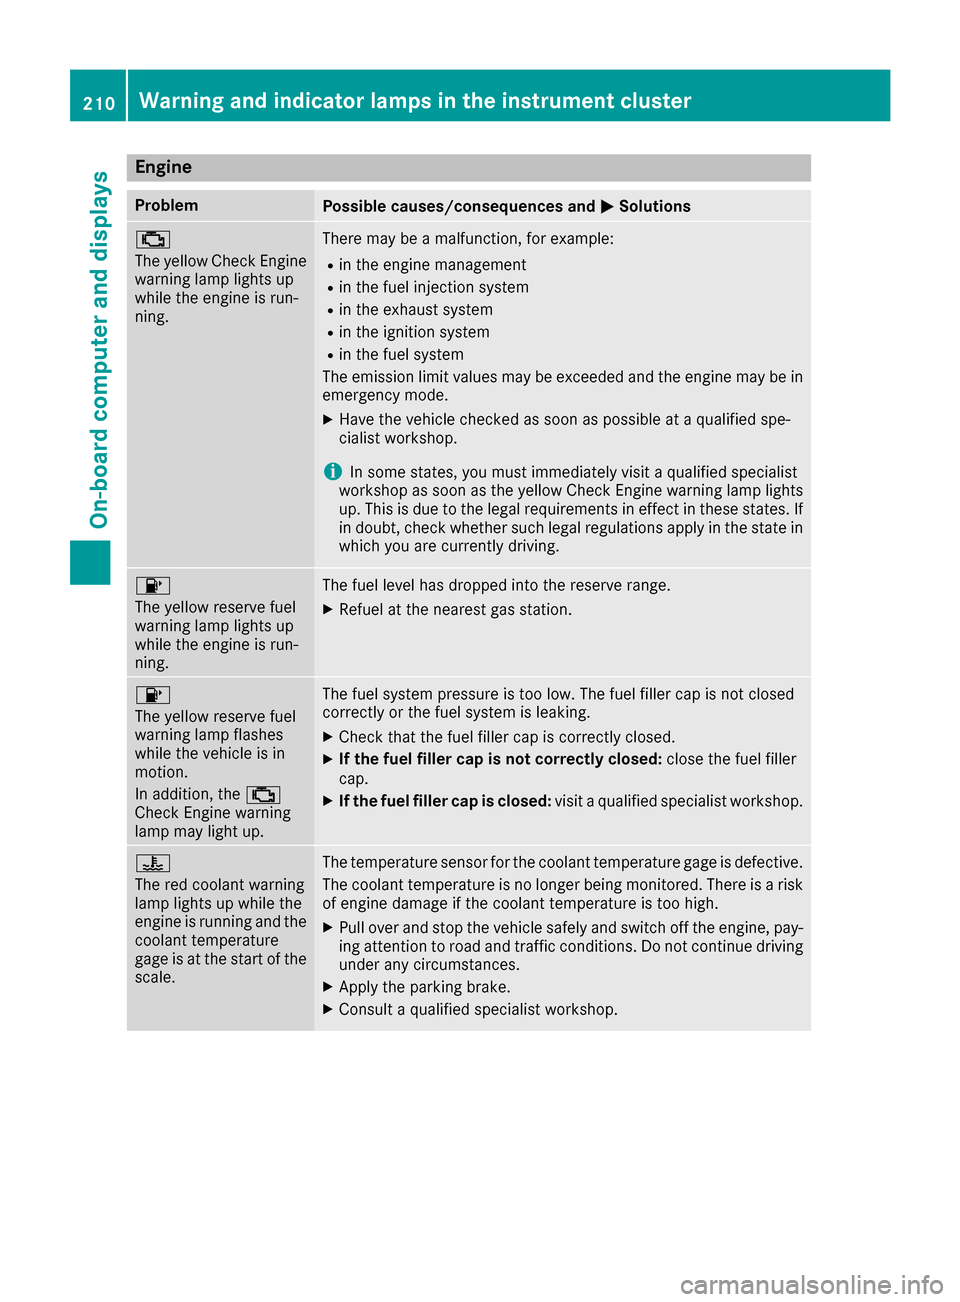
Engine
ProblemPossible causes/consequences andMSolutions
;
The yellow Check Engine
warning lamp lights up
while the engine is run-
ning.There may be a malfunction, for example:
Rin the engine management
Rin the fuel injection system
Rin the exhaust system
Rin the ignition system
Rin the fuel system
The emission limit values may be exceeded and the engine may be in
emergency mode.
XHave the vehicle checked as soon as possible at a qualified spe-
cialist workshop.
iIn some states, you must immediately visit a qualified specialist
workshop as soon as the yellow Check Engine warning lamp lights
up. This is due to the legal requirements in effect in these states. If
in doubt, check whether such legal regulations apply in the state in
which you are currently driving.
8
The yellow reserve fuel
warning lamp lights up
while the engine is run-
ning.The fuel level has dropped into the reserve range.
XRefuel at the nearest gas station.
8
The yellow reserve fuel
warning lamp flashes
while the vehicle is in
motion.
In addition, the ;
Check Engine warning
lamp may light up.The fuel system pressure is too low. The fuel filler cap is not closed
correctly or the fuel system is leaking.
XCheck that the fuel filler cap is correctly closed.
XIf the fuel filler cap is not correctly closed: close the fuel filler
cap.
XIf the fuel filler cap is closed: visit a qualified specialist workshop.
?
The red coolant warning
lamp lights up while the
engine is running and the
coolant temperature
gage is at the start of the
scale.The temperature sensor for the coolant temperature gage is defective.
The coolant temperature is no longer being monitored. There is a risk
of engine damage if the coolant temperature is too high.
XPull over and stop the vehicle safely and switch off the engine, pay-
ing attention to road and traffic conditions. Do not continue driving
under any circumstances.
XApply the parking brake.
XConsult a qualified specialist workshop.
210Warning and indicator lamps in the instrument cluster
On-board computer and displays
Page 245 of 302
increased corrosion of the brake discs and
brake pads/linings. For this reason, you
should drive for a few minutes after cleaning.
Braking heats the brake discs and the brake
pads/linings, thus drying them. The vehicle
can then be parked.
Cleaning the paintwork
!Do not affix:
Rstickers
Rfilms
Rmagnetic plates or similar items
to painted surfaces. You could otherwise
damage the paintwork.
Scratches, corrosive deposits, areas affected by corrosion and damage caused by inadequate
care cannot always be completely repaired. In
such cases, visit a qualified specialist workshop.
XRemove dirt immediately, where possible,
while avoiding rubbing too hard.
XSoak insect remains with insect remover and
rinse off the treated areas afterwards.
XSoak bird droppings with water and rinse off
the treated areas afterwards.
XRemove coolant, brake fluid, tree resin, oils,
fuels and greases by rubbing gently with a
cloth soaked in petroleum ether or lighter
fluid.
XUse tar remover to remove tar stains.
XUse silicone remover to remove wax.
If water no longer forms "beads" on the paint
surface, use the paint care products recommen-
ded and approved by Mercedes-Benz. This is the
case approximately every three to five months,
depending on the climate conditions and the
care product used.
If dirt has penetrated the paint surface or if the
paint has become dull, the paint cleaner recom-
mended and approved by Mercedes-Benz
should be used.
Do not use these care products in the sun or on
the hood while the hood is hot.
XUse a suitable touch-up stick, e.g. MB Touch-
Up Stick, to correct smaller areas of paint
damage quickly and provisionally.
Matte finish care
!Never polish the vehicle or the light alloy
wheels. Polishing causes the finish to shine.
!Never use paint cleaner, buffing or polishing
products, or gloss preserver, e.g. wax. These
products are only suitable for high-gloss sur-
faces. Their use on vehicles with matte finish
leads to considerable surface damage (shiny,
spotted areas).
Always have paintwork repairs carried out at a qualified specialist workshop.
!Do not use wash programs with a hot wax
treatment under any circumstances.
If your vehicle has a clear matte finish, observe
the following instructions in order to avoid dam-
age to the paintwork due to incorrect care.
These notes also apply to light alloy wheels with a clear matte finish.
iThe vehicle should preferably be washed by
hand using a soft sponge, car shampoo and
plenty of water.
iUse only insect remover and car shampoo
from the range of recommended and
approved Mercedes-Benz care products.
Cleaning the windows
GWARNING
You could become trapped by the windshield wipers if they start moving while cleaning the
windshield or wiper blades. There is a risk of
injury.
Always switch off the windshield wipers and
the ignition before cleaning the windshield or
wiper blades.
!Do not use dry cloths, abrasive products,
solvents or cleaning agents containing sol-
vents to clean the inside of the windows. Do
not touch the insides of the windows with
hard objects, e.g. an ice scraper or ring. There
is otherwise a risk of damaging the windows.
!Clean the water drainage channels of the
windshield and the rear window at regular
intervals. Deposits such as leaves, petals and pollen may under certain circumstances pre-
vent water from draining away. This can lead
Care243
Maintenance and care
Z
Page 292 of 302
Fuel
Important safety notes
GWARNIN G
Fuel is highly flammable. If you handle fuel
incorrectly, there is aris kof fir eand explo-
sion .
You must avoi dfire, open flames, creating
sparks and smoking. Switc hoff th eengin e
and ,if applicable, th eauxiliary heating before
refueling.
GWARNIN G
Fuel is poisonous and hazardous to health.
Ther eis aris kof injury.
You must mak esure that fuel does no tcome
int ocontact wit hyour skin, eyes or clothing
and that it is no tswallowed. Do no tinhale fuel
vapors. Kee pfuel away from children .
If you or other scome int ocontact wit hfuel ,
observ eth efollowing:
RWash away fuel from skin immediately
usin gsoap and water.
RIf fuel comes int ocontact wit hyour eyes,
immediately rinse them thoroughly wit h
clean water. Seek medical assistanc ewith-
out delay.
RIf fuel is swallowed, seek medical assis-
tance without delay. Do no tinduce vomit -
ing .
RImmediately chang eout of clothing whic h
has come int ocontact wit hfuel .
Tank capacity
The total capacit yof th efuel tan kmay var y
depending on th eequipmen tin th evehicle.
ModelTotal capa-
city
All models25.4 US gal
(96.0 l)
ModelOf which
reserve
All modelsApprox.
3.7 US gal (14.0 l)
Gasoline
Fuel grade
!Do not use diesel to refuel vehicles with a
gasoline engine. Do not switch on the ignition
if you accidentally refuel with the wrong fuel.
Otherwise, the fuel will enter the fuel system.
Even small amounts of the wrong fuel could
result in damage to the fuel system and the
engine. Notify a qualified specialist workshop
and have the fuel tank and fuel lines drained
completely.
!Only refuel using unleaded premium grade
gasoline with at least 91 AKI/95 RON.
!Only use the fuel recommended. Operating
the vehicle with other fuels can lead to engine failure.
!Do not use the following:
RE85 (gasoline with 85% ethanol)
RE100 (100% ethanol)
RM15 (gasoline with 15% methanol)
RM30 (gasoline with 30% methanol)
RM85 (gasoline with 85% methanol)
RM100 (100% methanol)
RGasoline with metalliferous additives
RDiesel
Do not mix such fuels with the fuel recom-
mended for your vehicle. Do not use addi-
tives. Otherwise, engine damage may occur.
This does not include cleaning additives for
the removal and prevention of residue build-
up. Gasoline may only be mixed with cleaning
additives recommended by Mercedes-Benz;
see "Additives". You can obtain further infor-
mation from any authorized Mercedes-Benz
Center.
!To ensure the longevity and full perform-
ance of the engine, only premium-grade
unleaded gasoline must be used.
290Service products and filling capacities
Technical data