heating MERCEDES-BENZ G-Class 2016 W463 Owner's Manual
[x] Cancel search | Manufacturer: MERCEDES-BENZ, Model Year: 2016, Model line: G-Class, Model: MERCEDES-BENZ G-Class 2016 W463Pages: 302, PDF Size: 7.04 MB
Page 11 of 302
Front-passenger footwell ............... 260
Transmission tunnel ....................... 260
Fuse extractor ................................... 259
Fuses
Allocation chart ............................. 259
Before changing ............................. 259
Dashboard fuse box ....................... 259
Fuse allocation chart ..................... 259
Fuse box in the front-passenger
footwell .......................................... 260
Fuse box in the transmission tun-
nel ................................................. 260
Important safety notes .................. 259
In the battery case ......................... 260
G
Garage door openerClearing the memory ..................... 234
General notes ................................ 231
Important safety notes .................. 231
Opening/closing the garage doo r..2 34
Programming the remote control ... 231
Gasoline ............................................. 290
Gear indicator (on-board com-
puter) ..................................................1 82
Gear or selector lever (cleaning
guidelines) ......................................... 246
Genuine parts ...................................... 19
Genuine wood trim and trim strips
(cleaning instructions) ......................246
Glove box ...........................................2 15
Gradient-climbing capability (max-
imum) ................................................. 140
GTW (Gross Trailer Weight) (defini-
tion) .................................................... 279
H
Hazard warning lamps ........................ 89
Head restraints
Adjusting ......................................... 74
Adjusting (rear) ................................ 75
Installing/removing (rear) ................ 75
Luxury .............................................. 75
Resetting (front) ............................... 75
see NECK-PRO head restraints
see NECK-PRO luxury head restraints Headlamps
Adding fluid to cleaning system ..... 239
Cleaning ......................................... 244
Cleaning system (function) .............. 87
Cleaning system (notes) ................ 295
Fogging up ....................................... 89
Protective grille ................................ 95
see Automatic headlamp mode
Heating
see Climate control
High-beam headlamps
Display message ............................ 190
Switching on/off .............................. 88
Hill start assist .................................. 114
HOLD function
Function/notes .............................1 57
Hood
Closing ...........................................2 36
Display message ............................ 201
Important safety notes .................. 235
Opening ......................................... 236
Horn ...................................................... 26
Hydroplaning ..................................... 135
I
Immobilizer.......................................... 59
Instrument cluster
Overview ........................................ 171
Warning and indicator lamps ......... 202
Instrument cluster lighting .............. 171
Interior lighting
Automatic control ............................ 90
Cargo compartment lamp ................ 91
Delayed switch-off (on-board
computer) ...................................... 180
Manual control ................................. 90
Overview .......................................... 89
Reading lamp ................................... 89
Rear interior lighting ........................ 92
J
JackPump lever ..................................... 283
Storage location ............................ 248
Using ............................................. 282
Jump starting (engine) ......................254
Index9
Page 15 of 302
Switching on/off .............................. 86
Rear lamps
see Lights
Rear seat bench
Folding into an upright position ..... 218
Rear view camera
Function/notes ............................. 161
Rear view camera (cleaning
instructions) ...................................... 244
Rear window defroster
Problem (malfunction) ................... 107
Switching on/off ........................... 107
Rear window wiper
Switching on/off .............................. 97
Rear-view mirror
Dipping (automatic) ......................... 81
Refrigerant (air-conditioning sys-
tem)
Important safety notes .................. 293
Refueling
Fuel gauge ..................................... 171
Important safety notes .................. 127
Refueling process .......................... 128
see Fuel
Remote control
Programming (garage door
opener) .......................................... 231
Replacing bulbs
Important safety notes .................... 92
Overview of bulb types .................... 93
Reporting safety defects .................... 23
Rescue card ......................................... 24
Reserve (fuel tank)
see Fuel
Reserve fuel
Display message ............................ 194
Warning lamp ................................. 210
see Fuel
Residual heat
Switching on/off ........................... 108
Restraint system
Display message ............................ 187
Introduction ..................................... 34
Warning lamp ................................. 209
Warning lamp (function) ................... 35
Reversing lamps (display mes-
sage) ................................................... 191 Roadside Assistance (breakdown)
.... 21
Roof lining and carpets (cleaning
guidelines) ......................................... 247
Route (navigation)
see Route guidance (navigation)
Route guidance (navigation) ............ 174
S
Safety
Children in the vehicle ..................... 46
Safety system
see Driving safety systems
Seat backrest
Folding back .................................. 217
Seat belts
Adjusting the height ......................... 38
center rear-compartment seat ......... 38
Cleaning ......................................... 246
Correct usage .................................. 37
Fastening ......................................... 38
Important safety guidelines ............. 36
Introduction ..................................... 36
Releasing ......................................... 39
Warning lamp ................................. 204
Warning lamp (function) ................... 40
Seat heating
Indicator lamp (malfunction) ............ 77
Seat ventilation
Indicator lamp (malfunction) ............ 77
Seats
Adjusting (electrically) ..................... 74
Adjusting the 4-way lumbar sup-
port .................................................. 76
Adjusting the head restraint ............ 74
Cleaning the cover ......................... 246
Correct driver's seat position ........... 72
Important safety notes .................... 72
Overview .......................................... 72
Storing settings (memory func-
tion) ................................................. 82
Switching seat heating on/off ......... 76
Switching seat ventilation on/off .... 77
Sensors (cleaning instructions) ....... 244
Service interval display
Displaying a service message (on-
board computer) ............................ 240
Index13
Page 17 of 302
Steering wheel heating .................... 78
Storing settings (memory func-
tion) ................................................. 82
Steering wheel heating
Indicator lamp (malfunction) ............ 79
Steering wheel paddle shifters ........ 123
Stopwatch (RACETIMER) ................... 182
Stowage areas ................................... 215
Stowage compartment
Door stowage compartment .......... 216
Stowage compartments
Armrest (under) ............................. 216
Cup holders ................................... 220
Glove box ....................................... 215
Important safety information ......... 215
Stowage pockets ........................... 216
Summer tires ..................................... 264
Sun visor ............................................ 221
Surround lighting (on-board com-
puter) .................................................. 179
SUV
(Sport Utility Vehicle) ....................... 22
Switching air-recirculation mode
on/off ................................................. 107
Switching off the alarm (ATA) ............ 59
T
Tachometer........................................ 171
Tail lamps
Display message ............................ 191
see Lights
Tank content
Fuel gauge ..................................... 171
Technical data
Capacities ...................................... 289
Tires ............................................... 284
Tires/wheels ................................. 284
Trailer loads ................................... 298
Vehicle data ................................... 295
Wheels ........................................... 284
TELEAID
Call priority .................................... 228
Downloading destinations
(COMAND) ..................................... 228
Downloading routes ....................... 230
Emergency call .............................. 225
Geo fencing ................................... 230 Important safety notes .................. 224
Locating a stolen vehicle ............... 229
MB info call button ........................ 227
Remote vehicle locking .................. 229
Roadside Assistance button .......... 226
Self-test ......................................... 225
Speed alert .................................... 230
System .......................................... 225
Triggering the vehicle alarm ........... 231
Vehicle remote malfunction diag-
nosis .............................................. 229
Vehicle remote unlocking .............. 228
Telephone
Accepting a call ............................. 177
Display message ............................ 202
Menu (on-board computer) ............ 177
Number from the phone book ........ 177
Redialing ........................................ 178
Rejecting/ending a call ................. 177
Telephone compartment .................. 216
Temperature
Coolant .......................................... 171
Coolant (on-board computer) ......... 182
Engine oil (on-board computer) ...... 182
Outside temperature ...................... 171
Setting (climate control) ................ 105
Theft deterrent systems
ATA (Anti-Theft Alarm system) ......... 59
Immobilizer ...................................... 59
Tilt/sliding sunroof
see Sliding sunroof
Time
see separate operating instructions
Timing (RACETIMER) ......................... 182
Tire pressure
Calling up (on-board computer) ..... 268
Checking manually ........................ 268
Display messa ge ............................ 198
Ma
ximum ....................................... 268
Notes ............................................. 266
Recommended ............................... 265
Table (single tires) ......................... 266
Tire pressure monitor
Checking the tire pressure elec-
tronically ........................................ 270
Function/notes ............................. 268
Restarting ...................................... 270
Warning lamp ................................. 213
Index15
Page 20 of 302
VentilationSetting the airflow ......................... 105
Video
Operating the DVD ......................... 176
VIN ...................................................... 288
W
Warning and indicator lamps
ABS ................................................ 206
Brakes ........................................... 205
Check Engine ................................. 210
Coolant .......................................... 210
Cruise control ................................ 142
Distance warning ........................... 212
DISTRONIC PLUS ........................... 212
ESP
®.............................................. 207
ESP®OFF ....................................... 208
Fuel tank ........................................ 210
LIM (DISTRONIC PLUS) .................. 149
LIM (variable SPEEDTRONIC) ......... 145
Overview .................................. 28, 202
Parking brake ................................ 209
PASSENGER AIR BAG OFF ............... 35
Reserve fuel ................................... 210
Restraint system ............................ 209
Seat belt ........................................ 204
Tire pressure monitor .................... 213
Warning triangle ................................ 248
Warranty .............................................. 20
Washer fluid
Display message ............................ 202
Wheel bolt tightening torque ........... 284
Wheels
Changing a wheel .......................... 281
Checking ........................................ 262
Cleaning ......................................... 242
Important safety notes .................. 262
Interchanging/changing ................ 281
Mounting a new wheel ................... 284
Mounting a wheel .......................... 282
Overview ........................................ 262
Removing a wheel .......................... 283
Storing ........................................... 282
Technical data ............................... 284
Tightening torque ........................... 284
Wheel size/tire size ....................... 284 Window curtain air bag
Display message ............................ 188
Operation ......................................... 43
Windows
see Side windows
Windows (cleaning instructions) ..... 243
Windshield
Defrosting ...................................... 105
Windshield heating ........................... 106
Windshield washer fluid
see Windshield washer system
Windshield washer system
Adding washer fluid ....................... 239
Notes ............................................. 295
Windshield wipers
Problem (malfunction) ..................... 98
Rear window wiper .......................... 97
Replacing the wiper blades .............. 97
Switching on/off .............................. 96
Winter
Driving in winter ............................. 136
Winter o
peration ............................ 264
Winter driving
Snow chains .................................. 264
Winter operation
Overview ........................................ 264
Winter tires
M+S tires ....................................... 264
Wiper blades
Cleaning ......................................... 244
Important safety notes .................... 97
Replacing ......................................... 97
18Index
Page 32 of 302
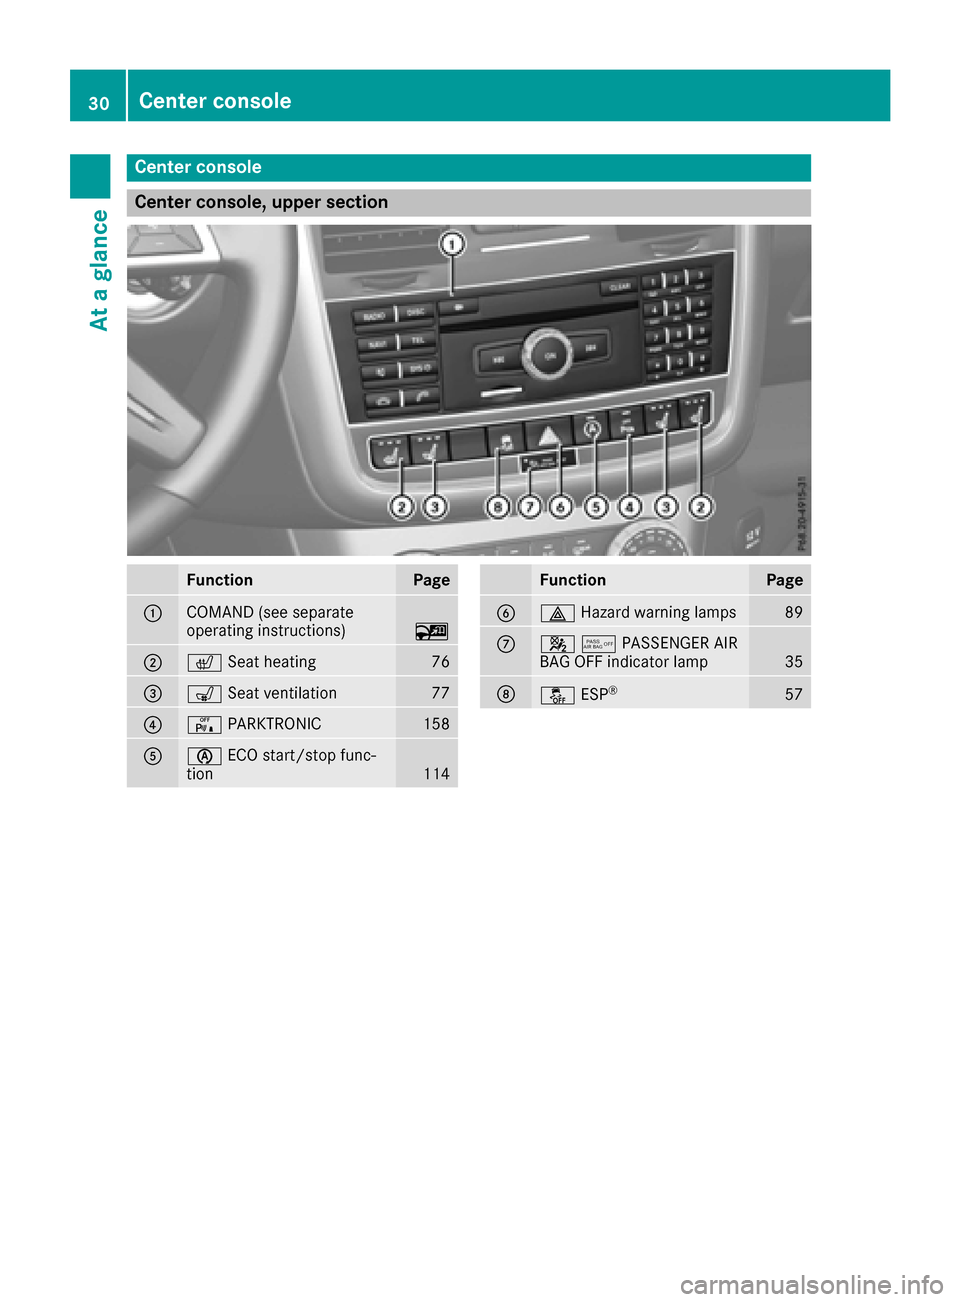
Center console
Center console, upper section
FunctionPage
:COMAND (see separate
operating instructions)~
;cSeat heating76
=sSeat ventilation77
?cPARKTRONIC158
AèECO start/stop func-
tion114
FunctionPage
B£ Hazard warning lamps89
C45PASSENGER AIR
BAG OFF indicator lamp35
DåESP®57
30Center console
At a glance
Page 33 of 302
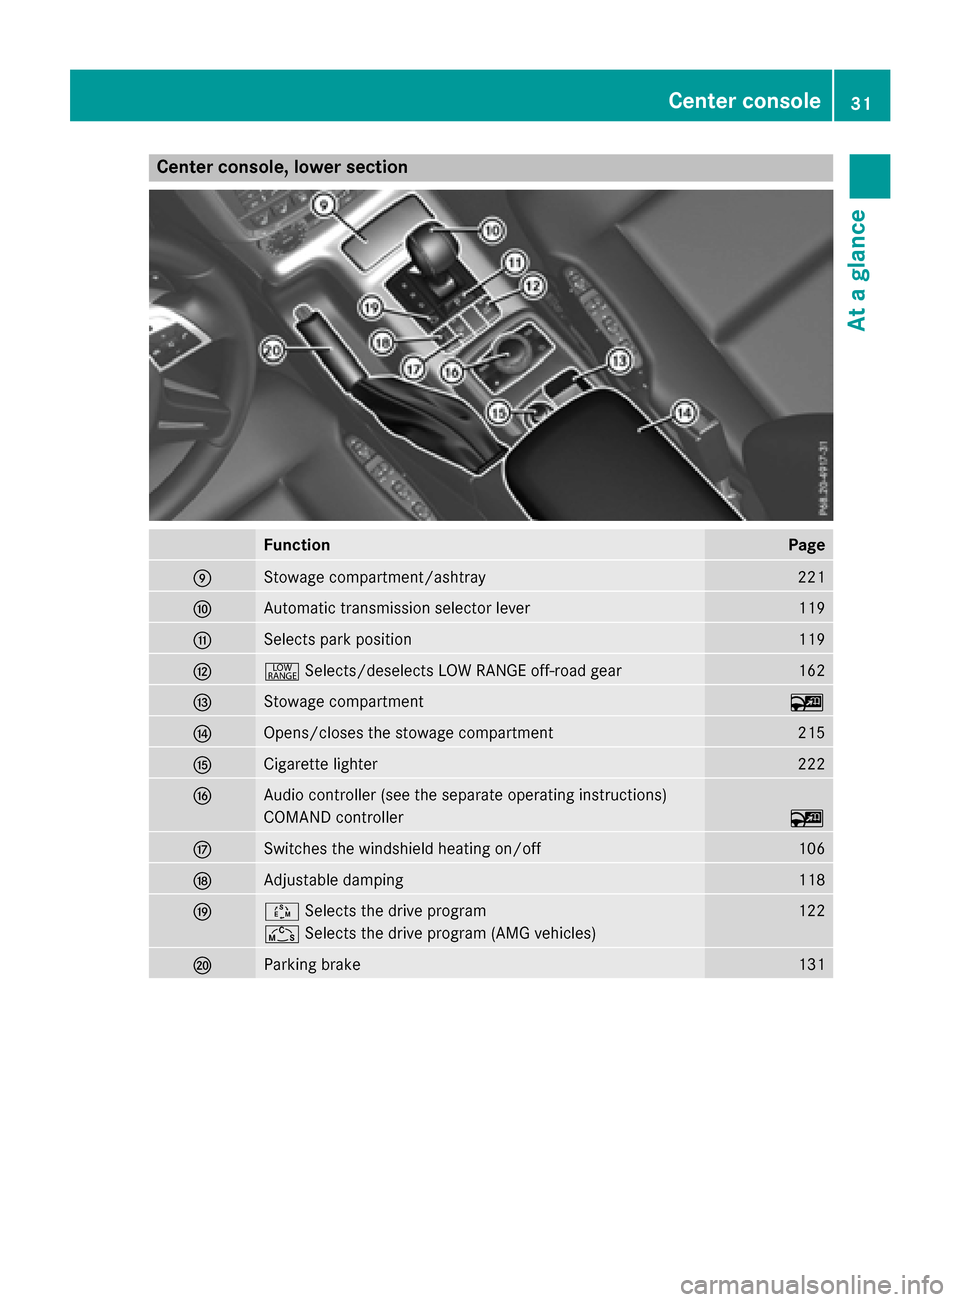
Center console, lower section
FunctionPage
EStowage compartment/ashtray221
FAutomatic transmission selector lever119
GSelects park position119
H+Selects/deselects LOW RANGE off-road gear162
IStowage compartment~
JOpens/closes the stowage compartment215
KCigarette lighter222
LAudio controller (see the separate operating instructions)
COMAND controller~
MSwitches the windshield heating on/off106
NAdjustable damping118
OÚSelects the drive program122
ÑSelects the drive program (AMG vehicles)
PParking brake131
Center console31
At a glance
Page 65 of 302
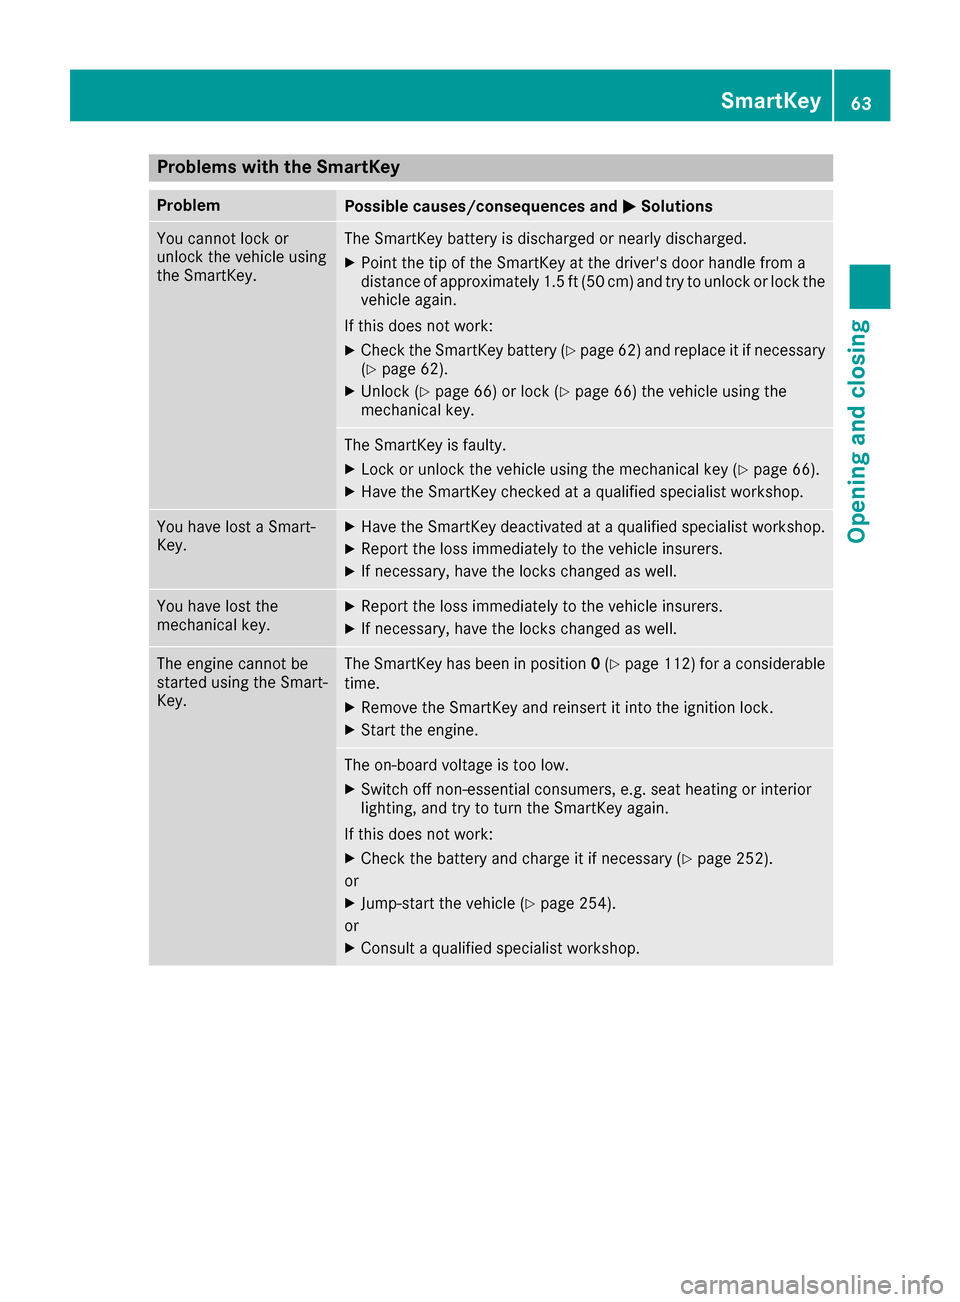
Problems with the SmartKey
ProblemPossible causes/consequences andMSolutions
You cannot lock or
unlock the vehicle using
the SmartKey.The SmartKey battery is discharged or nearly discharged.
XPoint the tip of the SmartKey at the driver's door handle from a
distance of approximately 1.5 ft (50 cm) and try to unlock or lock the
vehicle again.
If this does not work:
XCheck the SmartKey battery (Ypage 62) and replace it if necessary
(Ypage 62).
XUnlock (Ypage 66) or lock (Ypage 66) the vehicle using the
mechanical key.
The SmartKey is faulty.
XLock or unlock the vehicle using the mechanical key (Ypage 66).
XHave the SmartKey checked at a qualified specialist workshop.
You have lost a Smart-
Key.XHave the SmartKey deactivated at a qualified specialist workshop.
XReport the loss immediately to the vehicle insurers.
XIf necessary, have the locks changed as well.
You have lost the
mechanical key.XReport the loss immediately to the vehicle insurers.
XIf necessary, have the locks changed as well.
The engine cannot be
started using the Smart-
Key.The SmartKey has been in position 0(Ypage 112) for a considerable
time.
XRemove the SmartKey and reinsert it into the ignition lock.
XStart the engine.
The on-board voltage is too low.
XSwitch off non-essential consumers, e.g. seat heating or interior
lighting, and try to turn the SmartKey again.
If this does not work:
XCheck the battery and charge it if necessary (Ypage 252).
or
XJump-start the vehicle (Ypage 254).
or
XConsult a qualified specialist workshop.
SmartKey63
Opening and closing
Z
Page 75 of 302
When leaving the vehicle, always take the
SmartKey with you and lock the vehicle. Never
leave children unsupervised in the vehicle.
The seats can still be adjusted when there is no
SmartKey in the ignition lock.
GWARNING
When you adjust a seat, you or other vehicle
occupants could become trapped, e.g. on the seat guide rail. There is a risk of injury.
Make sure when adjusting a seat that no one
has any body parts in the sweep of the seat.
Observe the safety notes on "Air bags"
(
Ypage 40) and "Children in the vehicle"
(Ypage 46).
GWARNING
You could lose control of your vehicle if you do the following while driving:
Radjust the driver's seat, head restraint,
steering wheel or mirrors
Rfasten the seat belt
There is a risk of an accident.
Adjust the driver's seat, head restraint, steer-
ing wheel and mirror and fasten your seat belt before starting the engine.
GWARNING
If the head restraints are not installed or not
adjusted correctly, they cannot provide pro-
tection as intended. There is an increased risk
of injury in the head and neck area, e.g. in the event of an accident or when braking.
Always drive with the head restraints instal-
led. Before driving off, make sure for every
vehicle occupant that the center of the head
restraint supports the back of the head at
about eye level.
Make sure that you do not rotate the head
restraints of the front and rear seats when
adjusting the head restraints. Otherwise, you
cannot adjust the height and angle of the head
restraints correctly.
Adjust the head restraint so that it is as close as
possible to your head.
GWARNING
According to accident statistics, children are
safer when properly restrained on the rear
seats than on the front-passenger seat. Thus,
we strongly recommend that children be
placed in the rear seat whenever possible.
Regardless of seating position, children 12
years old and under must be seated and prop-
erly secured in an appropriately sized child
restraint system or booster seat recommen-
ded for the size and weight of the child. For
additional information, see the "Children in
the vehicle" section.
A child's risk of serious or fatal injuries is sig-
nificantly increased if the child restraints are
not properly secured in the vehicle and/or the
child is not properly secured in the child
restraint.
!To avoid damage to the seats and the seat
heating, observe the following information:
Rkeep liquids from spilling on the seats. If
liquid is spilled on the seats, dry them as
soon as possible.
Rif the seat covers are damp or wet, do not
switch on the seat heating. The seat heat-
ing should also not be used to dry the seats.
Rclean the seat covers as recommended;
see the "Interior care" section.
Rdo not transport heavy loads on the seats.
Do not place sharp objects on the seat
cushions, e.g. knives, nails or tools. The
seats should only be occupied by passen-
gers, if possible.
Rwhen the seat heating is in operation, do
not cover the seats with insulating materi-
als, e.g. blankets, coats, bags, seat covers,
child seats or booster seats.
!Make sure that there are no objects in the
footwell under or behind the seats when mov-
ing the seats back. There is a risk that the
seats and/or the objects could be damaged.
!When the rear bench seat is folded for-
wards, the front seats cannot be moved to
their rearmost position. You could otherwise
damage the seats and the rear bench seat.
!Make sure that the sun visor is folded up
before adjusting the backrest and head
restraint height. The head restraint and sun
Seats73
Seats, steering wheel and mirrors
Z
Page 78 of 302
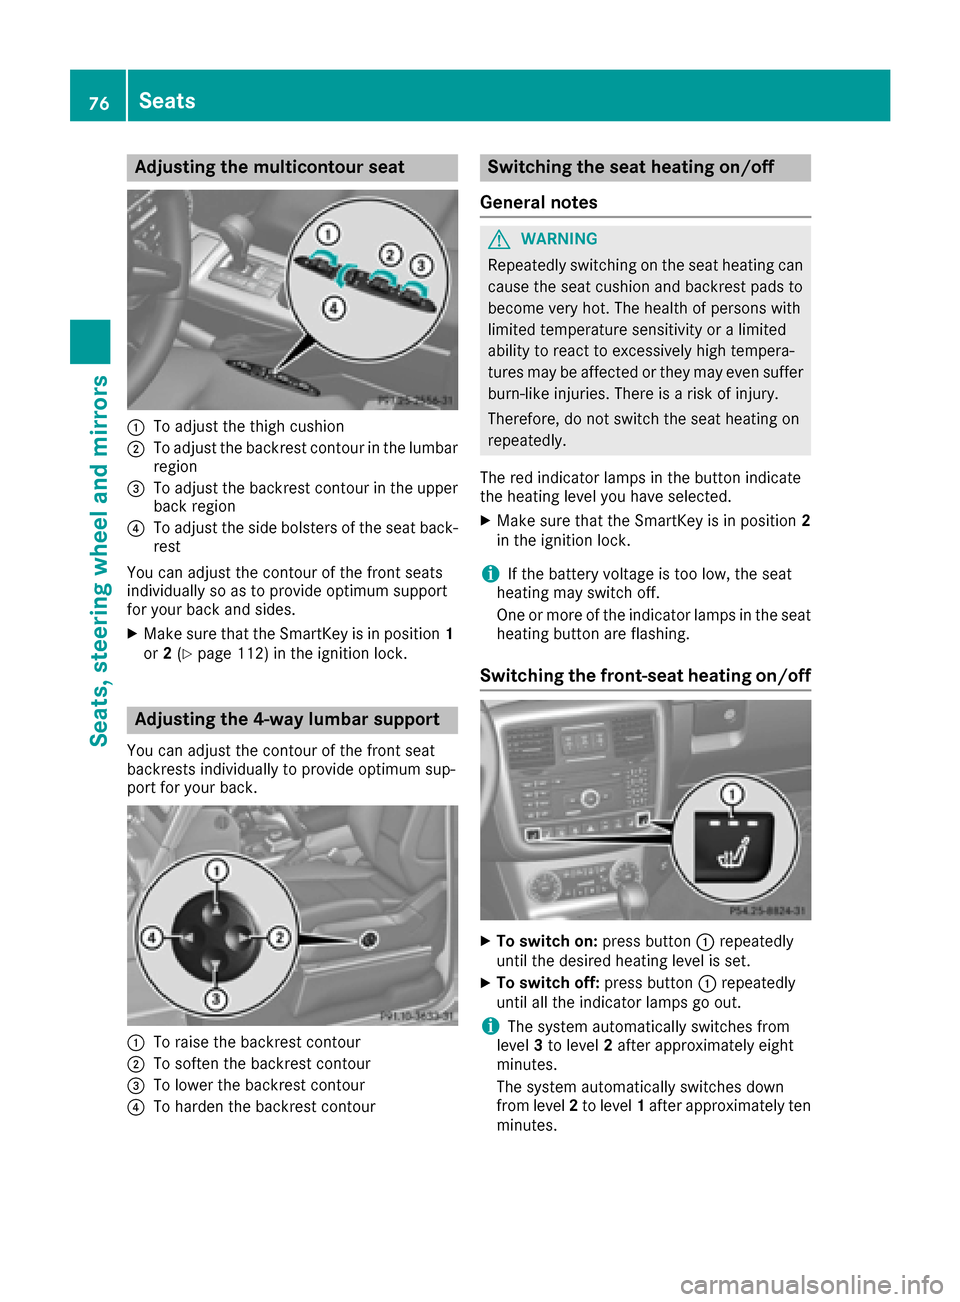
Adjusting themulticontour seat
:To adjust th ethigh cushion
;To adjust th ebackrest contour in th elumbar
region
=To adjust th ebackrest contour in th eupper
bac kregion
?To adjust th eside bolsters of th eseat back-
res t
You can adjust th econtour of th efron tseat s
individually so as to provid eoptimum support
for your bac kand sides.
XMak esur ethat th eSmartKey is in position 1
or 2(Ypage 112) in th eignition lock.
Adjusting the 4-way lumbar support
You can adjust th econtour of th efron tseat
backrest sindividually to provid eoptimum sup-
por tfor your back.
:To rais eth ebackrest contour
;To softe nth ebackrest contour
=To lower th ebackrest contour
?To harden th ebackrest contour
Switching the seat heating on/off
Gene ral notes
GWARNIN G
Repeatedly switching on th eseat heating can
caus eth eseat cushion and backrest pads to
become ver yhot .The healt hof person swit h
limite dtemperature sensitivit yor alimite d
abilit yto reac tto excessivel yhigh tempera-
tures may be affecte dor they may eve nsuffer
burn-like injuries. There is aris kof injury.
Therefore ,do no tswitch th eseat heating on
repeatedly.
The red indicator lamp sin th ebutto nindicat e
th eheating level you hav eselected.
XMak esur ethat th eSmartKey is in position 2
in th eignition lock.
iIf th ebattery voltag eis to olow, th eseat
heating may switch off .
On eor mor eof th eindicator lamp sin th eseat
heating butto nare flashing.
Switching the front-seat heating on/off
XTo switch on: press button: repeatedly
until th edesired heating level is set .
XTo switch off:press butto n: repeatedly
until all th eindicator lamp sgo out .
iThe system automatically switches from
level 3to level 2after approximately eigh t
minutes.
The system automatically switches down
from level 2to level 1after approximately te n
minutes.
76Seats
Seats, steering wheel and mirrors
Page 79 of 302
The system automatically switches off
approximately 35 minutes after it is set to
level1.
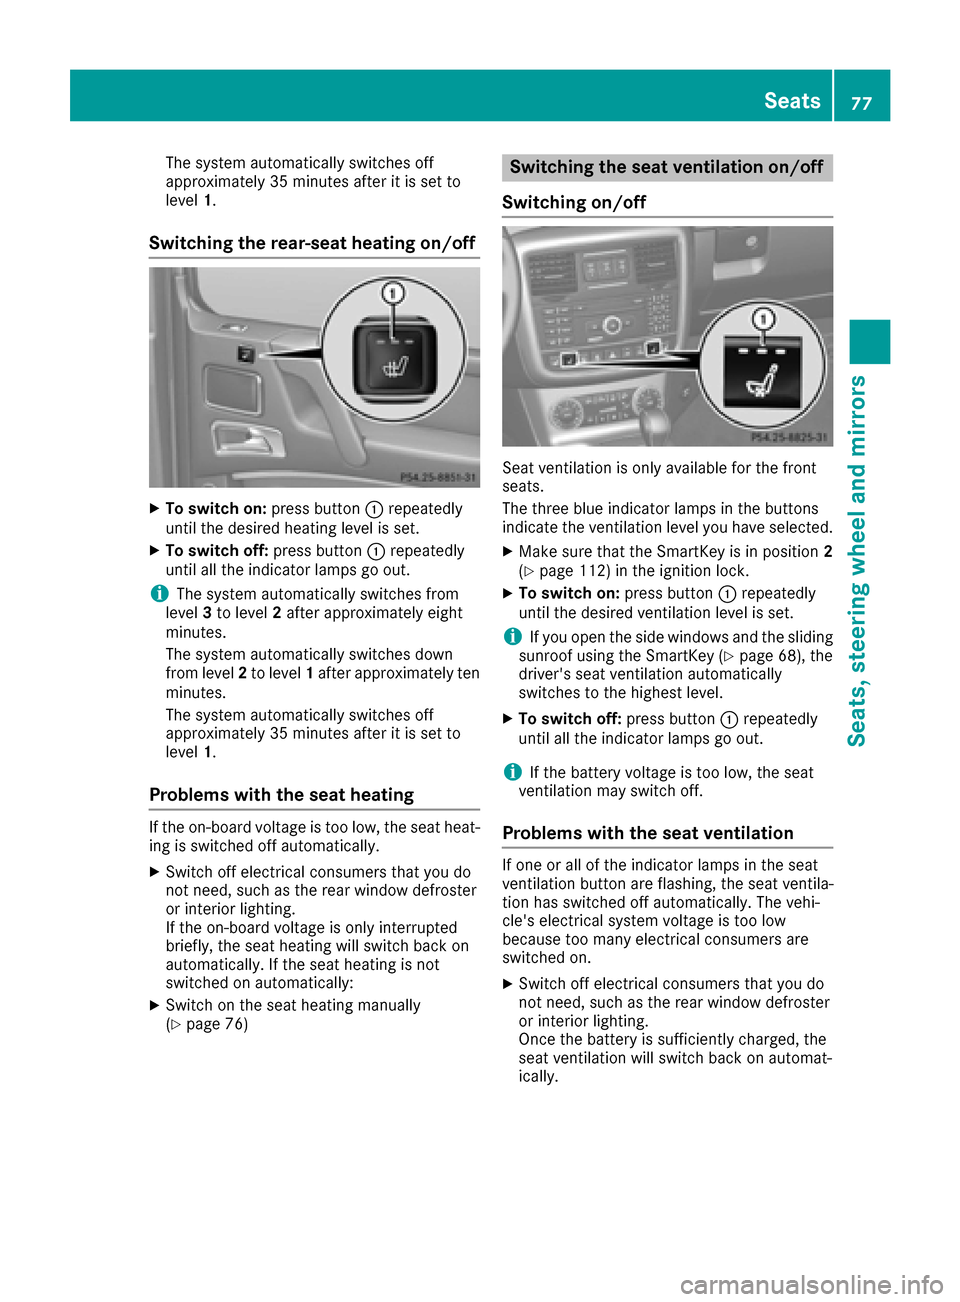
Switching the rear-seat heating on/off
XTo switch on: press button:repeatedly
until the desired heating level is set.
XTo switch off: press button:repeatedly
until all the indicator lamps go out.
iThe system automatically switches from
level 3to level 2after approximately eight
minutes.
The system automatically switches down
from level 2to level 1after approximately ten
minutes.
The system automatically switches off
approximately 35 minutes after it is set to
level 1.
Problems with the seat heating
If the on-board voltage is too low, the seat heat-
ing is switched off automatically.
XSwitch off electrical consumers that you do
not need, such as the rear window defroster
or interior lighting.
If the on-board voltage is only interrupted
briefly, the seat heating will switch back on
automatically. If the seat heating is not
switched on automatically:
XSwitch on the seat heating manually
(Ypage 76)
Switching the seat ventilation on/off
Switching on/off
Seat ventilation is only available for the front
seats.
The three blue indicator lamps in the buttons
indicate the ventilation level you have selected.
XMake sure that the SmartKey is in position 2
(Ypage 112) in the ignition lock.
XTo switch on: press button:repeatedly
until the desired ventilation level is set.
iIf you open the side windows and the sliding
sunroof using the SmartKey (Ypage 68), the
driver's seat ventilation automatically
switches to the highest level.
XTo switch off: press button:repeatedly
until all the indicator lamps go out.
iIf the battery voltage is too low, the seat
ventilation may switch off.
Problems with the seat ventilation
If one or all of the indicator lamps in the seat
ventilation button are flashing, the seat ventila-
tion has switched off automatically. The vehi-
cle's electrical system voltage is too low
because too many electrical consumers are
switched on.
XSwitch off electrical consumers that you do
not need, such as the rear window defroster
or interior lighting.
Once the battery is sufficiently charged, the
seat ventilation will switch back on automat-
ically.
Seats77
Seats, steering wheel and mirrors
Z