low oil pressure MERCEDES-BENZ G-Class 2017 W463 Owner's Manual
[x] Cancel search | Manufacturer: MERCEDES-BENZ, Model Year: 2017, Model line: G-Class, Model: MERCEDES-BENZ G-Class 2017 W463Pages: 286, PDF Size: 4.91 MB
Page 105 of 286

Notesonb reaking-in anew vehicle
Important safety notes
Thes ensors ystemofs omedriving and driving
safety systems adjusts automaticall ywhile a
certai ndistance is being driven after the vehicle
ha sb eend elivere dorafter repairs. Full system
effectiveness is not reachedu ntilthe end of this
teach-inp rocedure.
New and replaced brake pads and discs only
reach their optimum braking effect after several hundred kilometers of driving. Compensate for
thi sb yapplyin ggreate rforce to the brake pedal.
The first 1000 miles (150 0km)
Them orey ou look after the engine when it is
new ,the mor esatisfied yo uwillbew ithi ts per-
formance in the future.
RYo us houl dtherefore drive at varying vehicle
and engine speeds for the first 1,000 miles
(1,500 km).
RAvoi dheavy loads, e.g .driving at full throttle,
during thi speriod.
RWhen shifting gear smanually, shift up in good
time, befor ethe tachomete rneedl ereaches
Ô of the wa ytothe red area of the tachom-
ete rdisplay .
RDo not manuall yshift to alower gear to brake
the vehicle.
RTry to avoi ddepressing the accelerator pedal
beyond the pressure point (kickdown).
Additiona lbreaking-i nnote sfor Mercedes-AMG
vehicles:
RDo not drive fastert han85m ph (140km/h)
for the first 1,000 mile s(1,50 0km).
ROnlyb rieflyallow the engine to reach amax-
imum engine spee dof4,500 rpm.
RAvoiddriving off-roa dbefor et he first differ-
ential oi lchange at 2,000 mile s(3,000 km).
RIdeally ,for the first 1,000 mile s(1,50 0km),
drive in program C.
After 1,000 mile s(1,500 km), you can increase
the engine speedg radually and bring the vehicle
to ful lspeed.
You should also observe these notes on break-
i
ng in if the engine or parts of the drive train on
you rvehicle have beenr eplaced.
Always observe the maximu mpermissible
speed.
Axl edifferential transmission
(Mercedes-AMG vehicles)
Change the oil after abreaking-in period of
2,000 miles( 3,000 km) to improve protectiono f
the axle differential transmission.
This oil change prolongs the service life of the
axle differential transmission. Have the oil
change carrie dout at aqualified specialist work-
shop.
Driving
Important safety notes
GWARNING
Objects in the driver's footwell may restrict
the clearance around the pedal sorblock a
depressedp edal.This jeopardizes the oper-
ating and road safety of the vehicle. There is a risk of an accident.
Stow al lobjects securely in the vehicle so that
they do not get into the driver's footwell.
When using floormats or carpets, make sure
that they are properly secured so that they do not sliporo bstruct the pedals. Do not place
severalf loormats or carpets on top of one
another.
GWARNING
Unsuitabl efootwear can hinde rcorrect usage
of the pedals, e.g.:
Rshoesw ith thick soles
Rshoeswith high heels
Rslippers
There is arisk of an accident.
Wears uitablefootwear to ensure correct
usage of the pedals.
GWARNING
If you switch off the ignition while driving,
safety-relevant functions are only available
with limitations, or not at all. This coul daffect,
for example, the power steering and the brake
boosting effect. You wil lrequire considerably
more effort to steer and brake .There is arisk
of an accident.
Driving103
Driving and parking
Z
Page 130 of 286

Familiarize yourself with the characteristics of
your vehicle and the gearshift operation before
driving through difficult terrain.
The following driving systems are specially
adapted to off-roadd riving:
R4ETS (Ypage 59)
ROff-roadABS (Ypage 58)
RTransfer case (Ypage 145)
RDifferentia llocks (Ypage 120)
Observe the following notes:
RStop the vehicle before yo udrive off-roada nd,
if necessary ,shift the transfe rcase to the off-
roadd riving position LOW RANGE
(
Ypage 146).
REngag ethe differential locks if necessary
(Ypage 148).
iABS, 4ETS, ESP®and BAS are deactivated
while the differential locks are engaged.T his
allow sthe front wheels to lock briefly, so that
these can dig into aloose surface .However,
please note that locke dwheels skid and can
no longer steer.
RCheck that items of luggage and loads are
stowed safely and are well secured
(
Ypage 209).
RTo avoid damaging the vehicle, make sure
there is always sufficient ground clearance.
RAlway skeep the engine running and in gear
whe ndriving on adownhil lgradient.
RAlway skeep the engine running and in gear
whe ndriving downani ncline.
RDrive slowlyand evenly, if necessary at a
walking pace.
REnsure that the wheels are in contact with the
ground at al ltimes.
RDrive with extreme care on unfamilia roff-road
routes where visibility is poor. For safety rea-
sons, get ou
tofthe vehicle firs tand survey
the off-roadr oute.
RCheck the depth of water before fording rivers
and streams.
RWatch outfor obstacles.
RAlwayskeep the doors, reard oor, sidewin-
dowsa nd the sliding sunroof closed while the
vehicle is in motion.
RSwitch off cruise control.
RDo not deviate from marke droutes.
RAdap tyou rspeed to the terrain. The rougher,
steeper or more ruts on the terrain, the slower
your speed should be.
RDo not jump with the vehicle. as this will inter-
rup tthe vehicle' spropulsion.
RAvoid hig hengine speeds .Drive at appropri-
ate engine speeds (maximu m3,000 rpm).
RDo not shift the automatic transmission to
position N.
RAlwayscheck the vehicle for damag eafteroff-
roadd riving.
Do not use the HOLD function whe ndriving off-
road, on steep uphil lordownhil lgradients or on
slippery or loose surfaces. The HOLD function
cannot holdt he vehicle on such surfaces.
You can obtain further information aboutr etro-
fitting specia lall-terrain tires from aquali fied
specialist workshop.
Checklist before driving off-road
!If the engine oil warning lamp lights up while
the vehicle is in motion, stop the vehicle in a
saf ep lace as soona spossible. Check the
engine oil level. The engine oil warning lamp
warning mus tnot be ignored.C ontinuing the
journey while the symbol is displaye dcould
lea dtoe ngine damage.
XEngin eoillevel: check the engine oil level
and ad doil if necessary.
Whend riving on steep gradients, the engine
oil level mus tbes ufficiently hig htoensure a
correct oil supply in the vehicle.
XTire-changing too lkit: check that the jack is
working and make sur eyou hav ethe lug
wrench, arobust tow cable and afolding
spade in the vehicle.
XWheels and tires: check the tire treadd epth
and tire pressure.
XCheck for damag eand remove any foreign
objects, e.g. small stones,f rom the wheels/
tires.
XReplace any missing valve caps.
XReplace dente dordamaged wheels .Also
check the spare wheel.
XRims: dentedorbent rims can result in aloss
of tire pressure and damag ethe tire bead.
Befored riving off-road, check the wheels and
replace them if necessary.
128Drivin gtips
Drivin gand parking
Page 166 of 286

XPress the9or: button to select the
desired name.
or
XTo startr apid scrolling: press and hold9
or : for longer than one second.
Rapid scrolling stops when you release the
button or reach the end of the list.
XIf only one telephone number is stored for
an ame: press the 6ora button to
start dialing.
or
XIf thereism ore thanone number for a
particular name:press the 6ora
button to display the numbers.
XPress the 9or: button to select the
number you want to dial.
XPress the 6ora button to start dialing.
or
XTo exit the phone book: press the~or
% button.
Redialing
The on-board computer saves the last names or
numbers dialed in the redial memory.
XPress the =or; button on the steering
wheel to select the Telmenu.
XPress the6button to switch to the redial
memory.
XPress the 9or: button to select the
desired name or number.
XPress the 6ora button to start dialing.
or
XTo exit the redial memory: press the~
or % button.
Assistance menu
Introduction
In the DriveAssistmenu, you have the follow-
ing options:
RDisplaying the assistanc egraphic
(Ypage 164)
RActivating/deactivatin gBlind Spot Assist
(Ypage 164)
Showing the distance display
XPress the =or; button on the steering
wheel to select the DriveAssistmenu.
XPress9or: to select AssistanceGraphic.
XPressa.
The DISTRONIC PLUS distanc edisplay
appears in the multifunction display.
Activating/deactivating Blind Spot
Assist
XPress the =or; button on the steering
wheel to select the DriveAssistmenu.
XPress the9or: button to select
Blind Spot Assist.
XPress a.
The currents election appears.
XTo activate/deactivate: press theabut-
ton again.
For further information about Blind Spot Assist,
see (
Ypage 137).
Service menu
In the Serv.menu, you have the following
options:
RCalling up display messages (Ypage 170)
RChecking the tire pressure electronically
(Ypage 258)
RCalling up the service due date
(Ypage 231)
RChecking the engine oil level (Ypage 227)
Settings menu
Introduction
In the Sett.menu, you have the following
options:
RChanging the instrument cluster settings
(Ypage 165)
RChanging the light settings (Ypage 165)
RChanging the vehicle settings (Ypage 166)
RChanging the conveniences ettings
(Ypage 166)
RRestoring the factor ysettings (Ypage 167)
164Menus and submenus
On-board computer and displays
Page 274 of 286

Make sure that jackAis at the correct posi-
tion under axle carrier tube ?.The front or
rear axle must sit securely in the recess of
jack A.
XKeep pumping until axle carrier tube ?sits
securely in the recess of jack Aand the base
of the jack lies evenly on the ground.
Ensure that the jack is located vertically under
the jackingp oint.
XRaise the vehicle by pumping until the tire is
no more than 1.2 in (3 cm) off the ground.
Removingawheel
!Do not place wheel bolts in sand or on adirty
surface. The bolt and wheel hub threads could
otherwise be damaged when you screw them
in.
When mounting/removing wheels, and for as
long as the wheels are removed, avoid applying
any external force on the brake disks. This could impair the level of comfort when braking.
XUnscrew the wheel bolts.
XRemove the wheel.
Mounting anew wheel
GWARNING
Oiled or greased wheel bolts/wheel nuts and
damaged wheel bolt/wheel nut/wheel hub
threads can cause wheel bolts/wheel nuts to
come loose. As aresult, you could lose a
wheel while driving. There is arisk of an acci-
dent.
Never oil or grease wheel bolts/wheel nuts. In
the event of damage to the threads, contact a
qualified specialist workshop immediately.
Have the damaged wheel bolts/wheel nuts or
hub threads replaced/renewed. Do not con-
tinue driving.
GWARNING
If you tighten the wheel bolts or wheel nuts
when the vehicle is raised, the jack could tip
over. There is arisk of injury.
Only tighten the wheel bolts or wheel nuts
when the vehicle is on the ground.
!To prevent damage to the paintwork, hold
the wheel securely against the wheel hub
while screwing in the first wheel bolt.
Always pay attention to the instructions and
safety notes in the "Changing awheel" section
(
Ypage 269).
Only use wheel bolts that have been designed
for the wheel and the vehicle. For safety rea-
sons, Mercedes-Benzr ecommends that you
only use wheel bolts which have been approved
for Mercedes-Benzv ehicles and the respective
wheel.
XClean the wheel and wheel hub contact sur-
faces.
XPlace the new wheel on the wheel hub and
push it on.
XTighten the wheel bolts until they are finger-
tight.
Lowering the vehicle
GWARNING
The wheels could work loose if the wheel nuts and bolts are not tightened to the specified
tightening torque. There is arisk of accident.
Have the tightening torque immediately
checked at aqualified specialist workshop
after awheel is changed.
XSlowly open the pressure release screw on
the jack using the pump lever by approx-
imately one full turn and carefully lower the
vehicle (
Ypage 270).
XYou can put the jack aside.
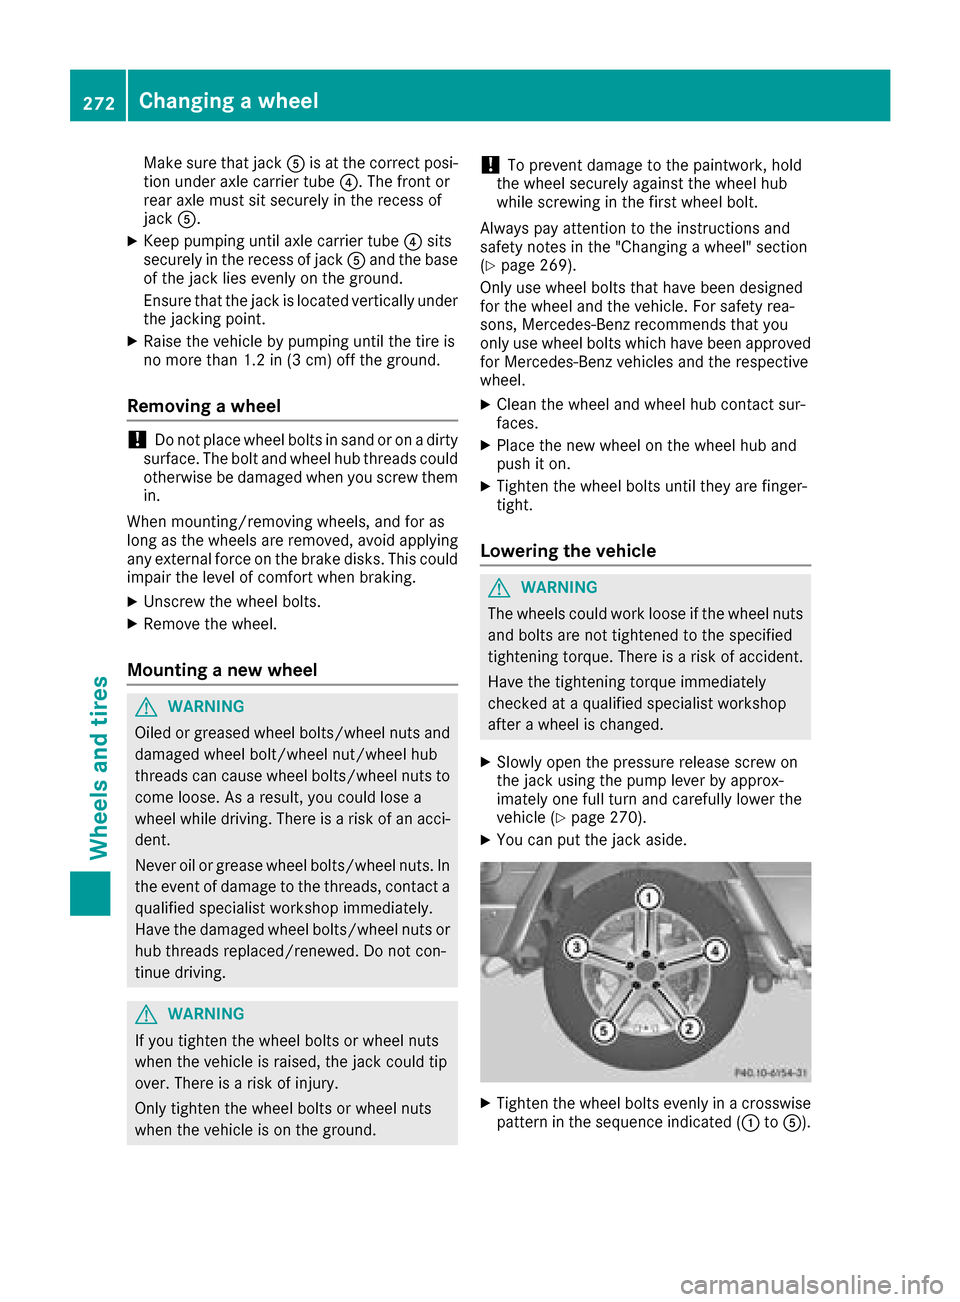
XTighten the wheel bolts evenly in acrosswise
pattern in the sequence indicated (: toA).
272Changing awheel
Wheels and tires