tire size MERCEDES-BENZ G-Class 2017 W463 Owner's Manual
[x] Cancel search | Manufacturer: MERCEDES-BENZ, Model Year: 2017, Model line: G-Class, Model: MERCEDES-BENZ G-Class 2017 W463Pages: 286, PDF Size: 4.91 MB
Page 21 of 286
Summer tiresinwinter .................. 253
Temperature .................................. 263
TIN (Tire Identification Number)
(definition) ..................................... 269
Tire bead (definition) ...................... 269
Tire pressure (definition) ................ 269
Tire pressures (recommended )...... 268
Tire size (data )............................... 273
Tire size designation, load-bearing
capacity, speed rating .................... 264
Tire tread. ...................................... 252
Tire tread( definition) ..................... 269
Totall oadlim it (definition) ............. 269
Tractio n......................................... 263
Tractio n(definition) ....................... 269
Tread wear ..................................... 263
TWR (permissibl etraile rdrawbar
noseweight) (definition) ................. 269
Uniform Tire Quality Grading
Standard s...................................... 263
Uniform Tire Quality Grading
Standard s(de finition) .................... 267
Wea rindicator (definition) ............. 269
Wheel and tire combination ........... 273
Wheel rim (definition) .................... 268
see Fla ttire
Top Tether ............................................ 52
Tow-starting
Emergency engine starting ............ 248
Important safety notes .................. 246
Towin gatrailer
Axle load ,permissibl e.................... 284
Cleaning the traile rtow hitch ......... 235
Coupling up atraile r...................... 154
Decoupling atraile r....................... 155
Driving tip s.................................... 151
Important safety notes .................. 149
Installing the ball coupling ............. 152
Lights display message .................. 176
Pulling away with atraile r.............. 105
Shift rang e..................................... 113
Trailer load s................................... 284
Trailer tow hitch ............................. 284
Towin gaway
Important safety guideline s........... 246
In the event of malfunctions .......... 248
With both axle
s on the ground ....... 247 Towin
geye
Front .............................................. 247
Rear ............................................... 247
Trafficr eports
see also Digital Operator's Man-
ua l.................................................. 198
Trailer
7-pi nconnecto r............................. 156
Power supply ................................. 156
Trailer coupling
see Towing atrailer
Trailer loads
Technical data ............................... 284
Trailer loads and drawbar nose-
weights ............................................... 155
Trailer tow hitch
Ballposition ................................... 284
Trailer towing
ESP
®................................................ 60
PARKTRONIC ................................. 142
Permissibl etraile rloads and
drawbar noseweights ..................... 155
Transfer case
Generaln otes ................................ 145
Shift rang e..................................... 145
Shifting .......................................... 146
Shifting (general notes). ................. 146
Shifting (important safety notes). .. 146
Shifting to neutral .......................... 147
Switching off the off-road gear
rati o............................................... 146
Switching on the off-road gear
rati o............................................... 146
Transmission
see Automati ctransmission
Transmissio npositions .................... 112
Transporting the vehicle .................. 247
Traveling uphill
Brow of hill ..................................... 130
Trim piece s(clea ning instruc-
tions) .................................................. 236
Trip computer (on-board com-
puter) .................................................. 160
Trip odometer
Calling up ....................................... 160
Resetting (on-board computer) ...... 160
Index19
Page 23 of 286
Warranty.............................................. 24
Washer fluid
Display message ............................ 187
Weather display (COMAND)
see als oDigita lOperator's Man-
ua l.................................................. 198
Wheel and tire combinations
Tires. .............................................. 273
Wheel bol ttightening torque ........... 272
Wheels
Changing awheel .......................... 269
Checking ........................................ 251
Cleaning ......................................... 233
Important safety notes .................. 251
Informatio nondriving .................... 251
Interchanging/changing ................ 269
Mounting anew wheel ...................2 72
Mounting awheel .......................... 270
Removing awheel .......................... 272
Snow chains .................................. 253
Storing ...........................................2 70
Tightening torque. .......................... 272
Wheels ize/tire size ....................... 273
Windowc urtain air bag
Display message ............................ 174
Operation ......................................... 46
Windows
see Side windows
Windshield
Defrosting ........................................ 99
Windshiel dheating .............................9 9
Windshield washe rfluid
see Windshieldw asher system
Windshield washe rsystem
Adding washer flui d....................... 229
Notes. ............................................ 280
Windshiel dwipers
Problem (malfunction) ..................... 94
Rear window wipe r.......................... 93
Replacing the wipe rblade s.............. 93
Switching on/off. ............................. 92
Winter driving
Important safety notes .................. 252
Slippery roads urfaces ................... 126
Snow chains .................................. 253
Winter operation
Overview ........................................ 252
Radiato rcover. .............................. 226 Summer tire
s................................. 253
Winter tires
M+S tire s....................................... 253
Wipe rblades
Cleaning ......................................... 234
Important safety notes .................... 93
Replacing ......................................... 93
Wo
oden trim (cleaning instruc-
tions) .................................................. 236
Index21
Page 61 of 286
4ETS (Electronic Traction System)
iObserve the "Important safety notes" sec-
tion (Ypage 57).
4ET Straction contro lispart of ESP
®.
4ET Straction contro lisnolonger activ eabove a
speed of approximately 37 mph (60 km/h).
Traction contro lbrakes the drive wheels indi-
vidually if they spin. This enables you to pull
away and accelerate on slippery surfaces,f or
example if the road surface is slippery on one
side. In addition, more drive torque is transfer-
red to the wheel or wheels with traction.
Traction contro lremains active, even if you
deactivate ESP
®.
Importan tsafetyn otes
iObserve the "Important safety notes" sec-
tion (Ypage 57).
GWARNING
If ESP
®is malfunctioning, ESP®is unable to
stabilize the vehicle. Additionally, further driv-
ing safety systems are deactivated. This
increases the risk of skiddin gand an accident.
Driv eonc arefully. Have ESP
®checked at a
qualified specialist workshop.
!Only operate the vehicle for amaximum of
ten seconds on abrake test dynamometer.
Switc hoff the ignition.
Application of the brakes by ESP
®may oth-
erwise destroy the brake system.
!Af unction or performanc etest should only
be carried out on atwo-axle dynamometer.
Beforey ou operate the vehicle on such a
dynamometer, please consult aqualified
workshop. You could otherwise damage the
drive train or the brake system.
If the å ESP
®OFF warning lamp lights up
continuously, ESP®is deactivated.
If the ÷ ESP®warning lamp lights up contin-
uously, ESP®is not available due to amalfunc-
tion.
Observe the information on warning lamps
(
Ypage 191) and display messages which may
be displayed in the instrument cluster
(
Ypage 171). Only use wheels with the recommended tire
sizes. Only then will ESP
®function properly.
If differential locksa re switched on, ABS, BAS
and ESP
®switc hoff automatically.
Characteristics of ESP®
Genera linformation
If the ÷ ESP®warning lamp goes out before
beginning the journey, ESP®is automatically
active.
If ESP
®intervenes, the ÷ESP®warning lamp
flashes in the instrument cluster.
If ESP
®intervenes:
XDo not deactivate ESP®under any circum-
stances.
XOnly depress the accelerator pedal as far as
necessary when pulling away.
XAdapt your drivings tyle to suit the prevailing
road and weather conditions.
ECO start/stop function
The ECO start/stop function switches the
engin eoff automatically when the vehicle stops
moving. The engin estart sautomatically when
the driver wants to pull away again. ESP
®
remains in its previously selected status, e.g. if
ESP®was deactivated before the engin ewas
automatically switched off.
Deactivating/activating ESP®
Important safetyn otes
iObservethe "Important safety notes" sec-
tion (Ypage 57).
You can select between the following states of
ESP
®:
RESP®is activated.
RESP®is deactivated.
GWARNING
If you deactivate ESP
®,E SP®no longer sta-
bilizes the vehicle. There is an increased risk
of skiddin gand an accident.
Only deactivate ESP
®in the situation sdescri-
bed in the following.
Driving safetys ystems59
Safety
Z
Page 234 of 286
cleaning agents. These cleaning agents can
damagethe paintwork or plasti cparts.
!Make sure that the automatic car wash is
suitablef or the size of the vehicle .Fold in the
exterior mirrors before the vehicle is washed.
The exterior mirrors could otherwise be dam-
aged.
!Make sure that the automatic transmission
is in position Nwhe nwashing your vehicle in
at ow-through car wash. The vehicle could be
damaged if the transmission is in another
position.
!Make sure that:
Rthe sid ewindow sand the sliding sunroof
are fully closed.
Rthe blower is switched off.
Rthe windshield wiper switch is at position 0.
The vehicle may otherwise be damaged.
You can wash the vehicle in an automatic car
wash from the very start.
If the vehicle is very dirty, pre-wash it before
cleaning it in an automatic car wash.
After using an automatic car wash, wipe off wax
from the windshield and the wiper blades. This
will prevent smears and reduce wiping noises
caused by residueont he windshield.
Washing by hand
In some countries,washing by hand is only
allowed at speciall yequipped washing bays.
Observe the legalr equirements in each country.
Whenu sing the vehicle in winter, remove all
trace sofroads altd eposits carefully and as
soona spossible.
Whenw ashing the underside of the vehicle ,also
clean the insides of the wheels.
XDo not us ehot water and do not wash the
vehicle in direct sunlight.
XUse asoft sponge to clean.
XUse amildc leaning agent, such as acar
shampooa pproved by Mercedes-Benz.
XThoroughlyh osedownthe vehicle with agen-
tle jet of water.
XDo not point the water jet directlyt owards the
ai ri nlet.
XUse plenty of water and rinse outt he sponge
frequently.
XRinse the vehicle with clean water and dry
thoroughly with achamois.
XDo not le tthe cleaning agent dry on the paint-
work.
Powe rwashers
GWARNING
The water jet from acircula rjet nozzle (dirt
blasters) can cause invisible exterior damage
to the tire sorchassisc omponents. Compo-
nents damaged in this wa ymay fai lunexpect-
edly. There is ariskofana ccident.
Do not us epower washers with circula rjet
nozzle stoclean the vehicle .Have damaged
tire sorc hassisc omponents replaced imme-
diately.
!Alway smaintainad istance of at least
11.8 in (30 cm )between the vehicle and the
power washern ozzle.Information aboutt he
correct distance is available from the equip-
ment manufacturer.
Move the power washern ozzle around when
cleaning your vehicle.
Do not ai mdirectlyata ny of the following:
RTires
RDoor gaps, roof gaps, joints, etc.
RElectrical components
RBattery
RConnectors
RLamps
RSeals
RTrim
RVentilation slots
Damaged seals or electrical components can
lead to leaks or failures.
!Vehicles with decorative film: parts of your
vehicle are covered with adecorative film.
Maintain adistance of at least 27.5 in (70 cm)
between the parts of the vehicle covered with
the fil mand the nozzle of the hig hpressure
cleaner.
Information aboutt he correct distance is
available from the equipment manufacturer.
Move the power washern ozzle around when
cleaning your vehicle.
232Care
Maintenancea nd care
Page 241 of 286
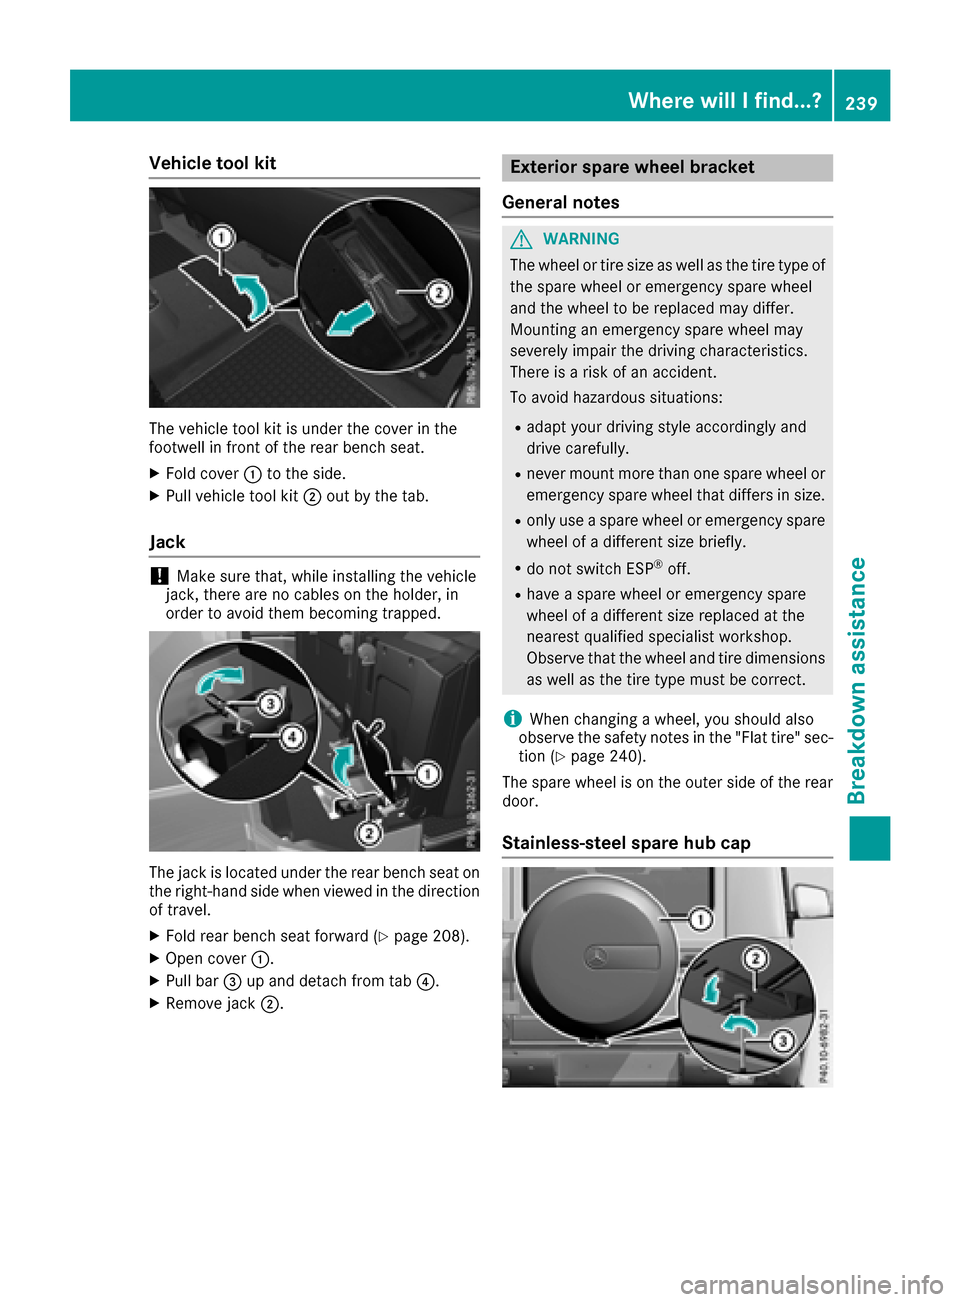
Vehicletoolkit
The vehicl etool kit is under the coverint he
footwell in front of the rearb ench seat.
XFoldc over:to the side.
XPull vehicl etool kit ;outb ythe tab.
Jack
!Make sure that, whil einstalling the vehicle
jack, ther eare no cable sonthe holder, in
order to avoid them becoming trapped.
The jack is locate dunder the rearb ench sea ton
the right-hand side when viewe dinthe direction
of travel.
XFoldr earb ench sea tforward (Ypage 208).
XOpe ncover :.
XPull bar =up and detach from tab ?.
XRemove jack;.
Exterior spare whee lbracket
General notes
GWARNING
The whee lortire size as well as the tire typ eof
the spare whee loremergency spare wheel
and the whee ltobereplaced mayd iffer.
Mounting an emergency spare whee lmay
severely impai rthe driving characteristics.
There is ariskofana ccident.
To avoid hazardouss ituations:
Radap tyou rd riving style accordinglya nd
drive carefully.
Rneve rmount more thano ne spare wheelor
emergency spare whee lthatd iffer sins ize.
Ronlyu seaspare whee loremergency spare
whee lofad ifferent size briefly.
Rdo not switch ESP®off.
Rhave aspare whee loremergency spare
whee lofad ifferent size replaced at the
nearestq ualified specialist workshop.
Observe thatt he wheeland tire dimensions
as well as the tire typ emustbec orrect.
iWhenchanging awheel ,you shoul dalso
observe the safety notes in the "Flat tire "sec-
tio n(
Ypage 240).
The spare whee lisonthe outer side of the rear
door.
Stainless-stee lspare hub cap
Where will Ifind...?239
Breakdo wn assis tance
Z
Page 254 of 286
Rbulges on tires
Rdeformation or severe corrosion on wheels
Regularly checkt he tire tread depth and the
condition of the tread across the whole width of
the tire (
Ypage 252). In order to inspec tthe
inne rside of the tire surface, turn the steering
wheel to full lock.
All wheels must have avalve cap to protect the
valve against dirt and moisture. Do not install
anythin gontot he valve other than the standard
valve cap or avalve cap approved by Mercedes-
Benzf or your vehicle. Do not use any other valve
caps or systems ,e.g. tire pressure monitoring
systems.
You should regularly checkt he pressure of all
your tires includin gthe spare wheel, particularly
prior to long trips. Adjust the tire pressure as
necessary (
Ypage 254).
The servicel ife of tires depends, among other
things, on the following factors:
RDriving style
RTire pressure
RDistance covered
Notes on tir etread
GWARNING
Insufficientt ire tread will reduce tire traction.
The tire is no longer able to dissipate water.
This means that on wet road surfaces,t he risk
of hydroplaning increases, in particular where speed is not adapted to suit the driving con-
ditions. There is arisk of accident.
If the tire pressure is too high or too low, tires
may exhibit differentl evels of wear at differ-
ent location sonthe tire tread. Thus, you
should regularly checkt he tread depth and
the condition of the tread across the entire
width of all tires.
Minimum tire tread depth for:
RSummer tires: âin (3 mm)
RM+S tires: ãin (4 mm)
For safety reasons ,replace the tires before
the legally prescribed limit for the minimum
tire tread depth is reached.
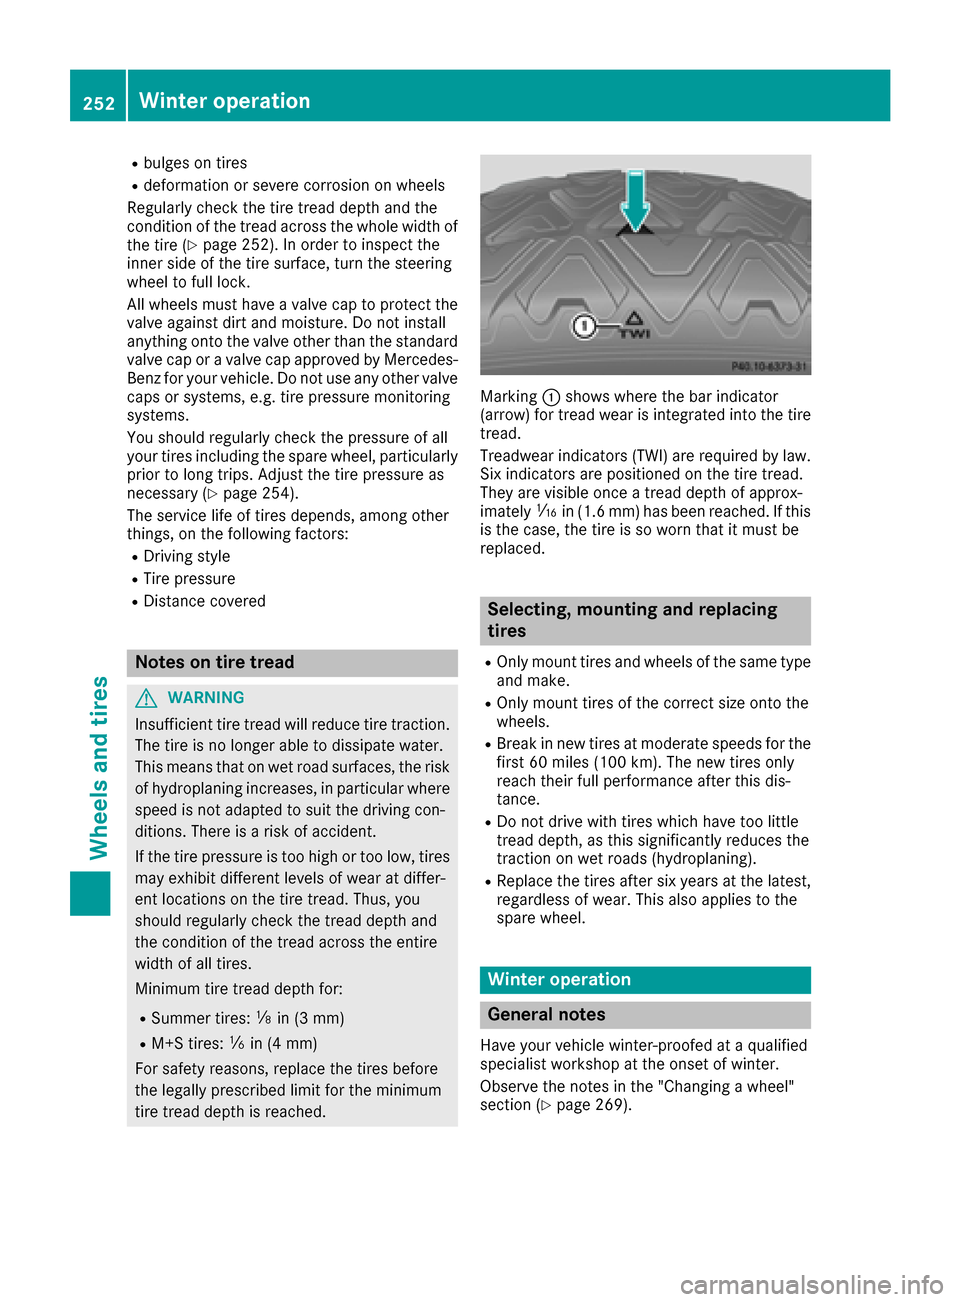
Marking :shows where the bar indicator
(arrow) for tread wear is integrated int othe tire
tread.
Treadwear indicators (TWI) are required by law. Six indicators are positioned on the tire tread.
They are visible onc eatread depth of approx-
imately áin (1.6 mm) has been reached. If this
is the case, the tire is so worn that it must be
replaced.
Selecting, mounting and replacing
tires
ROnly mount tires and wheels of the same type
and make.
ROnly mount tires of the correct size ont othe
wheels.
RBreak in new tires at moderates peeds for the
first 60 miles (100 km). The new tires only
reach their full performanc eafter this dis-
tance.
RDo not drive with tires which have too little
tread depth, as this significantly reduces the
traction on wet roads (hydroplaning).
RReplace the tires after six years at the latest,
regardless of wear. This also applies to the
spare wheel.
Winter operation
General notes
Have your vehicle winter-proofed at aqualified
specialist workshop at the onset of winter.
Observe the notes in the "Changing awheel"
section (
Ypage 269).
252Winter operation
Wheels and tires
Page 255 of 286
Drivingwiths ummer tires
At temperature sbelo w45‡( +7 †), elasticity in
summe rtires is significantly lower and thus also
traction and braking power. Change the tires on
you rvehicle to M+S tires .Using summe rtires at
very cold temperatures coul dcause cracks to
form, therebyd amaging the tires permanently.
Mercedes-Benz cannot accep tresponsibility for
this type of damage.
GWARNING
Damaged tires can cause tire inflation pres-
sure loss.Asar esult, you couldlose control of
you rvehicle. There is arisk of accident.
Check the tires regularly for signs of damage
and replace any damaged tires immediately.
M+S tires
GWARNING
M+S tires with atire tread depth of less than
ã in (4 mm )are not suitabl efor use in winter
and do not provide sufficient traction. There is
ar isk of an accident.
M+S tires with atread depth of less than ãin
(4 mm) must be replaced immediately.
GWARNING
Wheela nd tire dimensions as wel lasthe type
of tire can vary between the spare wheel and
the wheel to be replaced .When the spare
wheel is mounted ,driving characteristics may
be severely affected .There is arisk of an acci-
dent.
In order to reduce risks:
Ryou should thereforea dapt yourdriving
styl eand drive carefully.
Rnever mount more than one spare wheel
that differs from the wheel to be replaced.
Ronly use aspare wheel that differs from the
wheel to be replaced for ashort time.
Rdo not deactivate ESP®.
Rhave aspare wheel that differs from the
wheel that has beenc hangedreplaced at
the nearest qualified specialist workshop.
You must observe the correct wheel and
tire dimensions as wel lasthe wheel type.
Do not exceed amaximu mspeedof50m ph
(80 km/h) if aspare wheel of adifferent size is
installed.
At temperatures below 45 ‡(+7 †), use winter
tires or all-season tires. Both type softire are
identified by the M+S marking.
Only winter tires bearing the isnowflake
symbol in addition to the M+S marking provide
the best possibleg rip in wintry road conditions.
Only these tires wil lallow driving safety systems
such as ABS and ESP
®to function optimally in
winter. Theset ires have beend eveloped specif-
ically for driving in snow.
Use M+S tires of the same make and tread on all
wheels to maintain safe handling characteris-
tics.
Always observe the maximu mpermissible
speeds pecified for the M+S tires you have
mounted.
When you have mounted the M+S tires:
XCheck the tire pressures (Ypag e257).
XRestart the tire pressure monitor
(Ypag e259).
Snowc hains
GWARNING
If you drive too fast with snow chains moun-
ted, they may snap. As aresult, you could
injure others and damage the vehicle. There is
ar isk of an accident.
Observe the maximu mpermissible speedf or
operation with snow chains.
!Information about the use of snow chain
compatibleA MG winter tires is applicable for
AMG tires. Use of snow chains is only per-
missible with these tires.
!On some tire sizes there is not enoug hspace
for snow chains. To avoi ddamage to the vehi-
cle or tires, observe the "Wheel and tire com-
binations" section unde r"Tires and wheels".
Wintero peration253
Wheels and tires
Z
Page 257 of 286
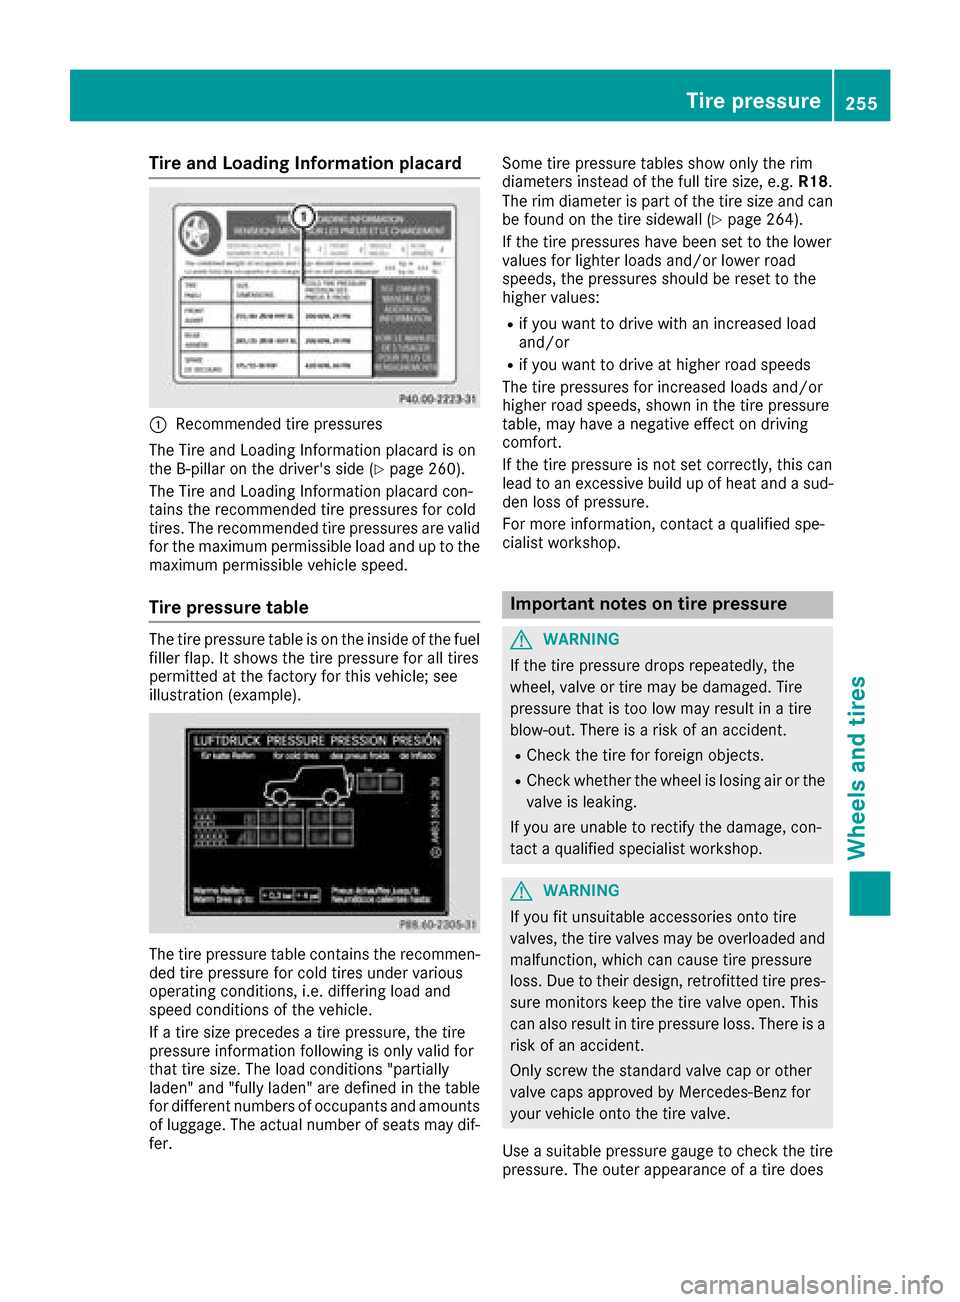
Tire and LoadingInfor matio nplacard
:Recommended tire pressures
The Tire and Loading Informatio nplacard is on
the B-pillar on the driver's side (
Ypage 260).
The Tire and Loading Informatio nplacard con-
tains the recommende dtire pressures for cold
tires. The recommende dtire pressures ar evalid
for the maximum permissibl eloa da nd up to the
maximum permissibl evehicl espeed.
Tire pressure table
The tire pressure table is on the insid eofthe fuel
fille rflap. It shows the tire pressure for al ltires
permitted at the factory for thisv ehicle; see
illustratio n(example).
The tire pressure table contains the recommen-
de dt ire pressure for col dtiresu nder various
operating conditions, i.e .differin gloa da nd
spee dconditions of the vehicle.
If at ire size precedes atire pressure, the tire
pressure informatio nfollowing is onl yvalid for
thatt ire size. The load conditions "partially
laden" and "fully laden" ar edefine dint he table
for different numbers of occupants and amounts of luggage.T he actual numbe rofseats mayd if-
fer. Some tire pressure table
sshowo nlyt he rim
diameters instea dofthe full tire size, e.g. R18.
The rim diamete rispartoft he tire size and can
be found on the tire sidewall (
Ypage 264).
If the tire pressures have been set to the lower
values for lighte rloads and/or lowe rroad
speeds ,the pressures shoul dbereset to the
highe rvalues :
Rif youwanttod rive with an increased load
and/or
Rif yo uwanttod rive at highe rroa ds peeds
The tire pressures for increased load sand/or
highe rroa ds peeds, shown in the tire pressure
table ,mayhave anegative effect on driving
comfort.
If the tire pressure is not set correctly, thisc an
lead to an excessive buil dupofheata nd asud-
de nlossofp ressure.
For mor
einformati
on, contactaquali fied spe-
cialist workshop.
Important notes on tire pressure
GWARNING
If the tire pressure drops repeatedly ,the
wheel, valve or tire maybed amaged.Tire
pressure thati stoo lo wmayresul tina tire
blow-out. There is ariskofana ccident.
RCheck the tire for foreign objects.
RCheck whether the whee lislosin gairor the
valve is leaking.
If yo uareunabl etorectify the damage,c on-
tact aquali fied specialis tworkshop.
GWARNING
If yo ufit unsuitable accessories onto tire
valves, the tire valve smaybe overloaded and
malfunction, which can cause tire pressure
loss. Due to their design, retrofitted tire pres- sure monitors kee pthe tire valve open. This
can also resul tintire pressure loss. There is a
ris kofana ccident.
Onlys crewt he standard valve cap or other
valve cap sapproved by Mercedes-Benz for
your vehicl eonto the tire valve.
Use asuitabl epressure gaug etocheck the tire
pressure. The outer appearance of atire does
Tire pressure255
Wheel sand tires
Z
Page 259 of 286

Checking thetirep ressures
Important safety notes
Observ ethe note sont irep ressure
(Ypage 254).
Information on air pressure for th etires on your
vehicle can be found:
Ron th evehicle's Tire and Loading Information
placard on th eB-pillar
Rin th etirep ressure table in th efuel fille rflap
(Ypage 119)
Runde r"Tire pressure "(Ypage 254)
Checking tir epressures manually
To determine and set th ecorrec ttirep ressure,
procee dasfollows:
XRemove th evalvec ap of th etiret hatistob e
checked.
XPress th etirep ressure gage securely onto the
valve.
XRead th etirep ressure and compare it to the
recommended value on th eTire and Loading
Information placard or th etirep ressure table
(
Ypage 254).
XIf th etirep ressure is to olow, increas ethe tire
pressure to th erecommended value.
XIf th etirep ressure is to ohigh,r elease air. To
do so, pres sdown th emetal pin in th evalve,
usingt hetip of apen for example .Then check
th et irep ressure again usingt hetirep ressure
checker.
XScrew th evalvec ap onto th evalve.
XRepeat these steps for th eother tires.
Tir ep ressure monitor
General notes
If at irep ressure monito risinstalled, th evehi-
cle's wheelsh ave sensorsthatm onito rthe tire
pressure sinall four tires. The tir epressure mon-
ito rw arn syou if th epressure drops in oneo r
mor eoft hetires. The tir epressure monito ronly
functionsift hecorrespondings ensorsare
installed in all wheels.
Information on tir epressure sisdisplayed in the
multifunction display. The curren ttirep ressure
of each wheel is shown in the Serv.
menuafter
driving for afew minutes.
Information on th emessage display can be
foun dint he"Checkin gthe tirep ressure elec-
tronically" sectio n(
Ypage 258).
Important safety notes
GWARNING
Eac htire, includingt hespare( if provided),
should be checked at least once amonth
when col dand inflate dtothepressure rec-
ommended by th evehicle manufacturer on
th eT ire and Loading Information placard on
th ed river'sd oor B-pillar or th etirep ressure
label on th einside of th efuel fille rflap. If your
vehicle has tires of adifferent sizet hant he
sizei ndicated on th eTire and Loading Infor-
mation placard or th etirep ressure label, you
should determine th eproper tir epressure for
those tires.
As an added safety feature, your vehicle has
been equipped withat irep ressure monitoring
system (TPMS) that illuminate salow tir epres-
sure telltale when oneorm oreofy our tires
are significantly underinflated. Accordingly,
when th elow tir epressure telltale illuminates,
you should stop and check your tires as soon
as possible, and inflate them to th eproper
pressure .Drivin gonas ignificantly underin-
flated tir ecauses th etiretoo verheat and can
lead to tir efailure. Underinflation also
reduces fuel efficienc yand tir etread life ,and
may affect th evehicle's handlinga nd stop-
pinga bility.
Pleasen otet hatthe TPMS is no tasubstitute
for proper tir emaintenance, and it is th edriv-
er'sr esponsibility to maintain correc ttire
pressure ,evenifu nderinflation has not
reached thel evelt otrigger illuminat
ionoft he
TPMS low tir epressure telltale.
USAo nly:
Tir ep ressure257
Wheels and tires
Z
Page 262 of 286
Radio type approval for the tire pres-
sure monitor(NEW)
CountryRadio type approval number
USAFCC ID: MRXGG4
FCC ID: MRXMC34MA4
CanadaIC: 2546A-GG4
Loadingthe vehicle
Instructionl abelsfor tiresa nd loads
GWARNING
Overloaded tire scan overheat, causing a
blowout. Overloaded tire scan also impai rthe
steering and driving characteristics and lead
to brake failure. There is ariskofa ccident.
Observe the load rating of the tires. The load
rating mus tbeatl easthalf of the GAW Rof
your vehicle. Nevero verload the tiresby
exceeding the maximum load.
Twoi nstruction label sonyourvehicl eshowt he
maximum possible load.
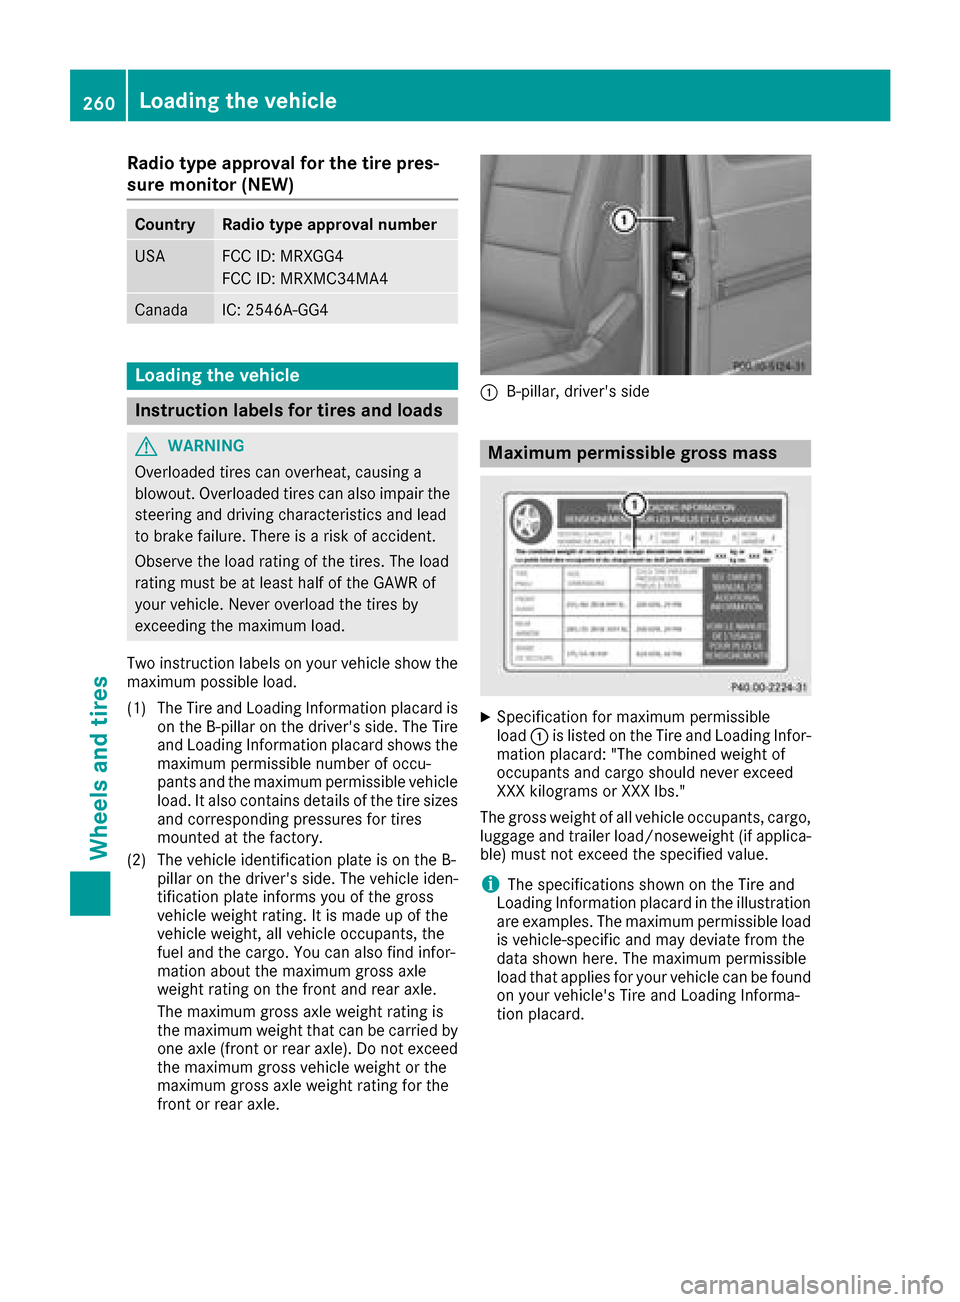
(1) The Tire and Loading Information placard is on the B-pillar on the driver'ss ide. The Tire
and Loading Information placard shows the
maximum permissible number of occu-
pants and the maximum permissible vehicle
load .Italsoc ontains detail softhe tire sizes
and corresponding pressures for tires
mounted at the factory.
(2) The vehicl eide ntification plate is on the B-
pillar on the driver'ss ide. The vehicleide n-
tification plate informs yo uofthe gross
vehicl eweigh trating. It is mad eupofthe
vehicl eweigh t, allvehicl eoccupants, the
fue land the cargo. Yo ucan also find infor-
mation aboutt he maximum gross axle
weight rating on the front and reara xle.
The maximum gross axl eweigh trating is
the maximum weight that can be carrie dby
one axl e(front or reara xle).Donot exceed
the maximum gross vehicl eweigh tort
he
ma
ximum gross axl eweigh trating for the
front or reara xle.
:B-pillar, driver'ss ide
Maximum permissibleg ross mass
XSpecification for maximum permissible
load:is listed on the Tire and Loading Infor-
mation placard: "The combine dweigh tof
occupants and carg oshoul dnevere xceed
XXX kilograms or XXX lbs."
The gross weight of al lvehicl eoccupants, cargo,
luggage and traile rload/n oseweight (i fappli ca-
ble) mus tnot excee dthe specified value.
iThe specifications shown on the Tire and
Loading Information placard in the illustration are examples. The maximum permissible load
is vehicle-specific and may deviate from the
data shown here. The maximum permissible
load that applie sfor your vehicl ecan be found
on your vehicle's Tire and Loading Informa-
tion placard.
260Loadingt he vehicle
Wheelsand tires