MERCEDES-BENZ G-CLASS 2018 Owner's Manual
Manufacturer: MERCEDES-BENZ, Model Year: 2018, Model line: G-CLASS, Model: MERCEDES-BENZ G-CLASS 2018Pages: 294, PDF Size: 4.86 MB
Page 251 of 294
Jump starting
For the jump-starting procedure, use only the jump-starting connection point in the engine com-
partment, consisting of a positive terminal and a ground point.
GWARNING
Battery acid is caustic. There is a risk of injury.
Avoid contact with skin, eyes or clothing. Do not inhale any battery gases. Do not lean over the
battery. Keep children away from batteries. Wash away battery acid immediately with plenty of
clean water and seek medical attention.
GWARNING
During charging and jump-starting, explosive gases can escape from the battery. There is a risk of an explosion.
Particularly avoid fire, open flames, creating sparks and smoking. Ensure there is sufficient ven-
tilation while charging and jump-starting. Do not lean over a battery.
GWARNING
During the charging process, a battery produces hydrogen gas. If a short circuit occurs or sparks
are created, the hydrogen gas can ignite. There is a risk of an explosion.
RMake sure that the positive terminal of a connected battery does not come into contact with
vehicle parts.
RNever place metal objects or tools on a battery.
RIt is important that you observe the described order of the battery terminals when connecting
and disconnecting a battery.
RWhen jump-starting, make sure that the battery poles with identical polarity are connected.
RIt is particularly important to observe the described order when connecting and disconnecting
the jumper cables.
RNever connect or disconnect the battery terminals while the engine is running.
GWARNING
A discharged battery can freeze at temperatures below freezing point. When jump-starting the
vehicle or charging the battery, gases can escape from the battery. There is a risk of an explosion. Allow the frozen battery to thaw out before charging it or jump-starting.
!Avoid repeated and lengthy starting attempts. Otherwise, the catalytic converter could be
damaged by the non-combusted fuel.
If the warning and indicator lamps do not light up on the instrument cluster when temperatures are
low, it is probably because the discharged battery has frozen. In this case, you may neither charge
the battery nor jump-start the vehicle. The service life of a thawed-out battery may be shorter. The
starting characteristics can be impaired, particularly at low temperatures. Have the thawed-out
battery checked at a qualified specialist workshop.
Jump starting249
Breakdown assistance
Z
Page 252 of 294
Do not start the vehicle using a rapid charging device. If your vehicle's battery is discharged, the
engine can be jump-started from another vehicle or from a donor battery using jumper cables.
Observe the following points:
RThe battery is not accessible in all vehicles. If the other vehicle's battery is not accessible, jump-
start the vehicle using a donor battery or a jump-starting device.
RYou may only jump-start the vehicle when the engine and exhaust system are cold.
RDo not start the engine if the battery is frozen. Let the battery thaw first.
RJump-starting may be performed only using batteries with a nominal voltage of 12 V.
ROnly use jumper cables which have a sufficient cross-section and insulated terminal clamps.
RIf the battery is fully discharged, leave the battery that is being used to jump-start connected for
a few minutes before attempting to start. This charges the battery slightly.
RMake sure that the two vehicles do not touch.
Make sure that:
RThe jumper cables are not damaged.
RWhen the jumper cables are connected to the battery, uninsulated sections of the terminal clamp
do not come into contact with other metal sections.
RThe jumper cables cannot come into contact with parts which can move when the engine is
running, such as the V-belt pulley or the fan.
XApply the parking brake.
XShift the automatic transmission to position j.
XMake sure that the ignition is switched off. All indicator lamps in the instrument cluster must be
off.
XSwitch off all electrical consumers, e.g. rear window defroster, lighting, etc.
XOpen the hood.
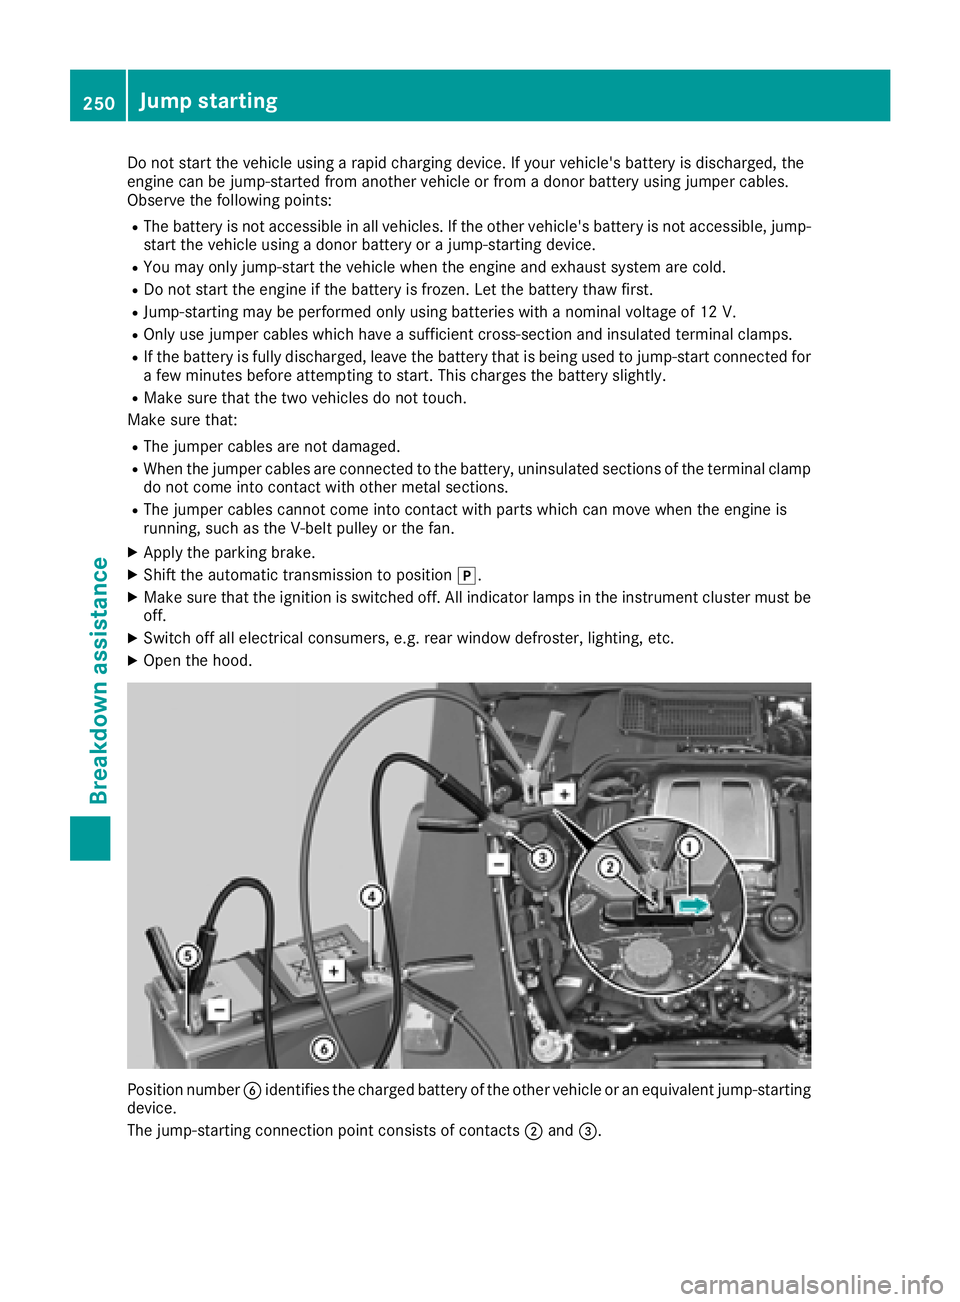
Position number Bidentifies the charged battery of the other vehicle or an equivalent jump-starting
device.
The jump-starting connection point consists of contacts ;and =.
250Jump starting
Breakdown assistance
Page 253 of 294
XLift up cover:of positive terminal ;in the direction of the arrow.
XConnect positive terminal ;on your vehicle to positive terminal ?of donor battery Busing the
jumper cable. Always begin with positive terminal ;on your own vehicle first.
XStart the engine of the donor vehicle and run it at idling speed.
XConnect negative terminal Aof donor battery Bto ground point =of your vehicle using the
jumper cable, connecting the jumper cable to donor battery Bfirst.
XStart the engine.
XBefore disconnecting the jumper cables, let the engine run for several minutes.
XFirst, remove the jumper cables from ground point =and negative terminal A, then from pos-
itive clamp ;and positive terminal ?. Begin each time at the contacts on your own vehicle first.
XClose cover:of positive terminal ;after removing the jumper cables.
XHave the battery checked at a qualified specialist workshop.
Jump-starting is not considered to be a normal operating condition.
iJumper cables and further information regarding jump-starting can be obtained at any qualified
specialist workshop.
Towing and tow-starting
Important safety notes
GWARNING
Functions relevant to safety are restricted or
no longer available if:
Rthe engine is not running.
Rthe brake system or the power steering is
malfunctioning.
Rthere is a malfunction in the voltage supply or the vehicle's electrical system.
If your vehicle is being towed, much more
force may be necessary to steer or brake.
There is a risk of an accident.
In such cases, use a tow bar. Before towing,
make sure that the steering moves freely.
GWARNING
You can no longer steer the vehicle if the
steering wheel lock has been engaged. There
is a risk of an accident.
Always switch off the ignition when towing the
vehicle with a tow cable or a tow bar.
GWARNING
When towing or tow-starting another vehicle
and its weight is greater than the permissible
gross weight of your vehicle, the:
Rthe towing eye could detach itself
Rthe vehicle/trailer combination could roll-
over.
There is a risk of an accident.
When towing or tow-starting another vehicle,
its weight should not be greater than the per- missible gross weight of your vehicle.
Details on the permissible gross vehicle weight
of your vehicle can be found on the vehicle iden-
tification plate (
Ypage 282).
!When DISTRONIC PLUS or the HOLD func-
tion is activated, the vehicle brakes automat-
ically in certain situations.
To avoid damage to the vehicle, deactivate
DISTRONIC PLUS and the HOLD function in
the following or similar situations:
Rwhen towing the vehicle
Rin the car wash
!The vehicle can be towed a maximum of
30 miles (50km). The towing speed of 30 mph (50 km/h) must not be exceeded.
If the vehicle has to be towed more than
30 miles (50km), the entire vehicle must be
raised and transported.
Towing and tow-starting251
Breakdown assistance
Z
Page 254 of 294
!Only secure the tow cable or tow bar to the
towing eyes. You could otherwise damage the
vehicle.
!Do not tow with sling-type equipment. This
could damage the vehicle.
!Do not use the towing eye for recovery. This
could damage the vehicle. If in doubt, have
the vehicle recovered using a crane.
!When towing, pull away slowly and
smoothly. If the tractive power is too high, the
vehicles could be damaged.
!Your vehicles is equipped with an automatic
transmission. Therefore, you must not have
the vehicle tow-started. The transmission
may otherwise be damaged.
It is better to have the vehicle transported than
to have it towed away.
If the transfer case can be shifted into the Neu-
tral position, you can tow away the vehicle.
If the transfer case cannot be shifted into the
Neutral position, you can tow away the vehicle
with one axle raised. Please bear the following in
mind:
Rremove the propeller shaft between the trans-
fer case and the rolling axle
Rturn the SmartKey to position 1in the igni-
tion lock
The battery must be connected and charged.
Otherwise, you:
Rcannot turn the SmartKey to position 2in
the ignition lock
Rcannot shift the automatic transmission to
position i
Disarm the automatic locking feature before the vehicle is towed (
Ypage 67). You could other-
wise be locked out when pushing or towing the
vehicle.
Towing eyes
Towing eyes, front
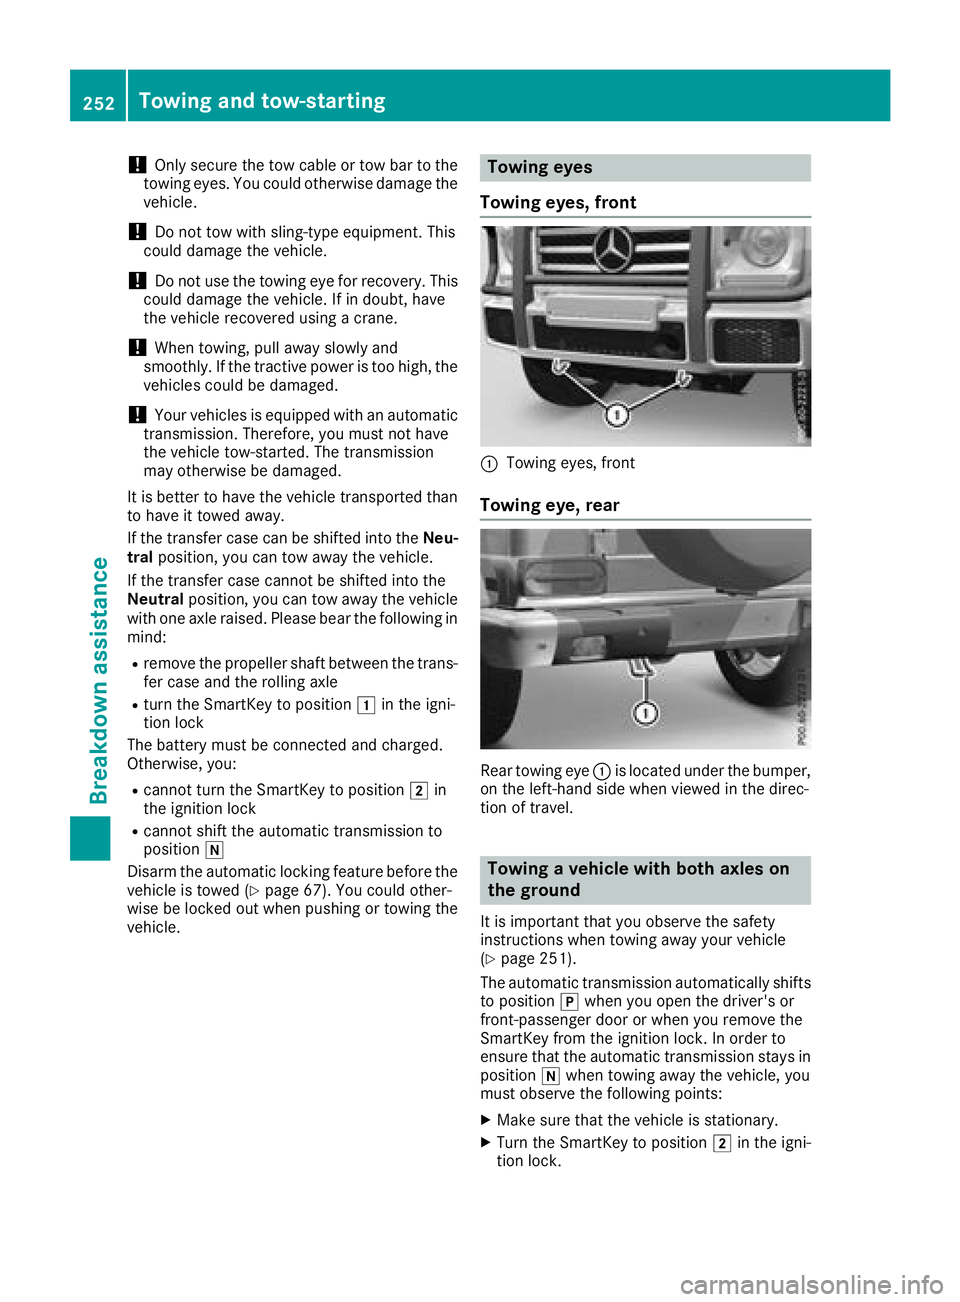
:Towing eyes, front
Towing eye, rear
Rear towing eye :is located under the bumper,
on the left-hand side when viewed in the direc-
tion of travel.
Towing a vehicle with both axles on
the ground
It is important that you observe the safety
instructions when towing away your vehicle
(
Ypage 251).
The automatic transmission automatically shifts
to position jwhen you open the driver's or
front-passenger door or when you remove the
SmartKey from the ignition lock. In order to
ensure that the automatic transmission stays in
position iwhen towing away the vehicle, you
must observe the following points:
XMake sure that the vehicle is stationary.
XTurn the SmartKey to position 2in the igni-
tion lock.
252Towing and tow-starting
Breakdown assistance
Page 255 of 294
XWhen the vehicle is stationary, depress the
brake pedal and keep it depressed.
XShift the transfer case to positionNeutral
(Ypage 150).
XShift the automatic transmission to position
i.
XLeave the SmartKey in position 2in the igni-
tion lock.
XRelease the brake pedal.
XRelease the parking brake.
XSwitch on the hazard warning lamps
(Ypage 88).
In order to signal a change of direction when
towing the vehicle with the hazard warning
lamps switched on, use the combination switch
as usual. In this case, only the indicator lamps
for the direction of travel flash. After resetting
the combination switch, the hazard warning
lamp starts flashing again.
iThe automatic transmission can only
change gear when the battery has sufficient
charge.
If you cannot shift the automatic transmission
to position i, the propeller shafts to the
driven axles must be removed.
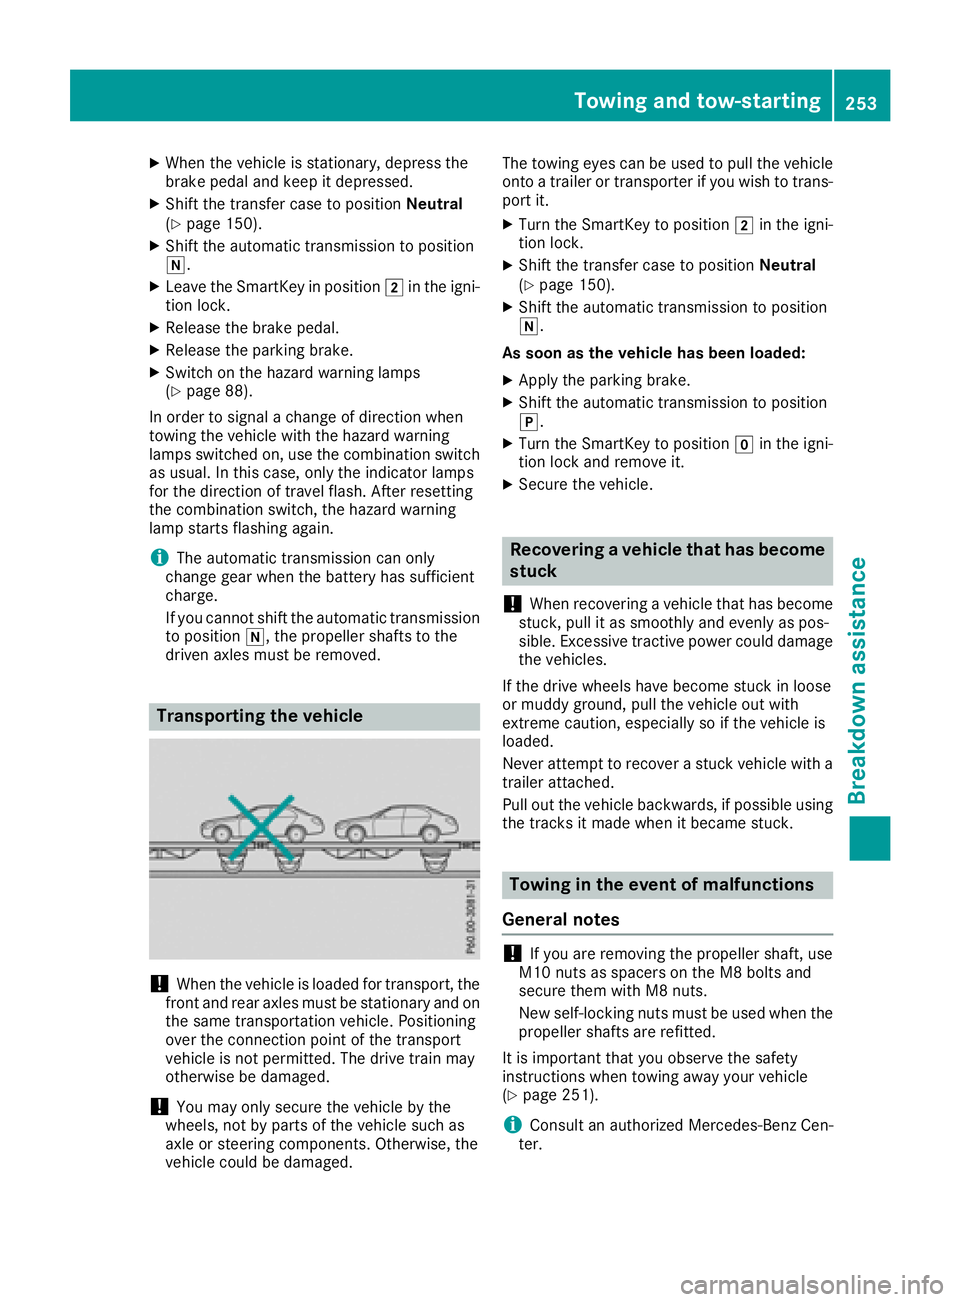
Transporting the vehicle
!When the vehicle is loaded for transport, the
front and rear axles must be stationary and on the same transportation vehicle. Positioning
over the connection point of the transport
vehicle is not permitted. The drive train may
otherwise be damaged.
!You may only secure the vehicle by the
wheels, not by parts of the vehicle such as
axle or steering components. Otherwise, the
vehicle could be damaged. The towing eyes can be used to pull the vehicle
onto a trailer or transporter if you wish to trans-
port it.
XTurn the SmartKey to position 2in the igni-
tion lock.
XShift the transfer case to position Neutral
(Ypage 150).
XShift the automatic transmission to position
i.
As soon as the vehicle has been loaded:
XApply the parking brake.
XShift the automatic transmission to position
j.
XTurn the SmartKey to position gin the igni-
tion lock and remove it.
XSecure the vehicle.
Recovering a vehicle that has become
stuck
!
When recovering a vehicle that has become
stuck, pull it as smoothly and evenly as pos-
sible. Excessive tractive power could damage
the vehicles.
If the drive wheels have become stuck in loose
or muddy ground, pull the vehicle out with
extreme caution, especially so if the vehicle is
loaded.
Never attempt to recover a stuck vehicle with a
trailer attached.
Pull out the vehicle backwards, if possible using the tracks it made when it became stuck.
Towing in the event of malfunctions
General notes
!If you are removing the propeller shaft, use
M10 nuts as spacers on the M8 bolts and
secure them with M8 nuts.
New self-locking nuts must be used when the
propeller shafts are refitted.
It is important that you observe the safety
instructions when towing away your vehicle
(
Ypage 251).
iConsult an authorized Mercedes-Benz Cen-
ter.
Towing and tow-starting253
Breakdown assistance
Z
Page 256 of 294
In the event of damage to the engine,
transmission or electrical system
XShift thetransfer cas eto neutra l
(Ypage 150).
XShift th eautomatic transmission to position
i.
In the event of damage to the transfer
case
Hav eth epropelle rshafts between th eaxles and
th etransfer cas eremoved.
In the event of damage to the front axle
Hav eth epropelle rshaf tbetween th erear axl e
and th etransfer cas eremoved.
Then hav eth evehicl etowed away wit hth efron t
axl eraised.
In the event of damage to the rear axle
Hav eth epropelle rshaf tbetween th efron taxl e
and th etransfer cas eremoved.
Then hav eth evehicl etowed wit hth erear axl e
raised and whee lroller sunder th efron taxle.
Tow-starting (emergency engine
starting)
!
Vehicles wit hautomatic transmission must
no tbe tow-started. You could otherwise dam-
age th eautomatic transmission .
You can fin dinformation on "Jump-starting "
under (
Ypage 249).
Fuses
Important safety notes
GWARNIN G
If you manipulat eor bridge afault yfus eor if
you replace it wit h afusewit h a higher amper-
age, th eelectric cables could be overloaded.
This could result in afire. Ther eis aris kof an
acciden tand injury.
Always replace fault yfuses wit hth especifie d
ne wfuses having th ecorrec tamperage .The fuses in your vehicl
eserve to close down
fault ycircuits. If afus eblows ,all th ecompo -
nent son th ecircuit and their function sstop
operating .
Blown fuses must be replace dwit hfuses of th e
sam erating ,whic hyou can recogniz eby th e
color and value .The fus erating sare listed in th e
fus eallocation chart (
Ypage 255).
If anewly inserted fus ealso blows ,hav eth e
caus etrace dand rectifie dat aqualified special-
ist workshop, e.g. an authorize dMercedes-Ben z
Center.
!Only use fuses that hav ebeen approve dfor
Mercedes-Ben zvehicles and whic hhav eth e
correc tfus erating for th esystem concerned.
Otherwise, component sor systems could be
damaged.
!Mak esur ethat no moisture can ente rth e
fus ebox when th ecover is open .
!When closingth ecover ,mak esur ethat it is
lyin gcorrectl yon th efus ebox .Moistur eseep -
ing in or dirt could oth
erwise impair th
eoper -
ation of th efuses.
Before changing a fuse
Pay attention to th eimportant safet ynote s
(Ypage 254).
XSwitc hoff th eengine.
XSwitc hoff all electrical consumers.
XRemove th eSmartKey from th eignition lock.
All indicator lamp sin th einstrumen tcluste r
must be off .
XSecureth evehicl eagainst rollin gaway
(Ypage 122).
The fuses are locate din various fus eboxes:
RMain fus ebox on th efront-passenger side of
th edashboar d
RFusebox in th efront-passenger footwell
RFus ebox in th etransmission tunne l
RFusebox in th ecargo compartmen t
The fus eallocation chart and th espar efuses are
in th efus ebox on th edashboar don th efront-
passenger side (
Ypage 255).
The fus eextractor is in th evehicl etool kit
(
Ypage 244).
254Fuses
Breakdown assistance
Page 257 of 294
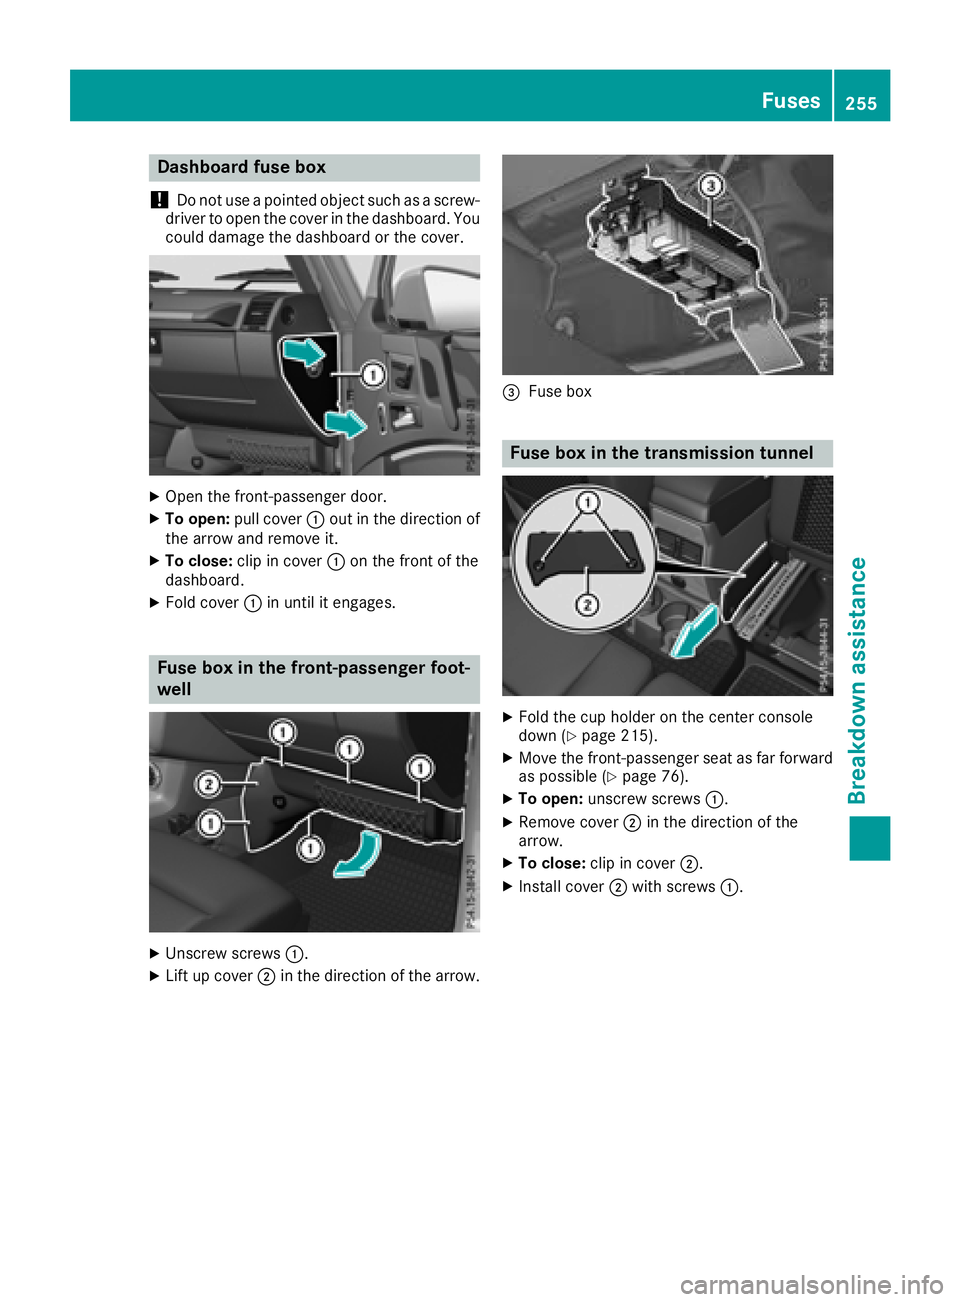
Dashboardfuse box
!
Do no tuse apointe dobjec tsuc has ascrew -
driver to ope nth ecover in th edashboard. You
could damage th edashboar dor th ecover .
XOpenth efront-passenger door.
XTo open: pull cover :out in th edirection of
th earrow and remov eit.
XTo close :clip in cover :on th efron tof th e
dashboard.
XFold cover :in until it engages.
Fus ebox in th efront-passenger foot -
well
XUnscrew screw s:.
XLif tup cover ;in th edirection of th earrow.
=Fus ebox
Fus ebox in th etransmission tunnel
XFold th ecup holder on th ecenter console
down (Ypage 215).
XMoveth efront-passenger seat as far forwar d
as possible (Ypage 76).
XTo open: unscrew screw s:.
XRemov ecover ;in th edirection of th e
arrow.
XTo close :clip in cover ;.
XInstall cover ;withscrew s:.
Fuses255
Breakdown assistance
Z
Page 258 of 294
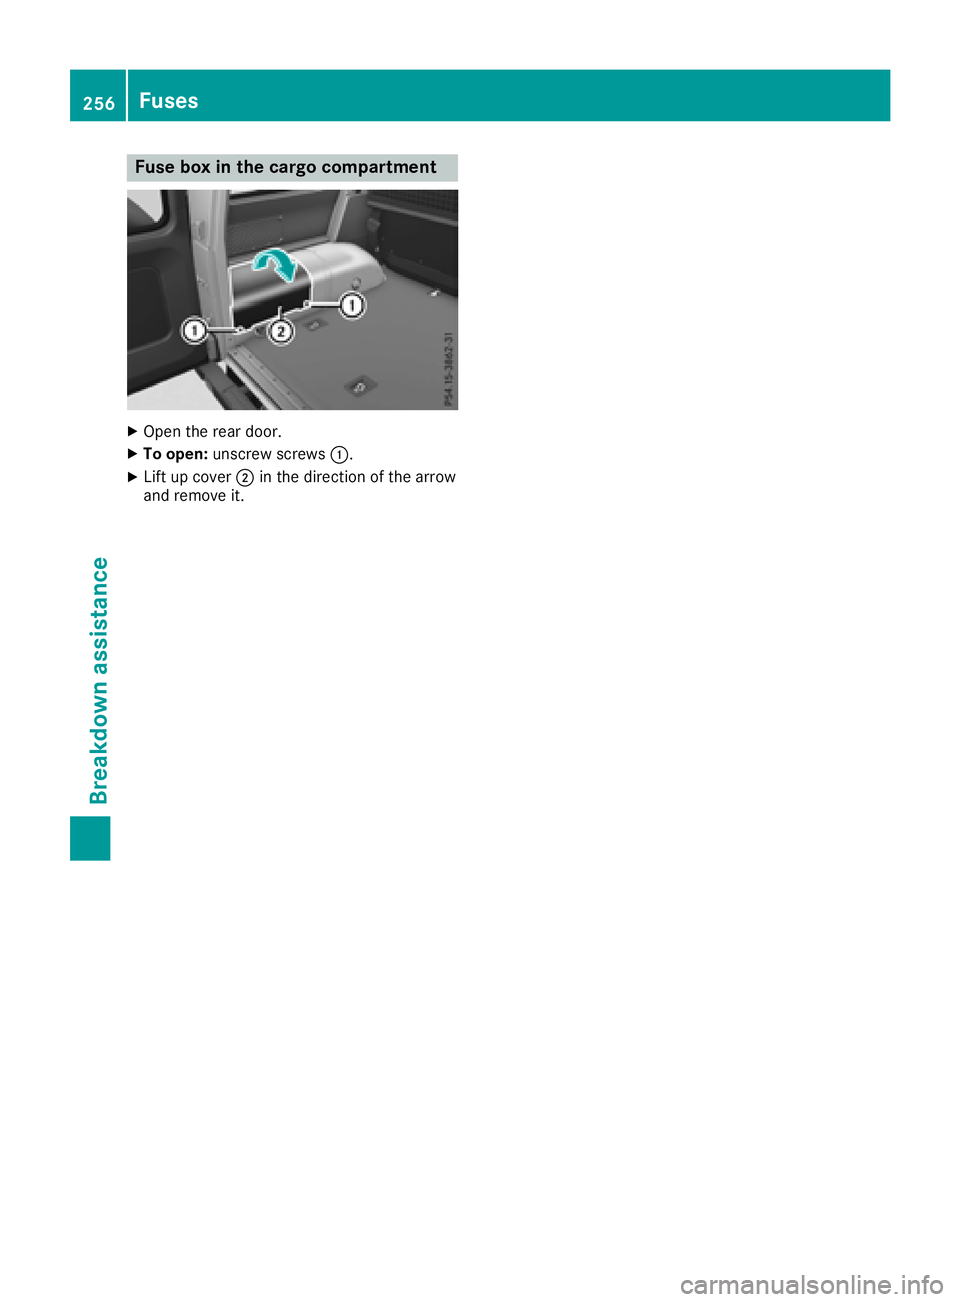
Fuse box in the cargo compartment
XOpen therear door .
XTo open:unscrew screws :.
XLiftup cover ;in th edirection of th earrow
and remove it .
256Fuses
Breakdown assistance
Page 259 of 294
Important safety notes
GWARNING
If wheels and tires of th ewrong siz eare used,
th ewhee lbrakes or suspension component s
may be damaged. Ther eis aris kof an acci-
dent.
Always replace wheels and tires wit hthose
that fulfill th especification sof th eoriginal
part .
When replacing wheels, mak esur eto use th e
correct:
Rdesignation
Rmodel
When replacing tires ,mak esur eto use th e
correct:
Rdesignation
Rmanufacturer
Rmodel
GWarning
A flat tire severely impairs th edriving ,steer -
ing and braking characteristics of th evehicle.
Ther eis aris kof an accident.
do no tdriv ewit h a flat tire. Immediately
replace th eflat tire wit hyour spar ewheel, or
consult aqualified specialist workshop.
Accessories that are no tapprove dfor your vehi-
cle by Mercedes-Ben zor are no tbein gused cor-
rectl ycan impair th eoperating safety.
Before purchasing and usin gnon-approve d
accessories, visit aqualified specialist work-
sho pand ask about :
Rsuitability
Rlegal stipulation s
Rfactory recommendation s
Further information regarding wheels and tires
can be foun dunder "Wheel/tire combinations"
(
Ypage 279).
You can ask for information regarding permitte d
wheel/tire combination sat an authorize d
Mercedes-Ben zCenter. Information on tire pressur
ecan be found:
Ron th eTir eand Loading Information placard
on th eB-pillar on th edriver' sside
(
Ypage 266)
Rin th etire pressur etable in th efuel filler flap
(Ypage 120)
Runder "Tir epressure" (Ypage 260)
Operation
Information on driving
Checkth etire pressur ewhen th evehicl eis
heavily laden and adjust prio rto atrip.
While driving ,pay attention to vibrations, noises
and unusual handlin gcharacteristics ,e.g. pull-
ing to on eside .This may indicat ethat th e
wheels or tires are damaged. If you suspec tthat
a tire is defective, reduce your spee dimmedi-
ately. Stop th evehicl eas soo nas possible to
chec kth ewheels and tires for damage. Hidden
tire damag ecould also be causing th eunusual
handlin gcharacteristics .If you fin dno sign sof
damage, hav eth etires and wheels checke dat a
qualified specialist workshop.
When parking your vehicle, mak esur ethat th e
tires do no tget deformed by th ecur bor other
obstacles. If they canno tbe avoided, driv eove r
obstacles suc has curbs slowly and at an obtuse
angle. You could otherwise damag eth ewhee l
rim sand tires .
Regular checking of wheels and tires
GWARNIN G
Damaged tires can caus etire inflation pres-
sur eloss .As aresult ,you could lose control of
your vehicle. Ther eis aris kof accident.
Chec kth etires regularly for sign sof damag e
and replace any damaged tires immediately.
Chec kwheels and tires for damag eat least once
a month .Chec kwheels and tires after driving
off-road or on roug hroads. Damaged wheels
can caus e aloss of tire pressure.
Pay particular attention to damag esuc has:
Rcut sin th etires
Rpunctures in th etires
Rtears in th etires
Operation257
Wheels and tires
Z
Page 260 of 294
Rbulges on tires
Rdeformation or severe corrosion on wheels
Regularly check the tire tread depth and the
condition of the tread across the whole width of
the tire (
Ypage 258). In order to inspect the
inner side of the tire surface, turn the steering
wheel to full lock.
All wheels must have a valve cap to protect the valve against dirt and moisture. Do not install
anything onto the valve other than the standard
valve cap or a valve cap approved by Mercedes-
Benz for your vehicle. Do not use any other valve
caps or systems, e.g. tire pressure monitoring
systems.
You should regularly check the pressure of all
your tires including the spare wheel, particularly
prior to long trips. Adjust the tire pressure as
necessary (
Ypage 260).
The service life of tires depends, among other
things, on the following factors:
RDriving style
RTire pressure
RDistance covered
Notes on tire tread
GWARNING
Insufficient tire tread will reduce tire traction.
The tire is no longer able to dissipate water.
This means that on wet road surfaces, the risk
of hydroplaning increases, in particular where speed is not adapted to suit the driving con-
ditions. There is a risk of accident.
If the tire pressure is too high or too low, tires
may exhibit different levels of wear at differ-
ent locations on the tire tread. Thus, you
should regularly check the tread depth and
the condition of the tread across the entire
width of all tires.
Minimum tire tread depth for:
RSummer tires: âin (3 mm)
RM+S tires: ãin (4 mm)
For safety reasons, replace the tires before
the legally prescribed limit for the minimum
tire tread depth is reached.
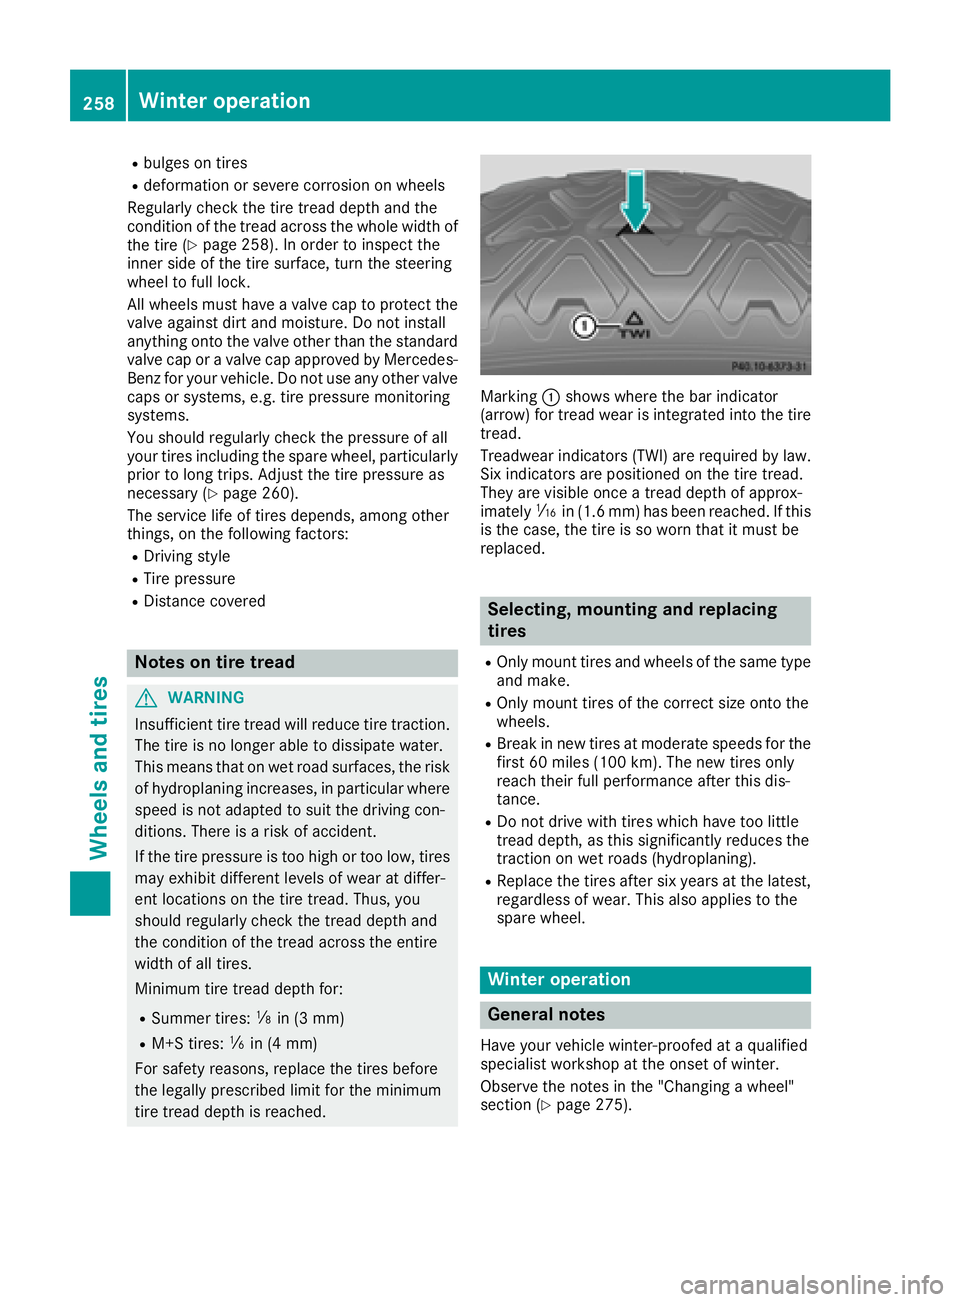
Marking :shows where the bar indicator
(arrow) for tread wear is integrated into the tire
tread.
Treadwear indicators (TWI) are required by law. Six indicators are positioned on the tire tread.
They are visible once a tread depth of approx-
imately áin (1.6 mm) has been reached. If this
is the case, the tire is so worn that it must be
replaced.
Selecting, mounting and replacing
tires
ROnly mount tires and wheels of the same type
and make.
ROnly mount tires of the correct size onto the
wheels.
RBreak in new tires at moderate speeds for the
first 60 miles (100 km). The new tires only
reach their full performance after this dis-
tance.
RDo not drive with tires which have too little
tread depth, as this significantly reduces the
traction on wet roads (hydroplaning).
RReplace the tires after six years at the latest,
regardless of wear. This also applies to the
spare wheel.
Winter operation
General notes
Have your vehicle winter-proofed at a qualified
specialist workshop at the onset of winter.
Observe the notes in the "Changing a wheel"
section (
Ypage 275).
258Winter operation
Wheels and tires