wheel bolts MERCEDES-BENZ G-CLASS 2019 Owner's Manual
[x] Cancel search | Manufacturer: MERCEDES-BENZ, Model Year: 2019, Model line: G-CLASS, Model: MERCEDES-BENZ G-CLASS 2019Pages: 514, PDF Size: 45.22 MB
Page 350 of 514
No
teson car eof vehicl epar ts &
WARNIN GRisk ofentr apment ifth e
winds hieldwiper sar eswit ched on while
th ewindshield isbeing cleaned
If th ewindshield wipersar ese tin mo tion
while youar ecle anin gth ewindshield or
wiper blades, youcan betrapped bythe
wiper arm. #
Alw aysswitc hof fth ewindshield wipers
and theignition beforecleanin gth e
winds hieldorwiper blades. &
WARNIN GRisk ofburning from theta il‐
pipe ortailpipe trim
The tailpipe andtailpipe trim can becom e
ve ry hot.Ifyo uco me intoco ntact withth ese
car parts,youco uld burnyo urself . #
Alw aysbe par ticular lycareful whenin
th evicinit yof theta ilpipe andtailpipe
tr ims and super visechildr envery
clos elywhe nin this area. #
Beforean ycon tact, allo w thecar parts
to cool down. Obs
erve thefo llo wing informa tion: No
teson cleaning andcareA voiding vehicl edamag e
Wheel s/rims
Usewaterand acid-free whee lclea ners. R
Donotuse acidicwhee lclea nersto remo vebrak edus t.
This could damag ewheel boltsandbrak ecom ponen ts.
R Toavoid corrosion ofthebr ak ediscs andbrak epads, drive
th eve hicle fora fe w min utes afte rclea ning beforepar king
it. The brak ediscs andbrak epa dswarm upand dryout .
Wi ndo ws
Cleanthewindo wsontheinside andoutside usingadam p
clo thand cleanin gag ent sre comme ndedbyMer cedes-Ben z.Do
notuse dryclo thsor abr asiv eor sol vent-ba sedcleani ng
ag ents tocle an theinside ofwindo ws. 34
8
Maint enance andcare
Page 367 of 514
Obser
vethefo llo wing during reco very to avo id
damag eto your vehicle:
R Ifth edr iven wheels gettr ap pe don loose or
mu ddygr ou nd, reco verth eve hicle withth e
utm ostcar e,
Es pec iallyso ifth eve hicle isladen.
R Neveratt em pttoreco vera ve hicle that is
st uc kwit hatrailer attached.
R Pull outtheve hicle that isstuc kbac kwards,
if poss ible, usingth etra cksit made beforeit
became stuc k. To
wing vehicl eaw ay intheeve ntofmalf unc‐
tions No
teson towing away intheev ent ofma l‐
fun ctions
* NO
TEDama gedue toinc orrect att ach‐
ment anduseof old nuts The
vehicle andcomponent sof theve hicle
can bedamag eddue toinc orrect att achment
and useof old nuts. #
Ifyo ure mo vethepr opeller shaft,place
th eM1 0nuts ontheM8 bolts as
spacer sand secur eth em withM8 nuts. #
Alw aysuse newself-loc kingnuts when
ins talling thepr opeller shafts. Obser
vetheno teson towing away
( / pag e362).
% Forfur ther information ,con sult anaut hor‐
ized Mercedes- BenzCenter.
To wing away intheev ent ofma lfun ctions
To wing away intheev ent ofdama getothe
engine, transm ission orelectr ics #
Shif tth etra nsmiss iontoposition 005C.
To wing away intheev ent oftransf ercase
da ma ge #
Remo vethepr opeller shaftsbetween the
axle sand thetransf ercase. To
wing away intheev ent offront axle dam‐
ag e #
Remo vethepr opeller shaftbe tween there ar
axle andthetransf ercase. #
Tow aw ay theve hicle withara ised front axle.
To wing away intheev ent ofrear axle dam‐
ag e #
Remo vethepr opeller shaftbe tween thefront
axle andthetransf ercase. #
Tow aw ay theve hicle withara ised rear axle
and withwheel roller sunder thefront axle. Loading
theve hicl efo rtr ans port #
Obser vetheno teson towing away
( / pag e362). #
Connec tth eto w bar totheto wing eyein
or der toload theve hicle. #
Shif tth etra nsmiss iontoposition 005C. Br
eakdo wnassis tance 36
5
Page 396 of 514
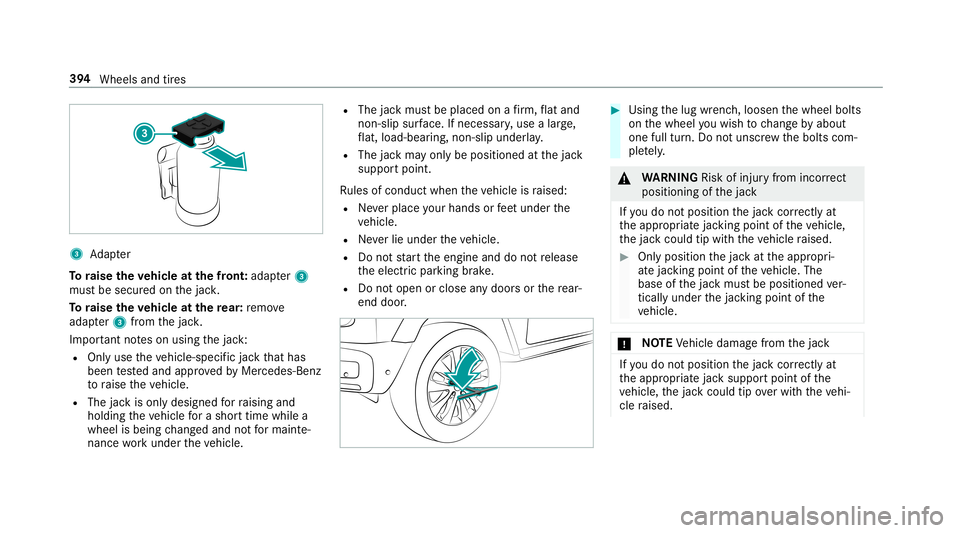
3
Adapter
To raise theve hicl eat thefront :adap ter3
mus tbe secur edon thejac k.
To raise theve hicl eat there ar: remo ve
adap ter3 from thejac k.
Im por tant noteson using thejac k:
R Onlyuse theve hicle-specif icjac kth at has
been tested and appr ovedby Mer cedes-Ben z
to raise theve hicle.
R The jackis onl ydesigned forra ising and
holdin gth eve hicle fora shor ttime whilea
whee lis being chang edand notfo rmaint e‐
nance workund ertheve hicle. R
The jackmus tbe placed onafirm ,fl at and
no n-slip surface. Ifneces sary,use alar ge,
fl at, load- bearing,no n-slip unde rlay .
R The jackma yonl ybe positioned atthejac k
suppor tpoint .
Ru les ofcon duct when theve hicle israised:
R Neverpla ceyour han dsorfeet und erthe
ve hicle.
R Neverlie under theve hicle.
R Donotst ar tth eengine anddonotre lease
th eelectr icpar king brak e.
R Donotopen orclose anydoor sor there ar-
end door . #
Usin gth elug wrenc h,loosen thewheel bolts
on thewheel youwish tochang eby about
on efull turn.Do notuns crew thebolts com‐
ple tely. &
WARNIN GRisk ofinju ryfrom incor rect
pos itioning ofthejac k
If yo udo notposi tionth ejac kcor rectl yat
th eappr opriatejac king point oftheve hicle,
th ejac kcould tipwithth eve hicle raised. #
Onlyposit ionthejac kat theappr opri‐
at ejac king point oftheve hicle. The
base ofthejac kmus tbe position edver‐
tically underthejac king point ofthe
ve hicle. *
NO
TEVehicle damag efrom thejac k If
yo udo notposi tionth ejac kcor rectl yat
th eappr opriatejac ksuppor tpoint ofthe
ve hicle, thejac kcould tipove rwit hth eve hi‐
cle raised. 39
4
Wheels andtires
Page 397 of 514
#
The jackis designed exclu sively for
jac king uptheve hicle atthejac ksup‐
por tpoint s. Ra
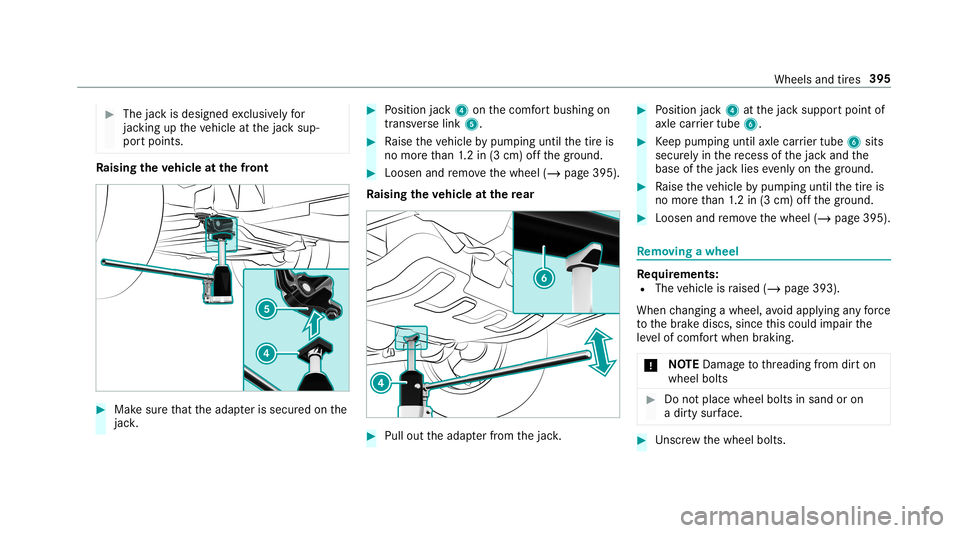
ising theve hicl eat thefront #
Mak esur eth at theadap teris secur edon the
jac k. #
Position jack4 onthecomf ortbushing on
tra nsv erse link 5. #
Raise theve hicle bypum ping until thetir eis
no mor eth an 1.2 in (3 cm) offth egr ound. #
Loosen andremo vethewheel (/page395).
Ra ising theve hicl eat there ar #
Pullout theadap terfr om thejac k. #
Position jack4 atthejac ksuppor tpoint of
axle carrier tube 6. #
Keep pum ping until axlecarrier tube 6sits
secur elyinthere cess ofthejac kand the
base ofthejac klies evenlyon thegr ound. #
Raise theve hicle bypum ping until thetir eis
no mor eth an 1.2 in (3 cm) offth egr ound. #
Loosen andremo vethewheel (/page395). Re
mo ving awh eel Re
quirement s:
R The vehicle israised (/page393).
When chang ingawheel, avoid applying anyfo rc e
to thebr ak ediscs, sincethis could impair the
le ve lof com fort when brakin g.
* NO
TEDama getothre adin gfrom dirton
wheel bolts #
Donotplace wheel boltsin san dor on
a dir tysur face. #
Unscr ew thewheel bolts. Wheels
andtires 395
Page 398 of 514
#
Remo vethewheel. #
Installth ene wwheel (/page396). Mounting
ane wwheel Re
quirement s:
R The wheel isremo ved(/ page395 ). &
WARNIN GRisk ofacci dent from losing a
whe el
Oil ed, grea sed ordamag edwhe elbol t/whe el
nut thre ads orwheel hub/wheel mounting
bolt thre ads can caus eth ewheel bolts/
wheel nutstocome loose.
As are sult, youco uld lose awheel whiledriv‐
ing . #
Neveroil orgrease theth re ads. #
Intheeve ntofdamag eto theth re ads,
con tact aqu alif ied spec ialistwo rkshop
immediat ely. #
Have thedamag edwheel boltsordam‐
ag ed hub thre ads replaced. #
Donotcon tinue driving. #
Obser vetheinf ormation onthech oice of
tir es (/ page389).
Fo rtir es wit haspecif ieddirection ofrotatio n,an
ar ro w on theside wallof thetir eindicat esthe
cor rect dire ction ofrotatio n.Ob serveth edir ec‐
tion ofrotatio nwh en installing. #
Place thewheel tobe installed onthewheel
hub andpush iton. &
WARNIN GRisk ofinju ryfrom tight ening
whee lbol tsand nuts
If yo utig hten thewheel boltsorwheel nuts
when theve hicle israised, thejac kcould tip. #
Onlytight enwheel boltsorwheel nuts
when theve hicle ison thegr ound. #
Forsaf etyre ason s,on lyuse wheel bolts
whic hha ve been approvedby Mer cedes-
Benz andforth ewheel inqu estion . *
NO
TEDama getopaintw orkof thewheel
ri m when screwing onthefirs twh eelbo lt If
th ewheel hastoomuc hpla ywhen screw‐
ing inthefirs twh eelbo lt, thewheel rim pai nt
can bedama ged. #
Press thewheel firm lyag ains tth e
wheel hubwhen screwing onthefirs t
wheel bolt. #
Tight enthewheel boltsevenlyin adi ag ona l
pa tter nin theor der indicat eduntil they are
fi ng er-tig ht. #
Lowe rth eve hicle (/page396). Lo
we ring theve hicl eaf te ra wh eelch ang e Re
quirement s:
R The newwheel hasbeen installed
(/ page396) . #
Place thera tche tont oth ehe xagon nutofthe
jac kso that theletter s"AB" arevisible. #
Tolowe rthe vehicl e:tur nth era tche tof the
jac kcou nter-clo ckwise. 396
Wheels andtires
Page 399 of 514
#
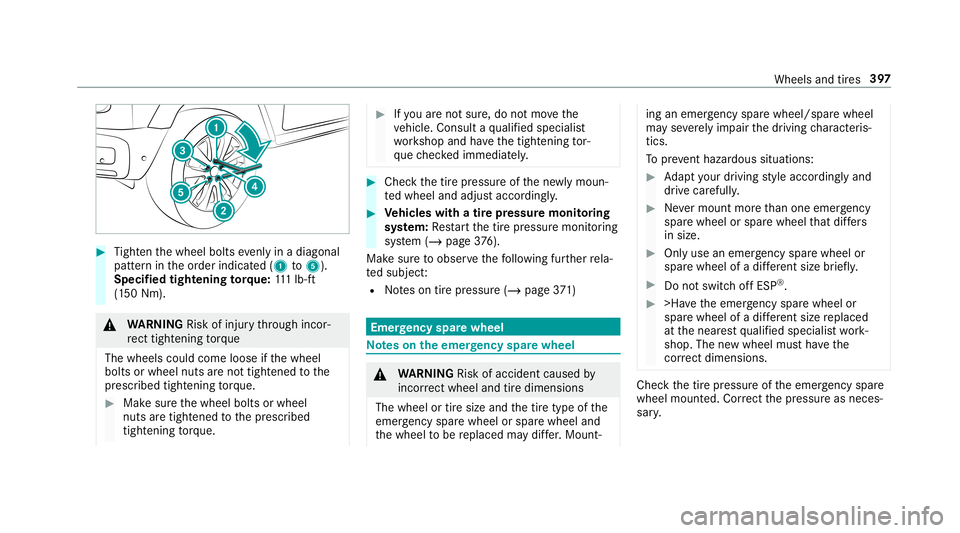
Tight enthewheel boltsevenlyin adi ag ona l
pa tter nin theor der indicat ed(1 to5 ).
Specif iedtight ening torq ue: 111 lb-ft
(1 50 Nm). &
WARNIN GRisk ofinju rythro ugh incor‐
re ct tigh tening torq ue
Th ewh eelscou ldcome looseifth ewheel
bolts orwheel nutsareno ttight ened tothe
pr escr ibed tighteningto rq ue. #
Makesur eth ewheel boltsorwheel
nuts aretight ened tothepr escr ibed
tight ening torq ue. #
Ifyo uar eno tsur e,do notmo vethe
ve hicle. Consult aqu alif ied spec ialist
wo rkshop andhave thetight ening tor‐
qu ech eckedimmediat ely. #
Chec kth etir epr essur eof thene wlymoun‐
te dwheel andadjus taccor dingly. #
Vehicl eswith atir epr ess uremonit oring
sy stem: Restar tth etir epr essur emonit oring
sy stem (/ page37 6).
Mak esur eto obser vethefo llo wing further rela‐
te dsubjec t:
R Noteson tirepr essur e(/ page37 1) Emer
gency spar ewheel No
teson the emer gency spar ewheel &
WARNIN GRisk ofacci dent caused by
inc orrect whe eland tiredimensi ons
The wheelor tiresize andthetir etype ofthe
emer gency sparewheel orspar ewheel and
th ewheel tobe replaced maydif fer. Mount‐ ing
anemer gency sparewheel/ sparewheel
ma yse verely im pair thedr iving charact eris‐
tic s.
To preve nthazardous situa tions: #
Adaptyo ur drivin gst yle accor dinglyand
dr ive car efull y. #
Nevermount moreth an oneemer gency
spa rewheel orspar ewheel that dif fers
in size . #
Onlyuse anemer gency sparewheel or
spar ewheel ofadif fere nt size briefly. #
Donotsw itchof fESP ®
. #
>Ha vetheemer gency sparewheel or
spar ewheel ofadif fere nt size replaced
at thenear estqu alif ied spec ialistwo rk‐
shop. Thenewwheel mustha ve the
cor rect dimensi ons. Ch
eckth etir epr essur eof theemer gency spare
wheel mounted. Cor rect thepr essur eas neces ‐
sar y. Wheels
andtires 39
7