dashboard MERCEDES-BENZ G-CLASS SUV 2008 Owners Manual
[x] Cancel search | Manufacturer: MERCEDES-BENZ, Model Year: 2008, Model line: G-CLASS SUV, Model: MERCEDES-BENZ G-CLASS SUV 2008Pages: 293, PDF Size: 4.49 MB
Page 8 of 293
5
Changing a wheel
see Flat tyre
Checklist (off-road driving)............... 174
Child-proof locks Rear doors. ....................................... 46
Side windows (rear) ..........................47
Children
In the vehicle. ................................... 38
Restraint systems. ............................ 38
Child seat
Automatic recognition ......................40
Automatic recognition (malfunc-
tion). ............................................... 211
Child restraint systems ....................44
ISOFIX............................................... 44
Recommendations. ...........................43
Suitable positions. ............................ 42
Child seat lock...................................... 44
Cigarette lighter................................. 149
Cockpit Overview. .......................................... 20
COMAND............................................... 99
On-board computer. .........................99
see separate operating instructions
Constant headlamp mode................... 76
Setting (on-board computer).......... .107
Consumption statistics (on-board
computer)........................................... 110
Convenience closing............................ 85Coolant................................................
161
Checking the level. .........................161
Display message..................... 200, 203
Mixture ratio ................................... 280
Temperature gauge ...........................96
Cornering lamps................................... 79
Courtesy lights..................................... 82
Cruise control..................................... 113
Display message ............................. 208
Cup holder.......................................... 138 D
Dashboard see Instrument cluster
Date
Setting (on-board computer).......... .106
Daytime driving lights
see Constant headlamp mode
Delayed switch-off
Exterior lighting (on-board com-
puter). ............................................. 107
Interior lighting (on-board com-
puter). ............................................. 108
Diesel
Low outside temperatures. .............156
Diesel engine
Winter driving. ................................ 156
Differential locks.................................. 93
Digital speedometer.......................... 101Dipped-beam headlamps
Automatic headlamp mode. ..............76
Display message ............................. 204
Symmetrical. .................................. 177
Display message ................................ 194
Display messages Service display................................ 181
Symbol messages. ..........................199
Text messages. ............................... 195
Door
Automatic locking ............................. 55
Emergency locking .........................230
Emergency unlocking...................... 229
Opening (from the inside). ................55
Door control panel
Overview. .......................................... 28
Draught stop....................................... 135
Drinks holder
see Cup holder
Driver's airbag...................................... 37
Driver's seat Display message ............................. 208
Driver's seat position........................... 75
Driving abroad.................................... 177
Driving information Off-road .......................................... 173
Tyre ruts. ........................................ 177
Driving safety system.......................... 47
ABS. .................................................. 48 Index
463_AKB; 1; 8, en-GB
wobuchh,
Version: 2.10.6 2008-07-17T15:19:41+02:00 - Seite 5Dateiname: 6515_4091_02_buchblock.pdf; preflight
Page 10 of 293
7F
Fire extinguisher................................ 192
First-aid kit Cabriolet. ........................................ 191
Long-wheelbase station wagon....... 189
Short-wheelbase station wagon. .....190
Flat tyre
Preparing the vehicle. .....................243
Floormat............................................. .153
Foglamps Display message ............................. 206
Fording........................................ 172, 176
Frequencies Garage door opene r........................ 282
Telephone. ...................................... 261
Front airbag .......................................... 37
Front-passenger airbag........................ 37
Front-passenger seat Display message ............................. 208
Fuel...................................................... 276
Diesel. ............................................ 156
Loss. ............................................... 219
Petrol .............................................. 155
Fuel/water separator........................ 182
Fuel consumption...................... 277, 278
Fuel filler flap Emergency release. ........................230
Opening/closing ............................ 154Fuel filter
Display message ............................. 202
Fuel level
Calling up the range (on-board
computer). ...................................... 111
Fuel line
Malfunction..................................... 219
Fuel tank
Malfunction..................................... 219
Fuse allocation chart......................... 255
Fuse box Battery case................................... .258
Dashboard. ..................................... 256
Front-passenger footwell ................256
Transmission tunnel........................ 257
Fuse extractor.................................... 255
Fuses................................................... 255 G
Garage door Opening/closing (with the remote
control) ........................................... 153
Garage door opener........................... 151
Clearing the memory. .....................153
Frequencies. ................................... 282
Programming the remote control ....152
Genuine Mercedes-Benz parts.......... 259
Glove compartment........................... 147Gradient-climbing capability (max-
imum)..................................................
175
Gross vehicle weight, maximum
permissible................................. 271, 272 H
Handbrake see Parking brake
Headlamp mode (automatic) ...............76
Headlamps Cleaning ......................................... 184
Cleaning system. .............................. 78
Misting up. ...................................... 223
Headlamps delayed switch-off
see Exterior lighting delayed switch-off
Head restraint
Adjusting (front) ................................ 61
Adjusting (rear). ................................ 62
Removing (rear). ............................... 62
Head restraints
Removing (front). .............................. 61
Resetting (front)................................ 62
Heating
see Air conditioning
High-pressure cleaners..................... 183
Hill start assist..................................... 87 Index
463_AKB; 1; 8, en-GB
wobuchh,
Version: 2.10.6 2008-07-17T15:19:41+02:00 - Seite 7Dateiname: 6515_4091_02_buchblock.pdf; preflight
Page 39 of 293
Occupant safety
36 secured in a child restraint system on the
seat.
R vehicle occupants ― in particular children
― must not lean their head on the area of
the window where the windowbag is
deployed
R rearward-facing child restraint systems
must not be fitted to the front-passenger
seat unless the front-passenger front air-
bag has been disabled. The front-
passenger front airbag of a vehicle fitted
with automatic child seat recognition* is
only disabled when a child restraint sys-
tem with automatic child seat recogni-
tion is fitted to the front-passenger seat.
The 5 PASSENGER AIRBAG OFF
warning lamp must be continuously lit.
If the front-passenger seat of your vehicle
does not have automatic child seat rec-
ognition*, or your rearward-facing child
restraint system does not have such a
feature, children must be secured in a
child restraint system on a suitable seat
in the rear. If you secure a forward-facing
child restraint system to the front-
passenger seat, you must move the front-
passenger seat as far back as possible. R
make sure there are no heavy or sharp-
edged objects in pockets of clothing.
R do not lean forwards, e.g. over the cover
of the driver's front airbag, particularly
when the vehicle is in motion.
R do not put your feet on the dashboard.
R only hold the steering wheel by the rim.
This allows the airbag to inflate fully. You
could be injured if the airbag is deployed
and you are holding the inside of the
steering wheel.
R do not lean on the doors from inside the
vehicle.
R make sure that there are no people, ani-
mals or objects between the vehicle
occupants and the area of deployment of
the airbag.
R do not place any objects between the
seat backrest and the door.
R do not hang any hard objects, for exam-
ple coat hangers, on the grab handles or
coat hooks.
R do not attach accessories, e.g. cup hold-
ers, to the doors. It is not possible to rule out a risk of injuries
caused by an airbag due to the high speed
at which the airbag is required to deploy.
G
Risk of injury
The airbag's functionality can only be guar-
anteed if the following parts are not cov-
ered and no badges or stickers are
attached to them:
R padded steering wheel boss
R front-passenger front airbag cover
R outer side of seats G
Risk of injury
When an airbag deploys, a small amount of
powder is released. The powder may cause
short-term breathing difficulties to persons
suffering from asthma or other pulmonary
conditions.
In order to prevent potential breathing dif-
ficulties you should leave the vehicle as
soon as it is safe to do so. You can also open
the window to allow fresh air to enter the
interior. The powder does not constitute a
health hazard and does not indicate that
there is a fire in the vehicle. Safety
* optional
463_AKB; 1; 8, en-GB
wobuchh,
Version: 2.10.6 2008-07-17T15:19:41+02:00 - Seite 36Dateiname: 6515_4091_02_buchblock.pdf; preflight
Page 70 of 293

Steering wheel
67Steering wheel heating*
The steering-wheel heating heats the leather
areas of the steering wheel. 1
To switch on the steering-wheel heating
2 Indicator lamp
3 To switch off the steering-wheel heating
X To switch on/off: make sure that the key
is in position 1or 2in the ignition lock.
X Turn the lever in direction of arrow 1or
3.
Indicator lamp 2lights up or goes out.
i The steering-wheel heating does not
switch off automatically. Easy-entry/exit feature
The easy-entry/exit feature makes getting in
and out of your vehicle easier.
The steering wheel moves upwards and
towards the dashboard if:
R an easy-entry/exit steering wheel position
has been stored on the key and
R you remove the key from the ignition lock
or
R you open the driver's door with the key in
position 0or 1in the ignition lock.
The steering wheel is moved automatically to
the position previously set when the key is
inserted into the ignition lock with the driver's
door closed.
i The steering wheel only moves upwards
and towards the dashboard if it has not
already reached the upper end stop. G
Risk of injury
Make sure that nobody can become trap-
ped when you activate the easy-entry/exit
feature.
If there is a risk of becoming trapped, stop
the adjustment procedure. To halt the pro-
cedure: R
press the steering-column adjustment
switch
R press one of the memory function posi-
tion buttons
The steering column stops moving immedi-
ately.
Never leave children unsupervised in the
vehicle. They could open the driver's door
and thereby unintentionally activate the
easy-entry feature and become trapped.
You can activate and deactivate the easy-
entry/exit feature via the on-board computer
(Y page 109). Controls
* optional
463_AKB; 1; 8, en-GB
wobuchh,
Version: 2.10.6 2008-07-17T15:19:41+02:00 - Seite 67 ZDateiname: 6515_4091_02_buchblock.pdf; preflight
Page 71 of 293
Mirrors
68 Mirrors
Rear-view mirror
X Adjust the rear-view mirror by hand so you
have a good overview of the traffic condi-
tions. Exterior mirrors
G
Risk of accident
The exterior mirrors reduce the size of the
image. Objects are actually closer than
they appear. You could misjudge the dis-
tance from vehicles driving behind and
cause an accident, e.g. when changing
lane. For this reason, make sure of the
actual distance from the vehicle driving
behind by glancing over your shoulder.
The convex exterior mirrors provide a larger
field of vision.
At low outside temperatures the exterior mir-
rors are heated automatically.
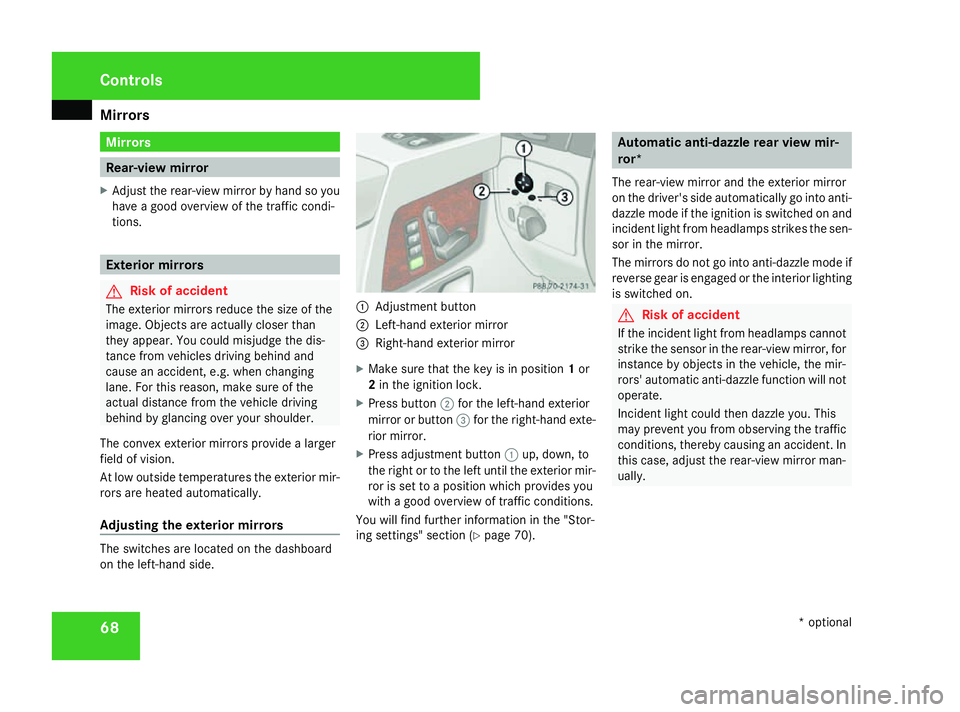
Adjusting the exterior mirrors The switches are located on the dashboard
on the left-hand side. 1
Adjustment button
2 Left-hand exterior mirror
3 Right-hand exterior mirror
X Make sure that the key is in position 1or
2 in the ignition lock.
X Press button 2for the left-hand exterior
mirror or button 3for the right-hand exte-
rior mirror.
X Press adjustment button 1up, down, to
the right or to the left until the exterior mir-
ror is set to a position which provides you
with a good overview of traffic conditions.
You will find further information in the "Stor-
ing settings" section (Y page 70). Automatic anti-dazzle rear view mir-
ror*
The rear-view mirror and the exterior mirror
on the driver's side automatically go into anti-
dazzle mode if the ignition is switched on and
incident light from headlamps strikes the sen-
sor in the mirror.
The mirrors do not go into anti-dazzle mode if
reverse gear is engaged or the interior lighting
is switched on. G
Risk of accident
If the incident light from headlamps cannot
strike the sensor in the rear-view mirror, for
instance by objects in the vehicle, the mir-
rors' automatic anti-dazzle function will not
operate.
Incident light could then dazzle you. This
may prevent you from observing the traffic
conditions, thereby causing an accident. In
this case, adjust the rear-view mirror man-
ually. Controls
* optional
463_AKB; 1; 8, en-GB
wobuchh,
Version: 2.10.6 2008-07-17T15:19:41+02:00 - Seite 68Dateiname: 6515_4091_02_buchblock.pdf; preflight
Page 78 of 293
Lights
75Correct driver's seat position
G
Risk of accident
Only adjust the driver's seat when the vehi-
cle is stationary. You will otherwise be dis-
tracted from the road and traffic conditions
and you could lose control of the vehicle as
a result of the seat moving. This could
cause an accident. G
Risk of accident
Only adjust the steering wheel when the
vehicle is stationary. Drive only when the
steering wheel is fixed.
X Check whether seat and the head restraint
are adjusted properly (Y page 60).
Make sure that:
R you are as far away from the driver's front
airbag as possible.
R you are sitting in a normal upright posi-
tion.
R you can fasten the seat belt properly.
R you have moved the backrest to an
almost vertical position.
R you have set the seat angle so that your
thighs are gently supported. R
you can depress the pedals properly.
R you have adjusted the head restraint so
that the back of your head is supported
at eye level by the central area of the
head restraint.
X Check whether steering wheel is adjusted
properly (Y page 66).
Make sure that:
R you can hold the steering wheel with your
arms slightly bent.
R you can move your legs freely.
R you can see all the displays in the instru-
ment cluster clearly.
X Check whether you have fastened seat belt
properly (Y page 71).
It should:
R fit snugly across your body
R be routed across the middle of your
shoulder
R routed in your pelvic area across the hip
joints Lights
Light switch
For safety reasons, Mercedes-Benz recom-
mends that you drive with the lights switched
on even during the daytime. In some coun-
tries, daytime operation of headlamps varies
due to legal and voluntary requirements. In
these countries, the dipped-beam headlamps
are automatically switched on when the
engine is started.
i If you drive in countries in which traffic
drives on the opposite side of the road to
the country where the vehicle is registered,
oncoming traffic may be dazzled by the
asymmetrical dipped-beam headlamps.
Have the headlamps changed to symmet-
rical dipped beam when driving in these
countries. You can obtain information
about this from any Mercedes-Benz Service
Centre.
The light switch is located on the dashboard
between the steering wheel and the driver's
door. Controls
463_AKB; 1; 8, en-GB
wobuchh,
Version: 2.10.6 2008-07-17T15:19:41+02:00 - Seite 75 ZDateiname: 6515_4091_02_buchblock.pdf; preflight
Page 153 of 293
Features
150 12 V sockets
The sockets can be used for accessories with
a maximum power consumption of 180 W.
! If the engine is switched off and consum-
ers are used for long periods, the battery
may become discharged.
Dashboard socket X
Lift up the cover of the socket.
The cigarette lighter socket can be also used
(Y page 149). It can also be used if the key
has been removed from the ignition lock. Socket in the rear passenger compart-
ment The socket is located at the rear of the centre
console.
X
Lift up the cover of the socket.
Load compartment power socket (long-
wheelbase station wagon) The socket is located in the luggage compart-
ment on the left-hand-side when viewed in the
direction of travel, next to the rear door. X
Lift up the cover of the socket. Mobile phone*
G
Risk of accident
Observe the legal requirements of the
country in which you are currently driving
regarding operating mobile communica-
tions equipment in a vehicle.
If it is permitted by law to operate commu-
nications equipment while the vehicle is in
motion, you may only do so when the traffic
situation allows. Otherwise, you could be
distracted from the traffic conditions,
cause an accident and injure yourself and
others. Cont
rols
* optional
463_AKB; 1; 8, en-GB
wobuchh,
Version: 2.10.6 2008-07-17T15:19:41+02:00 - Seite 150Dateiname: 6515_4091_02_buchblock.pdf; preflight
Page 188 of 293
Care
185
Cleaning the steering wheel boss and
dashboard X
Moisten a clean lint-free cloth with water.
X Clean the plastic parts and the dashboard.
X If particularly dirty, use a mild detergent. G
Risk of injury
Do not use cleaners and cockpit care
sprays containing solvents to clean the
cockpit and steering wheel boss. Cleaners
containing solvents cause the surface to
become porous and in the event of an air-
bag being triggered, plastic parts that have
become loose could cause considerable
injuries.
Leather upholstery* !
Cleaning
R Clean genuine leather covers using a
damp cloth, then wipe the covers down
using a dry cloth. Make sure that the
leather does not become soaked. For
leather care, use leather care foam A 001 986 59 71 10. You can purchase this
from any Mercedes-Benz Service Centre.
R Clean artificial leather covers with a cloth
moistened with a solution containing 1%
detergent (e. g. washing-up liquid).
R Clean fabric covers with a microfibre
cloth moistened with a solution contain-
ing 1% detergent (e. g. washing-up liquid).
When cleaning, take care not to rub too
vigorously and always wipe entire seat
sections to avoid leaving visible lines.
Leave the seat to dry afterwards. Clean-
ing results depend on the type of dirt and
how long it has been there.
i Note that leather covers are a natural
product and as such are subject to a natural
ageing process and may react differently
(e.g. increased formation of wrinkles) to
certain environmental influences (such as
high humidity, intense heat).
Note that regular care is essential to ensure
that the quality (both appearance and com-
fort) of the covers is retained over time. Cleaning real wood and trim strips X
Moisten a clean lint-free cloth with water.
X Clean the wooden trim.
X If particularly dirty, use a mild detergent.
! Do not use cleaning agents containing
solvents because these can damage the
wooden trim.
Cabriolet Frequent cleaning reduces the soft top's
resistance to dirt.
Intensive treatment with the Mercedes-Benz
convertible soft-top cleaning agents kit can
restore the resistance to dirt.
Incorrect cleaning and care, as well as ageing,
can cause soft-top seams to leak. Have the
soft-top seams sealed at a qualified specialist
workshop, e.g. at a Mercedes-Benz Service
Centre.
i
Cover the soft top with a suitable cover if
you plan to leave the vehicle outside for a
long period of time.
! Remove bird droppings immediately as
they are corrosive and can cause soft top
fabric leaks. Do not wash the vehicle with
a high-pressure cleaner or in an automatic Operation
* optional
463_AKB; 1; 8, en-GB
wobuchh,
Version: 2.10.6 2008-07-17T15:19:41+02:00 - Seite 185 ZDateiname: 6515_4091_02_buchblock.pdf; preflight
Page 258 of 293
Fuses
255
Have the vehicle towed with the front axle
raised.
In the event of damage to the front axle Have the propeller shaft between the rear
axle and the transfer case removed.
Have the vehicle towed with the front axle
raised.
In the event of damage to the rear axle
Have the propeller shaft between the front
axle and the transfer case removed.
Then have the vehicle towed with the rear axle
raised and with wheel rollers under the front
axle.
!
Always use new self-locking nuts when
fitting the propeller shafts.
i Consult a Mercedes-Benz Service Centre. Fuses
Notes on changing fuses
The fuses in your vehicle serve to close down
faulty circuits. If a fuse blows, all the compo-
nents on the circuit and their functions will
fail.
Blown fuses must be replaced with fuses of
the same rating, which you can recognise by
the colour and value. The fuse ratings are lis-
ted in the fuse allocation chart. A Mercedes-
Benz Service Centre will be happy to advise
you. G
Risk of fire
Only use fuses that have been approved for
Mercedes-Benz vehicles and which have
the correct fuse rating for the systems con-
cerned. Do not attempt to repair or bridge
faulty fuses. Otherwise, a circuit overload
could cause a fire. Have the cause traced
and rectified at a qualified specialist work-
shop, e.g. a Mercedes-Benz Service Centre.
If the newly inserted fuse also blows, have the
cause traced and rectified at a qualified spe-
cialist workshop, e.g. a Mercedes-Benz
Service Centre.
! Only use fuses that have been approved
for Mercedes-Benz vehicles and which have the correct fuse rating for the system
concerned. Otherwise, components or sys-
tems could be damaged.
The fuses are located in various fuse boxes:
R Main fuse box on the driver's side of the
dashboard
R Fuse box in the front-passenger footwell
R Fuse box in the transmission tunnel
R Fuse box in the battery case
Fuse allocation chart The fuse allocation chart is in the main fuse
box in the dashboard.
Spare fuses
Spare fuses are located in the main fuse box
on the dashboard.
Fuse extractor
You can find the fuse extractor in the vehicle
tool kit (Y
page 188). Practical advice
463_AKB; 1; 8, en-GB
wobuchh,
Version: 2.10.6 2008-07-17T15:19:41+02:00 - Seite 255 ZDateiname: 6515_4091_02_buchblock.pdf; preflight
Page 259 of 293
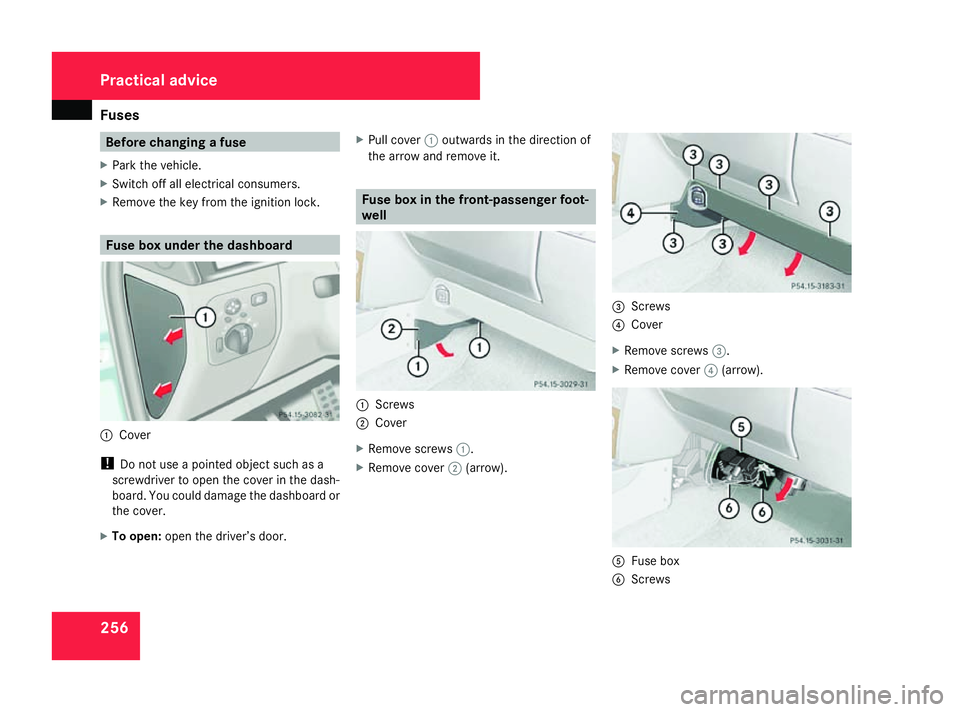
Fuses
256 Before changing a fuse
X Park the vehicle.
X Switch off all electrical consumers.
X Remove the key from the ignition lock. Fuse box under the dashboard
1
Cover
! Do not use a pointed object such as a
screwdriver to open the cover in the dash-
board. You could damage the dashboard or
the cover.
X To open: open the driver’s door. X
Pull cover 1outwards in the direction of
the arrow and remove it. Fuse box in the front-passenger foot-
well
1
Screws
2 Cover
X Remove screws 1.
X Remove cover 2(arrow). 3
Screws
4 Cover
X Remove screws 3.
X Remove cover 4(arrow). 5
Fuse box
6 Screws Practical advice
463_AKB; 1; 8, en-GB
wobuchh,
Version: 2.10.6 2008-07-17T15:19:41+02:00 - Seite 256Dateiname: 6515_4091_02_buchblock.pdf; preflight