key battery MERCEDES-BENZ G-CLASS SUV 2008 Owners Manual
[x] Cancel search | Manufacturer: MERCEDES-BENZ, Model Year: 2008, Model line: G-CLASS SUV, Model: MERCEDES-BENZ G-CLASS SUV 2008Pages: 293, PDF Size: 4.49 MB
Page 7 of 293
4
Battery
Changing (auxiliary heating
remote control) ............................... 235
Changing (key).. .............................. 234
Charging. ........................................ 250
Checking (key). ............................... 234
Check lamp (key). ........................... 234
Disconnecting ................................. 248
Display message ............................. 201
Maintenance (vehicle)..................... 247
Reconnecting.................................. 250
Removing/fitting. ........................... 250
Vehicle battery. .............................. 247
Belt force limiters
Activation.......................................... 33
Belt height adjustment........................ 74
Belt tensioners Activation.......................................... 33
Belt warning.......................................... 74
Bonnet Bonnet catch .................................. 158
Display message ............................. 200
Opening/closing ............................ 157
Bonnet release lever
Release leve r.................................. 158
Brake
Display message ............................. 201
Brake Assist
see BAS Brake fluid..........................................
281
Display message ............................. 201
Brake lamps
Display message ............................. 205
Brakes
Parking brake................................... .88
Warning lamp..................................2 14
Brake system
Display message ............................. 201
Bulbs
Brake lamp. .................................... 240
Cornering light function ..................238
Display messages ........................... 204
Foglamps. ....................................... 238
Licence plate lamp.......................... 241
Overview. ........................................ 236
Parking lamp. ......................... 237, 240
Rear foglamp. ................................. 241
Replacing............................... .237, 240
Reversing lamp. .............................. 241
Side lamp........................................ 237
Tail lamp ......................................... 240
Turn signal lamp. ....................239, 240 C
Cabriolet Draught stop................................... 135
Soft top .................................. 133, 134
Tonneau cover. ............................... 136
Calling up a malfunction
see Message memory menu
Care..................................................... 182
Automatic car wash. .......................183
Headlamps. .................................... 184
High-pressure cleaners. ..................183
Plastic trim. .................................... 184
Rear window. .................................. 184
Side windows.................................. 184
Trailer tow hitch. ............................. 186
Ultrasonic reversing aid. .................186
CD player/CD changer
Operating (on-board computer). .....102
Central locking
Automatic locking (on-board com-
puter). ............................................. 108
Key. .................................................. 54
Central locking/unlocking button...... 56
Central unlocking Key. .................................................. 54
Centre console
Lower section. .................................. 26
Upper section. .................................. 25Index
463_AKB; 1; 8, en-GB
wobuchh,
Version: 2.10.6 2008-07-17T15:19:41+02:00 - Seite 4Dateiname: 6515_4091_02_buchblock.pdf; preflight
Page 11 of 293
8 I
Immobiliser.......................................... .51
Indicator and warning lamp Brakes (red). ................................... 214
Engine diagnostic ........................... 215
PASSENGER AIRBAG OFF .........40, 211
Reserve fuel. ................................... 216
Seat belt. ........................................ 216
SRS........................................... 33, 214
Indicator and warning lamps............ 212
Indicator lamps see Warning and indicator lamps
Instrument cluster............................... 95
Overview. .......................................... 22
Selecting the language (on-board
computer). ...................................... 106
Instrument lighting.............................. 96
Interior lighting.................................... 79
Automatic control ............................. 80
Delayed switch-off (on-board
computer). ...................................... 108
Luggage compartment lighting. ........80
Manual control.................................. 80
Reading lamp .................................... 80
Rear interior lighting. ........................81
Interior motion sensor......................... 52
Intermittent wipe Windscreen wipers. ..........................83
ISOFIX child seat securing system..... 44 J
Jack Cabriolet. ........................................ 191
Long-wheelbase station wagon....... 189
Operation........................................ 244
Short-wheelbase station wagon. .....190
Jump-starting ...................................... 251
Jump leads ...................................... 251 K
Key......................................................... 54 Changing the battery ......................234
Checking the battery ......................234
Display message ............................. 208
Factory setting............................ 54, 55
Loss. ............................................... 225
Malfunction..................................... 225
Modifying the programming. .............54
Key positions
Key. .................................................. 59
Kickdown.............................................. 91 L
Lamps see Warning and indicator lamps
Lashing eyelets.................................. 140
Licence plate lighting Display message ............................. 206Light bulb
see Bulbs
Lighting
see Lights
Lights
Constant headlamp mode. ................76
Cornering light function ....................79
Courtesy lights.................................. 82
Dipped-beam headlamps ..................76
Display messages ........................... 204
Front foglamps.................................. 77
Hazard warning lamps. .....................78
Headlamp flasher.............................. 78
Light switch. ..................................... 75
Main-beam headlamps..................... .78
Rear fog lamp ................................... 77
Turn signals. ..................................... 77
LIM indicator lamp
Cruise control. ................................ 114
Variable Speedtronic. .....................116
Loading guidelines............................. 139
Locking Automatic. ........................................ 55
Emergency locking .........................230
From the inside (central locking
button) .............................................. 56
Luggage compartment enlarge-
ment.................................................... 141
Luggage cover.................................... 142Index
463_AKB; 1; 8, en-GB
wobuchh,
Version: 2.10.6 2008-07-17T15:19:41+02:00 - Seite 8Dateiname: 6515_4091_02_buchblock.pdf; preflight
Page 12 of 293
9
Luggage net
Front-passenger footwell. ...............139 M
Main-beam headlamps Display message ............................. 206
Maintenance
Battery ............................................ 247
Malfunction memory
see Message memory menu
Maximum speed
Technical data. ............................... 264
Memory card...................................... 102
Operating (on-board computer). .....102
see separate operating instructions
Memory function.................................. 70
Menu (on-board computer).................. 99 Audio. ............................................. 101
DVD. ............................................... 102
Message memory. .......................... 103
Navigation. ..................................... 103
Operating........................................ 100
Resetting to factory settings........... 104
Settings .......................................... 104
Submenu overview. ........................104
Telephone. ...................................... 111
Trip computer. ................................ 110Messages
see Display messages
see Message memory menu
see Warning and indicator lamps
Mirrors
Sun visor......................................... 148
Mobile phone...................................... 150
Display message..................... 208, 209
Installation. ..................................... 260
Telephone menu (on-board com-
puter). ............................................. 111
Modifying the programming
Key. .................................................. 54
MP3..................................................... 102
Operating (on-board computer). .....102
see separate operating instructions
Multicontour seat................................. 62
Multi-function display ....................96, 98
Multi-function steering wheel....... 24, 97 N
Navigation........................................... 103 Navigation menu (on-board com-
puter). ............................................. 103
see separate operating instructions O
Off-road Differential locks............................... 93
Off-road driving
Checklist......................................... 174
Information ..................................... 173
Oil
Consumption. ................................. 159
Topping up. ..................................... 160
Oil level
Checking (dipstick). ........................160
Checking (on-board computer). ......159
On-board computer.............................. 97
Audio menu. ................................... 101
Convenience submenu. ..................105
Display messages ........................... 194
DVD menu ...................................... 102
Factory settings .............................. 104
Heating submenu............................ 105
Instrument cluster submenu ...........105
Lighting submenu. ..........................105
Message memory menu.................. 103
Navigation menu. ............................ 103
Operation menu. ............................. 100
Settings menu ................................ 104
Standard display menu. ..................101
Telephone menu. ............................ 111
Time/date submenu. ......................105 Index
463_AKB; 1; 8, en-GB
wobuchh,
Version: 2.10.6 2008-07-17T15:19:41+02:00 - Seite 9Dateiname: 6515_4091_02_buchblock.pdf; preflight
Page 57 of 293
Opening and closing
54 Opening and closing
Key
The vehicle's equipment includes two keys
with remote control. Each key contains an
emergency key element. To help you distin-
guish between the two keys, the emergency
key element release catches each have a dif-
ferent colour.
The key is configured at the factory to cen-
trally lock and unlock the following:
R the doors
R the rear door or tailgate (Cabriolet)
R the fuel filler flap G
Risk of accident
If children are left unsupervised in the vehi-
cle, they could:
R open a door from the inside at any time,
even if it has been locked
R start the vehicle using a key which has
been left in the vehicle
R release the parking brake
They could endanger themselves and oth-
ers. Never leave children unsupervised in
the vehicle. Always take the key with you when leaving the vehicle, even if you are
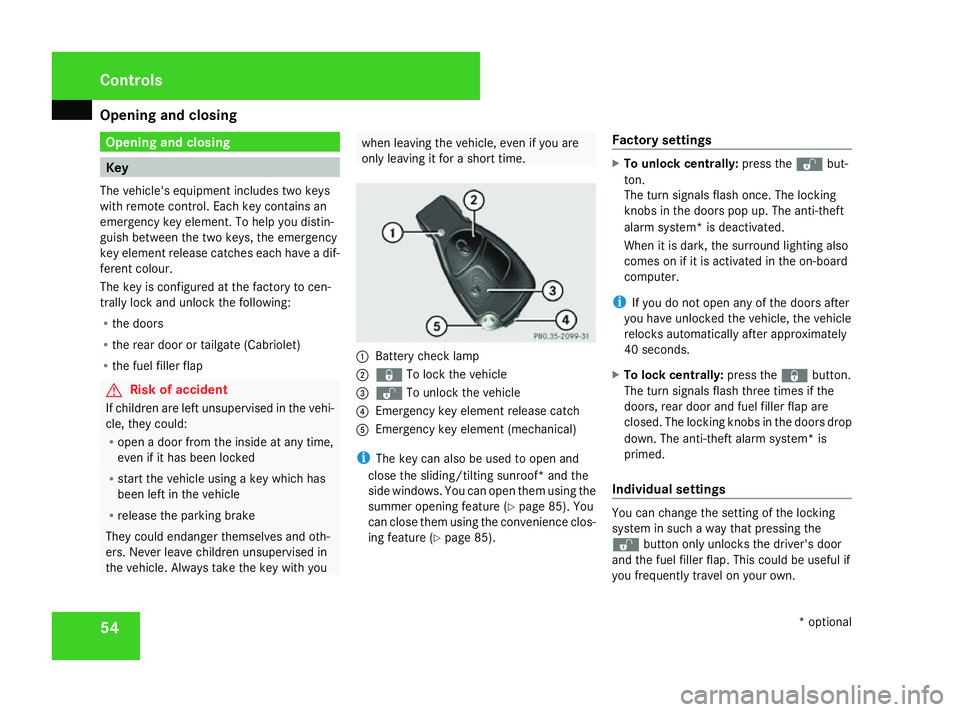
only leaving it for a short time. 1
Battery check lamp
2 j To lock the vehicle
3 k To unlock the vehicle
4 Emergency key element release catch
5 Emergency key element (mechanical)
i The key can also be used to open and
close the sliding/tilting sunroof* and the
side windows. You can open them using the
summer opening feature (Y page 85). You
can close them using the convenience clos-
ing feature (Y page 85). Factory settings X
To unlock centrally: press thekbut-
ton.
The turn signals flash once. The locking
knobs in the doors pop up. The anti-theft
alarm system* is deactivated.
When it is dark, the surround lighting also
comes on if it is activated in the on-board
computer.
i If you do not open any of the doors after
you have unlocked the vehicle, the vehicle
relocks automatically after approximately
40 seconds.
X To lock centrally: press thejbutton.
The turn signals flash three times if the
doors, rear door and fuel filler flap are
closed. The locking knobs in the doors drop
down. The anti-theft alarm system* is
primed.
Individual settings You can change the setting of the locking
system in such a way that pressing the
k button only unlocks the driver's door
and the fuel filler flap. This could be useful if
you frequently travel on your own. Controls
* optional
463_AKB; 1; 8, en-GB
wobuchh,
Version: 2.10.6
2008-07-17T15:19:41+02:00 - Seite 54 Dateiname: 6515_4091_02_buchblock.pdf; preflight
Page 58 of 293
Opening and closing
55
X
To change the setting: press and hold down
the k andj buttons simultaneously
for approximately six seconds until battery
check lamp 1flashes twice.
The key now functions as follows:
X To unlock the driver's door and fuel
filler flap: press thekbutton once.
X To unlock centrally: press thekbut-
ton twice.
X To lock centrally: press thejbutton.
Restoring the factory settings X
Press the kandj buttons simulta-
neously for approximately six seconds until
battery check lamp 1flashes twice. Opening the doors from the inside
You can open a door from the inside at any
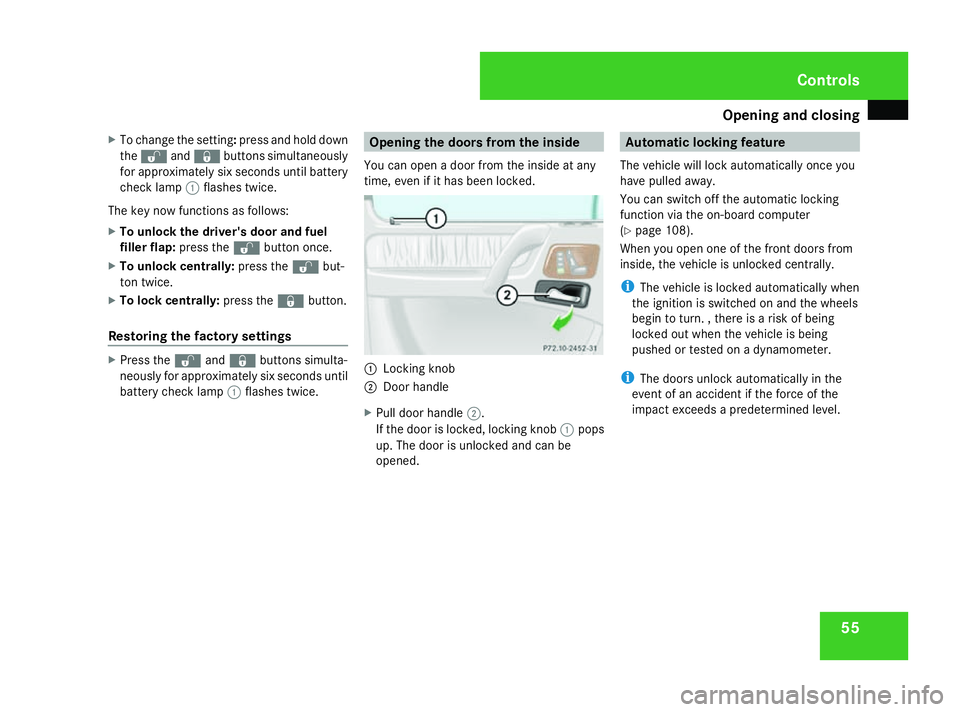
time, even if it has been locked. 1
Locking knob
2 Door handle
X Pull door handle 2.
If the door is locked, locking knob 1pops
up. The door is unlocked and can be
opened. Automatic locking feature
The vehicle will lock automatically once you
have pulled away.
You can switch off the automatic locking
function via the on-board computer
(Y page 108).
When you open one of the front doors from
inside, the vehicle is unlocked centrally.
i The vehicle is locked automatically when
the ignition is switched on and the wheels
begin to turn. , there is a risk of being
locked out when the vehicle is being
pushed or tested on a dynamometer.
i The doors unlock automatically in the
event of an accident if the force of the
impact exceeds a predetermined level. Controls
463_AKB; 1; 8, en-GB
wobuchh,
Version: 2.10.6 2008-07-17T15:19:41+02:00 - Seite 55 ZDateiname: 6515_4091_02_buchblock.pdf; preflight
Page 65 of 293
Seats
62
X
Insert the head restraint so that the
notches on the bar are on the left when
viewed in the direction of travel.
X Push the head restraint down until you hear
it click into place.
Resetting the front seat head restraints
It is necessary to reset the front seat head
restraints after the voltage supply has been
interrupted, e. g. if the battery has been com-
pletely discharged or disconnected.
X Make sure that the cup holder* on the
centre console is folded down
(Y page 138).
X Move the seat as far forward as possible
and the head restraint in as far as possible.
Adjusting the head restraint height G
Risk of injury
Make sure that the central area of the head
restraint supports the back of your head at
about eye level. You could seriously injure
your neck if your head is not correctly sup-
ported by the head restraint in the event of
an accident. Never travel without a cor-
rectly adjusted and engaged head restraint. X
To raise: pull the head restraint up until the
desired height has been reached.
X To lower: push the head restraint down
until the desired height has been reached.
Adjusting the head restraint angle X
Pull the lower edge of the head restraint
forwards or push it back until it is in the
desired position.
Fitting and removing the rear-compart-
ment head restraints X
To remove: pull the head restraint up and
out.
X To refit: insert the head restraint so that
the arched side points in the direction of
travel.
X Push the head restraint down until you hear
it click into place. Multi-contour seat*
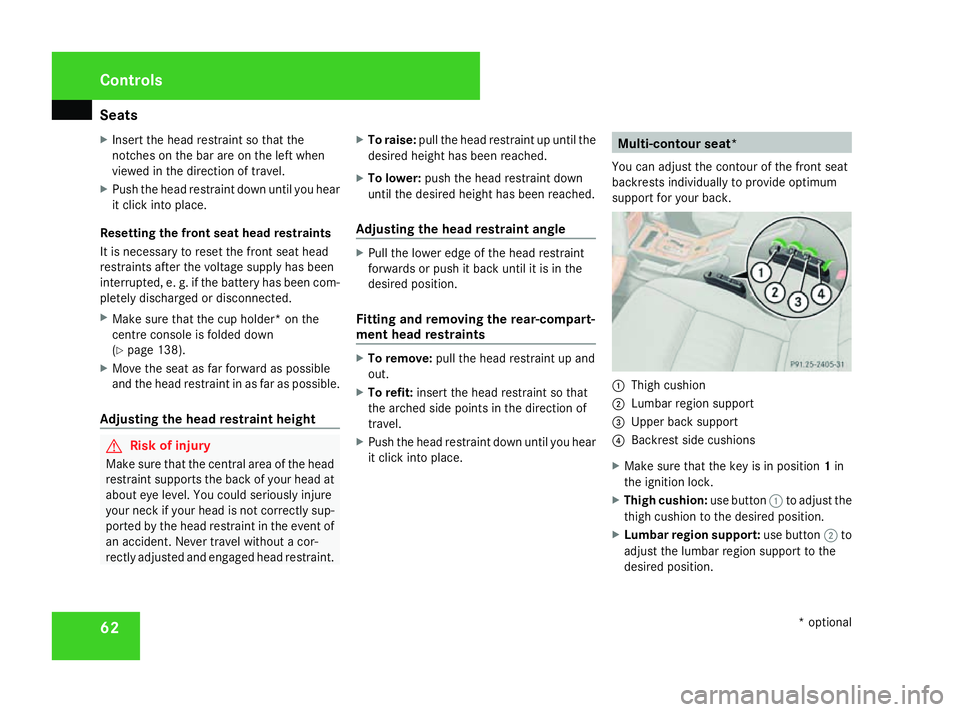
You can adjust the contour of the front seat
backrests individually to provide optimum
support for your back. 1
Thigh cushion
2 Lumbar region support
3 Upper back support
4 Backrest side cushions
X Make sure that the key is in position 1in
the ignition lock.
X Thigh cushion: use button1to adjust the
thigh cushion to the desired position.
X Lumbar region support: use button2to
adjust the lumbar region support to the
desired position. Controls
* optional
463_AKB; 1; 8, en-GB
wobuchh,
Version: 2.10.6 2008-07-17T15:19:41+02:00 - Seite 62Dateiname: 6515_4091_02_buchblock.pdf; preflight
Page 67 of 293
Seats
64Foot anti-entrapment feature
Interrupting the easy-entry feature
To interrupt the easy-entry feature you can do
the following:
X press one of the seat setting buttons
(Y page 60).
X press the memory button (Y page 70).
X move the steering wheel adjustment lever
(Y page 66). Seat ventilation
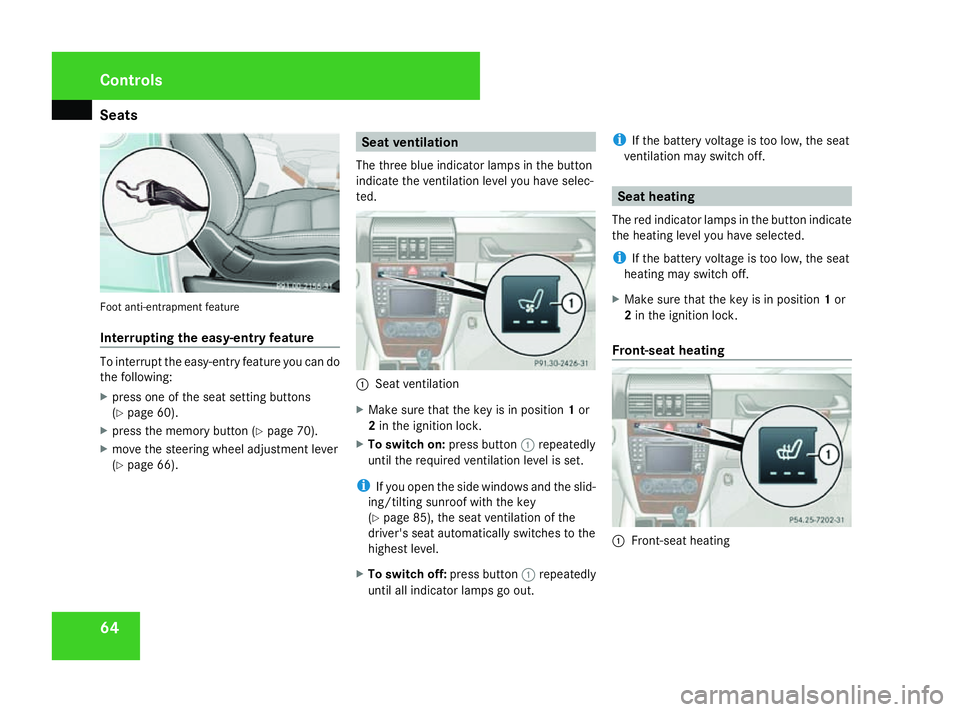
The three blue indicator lamps in the button
indicate the ventilation level you have selec-
ted. 1
Seat ventilation
X Make sure that the key is in position 1or
2 in the ignition lock.
X To switch on: press button1repeatedly
until the required ventilation level is set.
i If you open the side windows and the slid-
ing/tilting sunroof with the key
(Y page 85), the seat ventilation of the
driver's seat automatically switches to the
highest level.
X To switch off: press button1repeatedly
until all indicator lamps go out. i
If the battery voltage is too low, the seat
ventilation may switch off. Seat heating
The red indicator lamps in the button indicate
the heating level you have selected.
i If the battery voltage is too low, the seat
heating may switch off.
X Make sure that the key is in position 1or
2 in the ignition lock.
Front-seat heating 1
Front-seat heating Controls
463_AKB; 1; 8, en-GB
wobuchh,
Version: 2.10.6 2008-07-17T15:19:41+02:00 - Seite 64Dateiname: 6515_4091_02_buchblock.pdf; preflight
Page 88 of 293
Side windows
85
hold it until the corresponding window is in
the desired position.
X To open fully: press the switch down
briefly beyond the pressure point and
release it.
X To stop: briefly press the switch down or
pull it up. Resetting the windows
Each side window must be reset if the battery
was disconnected or discharged.
X Make sure that the key is in position 2in
the ignition lock.
X Pull the corresponding switch upwards
until the side window is closed, and hold it
in this position for about another second. Summer opening
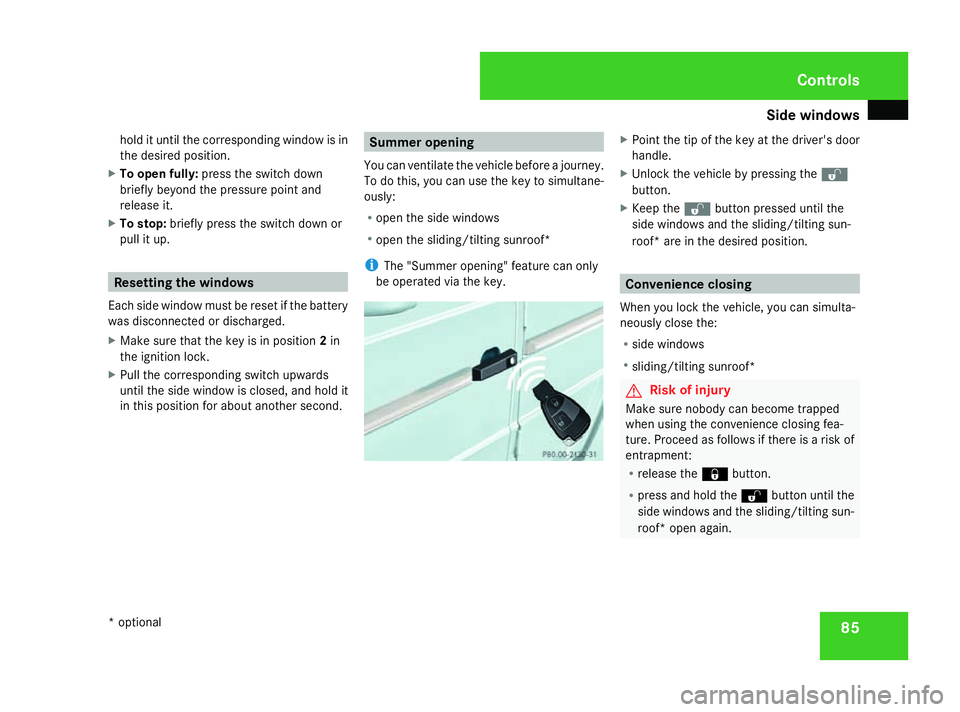
You can ventilate the vehicle before a journey.
To do this, you can use the key to simultane-
ously:
R open the side windows
R open the sliding/tilting sunroof*
i The "Summer opening" feature can only
be operated via the key. X
Point the tip of the key at the driver's door
handle.
X Unlock the vehicle by pressing the k
button.
X Keep the kbutton pressed until the
side windows and the sliding/tilting sun-
roof* are in the desired position. Convenience closing
When you lock the vehicle, you can simulta-
neously close the:
R side windows
R sliding/tilting sunroof* G
Risk of injury
Make sure nobody can become trapped
when using the convenience closing fea-
ture. Proceed as follows if there is a risk of
entrapment:
R release the jbutton.
R press and hold the kbutton until the
side windows and the sliding/tilting sun-
roof* open again. Controls
* optional
463_AKB; 1; 8, en-GB
wobuchh,
Version: 2.10.6 2008-07-17T15:19:41+02:00 - Seite 85 ZDateiname: 6515_4091_02_buchblock.pdf; preflight
Page 131 of 293
Air conditioning
128 Switching windscreen heating* on/
off G
Risk of accident
Clear all windows of ice or snow before set-
ting off. Impaired visibility could otherwise
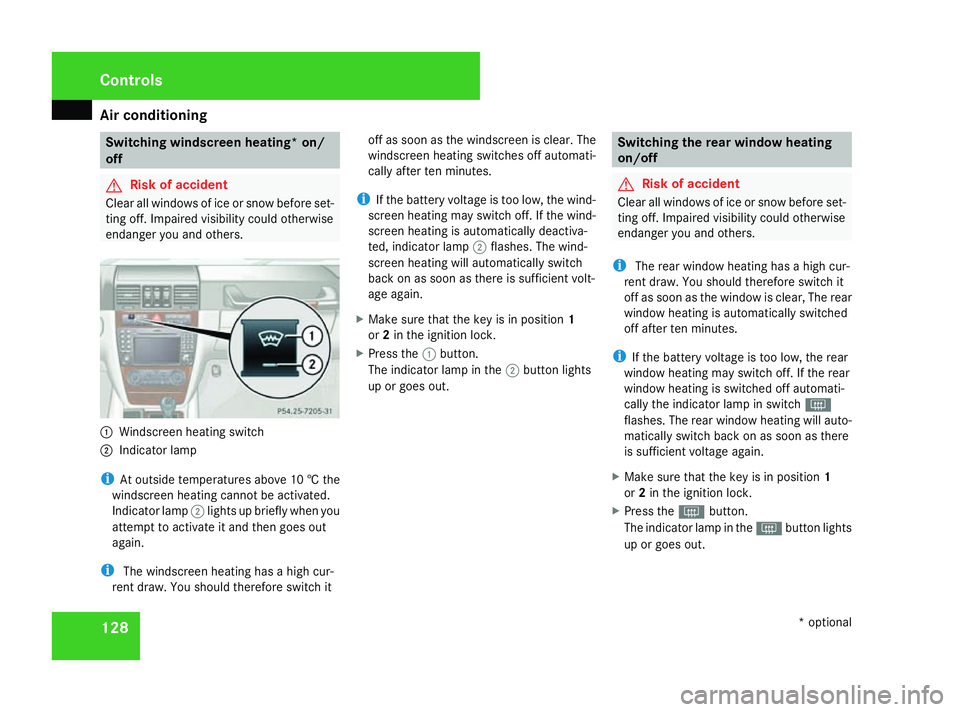
endanger you and others. 1
Windscreen heating switch
2 Indicator lamp
i At outside temperatures above 10 †the
windscreen heating cannot be activated.
Indicator lamp 2lights up briefly when you
attempt to activate it and then goes out
again.
i The windscreen heating has a high cur-
rent draw. You should therefore switch it off as soon as the windscreen is clear. The
windscreen heating switches off automati-
cally after ten minutes.
i If the battery voltage is too low, the wind-
screen heating may switch off. If the wind-
screen heating is automatically deactiva-
ted, indicator lamp 2flashes. The wind-
screen heating will automatically switch
back on as soon as there is sufficient volt-
age again.
X Make sure that the key is in position 1
or 2in the ignition lock.
X Press the 1button.
The indicator lamp in the 2button lights
up or goes out. Switching the rear window heating
on/off
G
Risk of accident
Clear all windows of ice or snow before set-
ting off. Impaired visibility could otherwise
endanger you and others.
i The rear window heating has a high cur-
rent draw. You should therefore switch it
off as soon as the window is clear, The rear
window heating is automatically switched
off after ten minutes.
i If the battery voltage is too low, the rear
window heating may switch off. If the rear
window heating is switched off automati-
cally the indicator lamp in switch F
flashes. The rear window heating will auto-
matically switch back on as soon as there
is sufficient voltage again.
X Make sure that the key is in position 1
or 2in the ignition lock.
X Press the Fbutton.
The indicator lamp in the Fbutton lights
up or goes out. Controls
* optional
463_AKB; 1; 8, en-GB
wobuchh
,V ersion: 2.10.6
2008-07-17T15:19:41+02:00 - Seite 128 Dateiname: 6515_4091_02_buchblock.pdf; preflight
Page 132 of 293
Air conditioning
129Activating/deactivating air-recircula-
tion mode
You can deactivate the flow of fresh air if
unpleasant odours are entering the vehicle
from outside. The air already inside the vehi-
cle will then be recirculated. G
Risk of accident
Only switch over to air-recirculation mode
briefly at low outside temperatures. Other-
wise, the windows could mist up, thus
impairing visibility and endangering your-
self and others. This may prevent you from
observing the traffic conditions, thereby
causing an accident.
X To activate: briefly press the ,button.
The indicator lamp in the ,button
comes on.
i Air-recirculation mode is activated auto-
matically at high outside temperatures.
When air-recirculation mode is activated
automatically, the indicator lamp in
the , button is not lit.
Outside air is added after about 30
minutes. X
To deactivate: press the,button.
The indicator lamp in the ,button goes
out.
i Air-recirculation mode switches off auto-
matically:
R after approximately five minutes at out-
side temperatures below approximately
5 †
R after approximately five minutes if cool-
ing with air dehumidification is deactiva-
ted
R after approximately 30 minutes at out-
side temperatures above approximately
5 † Switching the residual heat on/off
It is possible to make use of the residual heat
of the engine to continue heating the station-
ary vehicle for up to 30 minutes after the
engine has been switched off. The heating
time depends on the coolant temperature and
on the interior temperature that has been set.
i The blower will run at a low speed regard-
less of the airflow setting. i
If you activate the "residual heat" function
at high temperatures, only the ventilation
will be activated.
X Make sure that the key is in position 1or
0 in the ignition lock or that it has been
removed.
X To switch on: press the9button.
The indicator lamp in the 9button lights
up.
X To deactivate: press the9button.
The indicator lamp in the 9button goes
out.
i The auxiliary heating/ventilation is auto-
matically deactivated after about 30
minutes, or when:
R the ignition is switched on
R the battery voltage drops
R when the coolant temperature is too low Cont
rols
463_AKB; 1; 8, en-GB
wobuchh,
Version: 2.10.6 2008-07-17T15:19:41+02:00 - Seite 129 ZDateiname: 6515_4091_02_buchblock.pdf; preflight