roof MERCEDES-BENZ G-CLASS SUV 2008 Owners Manual
[x] Cancel search | Manufacturer: MERCEDES-BENZ, Model Year: 2008, Model line: G-CLASS SUV, Model: MERCEDES-BENZ G-CLASS SUV 2008Pages: 293, PDF Size: 4.49 MB
Page 8 of 293
5
Changing a wheel
see Flat tyre
Checklist (off-road driving)............... 174
Child-proof locks Rear doors. ....................................... 46
Side windows (rear) ..........................47
Children
In the vehicle. ................................... 38
Restraint systems. ............................ 38
Child seat
Automatic recognition ......................40
Automatic recognition (malfunc-
tion). ............................................... 211
Child restraint systems ....................44
ISOFIX............................................... 44
Recommendations. ...........................43
Suitable positions. ............................ 42
Child seat lock...................................... 44
Cigarette lighter................................. 149
Cockpit Overview. .......................................... 20
COMAND............................................... 99
On-board computer. .........................99
see separate operating instructions
Constant headlamp mode................... 76
Setting (on-board computer).......... .107
Consumption statistics (on-board
computer)........................................... 110
Convenience closing............................ 85Coolant................................................
161
Checking the level. .........................161
Display message..................... 200, 203
Mixture ratio ................................... 280
Temperature gauge ...........................96
Cornering lamps................................... 79
Courtesy lights..................................... 82
Cruise control..................................... 113
Display message ............................. 208
Cup holder.......................................... 138 D
Dashboard see Instrument cluster
Date
Setting (on-board computer).......... .106
Daytime driving lights
see Constant headlamp mode
Delayed switch-off
Exterior lighting (on-board com-
puter). ............................................. 107
Interior lighting (on-board com-
puter). ............................................. 108
Diesel
Low outside temperatures. .............156
Diesel engine
Winter driving. ................................ 156
Differential locks.................................. 93
Digital speedometer.......................... 101Dipped-beam headlamps
Automatic headlamp mode. ..............76
Display message ............................. 204
Symmetrical. .................................. 177
Display message ................................ 194
Display messages Service display................................ 181
Symbol messages. ..........................199
Text messages. ............................... 195
Door
Automatic locking ............................. 55
Emergency locking .........................230
Emergency unlocking...................... 229
Opening (from the inside). ................55
Door control panel
Overview. .......................................... 28
Draught stop....................................... 135
Drinks holder
see Cup holder
Driver's airbag...................................... 37
Driver's seat Display message ............................. 208
Driver's seat position........................... 75
Driving abroad.................................... 177
Driving information Off-road .......................................... 173
Tyre ruts. ........................................ 177
Driving safety system.......................... 47
ABS. .................................................. 48 Index
463_AKB; 1; 8, en-GB
wobuchh,
Version: 2.10.6 2008-07-17T15:19:41+02:00 - Seite 5Dateiname: 6515_4091_02_buchblock.pdf; preflight
Page 14 of 293
11
Reversing lamp
Display message ............................. 207
Roof
see Soft top
Roof load, maximum.................. 271, 272
Roof rack............................................. 139S
Safety net............................................ 144
Seat Adjusting .......................................... 60
Correct driver's seat position. ..........75
Folding the front seat backrests
forwards (easy entry feature) ............63
Side-facing bench seat in the lug-
gage compartment. ..........................65
Storing settings ................................ 70
Seat backrest
Folding forwards/back. ..................141
Seat belt
Adjusting the height.......................... 74
Fastening. ......................................... 71
Warning lamp. .......................... 74, 216
Seat belts
Display message ............................. 209
Seat heating......................................... .64
Seat ventilation.................................... 64
Malfunction indicator lamp. ............210
Securing a load................................... 140Selector lever
Positions. .......................................... 90
Service display
Calling up the due date (on-board
computer). ...................................... 181
Service indicator
see Service display
Service products................................ 276
Brake fluid. ..................................... 281
Coolant. .......................................... 280
Windscreen washer fluid. ................281
Settings
Calling up a stored setting. ...............70
Factory (key). .............................. 54, 55
Factory (on-board computer). .........104
Setting the unit (on-board computer)
Speedometer. ................................. 105
Shift range
Instrument cluster display. ...............89
Shift ranges
Automatic transmission ....................91
Side window
Fault. .............................................. 224
Side windows
Cleaning. ........................................ 184
Opening/closing. .............................. 84
Resetting. ......................................... 85
Ski rack............................................... 139
Sliding/tilting sunroof....................... 132
Manual operatio n............................ 231Sliding sunroof
see Sliding/tilting sunroof
Snow chains....................................... 169
Socket Cockpit. .......................................... 150
Luggage compartment. ...................150
Rear compartment. .........................150
Soft top............................................... 133
Closing (switch). ............................. 134
Emergency operation. .....................232
Malfunction..................................... 227
Opening (switch). ............................ 134
Soft top switch................................... 134
Spare fuses......................................... 255
Spare wheel Fitting ............................................. 244
Storage location. ............................ 192
Technical data. ............................... 268
Speed
Technical data. ............................... 264
Speed limiter
Speedtronic. ................................... 115
Speedometer
Digital speedometer (on-board
computer). ...................................... 101
Setting the unit (on-board com-
puter). ............................................. 105
Speedtronic ........................................ 115
Display message ............................. 208
Variabl e.......................................... 115 Index
463_AKB; 1; 8, en-GB
wobuchh,
Version: 2.10.6 2008-07-17T15:19:41+02:00 - Seite 11Dateiname: 6515_4091_02_buchblock.pdf; preflight
Page 18 of 293
Protection of the environment
15Protection of the environment
H
Environmental note
Daimler's declared policy is one of integra-
ted environmental protection.
The objectives are for the natural resources
which form the basis of our existence on
this planet to be used sparingly and in a
manner which takes the requirements of
both nature and humanity into account.
You too can help to protect the environ-
ment by operating your vehicle in an envi-
ronmentally-responsible manner.
Fuel consumption and the rate of engine,
transmission, brake and tyre wear depend
on the following factors:
R Operating conditions of your vehicle
R Your personal driving style
You can influence both factors.
You should bear the following in mind:
Operating conditions
R Avoid short trips as these increase fuel
consumption.
R Make sure that the tyre pressures are
always correct. R
Do not carry any unnecessary weight.
R Keep an eye on the vehicle's fuel con-
sumption.
R Remove roof racks once you no longer
need them.
R A regularly serviced vehicle will contrib-
ute to environmental protection. You
should therefore adhere to the service
intervals.
R Always have maintenance work carried
out at a qualified specialist workshop,
e.g. a Mercedes-Benz Service Centre.
Personal driving style
R Do not depress the accelerator pedal
when starting the engine.
R Do not warm up the engine with the vehi-
cle stationary.
R Drive carefully and maintain a safe dis-
tance from the vehicle in front.
R Avoid frequent, sudden acceleration.
R Change gear in good time and use each
gear only up to 2
/ 3of its maximum engine
speed.
R Switch off the engine in stationary traffic. Returning used vehicles
Mercedes-Benz will take back your
Mercedes-Benz to dispose of it in an environ-
mentally-responsible manner, in accordance
with the European Union (EU) End of Life
Vehicles Directive.
The End of Life Vehicles Directive applies to
vehicles of up to 3.5 t gross vehicle weight, in
accordance with national regulations. For
several years, Mercedes-Benz has been
meeting all the legal requirements for a
design which allows for recycling and re-use.
There is a network of return points and dis-
assembly plants which can recycle your vehi-
cle in an environmentally-responsible man-
ner. The options for recycling vehicles and
parts are constantly being developed and
improved. This means that your Mercedes-
Benz will also continue to meet even the
increased recycling quotas in the future in
good time. You can obtain further information
from your national Mercedes-Benz homepage
or your national hotline number. Introduction
463_AKB; 1; 8, en-GB
wobuchh,
Version: 2.10.6 2008-07-17T15:19:41+02:00 - Seite 15 ZDateiname: 6515_4091_02_buchblock.pdf; preflight
Page 30 of 293
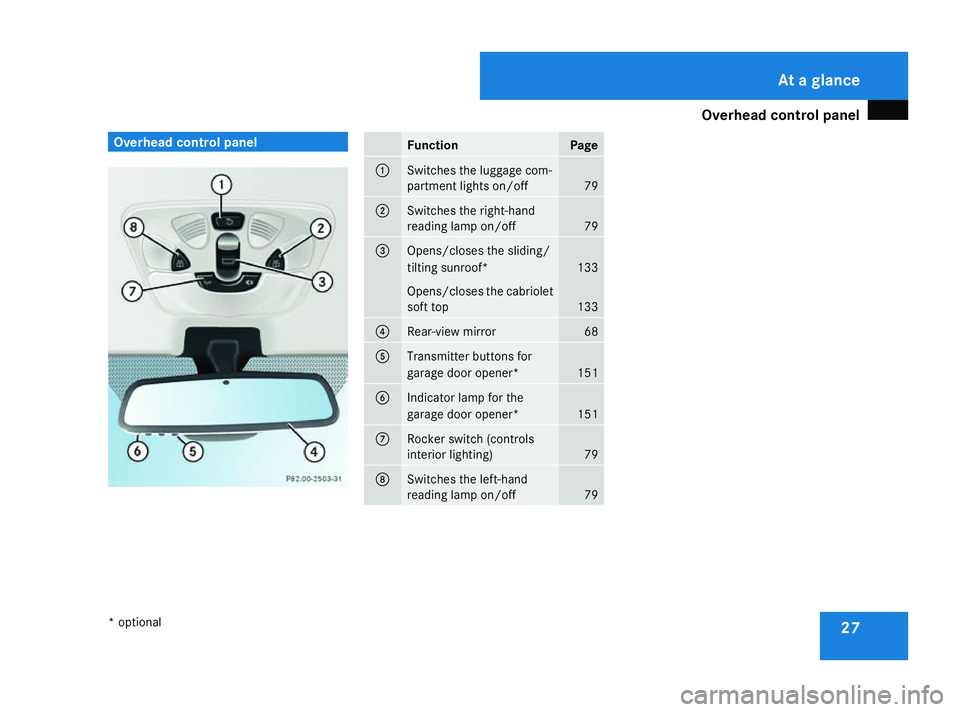
Overhead control panel
27Overhead control panel
Function Page
1
Switches the luggage com-
partment lights on/off
79
2
Switches the right-hand
reading lamp on/off
79
3
Opens/closes the sliding/
tilting sunroof*
133
Opens/closes the cabriolet
soft top
133
4
Rear-view mirror 68
5
Transmitter buttons for
garage door opener*
151
6
Indicator lamp for the
garage door opener*
151
7
Rocker switch (controls
interior lighting)
79
8
Switches the left-hand
reading lamp on/off
79 At a glance
* optional
463_AKB; 1; 8, en-GB
wobuchh,
Version: 2.10.6 2008-07-17T15:19:41+02:00 - Seite 27Dateiname: 6515_4091_02_buchblock.pdf; preflight
Page 40 of 293
Occupant safety
37G
Risk of injury
The airbag parts are hot after the airbag has
been deployed. Do not touch them, other-
wise you may burn yourself.
Have the airbags checked at a qualified
specialist workshop. Otherwise, occupants
are not protected by the airbags in the
event of another accident.
Front airbags
The front airbags are designed to increase
protection for the driver's and front-
passenger head and chest.
The driver's front airbag and front-passenger
front airbag are deployed:
R at the start of an accident with a high rate
of vehicle acceleration or deceleration in a
longitudinal direction
R if the system determines that airbag
deployment can offer additional protection
to that provided by the seat belt
R if the seat belt is fastened
R independently of other airbags in the vehi-
cle
R if the vehicle overturns, but only if the sys-
tem detects high vehicle deceleration in a
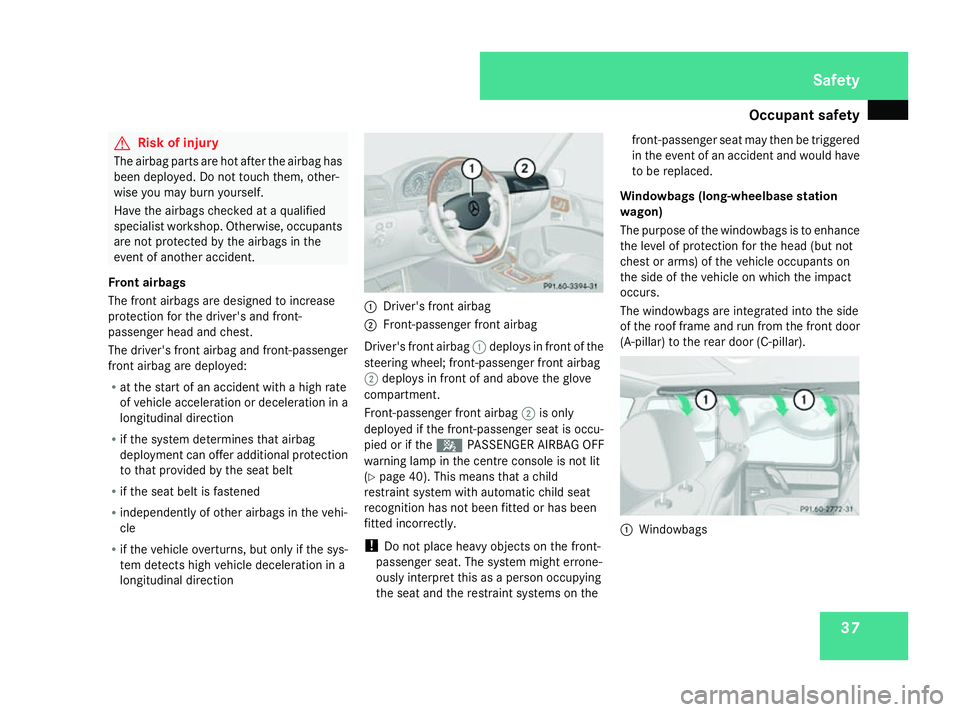
longitudinal direction 1
Driver's front airbag
2 Front-passenger front airbag
Driver's front airbag 1deploys in front of the
steering wheel; front-passenger front airbag
2 deploys in front of and above the glove
compartment.
Front-passenger front airbag 2is only
deployed if the front-passenger seat is occu-
pied or if the 5PASSENGER AIRBAG OFF
warning lamp in the centre console is not lit
(Y page 40). This means that a child
restraint system with automatic child seat
recognition has not been fitted or has been
fitted incorrectly.
! Do not place heavy objects on the front-
passenger seat. The system might errone-
ously interpret this as a person occupying
the seat and the restraint systems on the front-passenger seat may then be triggered
in the event of an accident and would have
to be replaced.
Windowbags (long-wheelbase station
wagon)
The purpose of the windowbags is to enhance
the level of protection for the head (but not
chest or arms) of the vehicle occupants on
the side of the vehicle on which the impact
occurs.
The windowbags are integrated into the side
of the roof frame and run from the front door
(A-pillar) to the rear door (C-pillar). 1
Windowbags Safety
463_AKB; 1; 8, en-GB
wobuchh, Version: 2.10.6 2008-07-17T15:19:41+02:00 - Seite 37 ZDateiname: 6515_4091_02_buchblock.pdf; preflight
Page 49 of 293
Occupant safety
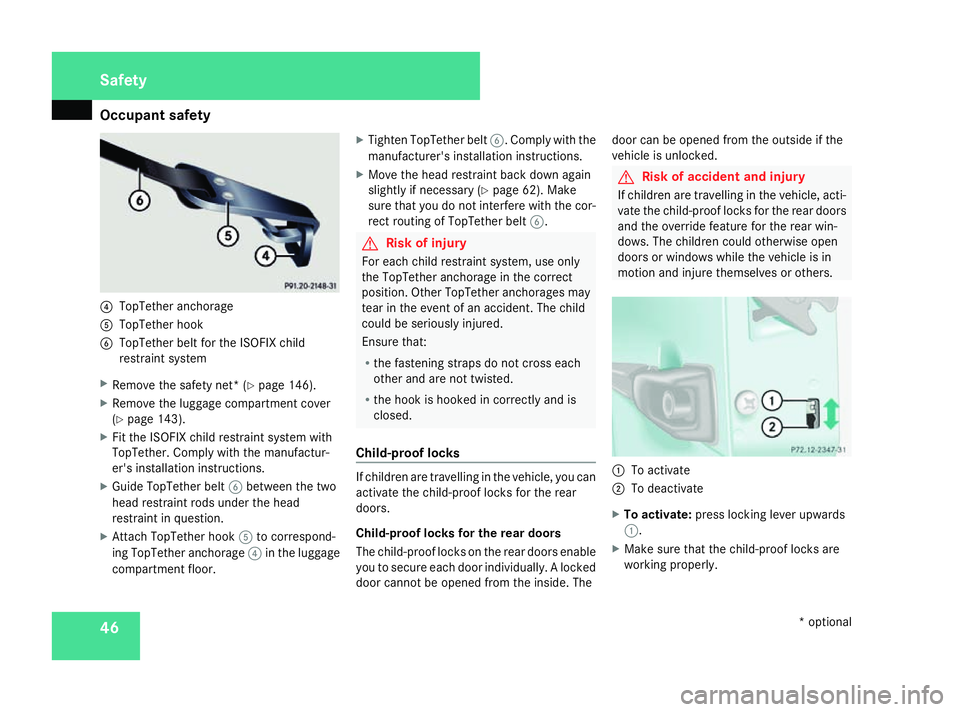
464
TopTether anchorage
5 TopTether hook
6 TopTether belt for the ISOFIX child
restraint system
X Remove the safety net* (Y page 146).
X Remove the luggage compartment cover
(Y page 143).
X Fit the ISOFIX child restraint system with
TopTether. Comply with the manufactur-
er's installation instructions.
X Guide TopTether belt 6between the two
head restraint rods under the head
restraint in question.
X Attach TopTether hook 5to correspond-
ing TopTether anchorage 4in the luggage
compartment floor. X
Tighten TopTether belt 6. Comply with the
manufacturer's installation instructions.
X Move the head restraint back down again
slightly if necessary (Y page 62). Make
sure that you do not interfere with the cor-
rect routing of TopTether belt 6. G
Risk of injury
For each child restraint system, use only
the TopTether anchorage in the correct
position. Other TopTether anchorages may
tear in the event of an accident. The child
could be seriously injured.
Ensure that:
R the fastening straps do not cross each
other and are not twisted.
R the hook is hooked in correctly and is
closed.
Child-proof locks If children are travelling in the vehicle, you can
activate the child-proof locks for the rear
doors.
Child-proof locks for the rear doors
The child-proof locks on the rear doors enable
you to secure each door individually. A locked
door cannot be opened from the inside. Thedoor can be opened from the outside if the
vehicle is unlocked. G
Risk of accident and injury
If children are travelling in the vehicle, acti-
vate the child-proof locks for the rear doors
and the override feature for the rear win-
dows. The children could otherwise open
doors or windows while the vehicle is in
motion and injure themselves or others. 1
To activate
2 To deactivate
X To activate: press locking lever upwards
1.
X Make sure that the child-proof locks are
working properly. Safety
* optional
463_AKB; 1; 8, en-GB
wobuchh,
Version: 2.10.6
2008-07-17T15:19:41+02:00 - Seite 46 Dateiname: 6515_4091_02_buchblock.pdf; preflight
Page 50 of 293
Driving safety sys
tems 47
X
To deactivate: press locking lever down-
wards 2.
Override feature for the rear windows G
Risk of accident and injury
If children are travelling in the vehicle, acti-
vate the child-proof locks for the rear doors
and the override feature for the rear win-
dows. The children could otherwise open
doors or windows while the vehicle is in
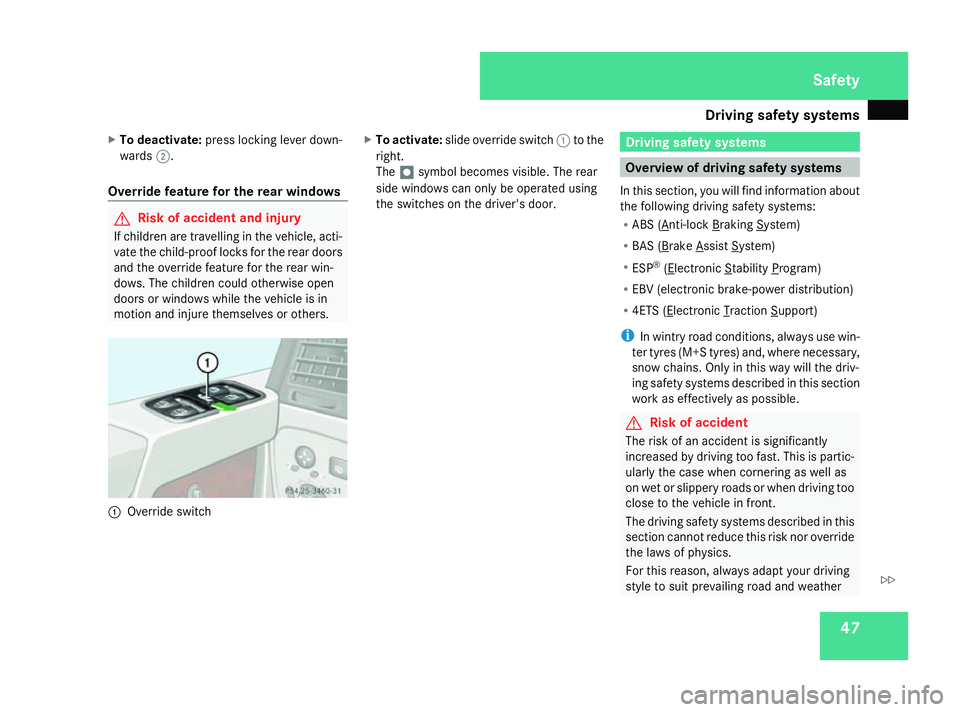
motion and injure themselves or others. 1
Override switch X
To activate: slide override switch 1to the
right.
The 7symbol becomes visible. The rear
side windows can only be operated using
the switches on the driver's door. Driving safety systems
Overview of driving safety systems
In this section, you will find information about
the following driving safety systems:
R ABS ( Anti-lock Braking System)
R BAS ( Brake Assist System)
R ESP ®
( Electronic Stability Program)
R EBV (electronic brake-power distribution)
R 4ETS ( Electronic Traction Support)
i In wintry road conditions, always use win-
ter tyres (M+S tyres) and, where necessary,
snow chains. Only in this way will the driv-
ing safety systems described in this section
work as effectively as possible. G
Risk of accident
The risk of an accident is significantly
increased by driving too fast. This is partic-
ularly the case when cornering as well as
on wet or slippery roads or when driving too
close to the vehicle in front.
The driving safety systems described in this
section cannot reduce this risk nor override
the laws of physics.
For this reason, always adapt your driving
style to suit prevailing road and weather Safety
463_AKB; 1; 8, en-GB
wobuchh
,V ersion: 2.10.6
2008-07-17T15:19:41+02:00 - Seite 47 ZDateiname: 6515_4091_02_buchblock.pdf; preflight
Page 56 of 293
Anti-theft syste
ms 53
R
the side windows are closed.
R the sliding/tilting sunroof* is closed.
R there are no objects, e.g. mascots, hang-
ing on the rear-view mirror or on the
grasp handles on the roof trim.
This will prevent false alarms.
X Lock the vehicle using the key.
The interior motion sensor is primed after
approximately 30 seconds.
Deactivating the interior motion sensor To prevent a false alarm, deactivate the inte-
rior motion sensor if you lock your vehicle and
R
people or animals remain in the vehicle
R the windows remain open
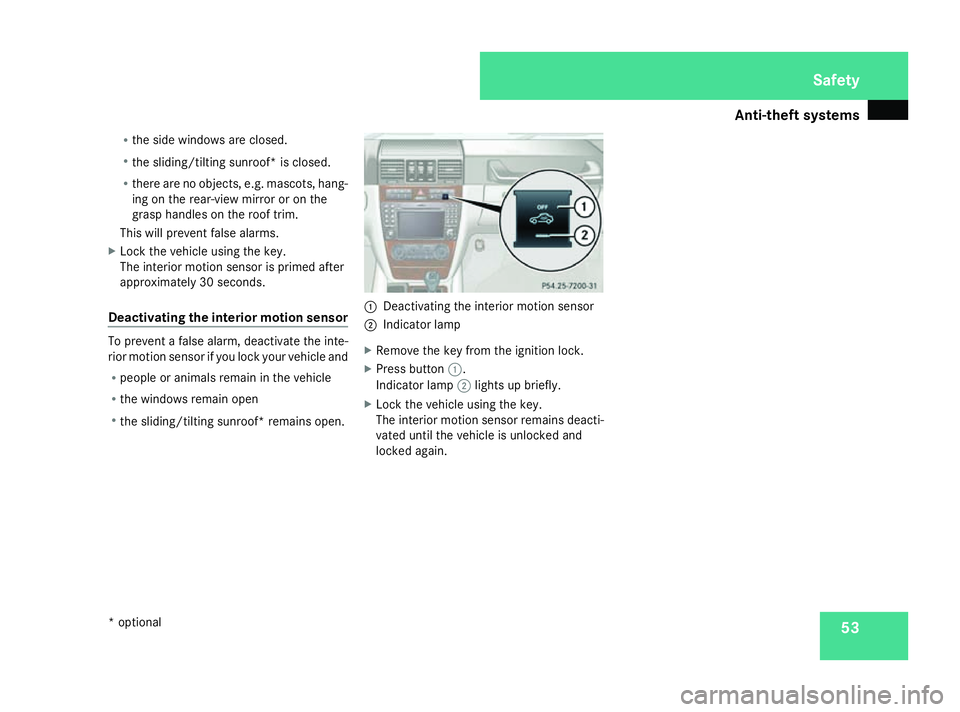
R the sliding/tilting sunroof* remains open. 1
Deactivating the interior motion sensor
2 Indicator lamp
X Remove the key from the ignition lock.
X Press button 1.
Indicator lamp 2lights up briefly.
X Lock the vehicle using the key.
The interior motion sensor remains deacti-
vated until the vehicle is unlocked and
locked again. Safety
* optional
463_AKB; 1; 8, en-GB
wobuchh
,V ersion: 2.10.6
2008-07-17T15:19:41+02:00 - Seite 53 ZDateiname: 6515_4091_02_buchblock.pdf; preflight
Page 57 of 293
Opening and closing
54 Opening and closing
Key
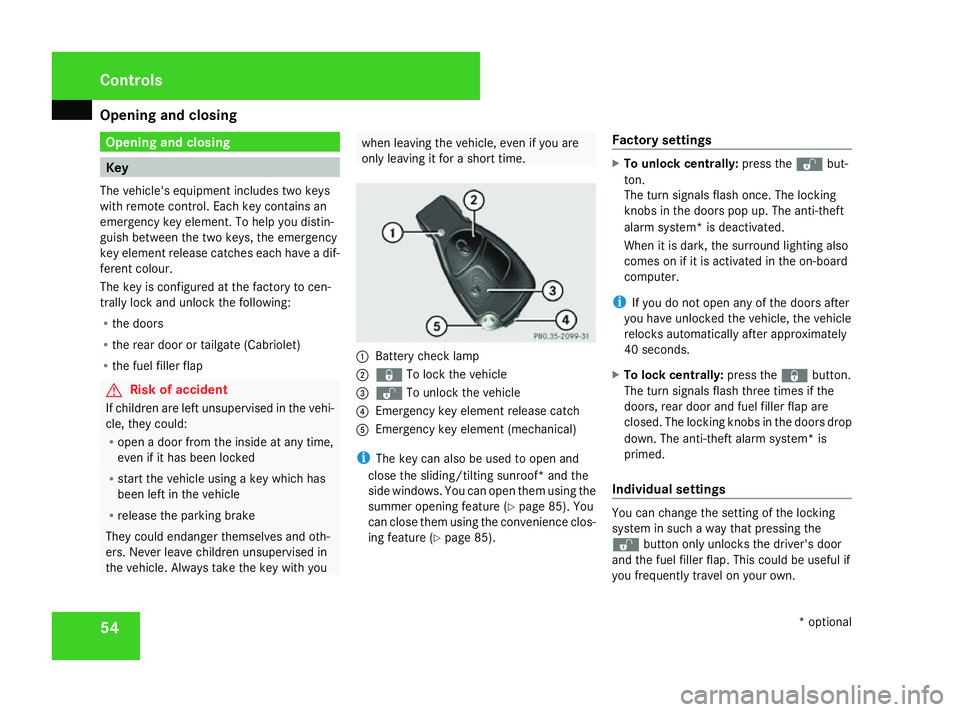
The vehicle's equipment includes two keys
with remote control. Each key contains an
emergency key element. To help you distin-
guish between the two keys, the emergency
key element release catches each have a dif-
ferent colour.
The key is configured at the factory to cen-
trally lock and unlock the following:
R the doors
R the rear door or tailgate (Cabriolet)
R the fuel filler flap G
Risk of accident
If children are left unsupervised in the vehi-
cle, they could:
R open a door from the inside at any time,
even if it has been locked
R start the vehicle using a key which has
been left in the vehicle
R release the parking brake
They could endanger themselves and oth-
ers. Never leave children unsupervised in
the vehicle. Always take the key with you when leaving the vehicle, even if you are
only leaving it for a short time. 1
Battery check lamp
2 j To lock the vehicle
3 k To unlock the vehicle
4 Emergency key element release catch
5 Emergency key element (mechanical)
i The key can also be used to open and
close the sliding/tilting sunroof* and the
side windows. You can open them using the
summer opening feature (Y page 85). You
can close them using the convenience clos-
ing feature (Y page 85). Factory settings X
To unlock centrally: press thekbut-
ton.
The turn signals flash once. The locking
knobs in the doors pop up. The anti-theft
alarm system* is deactivated.
When it is dark, the surround lighting also
comes on if it is activated in the on-board
computer.
i If you do not open any of the doors after
you have unlocked the vehicle, the vehicle
relocks automatically after approximately
40 seconds.
X To lock centrally: press thejbutton.
The turn signals flash three times if the
doors, rear door and fuel filler flap are
closed. The locking knobs in the doors drop
down. The anti-theft alarm system* is
primed.
Individual settings You can change the setting of the locking
system in such a way that pressing the
k button only unlocks the driver's door
and the fuel filler flap. This could be useful if
you frequently travel on your own. Controls
* optional
463_AKB; 1; 8, en-GB
wobuchh,
Version: 2.10.6
2008-07-17T15:19:41+02:00 - Seite 54 Dateiname: 6515_4091_02_buchblock.pdf; preflight
Page 62 of 293
Key positions
596
Handle
X Pull handle 6upwards and push down the
tailgate.
! Make sure that there is sufficient clear-
ance.
Closing from the outside G
Risk of injury
Make sure that nobody can become trap-
ped as you close the tailgate. Key positions
Key
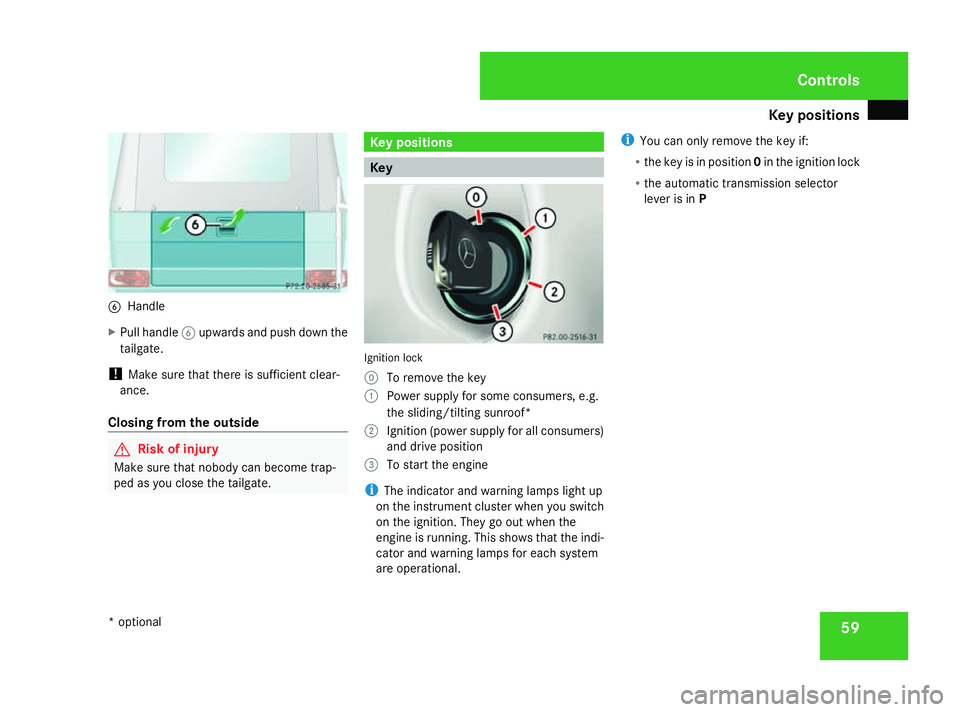
Ignition lock
0
To remove the key
1 Power supply for some consumers, e.g.
the sliding/tilting sunroof*
2 Ignition (power supply for all consumers)
and drive position
3 To start the engine
i The indicator and warning lamps light up
on the instrument cluster when you switch
on the ignition. They go out when the
engine is running. This shows that the indi-
cator and warning lamps for each system
are operational. i
You can only remove the key if:
R the key is in position 0in the ignition lock
R the automatic transmission selector
lever is in P Controls
* optional
463_AKB; 1; 8, en-GB
wobuchh , Version: 2.10.6 2008-07-17T15:19:41+02:00 - Seite 59 ZDateiname: 6515_4091_02_buchblock.pdf; preflight