check engine MERCEDES-BENZ G-CLASS SUV 2012 User Guide
[x] Cancel search | Manufacturer: MERCEDES-BENZ, Model Year: 2012, Model line: G-CLASS SUV, Model: MERCEDES-BENZ G-CLASS SUV 2012Pages: 357, PDF Size: 8.86 MB
Page 75 of 357
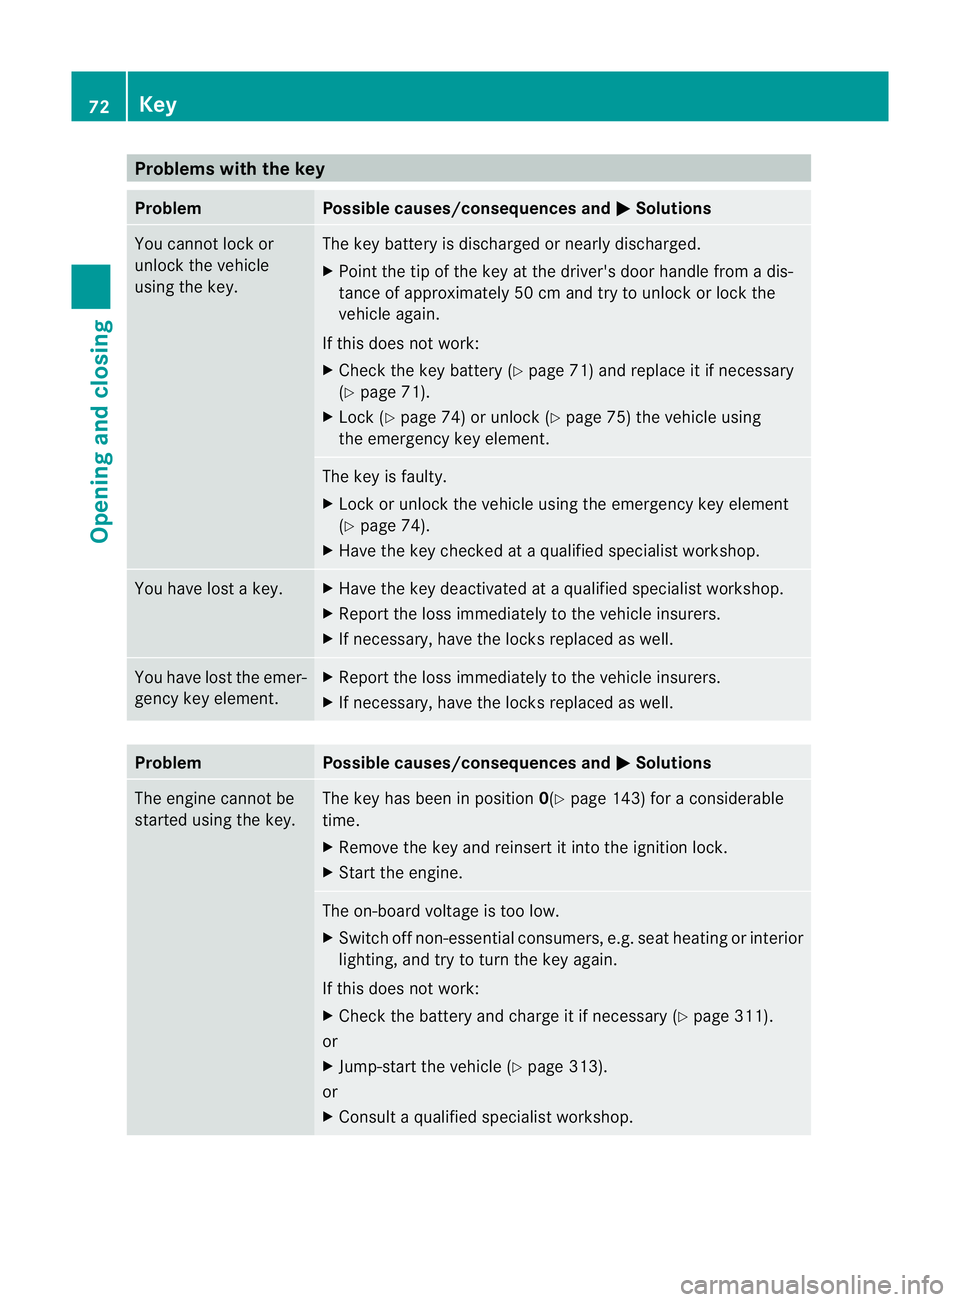
Problems with the key
Problem Possible causes/consequences and
M Solutions
You cannot lock or
unlock the vehicle
using the key. The key battery is discharged or nearly discharged.
X
Point the tip of the key at the driver's door handle from a dis-
tance of approximately 50 cm and try to unlock or lock the
vehicle again.
If this does not work:
X Check the key battery (Y page 71) and replace it if necessary
(Y page 71).
X Lock (Y page 74) or unlock (Y page 75) the vehicle using
the emergency key element. The key is faulty.
X
Lock or unlock the vehicle using the emergency key element
(Y page 74).
X Have the key checked at a qualified specialist workshop. You have lost a key. X
Have the key deactivated at a qualified specialist workshop.
X Report the loss immediately to the vehicle insurers.
X If necessary, have the locks replaced as well. You have lost the emer-
gency key element. X
Report the loss immediately to the vehicle insurers.
X If necessary, have the locks replaced as well. Problem Possible causes/consequences and
M Solutions
The engine cannot be
started using the key. The key has been in position
0(Ypage 143) for a considerable
time.
X Remove the key and reinsert it into the ignition lock.
X Start the engine. The on-board voltage is too low.
X
Switch off non-essential consumers, e.g. seat heating or interior
lighting, and try to turn the key again.
If this does not work:
X Check the battery and charge it if necessary (Y page 311).
or
X Jump-start the vehicle (Y page 313).
or
X Consult a qualified specialist workshop. 72
KeyOpening and closing
Page 78 of 357

X
Turn the emergency key element back and
remove it.
X Insert the emergency key element into the
key. Locking the vehicle
If the vehicle can no longer be centrally
locked with the key, use the emergency key
element.
X Close the front-passenger door, the rear
compartment doors and the rear door or
tailgate (G-Class Cabriolet).
X Press the locking button (Y page 73).
X Make sure that the lockin gknobs on the
doors are still visible .Press downt he lock-
ing knobs by hand, if necessary.
X Close the driver's door from the outside. X
Take the emergency key element out of the
key (Y page 70).
X Insert the emergency key element into the
lock of the driver's door as far as it will go.
X Turn the emergency key element clockwise
as far as it will go to position 1.
i On right-hand-drive vehicles, turn the
emergency key element anti-clockwise.
X Turn the emergency key element back and
remove it.
X Check if the doors, including the rear door
or tailgate (G-Class Cabriolet), are locked.
X Insert the emergency key element into the
key. Rear door (G-Class long-wheelbase
version)
Important safety notes
G
WARNING
Combustion engines emit poisonous exhaust
gases such as carbon monoxide. If the tail-
gate/rear door is open when the engine is
running, particularly if the vehicle is moving,
exhaust fumes could enter the passenger
compartment. There is a risk of poisoning.
Turn off the engine before opening the tail-
gate/rear door. Never drive off with the tail-
gate/rear door open.
! The tailgate swings out to the side when
opened. Therefore, make sure that there is
sufficient clearance.
i Do not leave the key in the luggage com-
partment.Y ou may otherwise be inadver-
tently locked out. Opening
You can only open the rear door after unlock-
ing it first.
X Press the %button on the key. X
Press release button :and pull door han-
dle ;.
X Open the rear door. Rear door (G-Class long-wheelbase version)
75Opening and closing Z
Page 117 of 357
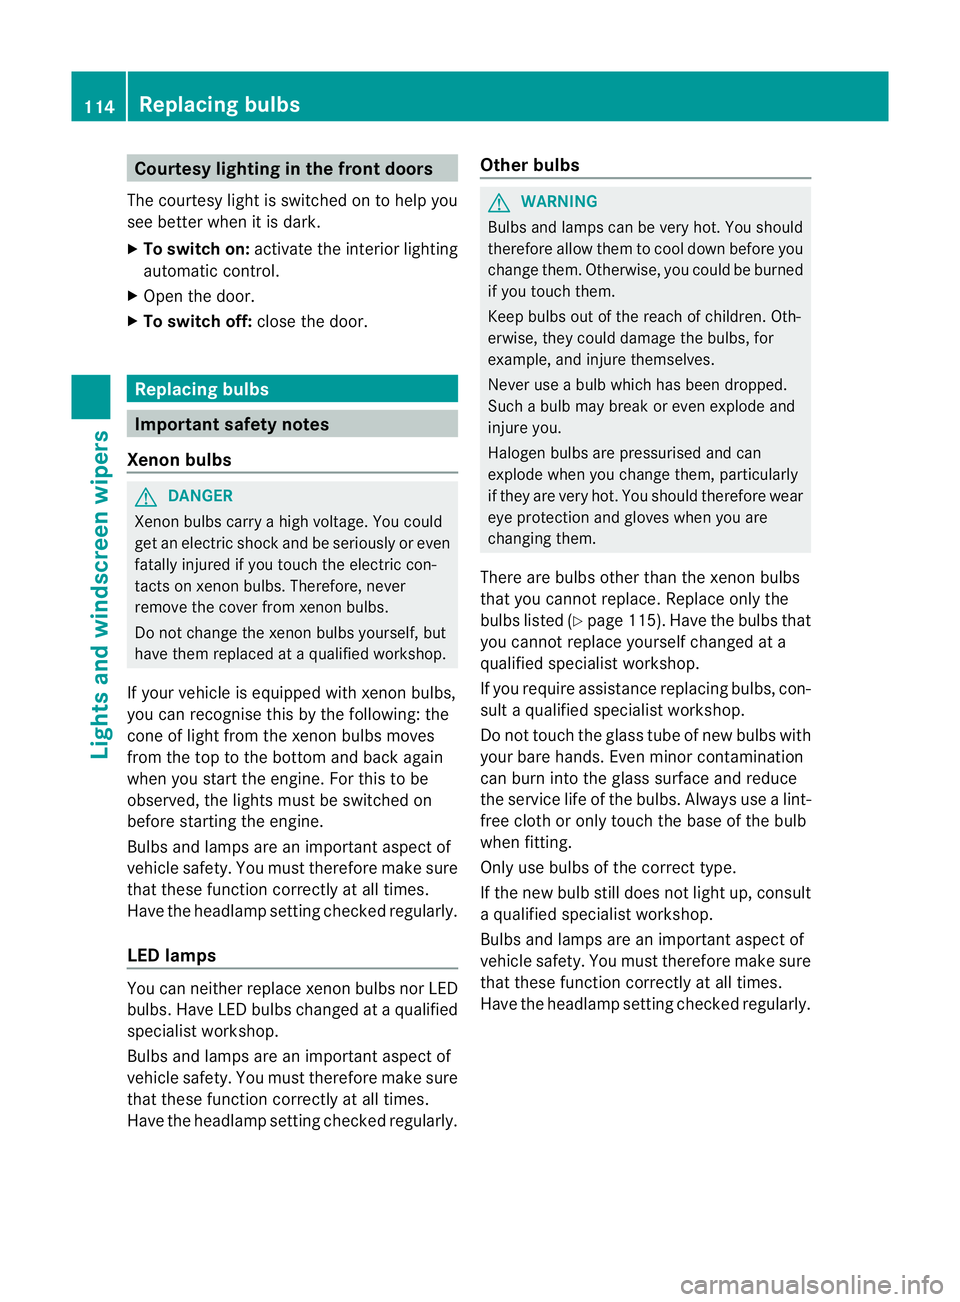
Courtesy lighting in the front doors
The courtesy light is switched on to help you
see bette rwhen it is dark.
X To switch on: activate the interior lighting
automatic control.
X Open the door.
X To switch off: close the door. Replacing bulbs
Important safety notes
Xenon bulbs G
DANGER
Xenon bulbs carry a high voltage. You could
get an electric shock and be seriously or even
fatally injured if you touch the electric con-
tacts on xenon bulbs. Therefore, never
remove the cover from xenon bulbs.
Do not change the xenon bulbs yourself, but
have them replaced at a qualified workshop.
If your vehicle is equipped with xenon bulbs,
you can recognise this by the following: the
cone of light from the xenon bulbs moves
from the top to the bottom and back again
when you start the engine. For this to be
observed, the lights must be switched on
before starting the engine.
Bulbs and lamps are an important aspect of
vehicle safety. You must therefore make sure
that these function correctly at all times.
Have the headlamp setting checked regularly.
LED lamps You can neither replace xenon bulbs nor LED
bulbs. Have LED bulbs changed at a qualified
specialist workshop.
Bulbs and lamps are an important aspect of
vehicle safety. You must therefore make sure
that these function correctly at all times.
Have the headlamp setting checked regularly. Other bulbs G
WARNING
Bulbs and lamps can be very hot. You should
therefore allow them to cool down before you
change them. Otherwise, you could be burned
if you touch them.
Keep bulbs out of the reach of children. Oth-
erwise, they could damage the bulbs, for
example, and injure themselves.
Never use a bulb which has been dropped.
Such a bulb may break or even explode and
injure you.
Halogen bulbs are pressurised and can
explode when you change them, particularly
if they are very hot. You should therefore wear
eye protection and gloves when you are
changing them.
There are bulbs other than the xenon bulbs
that you cannot replace. Replace only the
bulbs listed (Y page 115). Have the bulbs that
you cannot replace yourself changed at a
qualified specialist workshop.
If you require assistance replacing bulbs, con-
sult a qualified specialist workshop.
Do not touch the glass tube of new bulbs with
your bare hands. Even minor contamination
can burn into the glass surface and reduce
the service life of the bulbs. Always use a lint-
free cloth or only touch the base of the bulb
when fitting.
Only use bulbs of the correct type.
If the new bulb still does not light up, consult
a qualified specialist workshop.
Bulbs and lamps are an important aspect of
vehicle safety. You must therefore make sure
that these function correctly at all times.
Have the headlamp setting checked regularly. 114
Replacing bulbsLights and windscreen wipers
Page 141 of 357
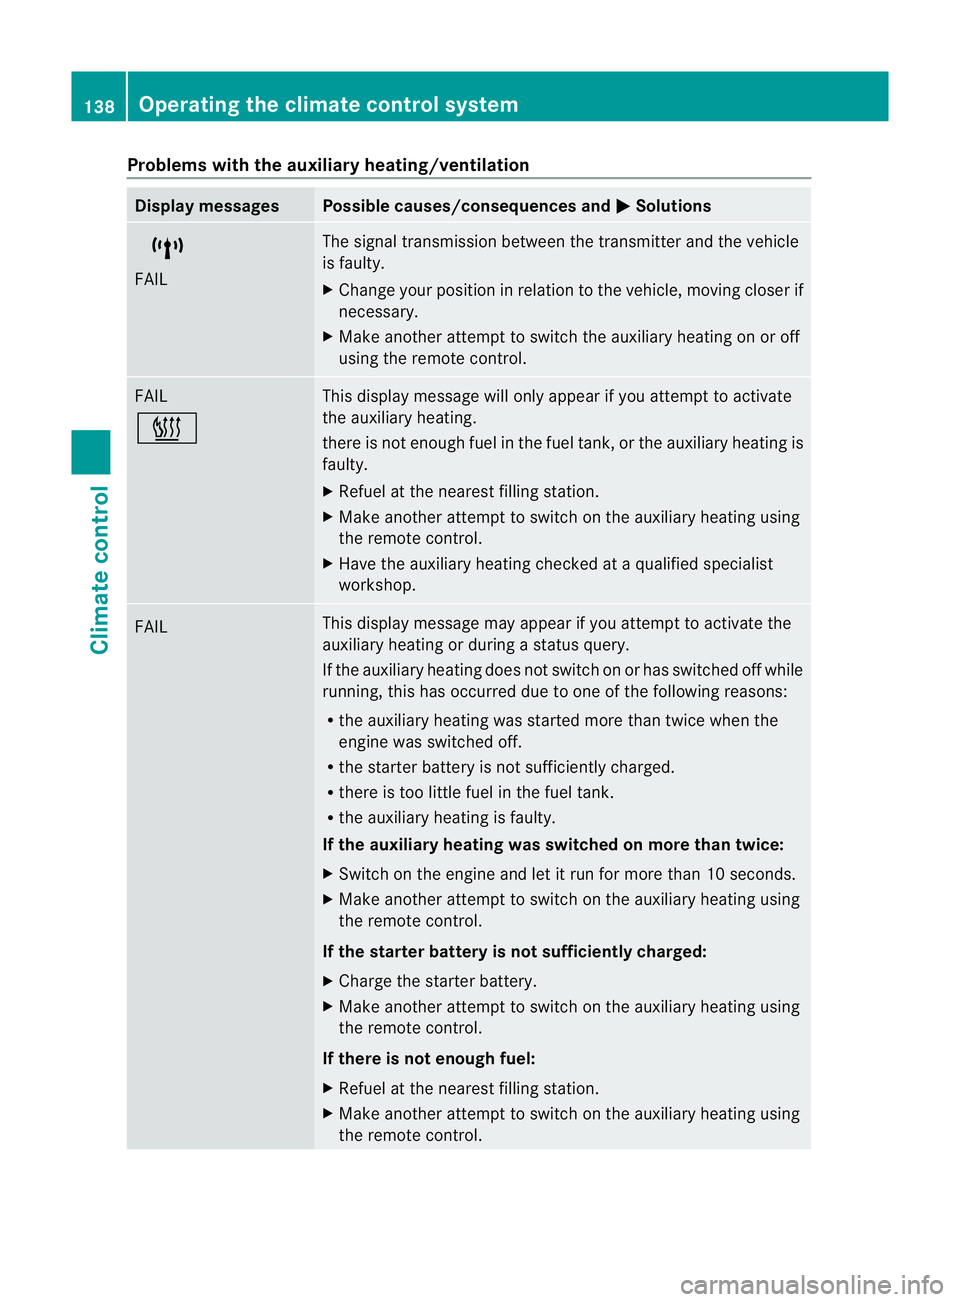
Problems with the auxiliary heating/ventilation
Display messages Possible causes/consequences and
M Solutions
$
FAIL The signal transmission between the transmitter and the vehicle
is faulty.
X
Change your position in relation to the vehicle, moving closer if
necessary.
X Make another attempt to switch the auxiliary heating on or off
using the remote control. FAIL
© This display message will only appear if you attempt to activate
the auxiliary heating.
there is not enough fuel in the fuel tank, or the auxiliary heating is
faulty.
X
Refuel at the nearest filling station.
X Make another attempt to switch on the auxiliary heating using
the remote control.
X Have the auxiliary heating checked at a qualified specialist
workshop. FAIL This display message may appear if you attempt to activate the
auxiliary heating or during a status query.
If the auxiliary heating does not switch on or has switched off while
running, this has occurred due to one of the following reasons:
R
the auxiliary heating was started more than twice when the
engine was switched off.
R the starter battery is not sufficiently charged.
R there is too little fuel in the fuel tank.
R the auxiliary heating is faulty.
If the auxiliary heating was switched on more than twice:
X Switch on the engine and let it run for more than 10 seconds.
X Make another attempt to switch on the auxiliary heating using
the remote control.
If the starter battery is not sufficiently charged:
X Charge the starter battery.
X Make another attempt to switch on the auxiliary heating using
the remote control.
If there is not enough fuel:
X Refuel at the nearest filling station.
X Make another attempt to switch on the auxiliary heating using
the remote control. 138
Operating the climate control systemClimate control
Page 152 of 357
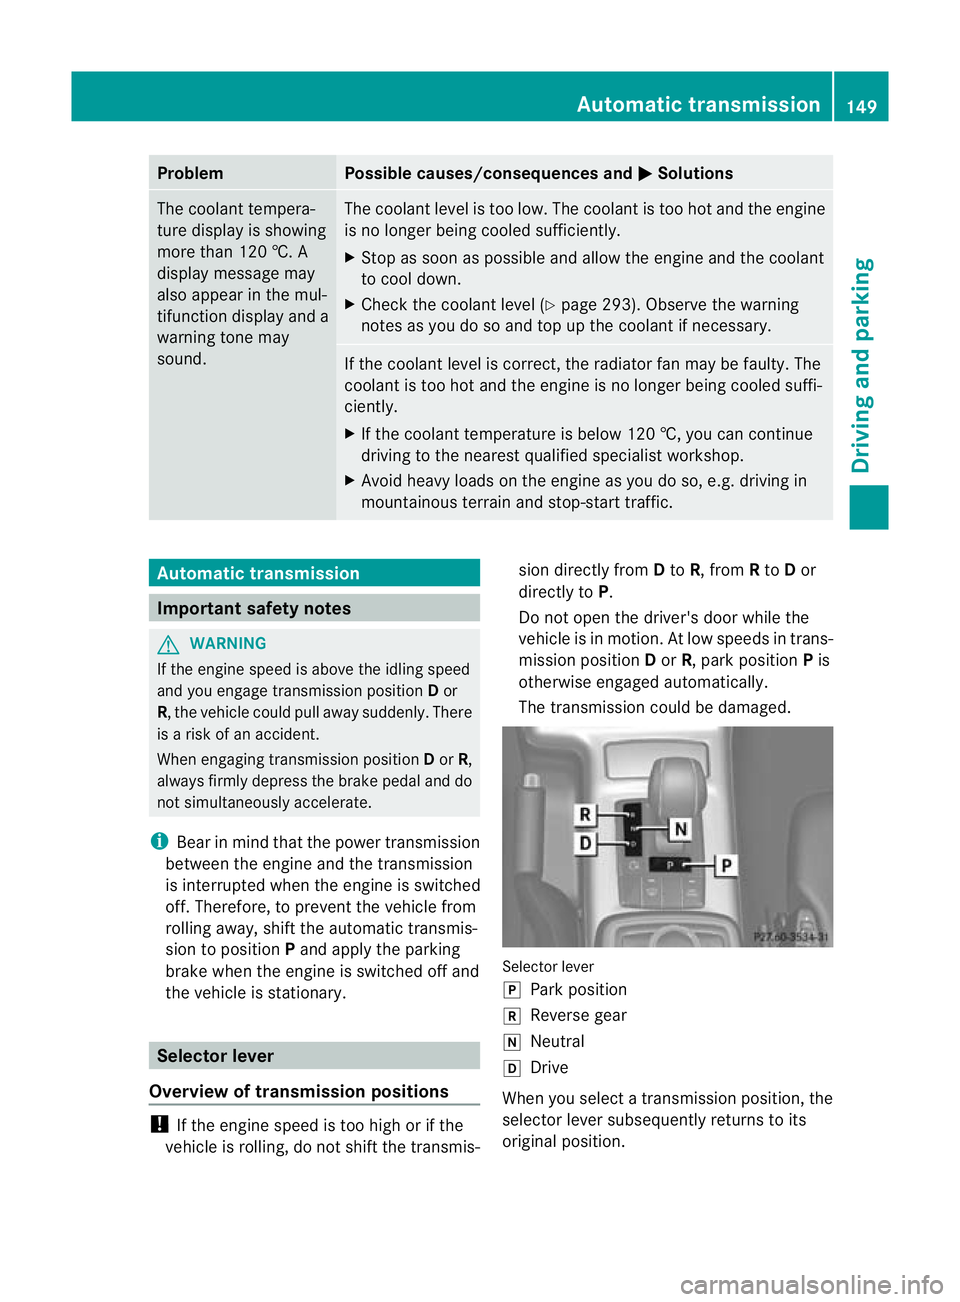
Problem Possible causes/consequences and
M Solutions
The coolant tempera-
ture display is showing
more than 120 †. A
display message may
also appearint
he mul-
tifunction display and a
warning tone may
sound. The coolant level is too low. The coolant is too hot and the engine
is no longer being cooled sufficiently.
X Stop as soon as possible and allow the engine and the coolant
to cool down.
X Check the coolant level (Y page 293). Observe the warning
notes as you do so and top up the coolant if necessary. If the coolant level is correct, the radiator fan may be faulty. The
coolant is too hot and the engine is no longer being cooled suffi-
ciently.
X
If the coolant temperature is below 120 †, you can continue
driving to the nearest qualified specialist workshop.
X Avoid heavy loads on the engine as you do so, e.g. driving in
mountainous terrain and stop-start traffic. Automatic transmission
Important safety notes
G
WARNING
If the engine speed is above the idling speed
and you engage transmission position Dor
R, the vehicle could pull away suddenly. There
is a risk of an accident.
When engaging transmission position Dor R,
always firmly depress the brake pedal and do
not simultaneously accelerate.
i Bear in mind that the power transmission
between the engine and the transmission
is interrupted when the engine is switched
off. Therefore, to prevent the vehicle from
rolling away, shift the automatic transmis-
sion to position Pand apply the parking
brake when the engine is switched off and
the vehicle is stationary. Selector lever
Overview of transmission positions !
If the engine speed is too high or if the
vehicle is rolling, do not shift the transmis- sion directly from
Dto R, from Rto Dor
directly to P.
Do not open the driver's door while the
vehicle is in motion. At low speeds in trans-
mission position Dor R, park position Pis
otherwise engaged automatically.
The transmission could be damaged. Selector lever
j
Park position
k Reverse gear
i Neutral
h Drive
When you select a transmission position, the
selector lever subsequently returns to its
original position. Automatic transmission
149Driving and parking Z
Page 154 of 357
Staying in neutral (N)
G
WARNING
If children are left unsupervised in the vehicle,
they could:
R open the doors, thus endangering other
people or road users.
R get out and disrupt traffic.
R operate the vehicle's equipment.
Additionally, children could set the vehicle in
motion if, for example, they:
R release the parking brake.
R shift the automatic transmission out of
parking position P.
R start the engine.
There is a risk of an accident and injury.
When leaving the vehicle, always take the key
with you and lock the vehicle. Never leave
children or animals unattended in the vehicle.
Always keep the key out of reach of children.
X Make sure the ignition is switched on.
X When the vehicle is stationary, depress the
brake pedal and keep it depressed.
X Select neutral N.
X Release the brake pedal.
X If the parking brake is applied, release it.
X Switch off the ignition and leave the key in
the ignition lock.
Shifting to transmission position D X
When the vehicle is stationary, depress the
brake pedal and keep it depressed.
X Push the selector lever back past the first
point of resistance.
Transmission position Dis engaged.
i For AMG vehicles: the ECO start/stop
function switches the engine off automati-
cally if the vehicle is braked to a standstill
when in transmission position Dand the
brake is still depressed (Y page 145). Transmission positions
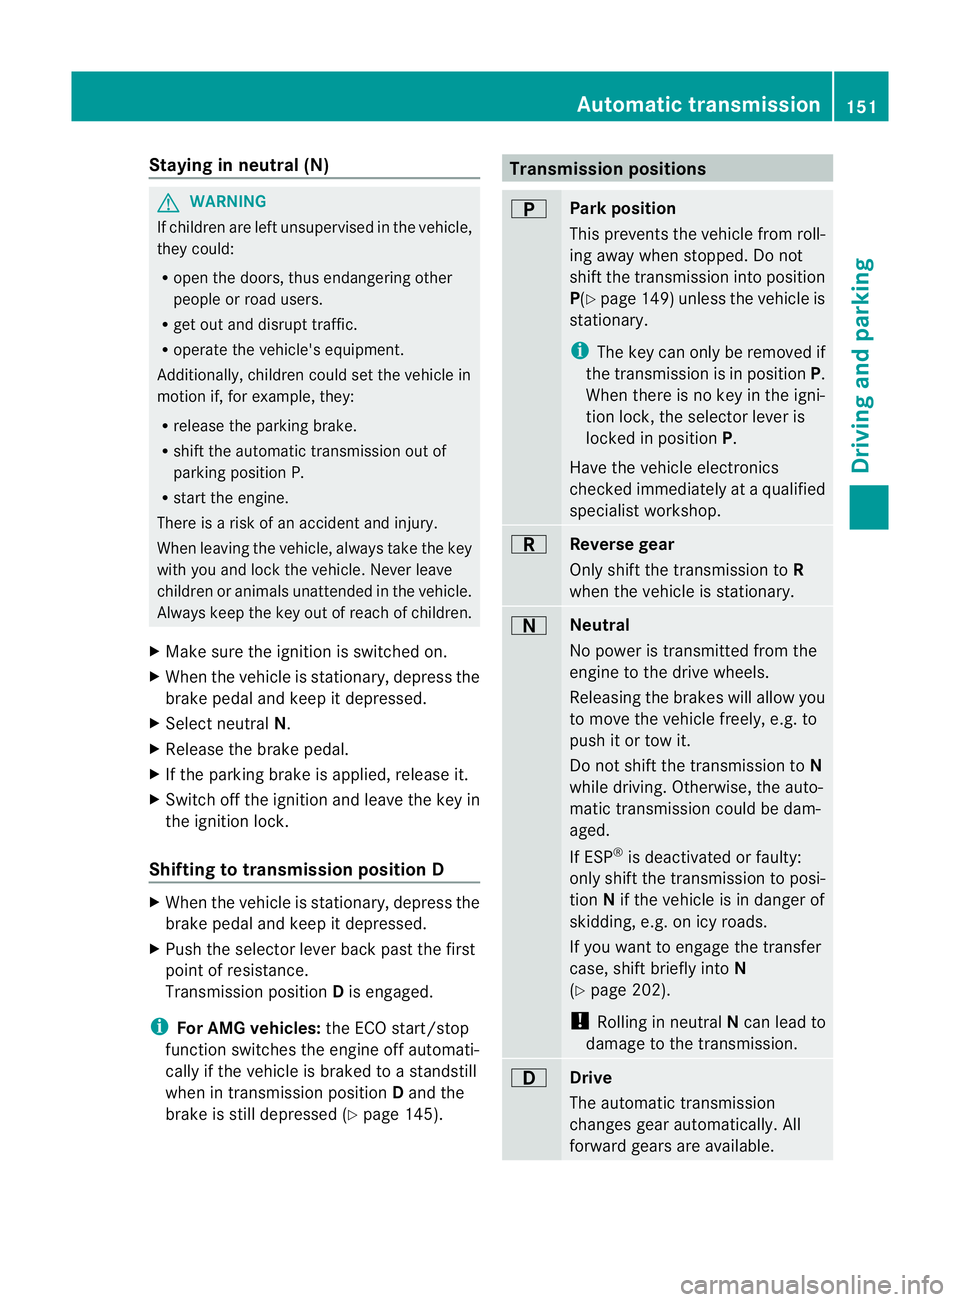
B
Park position
This prevents the vehicle from roll-
ing away when stopped. Do not
shift the transmission into position
P(Y
page 149) unless the vehicle is
stationary.
i The key can only be removed if
the transmission is in position P.
When there is no key in the igni-
tion lock, the selector lever is
locked in position P.
Have the vehicle electronics
checked immediately at a qualified
specialist workshop. C
Reverse gear
Only shift the transmission to
R
when the vehicle is stationary. A
Neutral
No power is transmitted from the
engine to the drive wheels.
Releasing the brakes will allow you
to move the vehicle freely, e.g. to
push it or tow it.
Do not shift the transmission to N
while driving. Otherwise, the auto-
matic transmission could be dam-
aged.
If ESP ®
is deactivated or faulty:
only shift the transmission to posi-
tion Nif the vehicle is in danger of
skidding, e.g. on icy roads.
If you want to engage the transfer
case, shift briefly into N
(Y page 202).
! Rolling in neutral Ncan lead to
damage to the transmission. 7
Drive
The automatic transmission
changes gear automatically. All
forward gears are available. Automatic transmission
151Driving and parking Z
Page 159 of 357
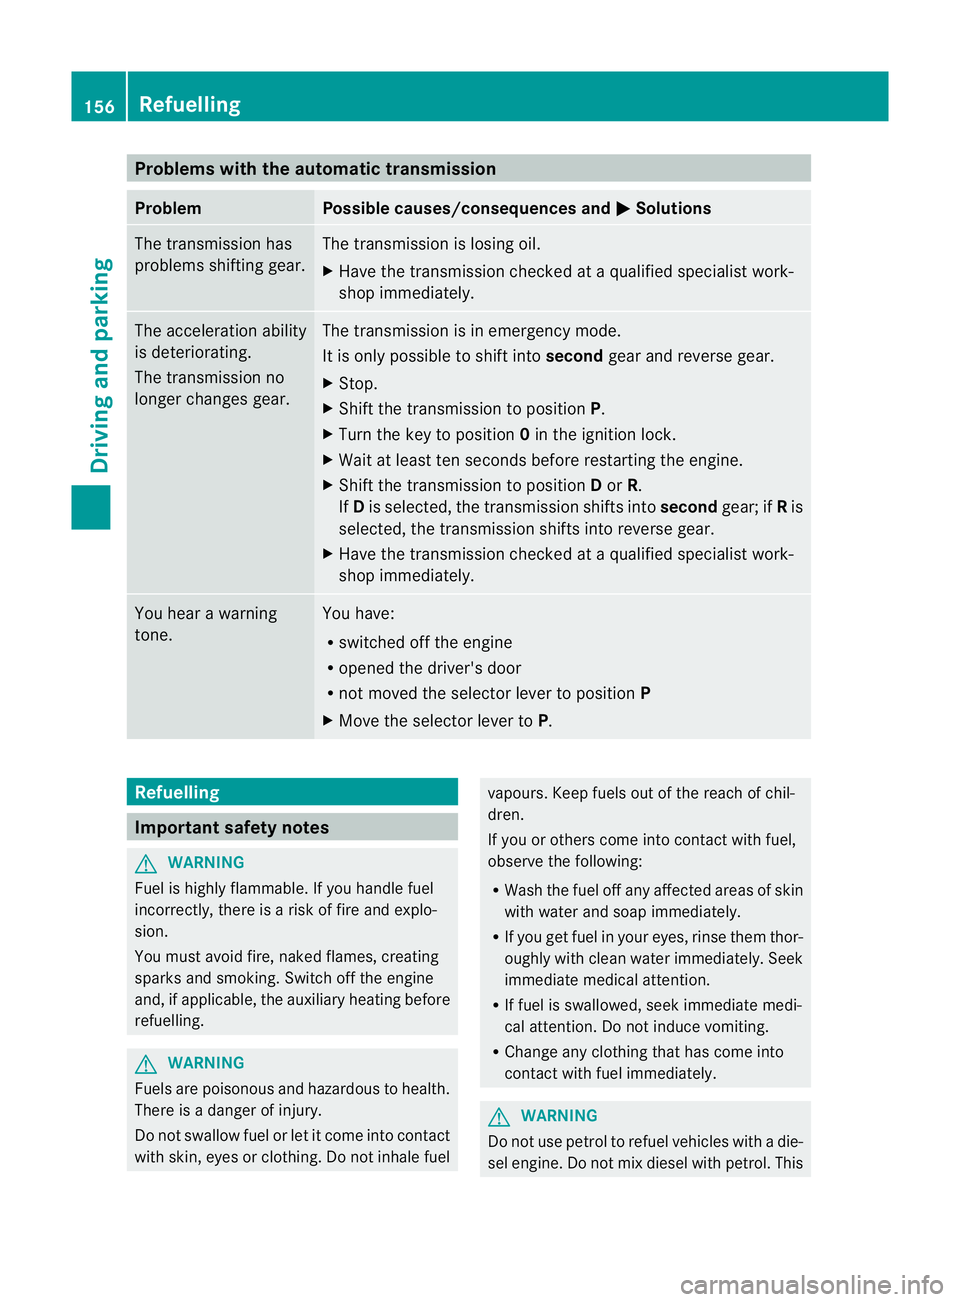
Problems with the automatic transmission
Problem Possible causes/consequences and
M Solutions
The transmission has
problems shifting gear. The transmission is losing oil.
X
Have the transmission checked at a qualified specialist work-
shop immediately. The acceleration ability
is deteriorating.
The transmission no
longer changes gear. The transmission is in emergency mode.
It is only possible to shift into
secondgear and reverse gear.
X Stop.
X Shift the transmission to position P.
X Turn the key to position 0in the ignition lock.
X Wait at least ten seconds before restarting the engine.
X Shift the transmission to position Dor R.
If D is selected, the transmission shifts into secondgear; ifRis
selected, the transmission shifts into reverse gear.
X Have the transmission checked at a qualified specialist work-
shop immediately. You hear a warning
tone. You have:
R
switched off the engine
R opened the driver's door
R not moved the selector lever to position P
X Move the selector lever to P.Refuelling
Important safety notes
G
WARNING
Fuel is highly flammable. If you handle fuel
incorrectly, there is a risk of fire and explo-
sion.
You must avoid fire, naked flames, creating
sparks and smoking. Switch off the engine
and, if applicable, the auxiliary heating before
refuelling. G
WARNING
Fuels are poisonous and hazardous to health.
There is a danger of injury.
Do not swallow fuel or let it come into contact
with skin, eyes or clothing. Do not inhale fuel vapours. Keep fuels out of the reach of chil-
dren.
If you or others come into contact with fuel,
observe the following:
R Wash the fuel off any affected areas of skin
with water and soap immediately.
R If you get fuel in your eyes, rinse them thor-
oughly with clean water immediately. Seek
immediate medical attention.
R If fuel is swallowed, seek immediate medi-
cal attention. Do not induce vomiting.
R Change any clothing that has come into
contact with fuel immediately. G
WARNING
Do not use petrol to refuel vehicles with a die-
sel engine. Do not mix diesel with petrol. This 156
RefuellingDriving and parking
Page 173 of 357
R
Chec kthat items of luggage and loads are
stowed safely and are well secured
(Y page 271).
R To avoid damaging the vehicle, make sure
there is always sufficient ground clearance.
R Always keep the engine running and in gear
when driving on a downhill gradient.
R Always keep the engine running and in gear
when driving on a slope.
R Drive slowly and evenly, if necessary at
walking pace.
R Ensure that the wheels are in contact with
the ground at all times.
R Drive with extreme care on unknown off-
road routes where visibility is poor. For
safety reasons, get out of the vehicle first
and survey the off-road route.
R Check the depth of water before fording
rivers and streams.
R When fording, do not stop and do not
switch off the engine.
R Look out for obstacles such as rocks, holes,
tree stumps and furrows.
R Always keep the doors, the rear door or
tailgate (G-Class Cabriolet), the side win-
dows and the sliding sunroof closed while
the vehicle is in motion.
R Switch off cruise control and variable
SPEEDTRONIC.
R Do not stray from marked routes or paths.
R Adapt your speed to the terrain. The
rougher, steeper or more ruts on the ter-
rain, the slower your speed should be.
R Drive slowly and at a constant speed
through the water. Ensure that a bow wave
does not form as you drive.
R On sand, drive quickly to overcome the roll-
ing resistance. Otherwise, the vehicle could
dig itself into the sand.
R Do not jump with the vehicle as this will
interrupt the vehicle's propulsion. R
Avoid high engine speeds. Drive at appro-
priate engine speeds.
R Always check the vehicle for damage after
off-road driving.
i Information about retrofitting special all-
terrain tyres is available from any qualified
specialist workshop.
i Do not use the HOLD function when driv-
ing off-road, on steep uphill or downhill gra-
dients or on slippery or loose surfaces. The
HOLD function cannot hold the vehicle on
such surfaces.
Checklist before driving off-road !
If the engine oil warning lamp lights up
during the journey, stop the vehicle in a
safe place as soon as is possible. Check the
engine oil level. The warning given by the
engine oil warning light must not be
ignored. Continuing your journey when the
symbol is shown may result in engine dam-
age.
X Engine oil level: check the engine oil and
top it up if necessary.
Only then does the engine receive enough
oil when the vehicle is standing on a steep
incline.
X G3 50 BlueTEC: have the AdBlue ®
level
checked at a qualified specialist workshop
(Y page 160).
X Tyre-change tool kit: check that the jack
is working and make sure you have the
wheelbrace, a robust tow cable and a fold-
ing spade in the vehicle.
X Wheels and tyres: check the tyre tread
depth and tyre pressure.
X Check for damage and remove any foreign
objects, e.g. small stones, from the
wheels/tyres.
X Replace any missing valve caps.
X Replace dented or damaged wheels.
X Carry a sound spare wheel. 170
Driving tipsDriving and parking
Page 174 of 357
Checklist after driving off-road
Driving ove
rrough terrain places greater
demands on your vehicle than driving on nor-
mal roads. After driving off-road, check the
vehicle. This allows you to detect damage
promptly and reduce the risk of an accident
to yourself and other road users.
X Shift the transfer case to HIGH
RANGE(Y page 202).
X Disengage the differential locks
(Y page 204).
X Clean the headlamps and rear lights and
check for damage.
X Clean the front and rear licence plates.
X Clean the wheels and tyres with a water jet
and remove any foreign objects.
X Clean the wheels, tyres, wheel arches and
the vehicle underside with a water jet;
check for any foreign objects and damage.
X Check whether twigs or other parts of
plants have become trapped. These
increase the risk of fire and can damage
fuel pipes, brake hoses or the rubber bel-
lows of the axle joints and propeller shafts.
X After the trip, examine without fail the
entire undercarriage, wheels, tyres, brakes,
bodywork structure, steering, chassis and
exhaust system for damage.
X After driving for extended periods across
sand, mud, gravel, water or in similarly dirty
conditions, have the brake discs, wheels,
brake pads/linings and axle joints checked
and cleaned.
X If you notice strong vibrations after off-road
driving, check for foreign objects in the
wheels and drive train and, if necessary,
remove them. Foreign objects can disturb
the balance and cause vibrations. Driving on sand Observe the following rules when driving on
sand:
R
Shift the transfer case to LOW
RANGE(Y page 202).
R Avoid high engine speeds.
R Limit the shift range of the automatic trans-
mission according to the off-road condi-
tions.
R Drive quickly to overcome the rolling resist-
ance. Otherwise, the vehicle could dig itself
into the sand.
R Drive in the tracks of other vehicles if pos-
sible. Make sure that the ruts are not too
deep, that the sand is firm enough and that
your vehicle has sufficient ground clear-
ance.
Tyre ruts and gravel roads !
Check that the ruts are not too deep and
that your vehicle has sufficient clearance.
Otherwise, your vehicle could be damaged
or bottom out and get stuck.
Observe the following rules when driving
along ruts in off-road terrain or on roads with
loose gravel:
R Shift the transfer case to LOW
RANGE(Y page 202).
R Avoid high engine speeds.
R Observe the safety notes (Y page 169) and
the general notes (Y page 169) on off-road
driving.
R Restrict the shift range of the automatic
transmission to 1(Ypage 153).
R Drive slowly.
R Where ruts are too deep, drive with the
wheels on one side on the middle section
of turf if possible.
Driving over obstacles !
Obstacles could damage the floor of the
vehicle or components of the chassis. Ask
passengers for guidance when driving over Driving tips
171Driving and parking Z
Page 176 of 357
R
Accelerate gently and make sure that the
wheels are gripping.
R Avoid high engine speeds, except when
driving on sandy and muddy routes with
high driving resistance.
R Whe ndriving downaslope, use the braking
power of the engine. Observe the engine
speed; do not overrev the engine.
R Select a shift range appropriate to the gra-
dient.
R Before tackling steep downhill gradients,
select shift range 1(Ypage 153).
R Always check the brakes after driving off-
road.
Maximum gradient-climbing capability On good road surfaces and with the
LOW
RANGE gear selected, the maximum gradi-
ent-climbing capability is 80%.
i If the load on the front axle is reduced
when pulling away on a steep uphill slope,
the front wheels have a tendency to spin.
4ETS recognises this and brakes the
wheels accordingly. The rear wheel torque
is increased and it is easier to pull away.
Hilltops When driving up an uphill gradient, slightly
reduce pressure on the accelerator immedi-
ately before reaching the brow of the hill.
Make use of the vehicle's own impetus to
travel over the brow.
This style of driving prevents:
R the vehicle from lifting off the ground on the
brow of a hill
R loss of traction
R the vehicle from travelling too quickly down
the other side.
Driving downhill R
Before tackling steep downhill gradients,
select shift range 1(Ypage 153). This way you use the engine's braking
effect to reduce the speed. If this is not
sufficient, brake gently. When doing so,
make sure that the vehicle is facing in the
direction of the line of fall.
R Observe the notes on driving in mountain-
ous terrain (Y page 173).
R Drive slowly.
R Do not drive at an angle down steep
inclines. Steer into the line of fall and drive
with the front wheels aligned straight. Oth-
erwise, the vehicle could slip sideways, tip
and overturn.
R Check that the brakes are working normally
after a long downhill stretch. Driving systems
Cruise control
Important safety notes G
WARNING
The brake pedal moves when cruise control
brakes the vehicle. Afoot in the area under
the brake pedal could become trapped. The
movement of the pedal, and therefore the
vehicle's ability to brake, may be restricted by
objects in the area under the brake. There is
a risk of an accident and injury.
Do not place your foot under the brake pedal.
Keep the area under the brake pedal free from
obstructions.
If you fail to adapt your driving style, cruise
control can neither reduce the risk of acci-
dent nor override the laws of physics. Cruise
control cannot take account of road, weather
and traffic conditions. Cruise control is only
an aid. You are responsible for the distance
to the vehicle in front, for vehicle speed and
for braking in good time. Adjust your driving
style to the traffic conditions. Only engage
cruise control when the current road, weather
and traffic conditions permit it to be done
safely. Drive carefully and maintain a suitable
distance to the vehicle in front. Driving systems
173Driving and parking Z