reset MERCEDES-BENZ G-CLASS SUV 2012 User Guide
[x] Cancel search | Manufacturer: MERCEDES-BENZ, Model Year: 2012, Model line: G-CLASS SUV, Model: MERCEDES-BENZ G-CLASS SUV 2012Pages: 357, PDF Size: 8.86 MB
Page 111 of 357
BN
Foglamps (except AMG vehicles)
CR Rear foglamp
X To switc hon:turn the light switch to
T. Parking lamps
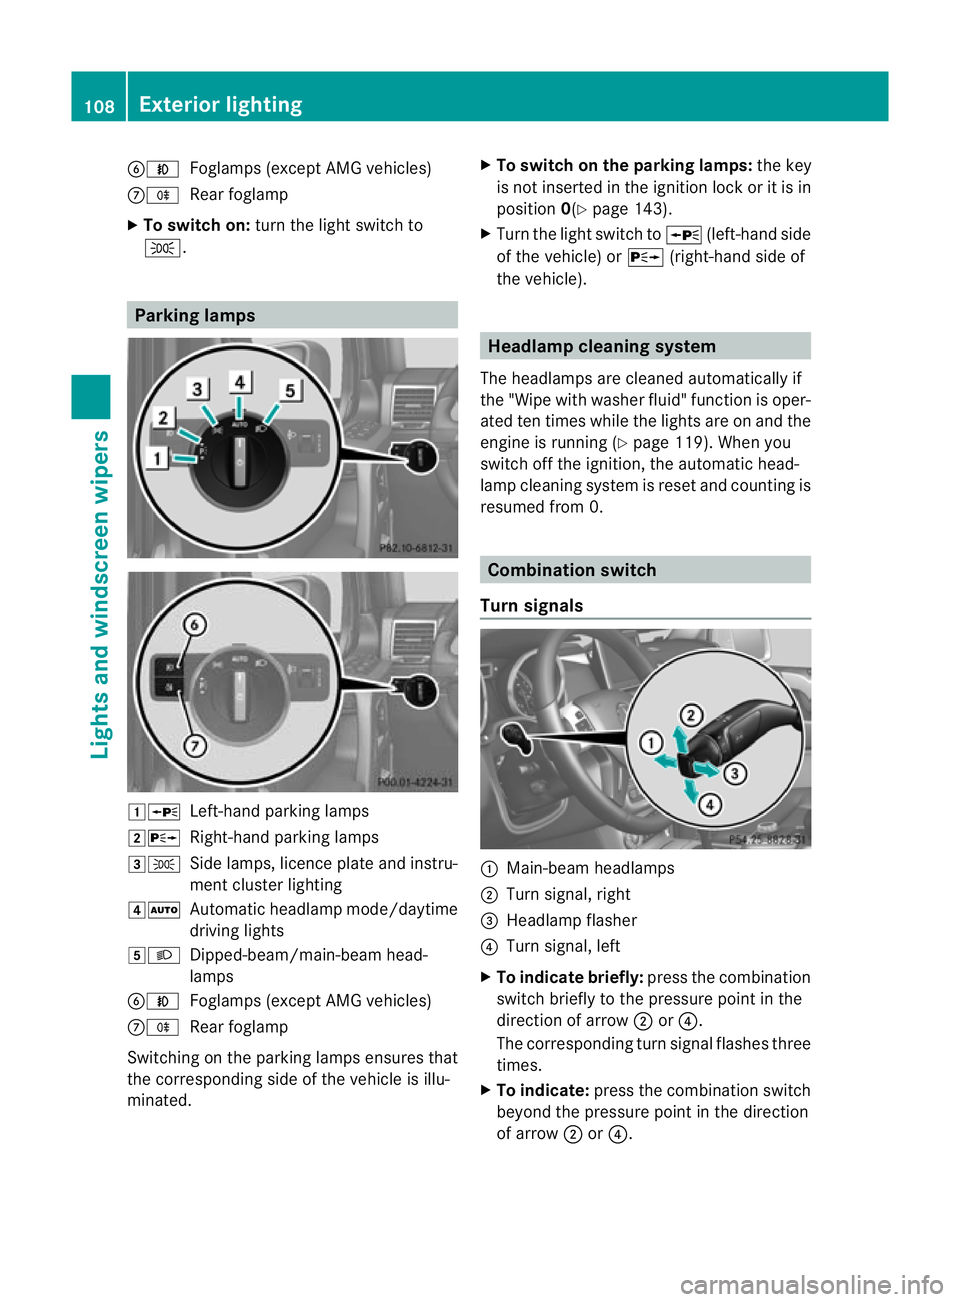
1W
Left-hand parking lamps
2X Right-hand parking lamps
3T Side lamps, licence plate and instru-
ment cluster lighting
4Ã Automatic headlamp mode/daytime
driving lights
5L Dipped-beam/main-beam head-
lamps
BN Foglamps (except AMG vehicles)
CR Rear foglamp
Switching on the parking lamps ensures that
the corresponding side of the vehicle is illu-
minated. X
To switch on the parking lamps: the key
is not inserted in the ignition lock or it is in
position 0(Ypage 143).
X Turn the light switch to W(left-hand side
of the vehicle) or X(right-hand side of
the vehicle). Headlamp cleaning system
The headlamps are cleaned automatically if
the "Wipe with washer fluid" function is oper-
ated ten times while the lights are on and the
engine is running (Y page 119). When you
switch off the ignition, the automatic head-
lamp cleaning system is reset and counting is
resumed from 0. Combination switch
Turn signals :
Main-beam headlamps
; Turn signal, right
= Headlamp flasher
? Turn signal, left
X To indicate briefly: press the combination
switch briefly to the pressure point in the
direction of arrow ;or?.
The corresponding turn signal flashes three
times.
X To indicate: press the combination switch
beyond the pressure point in the direction
of arrow ;or?. 108
Exterior lightingLights and windscreen wipers
Page 177 of 357
Do not use cruise control:
R
in traffi cconditions that do not allow you
to drive at a constant speed, e.g. heavy
traffic, on winding roads or off-road
R on slippery road surfaces. Braking or accel-
erating could cause the drive wheels to lose
traction and the vehicle could then skid.
R when there is poor visibility, e.g. due to fog,
heavy rain or snow
General notes Cruise control maintains a constant road
speed for you. On long and steep downhill
gradients, especially if the vehicle is laden or
towing a trailer, you must select shift range
1,
2or 3in good time. By doing so, you will
make use of the braking effect of the engine.
This relieves the load on the brake system and
prevents the brakes from overheating and
wearing too quickly.
Use cruise control only if road and traffic con-
ditions make it appropriate to maintain a
steady speed for a prolonged period. You can
store any road speed above 30 km/h.
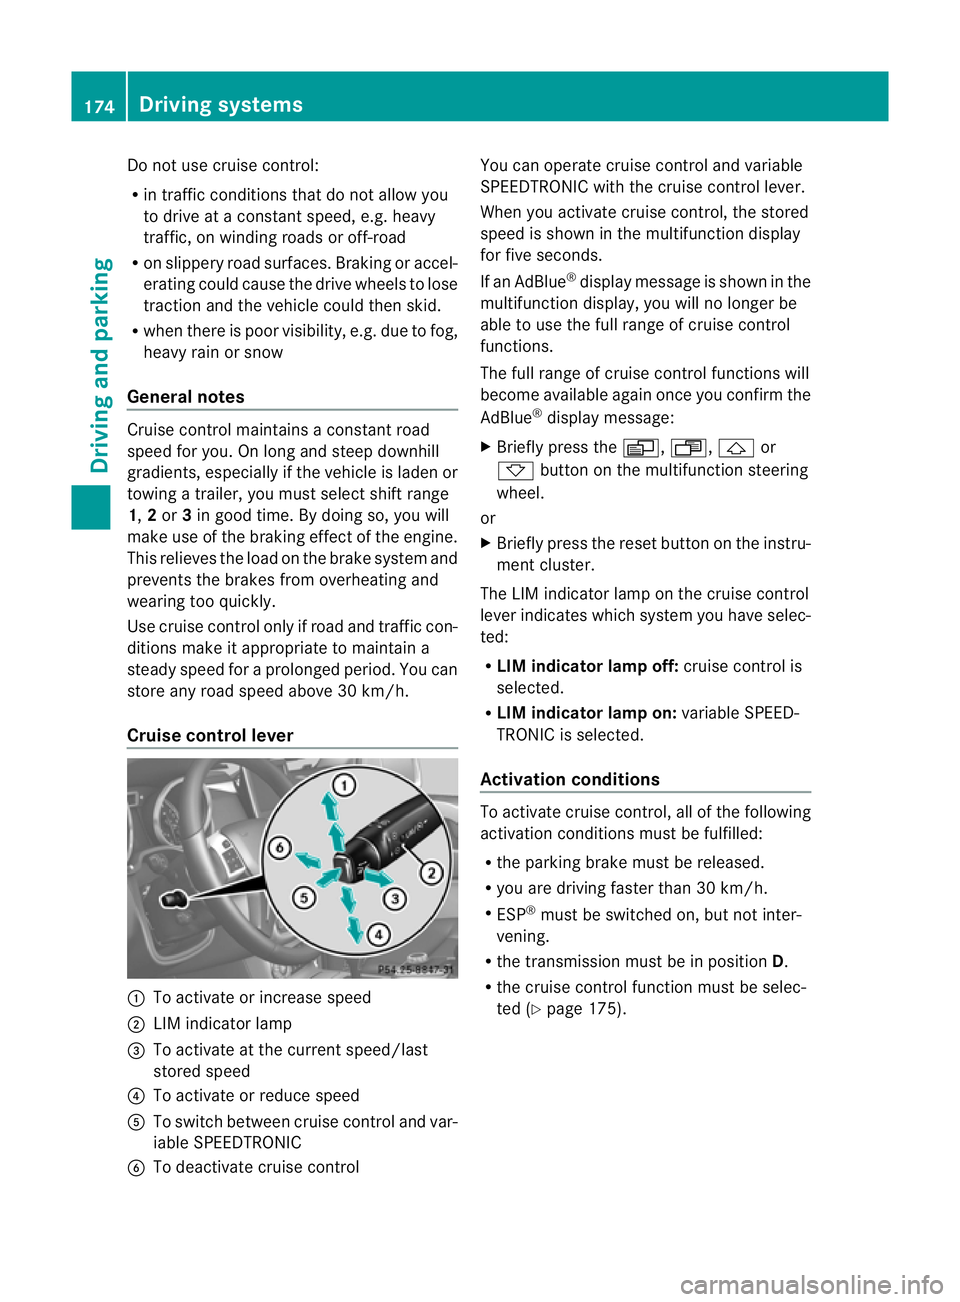
Cruise control lever :
To activate or increase speed
; LIM indicator lamp
= To activate at the current speed/last
stored speed
? To activate or reduce speed
A To switch between cruise control and var-
iable SPEEDTRONIC
B To deactivate cruise control You can operate cruise control and variable
SPEEDTRONIC with the cruise control lever.
When you activate cruise control, the stored
speed is shown in the multifunction display
for five seconds.
If an AdBlue ®
display message is shown in the
multifunction display, you will no longer be
able to use the full range of cruise control
functions.
The full range of cruise control functions will
become available again once you confirm the
AdBlue ®
display message:
X Briefly press the V,U,&or
* button on the multifunction steering
wheel.
or
X Briefly press the reset button on the instru-
ment cluster.
The LIM indicator lamp on the cruise control
lever indicates which system you have selec-
ted:
R LIM indicator lamp off: cruise control is
selected.
R LIM indicator lamp on: variable SPEED-
TRONIC is selected.
Activation conditions To activate cruise control, all of the following
activation conditions must be fulfilled:
R
the parking brake must be released.
R you are driving faster than 30 km/h.
R ESP ®
must be switched on, but not inter-
vening.
R the transmission must be in position D.
R the cruise control function must be selec-
ted (Y page 175). 174
Driving systemsDriving and parking
Page 186 of 357
be warned visually and acoustically. DIS-
TRONIC PLUS cannot preven tacollision with-
out your intervention. An intermittent warn-
ing tone will then sound and the distance
warning lamp will light up in the instrument
cluster. Brake immediately in order to
increase the distance from the vehicle in
front, or take evasive action, provided it is
safe to do so.
DISTRONIC PLUS may not detect narrow
vehicles driving in front, e.g. motorcycles, or
vehicles driving on a different line. Therefore,
always pay attention to traffic conditions
even when DISTRONIC PLUS is activated.
Otherwise, you may fail to recognise dangers
in time, cause an accident and injure yourself
and others.
If DISTRONIC PLUS is activated, the vehicle
brakes automatically in certain situations.
This can happe nunexpectedly, especially
when towing or in a car wash. There is a risk
of an accident. In these or similar situations,
deactivate DISTRONIC PLUS.
If you want DISTRONIC PLUS to assist you,
the following activatio nconditions must be
fulfilled (Y page 184) and the radar sensor
system must be operational.
General notes DISTRONIC PLUS regulates the speed and
automatically helps you maintain the dis-
tance to the vehicle detected in front. DIS-
TRONIC PLUS brakes automatically so that
the set speed is not exceeded.
On long and steep downhill gradients, espe-
cially if the vehicle is laden or towing a trailer,
you must select shift range 1,2or 3in good
time. By doing so, you will make use of the
braking effect of the engine. This relieves the
load on the brake system and prevents the
brakes from overheating and wearing too
quickly.
If DISTRONIC PLUS detects a slower-moving
vehicle in front, your vehicle is braked in order
to maintain the preset distance to the vehicle
in front. If there is no vehicle in front, DISTRONIC
PLUS operates in the same way as cruise
control in the speed range between
30 km/ha
nd 200 km/h. If avehicle is driving
in front of you, DISTRONIC operates in the
speed range between 0km/h and
200 km/h.
Do not use DISTRONIC PLUS on roads with
steep gradients.
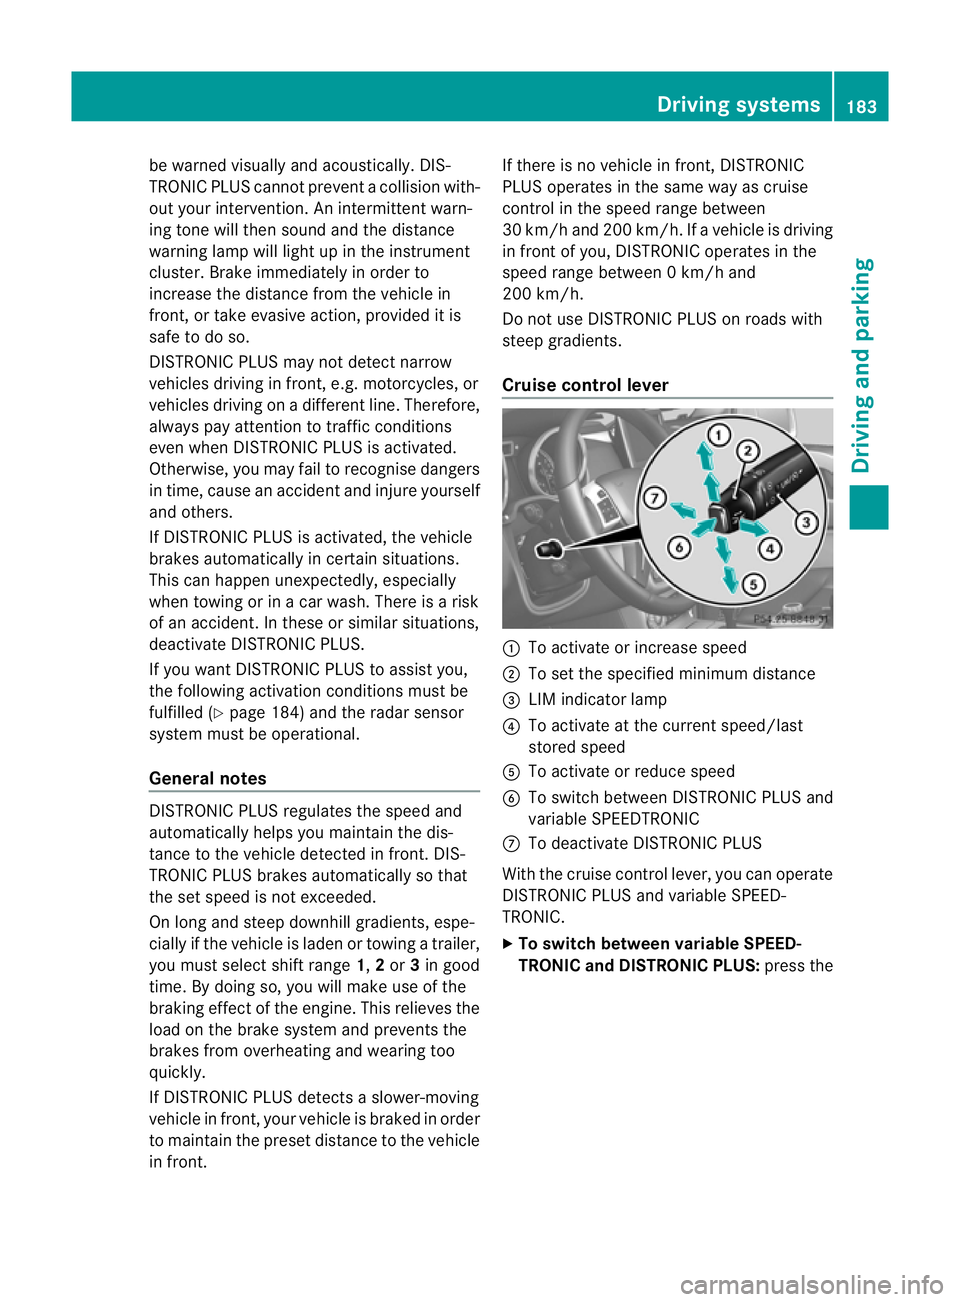
Cruise control lever :
To activate or increase speed
; To set the specified minimu mdistance
= LIM indicator lamp
? To activate at the current speed/last
stored speed
A To activate or reduce speed
B To switch between DISTRONIC PLUS and
variable SPEEDTRONIC
C To deactivate DISTRONIC PLUS
With the cruise control lever, you can operate
DISTRONIC PLUS and variable SPEED-
TRONIC.
X To switch between variable SPEED-
TRONIC and DISTRONIC PLUS: press the Driving systems
183Driving and parking Z
Page 218 of 357
R
Service menu (Y
page 220)
R Settings menu (Y
page 221)
R AMG menu in AMG vehicles (Y
page 225)
The Audio ,
Navi and
Tel menus differ slightly
in vehicles with an audio system and in vehi-
cles with COMAND Online. The examples
given in this Owner's Manual apply to vehicles
equipped with COMAND Online. Trip menu
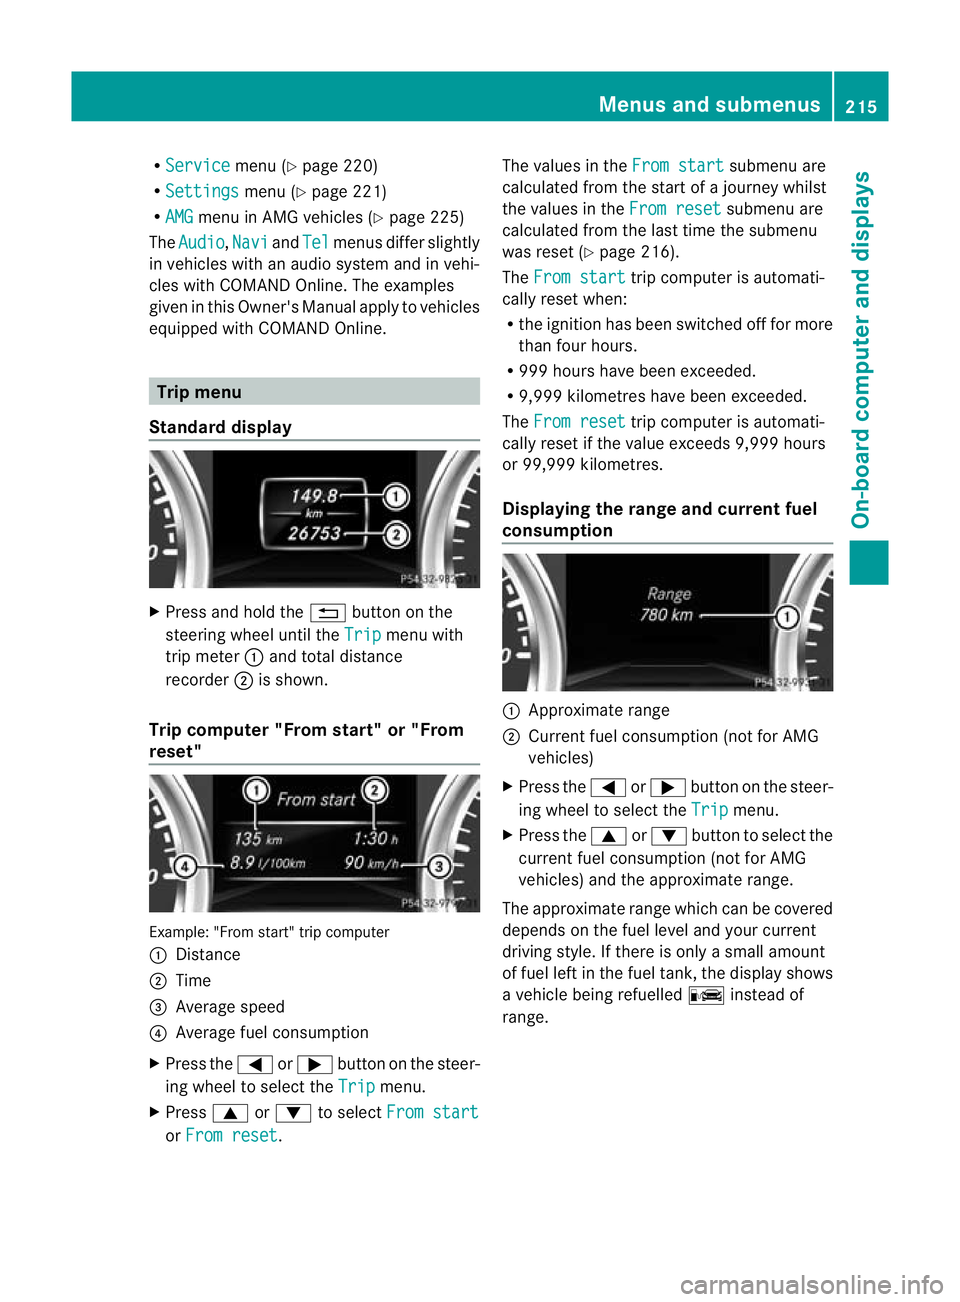
Standard display X
Press and hold the %button on the
steering wheel until the Trip menu with
trip meter :and total distance
recorder ;is shown.
Trip computer "From start" or "From
reset" Example: "From start" trip computer
:
Distance
; Time
= Average speed
? Average fuel consumption
X Press the =or; button on the steer-
ing wheel to select the Trip menu.
X Press 9or: to select From start or
From reset .The values in the
From start submenu are
calculated from the start of a journey whilst
the values in the From reset submenu are
calculated from the last time the submenu
was reset (Y page 216).
The From start trip computer is automati-
cally reset when:
R the ignition has been switched off for more
than four hours.
R 999 hours have been exceeded.
R 9,999 kilometres have been exceeded.
The From reset trip computer is automati-
cally reset if the value exceeds 9,999 hours
or 99,999 kilometres.
Displaying the range and current fuel
consumption :
Approximate range
; Current fuel consumption (not for AMG
vehicles)
X Press the =or; button on the steer-
ing wheel to select the Trip menu.
X Press the 9or: button to select the
current fuel consumption (not for AMG
vehicles) and the approximate range.
The approximate range which can be covered
depends on the fuel level and your current
driving style. If there is only a small amount
of fuel left in the fuel tank, the display shows
a vehicle being refuelled Cinstead of
range. Menus and submenus
215On-board computer and displays Z
Page 219 of 357
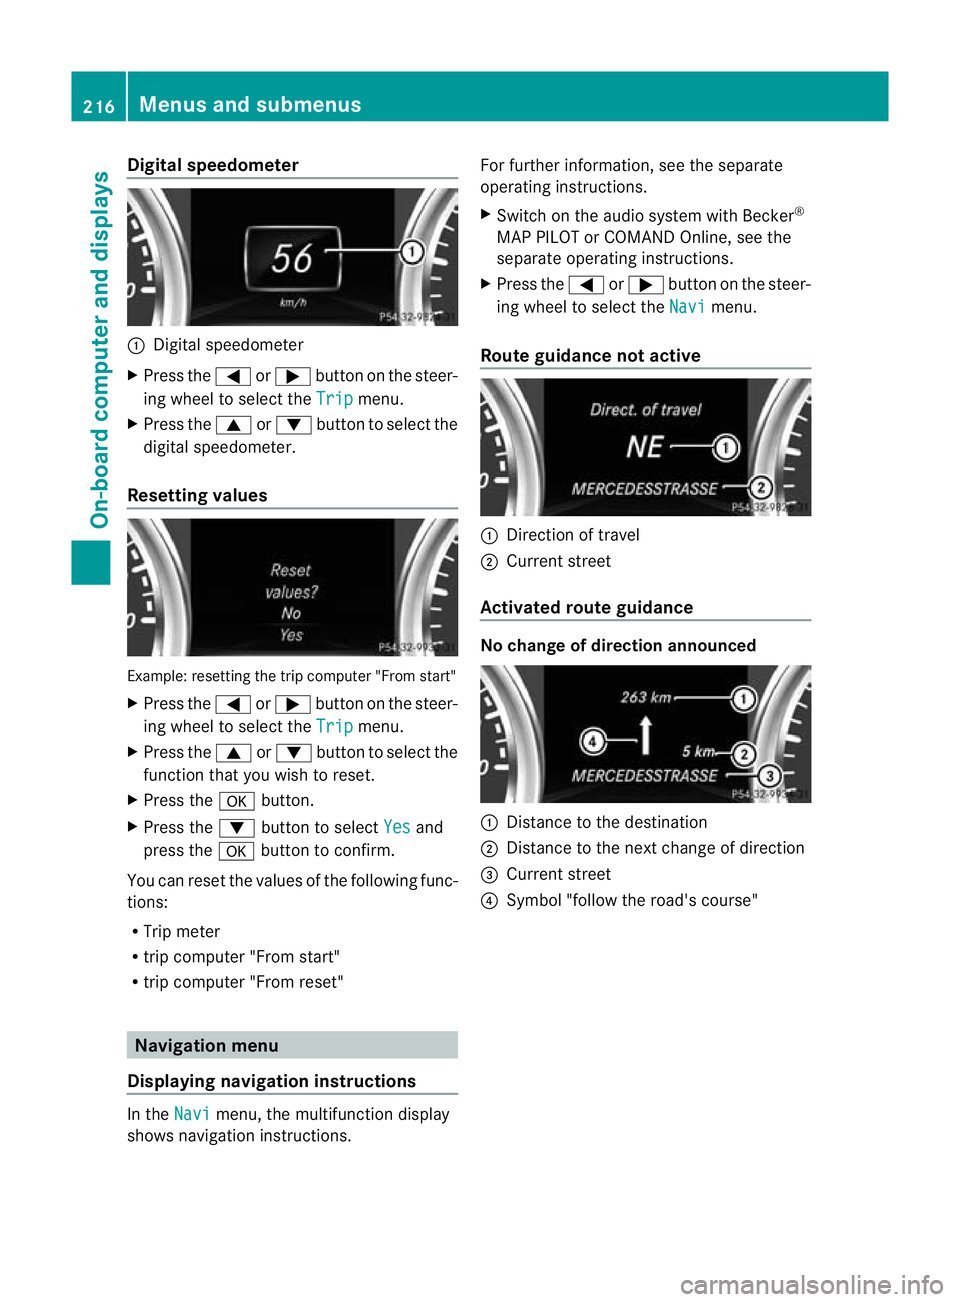
Digital speedometer
:
Digital speedometer
X Press the =or; buttononthe steer-
ing wheel to select the Trip menu.
X Press the 9or: button to select the
digital speedometer.
Resetting values Example: resetting the trip computer "From start"
X
Press the =or; button on the steer-
ing wheel to select the Trip menu.
X Press the 9or: button to select the
function that you wish to reset.
X Press the abutton.
X Press the :button to select Yes and
press the abutton to confirm.
You can reset the values of the following func-
tions:
R Trip meter
R trip computer "From start"
R trip computer "From reset" Navigation menu
Displaying navigation instructions In the
Navi menu, the multifunction display
shows navigation instructions. For further information, see the separate
operating instructions.
X
Switch on the audio system with Becker ®
MAP PILOT or COMAND Online, see the
separate operating instructions.
X Press the =or; button on the steer-
ing wheel to select the Navi menu.
Route guidance not active :
Direction of travel
; Current street
Activated route guidance No change of direction announced
:
Distance to the destination
; Distance to the next change of direction
= Current street
? Symbol "follow the road's course" 216
Menus and submenusOn-board computer and displays
Page 228 of 357
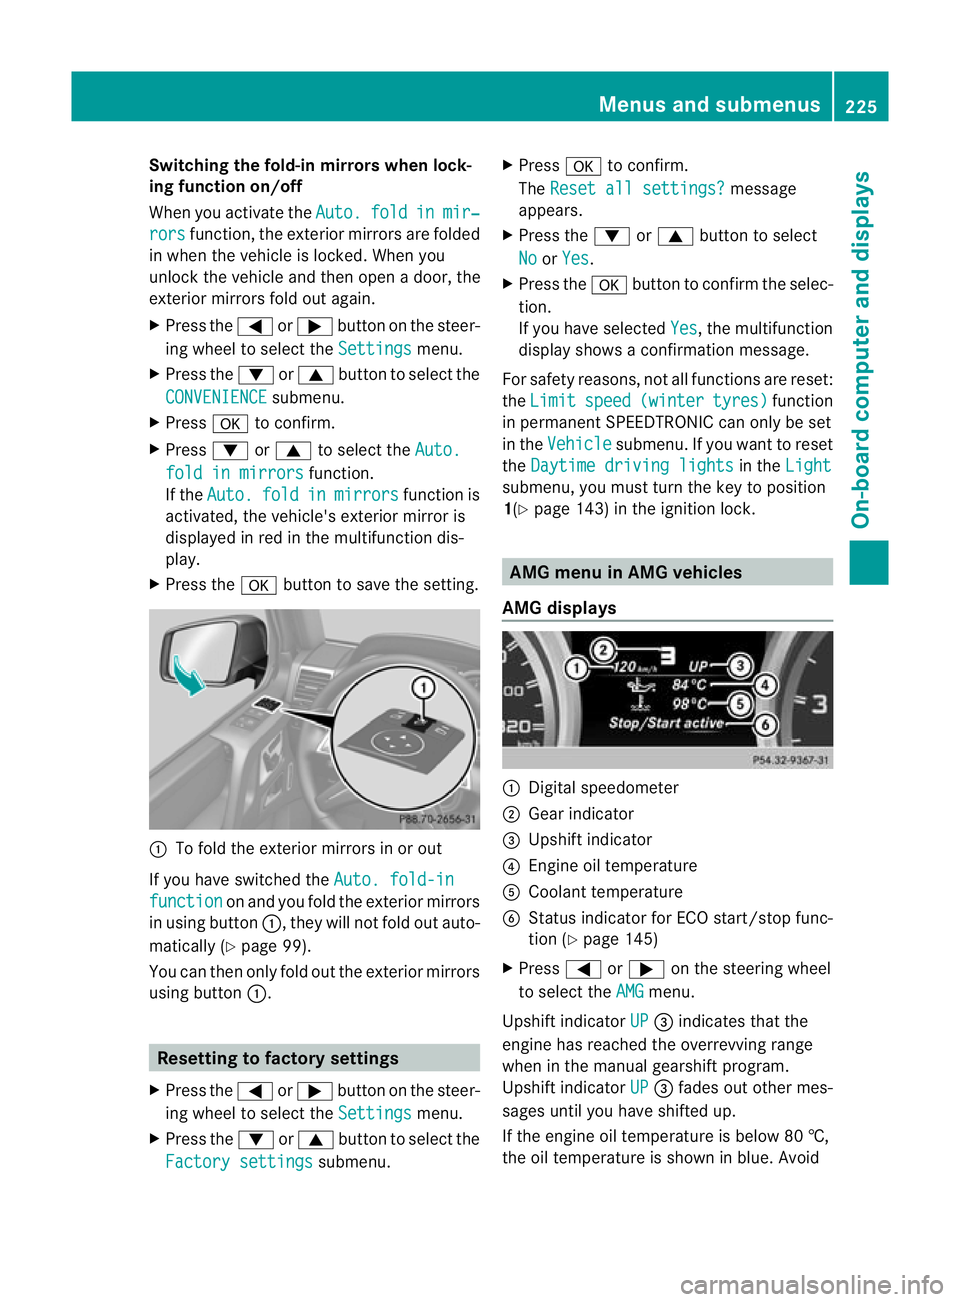
Switching the fold-in mirrors when lock-
ing function on/off
When you activate the
Auto. fold in mir‐
rors function, the exterior mirrors are folded
in when the vehicle is locked. When you
unlock the vehicle and then open a door, the
exterior mirrors fold out again.
X Press the =or; button on the steer-
ing wheel to select the Settings menu.
X Press the :or9 button to select the
CONVENIENCE submenu.
X Press ato confirm.
X Press :or9 to select the Auto. fold in mirrors function.
If the Auto. fold in mirrors function is
activated, the vehicle's exterior mirror is
displayed in red in the multifunction dis-
play.
X Press the abutton to save the setting. :
To fold the exterior mirrors in or out
If you have switched the Auto. fold-infunction on and you fold the exterior mirrors
in using button :, they will not fold out auto-
matically (Y page 99).
You can then only fold out the exterior mirrors
using button :. Resetting to factory settings
X Press the =or; button on the steer-
ing wheel to select the Settings menu.
X Press the :or9 button to select the
Factory settings submenu.X
Press ato confirm.
The Reset all settings? message
appears.
X Press the :or9 button to select
No or
Yes .
X Press the abutton to confirm the selec-
tion.
If you have selected Yes , the multifunction
display shows a confirmation message.
For safety reasons, not all functions are reset:
the Limit speed (winter tyres) function
in permanent SPEEDTRONIC can only be set
in the Vehicle submenu. If you want to reset
the Daytime driving lights in the
Light submenu, you must turn the key to position
1(Y
page 143) in the ignition lock. AMG menu in AMG vehicles
AMG displays :
Digital speedometer
; Gear indicator
= Upshift indicator
? Engine oil temperature
A Coolant temperature
B Status indicator for ECO start/stop func-
tion (Y page 145)
X Press =or; on the steering wheel
to select the AMG menu.
Upshift indicator UP =
indicates that the
engine has reached the overrevving range
when in the manual gearshift program.
Upshift indicator UP =
fades out other mes-
sages until you have shifted up.
If the engine oil temperature is below 80 †,
the oil temperature is shown in blue. Avoid Menus and submenus
225On-board computer and displays Z
Page 230 of 357
X
Press the %button on the steering
wheel.
X Press ato confirm Yes .
The RACETIMER is interrupted if you stop the
vehicle and turn the key to position
1(Y page 143) in the ignition lock. If you turn
the key to position 2or 3(Y page 143) and
then press ato confirm Start , timing is
continued.
Resetting the current lap
X Stop the RACETIMER (Y page 226).
X Press =or; to select Reset Lap .
X Press ato reset the lap time to "0".
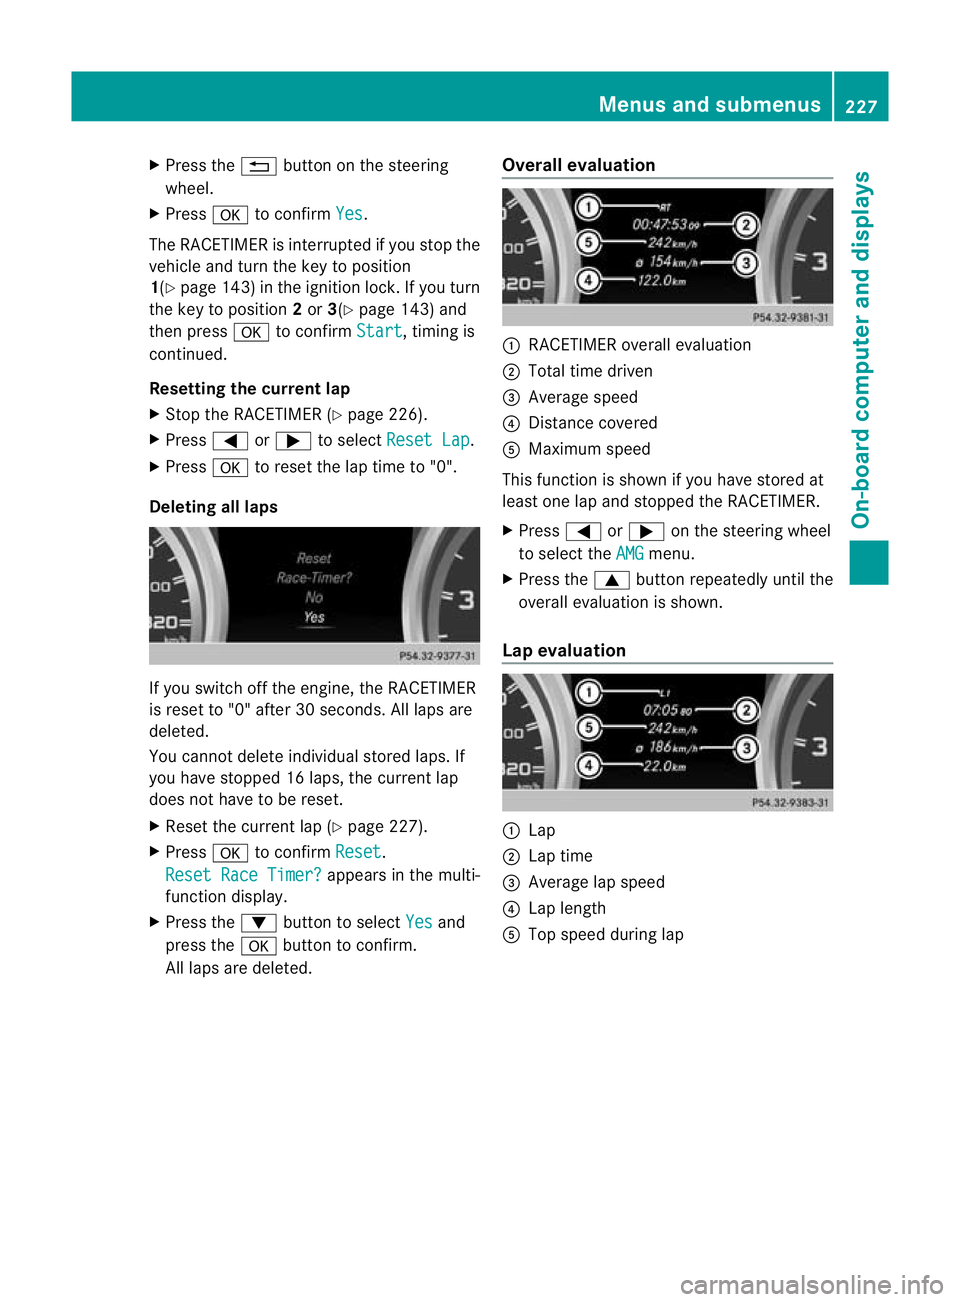
Deleting all laps If you switch off the engine, the RACETIMER
is reset to "0" after 30 seconds. All laps are
deleted.
You cannot delete individual stored laps. If
you have stopped 16 laps, the curren tlap
does no thave to be reset.
X Reset the curren tlap (Y page 227).
X Press ato confirm Reset .
Reset Race Timer? appears in the multi-
function display.
X Press the :button to select Yes and
press the abutton to confirm.
All laps are deleted. Overall evaluation :
RACETIMER overall evaluation
; Total time driven
= Average speed
? Distance covered
A Maximum speed
This function is shown if you have stored at
least one lap and stopped th eRACETIMER.
X Press =or; on the steering wheel
to select the AMG menu.
X Press the 9button repeatedly until the
overall evaluation is shown.
Lap evaluation :
Lap
; Lap time
= Average lap speed
? Lap length
A Top speed during lap Menus and submenus
227On-board computer and displays Z
Page 314 of 357
In order for the battery to achieve the maxi-
mum possible service life, it must always be
sufficiently charged.
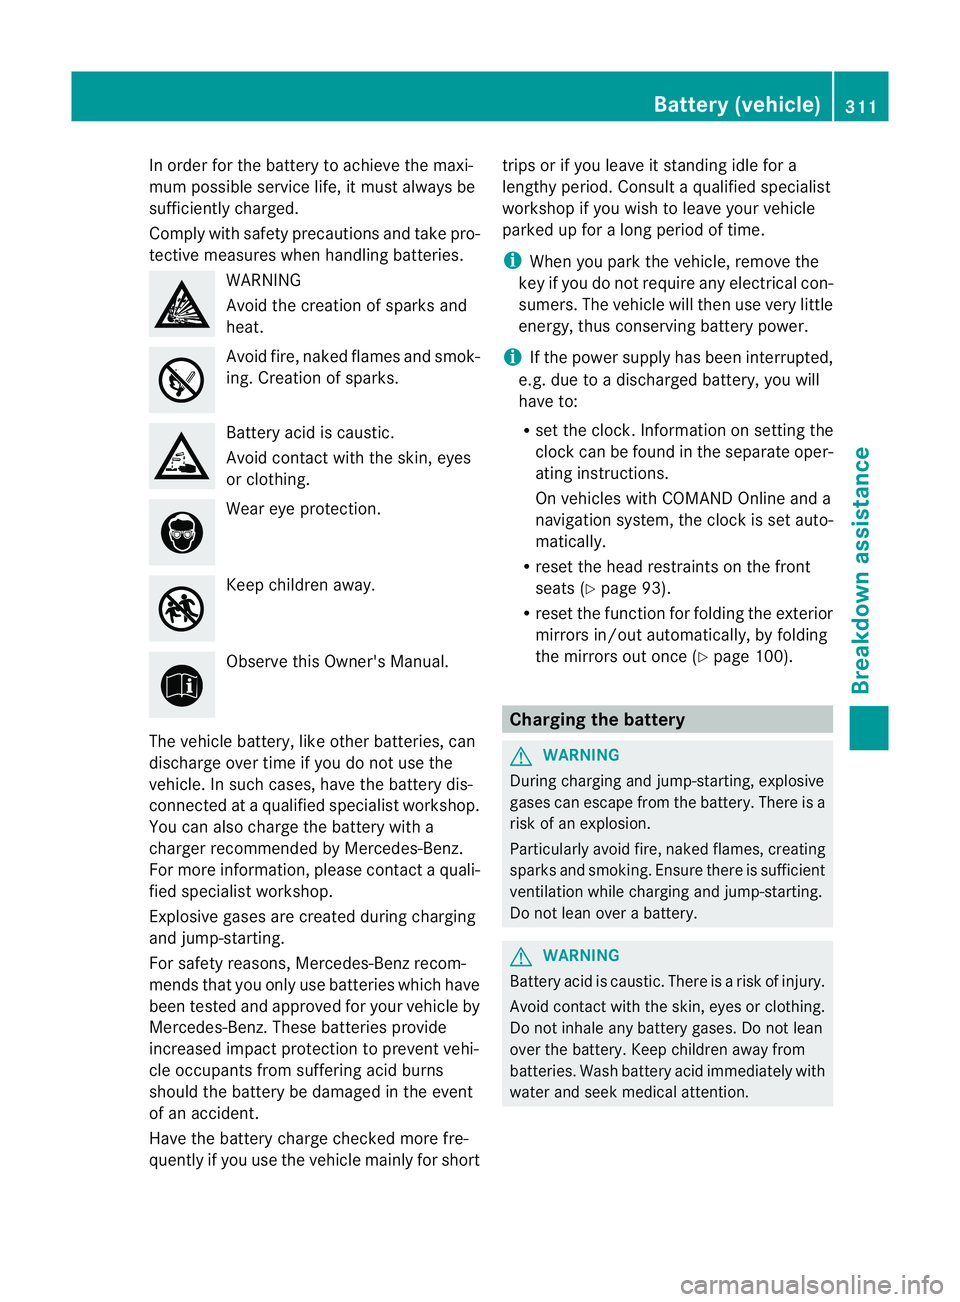
Comply with safety precautions and take pro-
tective measures when handling batteries. WARNING
Avoid the creation of sparks and
heat.
Avoid fire, naked flames and smok-
ing. Creation of sparks.
Battery acid is caustic.
Avoid contact with the skin, eyes
or clothing.
Wear eye protection.
Keep childre
naway. Observe this Owner's Manual.
The vehicle battery, like other batteries, can
discharge over time if you do not use the
vehicle. In such cases, have the battery dis-
connected at a qualified specialist workshop.
You can also charge the battery with a
charger recommended by Mercedes-Benz.
For more information, please contac taquali-
fied specialist workshop.
Explosive gases are created during charging
and jump-starting.
For safety reasons, Mercedes-Benz recom-
mends that you only use batteries which have
been tested and approved for your vehicle by
Mercedes-Benz .These batteries provide
increased impact protection to prevent vehi-
cle occupants from suffering acid burns
should the battery be damaged in the event
of an accident.
Have the battery charge checked more fre-
quently if you use the vehicle mainly for short trips or if you leave it standing idle for a
lengthy period. Consult a qualified specialist
workshop if you wish to leave your vehicle
parked up for a long period of time.
i
When you park the vehicle, remove the
key if you do not require any electrical con-
sumers. The vehicle will then use very little
energy, thus conserving battery power.
i If the power supply has been interrupted,
e.g. due to a discharged battery, you will
have to:
R set the clock. Information on setting the
clock can be found in the separate oper-
ating instructions.
On vehicles with COMAND Online and a
navigation system, the clock is set auto-
matically.
R reset the head restraints on the front
seats (Y page 93).
R reset the function for folding the exterior
mirrors in/out automatically, by folding
the mirrors out once (Y page 100). Charging the battery
G
WARNING
During charging and jump-starting, explosive
gases can escape from the battery. There is a
risk of an explosion.
Particularly avoid fire, naked flames, creating
sparks and smoking. Ensure there is sufficient
ventilation while charging and jump-starting.
Do not lean over a battery. G
WARNING
Battery acid is caustic. There is a risk of injury.
Avoid contact with the skin, eyes or clothing.
Do not inhale any battery gases. Do not lean
over the battery. Keep children away from
batteries. Wash battery acid immediately with
water and seek medical attention. Battery (vehicle)
311Breakdown assistance Z
Page 320 of 357
Towing the vehicle with both axles on
the ground
It is important tha tyou observe the safety
instructions when towing away your vehicle
(Y page 315).
X Switch on the hazard warning lamps
(Y page 109).
i In order to signal a change of direction
when towing the vehicle with the hazard
warning lamps switched on, use the com-
bination switch as usual.Int his case, only
the turn signals for the desired direction
flash. When you reset the combination
switch, the hazard warning lamps start
flashing again.
X Turn the key to position 2in the ignition
lock (Y page 143).
X When the vehicle is stationary, depress the
brake pedal and keep it depressed.
X Shift the transfer case to neu-
tral(Y page 203).
X Shift the automatic transmission to posi-
tion N.
X Release the brake pedal.
X Release the parking brake (Y page 164).
i The transmission can only change gear
when the battery has sufficient charge.
If you cannot move the selector lever to N,
you must remove the propeller shafts to the
driven axles. Transporting the vehicle
! Only lash the vehicle down by the wheels
or wheel rims, not by parts of the vehicle
such as axle or steering components. Oth-
erwise, the vehicle could be damaged.
Use the towing eyes to pull the vehicle if it
needs to be transported on a trailer or trans-
porter (Y page 316).
X Apply the parking brake.
X Turn the key to position 2in the ignition
lock (Y page 143). X
Move the selector lever to N.
X Shift the transfer case to neu-
tral(Y page 203).
X Secure the towing cable to the towing eyes
(Y page 316).
X Make sure that the vehicle cannot roll
away.
X Release the parking brake.
X Load the vehicle onto the transporter.
As soon as the vehicle is loaded:
X Apply the parking brake.
X Shift the automatic transmission to posi-
tion P.
X Turn the key to position 0in the ignition
lock (Y page 143) and remove it.
X Secure the vehicle. Recovering
avehicle that has become
stuck
! When recovering a trapped vehicle, do not
jerk the vehicle or pull it at an angle. If the
tractive power is too high, the vehicles
could be damaged.
If the drive wheels get trapped on loose or
muddy ground, recover th evehicle with the
utmost care, especially so if the vehicle is
laden.
Never attempt to recover a vehicle with a
trailer attached.
Pull out the vehicle backwards, if possible,
using the tracks it made when it became
stuck. Towing in the event of malfunctions
General notes !
If you are removing the propeller shaft,
use M10 nuts as spacers on the M8 bolts
and secure them with M8 nuts.
New self-locking nuts must be used when
the propeller shafts are refitted. Towing and tow-starting
317Breakdown assistance Z