wheel MERCEDES-BENZ G-CLASS SUV 2012 Workshop Manual
[x] Cancel search | Manufacturer: MERCEDES-BENZ, Model Year: 2012, Model line: G-CLASS SUV, Model: MERCEDES-BENZ G-CLASS SUV 2012Pages: 357, PDF Size: 8.86 MB
Page 154 of 357
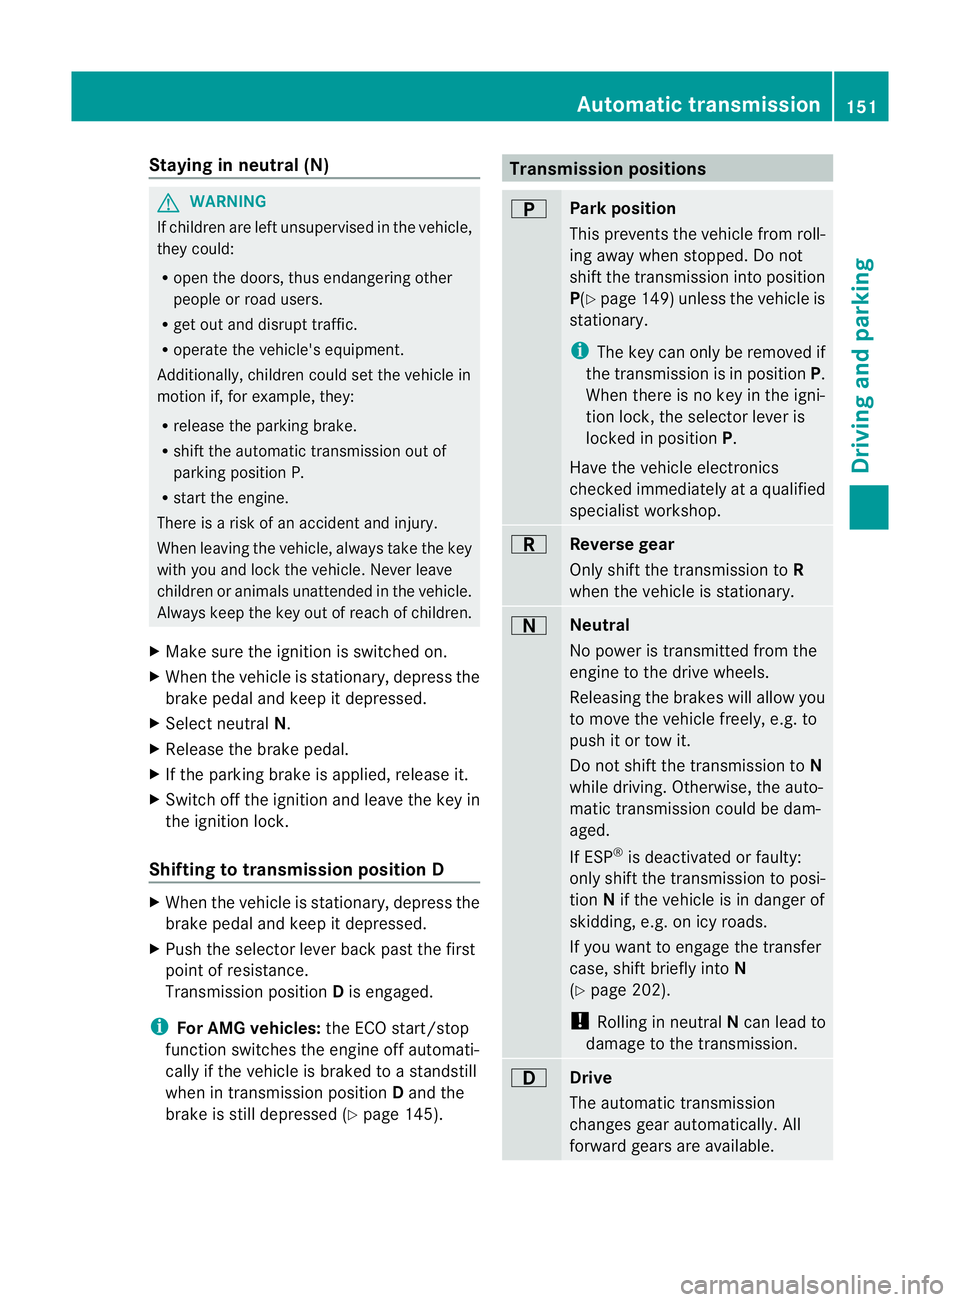
Staying in neutral (N)
G
WARNING
If children are left unsupervised in the vehicle,
they could:
R open the doors, thus endangering other
people or road users.
R get out and disrupt traffic.
R operate the vehicle's equipment.
Additionally, children could set the vehicle in
motion if, for example, they:
R release the parking brake.
R shift the automatic transmission out of
parking position P.
R start the engine.
There is a risk of an accident and injury.
When leaving the vehicle, always take the key
with you and lock the vehicle. Never leave
children or animals unattended in the vehicle.
Always keep the key out of reach of children.
X Make sure the ignition is switched on.
X When the vehicle is stationary, depress the
brake pedal and keep it depressed.
X Select neutral N.
X Release the brake pedal.
X If the parking brake is applied, release it.
X Switch off the ignition and leave the key in
the ignition lock.
Shifting to transmission position D X
When the vehicle is stationary, depress the
brake pedal and keep it depressed.
X Push the selector lever back past the first
point of resistance.
Transmission position Dis engaged.
i For AMG vehicles: the ECO start/stop
function switches the engine off automati-
cally if the vehicle is braked to a standstill
when in transmission position Dand the
brake is still depressed (Y page 145). Transmission positions
B
Park position
This prevents the vehicle from roll-
ing away when stopped. Do not
shift the transmission into position
P(Y
page 149) unless the vehicle is
stationary.
i The key can only be removed if
the transmission is in position P.
When there is no key in the igni-
tion lock, the selector lever is
locked in position P.
Have the vehicle electronics
checked immediately at a qualified
specialist workshop. C
Reverse gear
Only shift the transmission to
R
when the vehicle is stationary. A
Neutral
No power is transmitted from the
engine to the drive wheels.
Releasing the brakes will allow you
to move the vehicle freely, e.g. to
push it or tow it.
Do not shift the transmission to N
while driving. Otherwise, the auto-
matic transmission could be dam-
aged.
If ESP ®
is deactivated or faulty:
only shift the transmission to posi-
tion Nif the vehicle is in danger of
skidding, e.g. on icy roads.
If you want to engage the transfer
case, shift briefly into N
(Y page 202).
! Rolling in neutral Ncan lead to
damage to the transmission. 7
Drive
The automatic transmission
changes gear automatically. All
forward gears are available. Automatic transmission
151Driving and parking Z
Page 156 of 357
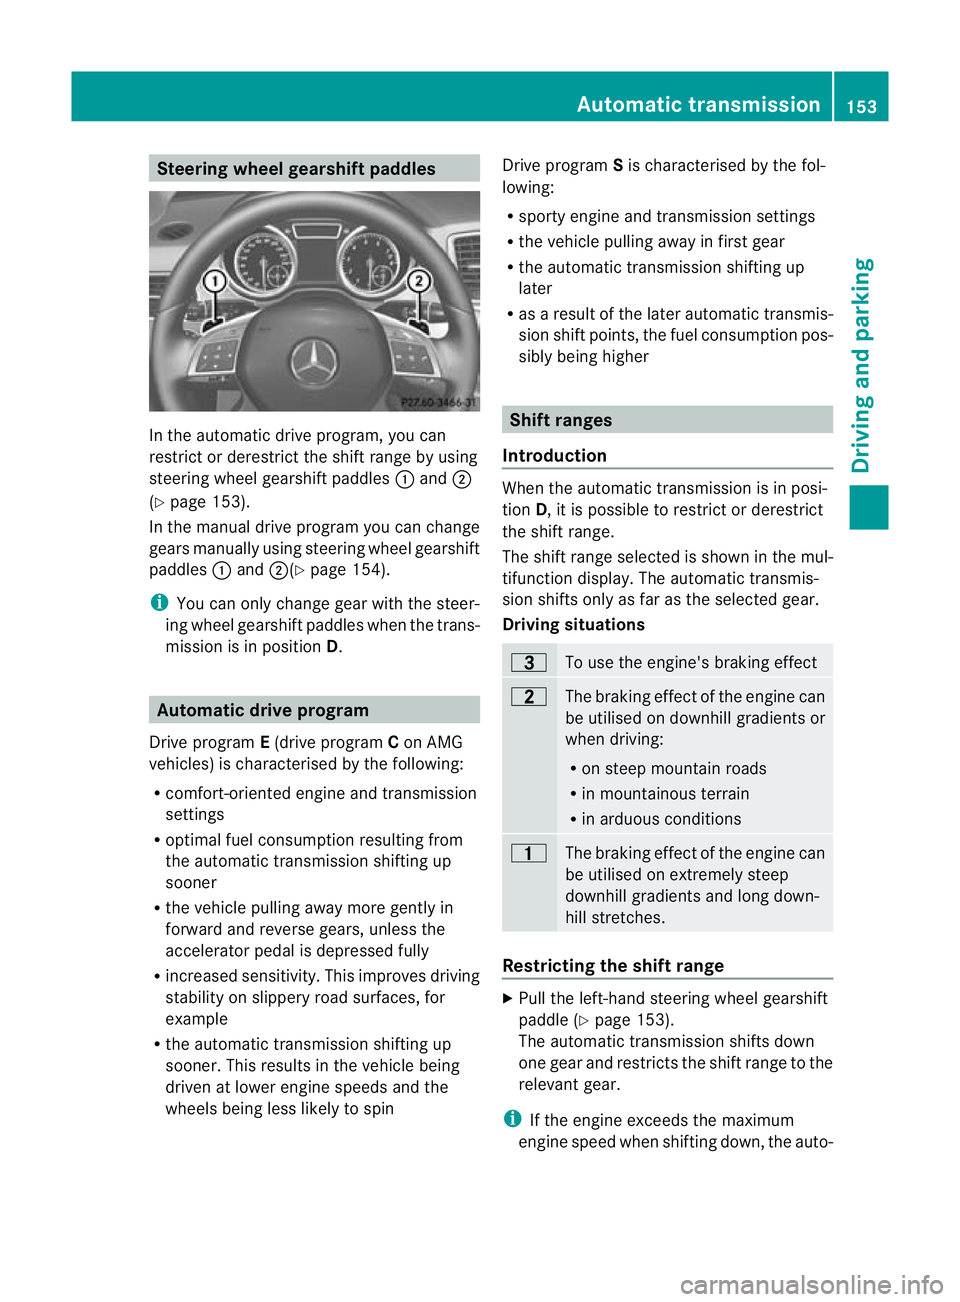
Steering wheel gearshift paddles
In the automatic drive program, you can
restrict or derestrict the shift range by using
steering wheel gearshift paddles :and ;
(Y page 153).
In the manual drive program you can change
gears manually using steering wheel gearshift
paddles :and ;(Y page 154).
i You can only change gear with the steer-
ing wheel gearshift paddles when the trans-
mission is in position D.Automatic drive program
Drive program E(drive program Con AMG
vehicles) is characterised by the following:
R comfort-oriented engine and transmission
settings
R optimal fuel consumption resulting from
the automatic transmission shifting up
sooner
R the vehicle pulling away more gently in
forward and reverse gears, unless the
accelerator pedal is depressed fully
R increased sensitivity. This improves driving
stability on slippery road surfaces, for
example
R the automatic transmission shifting up
sooner. This results in the vehicle being
driven at lower engine speeds and the
wheels being less likely to spin Drive program
Sis characterised by the fol-
lowing:
R sporty engine and transmission settings
R the vehicle pulling away in first gear
R the automatic transmission shifting up
later
R as a result of the later automatic transmis-
sion shift points, the fuel consumption pos-
sibly being higher Shift ranges
Introduction When the automatic transmission is in posi-
tion
D, it is possible to restrictord erestrict
the shift range.
The shift range selected is shown in the mul-
tifunction display. The automatic transmis-
sion shifts only as far as the selected gear.
Driving situations =
To use the engine's brakin
geffect 5
The braking effect of the engine can
be utilised on downhill gradients or
whe
ndriving:
R on steep mountai nroads
R in mountainous terrain
R in arduous conditions 4
The braking effect of the engine can
be utilised on extremely steep
downhill gradients and long down-
hill stretches.
Restricting the shift range
X
Pull the left-hand steerin gwheel gearshift
paddle (Y page 153).
The automatic transmission shifts down
one gear and restricts the shift range to the
relevant gear.
i If the engine exceeds the maximum
engine speed when shifting down, the auto- Automatic transmission
153Driving and parking Z
Page 157 of 357
matic transmission protects against engine
damage by not shifting down.
i If the maximu mengine speed for the shift
range is reached and you continue to accel-
erate, the automatic transmission shifts up
in order to prevent the engine from over-
revving, eve nifthe shift range is restricted.
Extending the shift range X
Pull the right-hand steering wheel gearshift
paddle (Y page 153).
The automatic transmission shifts up one
gear and restricts the shift range to the rel-
evant gear.
Clearing the shift range restriction X
Pull and hold the right-hand steering wheel
gearshift paddle (Y page 153) untilDis
shown again in the multifunction display.
The automatic transmission shifts from the
current shift range directly to D.
Selecting the ideal shift range X
Pull the left-hand steering wheel gearshift
paddle (Y page 153) and hold it in position.
The automatic transmission shifts to the
gear which allows optimum acceleration
and deceleration. To do this, the automatic
transmission shifts down one or more
gears.
i The automatic transmission cannot shift
down beyond second gear. To shift to first
gear, you have to pull the left steering
wheel gearshift paddle. Manual drive program
Introduction In drive program
M, you can change gear
manually using the steering wheel gearshift
paddles. For this, the transmission must be in
position D.The gear currently selected and engaged is shown in the multifunction dis-
play.
Manual drive program
Mdiffers from drive
programs Eand Swith regard to spontaneity,
responsiveness and smoothness of gear
changes.
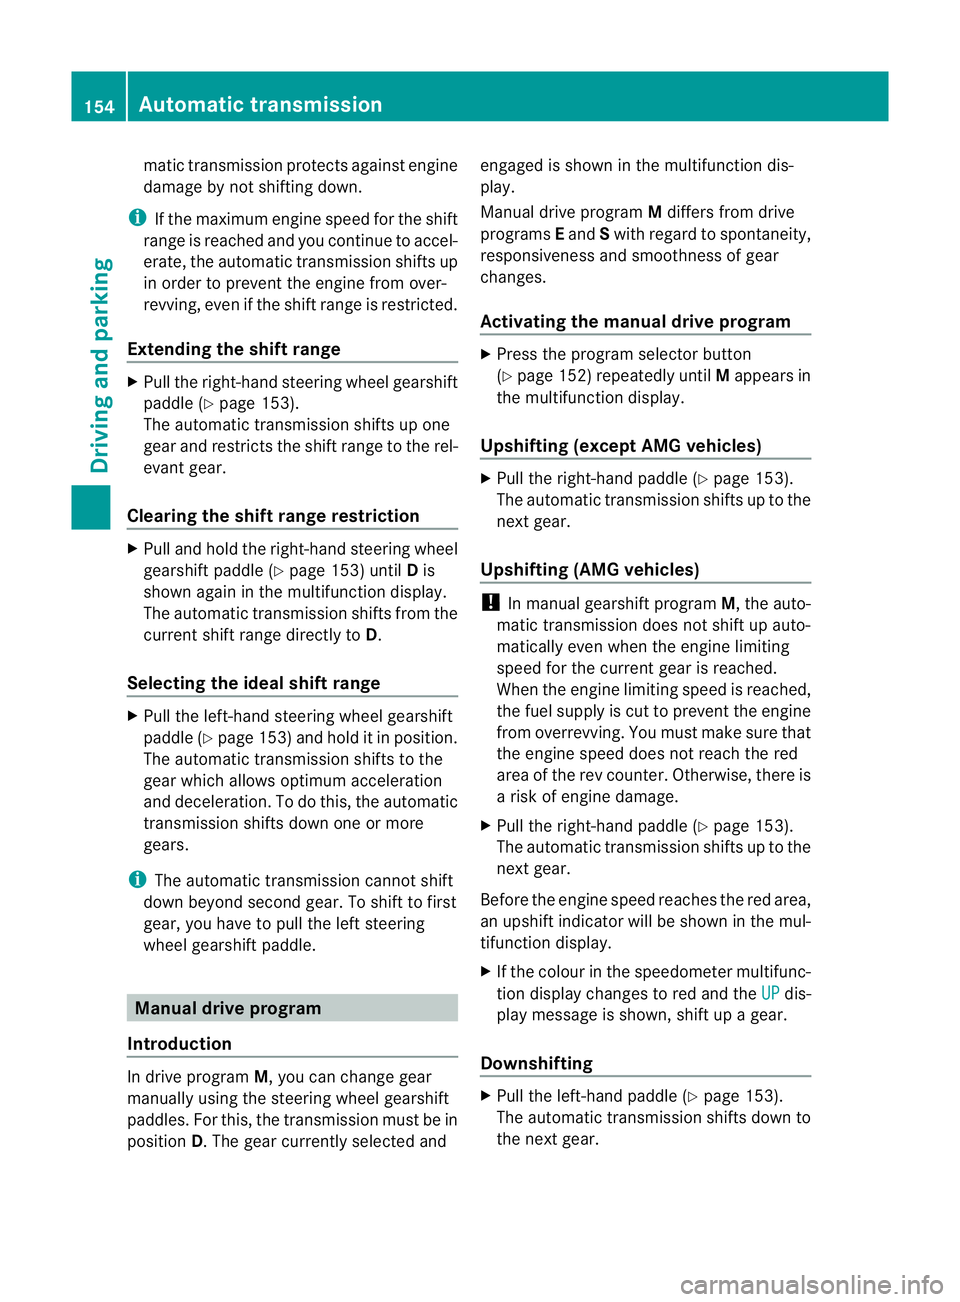
Activating the manual drive program X
Press the program selector button
(Y page 152) repeatedly until Mappears in
the multifunction display.
Upshifting (except AMG vehicles) X
Pull the right-hand paddle (Y page 153).
The automatic transmission shifts up to the
next gear.
Upshifting (AMG vehicles) !
In manual gearshift program M, the auto-
matic transmission does not shift up auto-
matically even when the engine limiting
speed for the current gear is reached.
When the engine limiting speed is reached,
the fuel supply is cut to prevent the engine
from overrevving. You must make sure that
the engine speed does not reach the red
area of the rev counter. Otherwise, there is
a risk of engine damage.
X Pull the right-hand paddle (Y page 153).
The automatic transmission shifts up to the
next gear.
Before the engine speed reaches the red area,
an upshift indicator will be shown in the mul-
tifunction display.
X If the colour in the speedometer multifunc-
tion display changes to red and the UP dis-
play message is shown, shift up a gear.
Downshifting X
Pull the left-hand paddle (Y page 153).
The automatic transmission shifts down to
the next gear. 154
Automatic transmissionDriving and parking
Page 158 of 357
i
If you slow down or stop withou tshifting
down, the automatic transmission auto-
matically shifts down.
Selecting the optimal gear for maxi-
mum acceleration X
Pull the left-hand steering wheel gearshift
paddle until the transmission selects the
optimum gear for the current speed.
Kickdown You can also use kickdown for maximum
acceleration in manual drive program
M.
X Depress the accelerator pedal beyond the
pressure point.
The transmission shifts to a lower gear
depending on the engine speed.
X Shift back up once the desired speed is
reached.
i Vehicles with an AMG engine: it is not
possible to use kickdown in manual drive
program M.
i Vehicles without an AMG engine: if you
apply full throttle, the automatic transmis-
sion shifts up to the next gear when the
maximum engine speed is reached. This
prevents the engine from overrevving.
Deactivating the manual drive program X
Press the program selector button
(Y page 152) repeatedly until E(C in AMG
vehicles) or Sappears in the multifunction
display. Automatic transmission
155Driving and parking Z
Page 161 of 357
X
Turn the fuel filler cap anti-clockwise and
remove it.
AdBlue ®
vehicles: do not confuse the fuel
filler cap with the blue AdBlue ®
filler cap.
X Insert the fuel filler cap into the holder
bracket on the inside of filler flap ?.
i AdBlue ®
vehicles do not have a bracket
on the inside of the filler flap.
X Completely insert the filler neck of the fuel
pump nozzle into the tank and refuel.
i Do not add any more fuel after the pump
stops filling for the first time. Otherwise,
fuel may leak out.
Closing X
Replace the fuel filler cap and turn it clock-
wise. The fuel filler cap audibly engages.
X Press the fuel filler flap closed until it
engages. Fuel filler flap emergency release
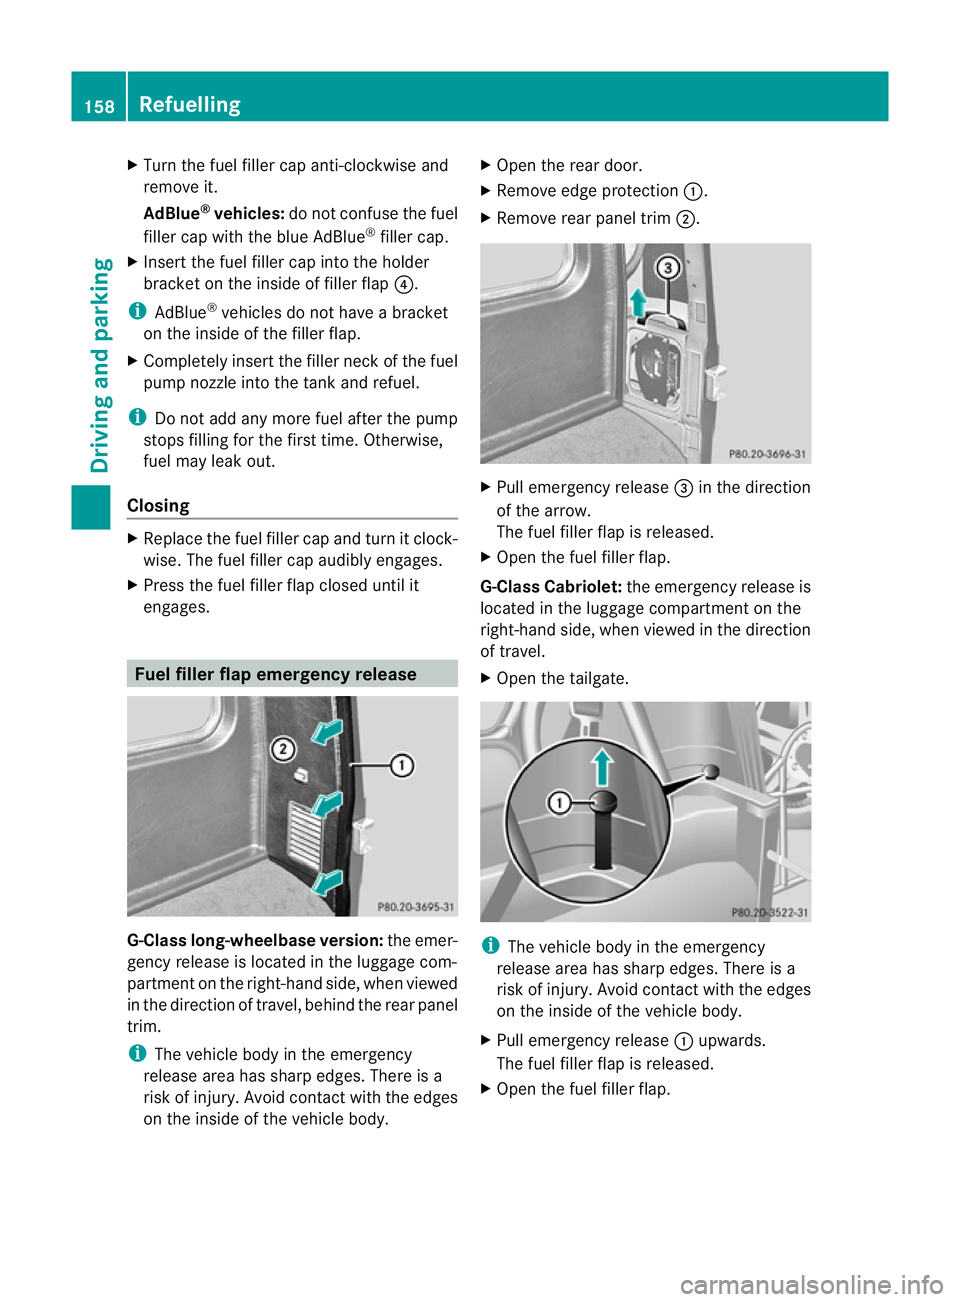
G-Class long-wheelbase version:
the emer-
gency release is located in the luggage com-
partmen tonthe right-hand side, when viewed
in the direction of travel, behind the rear panel
trim.
i The vehicle body in the emergency
release area has sharp edges. There is a
risk of injury. Avoid contact with the edges
on the inside of the vehicle body. X
Open the rear door.
X Remove edge protection :.
X Remove rear panel trim ;. X
Pull emergency release =in the direction
of the arrow.
The fuel filler flap is released.
X Open the fuel filler flap.
G-Class Cabriolet: the emergency release is
located in the luggage compartmentont he
right-hand side, when viewed in the direction
of travel.
X Open the tailgate. i
The vehicle body in the emergency
release area has sharp edges. There is a
risk of injury. Avoid contact with the edges
on the inside of the vehicle body.
X Pull emergency release :upwards.
The fuel filler flap is released.
X Open the fuel filler flap. 158
RefuellingDriving and parking
Page 166 of 357
X
Turn AdBlue ®
refill bottle :anti-clockwise
and remove it.
X Screw the protective cap onto AdBlue ®
refill bottle :again.
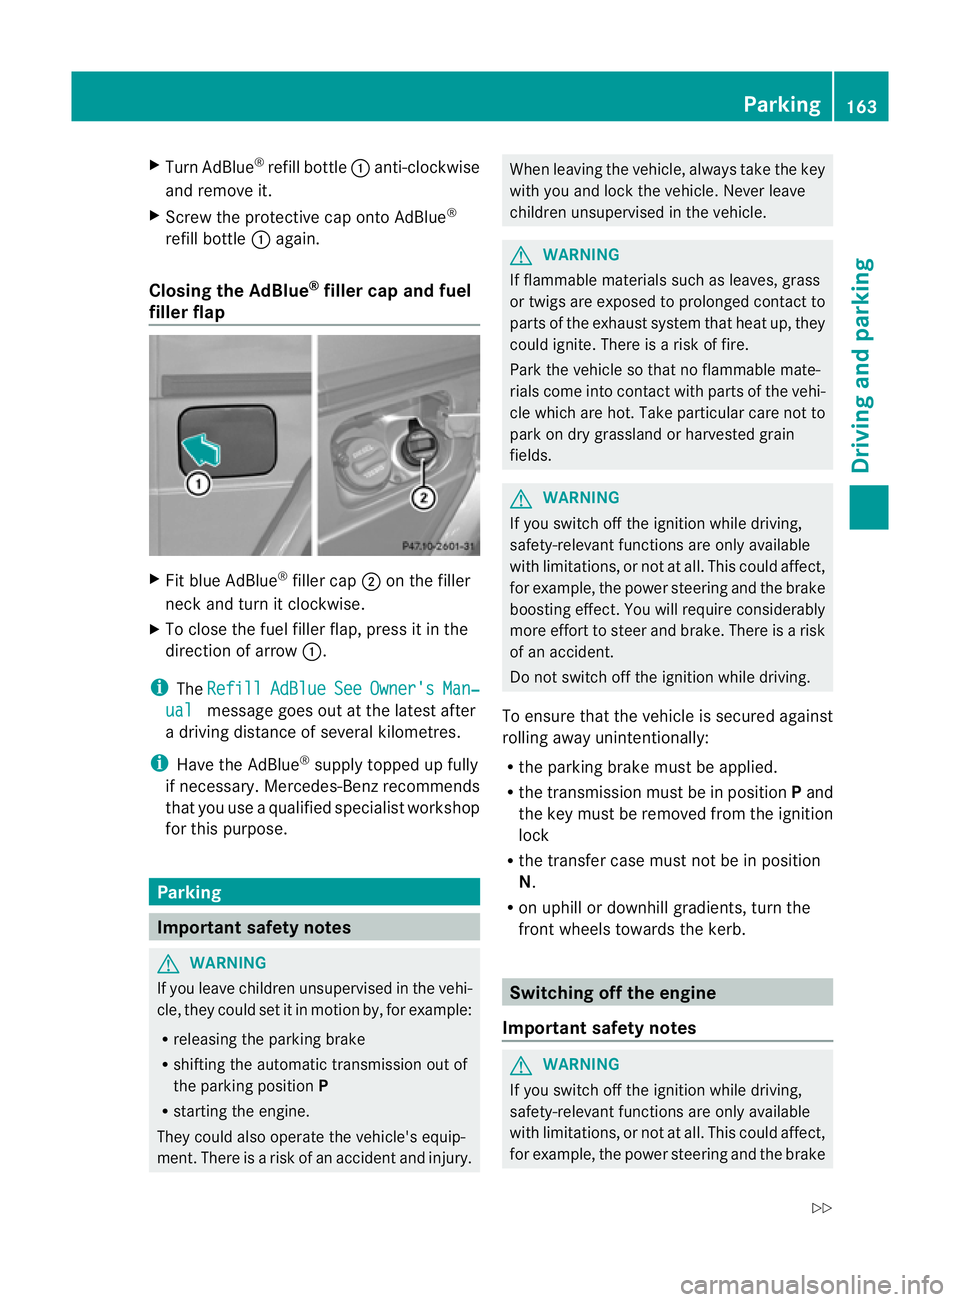
Closing the AdBlue ®
filler cap and fuel
filler flap X
Fit blue AdBlue ®
filler cap ;on the filler
neck and turn it clockwise.
X To close the fuel filler flap, press it in the
direction of arrow :.
i The Refill AdBlue See Owner's Man‐
ual message goes out at the latest after
a driving distance of several kilometres.
i Have the AdBlue ®
supply topped up fully
if necessary. Mercedes-Benz recommends
that you use a qualified specialist workshop
for this purpose. Parking
Important safety notes
G
WARNING
If you leave children unsupervised in the vehi-
cle, they could set it in motion by, for example:
R releasing the parking brake
R shifting the automatic transmission out of
the parking position P
R starting the engine.
They could also operate the vehicle's equip-
ment.T here is a risk of an accident and injury. When leaving the vehicle, always take the key
with you and lock the vehicle. Never leave
children unsupervised in the vehicle.
G
WARNING
If flammable materials such as leaves, grass
or twigs are exposed to prolonged contact to
parts of the exhaust system that heat up, they
could ignite. There is a risk of fire.
Park the vehicle so that no flammable mate-
rials come into contact with parts of the vehi-
cle which are hot. Take particular care not to
park on dry grassland or harvested grain
fields. G
WARNING
If you switch off the ignition while driving,
safety-relevant functions are only available
with limitations, or not at all. This could affect,
for example, the power steering and the brake
boosting effect.Y ou will require considerably
more effort to steer and brake. There is a risk
of an accident.
Do not switch off the ignition while driving.
To ensure that the vehicle is secured against
rolling away unintentionally:
R the parking brake must be applied.
R the transmission must be in position Pand
the key must be removed from the ignition
lock
R the transfer case must not be in position
N.
R on uphill or downhill gradients, turn the
front wheels towards the kerb. Switching off the engine
Important safety notes G
WARNING
If you switch off the ignition while driving,
safety-relevant functions are only available
with limitations, or not at all. This could affect,
for example, the power steering and the brake Parking
163Driving and parking
Z
Page 167 of 357
boosting effect. You will require considerably
more effor
tto steer and brake. There is a risk
of an accident.
Do not switch off the ignition while driving.
Vehicles with automatic transmission X
Shift the transmission to position P.
X Turn the key to position 0in the ignition
lock (Y page 143) and remove it.
The immobiliser is activated.
X Apply the parking brake firmly.
X Turn the steering wheel until the steering
wheel lock engages.
i If you switch the engine off with the trans-
mission in position Ror D, the automatic
transmission shifts to Nautomatically.
If you then open one of the front doors or
remove the key from the ignition, the auto-
matic transmission shifts to P.
If you shift the automatic transmission to
N before switching off the engine, the auto-
matic transmission remains in Neven if a
door is opened.
i The key can only be removed if the auto-
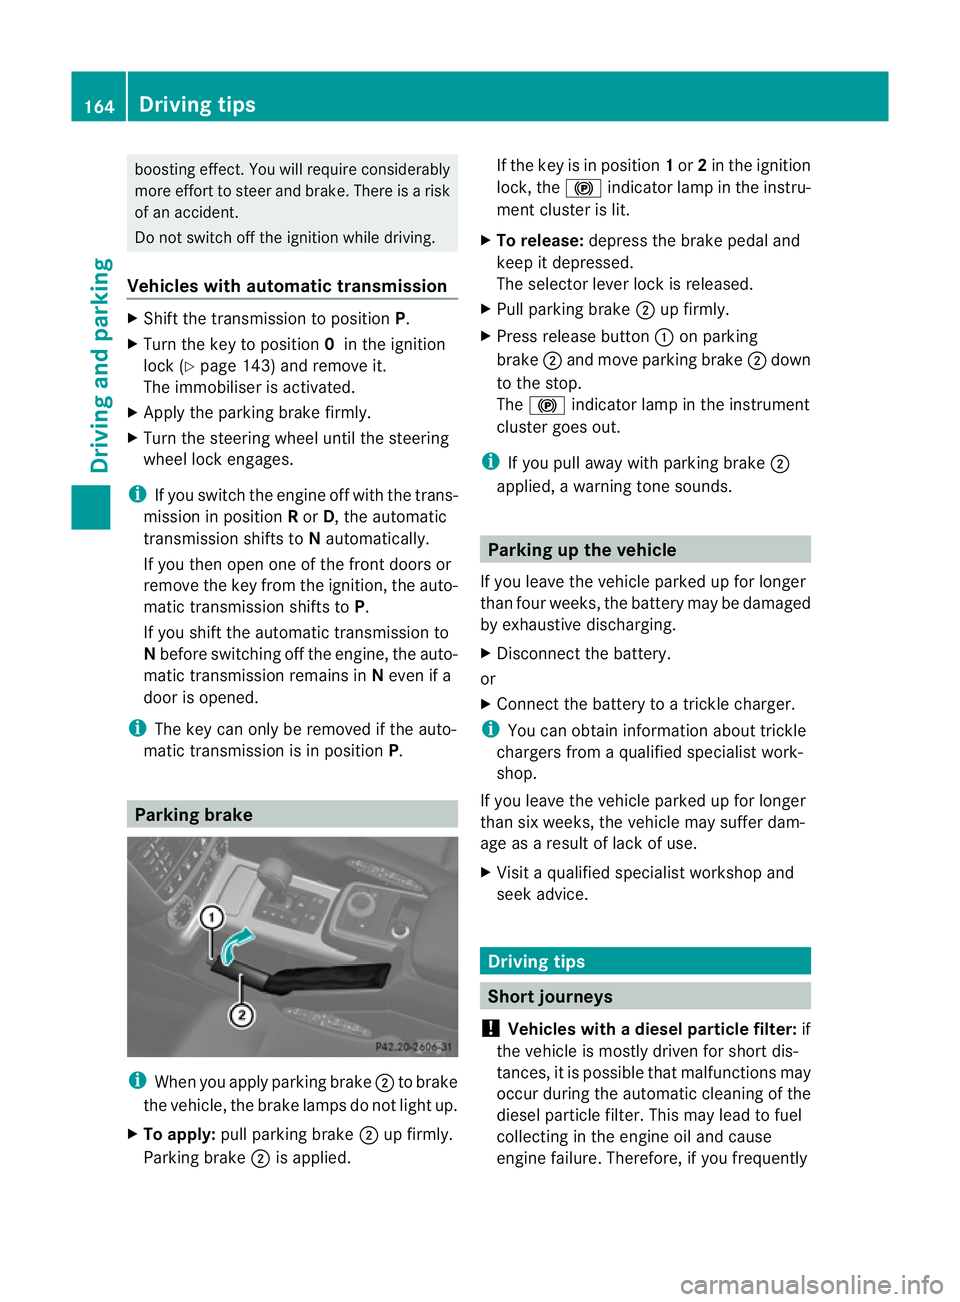
matic transmission is in position P.Parking brake
i
When you apply parking brake ;to brake
the vehicle, the brake lamps do not light up.
X To apply: pull parking brake ;up firmly.
Parking brake ;is applied. If the key is in position
1or 2in the ignition
lock, the !indicator lamp in the instru-
ment cluster is lit.
X To release: depress the brake pedal and
keep it depressed.
The selector lever lock is released.
X Pull parking brake ;up firmly.
X Press release button :on parking
brake ;and move parking brake ;down
to the stop.
The ! indicator lamp in the instrument
cluster goes out.
i If you pull away with parking brake ;
applied, a warning tone sounds. Parking up the vehicle
If you leave the vehicle parked up for longer
than four weeks, the battery may be damaged
by exhaustive discharging.
X Disconnect the battery.
or
X Connect the battery to a trickle charger.
i You can obtain information about trickle
chargers from a qualified specialist work-
shop.
If you leave the vehicle parked up for longer
than six weeks, the vehicle may suffer dam-
age as a result of lack of use.
X Visit a qualified specialist workshop and
seek advice. Driving tips
Short journeys
! Vehicles with adiesel particle filter: if
the vehicle is mostly driven for short dis-
tances, it is possible that malfunctions may
occur during the automatic cleaning of the
diesel particle filter. This may lead to fuel
collecting in the engine oil and cause
engine failure. Therefore, if you frequently 164
Driving tipsDriving and parking
Page 168 of 357
drive short distances, you should take a 20
minute trip on a motorway or rural road at
least every 500km. Brakes
Important safety notes G
WARNING
If you shift down on a slippery road surface in
an attempt to increase the engine's braking
effect, the drive wheels could lose their grip.
This increases the risk of skidding and having
an accident.
Do not shift down for additional engine brak-
ing on a slippery road surface.
Downhill gradients On long and steep downhill gradients, espe-
cially if the vehicle is laden or towing a trailer,
you must select shift range
1,2or 3
(Y page 153) in good time.
i This also applies if you have activated
cruise control or SPEEDTRONIC.
This will use the braking effec tofthe engine,
so less braking will be required to prevent the
vehicle from gaining speed. This relieves the
load on the brake system and prevents the
brakes from overheating and wearing too
quickly. If you need additional braking,
depress the brake pedal repeatedly rather
than continuously.
Heavy and light loads G
WARNING
The braking system can overheat if you leave
your foot on the brake pedal while driving.
This increases the braking distance and could
even cause the braking system to fail. There
is a risk of an accident.
Never use the brake pedal as a footrest.Do
not simultaneously depress both the brake
pedal and the accelerato rpedal while driving. If the brakes have been subjected to a heavy
load, do not stop the vehicle immediately, but
drive on for a short while. This allows the air-
flow to cool the brakes more quickly.
If the brakes have been used only moderately,
you should occasionally test their effective-
ness. To do this, brake more firmly from a
higher speed. This improves the grip of the
brakes.
Wet road surfaces
If driving in heavy rain for a prolonged period
of time without braking, there may be a
delayed reaction from the brakes when brak-
ing for the first time. This may also occur after
the vehicle has been washed.
You have to depress the brake pedal more
firmly. Maintain a greater distance from the
vehicle in front.
After driving on a wet road or having the vehi-
cle washed, brake firmly while paying atten-
tion to the traffic conditions .This will warm
up the brake discs, thereby drying them more
quickly and protecting them against corro-
sion.
Limited braking performance on salt-
treated roads If you drive on salt-treated roads, a layer of
salt may form on the brake discs and pads.
This can increase the braking distance con-
siderably.
R
Apply the brakes occasionally in order to
prevent any salt build-up. Ensure that you
do not endanger other road users when
doing so.
R Carefully depress the brake pedal at the
end of the journey and when starting the
next journey.
R Maintain a much greater distance to the
vehicle in front. Driving tips
165Driving and parking Z
Page 169 of 357
New brake pads/linings
New brake pads/brake pads and discs that
have been replaced only achieve optimum
braking effect after several hundred kilome-
tres of driving. Compensate for the reduced
braking effect by applying greate rforce to the
brake pedal.
For safety reasons, Mercedes-Benz recom-
mends that you only have brake pads/linings
fitted to your vehicle which have been
approved for Mercedes-Benz vehicles or
which correspond to an equivalent quality
standard. Brake pads/linings which have not
been approved for Mercedes-Benz vehicles or
which are not of an equivalent quality could
affect your vehicle's operating safety.
High-performance brake system for
AMG vehicles The high-performance brake system is
designed for high loads. This may lead to
noise when braking. This is dependent on:
R speed
R braking force
R environmental conditions, such as temper-
ature and humidity.
The wear of individual components of the
brake system, such as the brake pads/linings
or brake discs, depends on the individual driv-
ing style and operating conditions.
For this reason, it is impossible to state a
mileage (service life) that will be valid under
all circumstances. An aggressive driving style
will lead to high wear. You can obtain further
information about this from your Mercedes-
Benz Service Centre.
Parking brake G
WARNING
If you must brake the vehicle with the parking
brake, the braking distance is considerably
longer and the wheels could lock. This increa-
ses the risk of skidding and an accident. Only use the parking brake to brake the vehi-
cle when the service brake is faulty. Do not
apply the parking brake too firmly. If the
wheels lock, release the parking brake until
the wheels begin turning again.
When you apply the parking brake to brake
the vehicle, the brake lamps do not light up.
If you drive on wet roads or dirt-covered sur-
faces, road salt and/or dirt could get into the
parking brake.
In order to prevent corrosion and a reduction
in the braking power of the parking brake,
observe the following:
R pull the parking brake upwards with the
release button depressed from time to time
before beginning the journey
(Y page 164).
R drive for approximately 100 m at a maxi-
mum speed of 20 km/h. Tyre traction
G
WARNING
Whereas the vehicle can be fully controlled at
a certain speed on dry roads, you must reduce
your speed on wet or icy roads to achieve the
same road safety. You could otherwise cause
an accident.
Pay particular attention to the road conditions
at temperatures around freezing point.
If ice has formed on the road surface (e.g.
from fog), a thin film of water rapidly forms on
the ice when you brake, considerably reduc-
ing tyre traction. Drive with particular care in
such weather conditions. Driving on slippery surfaces
! If possible, do not let the drive wheels
spin. Otherwise, you could damage the
drive train.
X Engage the differential locks if necessary
(Y page 204). 166
Driving tipsDriving and parking
Page 171 of 357
R
Clean any mud from the tyre tread after
fording.
R Apply the brakes to dry them after fording.
R Water offers a high degree of resistance,
the ground is slippery and ,insome cases,
unstable. Therefore, it is difficult and dan-
gerous to pull away in the water.
R Ensure that a bow wave does not form as
you drive.
R Clean any mud from the tyre tread after
fording.
R Apply the brakes to dry them after fording. Parking the vehicle after heavy loads
on the engine
! Vehicles with adiesel engine: your
vehicle's exhaust gas turbocharger may get
very hot under heavy engine load, e.g. dur-
ing:
R trailer towing
R longe rmotorway journeys at high speed
R longer journeys through mountainous
terrain
X Let the engine run for approximately
another two minutes while the vehicle is
stationary before switching off the engine.
This way, the exhaust gas turbocharger can
cool down more effectively. Winter driving
General notes G
DANGER
If the exhaust pipe is blocked or adequate
ventilation is not possible, poisonous gases
such as carbon monoxide (CO) may enter the
vehicle. This is the case, e.g. if the vehicle
becomes trapped in snow. There is a risk of
fatal injury.
If you leave the engine or the auxiliary heating
running, make sure the exhaust pipe and area
around the vehicle are clear of snow. To ensure an adequate supply of fresh air, open
a window on the side of the vehicle that is not
facing into the wind. G
WARNING
If you have fitted snow chains to the front
wheels, they may scrape against the vehicle
body or chassis components. This could
cause damage to the vehicle or the tyres.
There is a risk of an accident.
To avoid hazardous situations:
R never fit snow chains on the front wheels
R fit snow chains to the rear wheels in pairs.
At the onset of winter, have your vehicle win-
terproofed at a qualified specialist workshop.
Observe the notes in the "Winter operation"
section (Y page 323).
Driving with summer tyres Observe the notes in the "Winter operation"
section (Y
page 323).
Slippery road surfaces G
WARNING
If you shift down on a slippery road surface in
an attempt to increase the engine's braking
effect, the drive wheels could lose their grip.
This increases the risk of skidding and having
an accident.
Do not shift down for additional engine brak-
ing on a slippery road surface.
You should drive particularly carefully on slip-
pery road surfaces. Avoid sudden accelera-
tion, steering and braking manoeuvres.
If the vehicle threatens to skid or cannot be
stopped when moving at low speed:
X Move the transmission to position N.
X Try to bring the vehicle under control by
using corrective steering.
i For more information on driving with
snow chains, see (Y page 324).168
Driving tipsDriving and parking