lights MERCEDES-BENZ G-CLASS SUV 2012 Manual Online
[x] Cancel search | Manufacturer: MERCEDES-BENZ, Model Year: 2012, Model line: G-CLASS SUV, Model: MERCEDES-BENZ G-CLASS SUV 2012Pages: 357, PDF Size: 8.86 MB
Page 259 of 357
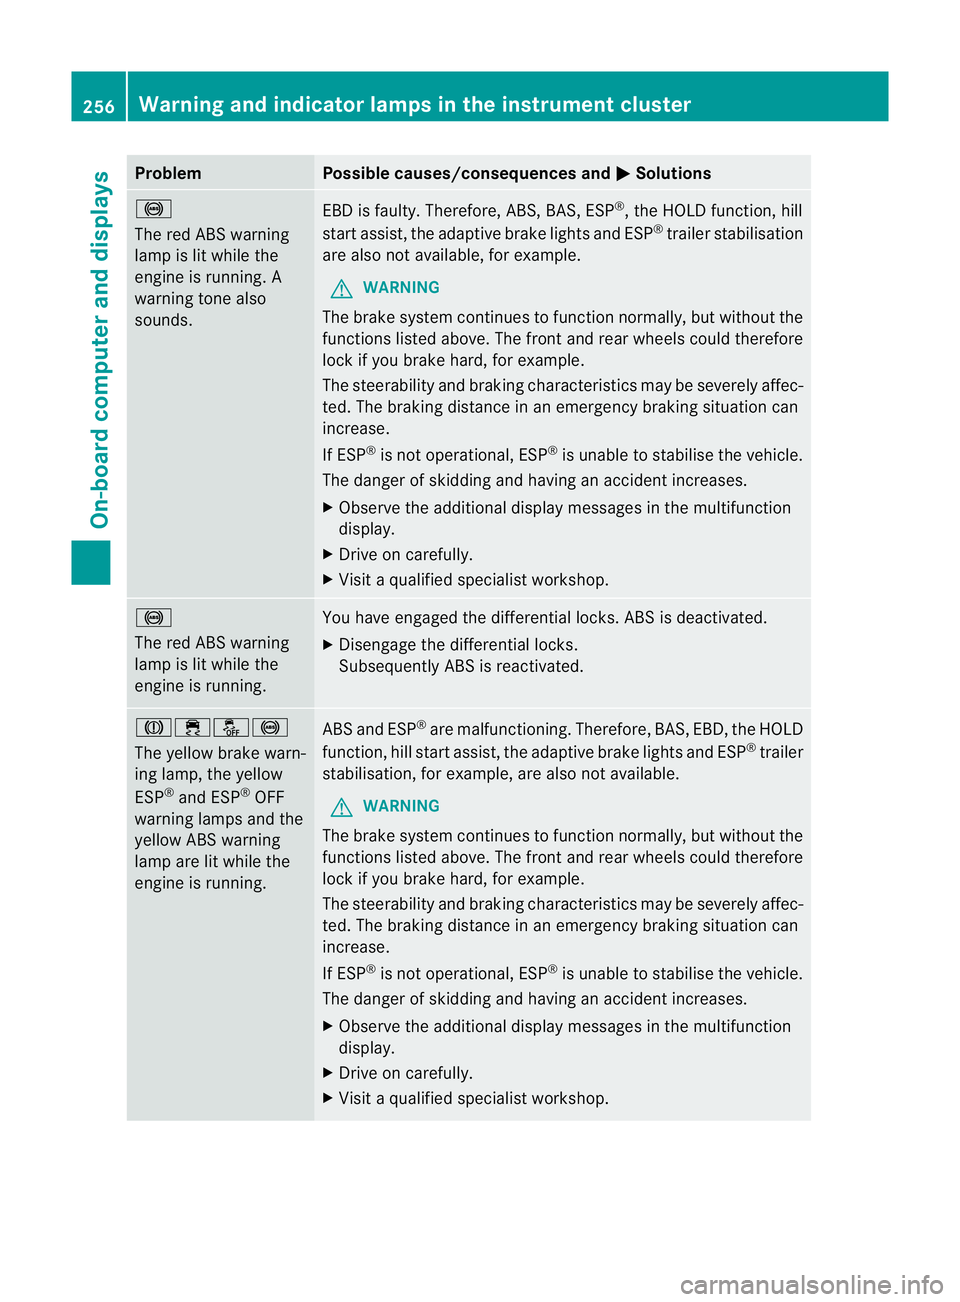
Problem Possible causes/consequences and
M Solutions
!
The red ABS warning
lamp is lit while the
engine is running. A
warning tone also
sounds.
EBD is faulty. Therefore, ABS, BAS, ESP
®
, the HOLD function, hill
start assist, the adaptive brake lights and ESP ®
trailer stabilisation
are also not available, for example.
G WARNING
The brake system continues to function normally, but without the
functions listed above. The front and rear wheels could therefore
lock if you brake hard, for example.
The steerability and braking characteristics may be severely affec-
ted. The braking distance in an emergency braking situation can
increase.
If ESP ®
is not operational, ESP ®
is unable to stabilise the vehicle.
The danger of skidding and having an accident increases.
X Observe the additional display messages in the multifunction
display.
X Drive on carefully.
X Visit a qualified specialist workshop. !
The red ABS warning
lamp is lit while the
engine is running.
You have engaged the differential locks. ABS is deactivated.
X
Disengage the differential locks.
Subsequently ABS is reactivated. J֌!
The yellow brake warn-
ing lamp, the yellow
ESP ®
and ESP ®
OFF
warning lamps and the
yellow ABS warning
lamp are lit while the
engine is running. ABS and ESP
®
are malfunctioning. Therefore, BAS, EBD, the HOLD
function, hill start assist, the adaptive brake lights and ESP ®
trailer
stabilisation, for example, are also not available.
G WARNING
The brake system continues to function normally, but without the
functions listed above. The front and rear wheels could therefore
lock if you brake hard, for example.
The steerability and braking characteristics may be severely affec-
ted. The braking distance in an emergency braking situation can
increase.
If ESP ®
is not operational, ESP ®
is unable to stabilise the vehicle.
The danger of skidding and having an accident increases.
X Observe the additional display messages in the multifunction
display.
X Drive on carefully.
X Visit a qualified specialist workshop. 256
Warning and indicator lamps in the instrument clusterOn-board computer and displays
Page 260 of 357
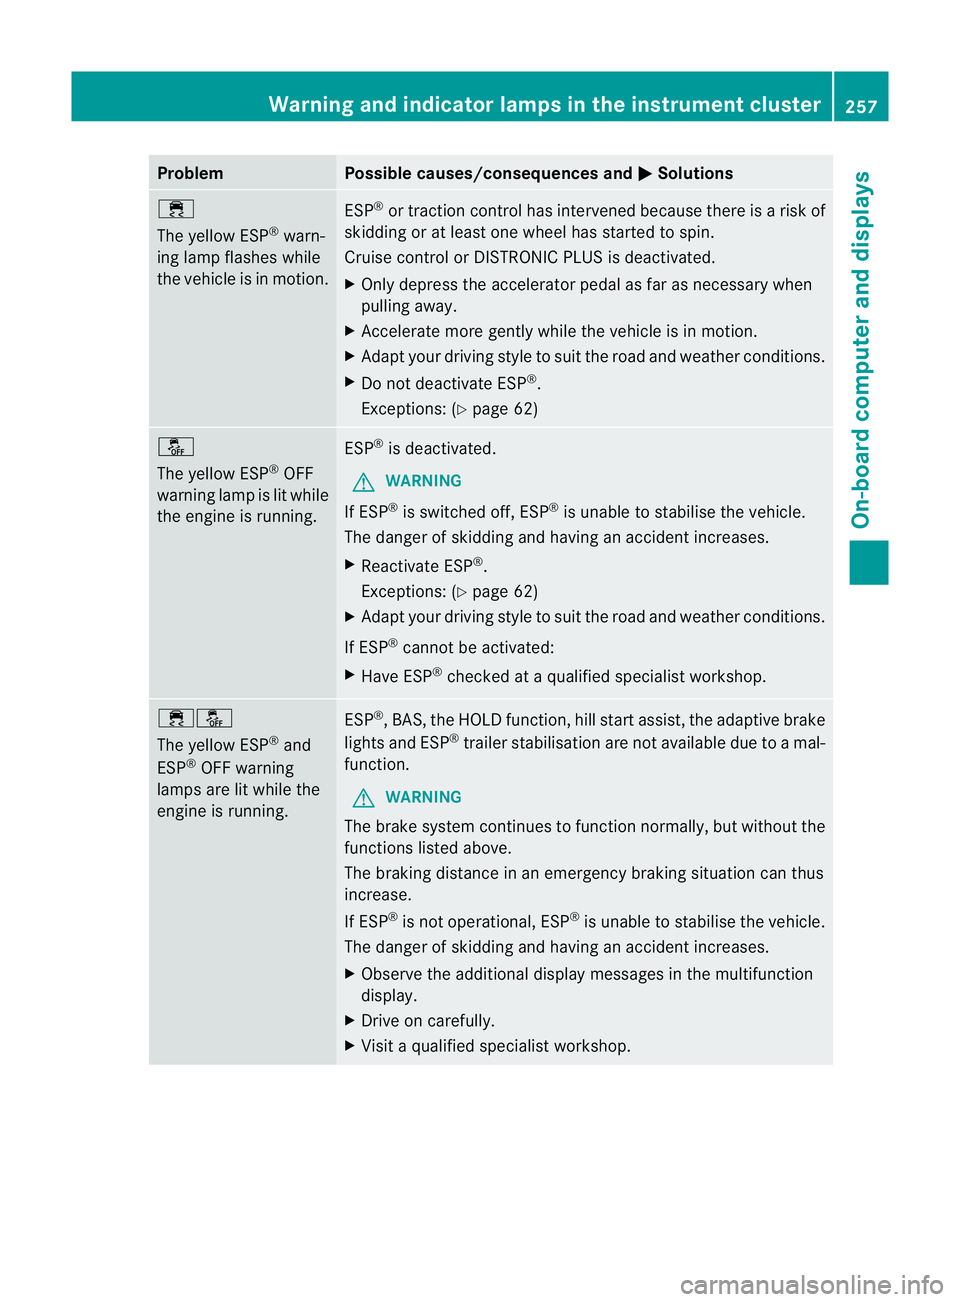
Problem Possible causes/consequences and
M Solutions
÷
The yellow ESP
®
warn-
ing lamp flashes while
the vehicle is in motion. ESP
®
or traction control has intervened because there is a risk of
skidding or at least one wheel has started to spin.
Cruise control or DISTRONIC PLUS is deactivated.
X Only depress the accelerator pedal as far as necessary when
pulling away.
X Accelerate more gently while the vehicle is in motion.
X Adapt your driving style to suit the road and weather conditions.
X Do not deactivate ESP ®
.
Exceptions: (Y page 62) å
The yellow ESP
®
OFF
warning lamp is lit while
the engine is running. ESP
®
is deactivated.
G WARNING
If ESP ®
is switched off, ESP ®
is unable to stabilise the vehicle.
The danger of skidding and having an accident increases.
X Reactivate ESP ®
.
Exceptions: (Y page 62)
X Adapt your driving style to suit the road and weather conditions.
If ESP ®
cannot be activated:
X Have ESP ®
checked at a qualified specialist workshop. ֌
The yellow ESP
®
and
ESP ®
OFF warning
lamps are lit while the
engine is running. ESP
®
, BAS, the HOLD function, hill start assist, the adaptive brake
lights and ESP ®
trailer stabilisation are not available due to a mal-
function.
G WARNING
The brake system continues to function normally, but without the
functions listed above.
The braking distance in an emergency braking situation can thus
increase.
If ESP ®
is not operational, ESP ®
is unable to stabilise the vehicle.
The danger of skidding and having an accident increases.
X Observe the additional display messages in the multifunction
display.
X Drive on carefully.
X Visit a qualified specialist workshop. Warning and indicator lamps in the instrument cluster
257On-board computer and displays Z
Page 261 of 357
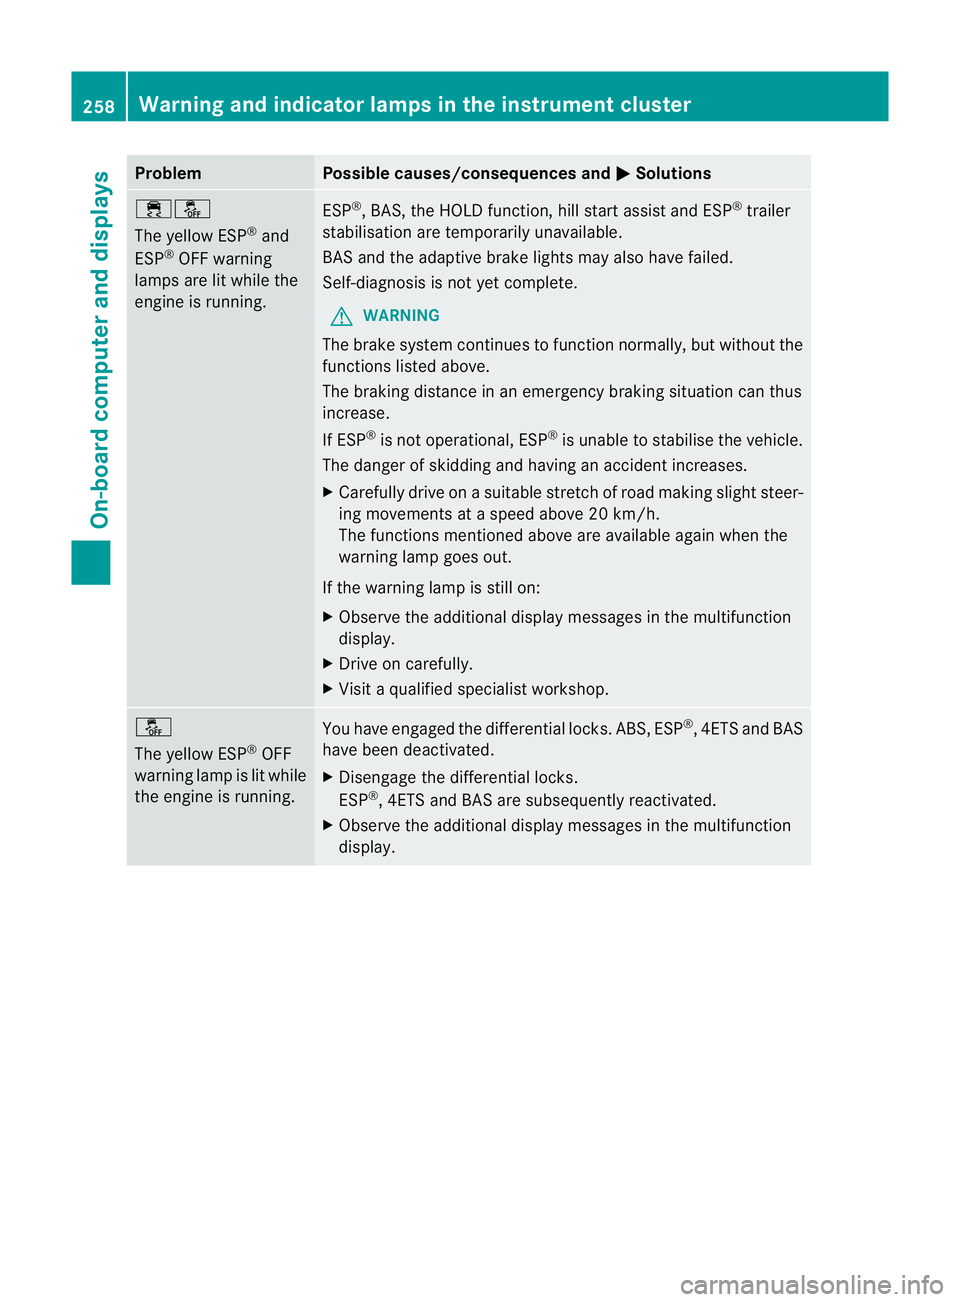
Problem Possible causes/consequences and
M Solutions
֌
The yellow ESP
®
and
ESP ®
OFF warning
lamps are lit while the
engine is running. ESP
®
, BAS, the HOLD function, hill start assist and ESP ®
trailer
stabilisation are temporarily unavailable.
BAS and the adaptive brake lights may also have failed.
Self-diagnosis is not yet complete.
G WARNING
The brake system continues to function normally, but without the
functions listed above.
The braking distance in an emergency braking situation can thus
increase.
If ESP ®
is not operational, ESP ®
is unable to stabilise the vehicle.
The danger of skidding and having an accident increases.
X Carefully drive on a suitable stretch of road making slight steer-
ing movements at a speed above 20 km/h.
The functions mentioned above are available again when the
warning lamp goes out.
If the warning lamp is still on:
X Observe the additional display messages in the multifunction
display.
X Drive on carefully.
X Visit a qualified specialist workshop. å
The yellow ESP
®
OFF
warning lamp is lit while
the engine is running. You have engaged the differential locks. ABS, ESP
®
,4 ETS and BAS
have been deactivated.
X Disengage the differential locks.
ESP ®
, 4ETS and BAS ar esubsequently reactivated.
X Observe the additional display messages in the multifunction
display. 258
Warning and indicator lamps in the instrument clusterOn-board computer and displays
Page 262 of 357
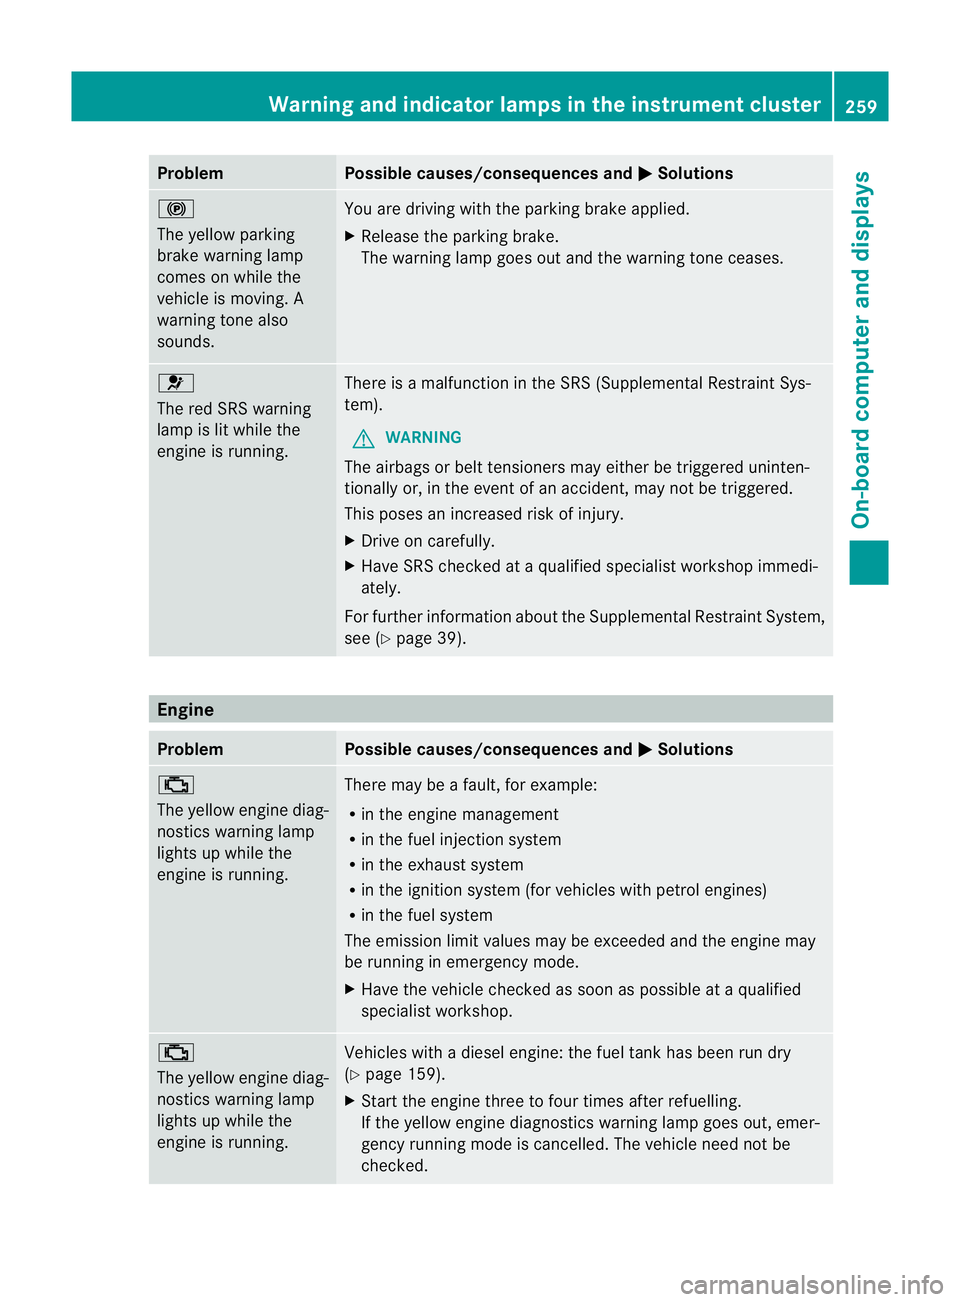
Problem Possible causes/consequences and
M Solutions
!
The yellow parking
brake warning lamp
comes on while the
vehicle is moving. A
warning tone also
sounds.
You are driving with the parking brake applied.
X
Release the parking brake.
The warning lamp goes out and the warning tone ceases. 6
The red SRS warning
lamp is lit while the
engine is running.
There is a malfunction in the SRS (Supplemental Restraint Sys-
tem).
G WARNING
The airbags or belt tensioners may either be triggered uninten-
tionally or, in the event of an accident, may not be triggered.
This poses an increased risk of injury.
X Drive on carefully.
X Have SRS checked at a qualified specialist workshop immedi-
ately.
For further information about the Supplemental Restraint System,
see (Y page 39). Engine
Problem Possible causes/consequences and
M Solutions
;
The yellow engine diag-
nostics warning lamp
lights up while the
engine is running.
There may be a fault, for example:
R
in the engine management
R in the fuel injection system
R in the exhaust system
R in the ignition system (for vehicles with petrol engines)
R in the fuel system
The emission limit values may be exceeded and the engine may
be running in emergency mode.
X Have the vehicle checked as soon as possible at a qualified
specialist workshop. ;
The yellow engine diag-
nostics warning lamp
lights up while the
engine is running.
Vehicles with a diesel engine: the fuel tank has been run dry
(Y
page 159).
X Start the engine three to four times after refuelling.
If the yellow engine diagnostics warning lamp goes out, emer-
gency running mode is cancelled. The vehicle need not be
checked. Warning and indicator lamps in the instrument cluster
259On-board computer and displays Z
Page 263 of 357
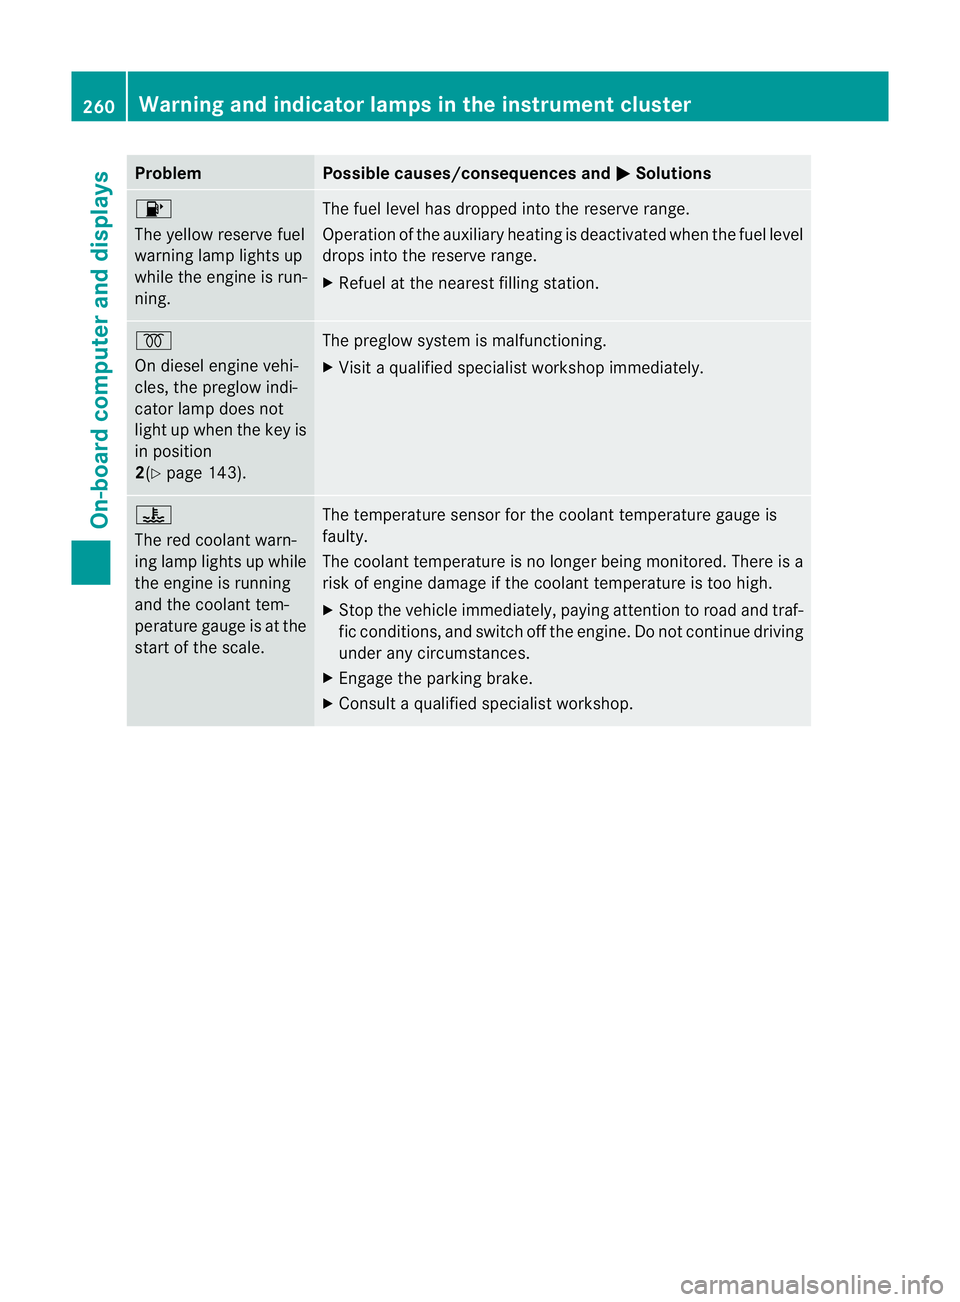
Problem Possible causes/consequences and
M Solutions
8
The yellow reserve fuel
warning lamp lights up
while the engine is run-
ning.
The fuel level has dropped into the reserve range.
Operation of the auxiliary heating is deactivated when the fuel level
drops into the reserve range.
X
Refuel at the nearest filling station. %
On diesel engine vehi-
cles, the preglow indi-
cator lamp does not
light up when the key is
in position
2(Y
page 143). The preglow system is malfunctioning.
X
Visit a qualified specialist workshop immediately. ?
The red coolant warn-
ing lamp lights up while
the engine is running
and the coolant tem-
perature gauge is at the
start of the scale.
The temperature sensor for the coolant temperature gauge is
faulty.
The coolant temperature is no longer being monitored. There is a
risk of engine damage if the coolant temperature is too high.
X
Stop the vehicle immediately, paying attention to road and traf-
fic conditions, and switch off the engine. Do not continue driving
under any circumstances.
X Engage the parking brake.
X Consult a qualified specialist workshop. 260
Warning and indicator lamps in the instrument clusterOn-board computer and displays
Page 265 of 357
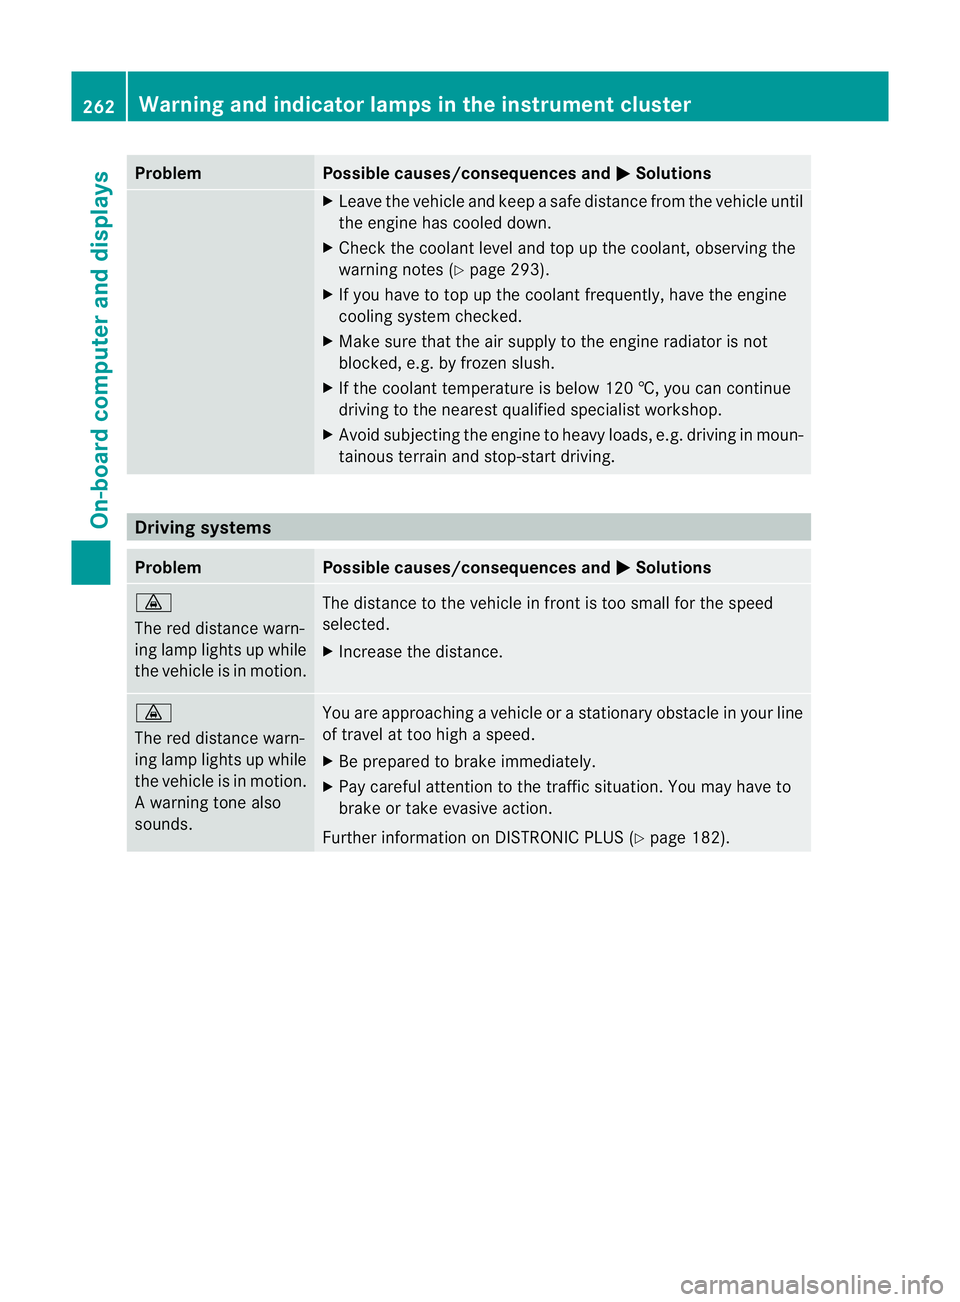
Problem Possible causes/consequences and
M Solutions
X
Leave the vehicle and keep a safe distance from the vehicle until
the engine has cooled down.
X Check the coolant level and top up the coolant, observing the
warning notes (Y page 293).
X If you have to top up the coolant frequently, have the engine
cooling system checked.
X Make sure that the air supply to the engine radiator is not
blocked, e.g. by frozen slush.
X If the coolant temperature is below 120 †, you can continue
driving to the nearest qualified specialist workshop.
X Avoid subjecting the engine to heavy loads, e.g. driving in moun-
tainous terrain and stop-start driving. Driving systems
Problem Possible causes/consequences and
M Solutions
·
The red distance warn-
ing lamp lights up while
the vehicle is in motion. The distance to the vehicle in front is too small for the speed
selected.
X
Increase the distance. ·
The red distance warn-
ing lamp lights up while
the vehicle is in motion.
Aw arning tone also
sounds. You are approaching a vehicle or a stationary obstacle in your line
of travel at too high a speed.
X
Be prepared to brake immediately.
X Pay careful attention to the traffic situation. You may have to
brake or take evasive action.
Further information on DISTRONIC PLUS (Y page 182).262
Warning and indicator lamps in the instrument clusterOn-board computer and displays
Page 279 of 357
before folding forward the backrests and
seat cushions of the rear bench seat.
:
Cup holders Sun visors
Sun visor overview G
WARNING
Keep the vanity mirror sinthe sun visors cov-
ered while driving. You could otherwise be
dazzled, which may impair your view of traffic
conditions and as a result could cause an
accident. :
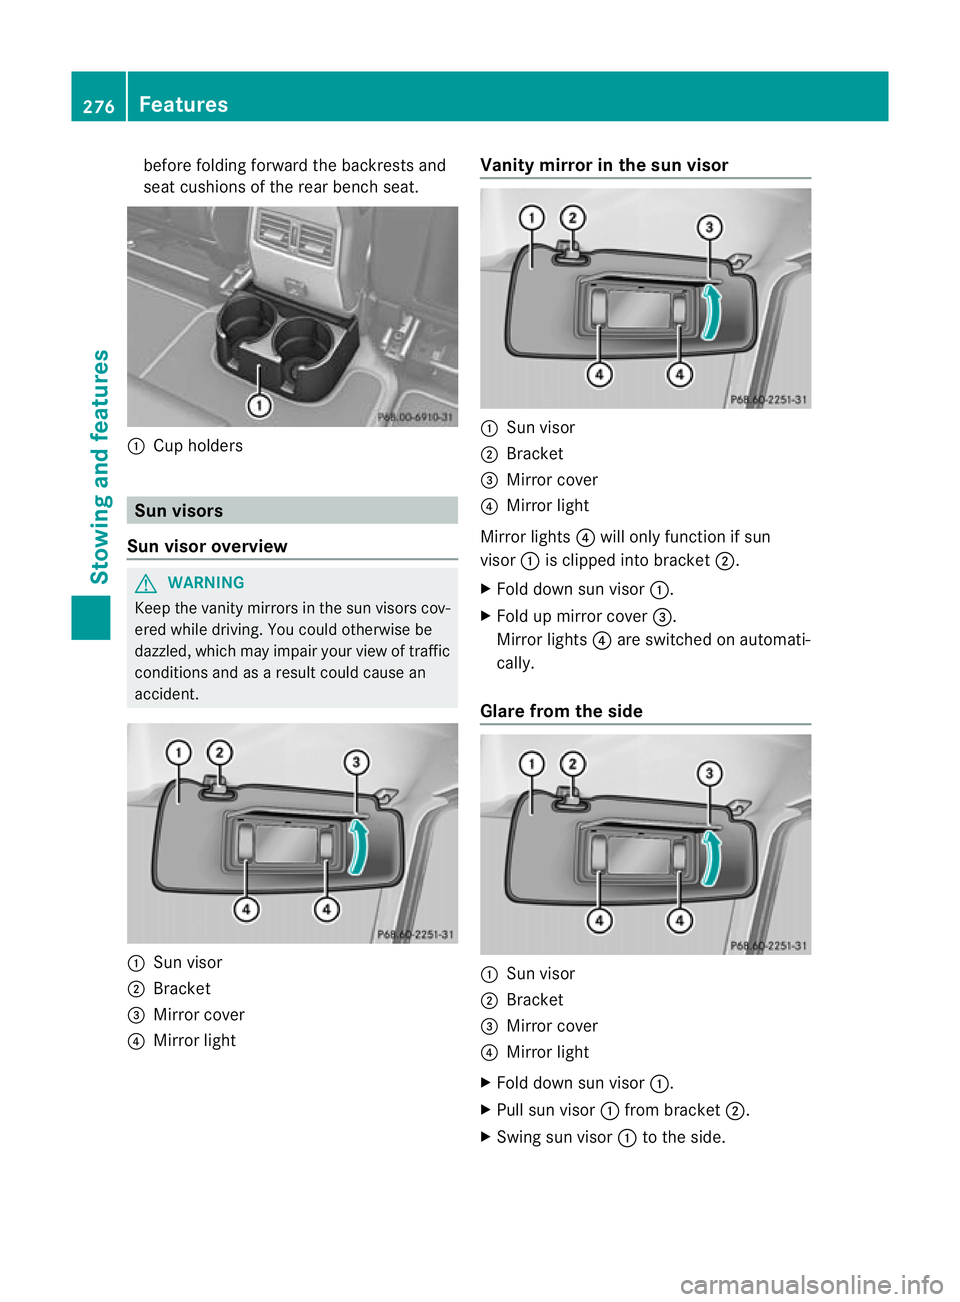
Sun visor
; Bracket
= Mirror cover
? Mirror light Vanity mirror in the sun visor
:
Sun visor
; Bracket
= Mirror cover
? Mirror light
Mirror lights ?will only function if sun
visor :is clipped into bracket ;.
X Fold down sun visor :.
X Fold up mirror cover =.
Mirror lights ?are switched on automati-
cally.
Glare from the side :
Sun visor
; Bracket
= Mirror cover
? Mirror light
X Fold down sun visor :.
X Pull sun visor :from bracket ;.
X Swing sun visor :to the side. 276
FeaturesStowing and features
Page 285 of 357
Problems when programming
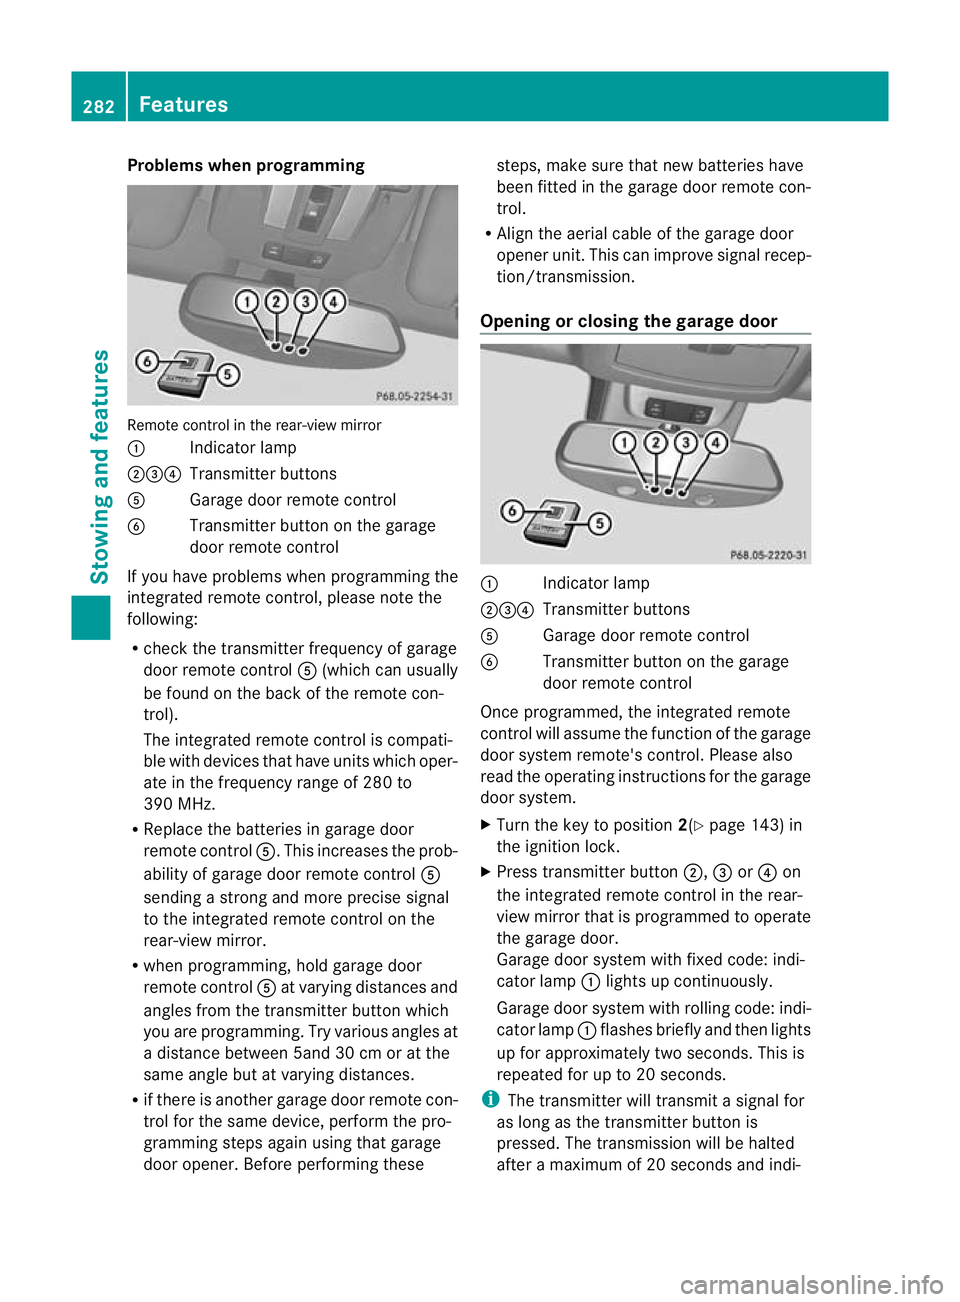
Remote control in the rear-view mirror
:
Indicator lamp
;=? Transmitter buttons
A Garage door remote control
B Transmitter button on the garage
door remote control
If you have problems when programming the
integrated remote control, please note the
following:
R check the transmitter frequency of garage
door remote control A(which can usually
be found on the back of the remote con-
trol).
The integrated remote control is compati-
ble with devices that have units which oper-
ate in the frequency range of 280 to
390 MHz.
R Replace the batteries in garage door
remote control A.This increases the prob-
ability of garage door remote control A
sending a strong and more precise signal
to the integrated remote control on the
rear-view mirror.
R when programming, hold garage door
remote control Aat varying distances and
angles from the transmitter button which
you are programming. Try various angles at
a distance between 5and 30 cm or at the
same angle but at varying distances.
R if there is another garage door remote con-
trol for the same device, perform the pro-
gramming steps again using that garage
door opener. Before performing these steps, make sure that new batteries have
been fitted in the garage door remote con-
trol.
R Align the aerial cable of the garage door
opener unit. This can improve signal recep-
tion/transmission.
Opening or closing the garage door :
Indicator lamp
;=? Transmitter buttons
A Garage door remote control
B Transmitter button on the garage
door remote control
Once programmed, the integrated remote
control will assume the function of the garage
door system remote's control. Please also
read the operating instructions for the garage
door system.
X Turn the key to position 2(Ypage 143) in
the ignition lock.
X Press transmitter button ;,=or? on
the integrated remote control in the rear-
view mirror that is programmed to operate
the garage door.
Garage door system with fixed code: indi-
cator lamp :lights up continuously.
Garage door system with rolling code: indi-
cator lamp :flashes briefly and then lights
up for approximately two seconds. This is
repeated for up to 20 seconds.
i The transmitter will transmit a signal for
as long as the transmitter button is
pressed. The transmission will be halted
after a maximum of 20 seconds and indi- 282
FeaturesStowing and features
Page 299 of 357
after having cleaned the wheels with wheel
cleaner. Wheel cleaners could cause
increased corrosio
nofthe brake discs and
brake pads/linings. For this reason, you
should drive for a few minutes after clean-
ing. Braking heats the brake discs and the
brake pads/linings, thus drying them. The
vehicle can then be parked up. Care of the exterior
Automatic car wash G
WARNING
Braking efficiency is reduced after washing
the vehicle. This could cause an accident. For
this reason, following a car wash, drive with
particular care until the brakes are dry.
! Preferably use car washes with adjustable
high-pressure jets for pre-washing. This
corresponds with the specifications for
cabriolet programmes. In car washes that
use high water pressures, there is a risk
that a small amount of water may leak into
the vehicle.
! Cabriolet: do not treat the vehicle with
hot wax under any circumstances.
! Make sure that the automatic car wash is
suitable for the size of the vehicle. Fold in
the exterior mirrors before the vehicle is
washed. The exterior mirrors could other-
wise be damaged.
! Make sure that the automatic transmis-
sion is in position Nwhen washing your
vehicle in a tow-through car wash. The vehi-
cle could be damaged if the transmission is
in another position.
! Make sure that:
R the side windows and sliding sunroof are
closed completely.
R the blower for the ventilation/heating is
switched off (airflow control is turned to position
0/theÃandÁ buttons
are switched off).
R the windscreen wiper switch is at posi-
tion 0.
The vehicle could otherwise be damaged.
You can wash the vehicle in an automatic car
wash from the very start.
Wash off excess dirt before cleaning the vehi-
cle in an automatic car wash.
After using an automatic car wash, wipe off
wax from the windscreen and the wiper
blades. This will prevent smears and reduce
wiping noises caused by residue on the wind-
screen.
High-pressure cleaning equipment G
WARNING
Do not use high-pressure cleaners with circu-
lar-jet nozzles (dirt grinders) to clean your
vehicle, in particular the tyres. You could oth-
erwise damage the tyres and cause an acci-
dent.
! Always maintain a distance of at least
30 cm between the vehicle and the high-
pressure cleaner nozzle. Information about
the correct distance is available from the
equipment manufacturer.
Move the high-pressure cleaner nozzle
around when cleaning your vehicle.
Do not aim directly at any of the following:
R tyres
R door gaps, roof gaps, joints etc.
R soft top (Cabriolet)
R electrical components
R battery
R connectors
R lights
R seals
R trim elements
R ventilation slots
Damaged seals or electrical components
can lead to leaks or failures. 296
CareMaintenance and care
Page 331 of 357
ured at a filling station with a pressure gauge.
The tyre pressures shown by the on-board
computer refer to those measured at sea
level. At high altitudes, the tyre pressure val-
ues indicated by a pressur
egauge are higher
than those shown by the on-board computer.
In this case, do no treduce the tyre pressures.
The operation of the tyre pressure monitor
can be affected by interference from radio
transmitting equipment (e.g. radio head-
phones, two-way radios) that may be being
operated in or near the vehicle.
Checking tyre pressure electronically X
Make sure that the key is in position 2
(Y page 143)in the ignition lock.
X Press the =or; button on the steer-
ing wheel to select the Serv. menu.
X Press the 9or: button to select
Tyre pressure .
X Press the abutton.
The curren ttyre pressur efor each wheel
will be displayed in the multifunction dis-
play.
If the vehicle has been parked for over
20 minutes, the message Tyre pressureswill be displayed after a few
minutes of driving appears.
After a teach-in period, the tyre pressure
monitor automatically recognises new
wheels or new sensors. As long as a clear
allocation of the tyre pressure values to the
individual wheels is not possible, the Tyrepressure monitor active display mes-
sage is shown instead of the tyre pressure
display .The tyre pressures are already being
monitored.
i If a spare wheel is fitted, the system may
continue to show the tyre pressure of the
wheel that has been removed for a few
minutes. If this occurs, note that the value
displayed for the position where the spare
tyre is fitted is not the same as the spare
tyre's current tyre pressure. Warning messages of the tyre pressure
monitor If the tyre pressure monitor detects a signifi-
cant pressure loss on one or more tyres, a
warning message is shown in the multifunc-
tion display.
Awarning tone also sounds and
the tyre pressure warning lamp lights up in
the instrument cluster.
Each tyre that is affected by a significant loss
of pressure is highlighted in the pressure dis-
play.
X If the Please correct tyre pres‐ surePlease correct tyre pressure
message appears in the multifunction dis-
play, check the tyre pressure on all four
wheels and correct it if necessary.
i If the wheel positions on the vehicle are
interchanged, the tyre pressures may be
displayed for the wrong positions for a
short time. This is rectified after a few
minutes of driving, and the tyre pressures
are displayed for the correct positions.
Restarting the tyre pressure monitor When you restar
tthe tyre pressure monitor,
all existing warning messages are deleted and
the warning lamps go out. The monitor uses
the currently set tyre pressures as the refer-
ence values for monitoring. In most cases, the
tyre pressure monitor will automatically
detect the new referencev alues after you
have changed the tyre pressure .However,
you can also define reference values man-
ually as described here.
X Use the table on the inside of the fuel filler
flap to ensure that the tyre pressure is set
correctly in all four tyres for the current
operating conditions.
Also observe the notes in the section on
tyre pressures (Y page 325).
X Make sure that the key is in position 2
(Y page 143) in the ignition lock.
X Press the =or; button on the steer-
ing wheel to select the Serv. menu.328
Tyre pressureWheels and tyres