center console MERCEDES-BENZ G-CLASS SUV 2013 Owners Manual
[x] Cancel search | Manufacturer: MERCEDES-BENZ, Model Year: 2013, Model line: G-CLASS SUV, Model: MERCEDES-BENZ G-CLASS SUV 2013Pages: 364, PDF Size: 9.62 MB
Page 8 of 364
Cargo compartment cover
Installing/removing .......................267
Notes/how to use ......................... 267
Opening and closing ...................... 267
Overview ........................................ 267
Cargo compartment enlargement
Important safety notes .................. 264
Cargo tie down rings ......................... 267
CD player/CD changer (on-board
computer)
.......................................... 216
Center console Overview .......................................... 32
Upper section .................................. 32
Central locking
Automatic locking (on-board
computer) ...................................... 220
Locking/unlocking (SmartKey) ........ 68
Changing bulbs
Important safety notes .................. 108
Overview of bulb types ..................109
Reversing lamps ............................ 113
Side marker lamps .........................112
Turn signals (front) ......................... 111
Changing gears .................................. 148
Checklist After driving off-road ...................... 166
Before driving off-road ................... 165
Child-proof locks
Important safety notes .................... 59
Rear doors ....................................... 59
Children
In the vehicle ................................... 54
Restraint systems ............................ 54
Child seat
Automatic recognition ..................... 44
Automatic recognition/air bag
deactivation, self-test ......................46
LATCH-type (ISOFIX) child seat
anchors ............................................ 57
Special seat belt retractor ............... 56
Top Tether ....................................... 58
Troubleshooting ............................... 47
Chrome parts (cleaning
instructions) ...................................... 298
Cigarette lighter ................................ 270Climate control
Controlling automatically ............... 130
Cooling with air dehumidification ..124
Defrosting the windows ................. 132
Defrosting the windshield
..............131
Dual-zone automatic climate
control ........................................... 119
Important safety notes .................. 118
Indicator lamp ................................ 129
Maximum cooling .......................... 132
Notes on using automatic climate
control ........................................... 120
Overview of systems ...................... 118
Problems with "cooling with air
dehumidification" ........................... 129
Problem with the rear window
defroster ........................................ 133
Refrigerant ..................................... 354
Setting the air distribution .............131
Setting the airflow ......................... 131
Setting the air vents ......................134
Setting the temperature ................ 131
Switching air-recirculation mode
on/off ............................................ 134
Switching on/off ........................... 121
Switching residual heat on/off ...... 134
Switching the rear window
defroster on/off ............................ 133
Switching the ZONE function on/
off .................................................. 131
Windshield defroster ......................133
Cockpit
Overview .......................................... 28
see Instrument cluster
COMAND
see separate operating instructions
Combination switch ..........................103
Consumption statistics (on-board
computer) .......................................... 213
Convenience opening feature see Side windows
Coolant (engine)
Checking the level ......................... 291
Display message ............................ 234
Filling capacity ............................... 356
Notes ............................................. 354
Temperature (on-board computer) . 222 6
Index
Page 9 of 364
Temperature gauge ........................ 209
Warning lamp ................................. 256
Cooling
see Climate control
Cornering light function
Function/notes ............................. 104
Cruise control
Cruise control lever .......................170
Display message ............................ 242
Driving system ............................... 169
Function/notes ............................. 169
Selecting ........................................ 170
Cup holder
Center console .............................. 268
Important safety notes .................. 268
Rear compartment ......................... 268
Customer Assistance Center (CAC) ...24
Customer Relations Department .......24 D
Data see Technical data
Daytime running lamps
Display message ............................ 234
Switching on/off (on-board
computer) ...................................... 219
Switching on/off (switch) ................ 99
Delayed switch-off
Exterior lighting (on-board
computer) ...................................... 219
Interior lighting .............................. 220
Differential locks ............................... 201
Digital speedometer .........................213
Display (cleaning instructions) ........298
Display messages Calling up (on-board computer) ..... 225
Driving systems ............................. 238
Engine ............................................ 234
General notes ................................ 224
Hiding (on-board computer) ........... 224
Lights ............................................. 231
Safety systems .............................. 226
Service interval display .................. 293
SmartKey ....................................... 247
Tires ............................................... 242
Vehicle ........................................... 245Distance display (on-board
computer) ..........................................
218
Distance recorder see Trip odometer
Distance warning (warning lamp) ....258
DISTRONIC PLUS Activating ....................................... 179
Activation conditions .....................179
Cruise control lever .......................179
Deactivating ................................... 184
Display message ............................ 240
Displays in the multifunction
display ........................................... 182
Driving tips .................................... 184
Function/notes ............................. 177
Important safety notes .................. 177
Setting the specified minimum
distance ......................................... 183
wählen ........................................... 179
Warning lamp ................................. 258
Door control panel
Overview .......................................... 35
Doors
Automatic locking (on-board
computer) ...................................... 220
Automatic locking (switch) ............... 75
Central locking/unlocking
(SmartKey) ....................................... 68
Display message ............................ 246
Emergency locking ........................... 76
Emergency unlocking .......................75
Important safety notes .................... 73
Opening (from inside) ......................74
Overview .......................................... 73
Drinking and driving .........................159
Drive program Automatic ...................................... 150
Display ........................................... 146
Manual ........................................... 151
SETUP (on-board computer) .......... 222
Driving abroad
Symmetrical low beam .................... 98
Driving in mountainous terrain
Approach/departure angle ............ 167
Driving downhill ............................. 169
Gradient-climbing capability
(maximum) ..................................... 168 Index
7
Page 29 of 364
Cockpit
................................................. 28
Instrument cluster ..............................29
Multifunction steering wheel .............31
Center console .................................... 32
Overhead control panel ......................34
Door control panel .............................. 35 27At a glance
Page 34 of 364
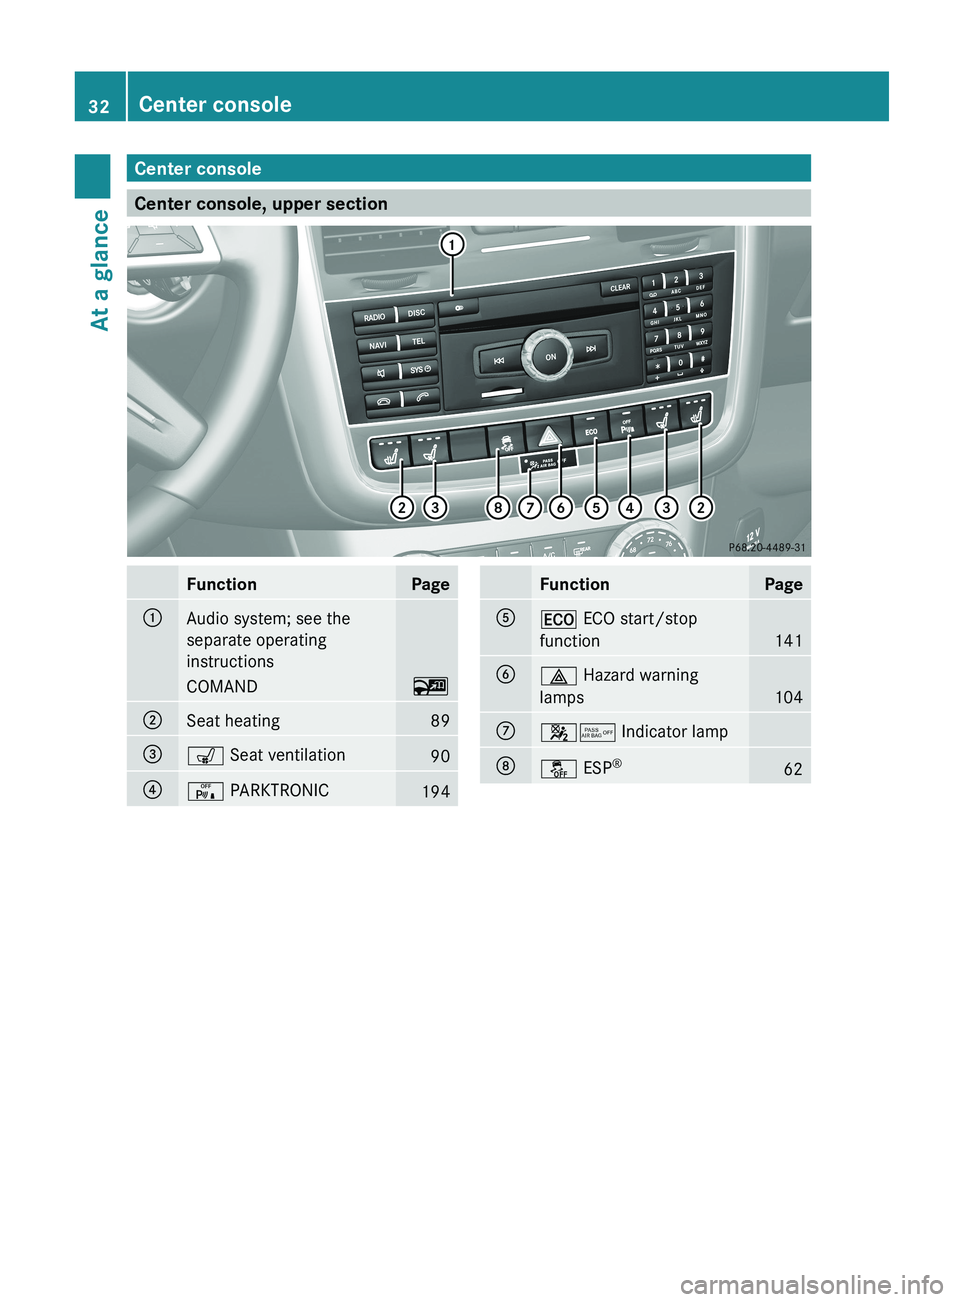
Center console
Center console, upper section
Function Page
0043
Audio system; see the
separate operating
instructions
COMAND 00FC
0044
Seat heating 89
0087
008E Seat ventilation
90
0085
008F PARKTRONIC
194 Function Page
0083
00A7 ECO start/stop
function
141
0084
002F Hazard warning
lamps
104
006B
00730074 Indicator lamp
006C
00BB ESP
® 6232
Center consoleAt a glance
Page 35 of 364
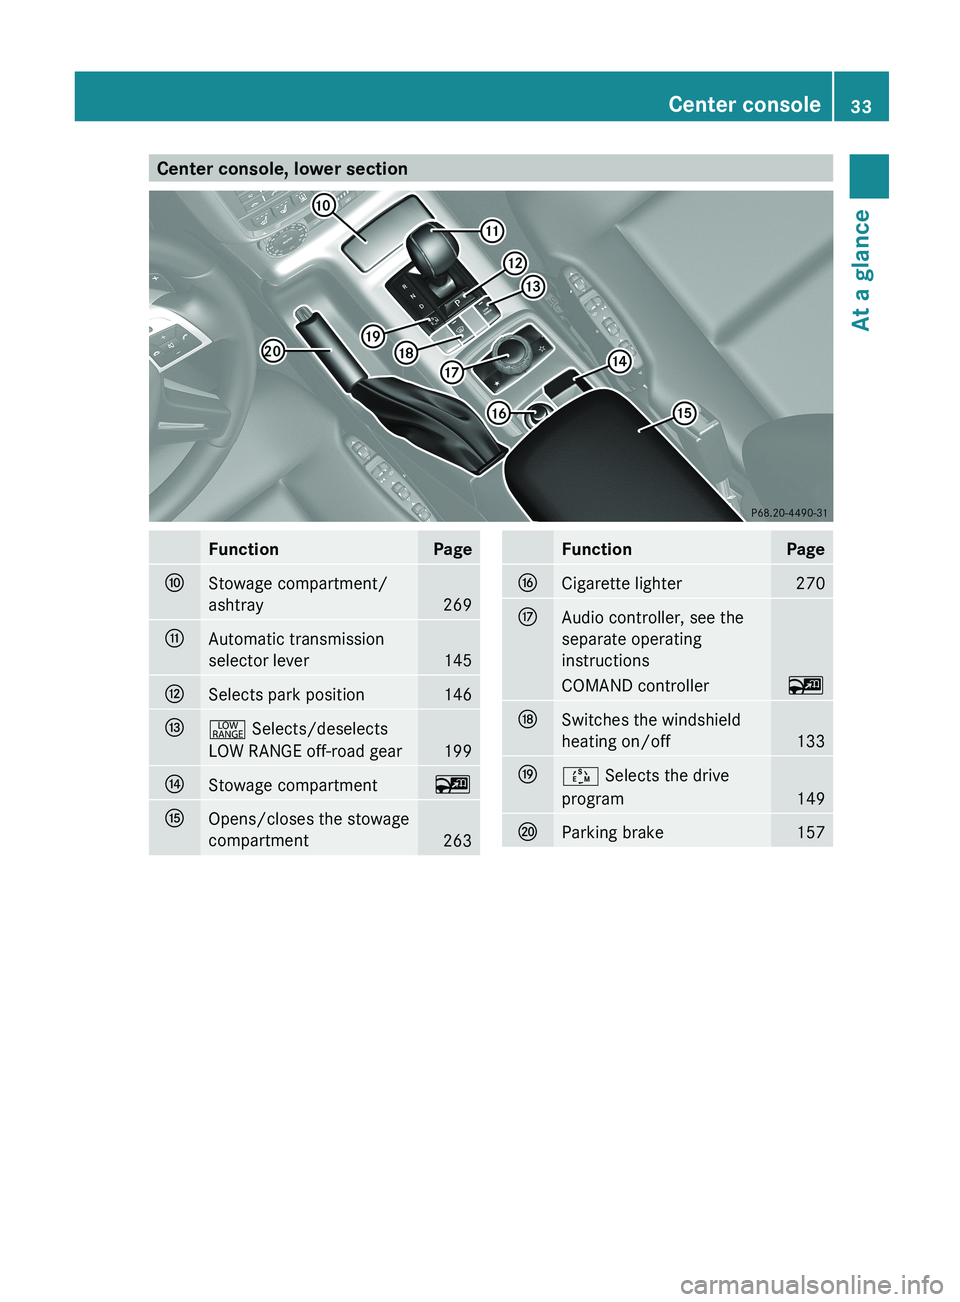
Center console, lower section
Function Page
006E
Stowage compartment/
ashtray
269
006F
Automatic transmission
selector lever
145
0070
Selects park position 146
0071
002E Selects/deselects
LOW RANGE off-road gear
199
0072
Stowage compartment 00FC
0073
Opens/closes the stowage
compartment
263 Function Page
0074
Cigarette lighter 270
0075
Audio controller, see the
separate operating
instructions
COMAND controller 00FC
0076
Switches the windshield
heating on/off
133
0077
00C8 Selects the drive
program
149
0078
Parking brake 157Center console
33At a glance
Page 45 of 364
If the
0073007C indicator lamp does not go
out, please consult an authorized Mercedes-
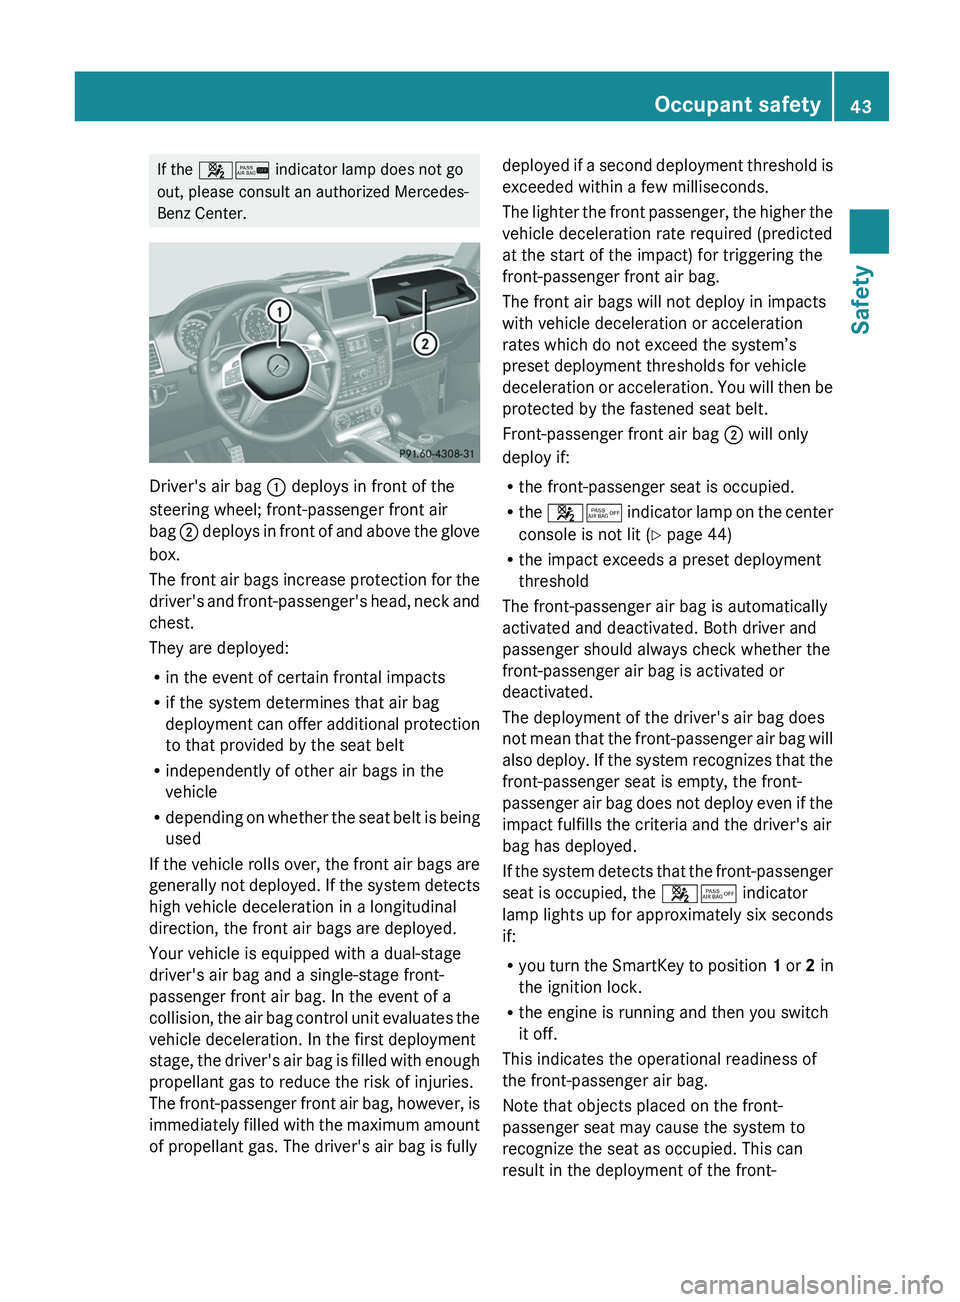
Benz Center. Driver's air bag
0043 deploys in front of the
steering wheel; front-passenger front air
bag 0044 deploys in front
of and above the glove
box.
The front air bags increase protection for the
driver's and front-passenger's head, neck and
chest.
They are deployed:
R in the event of certain frontal impacts
R if the system determines that air bag
deployment can offer additional protection
to that provided by the seat belt
R independently of other air bags in the
vehicle
R depending on whether the seat belt is being
used
If the vehicle rolls over, the front air bags are
generally not deployed. If the system detects
high vehicle deceleration in a longitudinal
direction, the front air bags are deployed.
Your vehicle is equipped with a dual-stage
driver's air bag and a single-stage front-
passenger front air bag. In the event of a
collision, the air bag control unit evaluates the
vehicle deceleration. In the first deployment
stage, the driver's air bag is filled with enough
propellant gas to reduce the risk of injuries.
The front-passenger front air bag, however, is
immediately filled with the maximum amount
of propellant gas. The driver's air bag is fully deployed if a second deployment threshold is
exceeded within a few milliseconds.
The
lighter the
front
passenger, the higher the
vehicle deceleration rate required (predicted
at the start of the impact) for triggering the
front-passenger front air bag.
The front air bags will not deploy in impacts
with vehicle deceleration or acceleration
rates which do not exceed the system’s
preset deployment thresholds for vehicle
deceleration or acceleration. You will then be
protected by the fastened seat belt.
Front-passenger front air bag 0044 will only
deploy if:
R the front-passenger seat is occupied.
R the 00730074 indicator lamp on the center
console is not lit (Y page 44)
R the impact exceeds a preset deployment
threshold
The front-passenger air bag is automatically
activated and deactivated. Both driver and
passenger should always check whether the
front-passenger air bag is activated or
deactivated.
The deployment of the driver's air bag does
not mean that the front-passenger air bag will
also deploy. If the system recognizes that the
front-passenger seat is empty, the front-
passenger air bag does not deploy even if the
impact fulfills the criteria and the driver's air
bag has deployed.
If the system detects that the front-passenger
seat is occupied, the 00730074 indicator
lamp lights up for approximately six seconds
if:
R you turn the SmartKey to position 1 or 2 in
the ignition lock.
R the engine is running and then you switch
it off.
This indicates the operational readiness of
the front-passenger air bag.
Note that objects placed on the front-
passenger seat may cause the system to
recognize the seat as occupied. This can
result in the deployment of the front- Occupant safety
43
Safety Z
Page 88 of 364
!
To avoid damage to
the seats and the seat
heating, observe the following information:
R keep liquids from spilling on the seats. If
liquid is spilled on the seats, dry them as
soon as possible.
R if the seat covers are damp or wet, do not
switch on the seat heating. The seat
heating should also not be used to dry
the seats.
R clean the seat covers as recommended;
see the "Interior care" section.
R do not transport heavy loads on the
seats. Do not place sharp objects on the
seat cushions, e.g. knives, nails or tools.
The seats should only be occupied by
passengers, if possible.
R when the seat heating is in operation, do
not cover the seats with insulating
materials, e.g. blankets, coats, bags,
seat covers, child seats or booster seats.
! Make sure that there are no objects in the
footwell or behind the seats when resetting
the seats. There is a risk that the seats
and/or the objects could be damaged.
! When the rear bench seat is folded
forwards, the front seats cannot be moved
to their rearmost position. You could
otherwise damage the seats and the rear
bench seat.
! Make sure that the sun visor is folded up
before adjusting the backrest and head
restraint height. The head restraint and sun
visor could otherwise collide when the head
restraint is fully extended.
i If the front door is open, the seats can be
adjusted for up 30 minutes after the
ignition has been switched off.
i The rear-compartment head restraints
can be removed ( Y page 88).
For more information, contact a qualified
specialist workshop.
i You can find further information about
enlarging the cargo compartment (folding the rear bench seat forwards) on
(Y page 266).
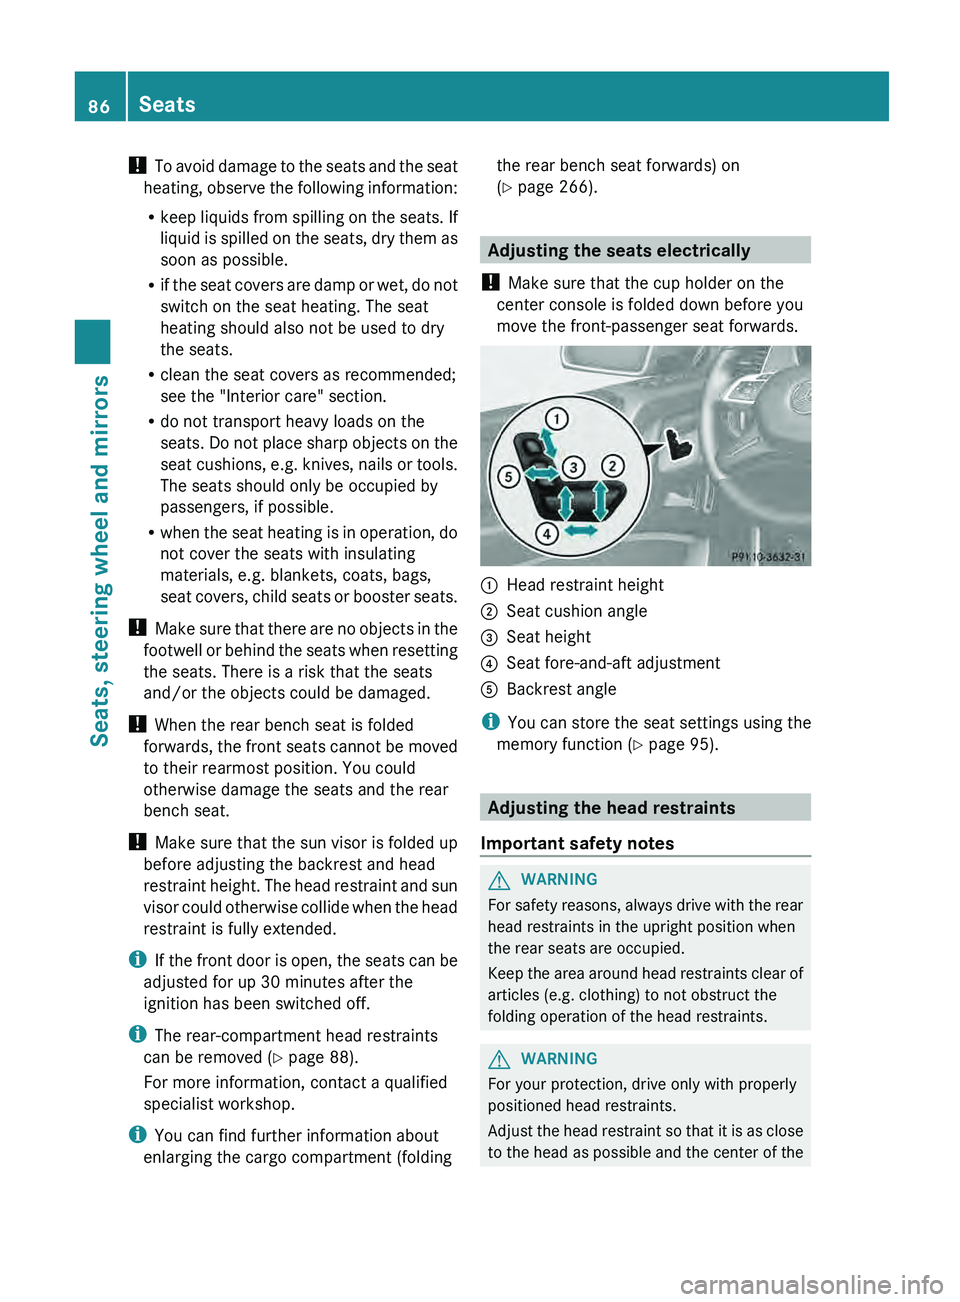
Adjusting the seats electrically
! Make sure that the cup holder on the
center console is folded down before you
move the front-passenger seat forwards. 0043
Head restraint height
0044 Seat cushion angle
0087 Seat height
0085 Seat fore-and-aft adjustment
0083 Backrest angle
i You can store the seat settings using the
memory function ( Y page 95). Adjusting the head restraints
Important safety notes G
WARNING
For safety reasons, always drive with the rear
head restraints in the upright position when
the rear seats are occupied.
Keep the area around
head restraints clear of
articles (e.g. clothing) to not obstruct the
folding operation of the head restraints. G
WARNING
For your protection, drive only with properly
positioned head restraints.
Adjust the head restraint
so that it is as close
to the head as possible and the center of the 86
Seats
Seats, steering wheel and mirrors
Page 89 of 364
head restraint supports the back of the head
at eye level. This will reduce the potential for
injury to the
head
and neck in the event of an
accident or similar situation.
Do not drive the vehicle without the seat head
restraints. Head restraints are intended to
help reduce injuries during an accident.
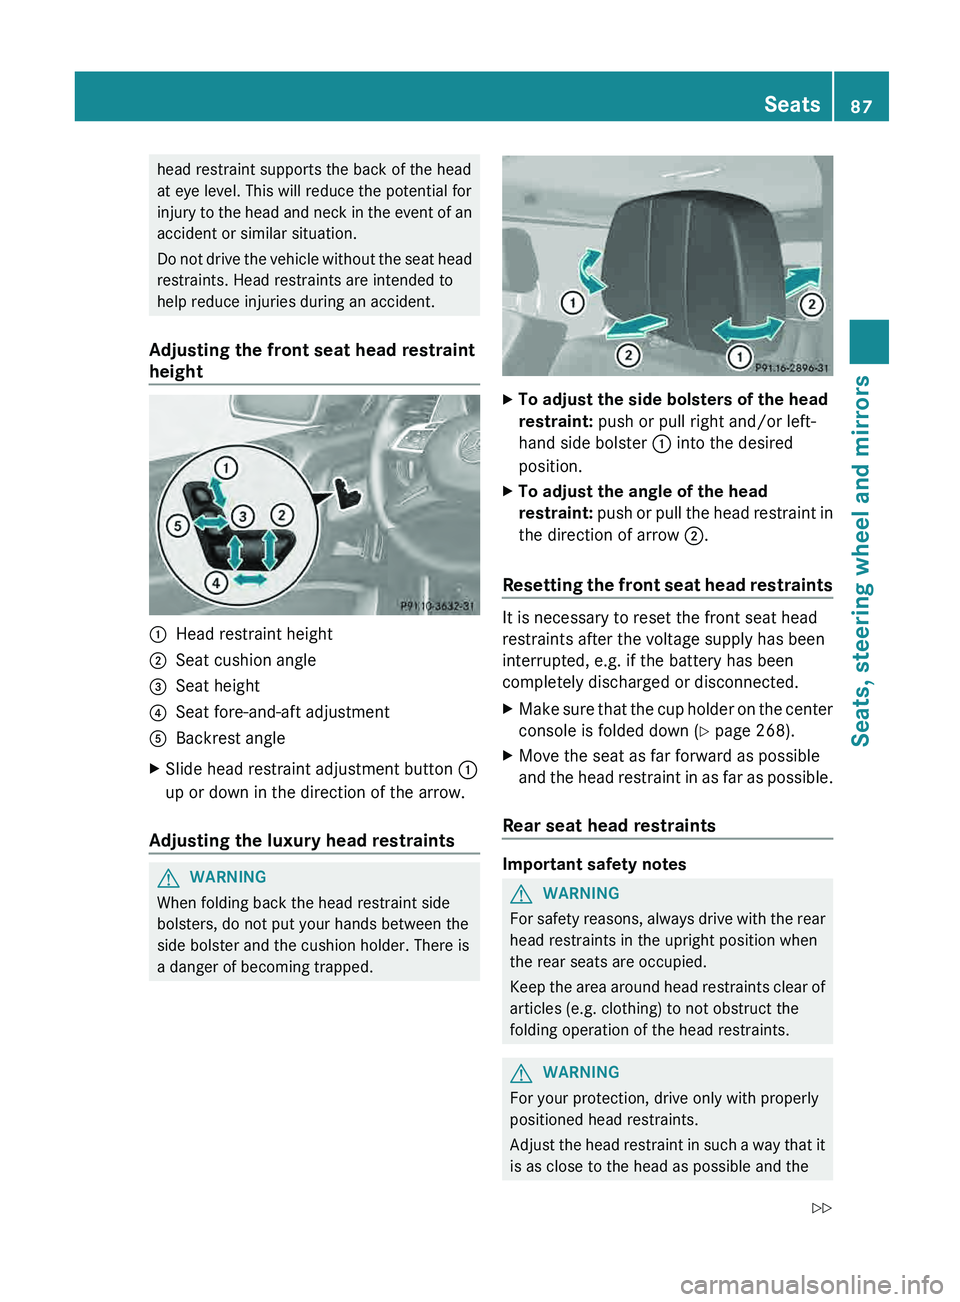
Adjusting the front seat head restraint
height 0043
Head restraint height
0044 Seat cushion angle
0087 Seat height
0085 Seat fore-and-aft adjustment
0083 Backrest angle
X Slide head restraint adjustment button 0043
up or down in the direction of the arrow.
Adjusting the luxury head restraints G
WARNING
When folding back the head restraint side
bolsters, do not put your hands between the
side bolster and the cushion holder. There is
a danger of becoming trapped. X
To adjust the side bolsters of the head
restraint: push or pull right and/or left-
hand side bolster 0043 into the desired
position.
X To adjust the angle of the head
restraint: push or pull
the head restraint in
the direction of arrow 0044.
Resetting the front seat head restraints It is necessary to reset the front seat head
restraints after the voltage supply has been
interrupted, e.g. if the battery has been
completely discharged or disconnected.
X
Make sure that the cup holder on the center
console is folded down ( Y page 268).
X Move the seat as far forward as possible
and the
head restraint
in as far as possible.
Rear seat head restraints Important safety notes
G
WARNING
For safety reasons, always drive with the rear
head restraints in the upright position when
the rear seats are occupied.
Keep the area
around
head restraints clear of
articles (e.g. clothing) to not obstruct the
folding operation of the head restraints. G
WARNING
For your protection, drive only with properly
positioned head restraints.
Adjust the head
restraint
in such a way that it
is as close to the head as possible and the Seats
87
Seats, steering wheel and mirrors
Z
Page 148 of 364
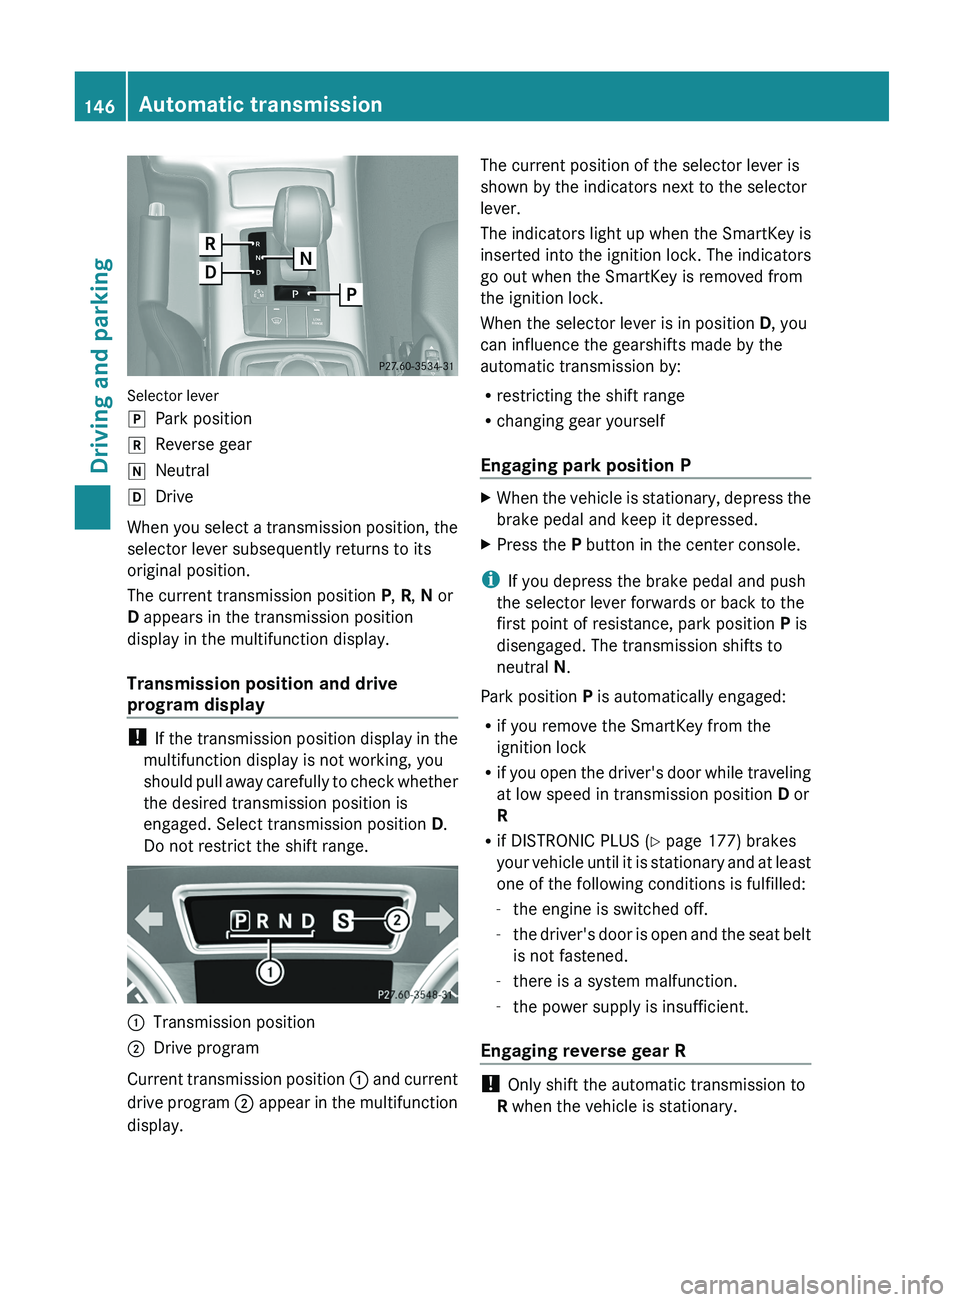
Selector lever
005D
Park position
005E Reverse gear
005C Neutral
005B Drive
When you select a transmission position, the
selector lever subsequently returns to its
original position.
The current transmission position P, R, N or
D appears in the transmission position
display in the multifunction display.
Transmission position and drive
program display !
If the transmission position
display in the
multifunction display is not working, you
should pull away carefully to check whether
the desired transmission position is
engaged. Select transmission position D.
Do not restrict the shift range. 0043
Transmission position
0044 Drive program
Current transmission position 0043 and current
drive program 0044
appear in the multifunction
display. The current position of the selector lever is
shown by the indicators next to the selector
lever.
The
indicators
light up
when the SmartKey is
inserted into the ignition lock. The indicators
go out when the SmartKey is removed from
the ignition lock.
When the selector lever is in position D, you
can influence the gearshifts made by the
automatic transmission by:
R restricting the shift range
R changing gear yourself
Engaging park position P X
When the vehicle is stationary, depress the
brake pedal and keep it depressed.
X Press the P button in the center console.
i If you depress the brake pedal and push
the selector lever forwards or back to the
first point of resistance, park position P is
disengaged. The transmission shifts to
neutral N.
Park position P is automatically engaged:
R if you remove the SmartKey from the
ignition lock
R if you open the
driver's door while traveling
at low speed in transmission position D or
R
R if DISTRONIC PLUS (Y page 177) brakes
your vehicle until it is stationary and at least
one of the following conditions is fulfilled:
-the engine is switched off.
- the driver's door is open and the seat belt
is not fastened.
- there is a system malfunction.
- the power supply is insufficient.
Engaging reverse gear R !
Only shift the automatic transmission to
R when the vehicle is stationary. 146
Automatic transmission
Driving and parking
Page 204 of 364
R
a central differential lock for the transfer
case,
R a differential lock for the front axle and
R a differential lock for the rear axle.
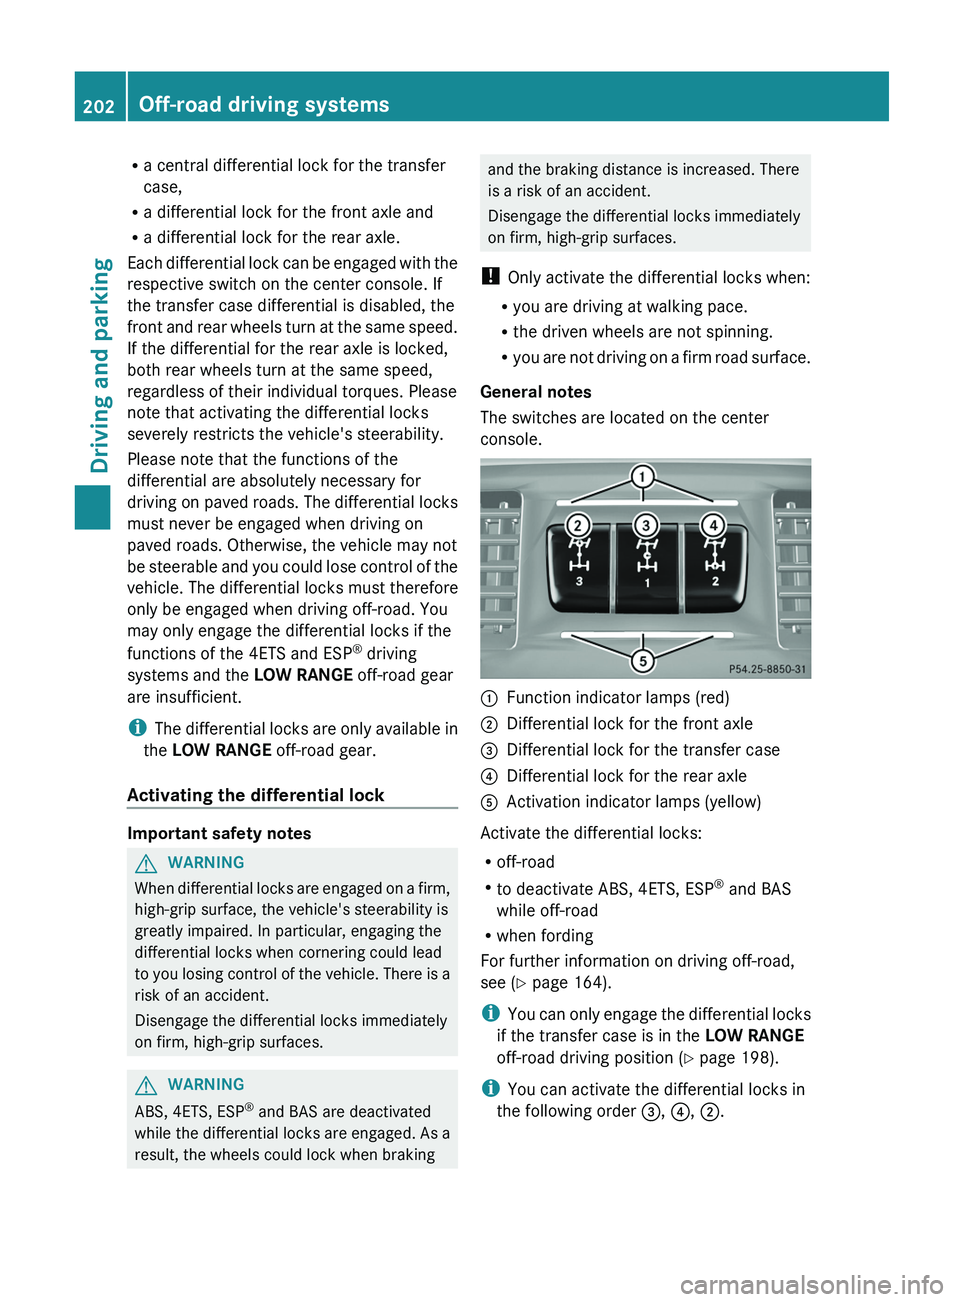
Each differential lock can
be engaged with the
respective switch on the center console. If
the transfer case differential is disabled, the
front and rear wheels turn at the same speed.
If the differential for the rear axle is locked,
both rear wheels turn at the same speed,
regardless of their individual torques. Please
note that activating the differential locks
severely restricts the vehicle's steerability.
Please note that the functions of the
differential are absolutely necessary for
driving on paved roads. The differential locks
must never be engaged when driving on
paved roads. Otherwise, the vehicle may not
be steerable and you could lose control of the
vehicle. The differential locks must therefore
only be engaged when driving off-road. You
may only engage the differential locks if the
functions of the 4ETS and ESP ®
driving
systems and the LOW RANGE off-road gear
are insufficient.
i The differential locks are only available in
the LOW RANGE off-road gear.
Activating the differential lock Important safety notes
G
WARNING
When differential locks are engaged on a firm,
high-grip surface, the vehicle's steerability is
greatly impaired. In particular, engaging the
differential locks when cornering could lead
to you losing control
of the vehicle. There is a
risk of an accident.
Disengage the differential locks immediately
on firm, high-grip surfaces. G
WARNING
ABS, 4ETS, ESP ®
and BAS are deactivated
while the differential locks are engaged. As a
result, the wheels could lock when braking and the braking distance is increased. There
is a risk of an accident.
Disengage the differential locks immediately
on firm, high-grip surfaces.
! Only activate the differential locks when:
R you are driving at walking pace.
R the driven wheels are not spinning.
R you are not driving
on a firm road surface.
General notes
The switches are located on the center
console. 0043
Function indicator lamps (red)
0044 Differential lock for the front axle
0087 Differential lock for the transfer case
0085 Differential lock for the rear axle
0083 Activation indicator lamps (yellow)
Activate the differential locks:
R off-road
R to deactivate ABS, 4ETS, ESP ®
and BAS
while off-road
R when fording
For further information on driving off-road,
see ( Y page 164).
i You can only engage
the differential locks
if the transfer case is in the LOW RANGE
off-road driving position (Y page 198).
i You can activate the differential locks in
the following order 0087, 0085, 0044.202
Off-road driving systems
Driving and parking