glove box MERCEDES-BENZ G-CLASS SUV 2013 Owners Manual
[x] Cancel search | Manufacturer: MERCEDES-BENZ, Model Year: 2013, Model line: G-CLASS SUV, Model: MERCEDES-BENZ G-CLASS SUV 2013Pages: 364, PDF Size: 9.62 MB
Page 12 of 364
Fuse box in the transmission
tunnel ............................................
314
Important safety notes .................. 313
In the battery case .........................315G
Garage door opener Clearing the memory ..................... 284
Important safety notes
..................280
Opening/closing the garage door ..284
Programming the remote control ... 281
Gasoline ............................................. 351
Gear indicator (on-board
computer) .......................................... 222
Gear or selector lever (cleaning
guidelines) ......................................... 299
Genuine Mercedes-Benz parts ......... 348
Genuine wood trim and trim strips
(cleaning instructions) ......................299
Glove box ........................................... 263
Gradient-climbing capability
(maximum) ......................................... 168
GTW (Gross Trailer Weight)
(definition) ......................................... 338H
Hazard warning lamps ......................104
Headlamps Adding fluid to cleaning system .....292
Cleaning ......................................... 297
Cleaning system (capacity) ............356
Cleaning system (function)
............103
Cleaning system (notes) ................356
Fogging up ..................................... 105
Protective grille .............................. 112
see Automatic headlamp mode
Head restraints
Adjusting ......................................... 86
Adjusting (rear) ................................ 87
Installing/removing (rear) ................ 88
Luxury .............................................. 87
Resetting (front) ............................... 87
Heating
see Climate control High-beam headlamps
Display message ............................ 232
Switching on/off ........................... 103
Hill start assist
.................................. 141
HOLD function Function/notes ............................. 192
Hood
Closing ........................................... 289
Display message ............................ 246
Important safety notes .................. 288
Opening ......................................... 289
Hydroplaning ..................................... 162 I
Immobilizer .......................................... 64
Instrument cluster Overview ........................................ 209
Warning and indicator lamps .........247
Instrument cluster lighting .............. 209
Interior lighting ................................. 105
Automatic control .......................... 106
Cargo compartment lamp ..............107
Delayed switch-off (on-board
computer)
...................................... 220
Manual control ............................... 106
Overview ........................................ 105
Reading lamp ................................. 107
Rear interior lighting ......................108 J
Jack Pump lever ..................................... 342
Storage location ............................ 302
Using ............................................. 342
Jump starting (engine)
......................308 K
Key positions SmartKey ....................................... 139
Kickdown
Manual drive program .................... 15210
Index
Page 17 of 364
Side windows
Convenience opening feature .......... 78
Important safety information ........... 78
Opening/closing .............................. 78
Overview
.......................................... 78
Troubleshooting ............................... 79
Ski rack .............................................. 267
Sliding sunroof Important safety notes .................... 79
Opening/closing .............................. 80
Operating manually ..........................80
Problem (malfunction) .....................81
SmartKey
Changing the battery ....................... 71
Changing the programming ............. 69
Checking the battery ....................... 70
Convenience opening feature .......... 78
Display message ............................ 247
Door central locking/unlocking ....... 68
Important safety notes .................... 68
Loss ................................................. 72
Malfunction ...................................... 72
Mechanical key ................................ 70
Overview .......................................... 68
Problem (malfunction) .....................72
Starting the engine ........................ 140
Snow chains ...................................... 321
Sockets Front-passenger footwell ...............271
Luggage compartment ................... 271
Rear compartment ......................... 271
SOS
see mbrace
Spare fuses ........................................ 313
Spare wheel Mounting ....................................... 340
Notes/data .................................... 346
Spare wheel bracket at the rear ....303
Stainless-steel spare hub cap ........ 304
Specialist workshop ............................ 23
Special seat belt retractor .................. 52
Speed, controlling see Cruise control
Speedometer
Digital ............................................ 213
In the Instrument cluster ............... 209Segments
...................................... 210
Selecting the unit of
measurement ................................ 219
see Instrument cluster
SPEEDTRONIC
Display message ............................ 241
Selecting ........................................ 175
Variable ......................................... 174
SRS
see SRS (Supplemental Restraint
System)
SRS (Supplemental Restraint
System)
Display message ............................ 229
Introduction ..................................... 39
Warning lamp ................................. 255
Warning lamp (function) ................... 39
Standing lamps
Display message ............................ 233
Switching on/off ........................... 102
Starting the engine
Important safety notes .................. 140
Steering (display message) ..............246
Steering wheel Adjusting (electrically) .....................91
Buttons (on-board computer) ......... 210
Cleaning ......................................... 299
Important safety notes .................... 90
Paddle shifters ............................... 150
Steering wheel heating .................... 91
Storing settings (memory
function) .......................................... 95
Steering wheel heating
Indicator lamp (malfunction) ............ 91
Steering wheel paddle shifters ........150
Stopwatch (RACETIMER) ................... 222
Stowage areas ................................... 263
Stowage compartments Armrest (under) ............................. 263
Cup holders ................................... 268
Glove box ....................................... 263
Important safety information ......... 263
Stowage pockets ........................... 264
Summer tires ..................................... 320
Sun visor ............................................ 268 Index
15
Page 45 of 364
If the
0073007C indicator lamp does not go
out, please consult an authorized Mercedes-
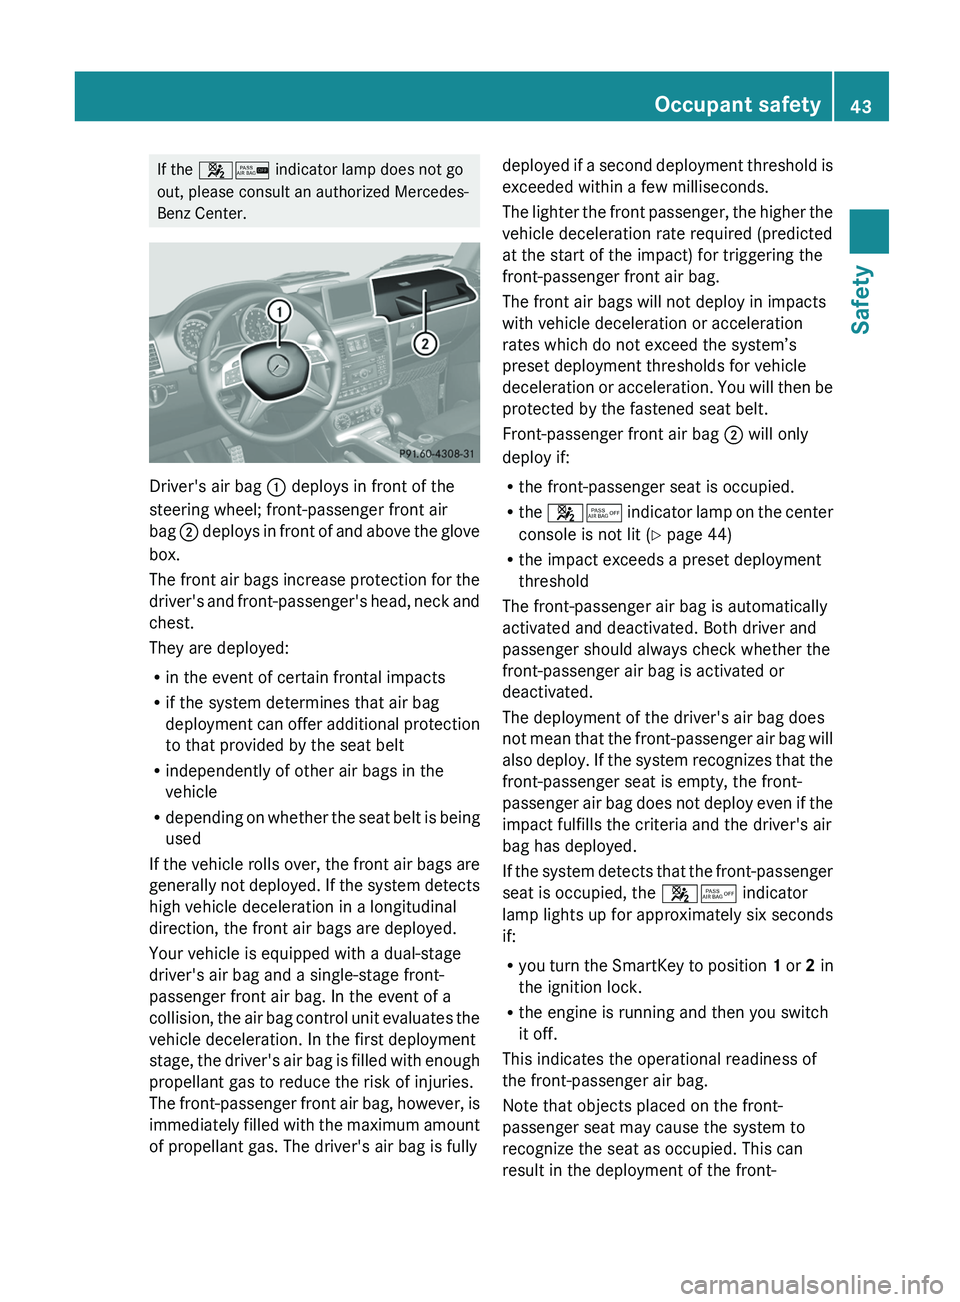
Benz Center. Driver's air bag
0043 deploys in front of the
steering wheel; front-passenger front air
bag 0044 deploys in front
of and above the glove
box.
The front air bags increase protection for the
driver's and front-passenger's head, neck and
chest.
They are deployed:
R in the event of certain frontal impacts
R if the system determines that air bag
deployment can offer additional protection
to that provided by the seat belt
R independently of other air bags in the
vehicle
R depending on whether the seat belt is being
used
If the vehicle rolls over, the front air bags are
generally not deployed. If the system detects
high vehicle deceleration in a longitudinal
direction, the front air bags are deployed.
Your vehicle is equipped with a dual-stage
driver's air bag and a single-stage front-
passenger front air bag. In the event of a
collision, the air bag control unit evaluates the
vehicle deceleration. In the first deployment
stage, the driver's air bag is filled with enough
propellant gas to reduce the risk of injuries.
The front-passenger front air bag, however, is
immediately filled with the maximum amount
of propellant gas. The driver's air bag is fully deployed if a second deployment threshold is
exceeded within a few milliseconds.
The
lighter the
front
passenger, the higher the
vehicle deceleration rate required (predicted
at the start of the impact) for triggering the
front-passenger front air bag.
The front air bags will not deploy in impacts
with vehicle deceleration or acceleration
rates which do not exceed the system’s
preset deployment thresholds for vehicle
deceleration or acceleration. You will then be
protected by the fastened seat belt.
Front-passenger front air bag 0044 will only
deploy if:
R the front-passenger seat is occupied.
R the 00730074 indicator lamp on the center
console is not lit (Y page 44)
R the impact exceeds a preset deployment
threshold
The front-passenger air bag is automatically
activated and deactivated. Both driver and
passenger should always check whether the
front-passenger air bag is activated or
deactivated.
The deployment of the driver's air bag does
not mean that the front-passenger air bag will
also deploy. If the system recognizes that the
front-passenger seat is empty, the front-
passenger air bag does not deploy even if the
impact fulfills the criteria and the driver's air
bag has deployed.
If the system detects that the front-passenger
seat is occupied, the 00730074 indicator
lamp lights up for approximately six seconds
if:
R you turn the SmartKey to position 1 or 2 in
the ignition lock.
R the engine is running and then you switch
it off.
This indicates the operational readiness of
the front-passenger air bag.
Note that objects placed on the front-
passenger seat may cause the system to
recognize the seat as occupied. This can
result in the deployment of the front- Occupant safety
43
Safety Z
Page 265 of 364
If the rear bench seat is not occupied:
X
Insert the belt tongue on the outer seat
belts into the buckle of opposite seat
belt 0043.
X Secure the load with sufficiently strong and
wear-resistant tie downs.
X Pad sharp edges for protection. Stowage areas
Stowage space
Important safety notes G
WARNING
To help avoid personal injury during a collision
or sudden maneuver, exercise care when
storing objects in the vehicle. Put luggage or
cargo in the cargo compartment if possible.
Do not pile luggage or cargo higher than the
seat backrests.
Keep compartment lids closed. This will help
to prevent stored objects from being thrown
about and injuring vehicle occupants during
R braking
R vehicle maneuvers
R an accident
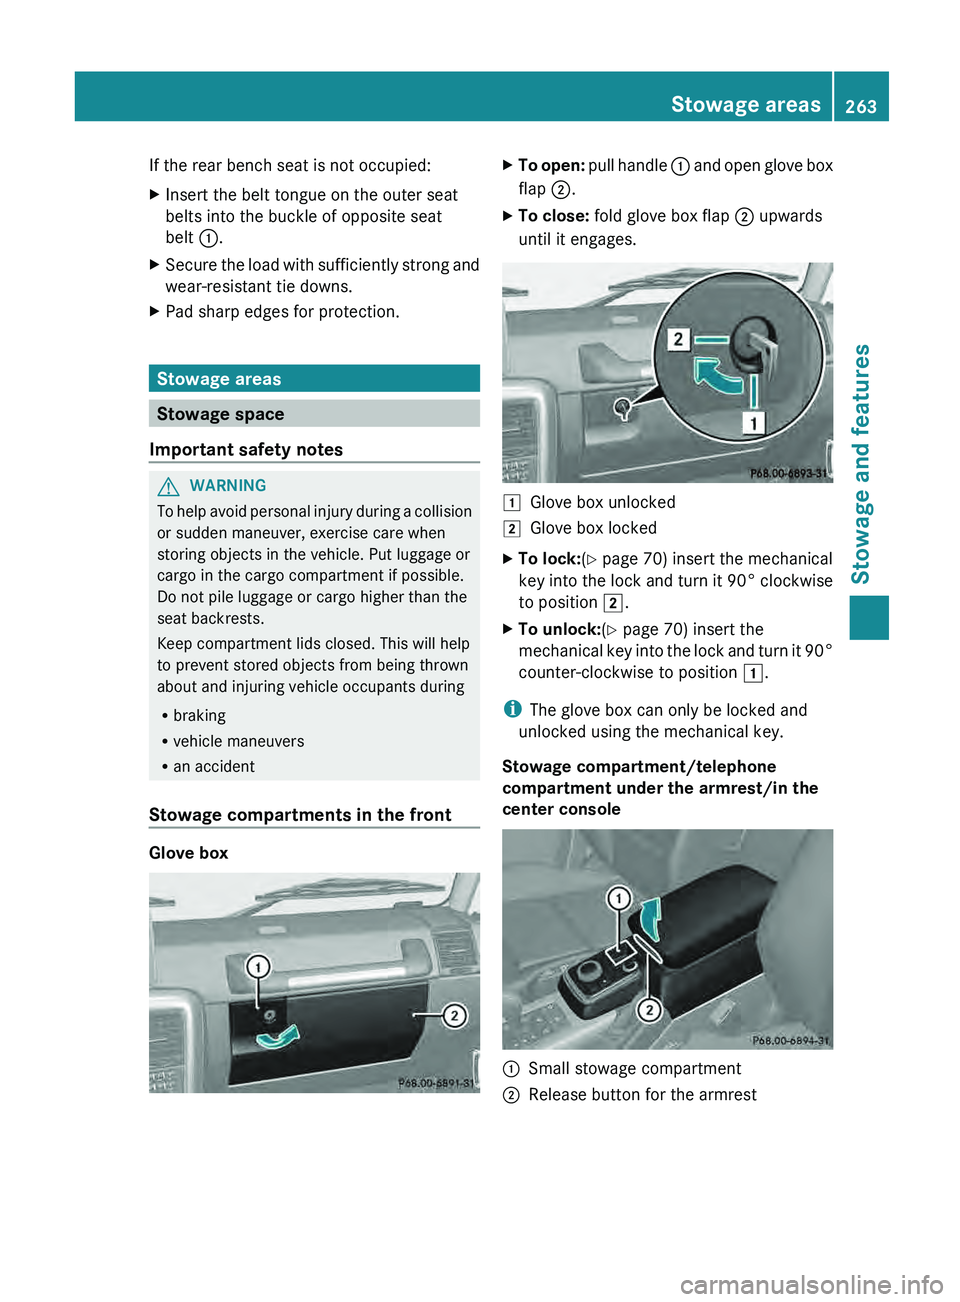
Stowage compartments in the front Glove box X
To open: pull handle 0043 and open glove box
flap 0044.
X To close: fold glove box flap 0044 upwards
until it engages. 0047
Glove box unlocked
0048 Glove box locked
X To lock:(Y page 70) insert the mechanical
key into the lock
and turn it 90° clockwise
to position 0048.
X To unlock:(Y page 70) insert the
mechanical key into the
lock and turn it 90°
counter-clockwise to position 0047.
i The glove box can only be locked and
unlocked using the mechanical key.
Stowage compartment/telephone
compartment under the armrest/in the
center console 0043
Small stowage compartment
0044 Release button for the armrest Stowage areas
263
Stowage and features Z
Page 271 of 364
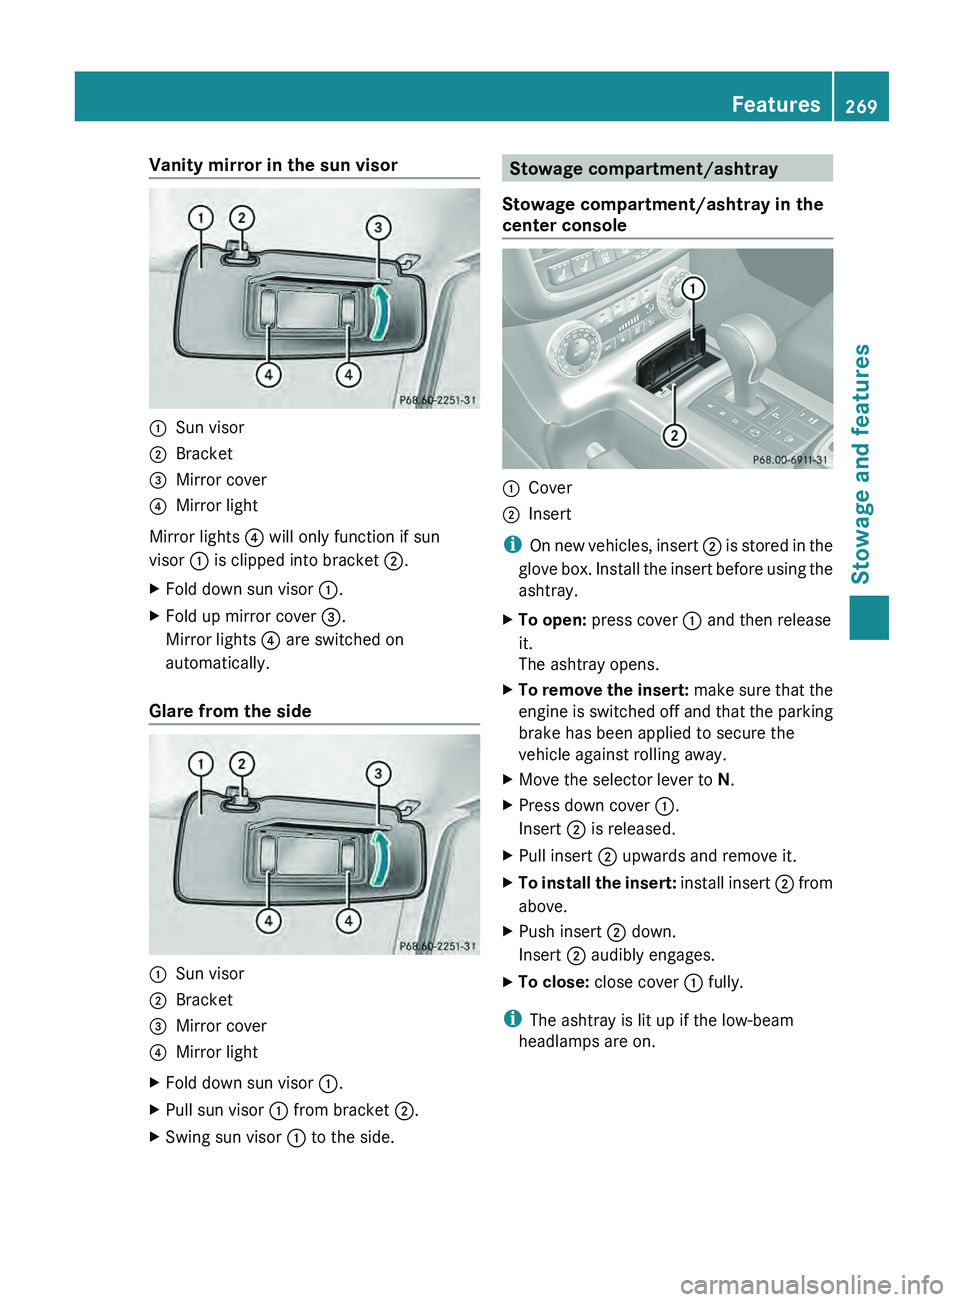
Vanity mirror in the sun visor
0043
Sun visor
0044 Bracket
0087 Mirror cover
0085 Mirror light
Mirror lights 0085 will only function if sun
visor 0043 is clipped into bracket 0044.
X Fold down sun visor 0043.
X Fold up mirror cover 0087.
Mirror lights 0085 are switched on
automatically.
Glare from the side 0043
Sun visor
0044 Bracket
0087 Mirror cover
0085 Mirror light
X Fold down sun visor 0043.
X Pull sun visor 0043 from bracket 0044.
X Swing sun visor 0043 to the side. Stowage compartment/ashtray
Stowage compartment/ashtray in the
center console 0043
Cover
0044 Insert
i On new vehicles,
insert 0044
is stored in the
glove box. Install the insert before using the
ashtray.
X To open: press cover 0043 and then release
it.
The ashtray opens.
X To remove the insert: make
sure that
the
engine is switched off and that the parking
brake has been applied to secure the
vehicle against rolling away.
X Move the selector lever to N.
X Press down cover 0043.
Insert 0044 is released.
X Pull insert 0044 upwards and remove it.
X To install the insert: install insert 0044
from
above.
X Push insert 0044 down.
Insert 0044 audibly engages.
X To close: close cover 0043 fully.
i The ashtray is lit up if the low-beam
headlamps are on. Features
269
Stowage and features Z