instrument panel MERCEDES-BENZ G-CLASS SUV 2013 Owners Manual
[x] Cancel search | Manufacturer: MERCEDES-BENZ, Model Year: 2013, Model line: G-CLASS SUV, Model: MERCEDES-BENZ G-CLASS SUV 2013Pages: 364, PDF Size: 9.62 MB
Page 14 of 364
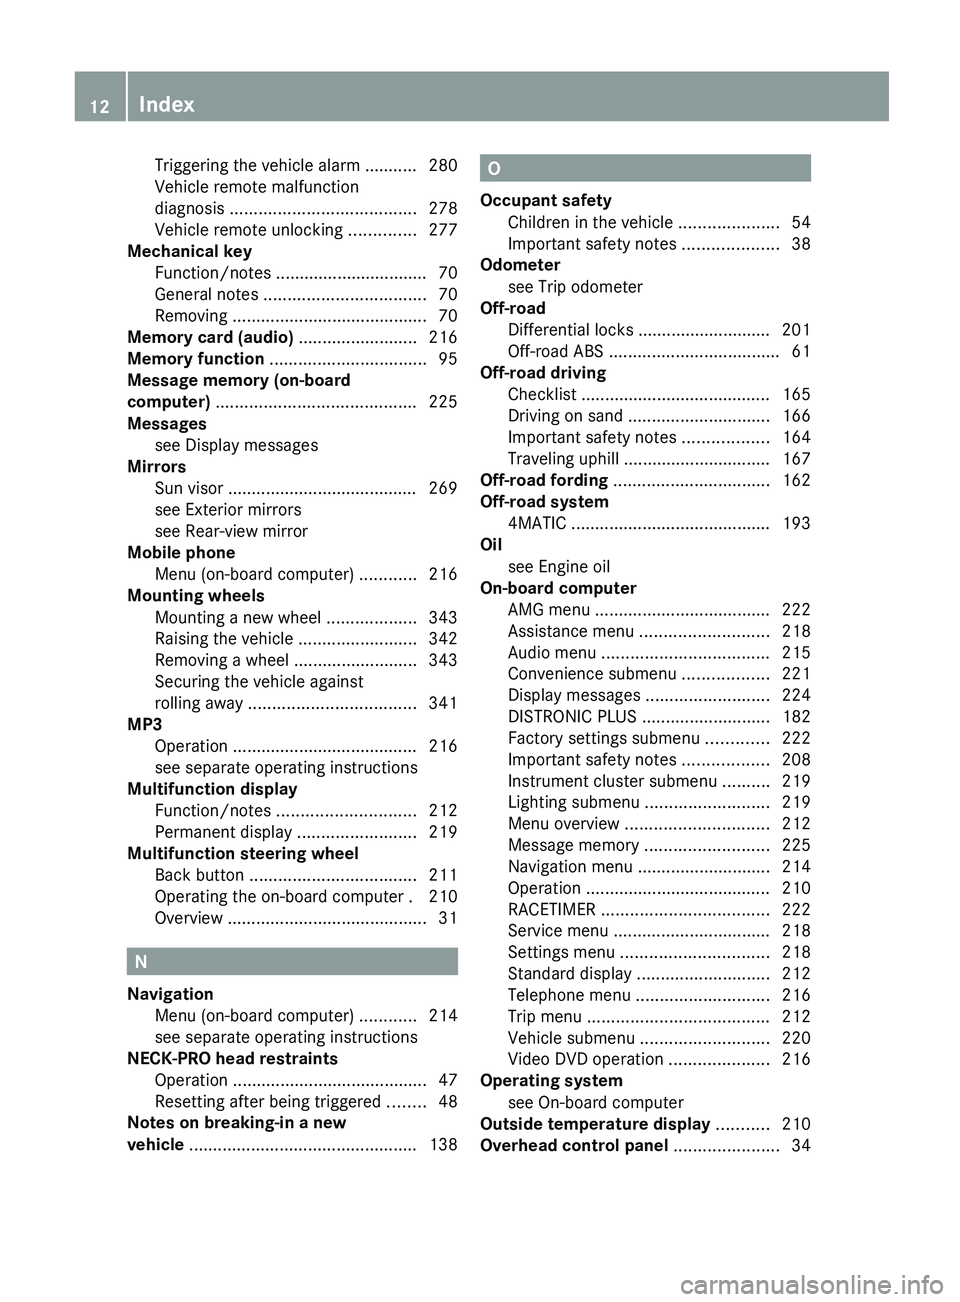
Triggering the vehicle alarm ........... 280
Vehicle remote malfunction
diagnosis
....................................... 278
Vehicle remote unlocking .............. 277
Mechanical key
Function/notes ................................ 70
General notes .................................. 70
Removing
......................................... 70
Memory card (audio) ......................... 216
Memory function ................................. 95
Message memory (on-board
computer) .......................................... 225
Messages see Display messages
Mirrors
Sun visor ........................................ 269
see Exterior mirrors
see Rear-view mirror
Mobile phone
Menu (on-board computer) ............ 216
Mounting wheels
Mounting a new wheel ................... 343
Raising the vehicle ......................... 342
Removing a wheel ..........................343
Securing the vehicle against
rolling away ................................... 341
MP3
Operation ....................................... 216
see separate operating instructions
Multifunction display
Function/notes ............................. 212
Permanent display ......................... 219
Multifunction steering wheel
Back button ................................... 211
Operating the on-board computer . 210
Overview .......................................... 31N
Navigation Menu (on-board computer) ............ 214
see separate operating instructions
NECK-PRO head restraints
Operation ......................................... 47
Resetting after being triggered ........ 48
Notes on breaking-in a new
vehicle ................................................ 138 O
Occupant safety Children in the vehicle .....................54
Important safety notes ....................38
Odometer
see Trip odometer
Off-road
Differential locks ............................ 201
Off-road ABS .................................... 61
Off-road driving
Checklist ........................................ 165
Driving on sand .............................. 166
Important safety notes .................. 164
Traveling uphill ............................... 167
Off-road fording ................................. 162
Off-road system 4MATIC .......................................... 193
Oil
see Engine oil
On-board computer
AMG menu ..................................... 222
Assistance menu ........................... 218
Audio menu ................................... 215
Convenience submenu .................. 221
Display messages ..........................224
DISTRONIC PLUS ........................... 182
Factory settings submenu ............. 222
Important safety notes .................. 208
Instrument cluster submenu ..........219
Lighting submenu .......................... 219
Menu overview .............................. 212
Message memory .......................... 225
Navigation menu ............................ 214
Operation ....................................... 210
RACETIMER ................................... 222
Service menu ................................. 218
Settings menu ............................... 218
Standard display ............................ 212
Telephone menu ............................ 216
Trip menu ...................................... 212
Vehicle submenu ........................... 220
Video DVD operation ..................... 216
Operating system
see On-board computer
Outside temperature display ...........210
Overhead control panel ......................3412
Index
Page 29 of 364
Cockpit
................................................. 28
Instrument cluster ..............................29
Multifunction steering wheel .............31
Center console .................................... 32
Overhead control panel ......................34
Door control panel .............................. 35 27At a glance
Page 30 of 364
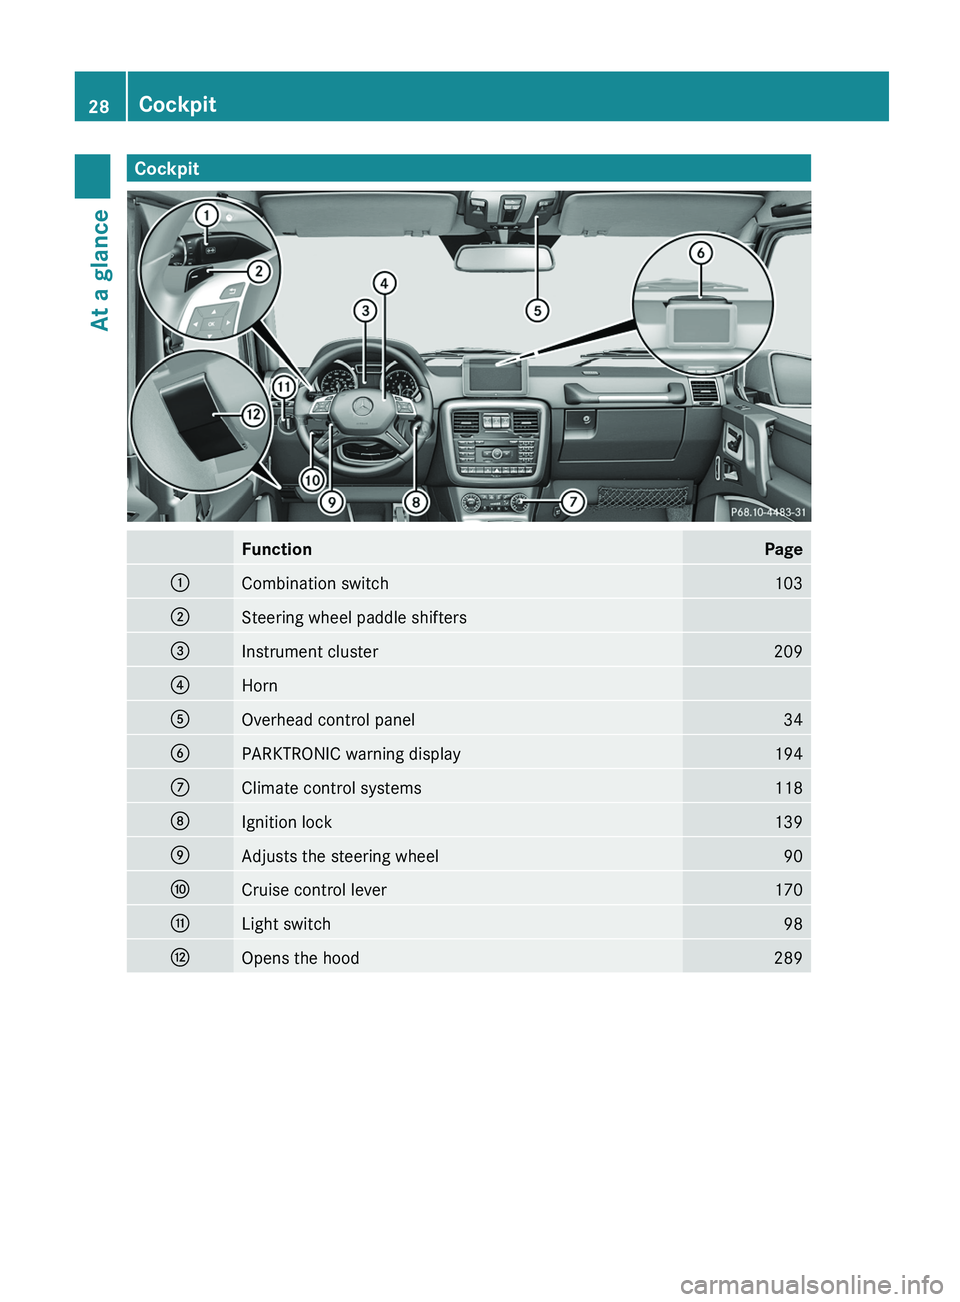
Cockpit
Function Page
0043
Combination switch 103
0044
Steering wheel paddle shifters
0087
Instrument cluster 209
0085
Horn
0083
Overhead control panel 34
0084
PARKTRONIC warning display 194
006B
Climate control systems 118
006C
Ignition lock 139
006D
Adjusts the steering wheel 90
006E
Cruise control lever 170
006F
Light switch 98
0070
Opens the hood 28928
CockpitAt a glance
Page 42 of 364
Safety guidelines for seat belts,
Emergency Tensioning Devices (ETDs)
and air bags
G
WARNING
R Damaged seat belts or
seat belts that have
been subjected to stress in an accident
must be replaced. Their anchoring points
must also be checked. Only use seat belts
installed or supplied by an authorized
Mercedes-Benz Center.
R Air bags and pyrotechnic Emergency
Tensioning Devices (ETDs) contain
perchlorate material, which may require
special handling and regard for the
environment. Check your national disposal
guidelines. California residents, see
www.dtsc.ca.gov/HazardousWaste/
Perchlorate/index.cfm.
R Air bags and ETDs are designed to function
on a one-time-only basis. An air bag or ETD
that has deployed must be replaced.
R Do not pass seat belts over sharp edges.
They could tear.
R Do not make any modification that could
change the effectiveness of the seat belts.
R Do not bleach or dye seat belts as this may
severely weaken them. In a crash they may
not be able to provide adequate protection.
R No modifications of any kind may be made
to any components or wiring of the SRS.
R Do not change or remove any component
or part of the SRS.
R Do not install additional trim material, seat
covers, badges, etc. over the steering
wheel hub, front-passenger front air bag
cover, outer sides of the seat backrests,
door trim panels, or door frame trims.
R Do not install additional electrical/
electronic equipment on or near SRS
components and wiring.
R Keep area between air bags and occupants
free of objects (e.g. packages, purses,
umbrellas, etc.). R
Do not hang items such as coat hangers
from the coat hooks or handles over the
door. These items may
be thrown around in
the vehicle and cause head and other
injuries when the window curtain air bag is
deployed.
R Air bag system components will be hot after
an air bag has inflated. Do not touch them.
R Never place your feet on the instrument
panel, dashboard, or on the seat. Always
keep both feet on the floor in front of the
seat.
R Improper repair work on the SRS creates a
risk of rendering the SRS inoperative or
causing unintended air bag deployment.
Work on the SRS must therefore only be
performed by qualified technicians.
Contact an authorized Mercedes-Benz
Center.
R For your protection and the protection of
others, when scrapping the air bag unit or
ETD, our safety instructions must be
followed. These instructions are available
from any authorized Mercedes-Benz
Center.
R Given the considerable deployment speed,
required inflation volume, and the material
of the air bags, there is the possibility of
abrasions or other, potentially more serious
injuries resulting from air bag deployment.
If you sell your vehicle, Mercedes-Benz
strongly recommends that you inform the
subsequent owner that the vehicle is
equipped with SRS. Also, refer them to the
applicable section in the Operator's Manual. 40
Occupant safety
Safety
Page 55 of 364
the door trim panel and the seat belt.
Damaged seat belts can no longer fulfill
their protective function and must be
replaced. Visit a qualified specialist
workshop.
X
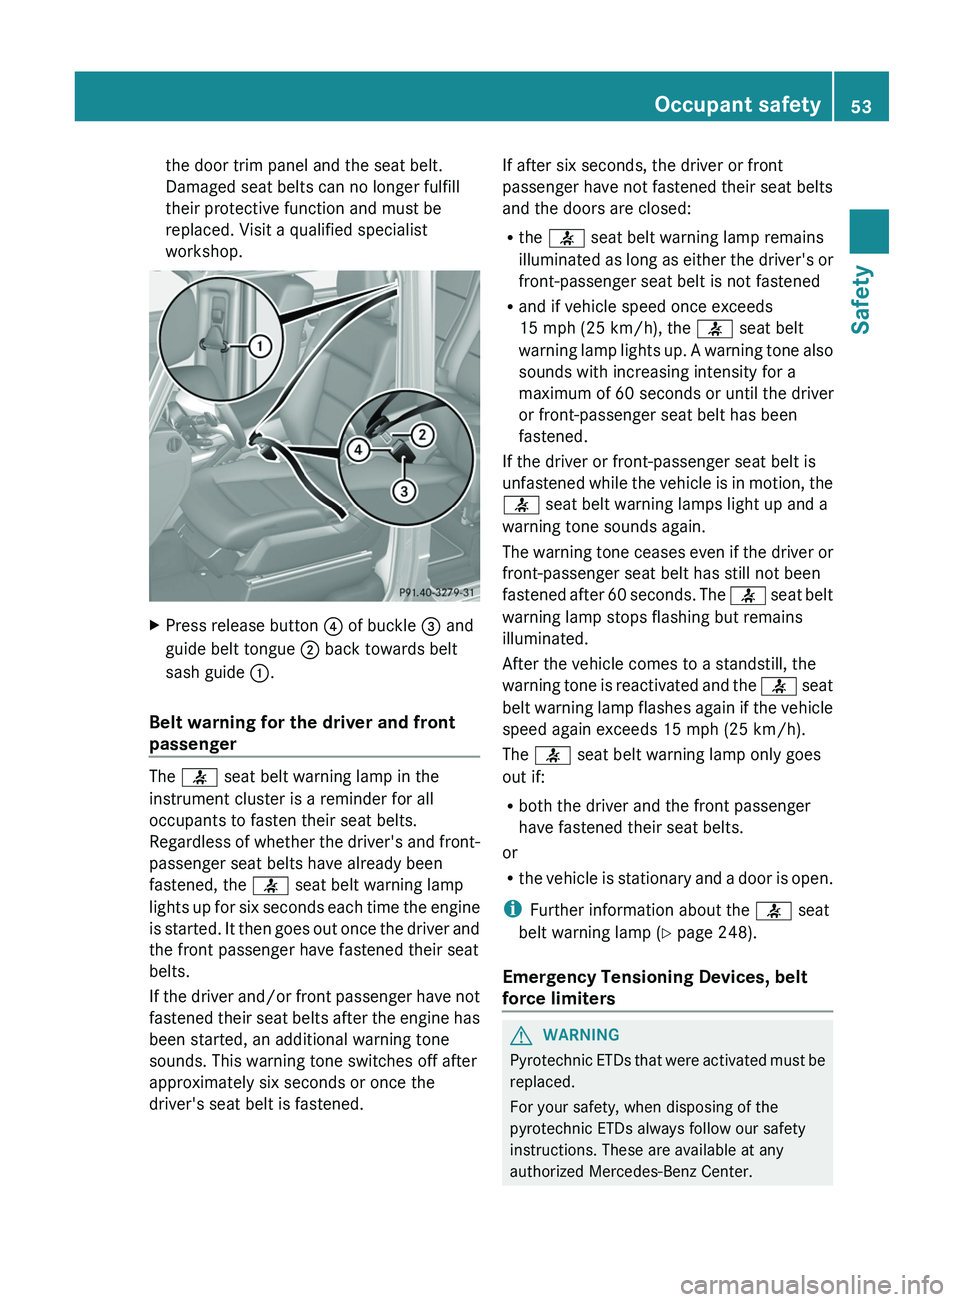
Press release button 0085 of buckle 0087 and
guide belt tongue 0044 back towards belt
sash guide 0043.
Belt warning for the driver and front
passenger The 0076 seat belt warning lamp in the
instrument cluster is a reminder for all
occupants to fasten their seat belts.
Regardless of whether
the
driver's and front-
passenger seat belts have already been
fastened, the 0076 seat belt warning lamp
lights up for six seconds each time the engine
is started. It then goes out once the driver and
the front passenger have fastened their seat
belts.
If the driver and/or front passenger have not
fastened their seat belts after the engine has
been started, an additional warning tone
sounds. This warning tone switches off after
approximately six seconds or once the
driver's seat belt is fastened. If after six seconds, the driver or front
passenger have not fastened their seat belts
and the doors are closed:
R
the 0076 seat belt warning lamp remains
illuminated as long as
either the driver's or
front-passenger seat belt is not fastened
R and if vehicle speed once exceeds
15 mph (25 km/h), the 0076 seat belt
warning lamp lights up. A warning tone also
sounds with increasing intensity for a
maximum of 60 seconds or until the driver
or front-passenger seat belt has been
fastened.
If the driver or front-passenger seat belt is
unfastened while the vehicle is in motion, the
0076 seat belt warning lamps light up and a
warning tone sounds again.
The warning tone ceases even if the driver or
front-passenger seat belt has still not been
fastened after 60 seconds. The 0076 seat belt
warning lamp stops flashing but remains
illuminated.
After the vehicle comes to a standstill, the
warning tone is reactivated and the 0076 seat
belt warning lamp flashes again if the vehicle
speed again exceeds 15 mph (25 km/h).
The 0076 seat belt warning lamp only goes
out if:
R both the driver and the front passenger
have fastened their seat belts.
or
R the vehicle is stationary and a door is open.
i Further information about the 0076 seat
belt warning lamp (Y page 248).
Emergency Tensioning Devices, belt
force limiters G
WARNING
Pyrotechnic ETDs that were activated must be
replaced.
For your safety, when disposing of the
pyrotechnic ETDs always follow our safety
instructions. These are available at any
authorized Mercedes-Benz Center. Occupant safety
53
Safety Z
Page 107 of 364
signal or turn the steering wheel to the
straight-ahead position
The cornering light
function
may remain lit for
a short time, but is automatically switched off
after no more than three minutes. Headlamps and indicator lamps
fogged up on the inside
The headlamps and the
indicator lamps in the
exterior mirrors may fog up on the inside if
there is high atmospheric humidity.
X Drive with the headlamps switched on.
The level of moisture diminishes,
depending on the length
of the journey and
the weather conditions (humidity and
temperature).
If the level of moisture does not diminish:
X Have the headlamps checked at a qualified
specialist workshop. Interior lighting
Overview of interior lighting
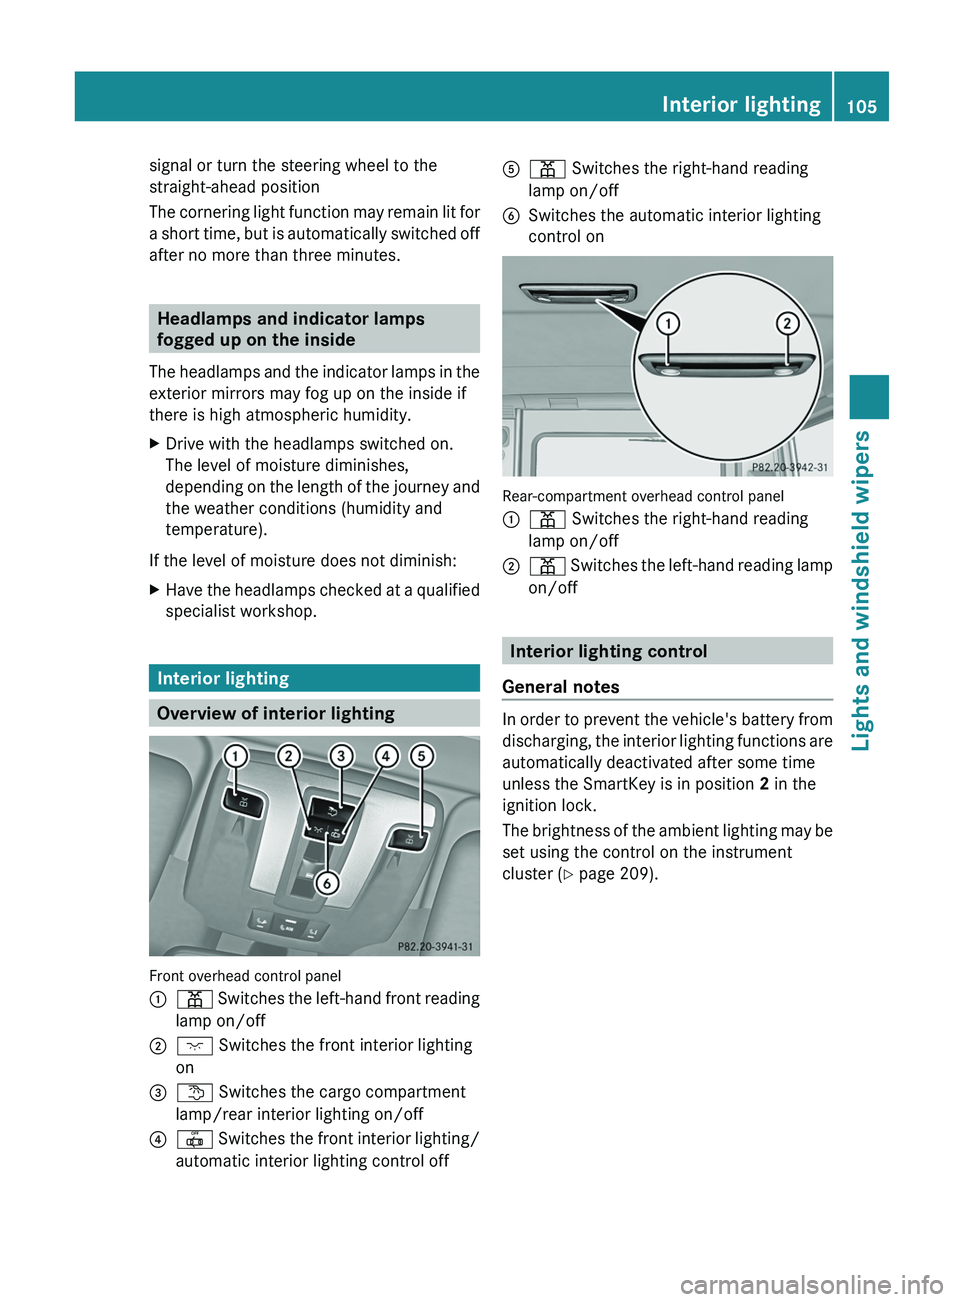
Front overhead control panel
0043
003D Switches the left-hand front reading
lamp on/off
0044 004A Switches the front interior lighting
on
0087 0041 Switches the cargo compartment
lamp/rear interior lighting on/off
0085 0033
Switches the front interior lighting/
automatic interior lighting control off 0083
003D Switches the right-hand reading
lamp on/off
0084 Switches the automatic interior lighting
control on Rear-compartment overhead control panel
0043
003D Switches the right-hand reading
lamp on/off
0044 003D Switches the left-hand reading lamp
on/off Interior lighting control
General notes In order to prevent the vehicle's battery from
discharging, the interior
lighting
functions are
automatically deactivated after some time
unless the SmartKey is in position 2 in the
ignition lock.
The brightness of the ambient lighting may be
set using the control on the instrument
cluster (Y page 209). Interior lighting
105
Lights and windshield wipers Z
Page 205 of 364
Differential lock for the transfer case
X
To engage: switch the transfer case to the
LOW RANGE off-road driving position ( Y
page 199).
X Press switch 0087.
When the transfer case is in the LOW
RANGE off-road driving position,
the yellow
activation indicator lamp below switch 0087
lights up.
The 00BB warning lamp in the instrument
panel lights up.
When the differential is locked, the red
function indicator lamp above switch 0087
lights up.
In the multifunction display you see the:
ABS not available Differential
Locked
The 00BB002500E5 warning lamps in the
instrument cluster light up.
The differential lock for the transfer case is
engaged.
4ETS, ESP ®
, BAS and ABS are deactivated.
The vehicle's ability to steer is severely
restricted. Drive carefully and accelerate
gently for optimum traction.
i You can now engage the differential lock
for rear axle 0085
and the differential lock for
front axle 0044 as required.
Differential lock for the rear axle X
To engage: press switch 0085.
Yellow activation indicator lamp 0083 lights
up first, followed by red function indicator
lamp 0043 of switch 0085.
The differential lock for the rear axle is
engaged.
Differential lock for the front axle X
To engage: press switch 0044.
First, the yellow activation indicator lamp
lights up, followed by the red function
indicator lamp. The differential lock for the front axle is
engaged.
Deactivating the differential lock You can deactivate the differential locks in
this order: 0044, 0085, 0087.
X
To simultaneously deactivate all
differential locks: press switch 0087.
Yellow activation indicator lamps 0083 and
red function indicator lamps 0043 go out.
After approximately three seconds of
normal driving, ABS, 4ETS, ESP ®
and BAS
are activated.
The ABS not available
Differential
Locked
message disappears from the
multifunction display and the 00BB, 0025
and 00E5 warning lamps in the instrument
cluster go out.
X Shift the transfer case to the HIGH
RANGE on-road position (Y page 199).
i If red function indicator lamps 0043 do not
go out after disengaging the differential
locks, bring the vehicle to a standstill in
accordance with the traffic conditions.
Then continue driving, as the load change
can release the differential locks. Towing a trailer
Notes on towing a trailer
Important safety notes G
WARNING
If you rest your foot on the brake pedal while
driving, the braking system
can overheat. This
increases the stopping distance and can even
cause the braking system to fail. There is a
risk of an accident.
Never use the brake pedal as a footrest. Never
depress the brake pedal and the accelerator
pedal at the same time. Towing a trailer
203
Driving and parking Z
Page 212 of 364
vehicle and do not stand near the vehicle until
the engine has cooled down.
! A display message is
shown if the coolant
temperature is too high.
If the coolant temperature is over
248 ‡(120 †), do not continue driving. The
engine will otherwise be damaged.
The coolant temperature gauge is in the
instrument cluster on the right-hand side
(Y page 209).
Under normal operating conditions and with
the specified coolant level, the coolant
temperature may rise to 248 ‡ (120 †). Tachometer
! Do not drive in the overrevving range, as
this could damage the engine.
The red band in
the tachometer indicates the
engine's overrevving range.
The fuel supply is interrupted to protect the
engine when the red band is reached. Outside temperature display
G
WARNING
The outside temperature indicator is not
designed to serve as an ice-warning device
and is therefore unsuitable for that purpose.
Indicated temperatures just above the
freezing point do not
guarantee that the road
surface is free of ice. The road may still be icy,
especially in wooded areas or on bridges.
The outside temperature display is in the
multifunction display ( Y page 212).
Changes in the outside temperature are
displayed after a short delay. Speedometer with segments
The segments in the speedometer indicate
which speed range is available.
R Cruise control activated ( Y page 169):
The segments light up from the stored
speed to the maximum speed.
R Variable SPEEDTRONIC activated
(Y page 174):
The segments light up
from the start of the
scale to the selected limit speed.
R DISTRONIC PLUS activated (Y page 179):
One or two segments in the set speed
range light up.
R DISTRONIC PLUS detects a vehicle in front:
The segments between the speed of the
vehicle in front and the stored speed light
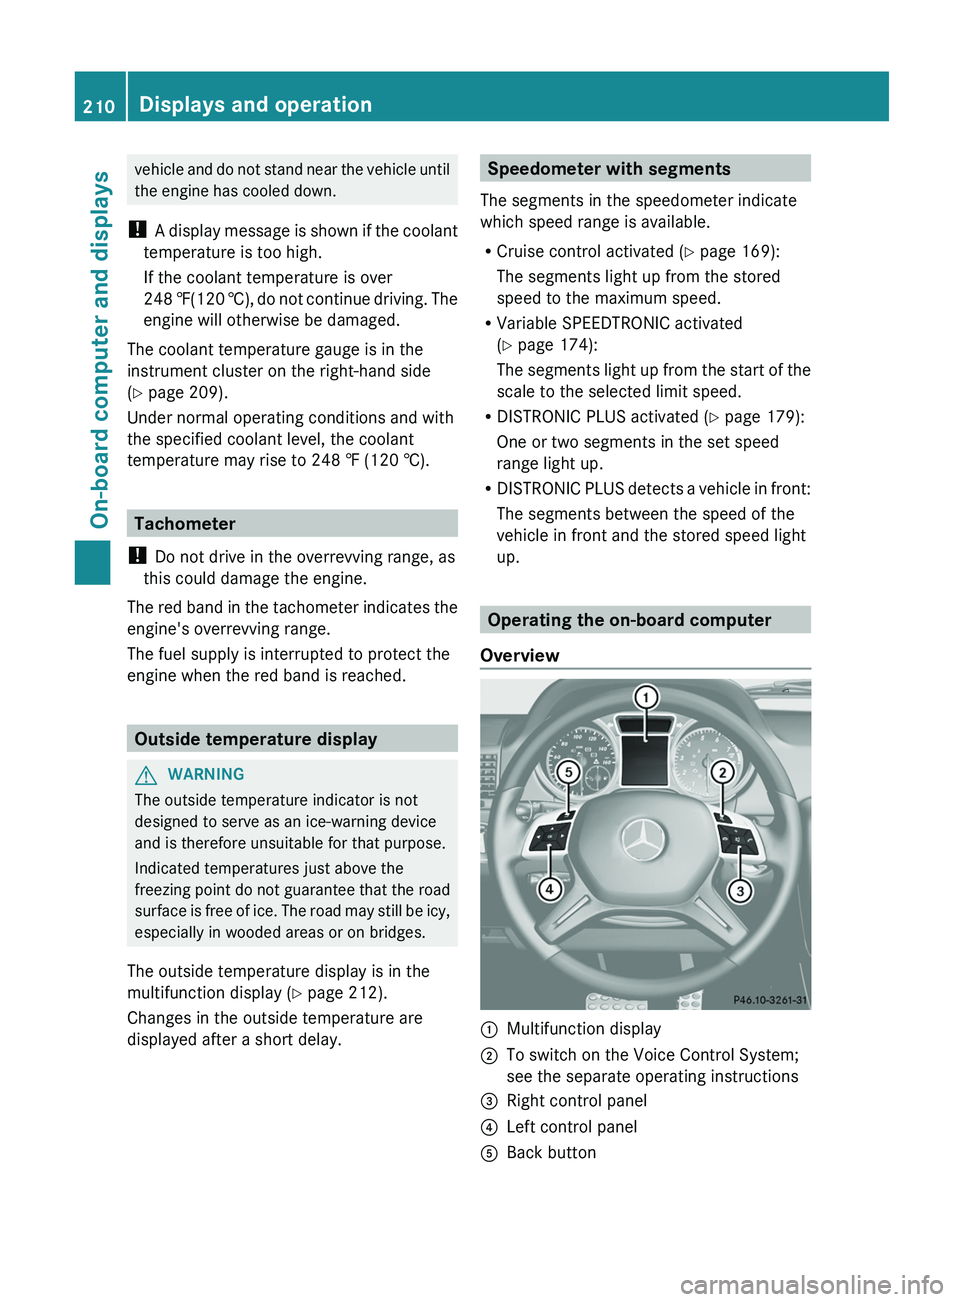
up. Operating the on-board computer
Overview 0043
Multifunction display
0044 To switch on the Voice Control System;
see the separate operating instructions
0087 Right control panel
0085 Left control panel
0083 Back button210
Displays and operation
On-board computer and displays