wheel size MERCEDES-BENZ G-CLASS SUV 2013 Owners Manual
[x] Cancel search | Manufacturer: MERCEDES-BENZ, Model Year: 2013, Model line: G-CLASS SUV, Model: MERCEDES-BENZ G-CLASS SUV 2013Pages: 364, PDF Size: 9.62 MB
Page 19 of 364
Checking ........................................ 319
Definition of terms .........................
338
Direction of rotation ...................... 341
Display message
............................ 242
Distribution of the vehicle
occupants (definition) .................... 340
DOT, Tire Identification Number
(TIN) ............................................... 337
DOT (Department of
Transportation) (definition) ............ 338
GAWR (Gross Axle Weight Rating)
(definition) ..................................... 338
GTW (Gross Trailer Weight)
(definition) ..................................... 338
GVW (Gross Vehicle Weight)
(definition) ..................................... 338
GVWR (Gross Vehicle Weight
Rating) (definition) .........................339
Important safety notes .................. 318
Increased vehicle weight due to
optional equipment (definition) ...... 338
Kilopascal (kPa) (definition) ........... 339
Labeling (overview) ........................ 334
Load bearing index (definition) ...... 340
Load index ..................................... 336
Load index (definition) ...................339
Maximum loaded vehicle weight
(definition) ..................................... 339
Maximum load on a tire
(definition) ..................................... 339
Maximum permissible tire
pressure (definition) ....................... 339
Maximum tire load ......................... 337
Maximum tire load (definition) .......339
Optional equipment weight
(definition) ..................................... 340
PSI (pounds per square inch)
(definition) ..................................... 339
Replacing ....................................... 340
Service life ..................................... 320
Sidewall (definition) .......................340
Speed rating (definition) ................ 338
Storing ........................................... 341
Structure and characteristics
(definition) ..................................... 338
Technical data ............................... 344
Temperature .................................. 333TIN (Tire Identification Number)
(definition) .....................................
340
Tire bead (definition) ......................340
Tire pressure (definition) ................ 339
Tire pressures (recommended)
......338
Tire size (data) ............................... 344
Tire size designation, load-bearing
capacity, speed rating .................... 334
Tire tread ....................................... 319
Tire tread (definition) .....................339
Total load limit (definition) ............. 340
Traction ......................................... 333
Traction (definition) ....................... 340
Tread wear ..................................... 333
TWR (permissible trailer drawbar
noseweight) (definition) .................340
Uniform Tire Quality Grading
Standards ...................................... 332
Uniform Tire Quality Grading
Standards (definition) .................... 338
Unladen weight (definition) ............ 339
Wear indicator (definition) .............340
Wheel rim (definition) .................... 338
see Flat tire
Top Tether ............................................ 58
Towing Important safety guidelines ...........310
In the event of malfunctions ..........313
Towing a trailer
Axle load, permissible .................... 358
Driving tips .................................... 203
Lights display message .................. 231
Mounting dimensions .................... 358
Shift range ..................................... 149
Trailer loads ................................... 358
Trailer tow hitch ............................. 358
Towing away
With both axles on the ground ....... 312
Towing eye
Front .............................................. 311
Rear ............................................... 311
Tow-starting
Important safety notes .................. 310
Trailer
7-pin connector ............................. 206
Power supply ................................. 206
Trailer loads
Technical data ............................... 358 Index
17
Page 21 of 364
Cruise control ................................
170
Distance warning ........................... 258
DISTRONIC PLUS ........................... 258
ESP ®
.............................................. 252
ESP ®
OFF ....................................... 253
Fuel tank ........................................ 256
LIM (DISTRONIC PLUS) ..................179
LIM (variable SPEEDTRONIC)
.........175
Overview .................................. 30, 247
Parking brake ................................ 255
PASSENGER AIRBAG OFF ................ 44
Reserve fuel ................................... 256
Seat belt ........................................ 248
SRS ................................................ 255
Tire pressure monitor .................... 259
Warning triangle ................................ 302
Warranty ............................................ 348
Washer fluid Display message ............................ 246
Wheel bolt tightening torque ...........344
Wheels Changing a wheel .......................... 340
Checking ........................................ 319
Cleaning ......................................... 296
Cleaning (warning) .........................341
Important safety notes .................. 318
Interchanging/changing ................340
Mounting a new wheel ................... 343
Mounting a wheel .......................... 341
Overview ........................................ 318
Removing a wheel ..........................343
Storing ........................................... 341
Technical data ............................... 344
Tightening torque ........................... 344
Wheel size/tire size ....................... 344
Window curtain air bag
Display message ............................ 230
Operation ......................................... 44
Windows
see Side windows
Windows (cleaning instructions) .....297
Windshield Defrosting ...................................... 131
Windshield heating ...........................133
Windshield washer fluid see Windshield washer system Windshield washer system
Adding washer fluid ....................... 292
Filling capacity ............................... 356
Notes
............................................. 356
Windshield wipers
Problem (malfunction) ...................116
Rear window wiper ........................115
Replacing the wiper blades ............ 115
Switching on/off ........................... 114
Winter
Driving in winter ............................. 163
Winter operation ............................ 320
Winter driving
Snow chains .................................. 321
Winter operation
Overview ........................................ 320
Winter tires
M+S tires ....................................... 320
Wiper blades
Cleaning ......................................... 297
Important safety notes .................. 115
Replacing ....................................... 115 Index
19
Page 43 of 364
Air bags
Important safety notes G
WARNING
Air bags are designed to reduce the potential
of injury and fatality in certain
R frontal impacts (front air bags)
R side impacts (window curtain air bags)
However, no system available today can
completely eliminate injuries and fatalities.
Deployment of the air bags temporarily
releases a small amount of dust from the air
bags. This dust, however, is neither harmful
to your health, nor
does it indicate a fire in the
vehicle. The dust might cause some
temporary breathing difficulty for people with
asthma or other breathing trouble. To avoid
this, you may wish to get out of the vehicle as
soon as it is safe to do so. If you have any
breathing difficulty but cannot get out of the
vehicle after the air bag inflates, then get fresh
air by opening a window or door. G
WARNING
To reduce the risk of injury when the front air
bags inflate, it
is
very important for the driver
and front passenger to always be in a properly
seated position and to wear their respective
seat belt.
For maximum protection in the event of a
collision always be in normal seated position
with your back against the seat backrest.
Fasten your seat belt and make sure it is
properly positioned on your body. Since the air bag inflates with considerable
speed and force, a proper seating position
and correct positioning of the hands on the
steering wheel will
help
to keep you at a safe
distance from the air bag. Occupants who are
not wearing their seat belt, are not seated
properly or are too close to the air bag can be
seriously injured or killed by an air bag as it
inflates with great force instantaneously:
R Sit with the seat belt properly fastened in a
position that is as upright as possible with
your back against the seat backrest.
R Move the driver's seat as far back as
possible, still permitting proper operation
of vehicle controls. The distance from the
center of the driver's chest to the center of
the air bag cover on the steering wheel
must be at least 10 inches (25 cm) or more.
You should be able to accomplish this by
adjusting the seat and steering wheel. If
you have any difficulties, please contact an
authorized Mercedes-Benz Center.
R Do not lean your head or chest close to the
steering wheel or dashboard.
R Keep hands on the outside of the steering
wheel rim. Placing hands and arms inside
the rim can increase the risk and potential
severity of hand/arm injury when the driver
front air bag inflates.
R Adjust the front passenger seat as far as
possible rearward from the dashboard
when the seat is occupied.
R Occupants, especially children, should
never place their bodies or lean their heads
in the area of the door where the window
curtain air bag inflates. This could result in
serious injuries or death should the window
curtain air bag be deployed. Always sit as
upright as possible, wear the seat belt
properly and use an appropriately sized
infant restraint, toddler restraint, or
booster seat recommended for the size and
weight of the child.
R Children 12 years old and under must never
ride in the front seat, except in a Mercedes-
Benz authorized BabySmart™ compatible Occupant safety
41
Safety
Z
Page 58 of 364
G
WARNING
When leaving the vehicle, always remove the
SmartKey from the ignition lock. Always take
the SmartKey with you and lock the vehicle.
Do not leave children unattended in the
vehicle, even if they are secured in a child
restraint system, or with access to an
unlocked vehicle. A child's unsupervised
access to a vehicle
could result in an accident
and/or serious personal injury. The children
could:
R injure themselves on parts of the vehicle
R be seriously or fatally injured through
excessive exposure to extreme heat or cold
R injure themselves or cause an accident with
vehicle equipment that can be operated
even if the SmartKey is removed from the
ignition lock or removed from the vehicle,
such as seat adjustment, steering wheel
adjustment, or the memory function
If children open a door, they could injure other
persons or get out of the vehicle and injure
themselves or be injured by following traffic.
Do not expose the child restraint system to
direct sunlight. The child restraint system's
metal parts, for example, could become very
hot, and the child could be burned on these
parts. G
WARNING
Do not carry heavy or hard objects in the
passenger compartment or trunk
unless they
are firmly secured in place.
Unsecured or improperly positioned cargo
increases a child's risk of injury in the event
of
R strong braking maneuvers
R sudden changes of direction
R an accident
We recommend that all infants and children
be properly restrained using the infant or
child restraint systems at all times while the
vehicle is in motion. Always use a child restraint system that is
compatible with BabySmart™ on the front-
passenger seat.
The use of
infant
or child restraints is required
by law in all 50 states, the District of
Columbia, all U.S. territories and all Canadian
provinces.
Infants and small children must be seated in
an appropriate infant or child restraint system
recommended for the size and weight of the
child. The infant or child restraint system
must be properly secured in accordance with
the manufacturer's instructions. All infant or
child restraint systems must comply with U.S.
Federal Motor Vehicle Safety Standards 213
and 225 and Canadian Motor Vehicle Safety
Standards 213 and 210.2.
An information label on the child restraint
system indicates whether it meets these
standards. This confirmation can also be
found in the installation instructions that are
included with the child restraint system.
Always read and follow the manufacturer's
instructions when using an infant or child
restraint system or booster seat.
Observe the warning labels in the vehicle
interior or on the infant or child restraint.
If an infant or child is traveling in the vehicle:
X Secure the child with a child or infant seat
restraint system appropriate to
the age and
weight of the child.
X Make sure that the infant or child is
properly secured at all times while the
vehicle is in motion.
Special seat belt retractor G
WARNING
Observe "Important safety notes"
(Y page 54). G
WARNING
Never release the seat belt buckle while the
vehicle is in motion,
since the special seat belt
retractor will be deactivated. 56
Children in the vehicle
Safety
Page 64 of 364
Adaptive brake lamps
If you brake sharply from a speed of more
than 30 mph (50 km/h) or if braking is
assisted by BAS, the brake lamps flash
rapidly. In this way, traffic traveling behind
you is warned in an even more noticeable
manner.
If you brake sharply from a speed of more
than 45 mph (70 km/h) to a standstill, the
hazard warning lamps are activated
automatically. If
the brakes are applied again,
the brake lamps light up continuously. If you
drive faster than 6 mph (10 km/h), the hazard
warning lamps are deactivated automatically.
You can also switch off the hazard warning
lamps using the hazard warning button
(Y page 104). ESP
®
(Electronic Stability Program)
Important safety notes i
Observe the "Important safety notes"
section ( Y page 60).G
WARNING
If ESP ®
is malfunctioning, ESP ®
is unable to
stabilize the vehicle. Additionally, further
driving safety systems are deactivated. This
increases the risk
of
skidding and an accident.
Drive on carefully. Have ESP ®
checked at a
qualified specialist workshop.
! Only operate the vehicle for a maximum
of ten seconds on a brake test
dynamometer. Switch off the ignition.
Application of the brakes by ESP ®
may
otherwise destroy the brake system.
! A function or performance test should
only be carried out on a two-axle
dynamometer. Before you operate the
vehicle on such a dynamometer, please
consult a qualified workshop. You could
otherwise damage the drive train or the
brake system. ESP
®
monitors driving stability and traction.
Traction is the power transmission between
the tires and the road surface.
ESP ®
is deactivated if
the 00BB warning lamp
in the instrument cluster lights up
continuously when the engine is running.
If the 00E5 warning lamp and the 00BB
warning lamp are lit continuously, ESP ®
is not
available due to a malfunction.
Observe the information on warning lamps
(Y page 252) and any display messages that
appear in the instrument cluster
(Y page 226).
If ESP ®
detects that the vehicle is deviating
from the direction desired by the driver, one
or more wheels are braked to stabilize the
vehicle. If necessary, the engine output is also
modified to keep the vehicle on the desired
course within physical limits. ESP ®
assists
the driver when pulling away on wet or
slippery roads. ESP ®
can also stabilize the
vehicle during braking.
If ESP ®
intervenes, the 00E5 warning lamp
flashes in the instrument cluster.
If ESP ®
intervenes:
X Do not deactivate ESP ®
under any
circumstances.
X Only depress the accelerator pedal as far
as necessary when pulling away.
X Adapt your driving style to suit the
prevailing road and weather conditions.
i Only use wheels with the recommended
tire sizes. Only then will ESP ®
function
properly.
i If differential locks are
switched on, ABS,
BAS and ESP ®
switch themselves off
automatically.
4ETS (Electronic Traction System) Traction control remains active if you
deactivate ESP
®
. 62
Driving safety systems
Safety
Page 87 of 364
Seats
Important safety notes
G
WARNING
The seats can still be adjusted when there is
no key in the ignition lock. For this reason,
children should never be left unsupervised in
the vehicle. They could otherwise become
trapped when adjusting the seat. G
WARNING
In order to avoid possible loss of vehicle
control, all seat, head restraint, steering
wheel and rear view mirror adjustments, as
well as fastening of seat belts, must be done
before setting the vehicle in motion. G
WARNING
Do not adjust the driver's seat while driving.
Adjusting the seat while driving could cause
the driver to lose control of the vehicle.
Never travel in a
moving vehicle with the seat
backrest in an excessively reclined position as
this can be dangerous. You could slide under
the seat belt in a collision. If you slide under
it, the seat belt would apply force at the
abdomen or neck. This could cause serious or
fatal injuries. The seat backrest and seat belts
provide the best restraint when the wearer is
in a position that is as upright as possible and
seat belts are properly positioned on the
body. G
WARNING
Your seat belt must be adjusted so that you
can correctly fasten your seat belt.
Observe the following points:
R adjust the seat backrest
until your arms are
slightly angled when holding the steering
wheel.
R adjust the seat to a comfortable seating
position that still allows you to reach the
accelerator/brake pedal safely. The
position should be as far back as possible with the driver still able to operate the
controls properly.
R adjust the head restraint so that it is as
close to the head
as possible and the center
of the head restraint supports the back of
the head at eye level.
R never place hands under the seat or near
any moving parts while a seat is being
adjusted.
Failure to do so could result in an accident
and/or serious personal injury. G
WARNING
According to accident statistics, children are
safer when properly restrained on the rear
seats than on the
front-passenger seat. Thus,
we strongly recommend that children be
placed in the rear seat whenever possible.
Regardless of seating position, children 12
years old and under must be seated and
properly secured in an appropriately sized
child restraint system or booster seat
recommended for the size and weight of the
child. For additional information, see the
"Children in the vehicle" section.
A child's risk of serious or fatal injuries is
significantly increased if the child restraints
are not properly secured in the vehicle and/
or the child is not properly secured in the child
restraint. G
WARNING
For your protection, drive only with properly
positioned head restraints.
Adjust the head restraint
so that it is as close
to the head as possible and the center of the
head restraint supports the back of the head
at eye level. This will reduce the potential for
injury to the head and neck in the event of an
accident or similar situation.
Do not drive the vehicle without the seat head
restraints. Head restraints are intended to
help reduce injuries during an accident. Seats
85
Seats, steering wheel and mirrors Z
Page 95 of 364
Mirrors
Rear-view mirror
X Adjust the rear-view mirror by hand so you
have a good overview of the traffic
conditions behind you. Exterior mirrors
Adjusting the exterior mirrors G
WARNING
The exterior mirrors reduce the size of the
image. Objects are actually closer than they
appear. You could misjudge
the distance from
vehicles driving behind and cause an
accident, e.g. when changing lane. For this
reason, make sure of the actual distance from
the vehicle driving behind by glancing over
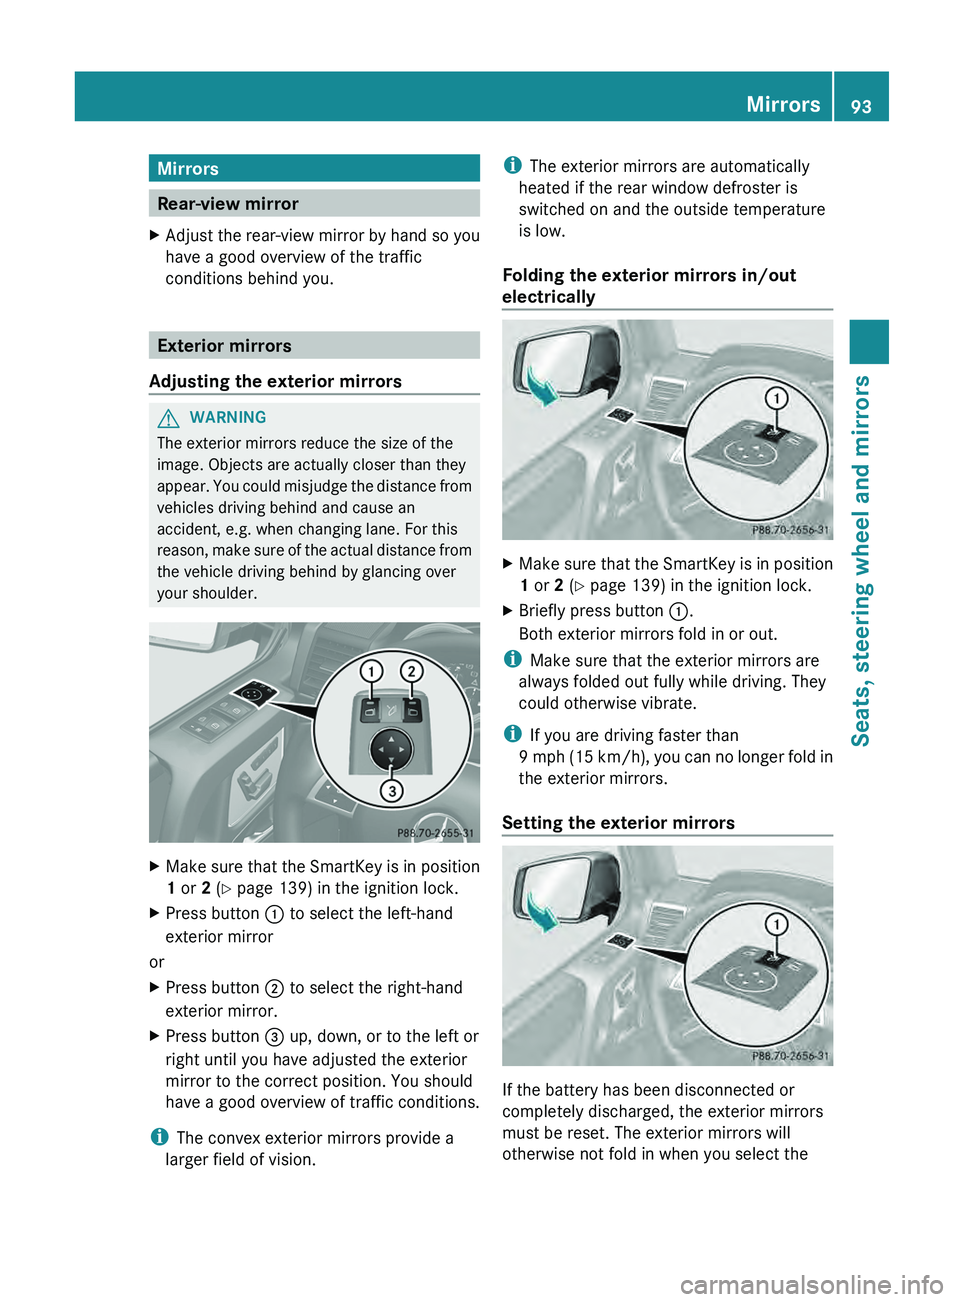
your shoulder. X
Make sure that the SmartKey is in position
1 or 2 (Y page 139) in the ignition lock.
X Press button 0043 to select the left-hand
exterior mirror
or
X Press button 0044 to select the right-hand
exterior mirror.
X Press button 0087 up, down, or to the left or
right until you have adjusted the exterior
mirror to the correct position. You should
have a good overview of traffic conditions.
i The convex exterior mirrors provide a
larger field of vision. i
The exterior mirrors are automatically
heated if the rear window defroster is
switched on and the outside temperature
is low.
Folding the exterior mirrors in/out
electrically X
Make sure that the SmartKey is in position
1 or 2 (Y page 139) in the ignition lock.
X Briefly press button 0043.
Both exterior mirrors fold in or out.
i Make sure that the exterior mirrors are
always folded out fully while driving. They
could otherwise vibrate.
i If you are driving faster than
9 mph (15
km/h
), you can no longer fold in
the exterior mirrors.
Setting the exterior mirrors If the battery has been disconnected or
completely discharged, the exterior mirrors
must be reset. The exterior mirrors will
otherwise not fold in when you select the Mirrors
93
Seats, steering wheel and mirrors Z
Page 264 of 364
Useful information
i This Operator's Manual describes all
models and all standard and optional
equipment of your vehicle available at the
time of publication of the Operator's
Manual. Country-specific differences are
possible. Please note that
your vehicle may
not be equipped with all features
described. This also applies to safety-
related systems and functions.
i Read the information on qualified
specialist workshops: ( Y page 23).Loading guidelines
G
WARNING
Always fasten items being carried as securely
as possible using cargo tie-down rings and
fastening materials appropriate for
the weight
and size of the load.
In an accident, during hard braking or sudden
maneuvers, loose items will be thrown around
inside the vehicle. This can cause injury to
vehicle occupants unless the items are
securely fastened in the vehicle.
To help avoid personal injury during a collision
or sudden maneuver, exercise care when
transporting cargo. Do not pile luggage or
cargo higher than the seat backrests.
Never drive a vehicle with the tailgate open.
Deadly carbon monoxide (CO) gases may
enter vehicle interior resulting in
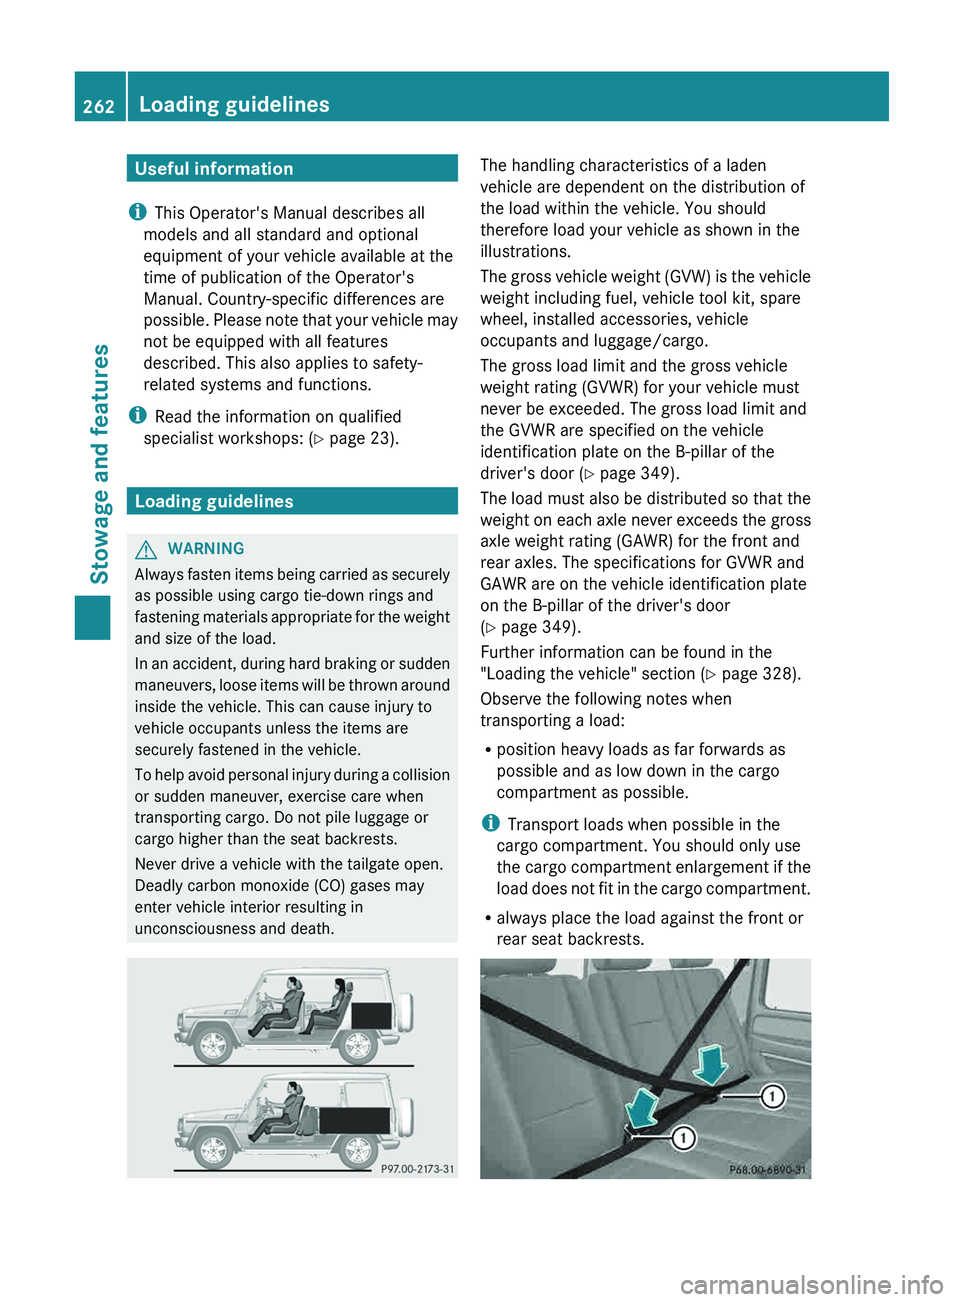
unconsciousness and death. The handling characteristics of a laden
vehicle are dependent on the distribution of
the load within the vehicle. You should
therefore load your vehicle as shown in the
illustrations.
The gross vehicle
weight
(GVW) is the vehicle
weight including fuel, vehicle tool kit, spare
wheel, installed accessories, vehicle
occupants and luggage/cargo.
The gross load limit and the gross vehicle
weight rating (GVWR) for your vehicle must
never be exceeded. The gross load limit and
the GVWR are specified on the vehicle
identification plate on the B-pillar of the
driver's door ( Y page 349).
The load must also be distributed so that the
weight on each axle never exceeds the gross
axle weight rating (GAWR) for the front and
rear axles. The specifications for GVWR and
GAWR are on the vehicle identification plate
on the B-pillar of the driver's door
(Y page 349).
Further information can be found in the
"Loading the vehicle" section ( Y page 328).
Observe the following notes when
transporting a load:
R position heavy loads as far forwards as
possible and as low down in the cargo
compartment as possible.
i Transport loads when possible in the
cargo compartment. You should only use
the cargo compartment enlargement if the
load does not fit in the cargo compartment.
R always place the load against the front or
rear seat backrests.262
Loading guidelines
Stowage and features
Page 297 of 364
Exterior care
Automatic car wash G
WARNING
Braking efficiency is reduced after washing
the vehicle. This could
cause an accident. For
this reason, you must drive particularly
carefully after washing the vehicle until the
brakes have dried.
! Never clean your vehicle in a Touchless
Automatic Car Wash as these use special
cleaning agents. These cleaning agents can
damage the paintwork or plastic parts.
! Make sure that the automatic car wash is
suitable for the size of the vehicle. Fold in
the exterior mirrors before the vehicle is
washed. The exterior mirrors could
otherwise be damaged.
! Make sure that the automatic
transmission is in position N when washing
your vehicle in a tow-through car wash. The
vehicle could be damaged if the
transmission is in another position.
! Make sure that:
R the side windows and sliding sunroof are
closed completely.
R the blower for the ventilation/heating is
switched off (airflow control is turned to
position 0/the 0058 and 0056 buttons
are switched off).
R the windshield wiper switch is at position
0.
The vehicle could otherwise be damaged.
You can wash the vehicle in an automatic car
wash from the very start.
If the vehicle is very dirty, pre-wash it before
cleaning it in an automatic car wash.
After using an automatic car wash, wipe off
wax from the windshield and the wiper
blades. This will prevent smears and reduce
wiping noises caused by residue on the
windshield. Washing by hand In some countries, washing by hand is only
allowed at specially equipped washing bays.
Observe the legal requirements in all
countries concerned.
When using the vehicle in winter, remove all
traces of road salt deposits carefully and as
soon as possible.
When washing the vehicle underbody, also
clean the inside of the wheels.
X
Do not use hot water and do not wash the
vehicle in direct sunlight.
X Use a soft sponge to clean.
X Use a mild cleaning agent, such as a car
shampoo approved by Mercedes-Benz.
X Thoroughly hose down the vehicle with a
gentle jet of water.
X Do not point the water jet directly towards
the air inlets.
X Use plenty of water and rinse out the
sponge frequently.
X Rinse the vehicle with clean water and dry
thoroughly with a chamois.
X Do not let the cleaning agent dry on the
paintwork.
Power washers G
WARNING
Do not use power washers with circular jet
nozzles (concentrated-power jets) to clean
your vehicle, especially for
cleaning tires. You
could otherwise damage the tires and cause
an accident.
! Always maintain a distance of at least
11.8 in (30 cm) between the vehicle and the
power washer nozzle. Information about
the correct distance is available from the
equipment manufacturer.
Move the power washer nozzle around
when cleaning your vehicle. Care
295
Maintenance and care Z
Page 305 of 364
Vehicle tool kit
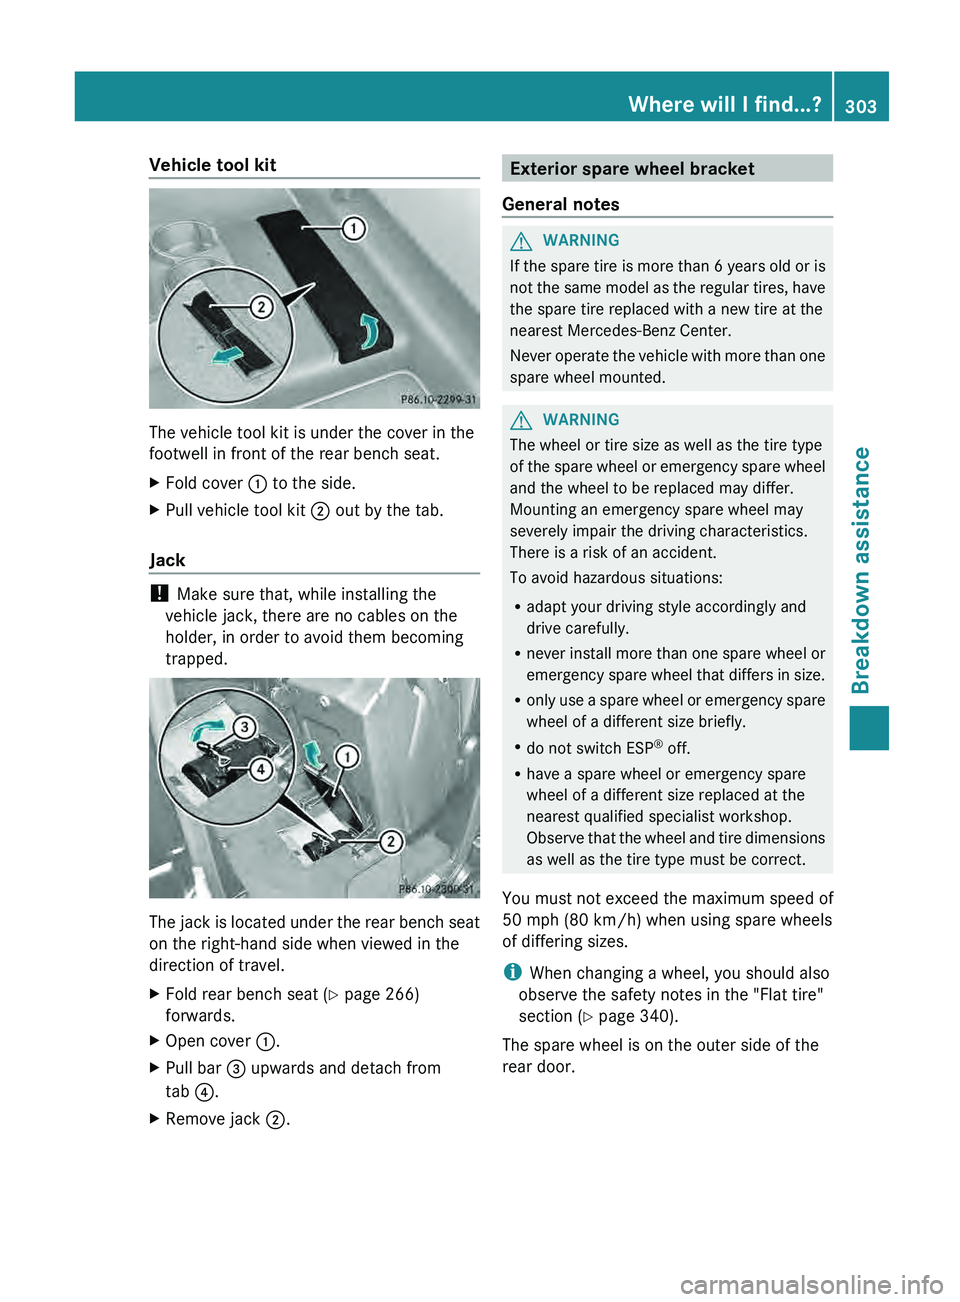
The vehicle tool kit is under the cover in the
footwell in front of the rear bench seat.
X
Fold cover 0043 to the side.
X Pull vehicle tool kit 0044 out by the tab.
Jack !
Make sure that, while installing the
vehicle jack, there are no cables on the
holder, in order to avoid them becoming
trapped. The jack is located under the rear bench seat
on the right-hand side when viewed in the
direction of travel.
X
Fold rear bench seat ( Y page 266)
forwards.
X Open cover 0043.
X Pull bar 0087 upwards and detach from
tab 0085.
X Remove jack 0044. Exterior spare wheel bracket
General notes G
WARNING
If the spare tire is more than 6 years old or is
not the same model
as the regular tires, have
the spare tire replaced with a new tire at the
nearest Mercedes-Benz Center.
Never operate the vehicle with more than one
spare wheel mounted. G
WARNING
The wheel or tire size as well as the tire type
of the spare wheel
or emergency spare wheel
and the wheel to be replaced may differ.
Mounting an emergency spare wheel may
severely impair the driving characteristics.
There is a risk of an accident.
To avoid hazardous situations:
R adapt your driving style accordingly and
drive carefully.
R never install more than one spare wheel or
emergency spare wheel that differs in size.
R only use a spare wheel or emergency spare
wheel of a different size briefly.
R do not switch ESP ®
off.
R have a spare wheel or emergency spare
wheel of a different size replaced at the
nearest qualified specialist workshop.
Observe that the wheel and tire dimensions
as well as the tire type must be correct.
You must not exceed the maximum speed of
50 mph (80 km/h) when using spare wheels
of differing sizes.
i When changing a wheel, you should also
observe the safety notes in the "Flat tire"
section ( Y page 340).
The spare wheel is on the outer side of the
rear door. Where will I find...?
303
Breakdown assistance Z