MERCEDES-BENZ G-CLASS SUV 2015 Owners Manual
Manufacturer: MERCEDES-BENZ, Model Year: 2015, Model line: G-CLASS SUV, Model: MERCEDES-BENZ G-CLASS SUV 2015Pages: 274, PDF Size: 31.95 MB
Page 211 of 274
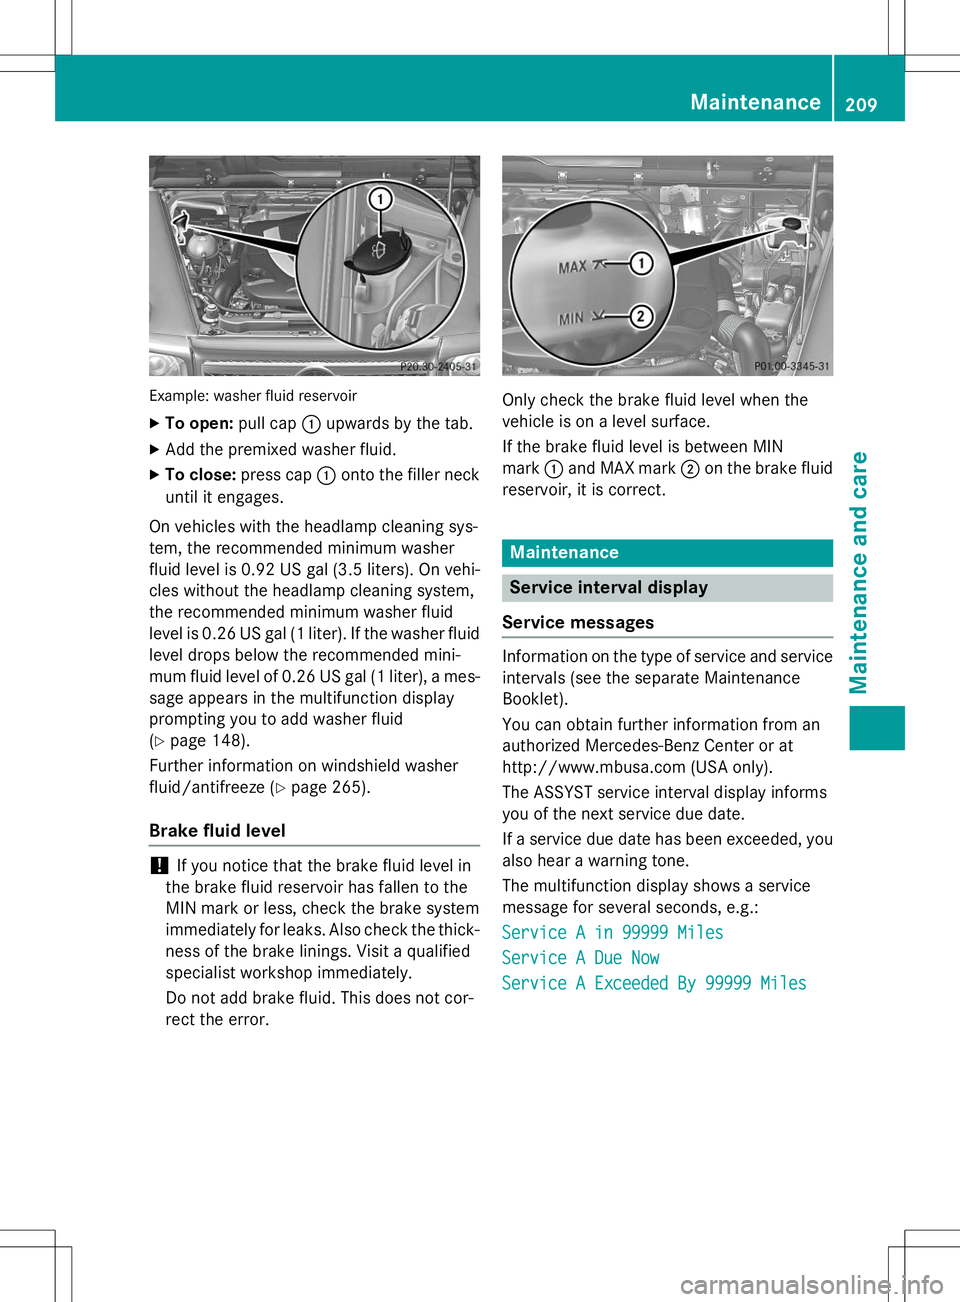
Example: washer fluid reservoir
XTo open: pull cap:upwards by the tab.
X Add the premixed washer fluid.
X To close: press cap :onto the filler neck
until it engages.
On vehicles with the headlamp cleaning sys-
tem, the recommended minimum washer
fluid level is 0.92 US ga l(3.5 liters). On vehi-
cles without the headlamp cleaning system,
the recommended minimum washer fluid
level is 0.26 US gal (1liter). If the washer fluid
level drops below the recommended mini-
mum fluid level of 0.26 US gal (1 liter), a mes-
sage appears in the multifunction display
prompting you to add washer fluid( Y page 148).
Further information on windshield washer
fluid/antifreeze ( Ypage 265).
Brake fluid level
!If you notice that the brake fluid level in
the brake fluid reservoir has fallen to the
MIN mark or less, check the brake system
immediately for leaks. Also check the thick-
ness of the brake linings. Visit a qualified
specialist workshop immediately.
Do not add brake fluid. This does not cor-
rect the error.
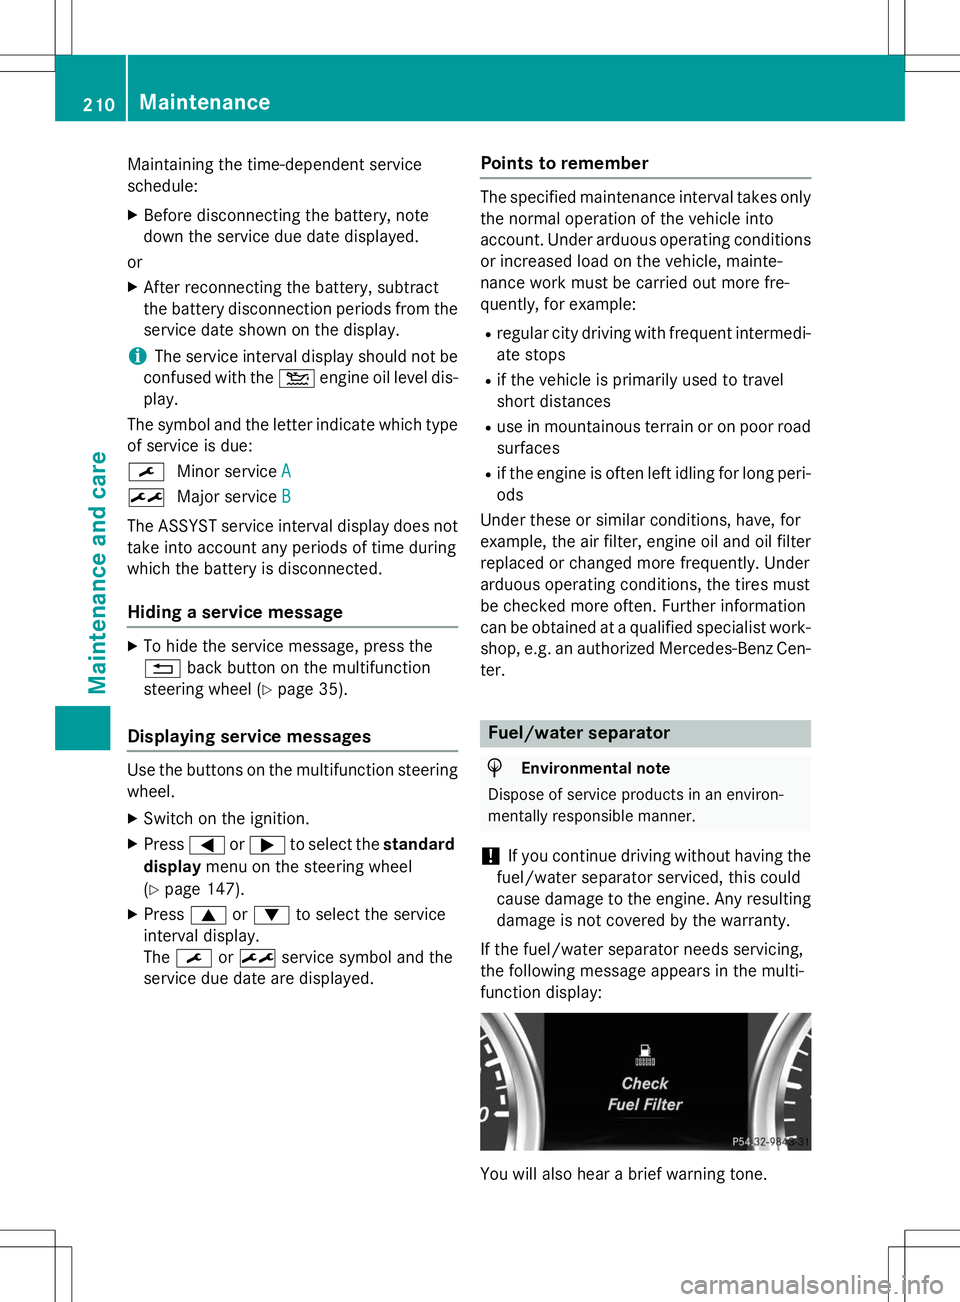
Only check the brake fluid level when the
vehicle is on a level surface.
If the brake fluid level is between MIN mark :and MAX mark ;on the brake fluid
reservoir, it is correct.
Maintenance
Service interval display
Service messages
Information on the type of service and service
intervals (see the separate Maintenance
Booklet).
You can obtain further information from an
authorized Mercedes-Benz Center or at
http://www.mbusa.com (USA only).
The ASSYST service interval display informs
you of the next service due date.
If a service due date has been exceeded, you also hear a warning tone.
The multifunction display shows a service
message for several seconds, e.g.:
Service A in 99999 Miles
Service A Due Now
Service A Exceeded By 99999 Miles
Maintenance209
Maintenance and care
Z
Page 212 of 274
Maintaining the time-dependent service schedule:X Before disconnecting the battery, note
down the service due date displayed.
or X After reconnecting the battery, subtract
the battery disconnection periods from the
service date shown on the display.
iThe service interval display should not be
confused with the 4engine oil level dis-
play.
The symbol and the letter indicate which type
of service is due: ¯ Minor service
A
±Major serviceB
The ASSYST service interval display does not
take into account any periods of time during
which the battery is disconnected.
Hiding a service message
X To hide the service message, press the % back button on the multifunction
steering wheel ( Ypage 35).
Displaying service messages
Use the buttons on the multifunction steering
wheel.
X Switch on the ignition.
X Press =or; to select the standard
display menu on the steering wheel
( Y page 147).
X Press 9or: to select the service
interval display. The ¯ or± service symbol and the
service due date are displayed.
Points to remember
The specified maintenance interval takes only the normal operation of the vehicle into
account. Under arduous operating conditions
or increased load on the vehicle, mainte-
nance work must be carried out more fre-
quently, for example: R regular city driving with frequent intermedi-
ate stops
R if the vehicle is primarily used to travel
short distances
R use in mountainous terrain or on poor road
surfaces
R if the engine is often left idling for long peri-
ods
Under these or similar conditions, have, for
example, the air filter, engine oil and oil filter
replaced or changed more frequently. Under
arduous operating conditions, the tires must
be checked more often. Further information
can be obtained at a qualified specialist work- shop, e.g. an authorized Mercedes-Benz Cen-
ter.
Fuel/water separator
HEnvironmental note
Dispose of service products in an environ-
mentally responsible manner.
!If you continue driving without having the
fuel/water separator serviced, this could
cause damage to the engine. Any resulting
damage is not covered by the warranty.
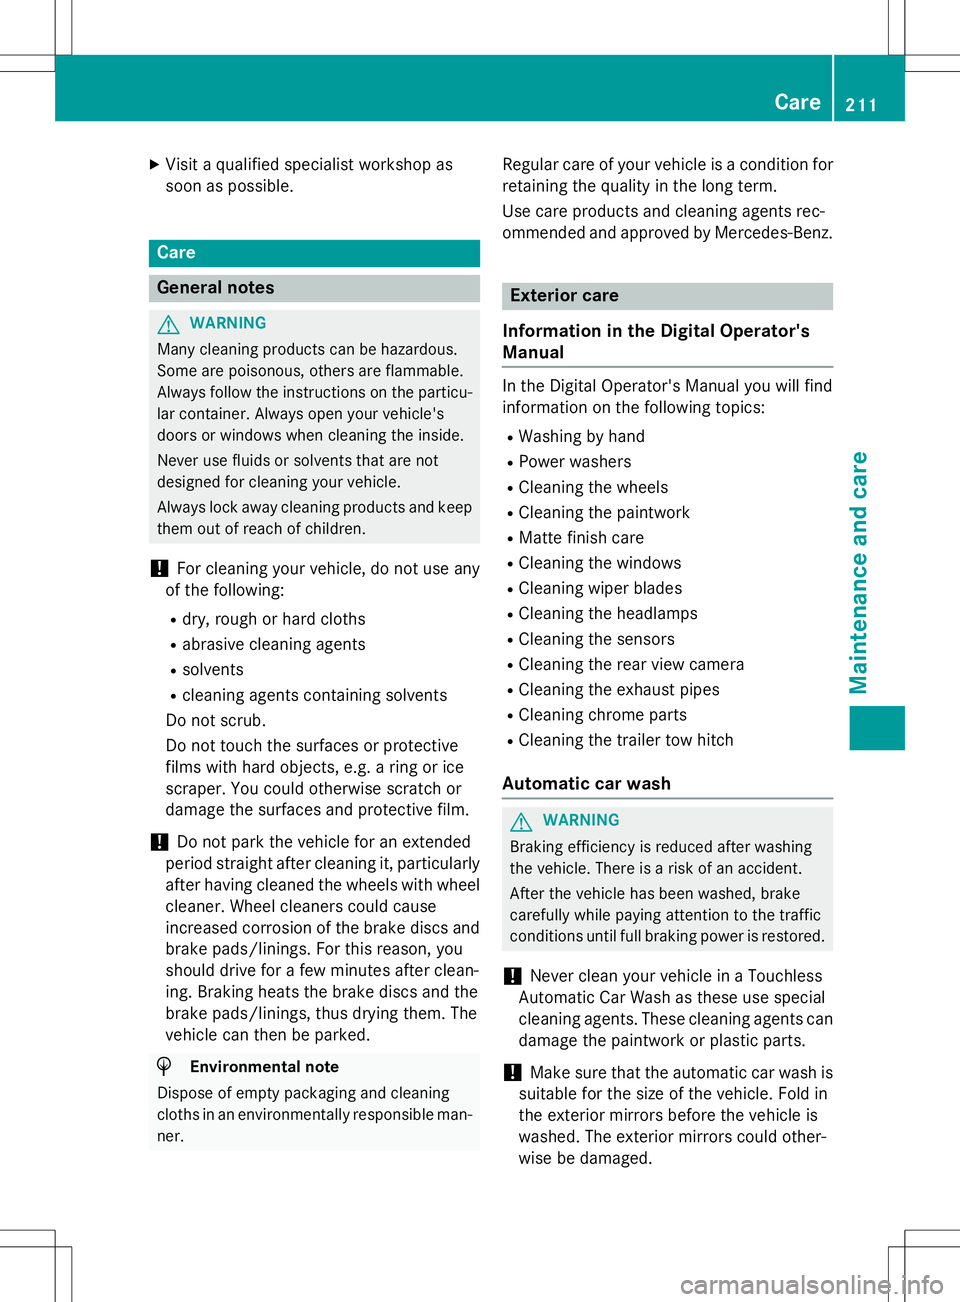
If the fuel/water separator needs servicing,
the following message appears in the multi-
function display:
You will also hear a brief warning tone.
210Maintenance
Maintenance and care
Page 213 of 274
XVisit a qualified specialist workshop as
soon as possible.
Care
General notes
GWARNING
Many cleaning products can be hazardous.
Some are poisonous, others are flammable.
Always follow the instructions on the particu-
lar container. Always open your vehicle's
doors or windows when cleaning the inside.
Never use fluids or solvents that are not
designed for cleaning your vehicle.
Always lock away cleaning products and keep
them out of reach of children.
!For cleaning your vehicle, do not use any
of the following:
R dry, rough or hard cloths
R abrasive cleaning agents
R solvents
R cleaning agents containing solvents
Do not scrub.
Do not touch the surfaces or protective
films with hard objects, e.g. a ring or ice
scraper. You could otherwise scratch or
damage the surfaces and protective film.
!Do not park the vehicle for an extended
period straight after cleaning it, particularly
after having cleaned the wheels with wheel
cleaner. Wheel cleaners could cause
increased corrosion of the brake discs and
brake pads/linings. For this reason, you
should drive for a few minutes after clean-
ing. Braking heats the brake discs and the
brake pads/linings, thus drying them. The
vehicle can then be parked.
HEnvironmental note
Dispose of empty packaging and cleaning
cloths in an environmentally responsible man-
ner. Regular care of your vehicle is a condition for
retaining the quality in the long term.
Use care products and cleaning agents rec-
ommended and approved by Mercedes-Benz.
Exterior care
Information in the Digital Operator's Manual
In the Digital Operator's Manual you will find
information on the following topics: R Washing by hand
R Power washers
R Cleaning the wheels
R Cleaning the paintwork
R Matte finish care
R Cleaning the windows
R Cleaning wiper blades
R Cleaning the headlamps
R Cleaning the sensors
R Cleaning the rear view camera
R Cleaning the exhaust pipes
R Cleaning chrome parts
R Cleaning the trailer tow hitch
Automatic car wash
GWARNING
Braking efficiency is reduced after washing
the vehicle. There is a risk of an accident.
After the vehicle has been washed, brake
carefully while paying attention to the traffic
conditions until full braking power is restored.
!Never clean your vehicle in a Touchless
Automatic Car Wash as these use special
cleaning agents. These cleaning agents can damage the paintwork or plastic parts.
!Make sure that the automatic car wash is
suitable for the size of the vehicle. Fold in
the exterior mirrors before the vehicle is
washed. The exterior mirrors could other-
wise be damaged.
Care211
Maintenance and care
Z
Page 214 of 274
!Make sure that the automatic transmis-
sion is in position Nwhen washing your
vehicle in a tow-through car wash. The vehi-
cle could be damaged if the transmission is
in another position.
!Make sure that:
R the side windows and sliding sunroof are
closed completely.
R the blower for the ventilation/heating is
switched off (airflow control is turned toposition 0/the à andÁ buttons
are switched off).
R the windshield wiper switch is at position0.
The vehicle could otherwise be damaged.
You can wash the vehicle in an automatic car wash from the very start.
If the vehicle is very dirty, pre-wash it before
cleaning it in an automatic car wash.
After using an automatic car wash, wipe off
wax from the windshield and the wiper
blades. This will prevent smears and reduce
wiping noises caused by residue on the wind-shield.
Interior care
Information in the Digital Operator's Manual
In the Digital Operator's Manual you will find
information on the following topics: R Cleaning the display
R Cleaning the plastic trim
R Cleaning the steering wheel and gear or
selector lever
R Cleaning wooden trim and trim strips
R Cleaning the seat covers
R Cleaning the seat belts
R Cleaning the headliner and carpets
212Care
Maintenance and care
Page 215 of 274
Useful information............................214
Where will I find...? ...........................214
Flat tire .............................................. 216
Battery (vehicle) ................................ 216
Jump-starting .................................... 220
Towing and tow-starting ..................222
Fuses .................................................. 225
213
Roadside Assistance
Page 216 of 274
Useful information
iThis Operator's Manual describes all
models and all standard and optional equip- ment of your vehicle available at the time of
publication of the Operator's Manual.
Country-specific differences are possible.
Please note that your vehicle may not be
equipped with all features described. This
also applies to safety-related systems and
functions.
iRead the information on qualified special-
ist workshops: ( Ypage 28).
Where will I find...?
Warning triangle
Setting up the warning triangle
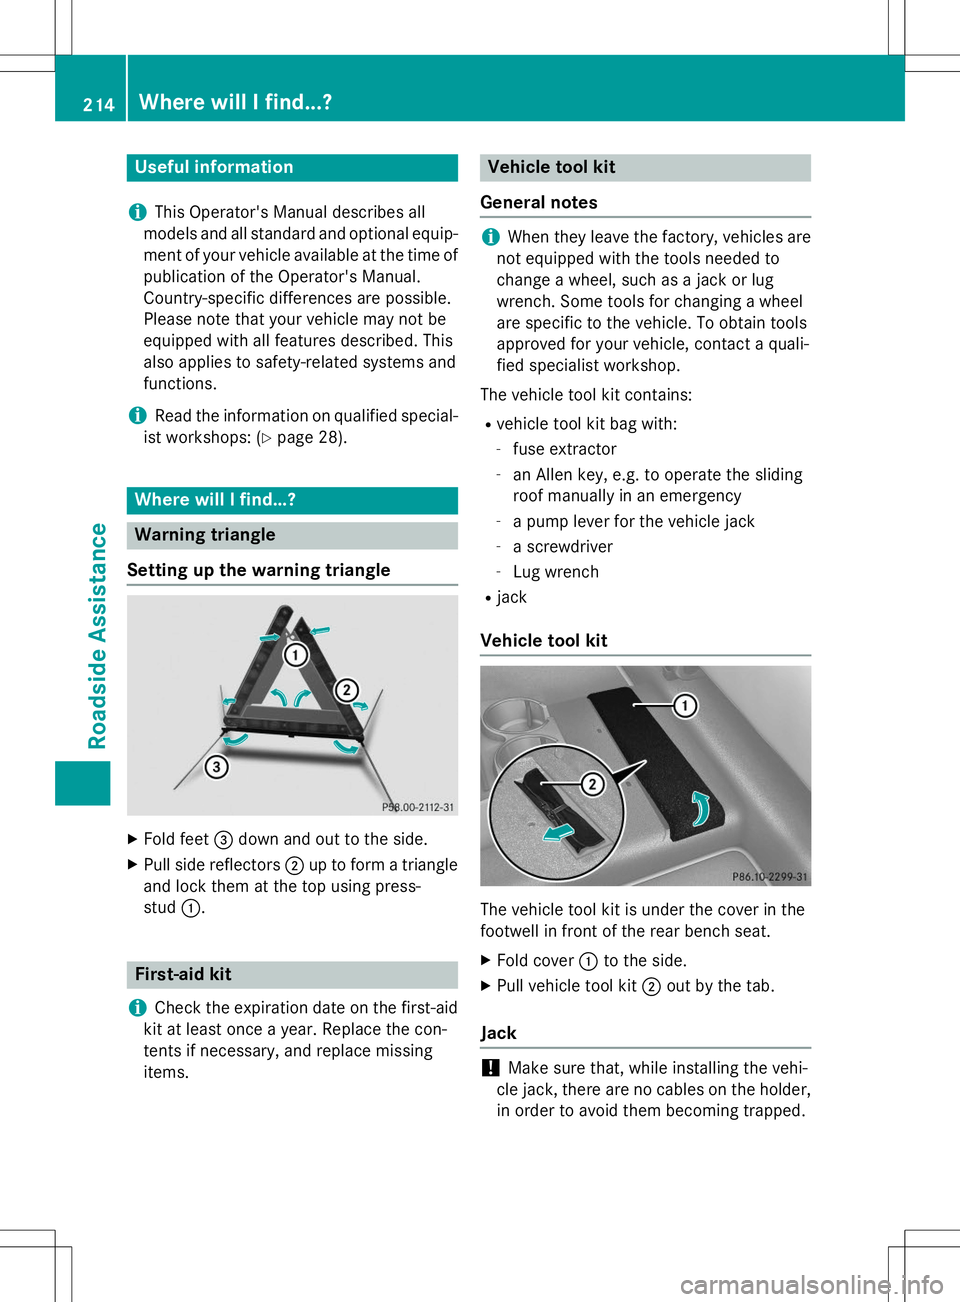
X Fold feet =down and out to the side.
X Pull side reflectors ;up to form a triangle
and lock them at the top using press- stud :.
First-aid kit
iCheck the expiration date on the first-aid
kit at least once a year. Replace the con-
tents if necessary, and replace missing
items.
Vehicle tool kit
General notes
iWhen they leave the factory, vehicles are
not equipped with the tools needed to
change a wheel, such as a jack or lug
wrench. Some tools for changing a wheel
are specific to the vehicle. To obtain tools
approved for your vehicle, contact a quali-
fied specialist workshop.
The vehicle tool kit contains: R vehicle tool kit bag with:
- fuse extractor
- an Allen key, e.g. to operate the sliding
roof manually in an emergency
- a pump lever for the vehicle jack
- a screwdriver
- Lug wrench
R jack
Vehicle tool kit
The vehicle tool kit is under the cover in the
footwell in front of the rear bench seat.
X Fold cover :to the side.
X Pull vehicle tool kit ;out by the tab.
Jack
!Make sure that, while installing the vehi-
cle jack, there are no cables on the holder, in order to avoid them becoming trapped.
214Where will I find...?
Roadside Assistance
Page 217 of 274
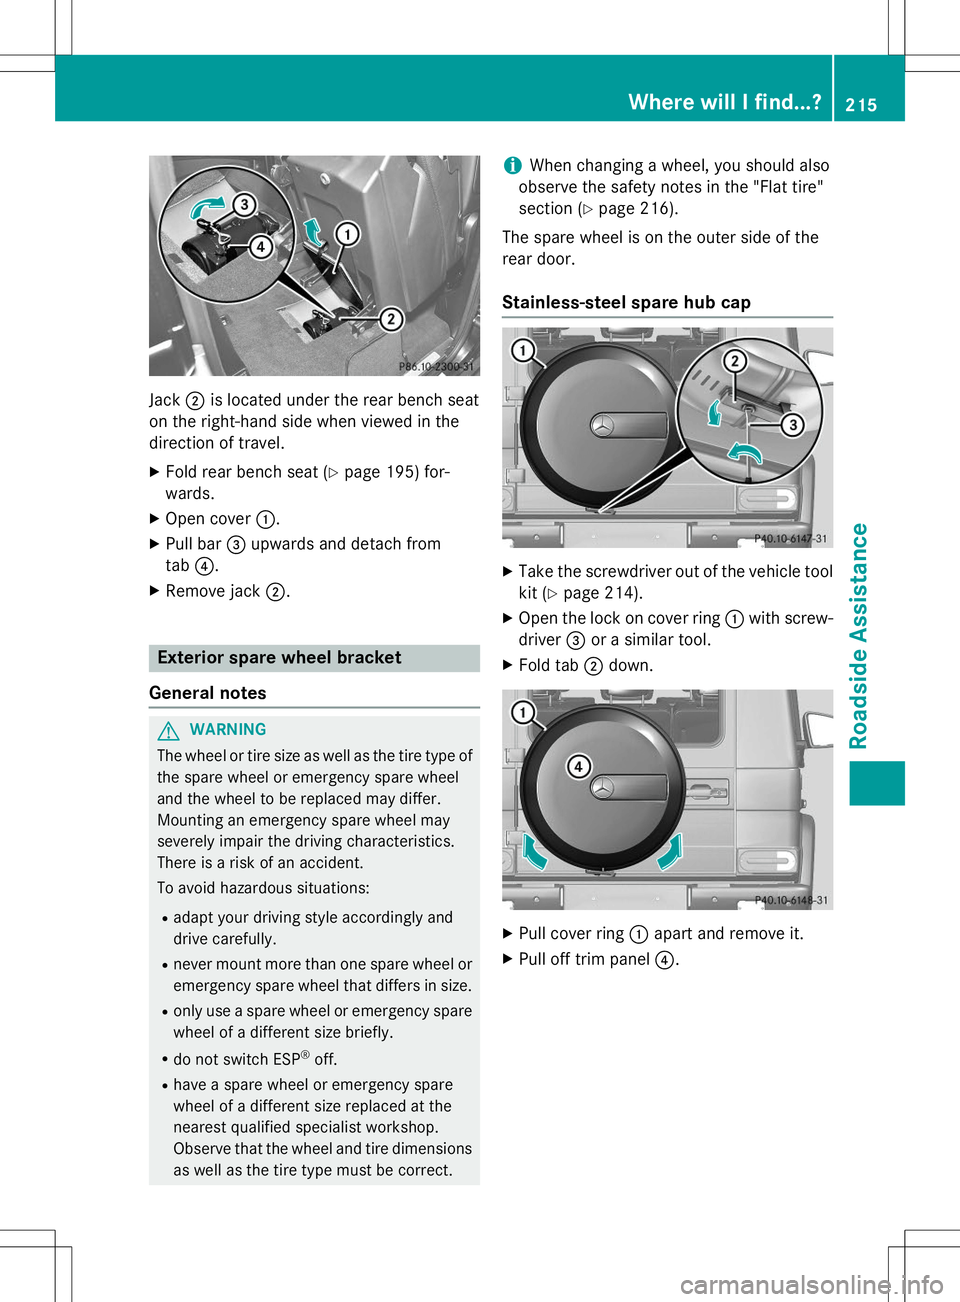
Jack;is located under the rear bench seat
on the right-hand side when viewed in the
direction of travel.
X Fold rear bench seat ( Ypage 195) for-
wards.
X Open cover :.
X Pull bar =upwards and detach from
tab ?.
X Remove jack ;.
Exterior spare wheel bracket
General notes
GWARNING
The wheel or tire size as well as the tire type of the spare wheel or emergency spare wheel
and the wheel to be replaced may differ.
Mounting an emergency spare wheel may
severely impair the driving characteristics.
There is a risk of an accident.
To avoid hazardous situations:
R adapt your driving style accordingly and
drive carefully.
R never mount more than one spare wheel or
emergency spare wheel that differs in size.
R only use a spare wheel or emergency spare
wheel of a different size briefly.
R do not switch ESP ®
off.
R have a spare wheel or emergency spare
wheel of a different size replaced at the
nearest qualified specialist workshop.
Observe that the wheel and tire dimensions
as well as the tire type must be correct.
iWhen changing a wheel, you should also
observe the safety notes in the "Flat tire"
section ( Ypage 216).
The spare wheel is on the outer side of the
rear door.
Stainless-steel spare hub cap
X Take the screwdriver out of the vehicle tool
kit ( Ypage 214).
X Open the lock on cover ring :with screw-
driver =or a similar tool.
X Fold tab ;down.
X
Pull cover ring :apart and remove it.
X Pull off trim panel ?.
Where will I find...?215
Roadside Assistance
Z
Page 218 of 274
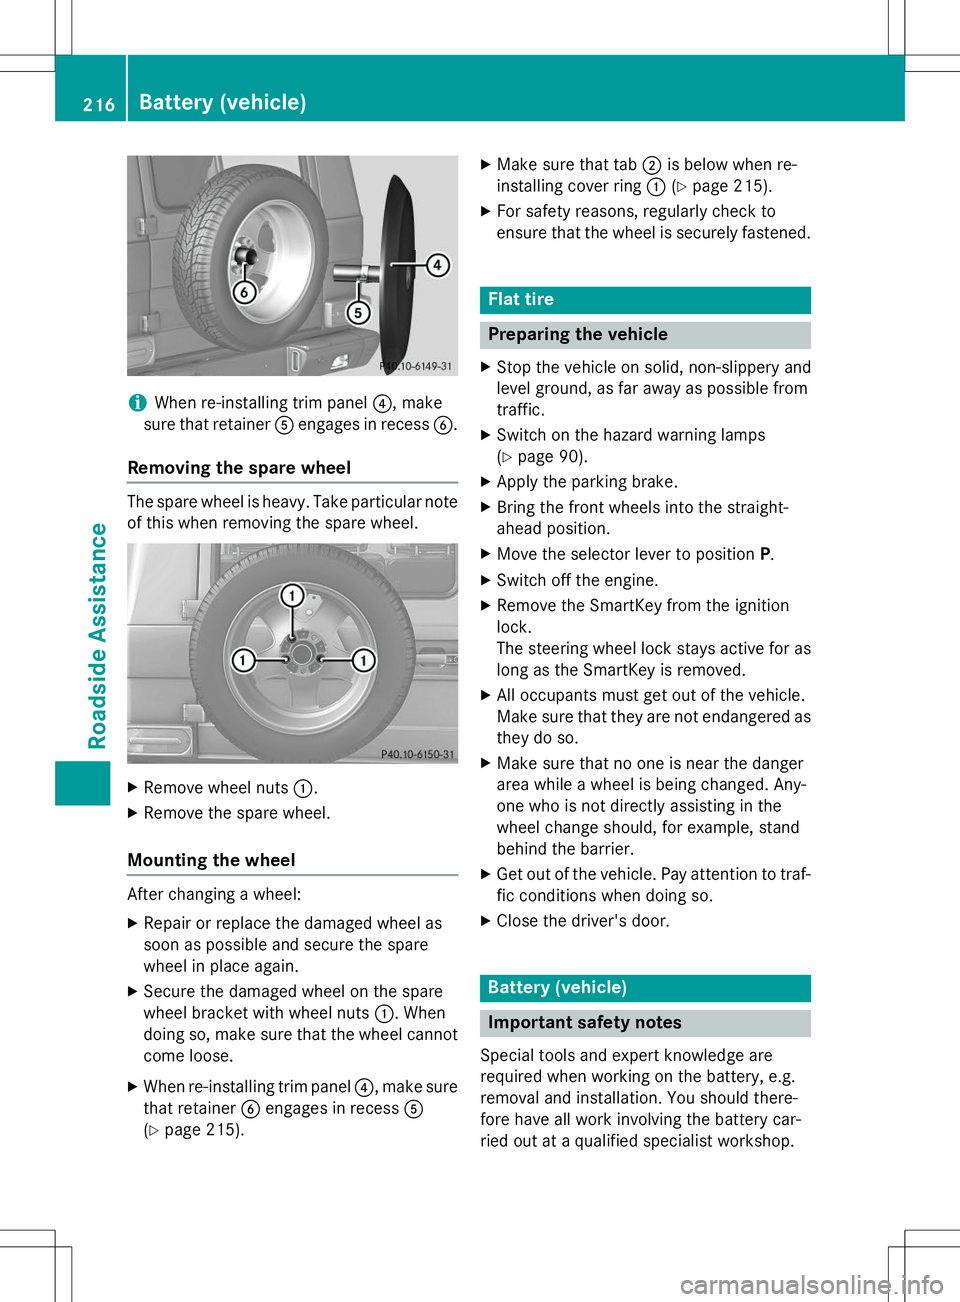
iWhen re-installing trim panel?, make
sure that retainer Aengages in recess B.
Removing the spare wheel
The spare wheel is heavy. Take particular note
of this when removing the spare wheel.
X Remove wheel nuts :.
X Remove the spare wheel.
Mounting the wheel
After changing a wheel:
X Repair or replace the damaged wheel as
soon as possible and secure the spare
wheel in place again.
X Secure the damaged wheel on the spare
wheel bracket with wheel nuts :. When
doing so, make sure that the wheel cannot
come loose.
X When re-installing trim panel ?, make sure
that retainer Bengages in recess A
( Y page 215). X
Make sure that tab ;is below when re-
installing cover ring :(Y page 215).
X For safety reasons, regularly check to
ensure that the wheel is securely fastened.
Flat tire
Preparing the vehicle
XStop the vehicle on solid, non-slippery and
level ground, as far away as possible from
traffic.
X Switch on the hazard warning lamps(Y page 90).
X Apply the parking brake.
X Bring the front wheels into the straight-
ahead position.
X Move the selector lever to position P.
X Switch off the engine.
X Remove the SmartKey from the ignitionlock.
The steering wheel lock stays active for as
long as the SmartKey is removed.
X All occupants must get out of the vehicle.
Make sure that they are not endangered as
they do so.
X Make sure that no one is near the danger
area while a wheel is being changed. Any-
one who is not directly assisting in the
wheel change should, for example, stand
behind the barrier.
X Get out of the vehicle. Pay attention to traf-
fic conditions when doing so.
X Close the driver's door.
Battery (vehicle)
Important safety notes
Special tools and expert knowledge are
required when working on the battery, e.g.
removal and installation. You should there-
fore have all work involving the battery car-
ried out at a qualified specialist workshop.
216Battery (vehicle)
Roadside Assistance
Page 219 of 274
GWARNING
Work carried out incorrectly on the battery
can lead, for example, to a short circuit and
thus damage the vehicle electronics. This canlead to function restrictions applying to
safety-relevant systems, e.g the lighting sys-
tem, the ABS (anti-lock braking system) or the
ESP ®
(Electronic Stability Program). The oper-
ating safety of your vehicle may be restricted.
You could lose control of the vehicle, for
example:
R when braking
R in the event of abrupt steering maneuvers
and/or when the vehicle's speed is not
adapted to the road conditions
There is a risk of an accident.
In the event of a short circuit or a similar inci-
dent, contact a qualified specialist workshop
immediately. Do not drive any further. You
should have all work involving the battery car- ried out at a qualified specialist workshop.
If ABS malfunctions, the wheels can lock dur-
ing braking. This limits the steerability of the
vehicle when braking and may increase the
braking distance.
If ESP ®
malfunctions, the vehicle will not be
stabilized if it starts to skid or a wheel starts to spin.
iFor further information about ABS and
ESP ®
, see ( Ypage 65) and ( Ypage 66).
GWARNING
During the charging process, a battery produ-
ces hydrogen gas. If a short circuit occurs or
sparks are created, the hydrogen gas can
ignite. There is a risk of an explosion.
R Make sure that the positive terminal of a
connected battery does not come into con-
tact with vehicle parts.
R Never place metal objects or tools on a bat-
tery.
R It is important that you observe the descri-
bed order of the battery terminals when
connecting and disconnecting a battery.
R When jump-starting, make sure that the
battery poles with identical polarity areconnected.
R It is particularly important to observe the
described order when connecting and dis-
connecting the jumper cables.
R Never connect or disconnect the battery
terminals while the engine is running.
GWARNING
Electrostatic build-up can lead to the creation
of sparks, which could ignite the highly explo-
sive gases of a battery. There is a risk of an
explosion.
Before handling the battery, touch the vehicle body to remove any existing electrostatic
build-up.
The highly flammable gas mixture forms when
charging the battery as well as when jump-starting.
Always make sure that neither you nor the
battery is electrostatically charged. A build-
up of electrostatic charge can be caused, for
example:
R by wearing clothing made from synthetic
fibers
R due to friction between clothing and seats
R if you push or pull the battery across the
carpet or other synthetic materials
R if you wipe the battery with a cloth
GWARNING
Battery acid is caustic. There is a risk of injury.
Avoid contact with skin, eyes or clothing. Do
not inhale any battery gases. Do not lean over
the battery. Keep children away from batter-
ies. Wash away battery acid immediately with
plenty of clean water and seek medical atten- tion.
!Have the battery checked regularly at a
qualified specialist workshop.
Observe the service intervals in the Main-
tenance Booklet or contact a qualified spe- cialist workshop for more information.
Battery (vehicle)217
Roadside Assistance
Z
Page 220 of 274
!You should have all work involving the
battery carried out at a qualified specialist
workshop. In the exceptional case that it is
necessary for you to disconnect the battery yourself, make sure that:
R you switch off the engine and remove the
SmartKey. Check that all the indicator
lamps in the instrument cluster are off.
Otherwise, electronic components, such
as the alternator, may be damaged.
R you first remove the negative terminal
clamp and then the positive terminal
clamp. Never swap the terminal clamps.
Otherwise, the vehicle's electronic sys-
tem may be damaged.
R on vehicles with automatic transmission,
the transmission is locked in position P
after disconnecting the battery. The vehi-
cle is secured against rolling away. You
can then no longer move the vehicle.
The battery and the cover of the positive
terminal clamp must be installed securely
during operation.
HEnvironmental note
Batteries contain dangerous
substances. It is against the
law to dispose of them with
the household rubbish. They
must be collected separately and recycled to protect the
environment.
Dispose of batteries in an
environmentally friendly
manner. Take discharged
batteries to a qualified spe-
cialist workshop or a special
collection point for used bat-teries.
In order for the battery to achieve the maxi-
mum possible service life, it must always be
sufficiently charged.
Comply with safety precautions and take pro-
tective measures when handling batteries.
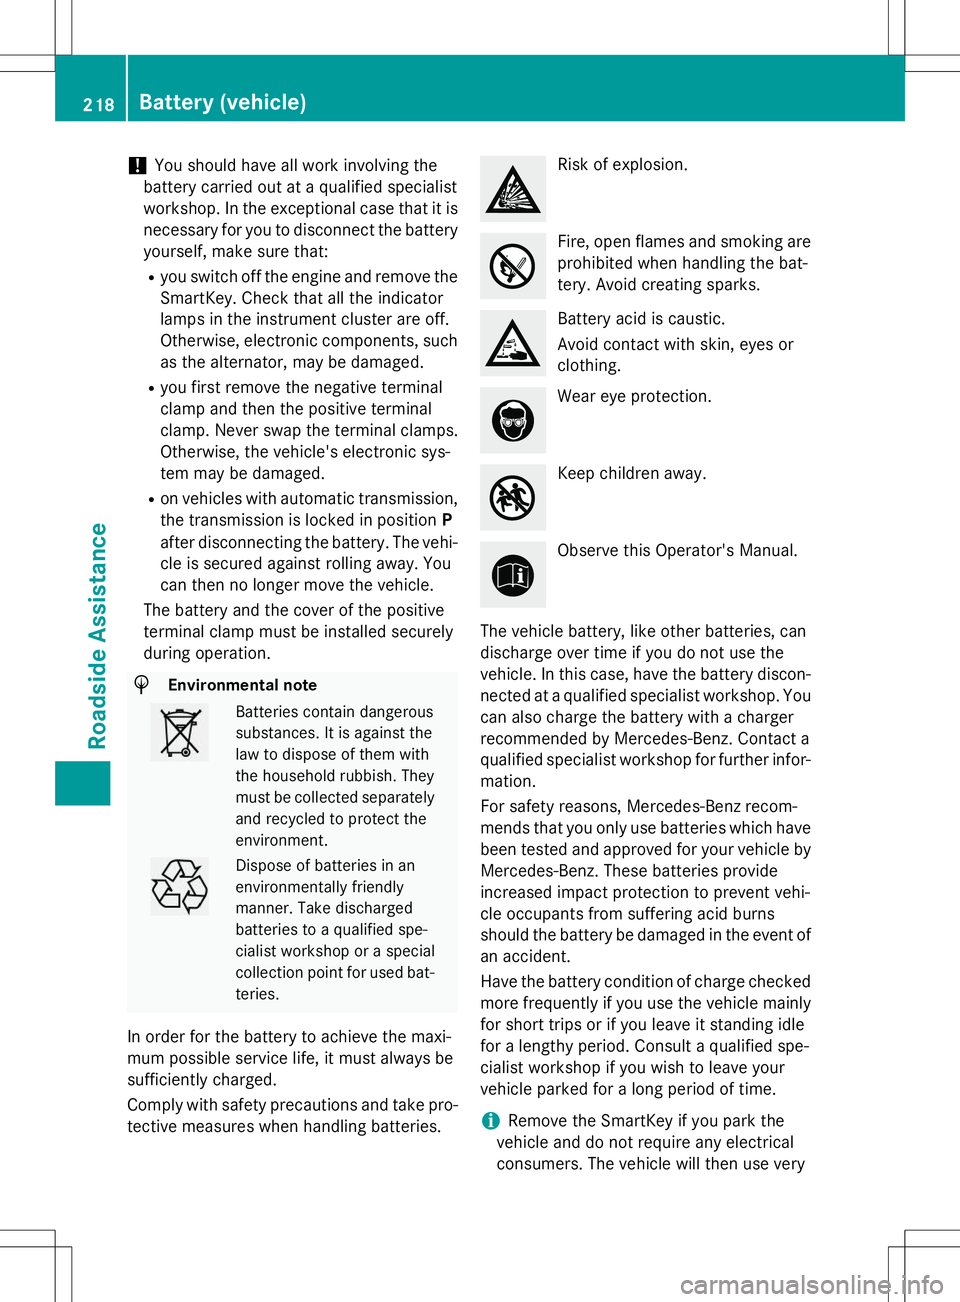
Risk of explosion.
Fire, open flames and smoking are
prohibited when handling the bat-
tery. Avoid creating sparks.
Battery acid is caustic.
Avoid contact with skin, eyes or clothing.
Wear eye protection.
Keep children away.
Observe this Operator's Manual.
The vehicle battery, like other batteries, can
discharge over time if you do not use the
vehicle. In this case, have the battery discon-
nected at a qualified specialist workshop. You can also charge the battery with a charger
recommended by Mercedes-Benz. Contact a
qualified specialist workshop for further infor-
mation.
For safety reasons, Mercedes-Benz recom-
mends that you only use batteries which have been tested and approved for your vehicle by
Mercedes-Benz. These batteries provide
increased impact protection to prevent vehi-
cle occupants from suffering acid burns
should the battery be damaged in the event of an accident.
Have the battery condition of charge checked
more frequently if you use the vehicle mainly
for short trips or if you leave it standing idle
for a lengthy period. Consult a qualified spe-
cialist workshop if you wish to leave your
vehicle parked for a long period of time.
iRemove the SmartKey if you park the
vehicle and do not require any electrical
consumers. The vehicle will then use very
218Battery (vehicle)
Roadside Assistance