belt MERCEDES-BENZ G-CLASS SUV 2015 Owner's Guide
[x] Cancel search | Manufacturer: MERCEDES-BENZ, Model Year: 2015, Model line: G-CLASS SUV, Model: MERCEDES-BENZ G-CLASS SUV 2015Pages: 274, PDF Size: 31.95 MB
Page 195 of 274
Further information can be found in the
"Loading the vehicle" section (Ypage 238).
Observe the following notes when transport-
ing a load:
R Position heavy loads as far forwards as pos-
sible and as low down in the cargo com-
partment as possible.
iTransport loads when possible in the
cargo compartment. You should only use
the cargo compartment enlargement if the
load does not fit in the cargo compartment.
R Always place the load against the backrests
of the front seats or rear seats.
R Use the cargo tie-down rings and the parcel
nets to transport loads and luggage.
R Use cargo tie-down rings and fastening
materials appropriate for the weight and
size of the load.
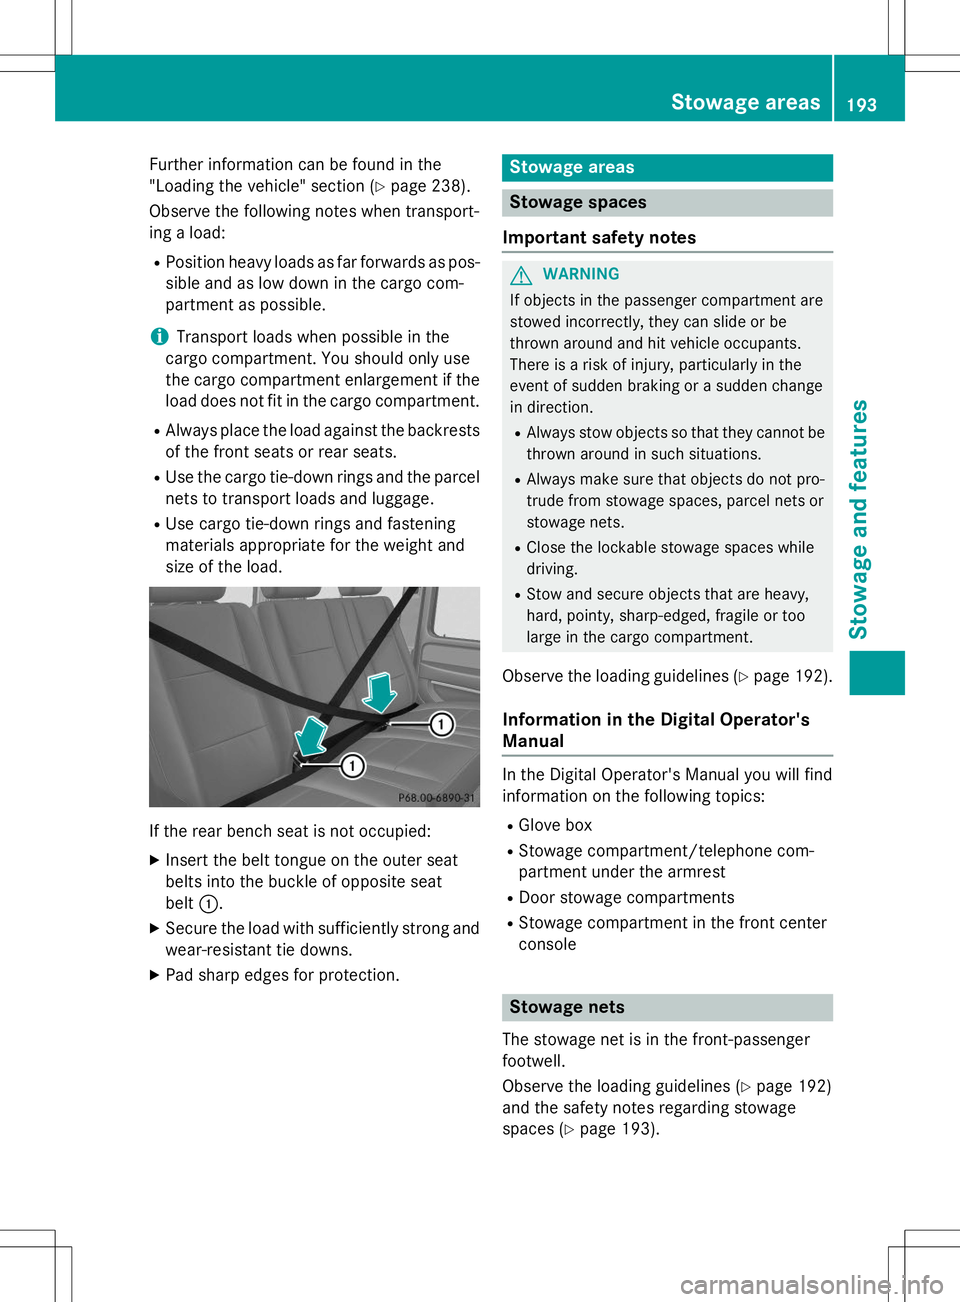
If the rear bench seat is not occupied: XInsert the belt tongue on the outer seat
belts into the buckle of opposite seat
belt :.
X Secure the load with sufficiently strong and
wear-resistant tie downs.
X Pad sharp edges for protection.
Stowage areas
Stowage spaces
Important safety notes
GWARNING
If objects in the passenger compartment are
stowed incorrectly, they can slide or be
thrown around and hit vehicle occupants.
There is a risk of injury, particularly in the
event of sudden braking or a sudden change
in direction. R Always stow objects so that they cannot be
thrown around in such situations.
R Always make sure that objects do not pro-
trude from stowage spaces, parcel nets or
stowage nets.
R Close the lockable stowage spaces while
driving.
R Stow and secure objects that are heavy,
hard, pointy, sharp-edged, fragile or too
large in the cargo compartment.
Observe the loading guidelines ( Ypage 192).
Information in the Digital Operator'sManual
In the Digital Operator's Manual you will find
information on the following topics: R
Glove box
R Stowage compartment/telephone com-
partment under the armrest
R Door stowage compartments
R Stowage compartment in the front center
console
Stowage nets
The stowage net is in the front-passenger
footwell.
Observe the loading guidelines ( Ypage 192)
and the safety notes regarding stowage
spaces ( Ypage 193).
Stowage areas193
Stowage and features
Z
Page 196 of 274
Cargo compartment enlargement
Important safety notes
GWARNING
If the rear bench seat/rear seat and seat
backrest are not engaged they could fold for- wards, e.g. when braking suddenly or in the
event of an accident. R The vehicle occupant would thereby be
pushed into the seat belt by the rear bench
seat/rear seat or by the seat backrest. The
seat belt can no longer offer the intended
level of protection and could even cause
injuries.
R Objects or loads in the trunk/cargo com-
partment cannot be restrained by the seat
backrest.
There is an increased risk of injury.
Before every trip, make sure that the seat
backrests and the rear bench seat/rear seat
are engaged.
GWARNING
Combustion engines emit poisonous exhaust
gases such as carbon monoxide. If the rear
door is open when the engine is running, par- ticularly if the vehicle is moving, exhaust
fumes could enter the passenger compart-
ment. There is a risk of poisoning.
Turn off the engine before opening the rear
door. Never drive with the rear door open.
!Ensure that you remove all containers
from the cup holder in the rear before fold- ing the seat backrest and the seat cushionof the rear bench seat forwards.
Observe the loading guidelines ( Ypage 192).
The rear bench seat is split symmetrically.
The left-hand and right-hand rear bench seats
can be folded forward to increase the capa-
city of the rear compartment. The following
changes are possible:
R fold the seat backrests forward
R fold the rear bench seat back fully
Folding the seat backrest forward
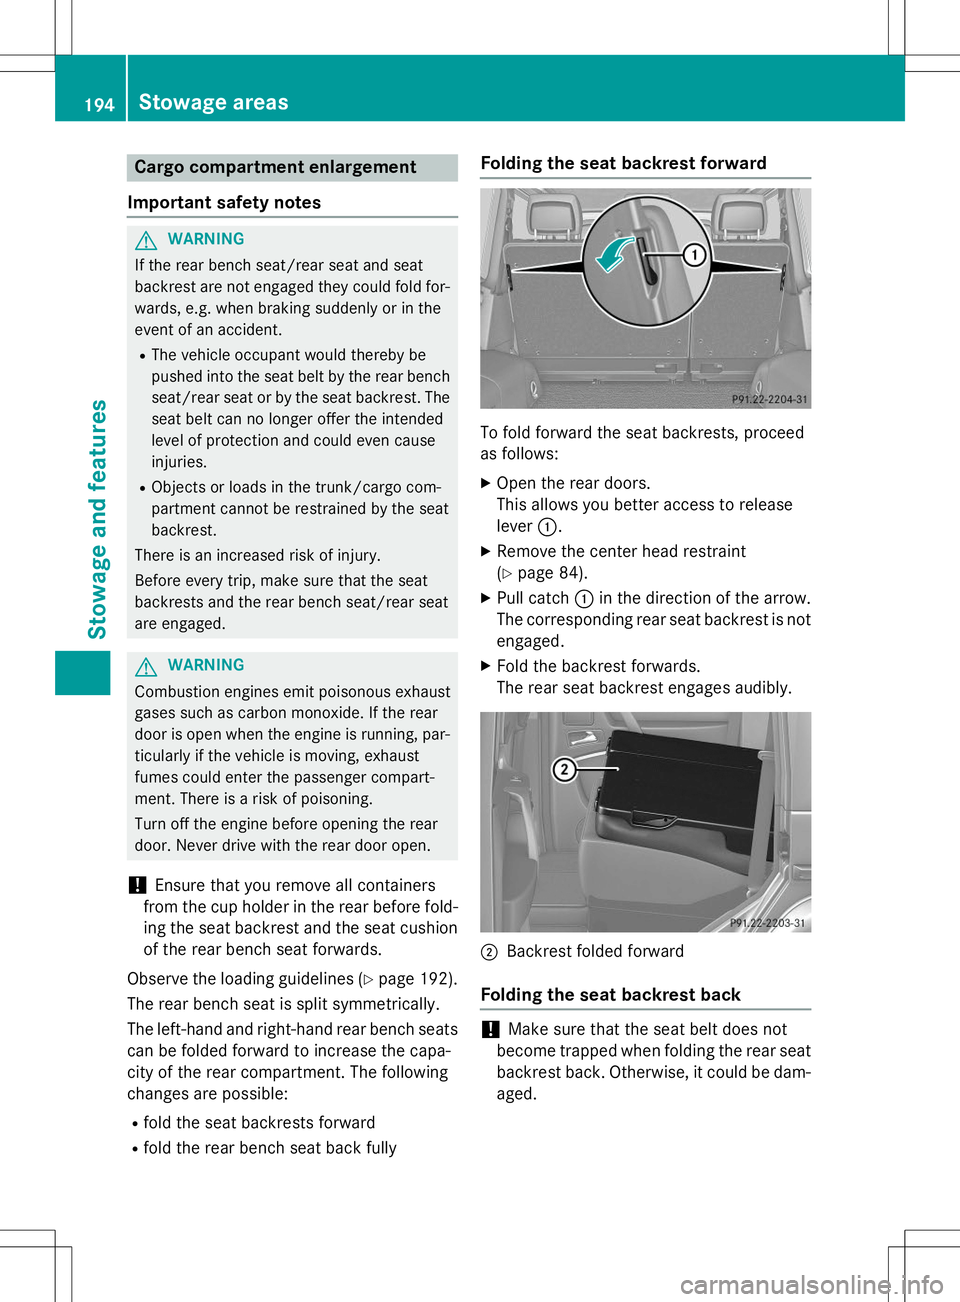
To fold forward the seat backrests, proceed
as follows:
X Open the rear doors.
This allows you better access to release
lever :.
X Remove the center head restraint(Y page 84).
X Pull catch :in the direction of the arrow.
The corresponding rear seat backrest is not
engaged.
X Fold the backrest forwards.
The rear seat backrest engages audibly.
;Backrest folded forward
Folding the seat backrest back
!Make sure that the seat belt does not
become trapped when folding the rear seat backrest back. Otherwise, it could be dam- aged.
194Stowage areas
Stowage and features
Page 197 of 274
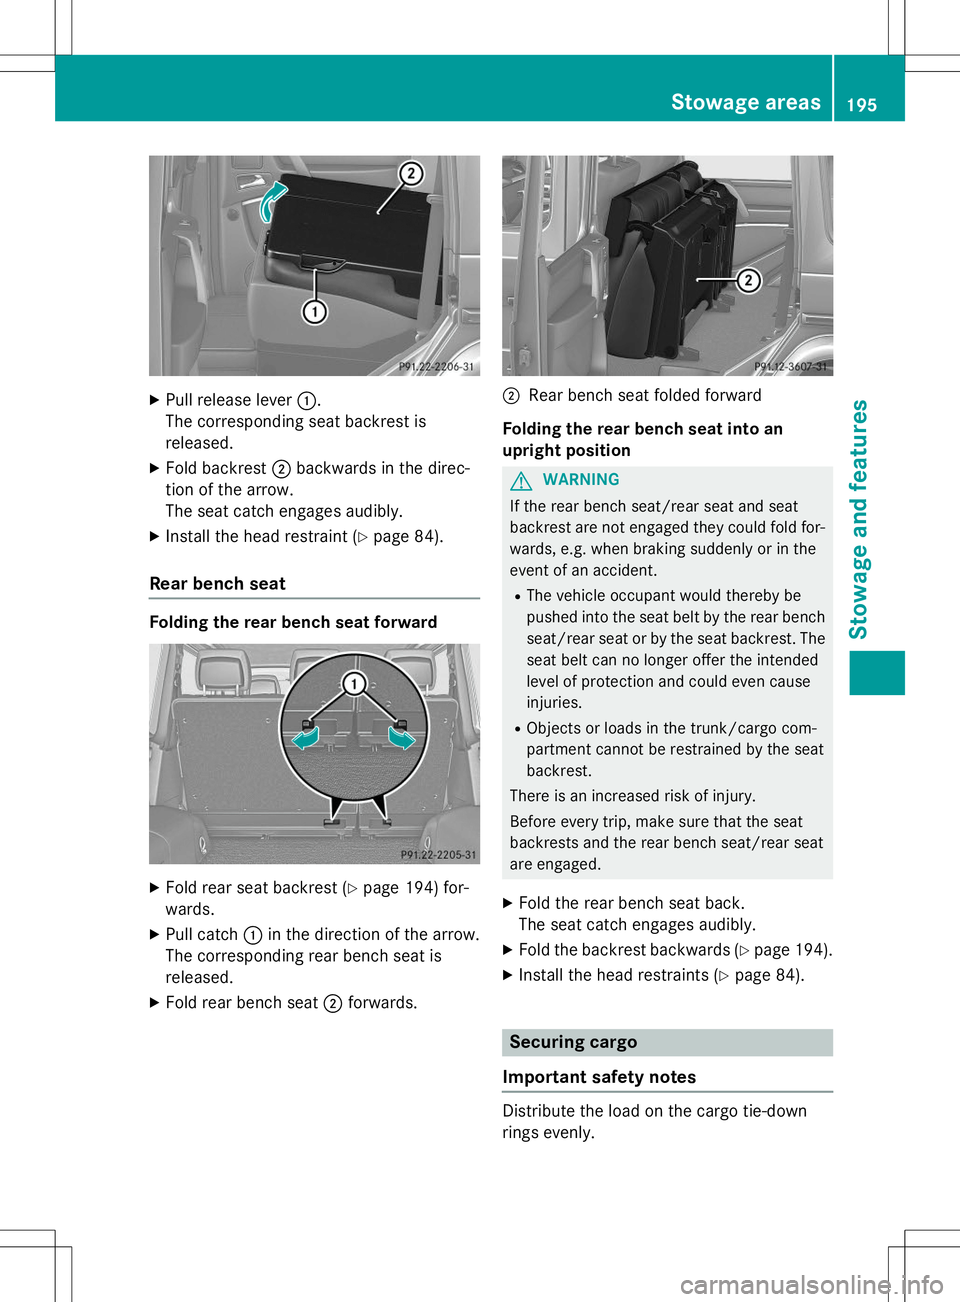
XPull release lever :.
The corresponding seat backrest is released.
X Fold backrest ;backwards in the direc-
tion of the arrow.
The seat catch engages audibly.
X Install the head restraint ( Ypage 84).
Rear bench seat
Folding the rear bench seat forward
X
Fold rear seat backrest ( Ypage 194) for-
wards.
X Pull catch :in the direction of the arrow.
The corresponding rear bench seat is released.
X Fold rear bench seat ;forwards.
;Rear bench seat folded forward
Folding the rear bench seat into an
upright position
GWARNING
If the rear bench seat/rear seat and seat
backrest are not engaged they could fold for- wards, e.g. when braking suddenly or in the
event of an accident. R The vehicle occupant would thereby be
pushed into the seat belt by the rear bench
seat/rear seat or by the seat backrest. The
seat belt can no longer offer the intended
level of protection and could even causeinjuries.
R Objects or loads in the trunk/cargo com-
partment cannot be restrained by the seat
backrest.
There is an increased risk of injury.
Before every trip, make sure that the seat
backrests and the rear bench seat/rear seat
are engaged.
X Fold the rear bench seat back.
The seat catch engages audibly.
X Fold the backrest backwards ( Ypage 194).
X Install the head restraints ( Ypage 84).
Securing cargo
Important safety notes
Distribute the load on the cargo tie-down
rings evenly.
Stowage areas195
Stowage and features
Z
Page 214 of 274
!Make sure that the automatic transmis-
sion is in position Nwhen washing your
vehicle in a tow-through car wash. The vehi-
cle could be damaged if the transmission is
in another position.
!Make sure that:
R the side windows and sliding sunroof are
closed completely.
R the blower for the ventilation/heating is
switched off (airflow control is turned toposition 0/the à andÁ buttons
are switched off).
R the windshield wiper switch is at position0.
The vehicle could otherwise be damaged.
You can wash the vehicle in an automatic car wash from the very start.
If the vehicle is very dirty, pre-wash it before
cleaning it in an automatic car wash.
After using an automatic car wash, wipe off
wax from the windshield and the wiper
blades. This will prevent smears and reduce
wiping noises caused by residue on the wind-shield.
Interior care
Information in the Digital Operator's Manual
In the Digital Operator's Manual you will find
information on the following topics: R Cleaning the display
R Cleaning the plastic trim
R Cleaning the steering wheel and gear or
selector lever
R Cleaning wooden trim and trim strips
R Cleaning the seat covers
R Cleaning the seat belts
R Cleaning the headliner and carpets
212Care
Maintenance and care
Page 249 of 274
Do not overload the tires by exceeding the
specified load limit. The maximum permissi-
ble load can be found on the vehicle's Tire andLoading Information placard on the B-pillar on
the driver's side ( Ypage 238).
iThe actual values for tires are vehicle-
specific and may deviate from the values in
the illustration.
DOT, Tire Identification Number (TIN)
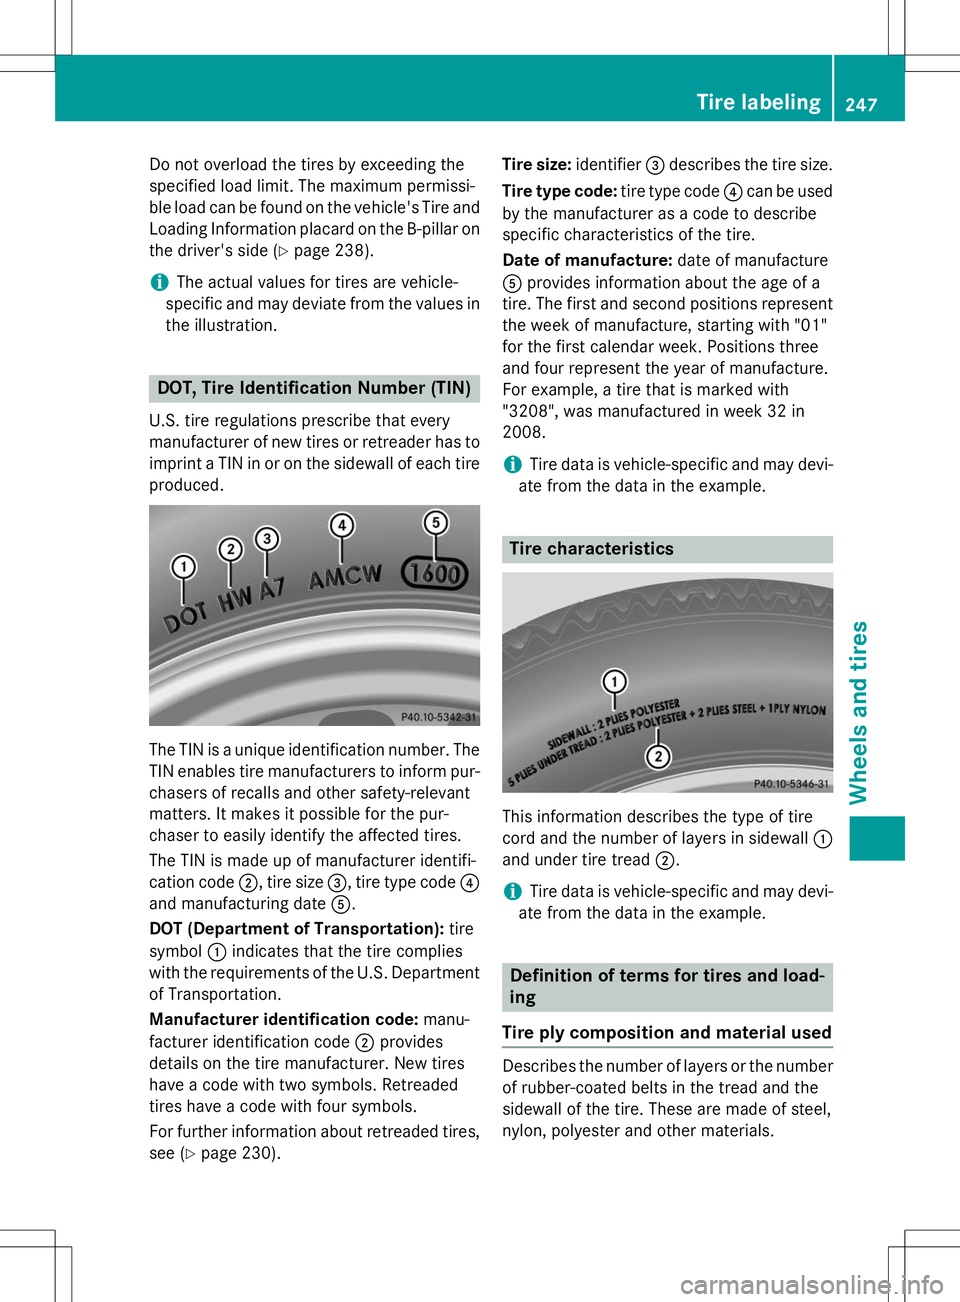
U.S. tire regulations prescribe that every
manufacturer of new tires or retreader has to imprint a TIN in or on the sidewall of each tire produced.
The TIN is a unique identification number. The
TIN enables tire manufacturers to inform pur-
chasers of recalls and other safety-relevant
matters. It makes it possible for the pur-
chaser to easily identify the affected tires.
The TIN is made up of manufacturer identifi-
cation code ;, tire size =, tire type code ?
and manufacturing date A.
DOT (Department of Transportation): tire
symbol :indicates that the tire complies
with the requirements of the U.S. Department of Transportation.
Manufacturer identification code: manu-
facturer identification code ;provides
details on the tire manufacturer. New tires
have a code with two symbols. Retreaded
tires have a code with four symbols.
For further information about retreaded tires,
see ( Ypage 230). Tire size:
identifier=describes the tire size.
Tire type code: tire type code?can be used
by the manufacturer as a code to describe
specific characteristics of the tire.
Date of manufacture: date of manufacture
A provides information about the age of a
tire. The first and second positions represent
the week of manufacture, starting with "01"
for the first calendar week. Positions three
and four represent the year of manufacture.
For example, a tire that is marked with
"3208", was manufactured in week 32 in
2008.
iTire data is vehicle-specific and may devi-
ate from the data in the example.
Tire characteristics
This information describes the type of tire
cord and the number of layers in sidewall :
and under tire tread ;.
iTire data is vehicle-specific and may devi-
ate from the data in the example.
Definition of terms for tires and load-
ing
Tire ply composition and material used
Describes the number of layers or the number
of rubber-coated belts in the tread and the
sidewall of the tire. These are made of steel,
nylon, polyester and other materials.
Tire labeling247
Wheels and tires
Z