sunroof MERCEDES-BENZ G-CLASS SUV 2015 Owners Manual
[x] Cancel search | Manufacturer: MERCEDES-BENZ, Model Year: 2015, Model line: G-CLASS SUV, Model: MERCEDES-BENZ G-CLASS SUV 2015Pages: 274, PDF Size: 31.95 MB
Page 18 of 274
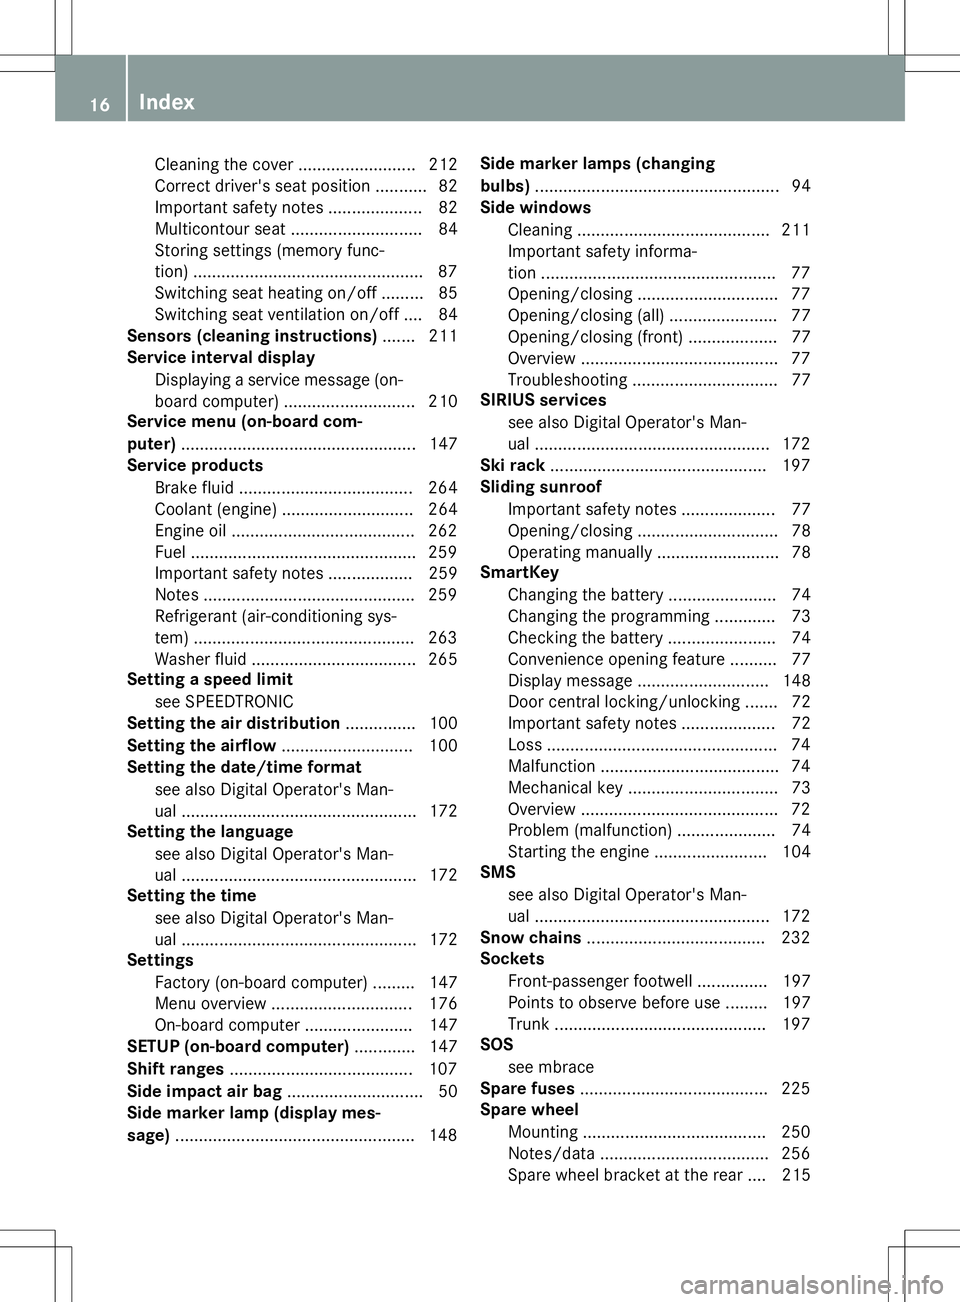
Cleaning the cover .........................212
Correct driver's seat position ........... 82
Important safety notes .................... 82
Multicontour seat ............................ 84
Storing settings (memory func-
tion) ................................................. 87
Switching seat heating on/off ......... 85
Switching seat ventilation on/off .... 84
Sensors (cleaning instructions) ....... 211
Service interval display
Displaying a service message (on-board computer) ............................ 210
Service menu (on-board com- puter) ................................................. .147
Service products
Brake fluid ..................................... 264
Coolant (engine) ............................ 264
Engine oil ....................................... 262
Fuel ................................................ 259
Important safety notes .................. 259
Notes ............................................. 259
Refrigerant (air-conditioning sys-
tem) ............................................... 263
Washer fluid ................................... 265
Setting a speed limit
see SPEEDTRONIC
Setting the air distribution ...............100
Setting the airflow ............................ 100
Setting the date/time format
see also Digital Operator's Man-
ual ................................................. .172
Setting the language
see also Digital Operator's Man-
ual ................................................. .172
Setting the time
see also Digital Operator's Man-
ual ................................................. .172
Settings
Factory (on-board computer) ......... 147
Menu overview .............................. 176
On-board computer ....................... 147
SETUP (on-board computer) ............. 147
Shift ranges ....................................... 107
Side impact air bag .............................50
Side marker lamp (display mes- sage) ................................................... 148 Side marker lamps (changingbulbs)
................................................... .94
Side windows
Cleaning ......................................... 211
Important safety informa-
tion .................................................. 77
Opening/closing .............................. 77
Opening/closing (all) ....................... 77
Opening/closing (front )................... 77
Overview .......................................... 77
Troubleshooting ............................... 77
SIRIUS services
see also Digital Operator's Man-
ual .................................................. 172
Ski rack .............................................. 197
Sliding sunroof
Important safety notes .................... 77
Opening/closing .............................. 78
Operating manually .......................... 78
SmartKey
Changing the battery ....................... 74
Changing the programming ............. 73
Checking the battery ....................... 74
Convenience opening feature .......... 77
Display message ............................ 148
Door central locking/unlocking ....... 72
Important safety notes .................... 72
Loss ................................................. 74
Malfunction ...................................... 74
Mechanical key ................................ 73
Overview .......................................... 72
Problem (malfunction) ..................... 74
Starting the engine ........................ 104
SMS
see also Digital Operator's Man-
ual .................................................. 172
Snow chains ...................................... 232
Sockets
Front-passenger footwell ............... 197
Points to observe before use ......... 197
Trunk ............................................. 197
SOS
see mbrace
Spare fuses ........................................ 225
Spare wheel
Mounting ....................................... 250
Notes/data .................................... 256
Spare wheel bracket at the rear .... 215
16Index
Page 19 of 274
Stainless-steel spare hub cap ........ 215
Special seat belt retractor .................. 56
Specialist workshop ............................ 28
Speed, controlling
see Cruise control
Speedometer
In the Instrument cluster ............... 146
Segments ...................................... 146
Selecting the unit of measure-
ment .............................................. 147
see Instrument cluster
SPEEDTRONIC
Display message ............................ 148
Selecting ........................................ 116
Variabl e......................................... 115
Standing lamps
Display message ............................ 148
Switching on/of f.............................. 91
Starting the engine
Important safety notes .................. 104
Steering (display message) ...... 148, 160
Steering wheel
Adjusting (electrically) ..................... 87
Buttons (on-board computer) ......... 146
Important safety notes .................... 86
Paddle shifters ............................... 107
Steering wheel heating .................... 87
Storing settings (memory func-
tion) ................................................. 87
Steering wheel (cleaning instruc-
tions) .................................................. 212
Steering wheel paddle shifters ........ 107
Stopwatch (RACETIMER) ................... 147
Stowage areas ................................... 193
Stowage compartments
Armrest (under) ............................. 193
Center console .............................. 193
Cup holders ................................... 197
Display message) ........................... 148
Door stowage compartment .......... 193
Glove box ....................................... 193
Important safety information ......... 193
Summer tires ..................................... 232
Surround lighting (on-board com- puter) .................................................. 147
Switching air-recirculation mode
on/off ................................................. 100 Switching off the alarm (ATA)
............ 69
T
Tachometer........................................ 146
Tail lamps
Display message ............................ 148
see Lights
Tank content
Fuel gaug e..................................... 146
Technical data
Capacities ...................................... 259
Tires ............................................... 254
Tires/wheels ................................. 254
Trailer load s................................... 269
Vehicle data ................................... 266
Wheels ........................................... 254
TELEAID
Call priority .................................... 201
Emergency call .............................. 198
Important safety notes .................. 197
MB info call button ........................ 200
Roadside Assistance button .......... 200
Self-test ......................................... 198
System .......................................... 198
Telephone
Accepting a call ............................. 147
Display message ............................ 148
Number from the phone book ........ 147
Redialing ........................................ 147
Rejecting/ending a call ................. 147
see also Digital Operator's Man-ual.................................................. 172
Telephone compartment .................. 193
Temperature
Coolant .......................................... 146
Coolant (on-board computer) ......... 147
Engine oil (on-board computer) ...... 147
Outside temperature ...................... 146
Theft deterrent systems
ATA (Anti-Theft Alarm system )......... 69
Immobilizer ...................................... 68
Tilt/sliding sunroof
see Sliding sunroof
Time
see separate operating instructions
Timing (RACETIMER) ......................... 147
Index17
Page 40 of 274
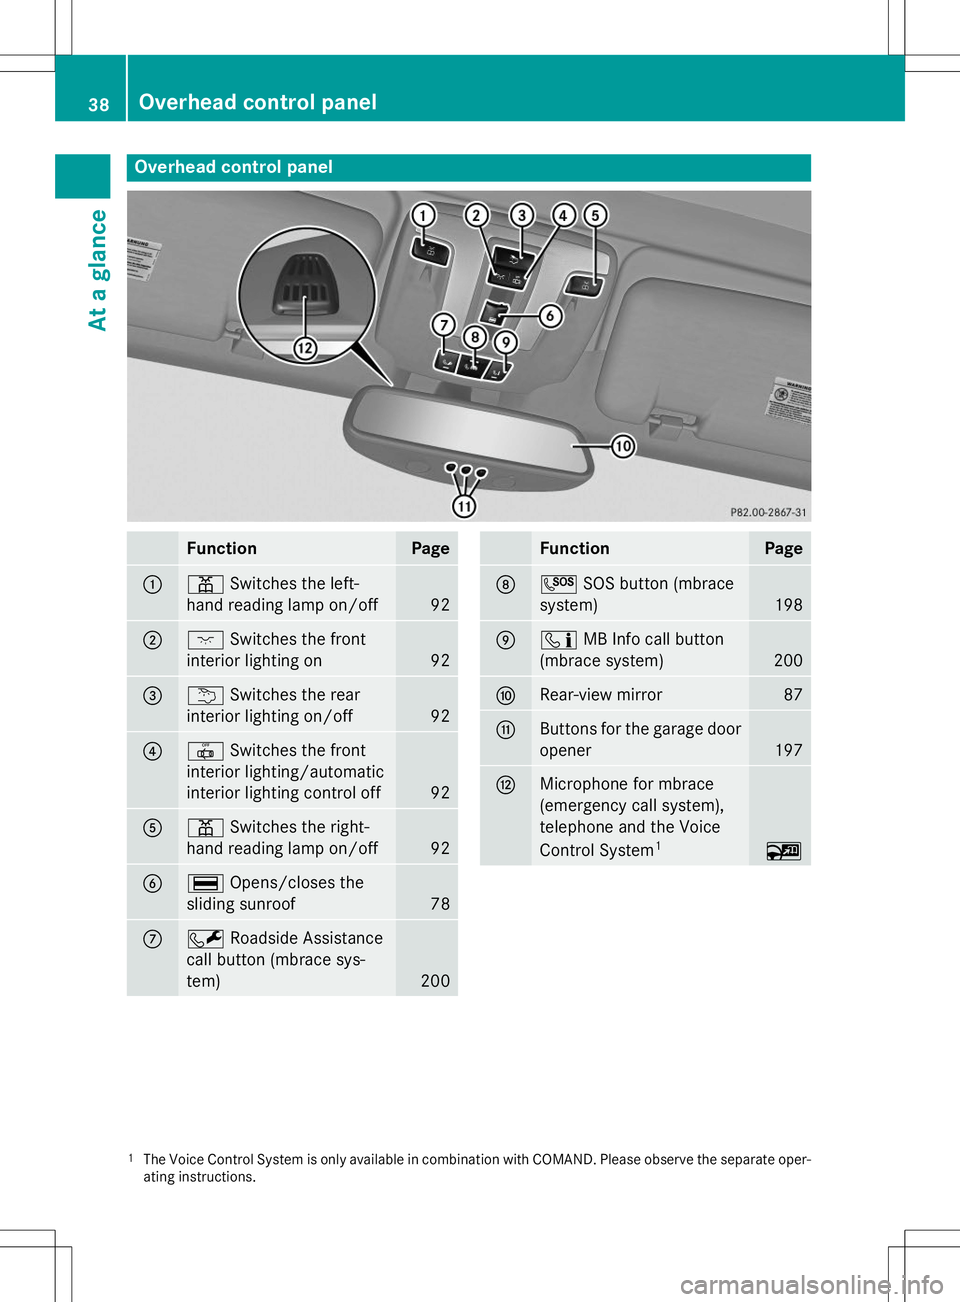
Overhead control panel
FunctionPage
:pSwitches the left-
hand reading lamp on/off
92
;c Switches the front
interior lighting on
92
=u Switches the rear
interior lighting on/off
92
?| Switches the front
interior lighting/automatic
interior lighting control off
92
Ap Switches the right-
hand reading lamp on/off
92
B¡ Opens/closes the
sliding sunroof
78
CF Roadside Assistance
call button (mbrace sys- tem)
200
FunctionPage
DG SOS button (mbrace
system)
198
Eï MB Info call button
(mbrace system)
200
FRear-view mirror87
GButtons for the garage door opener
197
HMicrophone for mbrace
(emergency call system),
telephone and the Voice
Control System 1
~
1
The Voice Control System is only available in combination with COMAND. Please observe the separate oper-
ating instructions.
38Overhead control panel
At a glance
Page 73 of 274
Useful information..............................72
SmartKey ............................................. 72
Doors .................................................... 75
Rear door ............................................. 76
Side windows ...................................... 77
Sliding sunroof .................................... 77
71
Opening and closing
Page 79 of 274
Side windows
Important safety notes
GWARNING
While closing the side windows, body parts inthe closing area could become trapped. There is a risk of injury.
When closing make sure that no parts of the
body are in the closing area. If somebody
becomes trapped, release the switch or press
the switch to open the side window again.
GWARNING
While opening the side windows, body parts
could become trapped between the side win- dow and the door frame as the side window
moves. There is a risk of injury.
Make sure that nobody touches the side win-
dow during the opening procedure. If some-
body becomes trapped, release the switch or pull the switch to close the side window again.
Information in the Digital Operator's Manual
In the Digital Operator's Manual you will find
information on the following topics:
R Opening and closing the side windows
R Opening and closing all side windows
Problems with the side windows
GWARNING
Closing the side windows with increased force
or without the anti-entrapment feature could
lead to serious or even fatal injury. Make sure
that nobody can become trapped when clos-
ing the side windows.
Problem: a side window cannot be closed because objects are trapped between the
side window and the door frame.
X Remove the objects.
X Close the side window. Problem: a side window cannot be closed
and you cannot see the cause.
If a side window is obstructed during closing
and reopens again slightly:
X Immediately after the window blocks, pull
the corresponding switch again until the
side window has closed.
If a side window is obstructed again during
closing and reopens again slightly: X Immediately after the window blocks, pull
the corresponding switch again until the
side window has closed.
iIf a side window no longer opens or closes
due to a malfunction, contact a qualified
specialist workshop.
Sliding sunroof
Important safety notes
!
Only open the sliding sunroof if it is free of
snow and ice. Otherwise, malfunctions may
occur.
Do not allow anything to protrude from the sliding sunroof. Otherwise, the seals could
be damaged.
!If the sliding sunroof still cannot be
opened or closed as a result of a malfunc-
tion, contact a qualified specialist work-shop.
!The weather can change abruptly. It could
start to rain or snow. Make sure that the
sliding sunroof is closed when you leave the
vehicle. The vehicle electronics can be
damaged if water enters the vehicle inte-rior.
iResonance noises can occur in addition to
the usual airflow noises when the sliding
sunroof is open. They are caused by minor
pressure fluctuations in the vehicle interior.
Change the position of the sliding sunroof
or open a side window slightly to reduce or
eliminate these noises.
Sliding sunroof77
Opening and closing
Z
Page 80 of 274
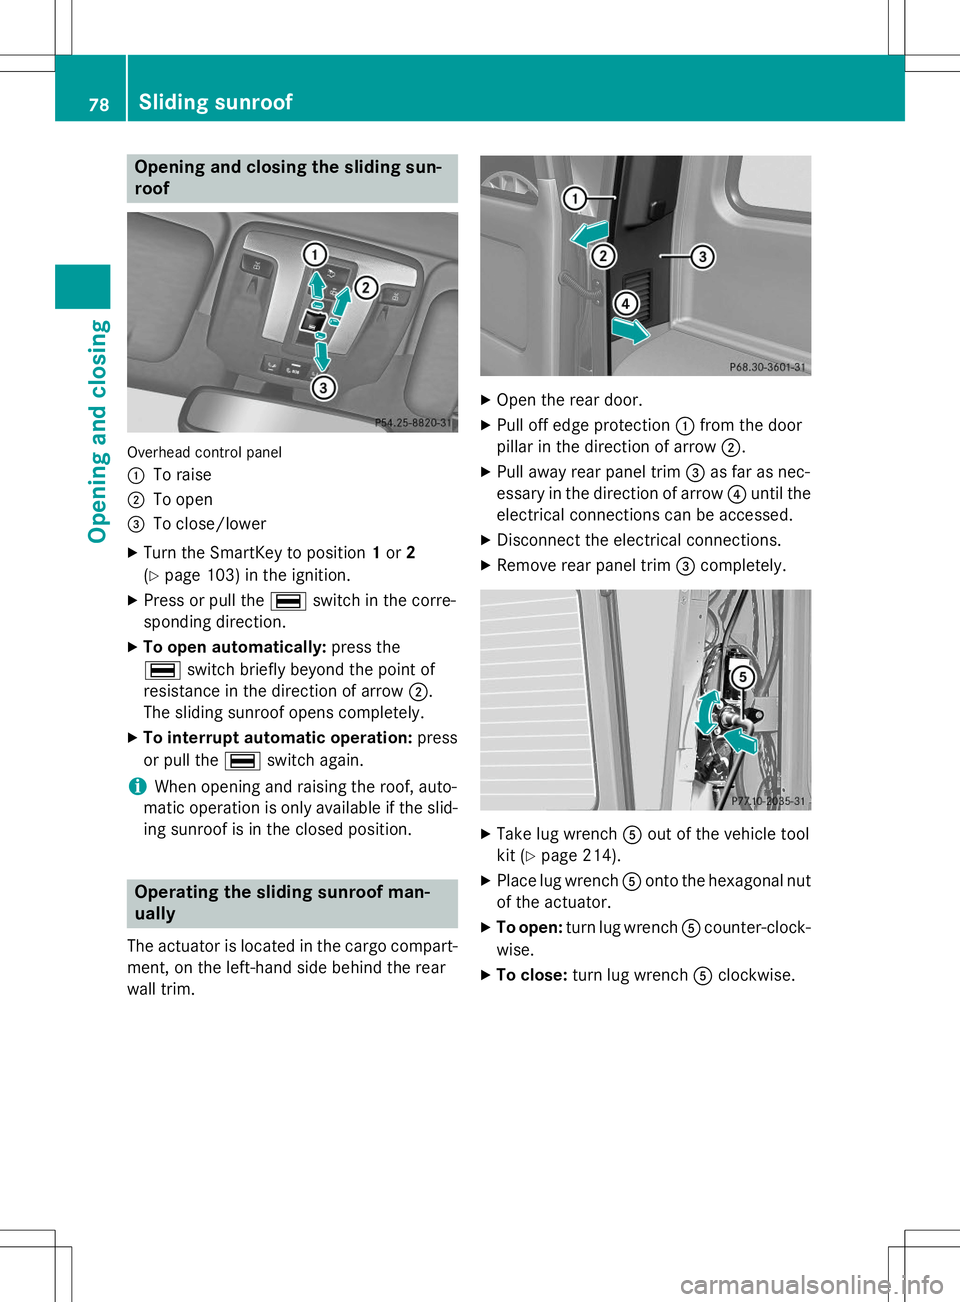
Opening and closing the sliding sun- roof
Overhead control panel :
To raise
;To open
=To close/lower
X Turn the SmartKey to position 1or 2
( Y page 103) in the ignition.
X Press or pull the ¡switch in the corre-
sponding direction.
X To open automatically: press the
¡ switch briefly beyond the point of
resistance in the direction of arrow ;.
The sliding sunroof opens completely.
X To interrupt automatic operation: press
or pull the ¡switch again.
iWhen opening and raising the roof, auto-
matic operation is only available if the slid- ing sunroof is in the closed position.
Operating the sliding sunroof man- ually
The actuator is located in the cargo compart-
ment, on the left-hand side behind the rear
wall trim.
X Open the rear door.
X Pull off edge protection :from the door
pillar in the direction of arrow ;.
X Pull away rear panel trim =as far as nec-
essary in the direction of arrow ?until the
electrical connections can be accessed.
X Disconnect the electrical connections.
X Remove rear panel trim =completely.
X
Take lug wrench Aout of the vehicle tool
kit ( Ypage 214).
X Place lug wrench Aonto the hexagonal nut
of the actuator.
X To open: turn lug wrench Acounter-clock-
wise.
X To close: turn lug wrench Aclockwise.
78Sliding sunroof
Opening and closing
Page 100 of 274
Useful information
iThis Operator's Manual describes all
models and all standard and optional equip- ment of your vehicle available at the time of
publication of the Operator's Manual.
Country-specific differences are possible.
Please note that your vehicle may not be
equipped with all features described. This
also applies to safety-related systems and
functions.
iRead the information on qualified special-
ist workshops: ( Ypage 28).
Overview of climate control systems
Important safety notes
Observe the settings recommended on the
following pages. The windows could other-
wise fog up. This could prevent you from
observing the traffic conditions, thereby
causing an accident.
Climate control regulates the temperature
and the humidity in the vehicle interior and
filters undesirable substances from the air.
Dual-zone automatic climate control is only
operational when the engine is running. Opti-
mum operation is only achieved if you drive
with the side windows and sliding sunroofclosed.
The climatic comfort deteriorates whilst the
sliding sunroof is open. The automatic climate control cannot maintain the set temperature
with the sliding sunroof open. You have to
adjust the climate control manually.
iVentilate the vehicle for a brief period
during warm weather, e.g. using the con-
venience opening feature ( Ypage 77). This
will speed up the cooling process and the
desired vehicle interior temperature will be
reached more quickly.
iThe integrated filter can filter out most
particles of dust, and completely filters out
pollen. A clogged filter reduces the amount of air supplied to the vehicle interior. For
this reason, you should always observe the
interval for replacing the filter, which is
specified in the Maintenance Booklet. As it
depends on environmental conditions, e.g. heavy air pollution, the interval may be
shorter than stated in the Maintenance
Booklet.
98Overview of climate control systems
Climate control
Page 214 of 274
!Make sure that the automatic transmis-
sion is in position Nwhen washing your
vehicle in a tow-through car wash. The vehi-
cle could be damaged if the transmission is
in another position.
!Make sure that:
R the side windows and sliding sunroof are
closed completely.
R the blower for the ventilation/heating is
switched off (airflow control is turned toposition 0/the à andÁ buttons
are switched off).
R the windshield wiper switch is at position0.
The vehicle could otherwise be damaged.
You can wash the vehicle in an automatic car wash from the very start.
If the vehicle is very dirty, pre-wash it before
cleaning it in an automatic car wash.
After using an automatic car wash, wipe off
wax from the windshield and the wiper
blades. This will prevent smears and reduce
wiping noises caused by residue on the wind-shield.
Interior care
Information in the Digital Operator's Manual
In the Digital Operator's Manual you will find
information on the following topics: R Cleaning the display
R Cleaning the plastic trim
R Cleaning the steering wheel and gear or
selector lever
R Cleaning wooden trim and trim strips
R Cleaning the seat covers
R Cleaning the seat belts
R Cleaning the headliner and carpets
212Care
Maintenance and care