fog light bulb MERCEDES-BENZ G-CLASS SUV 2016 Owners Manual
[x] Cancel search | Manufacturer: MERCEDES-BENZ, Model Year: 2016, Model line: G-CLASS SUV, Model: MERCEDES-BENZ G-CLASS SUV 2016Pages: 261, PDF Size: 6.01 MB
Page 9 of 261
Breakdown
see Fla ttyre
see Towing away
Brightness contro l(instrument
cluste rlighting) ................................... 26
Bulbs
Brake lamp ...................................... 79
Parking lamp (rear) .......................... 79
Rear foglamp ................................... 79
Reversing lamp ................................ 79
Tail lamp .......................................... 79
Turn signa llam p(front) .................... 79
Turn signa llam p(rear) ..................... 79
see Replacing bulbs
Bumper (steel) ................................... 210 C
Calling up afault
see Display messages
Car wash (care) ................................ .217
Care
Automatic car wash ....................... 217
Carpets .......................................... 221
Display .......................................... .220
Exhaus tpipe. ................................. 219
Exterior lighting ............................ .219
General notes ................................ 216
High-pressure cleaner .................... 218
Interior .......................................... .220
Paint .............................................. 218
Plastic trim ................................... .220
Roo flining ...................................... 221
Seat bel t........................................ 221
Seat cover ..................................... 220
Selector leve r................................ 220
Steering whee l............................... 220
Tri mp iece s.................................... 220
Washing by hand ........................... 217
Wheel s........................................... 218
Window s........................................ 219
Wipe rblade s.................................. 219
Woode nloa dc ompartment floor ... 221
Woode ntrim .................................. 220
Central locking
Automati cloc king (on-board com-
puter) ............................................. 139
Locking/unlocking (key) .................. 57 Centr
econsole
Lowe rsectio n................................. .29
Overview .......................................... 28
Upper sectio n................................. .28
Changing bulbs
Parking lamp (rear ).......................... 80
Changin ggears .................................. 103
Child
Restraint system .............................. 40
Child seat
Automati crecognition ..................... 42
Forward-facing restraint system ...... 45
ISOFIX .............................................. 40
On the front-passenger sea t............ 43
Problem (malfunction) ..................... 46
Rearward-facing restraint system .... 44
Recommendations ........................... 49
Suitable positions ............................ 46
Top Tether ....................................... 41
Child seat lock ..................................... 39
Child-proof locks
Important safety notes .................... 51
Rear doors ....................................... 51
Children
child sea tloc k. ................................. 39
Childre ninthe vehicle
Important safety notes .................... 38
Cigarette lighter ................................ 209
Cleaning ............................................. 166
Trailer tow hitch ............................. 220
Climate control
Auxiliary heating/ventilation ............ 89
Controlling automaticall y................. 86
Cooling with ai rdehumidifica tion ..... 85
Demisting the window s.................... 87
Demisting the windscree n............... 87
ECO start/stop function .................. 85
Important safety notes .................... 84
Indicato rlam p.................................. 86
Note sonu sing THERMATI Cauto-
mati cclimate control ....................... 85
Overview of systems ........................ 84
Problem with the rea rwindow
heating ............................................. 88
Problems with "cooling with air
dehumidification" ............................. 86
Setting the ai rdistribution ............... 86
Setting the ai rvents ........................ 93 6
Index
Page 14 of 261
Interior lighting
.................................. .77
Automatic contro lsystem ................ 77
Delayed switch-off (on-board
computer) ...................................... 139
Luggage compartment lighting ........ 78
Manua lcontro l................................. 77
Overview .......................................... 77
Reading lamp ................................... 78
Rear interio rlighting ........................ 78
iPod ®
and iPhone ®
Audio playback .............................. 178
ISOFIX chil dseats ecur ings ystem .... 40 J
Jack Declaration of conformity ................ 22
Pump leve r.....................................2 44
Storage location ............................ 223
Using ............................................. 244
Jump starting (engine) ......................227 K
Key Changing the battery ....................... 59
Checki ngtheb attery ...................... .59
Display message ............................ 155
Doo rcentral locking/unlocking ....... 57
Emergency key element ................... 58
Important safety note s.................... 57
Los s................................................. 60
Modifying the programming ............. 58
Overview .......................................... 57
Positions (ignition lock) .................... 96
Problem (malfunction) ..................... 60
Starting the engine .......................... 96
Ke yp ositions
Key .................................................. 96 L
Language (on-board computer) ........ 138
Lashin geyelets ................................ .203
Licenc eplate lamp (display mes-
sage) ................................................... 145
Light sensor (display message) ....... 145Lights
Activating/deac tivating th einte-
rior lighting delayed switch-off ...... .139
Automatic headlamp mode .............. 75
Combination switch ......................... 76
Dipped-bea mheadlamps ................. 74
Driving abroad ................................. 74
General notes .................................. 74
Hazard warning lamps ..................... 76
Headlamp flasher ............................ .76
Light switch .....................................74
Main-beam headlamps ..................... 76
Misted up headlamps ....................... 76
Parking lamps ..................................75
Rear foglamp .................................. .75
Sid elam ps ....................................... 75
Switching the daytime driving
lights on/of f(on -board com-
puter) ............................................. 138
Switching the daytime driving
lights on/of f(switch) ....................... 74
Switching the exterio rlighting
delaye dswitch-off on/of f(on-
board computer) ............................ 138
Switching the surround lighting
on/of f(on -board computer) .......... 138
Turn signal s..................................... 76
see Interior lighting
see Replacing bulbs
Loadin gguidelines ............................ 198
Locking
see Central locking
Locking (doors)
Automati c........................................ 62
Emergency locking ........................... 62
From inside (central locking but-
ton) .................................................. 62
Locking centrally
see Central locking
Locking verification signal (on-
board computer) ............................... 139
LO WR ANGE off-road gear ................ 124
Luggag ecom partment cover
Fitting/removing ........................... 204
Important safety notes .................. 203
Notes/function .............................. 203
Opening and closing ...................... 203 Index
11
Page 82 of 261
the xeno
nbulbs carrie doutataq uali fied spe-
cialist workshop. G
WARNING
Bulbs, lamp sand plugc onnectors can
become very hot during use. When replacing a bulb, you coul dburn yourself on these com-
ponents. There is arisk of injury.
Allow these components to cool downb efore
replacing the bulb.
Do not use abulbifith as been dropped or if its
glass has been scratched.
The bulbm ay explode if:
R you touch it
R it is hot
R you drop it
R you scratch it
Use bulbs only in closed lamp sthat have been
designed for this purpose. Fit only spar ebulbs of
the same type and the specified voltage.
Marks on the glass reduce the service life of the bulbs. Do not touch the glass tube with your
bare hands. If necessary, clea nthe glass tube
when cold with alcohol or spiri tand rub it off
with alint-free cloth.
Protect bulbs from moisture during operation.
Do not allow bulbs to come into contact with
liquids.
Xeno nbulbs and LED modules: you cannot
replace xenon bulbs or LED modules yourself.
Have the following bulbs replaced at aqualified
specialist workshop:
R third brake lamp
R side lamps/parking lamp s(front)
R main-beam/dipped-beam headlamps (xenon
headlamps)
R daytime driving lights
R licence plate lamp
i Individuals
egments of the licence plate
lamp LEDs may fail without adisplay message
appearing in the multifunction display.R egu-
larl ycheck the licence plate lighting. If nec-
essary, visit aqualified specialist workshop.
You can replace the following bulbs: R turn signa llamp (front)
R brake/tai llamp
R turn signa llamp (rear) R
tail lamp/parking lamp
R reversing light
R rear foglamp
Replace only the bulb sliste d( Ypage 79).
Hav ethe bulb stha tyou cannot change yourself
replaced at aquali fied specialis tworkshop.
If yo urequire assistance replacing bulbs, con-
sult aquali fied specialis tworkshop.
If the new bulb still does not light up ,consul ta
qualified specialis tworkshop.
Headlamps and lights ar eanimportant aspect of
vehicl esafety .You must therefore make sure
tha tthese functio ncorrectl yatalltimes .Have
the headlamp setting verified regularly. Overview of bulb types
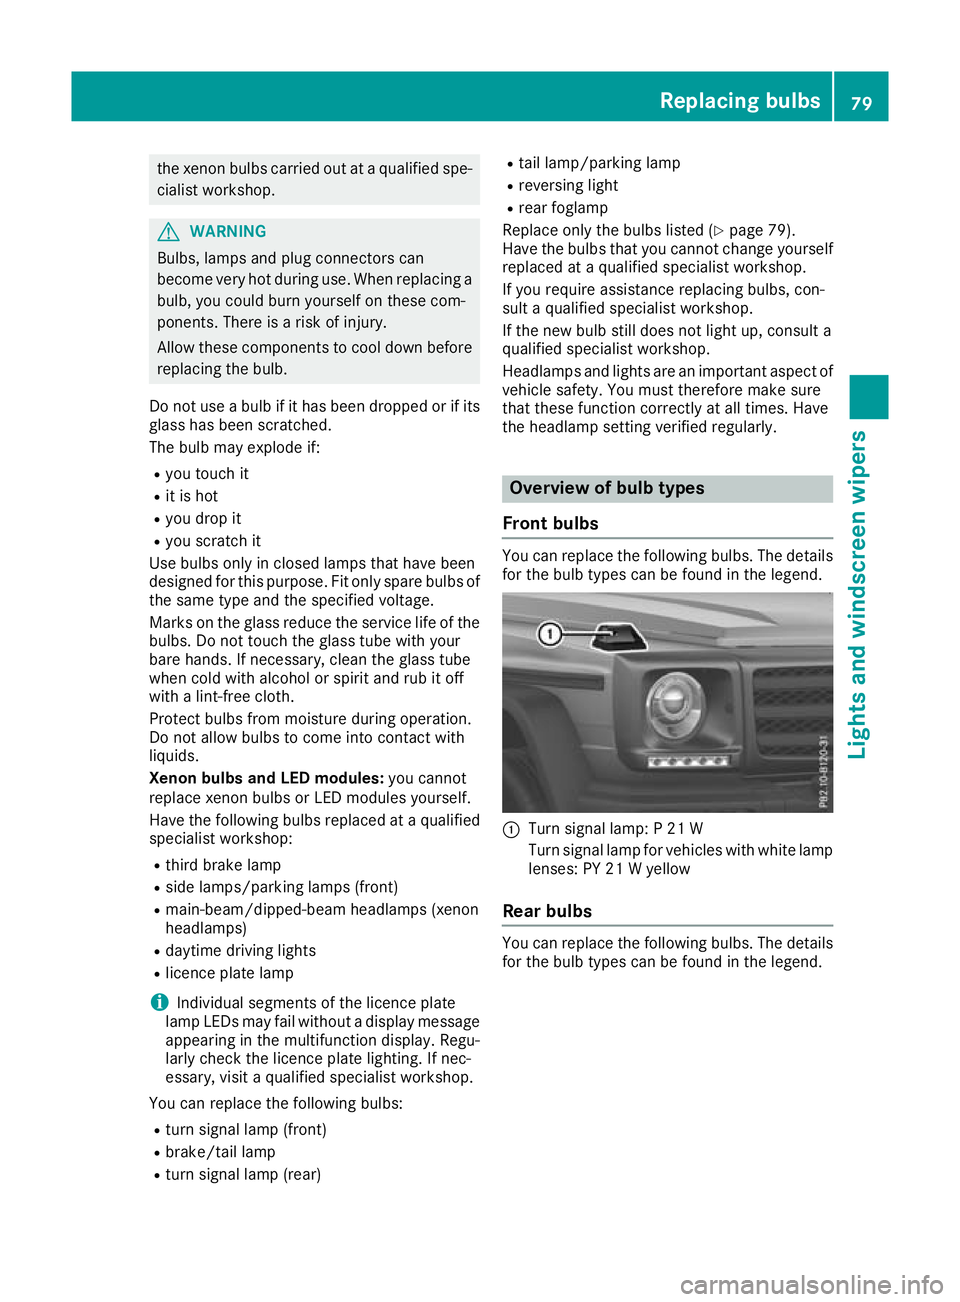
Fron tbulbs You can replace the following bulbs. The details
for the bulb types can be found in the legend. :
Turn signal lamp: P21W
Turn signal lamp for vehicles with white lamp lenses: PY 21 Wyellow
Rear bulbs You can replace the following
bulbs. The details
for the bulb types can be foun dinthe legend. Replacing bulbs
79Lights and windscreen wipers Z
Page 83 of 261
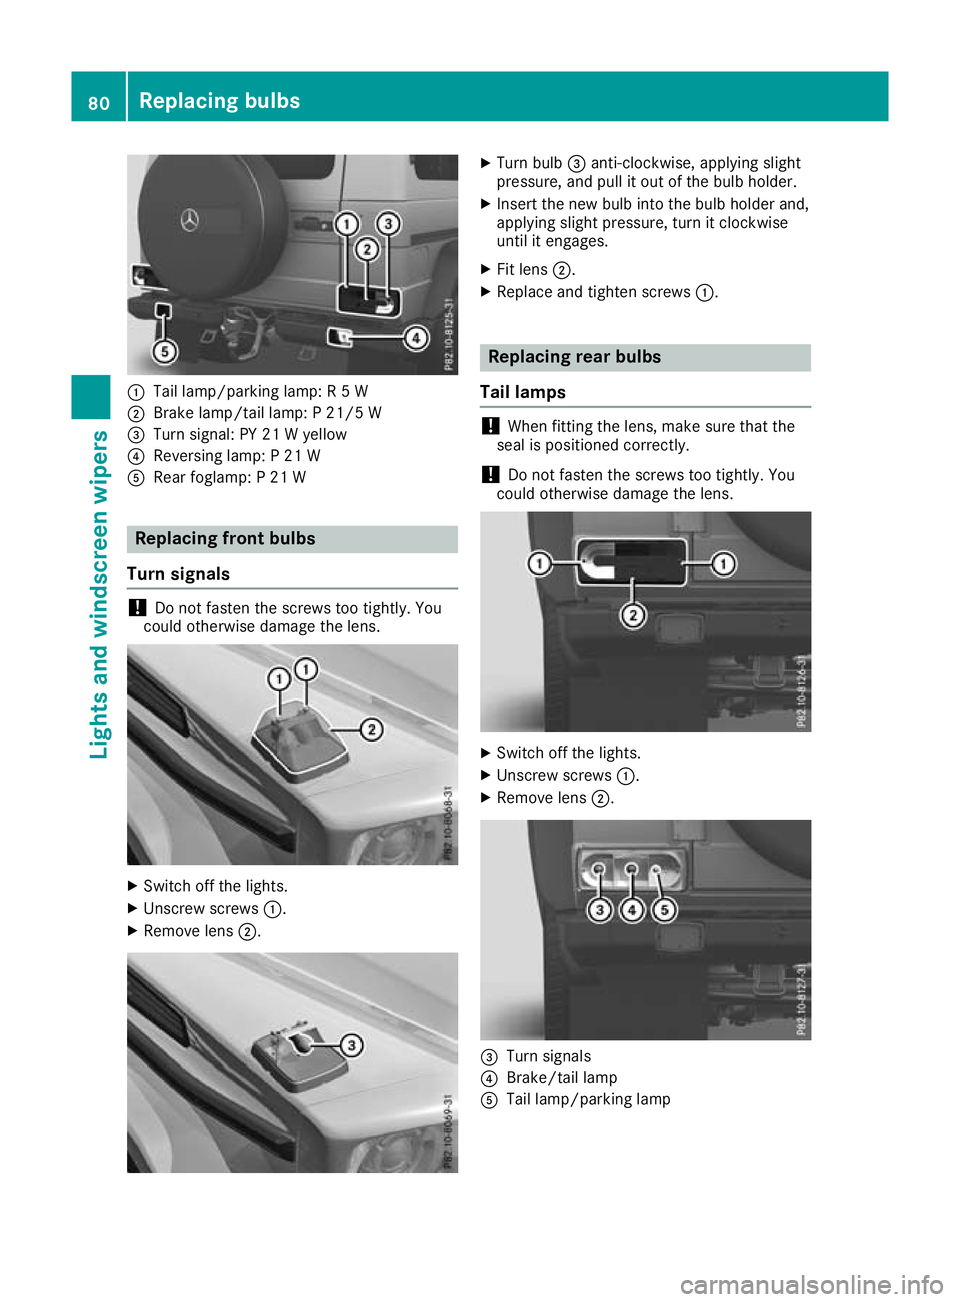
:
Tail lamp/parking lamp: R5W
; Brake lamp/tail lamp: P21/5 W
= Turn signal: PY 21 Wyellow
? Reversing lamp: P21W
A Rear foglamp: P21W Replacing fron
tbulbs
Turn signals !
Do not fasten the screws too tightly. You
coul dotherwise damage the lens. X
Switch off the lights.
X Unscrew screws :.
X Remove lens ;. X
Turn bulb =anti-clockwise, applying slight
pressure, and pull it out of the bulb holder.
X Insert the new bulb into the bulb holder and,
applying slight pressure, turn it clockwise
until it engages.
X Fit lens ;.
X Replace and tighten screws :. Replacing rear bulbs
Tail lamps !
When fitting the lens, make sure that the
seal is positioned correctly.
! Do not fasten the screws too tightly. You
could otherwise damage the lens. X
Switch off the lights.
X Unscrew screws :.
X Remove lens ;. =
Turn signals
? Brake/tail lamp
A Tail lamp/parkin glamp 80
Replacing bulbsLightsa
nd windscreen wipers
Page 84 of 261
X
Turn the respective bulb anti-clockwise,
applying slight pressure, and pull it out of the
bulb holder.
X Insert the new bulb into the bulb holder and,
applying slight pressure, turn it clockwise
until it engages.
X Fit lens ;.
X Tighten screws :.
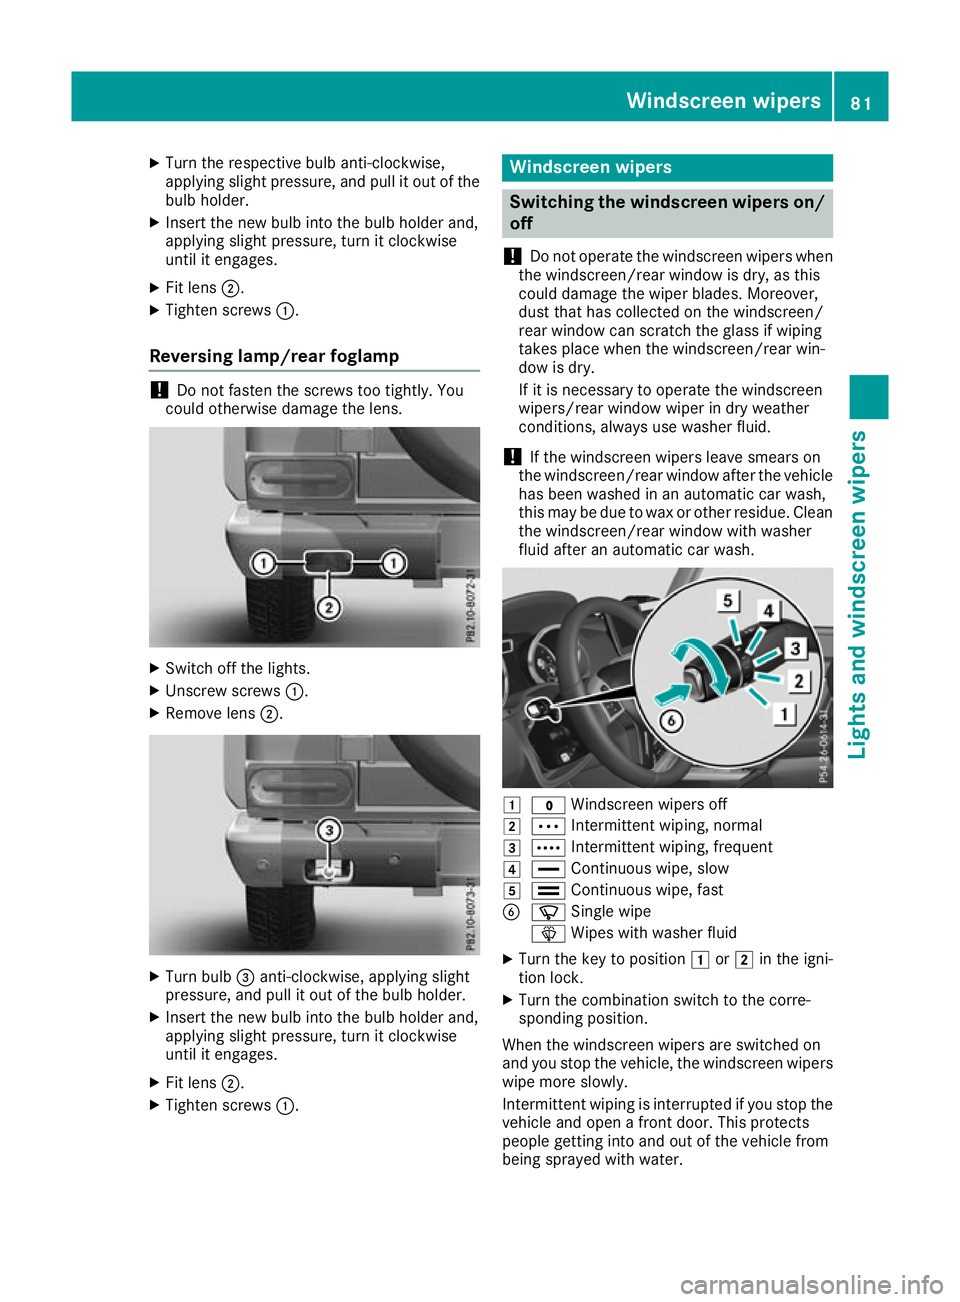
Reversing lamp/rear foglamp !
Do not fasten the screws too tightly. You
could otherwise damage the lens. X
Switch off the lights.
X Unscrew screws :.
X Remove lens ;. X
Turn bulb =anti-clockwise, applying slight
pressure, and pull it out of the bulb holder.
X Insert the new bulb into the bulb holder and,
applying slight pressure, turn it clockwise
until it engages.
X Fit lens ;.
X Tighten screws :. Windscreen wipers
Switching the windscreen wipers on/
off
! Do not operate the windscreen wipers when
the windscreen/rear window is dry, as this
could damage the wiper blades. Moreover,
dust that has collected on the windscreen/
rear window can scratc hthe glass if wiping
takes place when the windscreen/rear win-
dow is dry.
If it is necessary to operate the windscreen
wipers/rear window wiper in dry weather
conditions, always use washer fluid.
! If the windscreen wipers leave smears on
the windscreen/rear window after the vehicle has been washed in an automatic car wash,
this may be due to wax or other residue. Clean
the windscreen/rear window with washer
fluid after an automatic car wash. 1
$ Windscreen wipers off
2 Ä Intermittent wiping, normal
3 Å Intermittent wiping, frequent
4 ° Continuous wipe, slow
5 ¯ Continuous wipe, fast
B í Single wipe
î Wipes with washer fluid
X Turn the key to position 1or2 in the igni-
tion lock.
X Turn the combination switch to the corre-
sponding position.
When the windscreen wipers are switched on
and you stop the vehicle, the windscreen wipers
wipe more slowly.
Intermittent wiping is interrupted if you stop the
vehicle and open afron tdoor. This protects
people getting into and out of the vehicle from
being sprayed with water. Windscreen wipers
81Lightsand windscreen wipers Z