low beam MERCEDES-BENZ G-CLASS SUV 2016 Owners Manual
[x] Cancel search | Manufacturer: MERCEDES-BENZ, Model Year: 2016, Model line: G-CLASS SUV, Model: MERCEDES-BENZ G-CLASS SUV 2016Pages: 261, PDF Size: 6.01 MB
Page 10 of 261
Setting the airflow ........................... 87
Setting the temperature .................. 86
Switching air-recirculation mode
on/of
f.............................................. 89
Switching on/of f.............................. 85
Switching residua lheato n/of f........ 89
Switching the rea rwindow heat-
ing on/of f........................................ 88
Switching the ZONE function
on/of f.............................................. 87
THERMATI Cautomatic climate
control (2-zone) ............................... 84
Cloc k(on-board computer) ............... 138
Cockpit
Overview .......................................... 25
COMAND display
Cleaning ......................................... 220
Combination switch ............................ 76
Constant headlamp mode
see Daytime driving lights
Consumptio nstatistics (on-board
computer) .......................................... 134
Coolant (engine)
Checking the level ......................... 215
Displa ymessage ............................ 146
Note s............................................. 253
Temperature gaug e........................ 131
Warning lamp ................................. 162
Cooling
see Climate control
Copyright ............................................. 24
Correc tuse ........................................ 165
Cup holder
Important safety notes .................. 206 D
Data seeT echnica ldata
Dat e(on-board computer) ................ 138
Daytime drivin glights
Displa ymessage ............................ 145
Switchin gon/of f(on-boar dcom-
puter) ............................................ .138
Switching on/off (switch) ................ 74
Declaration of conformity (multi-
media system) ................................... 165
Declarations of conformity ................. 22Delaye
dswitch-off
Exterio rlighting (on-boar dcom-
puter) ............................................ .138
Interior lighting .............................. 139
Destination
Entering ......................................... 182
Entering by address ....................... 182
Entering from destination mem-
ory ................................................. 183
Entering from the last destina-
tions .............................................. 183
Entering using the map .................. 184
Route guidance .............................. 187
Saving ............................................ 187
Selecting from points of interest ... 183
Diagnostic sconnection ..................... .23
Diesel .................................................. 251
Diesel particle filter .......................... 115
Differential lock
Disengaging .................................. .127
Front axle ...................................... 126
General notes ................................ 125
Rea raxle ........................................ 126
Transfe rcase ................................. 126
Differential locks ............................... 125
Engaging ........................................ 126
Terrain .......................................... .125
Digital speedometer ......................... 134
Dipped-beam headlamp
Switching on/off .............................. 74
Dipped-beam headlamps
Display message ............................ 145
Setting for driving abroad (sym-
metrical) .......................................... 74
Display message
ASSYST service interva ldispla y..... 215
Driving systems ............................ .149
Display messages
Calling up (on-board computer) ..... 141
Engine ............................................ 146
General information ....................... 141
Hiding (on-board computer) ........... 141
Key ................................................ 155
Lights ............................................. 145
Safety systems .............................. 142
Tyres .............................................. 150
Vehicle .......................................... .153 Index
7
Page 29 of 261
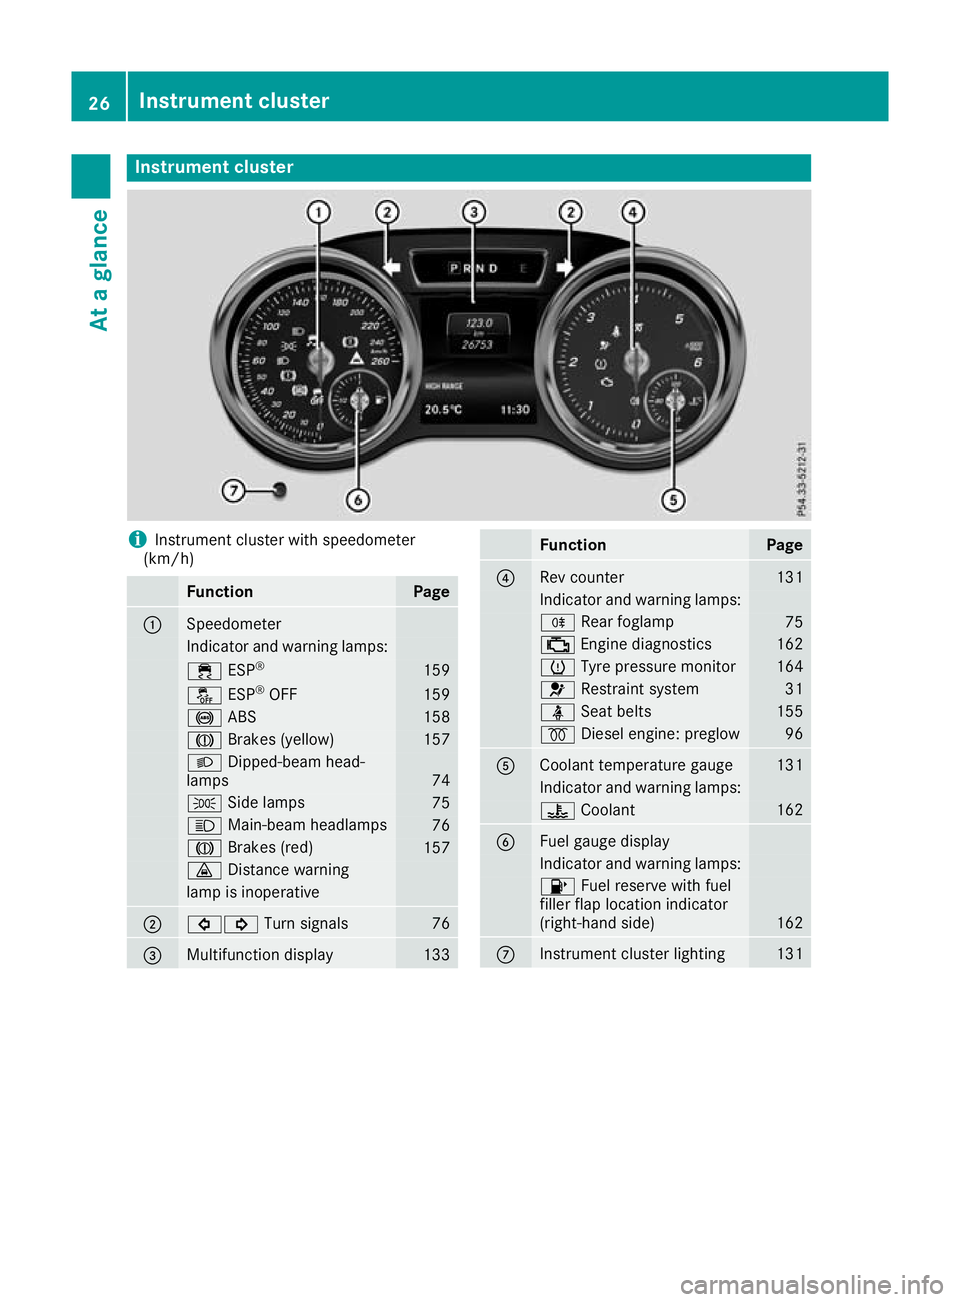
Instrumen
tcluster i
Instrument cluste
rwith speedometer
(km/h) Function Page
:
Speedometer
Indicator and warning lamps:
÷
ESP® 159
å
ESP®
OFF 159
!
ABS 158
J
Brakes (yellow) 157
L
Dipped-bea mhead-
lamps 74
T
Sidelam ps 75
K
Main-beam headlamps 76
J
Brakes(red) 157
·
Distance warning lamp is inoperative
;
#!
Turn signals 76
=
Multifunctio
ndisplay 133 Function Page
?
Rev counter 131
Indicato
rand warning lamps: R
Rear foglamp 75
;
Engine diagnost ics 162
h
Tyre pressure monitor 164
6
Restraint system 31
ü
Seat belts 155
%
Diesel engine: preglow 96
A
Coolant temperature gauge 131
Indicator and warning lamps:
?
Coolant 162
B
Fuel gaug
edisplay Indicator and warnin
glamps: 8
Fuel reserve with fuel
filler flap location indicator
(right-hand side) 162
C
Instrument cluster lighting 13126
Instrument clusterAt
ag lance
Page 78 of 261
Automati
cheadlamp mode G
WARNING
When th elight switch is set to Ã,the
dipped-beam headlamps may not be switched on automatically if there is fog, snow or othercauses of poor visibility due to the weather
conditions such as spray. There is arisk of an
accident.
In such situations, turn the light switch to
L.
The automatic headlamp feature is only an aid.
The drive risresponsibl efor the vehicl elighting
at all times.
à is the preferre dlight switch position.
The light setting is automatically selected
according to the brightness of the ambient light,
but not in the event of poor visibility due to
weather conditions such as fog, snow or spray.
X To switch on the automatic headlamps:
turn the light switch to the Ãposition.
With the key in position 1in the ignitio nlock,
the side lamp sare switched on or off auto-
matically depending on the brightness of the
ambient light.
If you have switched on the Daytime driv‐ Daytime driv‐
ing lights
ing lights functionvia the on-board com-
puter, the daytime driving lights or the side
lamps and dipped-beam headlamps will
switch on or off automaticallyw hile the
engine is running.
When the dipped-beam headlamps are
switched on, the green Lindicator lamp in
the instrument cluster lights up. Rear foglamp
The rear fog lamp improves the visibility of your vehicle for the traffic behind in the event of
heavy fog. You must observe the legal require-
ment sfor the country in which yo uare currently
driving when operating the rea rfog lamp.
X To switc honthe rear fog lamp: turn the key
in the ignition lock to position 2or star tthe
engine.
X Turn the light switch to the Lposition.
X Press the Rbutton.
The yellow Rindicator lamp on the instru-
ment cluster lights up. Sid
elamps
! When the battery is discharged heavily,t
he
side lamps or parking lamps are automatically
switched off to facilitate an engine start.
Always park your vehicle safely and in awell lit
area, in accordance with the relevant legal
stipulations. Avoid using the Tside lamps
for periods lasting several hours. Where pos-
sible, switch on the right Xor left W
parking lamp.
X To switch on: turn the light switch to the
T position.
The green Tindicator lamp on the instru-
ment cluster lights up. Parking lamps
Switching on the parking lamps ensures that the
correspondin gside of the vehicle is illuminated.
X To switch on the parking lamp: turn the key
to position uin the ignition lock or remove
the key.
X Turn the light switch to the W(left-hand
side of the vehicle) or X(right-hand side of
the vehicle) position. Headlamp cleaning system
The headlamps are cleaned automatically if the
"Wipe with washer fluid" function is operated
ten times (Y page 81) while the lights are on
and the engin eisrunning. When you switch off
the ignition, the automatic headlamp cleaning
system is reset and counting is resumed from 0. Exterior lighting
75Lightsand windscreen wipers Z
Page 82 of 261
the xeno
nbulbs carrie doutataq uali fied spe-
cialist workshop. G
WARNING
Bulbs, lamp sand plugc onnectors can
become very hot during use. When replacing a bulb, you coul dburn yourself on these com-
ponents. There is arisk of injury.
Allow these components to cool downb efore
replacing the bulb.
Do not use abulbifith as been dropped or if its
glass has been scratched.
The bulbm ay explode if:
R you touch it
R it is hot
R you drop it
R you scratch it
Use bulbs only in closed lamp sthat have been
designed for this purpose. Fit only spar ebulbs of
the same type and the specified voltage.
Marks on the glass reduce the service life of the bulbs. Do not touch the glass tube with your
bare hands. If necessary, clea nthe glass tube
when cold with alcohol or spiri tand rub it off
with alint-free cloth.
Protect bulbs from moisture during operation.
Do not allow bulbs to come into contact with
liquids.
Xeno nbulbs and LED modules: you cannot
replace xenon bulbs or LED modules yourself.
Have the following bulbs replaced at aqualified
specialist workshop:
R third brake lamp
R side lamps/parking lamp s(front)
R main-beam/dipped-beam headlamps (xenon
headlamps)
R daytime driving lights
R licence plate lamp
i Individuals
egments of the licence plate
lamp LEDs may fail without adisplay message
appearing in the multifunction display.R egu-
larl ycheck the licence plate lighting. If nec-
essary, visit aqualified specialist workshop.
You can replace the following bulbs: R turn signa llamp (front)
R brake/tai llamp
R turn signa llamp (rear) R
tail lamp/parking lamp
R reversing light
R rear foglamp
Replace only the bulb sliste d( Ypage 79).
Hav ethe bulb stha tyou cannot change yourself
replaced at aquali fied specialis tworkshop.
If yo urequire assistance replacing bulbs, con-
sult aquali fied specialis tworkshop.
If the new bulb still does not light up ,consul ta
qualified specialis tworkshop.
Headlamps and lights ar eanimportant aspect of
vehicl esafety .You must therefore make sure
tha tthese functio ncorrectl yatalltimes .Have
the headlamp setting verified regularly. Overview of bulb types
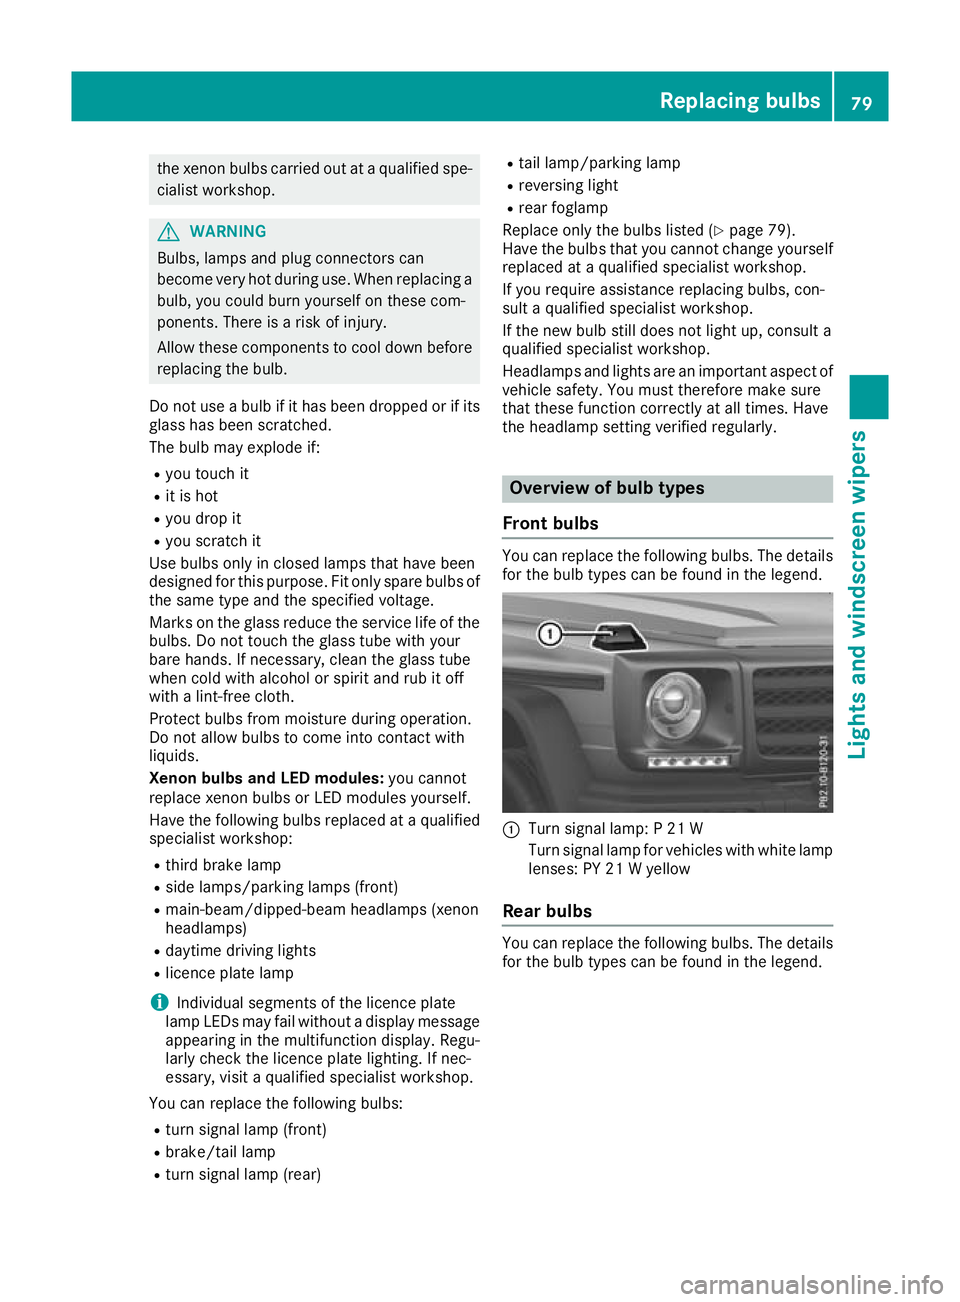
Fron tbulbs You can replace the following bulbs. The details
for the bulb types can be found in the legend. :
Turn signal lamp: P21W
Turn signal lamp for vehicles with white lamp lenses: PY 21 Wyellow
Rear bulbs You can replace the following
bulbs. The details
for the bulb types can be foun dinthe legend. Replacing bulbs
79Lights and windscreen wipers Z
Page 142 of 261
i
Depending on your vehicle's equipment,
when the surround lighting and exterio rlight-
ing delaye dswitch-off ar eon, the following
light up:
R side lamps
R dipped-beam headlamps
Switchin gthe interior lighting delayed
switch-off on/off
If yo uactivate the Lighting
Lighting delayed
delayedsw.-off
sw.-off
function, the interio rlighting remains on for
20 second safter yo uremove the key fro mthe
ignition lock.
X Press the =or; button on the steering
whee ltoselect theSettings
Settings menu.
X Press the :or9 button to select the
Lights
Lights submenu.
X Press ato confirm.
X Press the :or9 button to select the
Lighting delaye dsw.-off
Lighting delayed sw.-off function.
If the Lighting delayed sw.-off
Lighting delayed sw.-off function
has been activated, the vehicle interior is dis-
played in red in the multifunction display.
X Press ato save the setting.
Vehicle Activating/deactivating the automatic
locking feature
If you activate the Automatic door locks Automatic door locks
function, the vehicle is centrallyl ockedabov ea
spee dofa pproximately 15 km/h.
X Press the =or; buttononthesteering
whee ltos elect the Settings
Settings menu.
X Press the :or9 buttontos elect the
Vehicle
Vehicle submenu.
X Press ato confirm.
X Press the :or9 button to select the
Automatic doo rlocks
Automatic door locks function.
When the Automatic
Automatic door
doorlocks
locks function is
activated, the vehicle doors are displayed in
red in the multifunction display.
X Press ato save the setting.
For further information on the automatic locking
feature; see (Y page 62). Activating/deactivating the acoustic
locking confirmation
If you swi tchont heAcoustic Acoustic Lock
Lockfunction ,an
acoustic signal sounds when you loc kthe vehi-
cle.
X Press the =or; buttononthesteering
whee ltos elect the Settings
Settings menu.
X Press the :or9 buttontos elect the
Vehicle
Vehicle submenu.
X Press ato confirm.
X Press the :or9 button to select the
Acoustic Lock
Acoustic Lock function.
If the Acoustic Lock
Acoustic Lock function is activated,
the & symbol in the multifunctio ndisplay
lights up red.
X Press ato save the setting.
Heating Auxiliary heating departure time
G
DAN
GER
If th eexhaust pipe is blocke dorsufficient
ventilation is no tpossible, toxic exhaust
fumes can ente rthe vehicle, especially car-
bon monoxide. This is th ecase, e.g. in
enclosed spaces, or if th evehicl eiss tuck in
snow. There is ariskoff atal injuries.
You should switch off th eauxiliary heating in
enclosed spaces whic hdonothav eane xtrac-
tion system, e.g. agarage. If th evehicl eis
stuck in snow and you mus tleav ethe auxiliary
heating running, keep th eexhaust pipe and
th ea rea around th evehicl eclear of snow. To
guarantee asufficien tsupply of fresh air, open
aw indow on th eside of th evehicl eaway from
th ew ind. G
WARNING
When th eauxiliary heating is switched on,
parts of the vehicl ecan become very hot.
Flammable materials such as leaves, grass or twigs may ignite if they come into contact
with:
R hot parts of the exhaust system
R the exhaust gas itself
There is arisk of fire. Menus and submenus
139On-boardcomputer and displays
Z