wiper blades MERCEDES-BENZ G-CLASS SUV 2016 Owners Manual
[x] Cancel search | Manufacturer: MERCEDES-BENZ, Model Year: 2016, Model line: G-CLASS SUV, Model: MERCEDES-BENZ G-CLASS SUV 2016Pages: 261, PDF Size: 6.01 MB
Page 22 of 261
Windscreen washe
rfluid
see Windscreen washer system
Windscreen washe rsystem
Notes ............................................. 254
Topping up .................................... .215
Windscreen wipers
Problem (malfunction) ..................... 83
Rea rwindow wiper .......................... 82
Replacing the wiper blades .............. 82
Switching on/off .............................. 81
Winte roperation
Important safety notes .................. 236
Overview ........................................ 236
Radiator cover ............................... 212
Slippery road surfaces ................... 118
Snow chains .................................. 237
Summer tyres ................................ 237
Winte rtyres
M+S tyres ...................................... 237
Wiper blades
Cleaning ......................................... 219
Important safety notes .................... 82
Replacing ......................................... 82
Wooden load compartment floor
(cleaning instructions) ......................221
Wooden trim (cleaning instruc-
tions) ................................................. .220 Index
19
Page 84 of 261
X
Turn the respective bulb anti-clockwise,
applying slight pressure, and pull it out of the
bulb holder.
X Insert the new bulb into the bulb holder and,
applying slight pressure, turn it clockwise
until it engages.
X Fit lens ;.
X Tighten screws :.
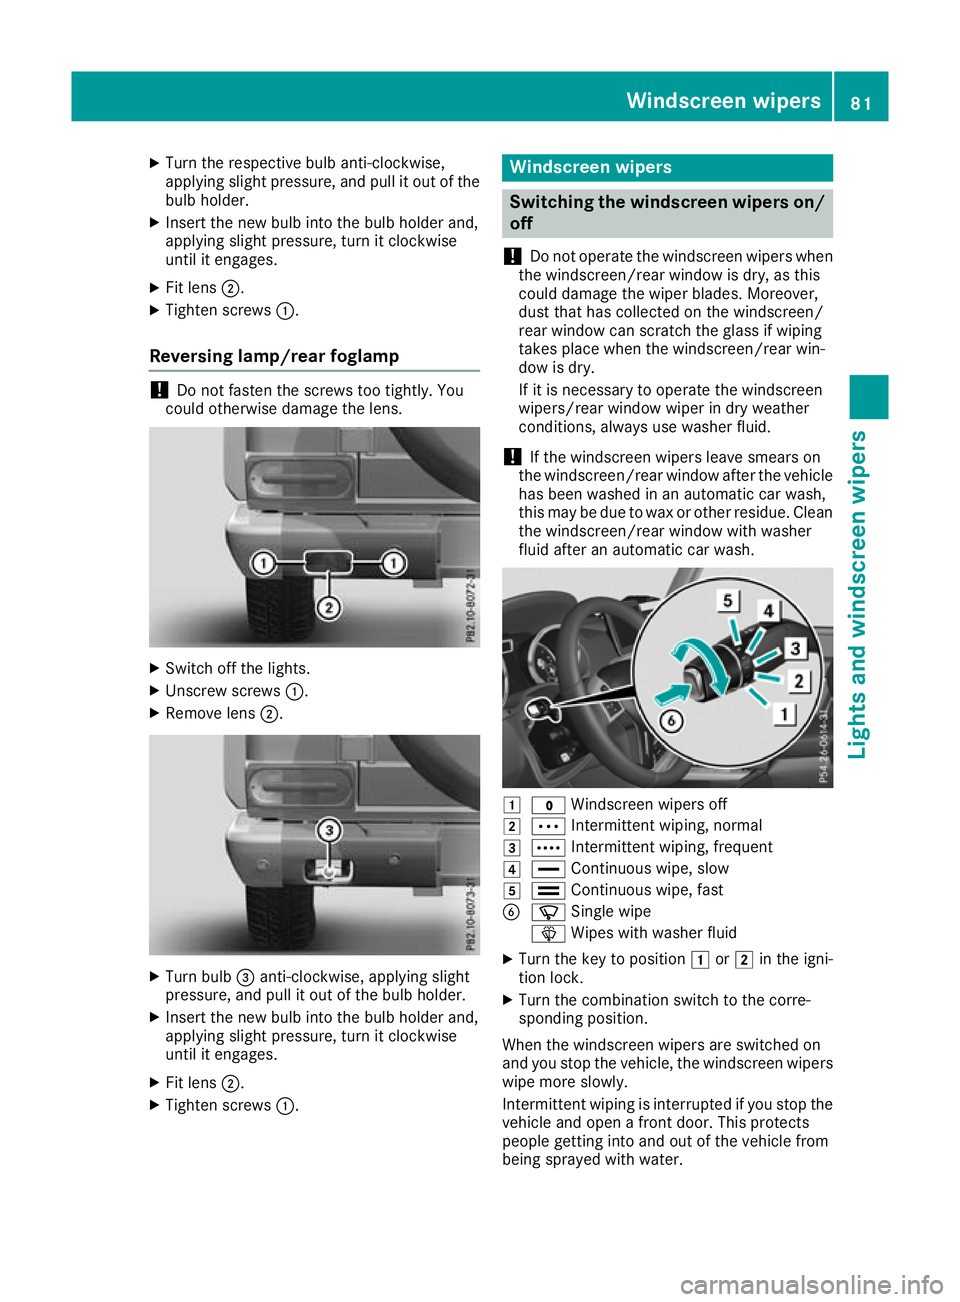
Reversing lamp/rear foglamp !
Do not fasten the screws too tightly. You
could otherwise damage the lens. X
Switch off the lights.
X Unscrew screws :.
X Remove lens ;. X
Turn bulb =anti-clockwise, applying slight
pressure, and pull it out of the bulb holder.
X Insert the new bulb into the bulb holder and,
applying slight pressure, turn it clockwise
until it engages.
X Fit lens ;.
X Tighten screws :. Windscreen wipers
Switching the windscreen wipers on/
off
! Do not operate the windscreen wipers when
the windscreen/rear window is dry, as this
could damage the wiper blades. Moreover,
dust that has collected on the windscreen/
rear window can scratc hthe glass if wiping
takes place when the windscreen/rear win-
dow is dry.
If it is necessary to operate the windscreen
wipers/rear window wiper in dry weather
conditions, always use washer fluid.
! If the windscreen wipers leave smears on
the windscreen/rear window after the vehicle has been washed in an automatic car wash,
this may be due to wax or other residue. Clean
the windscreen/rear window with washer
fluid after an automatic car wash. 1
$ Windscreen wipers off
2 Ä Intermittent wiping, normal
3 Å Intermittent wiping, frequent
4 ° Continuous wipe, slow
5 ¯ Continuous wipe, fast
B í Single wipe
î Wipes with washer fluid
X Turn the key to position 1or2 in the igni-
tion lock.
X Turn the combination switch to the corre-
sponding position.
When the windscreen wipers are switched on
and you stop the vehicle, the windscreen wipers
wipe more slowly.
Intermittent wiping is interrupted if you stop the
vehicle and open afron tdoor. This protects
people getting into and out of the vehicle from
being sprayed with water. Windscreen wipers
81Lightsand windscreen wipers Z
Page 85 of 261
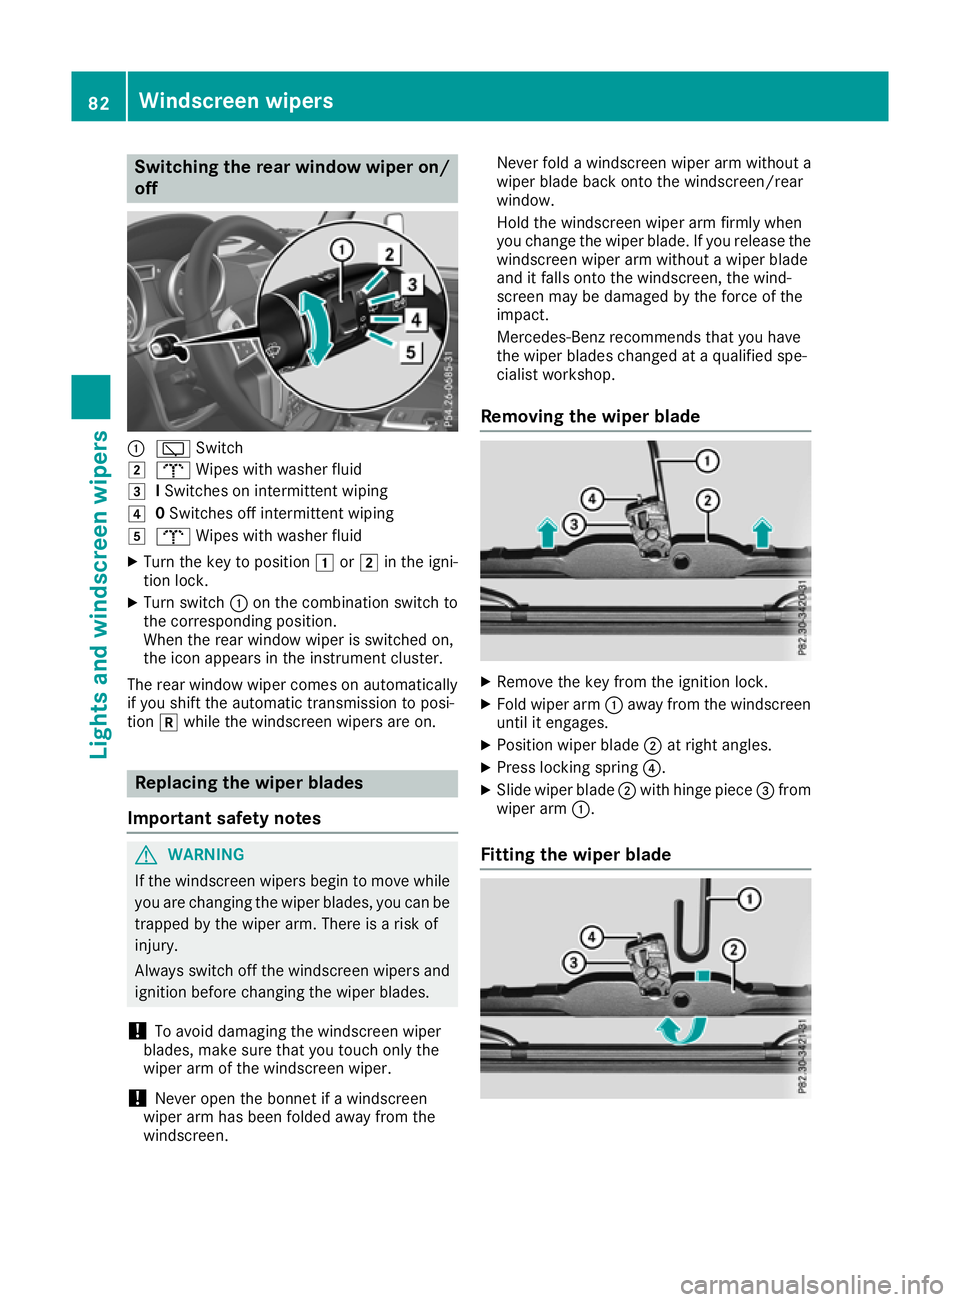
Switching the rear window wiper on/
off :
è Switch
2 b Wipes with washer fluid
3 ISwitches on intermittent wiping
4 0Switches off intermittent wiping
5 b Wipes with washer fluid
X Turn the key to position 1or2 in the igni-
tio nlock.
X Turn switch :on the combination switch to
the corresponding position.
Whe nthe rea rwindow wiper is switched on,
the ico nappears in the instrument cluster.
The rea rwindow wiper come sonautomatically
if yo ushift the automatic transmissio ntoposi-
tion kwhil ethe windscreen wiper sare on. Replacing the wiper blades
Important safety notes G
WARNING
If the windscreen wipers begi ntomove while
you are changing the wiper blades, you can be trappe dbythe wiper arm. There is arisk of
injury.
Always switch off the windscreen wipers and
ignitio nbefore changing the wiper blades.
! To avoi
ddamaging the windscreen wiper
blades, make sure that you touch only the
wiper arm of the windscreen wiper.
! Never open the bonnet if
awindscreen
wiper arm has been folde dawayfrom the
windscreen. Never fold
awindscreen wipera rm withouta
wiperb ladeback onto the windscreen/rear
window.
Hold the windscreen wipera rm firmly when
you change the wiperb lade. If you release the
windscreen wipera rm withoutawiperblade
and it falls onto the windscreen, the wind-
screen may be damaged by the force of the
impact.
Mercedes-Benz recommends that you have
the wiperb lades changed at aqualifieds pe-
cialist workshop.
Removing the wiper blade X
Remove the key from the ignitio nlock.
X Fold wiper arm :away from th ewindscreen
until it engages.
X Position wiper blade ;at right angles.
X Press lockin gspring ?.
X Slide wiper blade ;withhinge piece =from
wiper arm :.
Fitting th ewiper blade 82
Windscreen wipersLight
sand windscreen wipers
Page 220 of 261
Do not touch the surfaces or protective films
with hard objects ,e.g.ar ingori ce scraper.
Yo uc ould otherwis escratch or damage the
surfaces and protective film.
! Do not park up your vehicl
efor alon gp eriod
of time immediatel yafter cleaning, particu-
larly after cleaning the whee lrim with wheel
cleaner. Whee lcleane rmaylead to increased
corrosion of the brake discs and pads .You
shoul dtherefore drive for afew minute safter
cleaning. By heating up the brakes ,the brake
discs and pads dry .The vehicl ecan the nbe
parked up for alon gp eriodoft ime. H
Environmental note
Dispose of empty packaging an dcleaning
cloths in an environmentally responsible man- ner.
Regular car eofyour vehicle is acondition for
retainin gqualit yint helongterm.
Use car eproduct sand cleaning agents recom-
mended and approved by Mercedes-Benz. Washin
gthe vehiclea nd cleaning the
paintwork
Automatic car wash G
WARNING
Braking efficiency is reduced after the vehicle has been washed. There is arisk of an acci-
dent.
After washing the vehicle, brake carefully
while paying attention to the traffic conditions in order to restore full braking efficiency.
! When the HOLD function is activated, the
vehicl ebrakes automatically in certain situa-
tions.
To avoi ddamage to the vehicle, deactivate
the HOLD function in the following or similar
situations:
R when towing away
R in ac ar wash
! Make sure that the automatic car washis
suitable for the size of the vehicle. Fold in the exterior mirrors before the vehicl eiswashed.
The exterior mirrors coul dotherwise be dam-
aged. !
Make sure that the automatic transmission
is in position Nwhen washing your vehicle in
at ow-through car wash. The vehicle could be
damagedift he transmission is in another
position.
! Make sure:
R the side windows and sliding sunroof are
closed completely.
R the blower is switched off
R the windscreen wiper switch is at position
0
The vehicle could otherwise be damaged.
You can wash the vehicle in an automatic car
wash from the very start.
If the vehicle is very dirty, wash off excess dirt
before cleaning the vehicle in an automatic car
wash.
After using an automatic car wash, wipe off the
wax from the windscreen and the windscreen
wiper blades. This will prevent smears and
reduce wiping noises caused by residue on the
windscreen.
Washing by hand In some countries, washing by hand is only
allowed at specially equipped washing bays.
Observe the legal requirements for each indi-
vidual country.
When using the vehicle in winter, remove all
traces of road salt deposits carefully and as
soon as possible.
When washing the underside of the vehicle, also
clean the insides of the wheels.
X Do not use hot water and do not wash the
vehicle in direct sunlight.
X Use asoft sponge to clean.
X Use amild cleaning agent, such as acar
shampo oapproved by Mercedes-Benz.
X Thoroughly hose down the vehicle with agen-
tle jet of water.
X Do not point the water jet directly towards the
air inlet.
X Use plenty of water and rinse out the sponge
frequently.
X Rinse the vehicle with clean water and dry
thoroughl ywithachamois.
X Do not let the cleaning agent dry on the paint-
work. Ca
re
217Maintenance an dcare Z
Page 222 of 261
Cleaning th
ewindows G
WARNING
If th ewindscreen wipers are set in motion
when cleaning the windscreen or wiper
blades, you coul dbecome trapped. There is a
dange rofinjury.
Always switch off the windscreen wipers and
the ignitio nbefore cleaning the windscreen or
wiper blades.
! Do not use dry cloths, abrasive cleaning
agents, solvents or solvent-based cleaning
agents to clea nthe insid eofthe windows/
windscreen. Do not touch the insid eofthe
windows/windscreen with hard items such
as an ice scrape roraring. Otherwise, the
windows/windscreen coul dbedamaged.
! Clean the water drainage channels of the
windscreen and the rear windo watregular
intervals. Deposits such as leaves, petal sand
pollen may under certain circumstances pre-
vent water from draining away. This can lead
to corrosio ndamage and damage to elec-
tronic components.
X Clean the insid eand outside of the windows
with adamp cloth and acleaning agent that is
recommende dand approved by Mercedes-
Benz.
Cleaning the wiper blades G
WARNING
If the windscreen wipers are set in motion
when cleaning the windscreen or wiper
blades, you coul dbecome trapped. There is a
dange rofinjury.
Always switch off the windscreen wipers and
the ignitio nbefore cleaning the windscreen or
wiper blades.
! Do not pullont
he wiper blade. Otherwise,
the wiper blade coul dbedamaged.
! Do not clea
nwiper blades too often and do
not rub them too hard .Otherwise, the graph-
ite coating coul dbedamaged. This could
caus ewiper noise. !
Hold the wiper arm securel
ywhen folding
back. The windscreen could be damagedif
the wiper arm hits against it suddenly.
X Fold the wiper arms awayf rom the wind-
screen.
X Cleant he wiper bladesc arefully usingadamp
cloth.
X Fold the windscreen wipers back againb efore
switching on the ignition.
Cleaning the exterior lighting !
Only use cleaning agents or cleaning cloths
that are suitablef or plastic lenses. Unsuitable
cleaning agents or cleaning cloths could
scratch or damage the plastic lenses of the
exterior lighting.
X Cleant he plastic lenses of the exterior light-
ing using awet sponge and amild cleaning
agent, e.g. Mercedes-Benz car shampoo or
cleaning cloths.
Cleaning the exhaust pipe G
WARNING
The exhaust tail pipe and tail pipe trim can
become very hot. If you come into contact
with these parts of the vehicle, you could burn
yourself. There is arisk of injury.
Always be particularl ycarefu laround the
exhaust tail pipea nd the tail pipetrim. Allow
these components to cool downb efore touch-
ing them.
! Do not clea
nthe exhaust pipew ith acid-
base dcleaning agents, such as sanitary
cleanser or whee lcleaner.
Impurities combined with the effects of road grit and corrosive environmental factors may cause
flas hrust to form on the surface. You can
restore the original shine of the exhaust pipeby
cleaning it regularly, especially in winter and
after washing the vehicle.
X Clean the exhaust pipew ithacare product
tested and approved by Mercedes-Benz. Ca
re
219Maintenance an dcare Z