buttons MERCEDES-BENZ G500 2002 W463 Owner's Manual
[x] Cancel search | Manufacturer: MERCEDES-BENZ, Model Year: 2002, Model line: G500, Model: MERCEDES-BENZ G500 2002 W463Pages: 385, PDF Size: 30.37 MB
Page 32 of 385
29 Central locking system
Te ch n i c a l
data Instruments
and controlsOperationDrivingInstrument
cluster displayPractical hints Car care Index Central locking system
Radio frequency and infrared remote control
The electronic key has an integrated radio frequency
and infrared remote control.
Due to the extended operational range of the remote
control, it could be possible to unintentionally lock or
unlock the vehicle by pressing the transmit button. If
one of the transmit buttons is pressed, the battery check
lamp lights up briefly – indicating that the batteries are
in order. See page 343 for checking batteries.
The vehicle doors, tailgate and fuel filler flap can be
centrally locked and unlocked via remote control.
Opening and closing the windows can only be done with
the infrared portion of the remote control. Aim
transmitter eye at the receiver of the driver’s door (6),
press and hold transmit button Œ or ‹,
seepage32.
If the electronic key is inserted in the starter switch, the
vehicle cannot be locked or unlocked with the remote
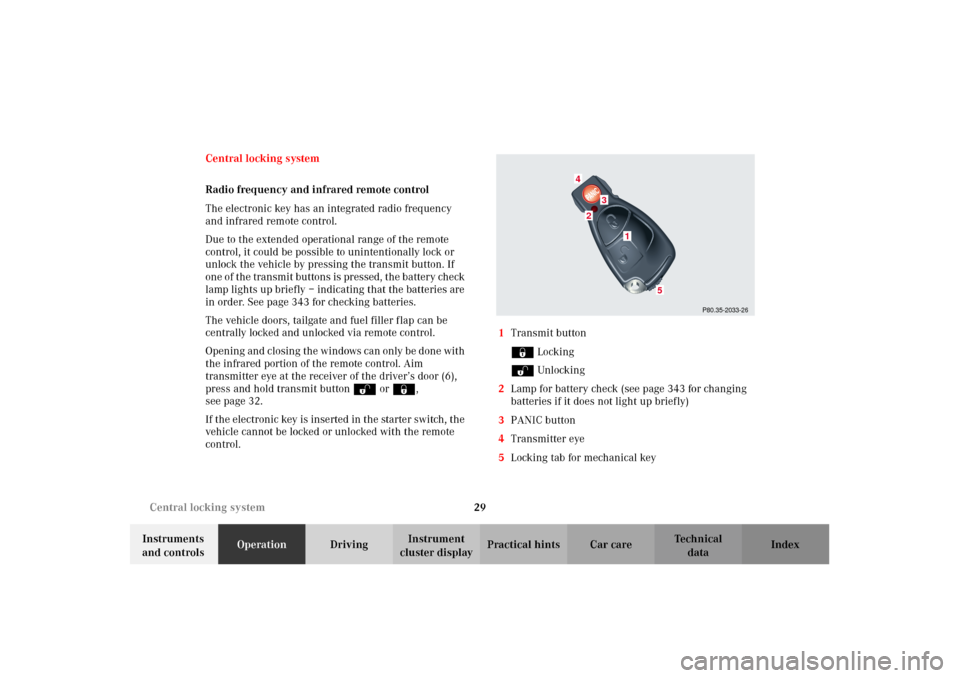
control.1Transmit button
‹ Locking
ΠUnlocking
2Lamp for battery check (see page 343 for changing
batteries if it does not light up briefly)
3PANIC button
4Transmitter eye
5Locking tab for mechanical key
P80.35-2033-26
2
1
4
3
5
J_G463.book Seite 29 Mittwoch, 19. September 2001 8:06 08
Page 34 of 385
31 Central locking system
Te ch n i c a l
data Instruments
and controlsOperationDrivingInstrument
cluster displayPractical hints Car care Index Locking and unlocking with remote control
Unlocking:
Press transmit button Œ. All turn signal lamps blink
once to indicate that the vehicle is unlocked.
The remote control can be programmed for two kinds of
unlocking modes (see below):
Selective unlocking mode –
Press transmit button Œ once to unlock driver’s door
and fuel filler flap.
Press transmit button Πtwice to unlock all doors,
fuel filler flap, and tailgate.
Global unlocking mode –
Press transmit button Πonce to unlock all doors,
fuel filler flap, and tailgate.
Notes:
If the tailgate was previously locked separately, it will
remain locked, see page 39.
The presently active unlocking mode (selective or
global) can only be determined by unlocking the vehicle
with the remote control (see below for changing mode).If within 40 seconds of unlocking with the remote
control, neither door or tailgate is opened, the electronic
key is not inserted in the starter switch, or the central
locking switch is not activated, the vehicle will
automatically lock.
Locking:
Press transmit button ‹ once. All turn signal lamps
blink three times to indicate that the vehicle is locked. If
they do not blink three times, a door or the tailgate is
not properly closed.
Note:
If the vehicle cannot be locked or unlocked by pressing
the transmit button, then it may be necessary to change
the batteries in the electronic key (if ok, battery check
lamp in electronic key will light briefly when pressing
transmit button) or to synchronize the remote control,
see pages 343 and 345.
Choosing global or selective mode on remote control
Press and hold transmit buttons‹ andŒ
simultaneously for 6 seconds to reprogram the remote
control. Battery check lamp will blink two times
indicating the completed mode change.
J_G463.book Seite 31 Mittwoch, 19. September 2001 8:06 08
Page 38 of 385
35 Central locking system
Te ch n i c a l
data Instruments
and controlsOperationDrivingInstrument
cluster displayPractical hints Car care Index When you lock the driver’s door with the mechanical
key, the door lock button should move down.
Each individual door must be locked with the respective
door lock button – the driver’s door can only be locked
when it is closed.
Notes:
The alarm sounds when unlocking the driver’s door
with the mechanical key. Cancel alarm by turning
electronic key in starter switch to position 1, or with the
remote control by pressing buttonŒ or ‹.
If the vehicle has previously been locked from the
outside, only the door being opened from the inside will
unlock, and the alarm will come on. The doors, the
tailgate and fuel filler flap remain locked.
In case of a malfunction in the central locking system
the doors can be locked and unlocked individually.To lock, push down lock buttons and turn mechanical
key in driver’s door lock to position 4. In addition lock
the tailgate.
To unlock the driver’s manually, see page 36.
Rear doors, previously centrally locked, can be opened
from inside by first unlocking the vehicle with the
central locking switch, see page 40, or by first pulling
up the door lock button.
If the fuel filler flap cannot be opened, see page 347.
J_G463.book Seite 35 Mittwoch, 19. September 2001 8:06 08
Page 51 of 385
48 Seats
Te ch n i c a l
data Instruments
and controlsOperationDrivingInstrument
cluster displayPractical hints Car care Index
Memory function
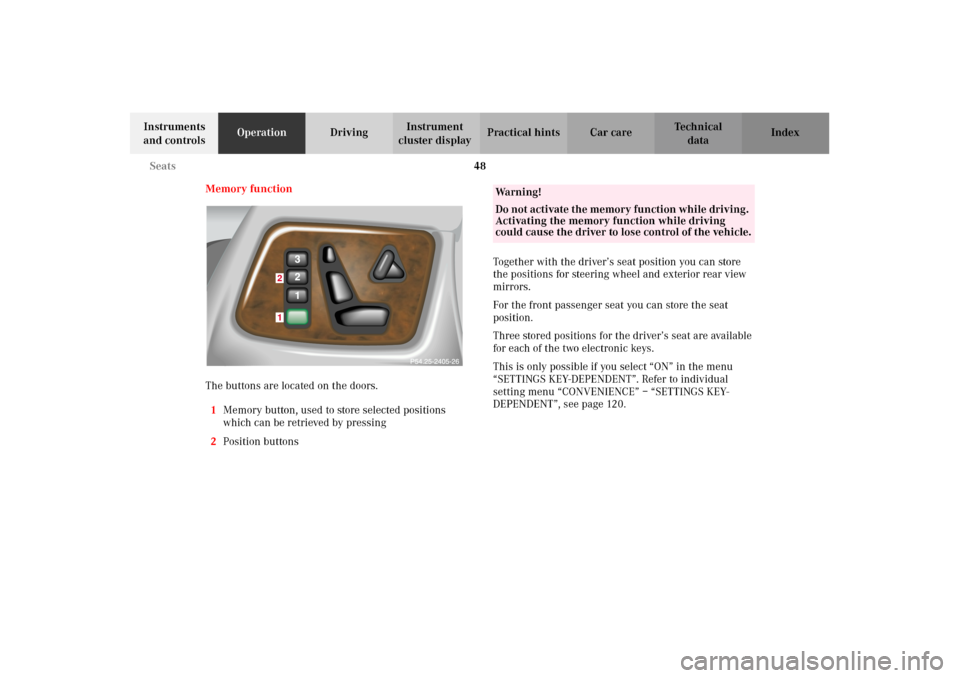
The buttons are located on the doors.
1Memory button, used to store selected positions
which can be retrieved by pressing
2Position buttonsTogether with the driver’s seat position you can store
the positions for steering wheel and exterior rear view
mirrors.
For the front passenger seat you can store the seat
position.
Three stored positions for the driver’s seat are available
for each of the two electronic keys.
This is only possible if you select “ON” in the menu
“SETTINGS KEY-DEPENDENT”. Refer to individual
setting menu “CONVENIENCE” – “SETTINGS KEY-
DEPENDENT”, see page 120.
21
Wa r n i n g !
Do not activate the memory function while driving.
Activating the memory function while driving
could cause the driver to lose control of the vehicle.
J_G463.book Seite 48 Mittwoch, 19. September 2001 8:06 08
Page 83 of 385
80 Rear view mirrors
Te ch n i c a l
data Instruments
and controlsOperationDrivingInstrument
cluster displayPractical hints Car care Index
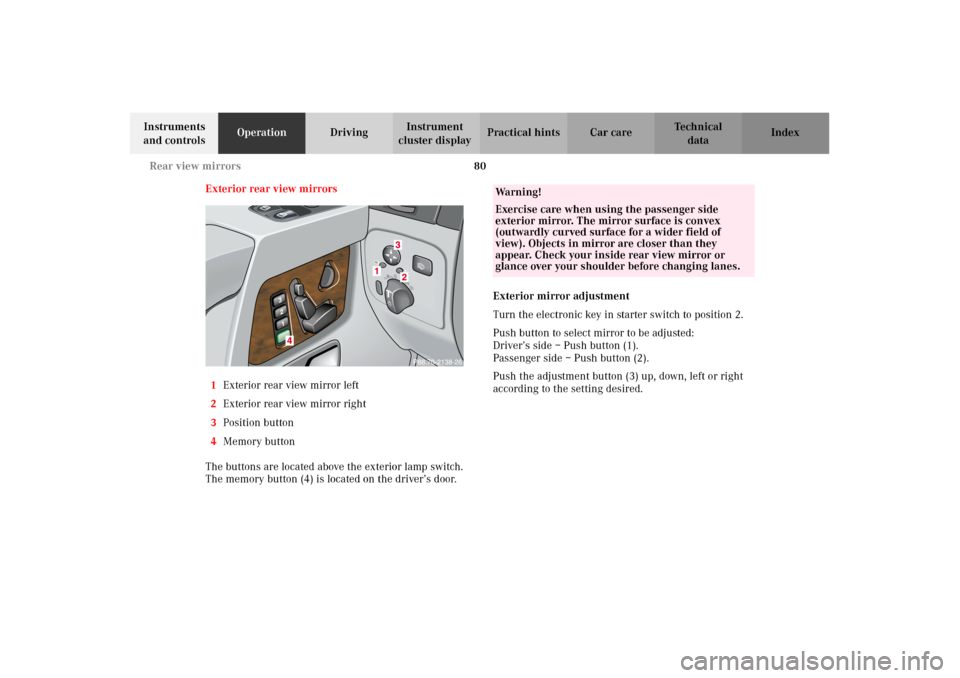
Exterior rear view mirrors
1Exterior rear view mirror left
2Exterior rear view mirror right
3Position button
4Memory button
The buttons are located above the exterior lamp switch.
The memory button (4) is located on the driver’s door.Exterior mirror adjustment
Turn the electronic key in starter switch to position 2.
Push button to select mirror to be adjusted:
Driver’s side – Push button (1).
Passenger side – Push button (2).
Push the adjustment button (3) up, down, left or right
according to the setting desired.
Wa r n i n g !
Exercise care when using the passenger side
exterior mirror. The mirror surface is convex
(outwardly curved surface for a wider field of
view). Objects in mirror are closer than they
appear. Check your inside rear view mirror or
glance over your shoulder before changing lanes.
J_G463.book Seite 80 Mittwoch, 19. September 2001 8:06 08
Page 94 of 385
91 Multifunction steering wheel, multifunction display
Te ch n i c a l
data Instruments
and controlsOperationDrivingInstrument
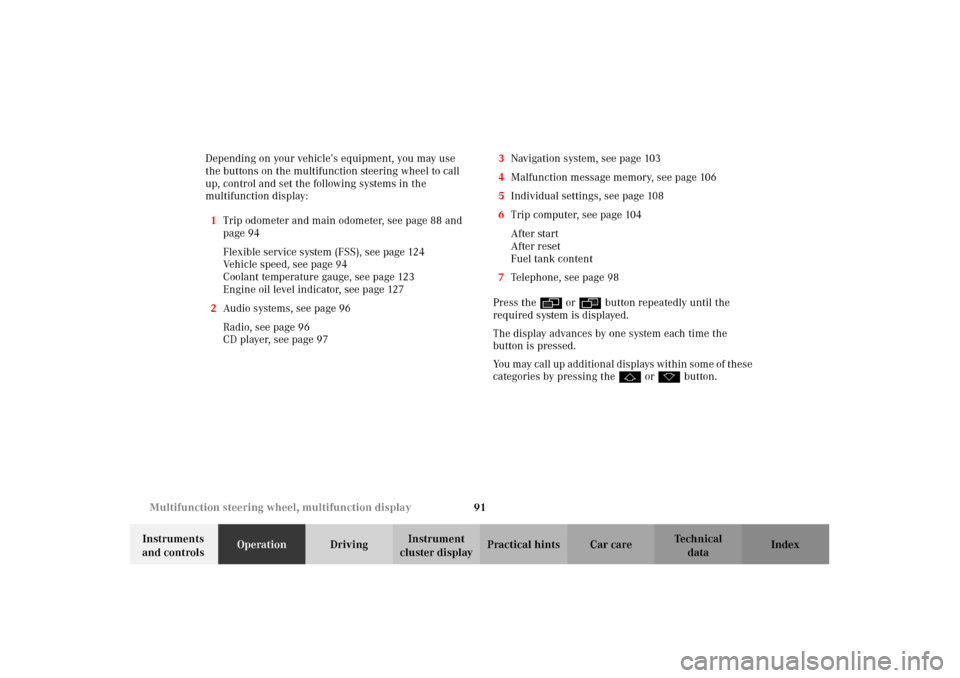
cluster displayPractical hints Car care Index Depending on your vehicle’s equipment, you may use
the buttons on the multifunction steering wheel to call
up, control and set the following systems in the
multifunction display:
1Trip odometer and main odometer, see page 88 and
page 94
Flexible service system (FSS), see page 124
Vehicle speed, see page 94
Coolant temperature gauge, see page 123
Engine oil level indicator, see page 127
2Audio systems, see page 96
Radio, see page 96
CD player, see page 973Navigation system, see page 103
4Malfunction message memory, see page 106
5Individual settings, see page 108
6Trip computer, seepage104
After start
After reset
Fuel tank content
7Telephone, see page 98
Press the è or ÿ button repeatedly until the
required system is displayed.
The display advances by one system each time the
button is pressed.
You may call up add ition al d is plays wit hin som e of t hes e
categories by pressing the j or k button.
J_G463.book Seite 91 Mittwoch, 19. September 2001 8:06 08
Page 189 of 385
186 Garage door opener
Te ch n i c a l
data Instruments
and controlsOperationDrivingInstrument
cluster displayPractical hints Car care Index
For operation in the USA only: This device complies
with Part 15 of the FCC Rules. Operation is subject to
the following two conditions:
(1) This device may not cause harmful interference, and
(2) this device must accept any interference received,
including interference that may cause undesired
operation.
Any unauthorized modification to this device could void
the user’s authority to operate the equipment.
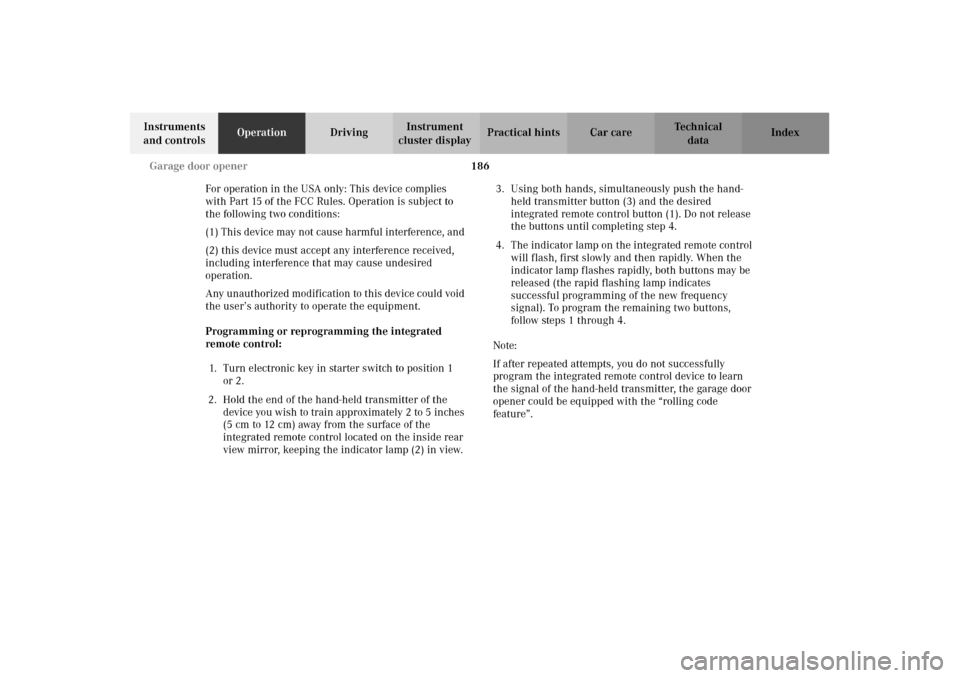
Programming or reprogramming the integrated
remote control:
1. Turn electronic key in starter switch to position 1
or 2.
2. Hold the end of the hand-held transmitter of the
device you wish to train approximately 2 to 5 inches
(5 cm to 12 cm) away from the surface of the
integrated remote control located on the inside rear
view mirror, keeping the indicator lamp (2) in view.3. Using both hands, simultaneously push the hand-
held transmitter button (3) and the desired
integrated remote control button (1). Do not release
the buttons until completing step 4.
4. The indicator lamp on the integrated remote control
will flash, first slowly and then rapidly. When the
indicator lamp flashes rapidly, both buttons may be
released (the rapid flashing lamp indicates
successful programming of the new frequency
signal). To program the remaining two buttons,
follow steps 1 through 4.
Note:
If after repeated attempts, you do not successfully
program the integrated remote control device to learn
the signal of the hand-held transmitter, the garage door
opener could be equipped with the “rolling code
feature”.
J_G463.book Seite 186 Mittwoch, 19. September 2001 8:06 08
Page 191 of 385
188 Garage door opener
Te ch n i c a l
data Instruments
and controlsOperationDrivingInstrument
cluster displayPractical hints Car care Index
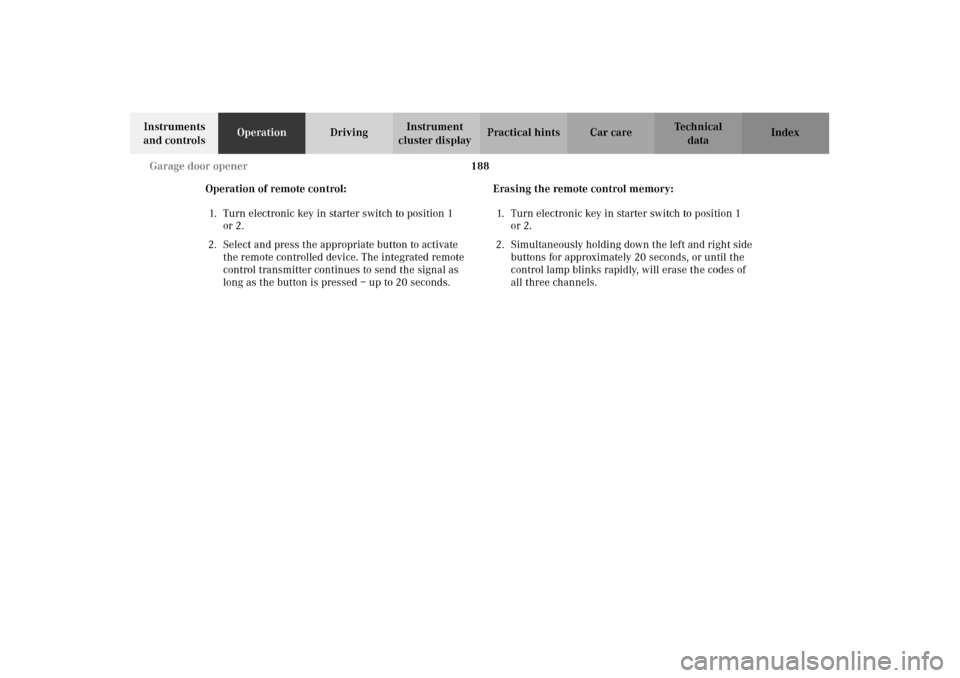
Operation of remote control:
1. Turn electronic key in starter switch to position 1
or 2.
2. Select and press the appropriate button to activate
the remote controlled device. The integrated remote
control transmitter continues to send the signal as
long as the button is pressed – up to 20 seconds.Erasing the remote control memory:
1. Turn electronic key in starter switch to position 1
or 2.
2. Simultaneously holding down the left and right side
buttons for approximately 20 seconds, or until the
control lamp blinks rapidly, will erase the codes of
all three channels.
J_G463.book Seite 188 Mittwoch, 19. September 2001 8:06 08
Page 201 of 385
198 Tele Aid
Te ch n i c a l
data Instruments
and controlsOperationDrivingInstrument
cluster displayPractical hints Car care Index
Notes:
The indicator lamp in the Information button¡
remains illuminated in red for approx. 10 seconds
during the system self-check after turning electronic
key in starter switch to position 2 (together with the
“SOS” button and the Roadside Assistance button).
See system self-check on page 192 when the indicator
lamp does not light up in red or stays on longer than
approximately 10 seconds.
If the indicator lamp in the Information button¡ is
illuminated continuously and there was no voice
connection to the Response Center established, then the
Tele Aid system could not initiate an Information call
(e.g. the relevant cellular phone network is not
available). The message “info – CALL FAILED” appears
in the multifunction display.
Information calls can be terminated using the
ìbutton on the multifunction steering wheel.Important!
If the indicator lamps do not start flashing after
pressing one of the buttons or remain illuminated (in
red) at any time, the Tele Aid system has detected a fault
or the service is not currently active, and may not
initiate a call. Visit your Mercedes-Benz Light Truck
Center and have the system checked or contact the
Response Center at 1-800-756-9018 (in the USA) or
1-888-923-8367 (in Canada) as soon as possible.
Upgrade Signals
Tele Aid system processes calls using the following
priority.
•Automatic emergency – First priority
•Manual emergency – Second priority
•Roadside assistance – Third priority
•Information – Fourth priority
Should a higher priority call be initiated while you are
connected, an upgrade (alternating) tone will be heard,
and the appropriate indicator lamp will flash. If certain
information such as vehicle identification number or
customer information is not available, the operator may
need to retransmit.
J_G463.book Seite 198 Mittwoch, 19. September 2001 8:06 08
Page 346 of 385
343 Electronic main key
Te ch n i c a l
data Instruments
and controlsOperation DrivingInstrument
cluster displayPractical hintsCar care Index Changing batteries in the electronic key
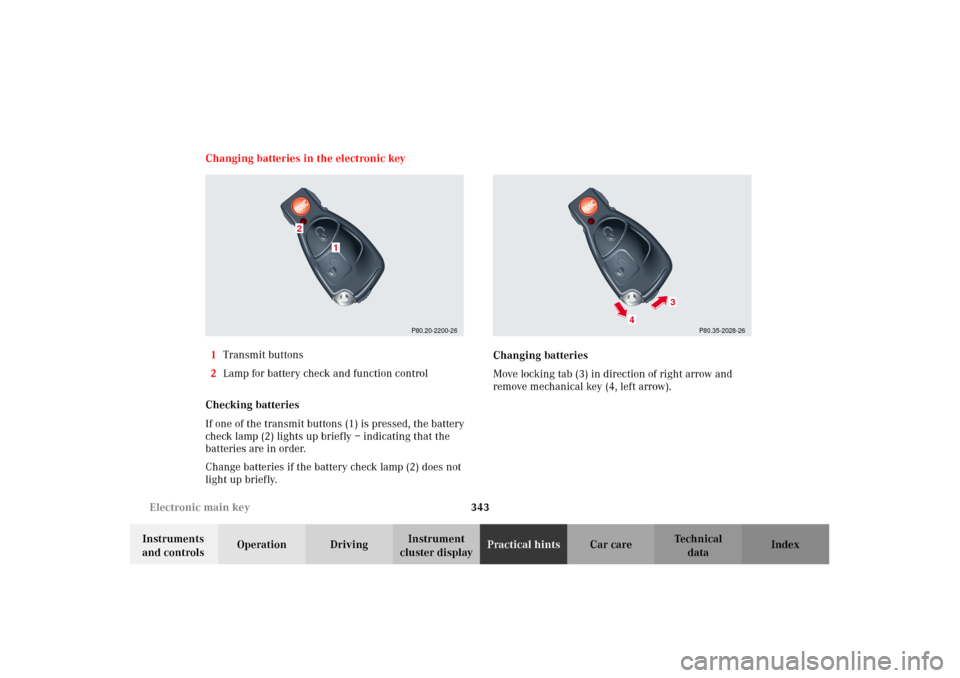
1Transmit buttons
2Lamp for battery check and function control
Checking batteries
If one of the transmit buttons (1) is pressed, the battery
check lamp (2) lights up briefly – indicating that the
batteries are in order.
Change batteries if the battery check lamp (2) does not
light up briefly.Changing batteries
Move locking tab (3) in direction of right arrow and
remove mechanical key (4, left arrow).
P80.20-2200-26
1
2
P80.35-2028-26
4
3
J_G463.book Seite 343 Mittwoch, 19. September 2001 8:06 08