buttons MERCEDES-BENZ G550 2010 W463 Owner's Manual
[x] Cancel search | Manufacturer: MERCEDES-BENZ, Model Year: 2010, Model line: G550, Model: MERCEDES-BENZ G550 2010 W463Pages: 272, PDF Size: 7.04 MB
Page 13 of 272
Memory function ................................. 73
Menus see Control system menus
Mirrors .................................................. 72
Auto-dimming rear view mirrors ....... 73
Exterior rear view mirror parking
position ............................................ 73
Exterior rear view mirrors ................72
Interior rear view mirror ...................72
Memory function .............................. 73
Vanity mirror .................................. 135
MON (Motor Octane Number) .......... 263
Motor Octane Number see MON
Multicontour seat ................................ 68
Multifunction display ........................ 101
Symbol messages ..........................208
Text messages ............................... 204
Vehicle status messages ...............203
Multifunction display messages
ABS ................................................ 204
Advanced TPMS ..................... 206, 218
Alternator ...................................... 212
Battery ........................................... 212
Brake fluid ..................................... 208
Brake pads ..................................... 208
Coolant .......................................... 210
Cruise control ................................ 205
Doors ............................................. 210
Engine oil ....................................... 213
ESP ®
.............................................. 204
Fog lamps .............................. 215, 217
Gas cap .......................................... 214
High-beam lamps ........................... 216
Hood .............................................. 210
License plate lamps .......................216
Light sensor ................................... 216
Low-beam lamps ............................ 216
Parking brake ................................ 208
Parking lamps ................................ 216
Reserve fuel ................................... 214
Reverse lamp ................................. 215
Side marker lamps .........................215
SmartKey ....................................... 210
SRS ................................................ 205
Tailgate .......................................... 210
Tail lamps ...................................... 217
Tele Aid .......................................... 209Tire inflation pressure ............206, 218
Tire pressure monitor ....................206
Tires ...................................... 206, 218
Transfer case ................................. 209
Turn signals ................................... 218
Washer fluid ................................... 210
Multifunction steering wheel
Adjustment ...................................... 70
Buttons ............................................ 99
Cleaning ......................................... 196
Easy-entry/exit feature ...........71, 112
Heating ............................................ 72
Memory function .............................. 73
Overview .......................................... 27
N
Navigation menu ............................... 105
Navigation system see Separate operating instructions
Net, parcel ......................................... 130
Night security illumination .............. 110
Normal occupant weight .................. 178
Number, vehicle identification
(VIN) ................................................... 255
O
Occupant distribution ....................... 178
Occupant safety
Air bags ........................................... 33
BabySmart™ .................................... 37
Children and air bags .......................33
Children in the vehicle .....................46
Child seat anchors – LATCH-type
(ISOFIX) ........................................... 49
Fastening the seat belts ................... 41
Front passenger front air bag off
indicator lamp .......................... 37, 227
Infant and child restraint systems .... 47
Introduction ..................................... 32
ISOFIX (Child seat anchors –
LATCH-type) ..................................... 49
Seat belts .................................. 34, 39
Odometer ........................................... 101
Off-road driving ................................. 184
Checklist ............................... 185, 189
Crossing obstacles ........................188
Index11463_AKB; 3; 35, en-USd2ureepe,Version: 2.11.8.12009-07-16T20:59:56+02:00 - Seite 11
Page 63 of 272
iCanada only:
This device complies with RSS-210 of
Industry Canada. Operation is subject to
the following two conditions:
1.This device may not cause interference,
and
2. this device must accept any
interference received, including
interference that may cause undesired
operation of the device.
Any unauthorized modification to this
device could void the user’s authority to
operate the equipment.
Factory setting
XGlobal unlocking: Press button %.
Unless you open a door or the tailgate within
approximately 40 seconds after unlocking
the vehicle:
RThe vehicle will be locked again.
RThe anti-theft alarm system will be
rearmed.
XGlobal locking: Press button &.
Selective setting
If you frequently travel alone, you may wish
to reprogramm the SmartKey. Pressing
button % will then only unlock the driver’s
door and the fuel filler flap.
XSwitching on/off: Press and hold buttons
% and & simultaneously for
approximately 6 seconds until the battery
check lamp (Y page 61) flashes twice.
The SmartKey will then function as follows:
XUnlocking driver’s door and fuel filler
flap: Press button % once.
XGlobal unlocking: Press button %
twice.
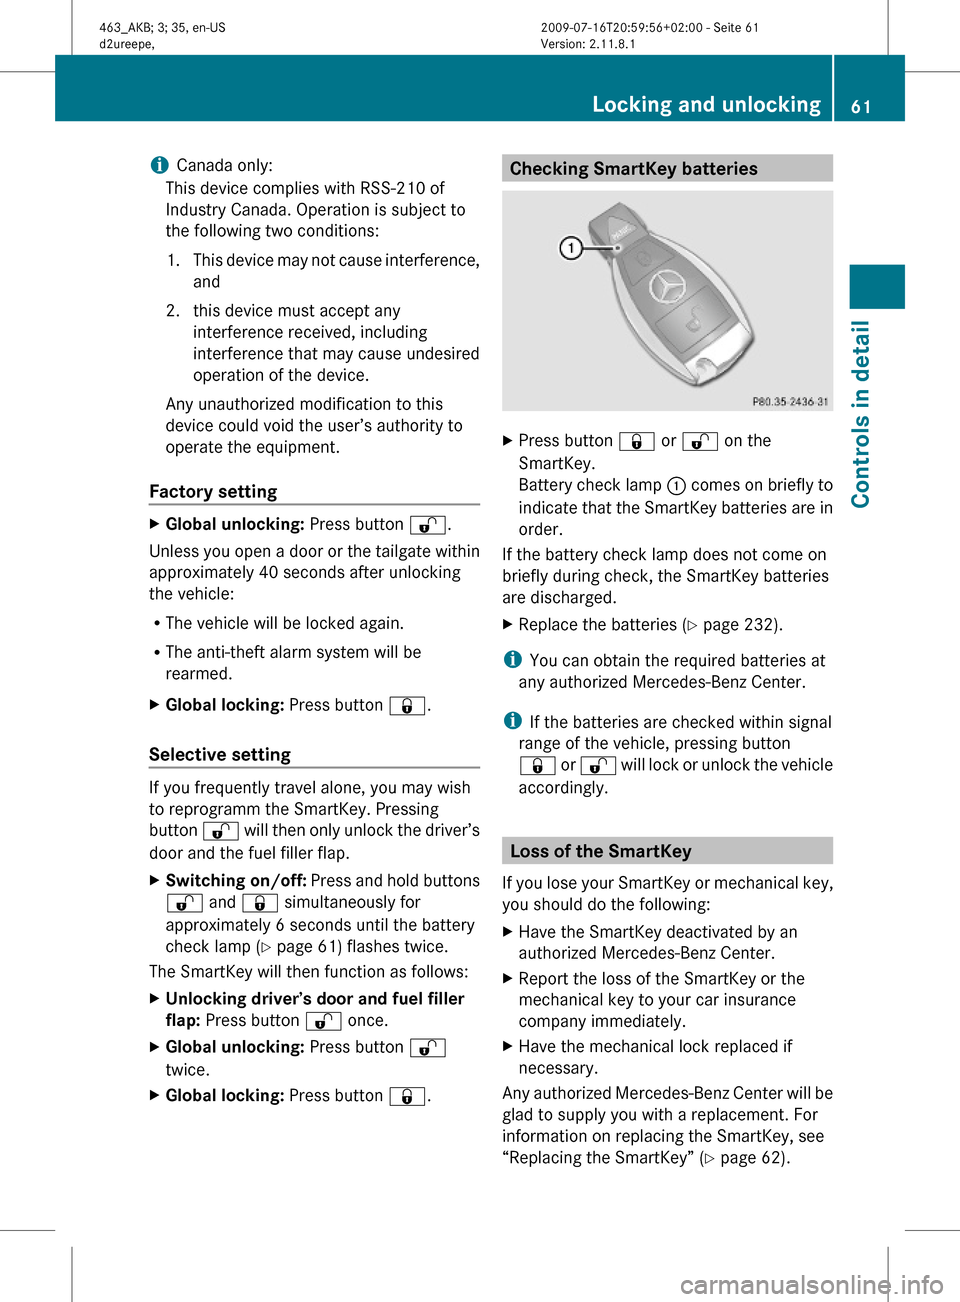
XGlobal locking: Press button &.Checking SmartKey batteriesXPress button & or % on the
SmartKey.
Battery check lamp : comes on briefly to
indicate that the SmartKey batteries are in
order.
If the battery check lamp does not come on
briefly during check, the SmartKey batteries
are discharged.
XReplace the batteries (Y page 232).
iYou can obtain the required batteries at
any authorized Mercedes-Benz Center.
iIf the batteries are checked within signal
range of the vehicle, pressing button
& or % will lock or unlock the vehicle
accordingly.
Loss of the SmartKey
If you lose your SmartKey or mechanical key,
you should do the following:
XHave the SmartKey deactivated by an
authorized Mercedes-Benz Center.
XReport the loss of the SmartKey or the
mechanical key to your car insurance
company immediately.
XHave the mechanical lock replaced if
necessary.
Any authorized Mercedes-Benz Center will be
glad to supply you with a replacement. For
information on replacing the SmartKey, see
“Replacing the SmartKey” (Y page 62).
Locking and unlocking61Controls in detail463_AKB; 3; 35, en-USd2ureepe,Version: 2.11.8.12009-07-16T20:59:56+02:00 - Seite 61Z
Page 73 of 272
Steering wheel adjustmentXSwitch on the ignition.
or
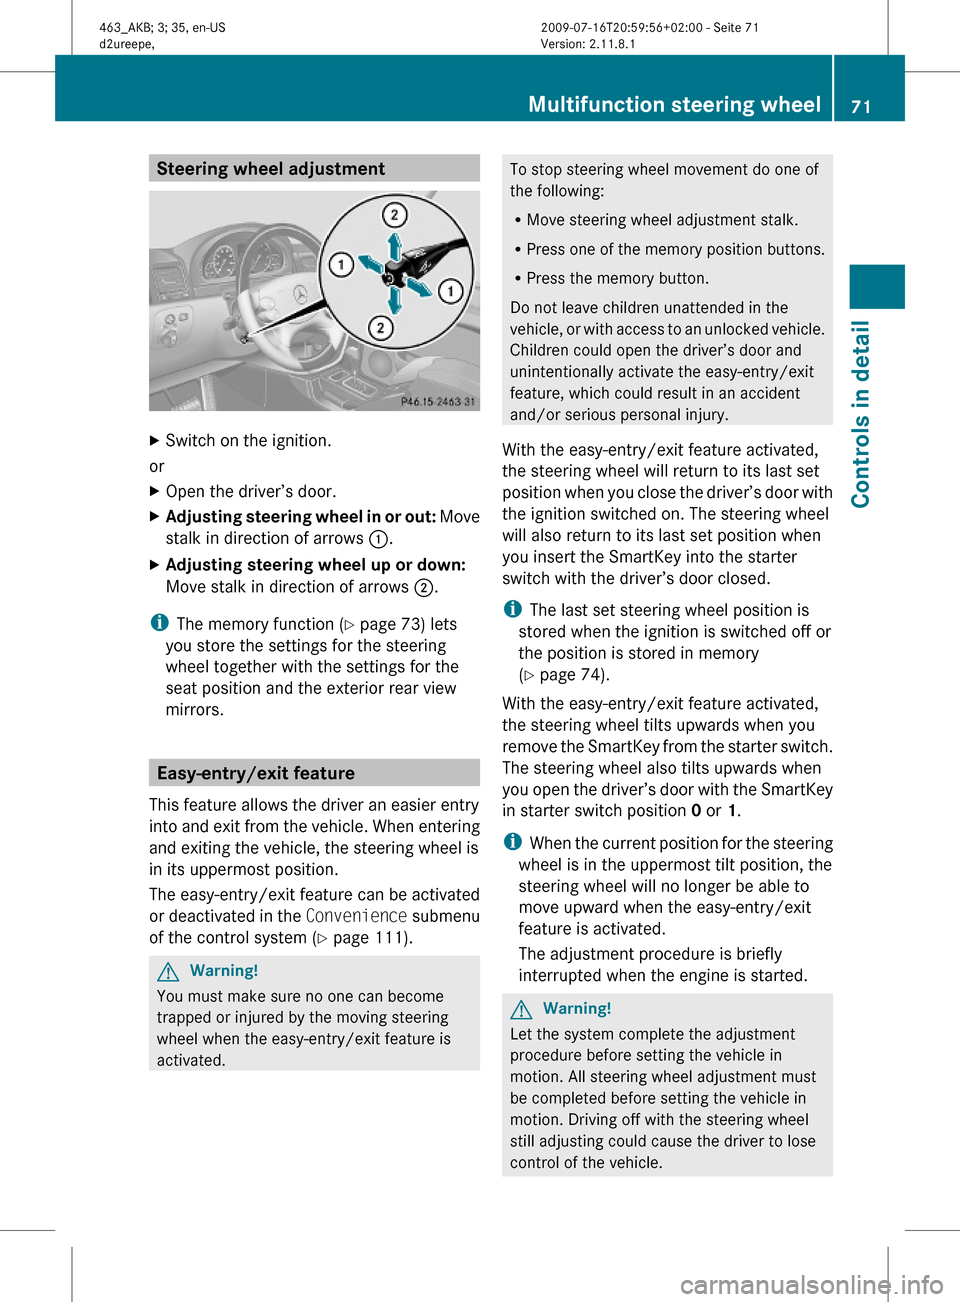
XOpen the driver’s door.XAdjusting steering wheel in or out: Move
stalk in direction of arrows :.
XAdjusting steering wheel up or down:
Move stalk in direction of arrows ;.
iThe memory function (Y page 73) lets
you store the settings for the steering
wheel together with the settings for the
seat position and the exterior rear view
mirrors.
Easy-entry/exit feature
This feature allows the driver an easier entry
into and exit from the vehicle. When entering
and exiting the vehicle, the steering wheel is
in its uppermost position.
The easy-entry/exit feature can be activated
or deactivated in the Convenience submenu
of the control system (Y page 111).
GWarning!
You must make sure no one can become
trapped or injured by the moving steering
wheel when the easy-entry/exit feature is
activated.
To stop steering wheel movement do one of
the following:
RMove steering wheel adjustment stalk.
RPress one of the memory position buttons.
RPress the memory button.
Do not leave children unattended in the
vehicle, or with access to an unlocked vehicle.
Children could open the driver’s door and
unintentionally activate the easy-entry/exit
feature, which could result in an accident
and/or serious personal injury.
With the easy-entry/exit feature activated,
the steering wheel will return to its last set
position when you close the driver’s door with
the ignition switched on. The steering wheel
will also return to its last set position when
you insert the SmartKey into the starter
switch with the driver’s door closed.
iThe last set steering wheel position is
stored when the ignition is switched off or
the position is stored in memory
(Y page 74).
With the easy-entry/exit feature activated,
the steering wheel tilts upwards when you
remove the SmartKey from the starter switch.
The steering wheel also tilts upwards when
you open the driver’s door with the SmartKey
in starter switch position 0 or 1.
iWhen the current position for the steering
wheel is in the uppermost tilt position, the
steering wheel will no longer be able to
move upward when the easy-entry/exit
feature is activated.
The adjustment procedure is briefly
interrupted when the engine is started.
GWarning!
Let the system complete the adjustment
procedure before setting the vehicle in
motion. All steering wheel adjustment must
be completed before setting the vehicle in
motion. Driving off with the steering wheel
still adjusting could cause the driver to lose
control of the vehicle.
Multifunction steering wheel71Controls in detail463_AKB; 3; 35, en-USd2ureepe,Version: 2.11.8.12009-07-16T20:59:56+02:00 - Seite 71Z
Page 101 of 272
Steam from an overheated engine can cause
serious burns which can occur just by opening
the engine hood. Stay away from the engine
if you see or hear steam coming from it.
Stop the vehicle in a safe location away from
other traffic. Turn off the engine, get out of the
vehicle and do not stand near the vehicle until
the engine has cooled down.
During severe operating conditions, e.g. stop-
and-go traffic, the coolant temperature may
rise close to 248‡ (120†).
! Excessive coolant temperature triggers a
warning in the multifunction display.
The engine should not be operated with a
coolant temperature above 248‡ (120†),
i.e. in the red zone of the coolant
temperature gauge. Doing so may cause
serious engine damage which is not
covered by the Mercedes-Benz Limited
Warranty.
Resetting trip odometer
XMake sure you are viewing the standard
display ( Y page 102) in the multifunction
display.XPress and hold the reset button in the
instrument cluster (Y page 98) until the trip
odometer is reset.
Tachometer
The red marking on the tachometer
( Y page 26) denotes excessive engine speed.
! Avoid driving at excessive engine speeds,
as it may result in serious engine damage
that is not covered by the Mercedes-Benz
Limited Warranty.
To help protect the engine, the fuel supply is
interrupted if the engine is operated within
the red marking.
Control system
Introduction
The control system is activated as soon as the
starter switch is in position 1.
The control system enables you to call up
information about your vehicle and to change
vehicle settings.
For example, you can use the control system
to find out when your vehicle is next due for
maintenance service, to set the language for
messages in the instrument cluster display,
and much more.
GWarning!
A driver’s attention to the road and traffic
conditions must always be his/her primary
focus when driving.
For your safety and the safety of others,
selecting features through the multifunction
steering wheel should only be done by the
driver when traffic and road conditions permit
it to be done safely.
Bear in mind that at a speed of just 30 mph
(approximately 50 km/h), your vehicle is
covering a distance of 44 feet (approximately
14 m) every second.
The control system relays information to the
multifunction display.
Multifunction steering wheel
The displays in the multifunction display and
the settings in the control system are
controlled by using the buttons on the
multifunction steering wheel.
Control system99Controls in detail463_AKB; 3; 35, en-USd2ureepe,Version: 2.11.8.12009-07-16T20:59:56+02:00 - Seite 99Z
Page 102 of 272
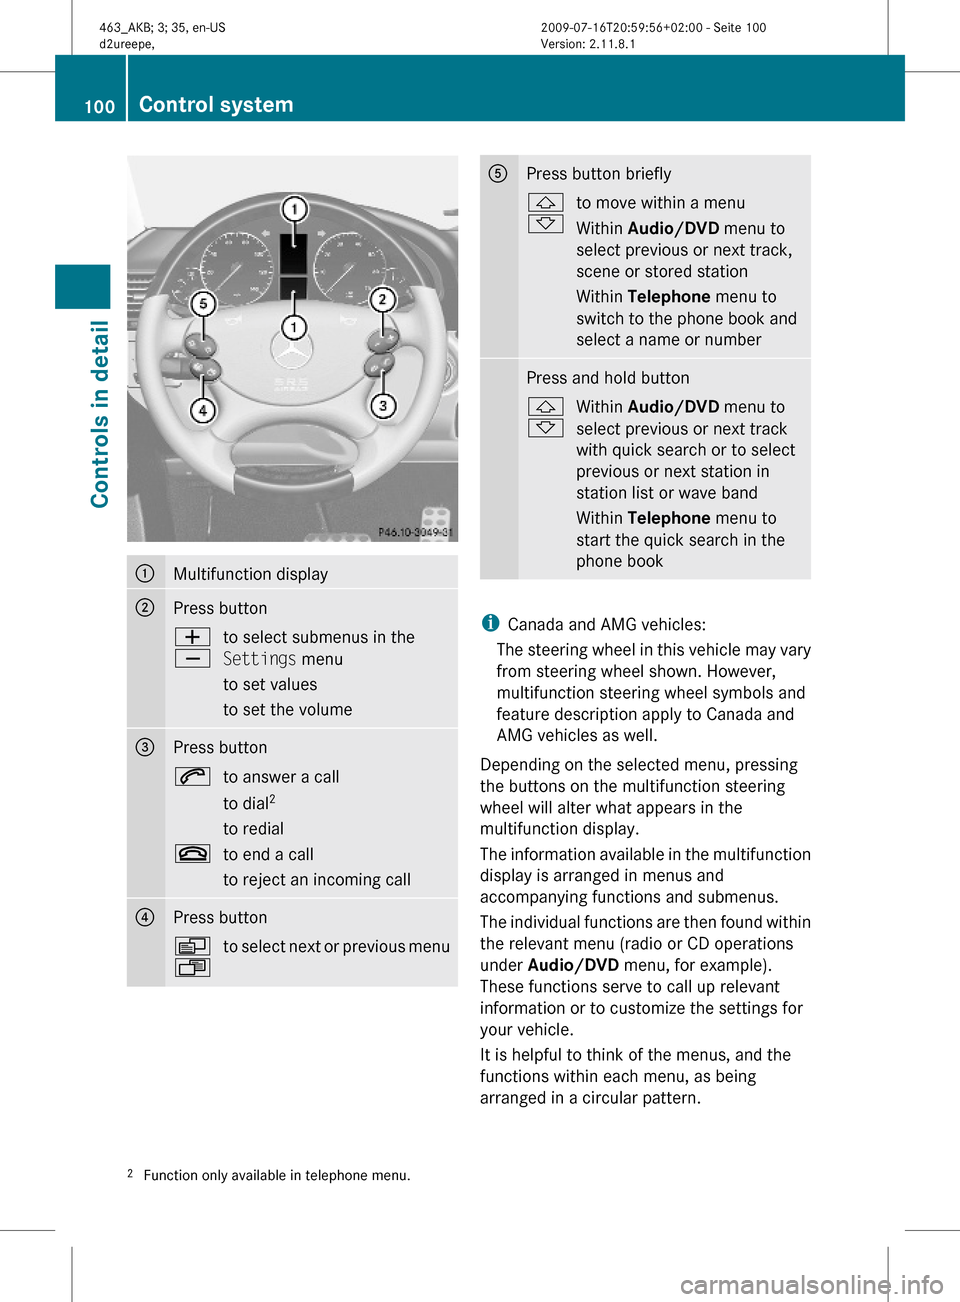
:Multifunction display;Press buttonW
X
to select submenus in the
Settings menu
to set values
to set the volume
=Press button6to answer a call
to dial2
to redial
~to end a call
to reject an incoming call
?Press buttonV
U
to select next or previous menuAPress button briefly&
*
to move within a menu
Within Audio/DVD menu to
select previous or next track,
scene or stored station
Within Telephone menu to
switch to the phone book and
select a name or number
Press and hold button&
*
Within Audio/DVD menu to
select previous or next track
with quick search or to select
previous or next station in
station list or wave band
Within Telephone menu to
start the quick search in the
phone book
iCanada and AMG vehicles:
The steering wheel in this vehicle may vary
from steering wheel shown. However,
multifunction steering wheel symbols and
feature description apply to Canada and
AMG vehicles as well.
Depending on the selected menu, pressing
the buttons on the multifunction steering
wheel will alter what appears in the
multifunction display.
The information available in the multifunction
display is arranged in menus and
accompanying functions and submenus.
The individual functions are then found within
the relevant menu (radio or CD operations
under Audio/DVD menu, for example).
These functions serve to call up relevant
information or to customize the settings for
your vehicle.
It is helpful to think of the menus, and the
functions within each menu, as being
arranged in a circular pattern.
2Function only available in telephone menu.100Control systemControls in detail
463_AKB; 3; 35, en-USd2ureepe,Version: 2.11.8.12009-07-16T20:59:56+02:00 - Seite 100
Page 114 of 272
Activating easy-entry/exit feature
Use this function to activate and deactivate
the easy-entry/exit feature (Y page 71).
GWarning!
You must make sure no one can become
trapped or injured by the moving steering
wheel when the easy-entry/exit feature is
activated.
To stop steering wheel movement do one of
the following:
RMove steering wheel adjustment stalk.
RPress one of the memory position buttons.
RPress the memory button.
Do not leave children unattended in the
vehicle, or with access to an unlocked vehicle.
Children could open the driver’s door and
unintentionally activate the easy-entry/exit
feature, which could result in an accident
and/or serious personal injury.
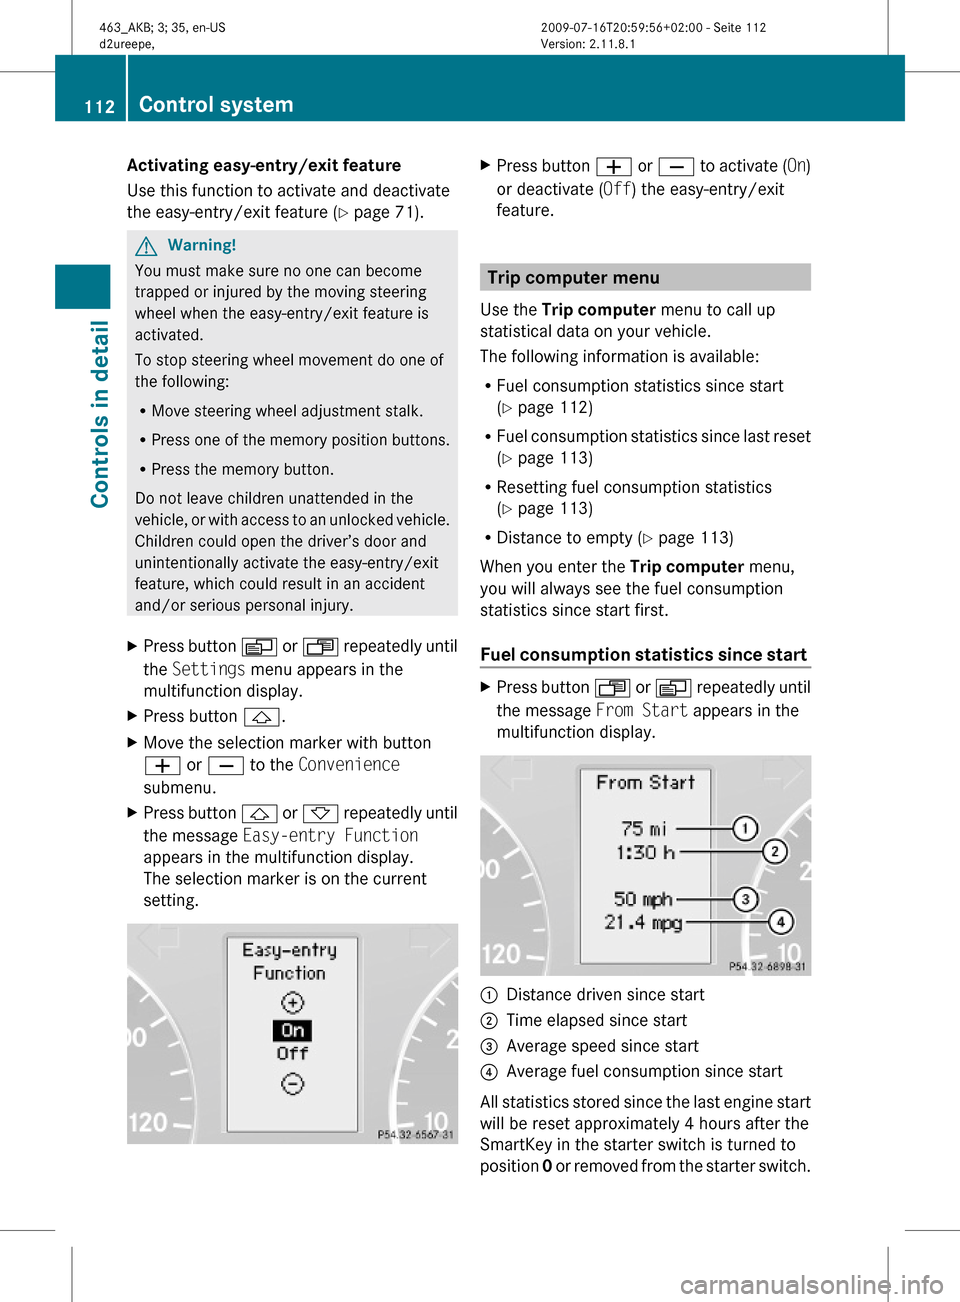
XPress button V or U repeatedly until
the Settings menu appears in the
multifunction display.
XPress button &.XMove the selection marker with button
W or X to the Convenience
submenu.
XPress button & or * repeatedly until
the message Easy-entry Function
appears in the multifunction display.
The selection marker is on the current
setting.
XPress button W or X to activate (On)
or deactivate (Off) the easy-entry/exit
feature.
Trip computer menu
Use the Trip computer menu to call up
statistical data on your vehicle.
The following information is available:
RFuel consumption statistics since start
(Y page 112)
RFuel consumption statistics since last reset
(Y page 113)
RResetting fuel consumption statistics
(Y page 113)
RDistance to empty (Y page 113)
When you enter the Trip computer menu,
you will always see the fuel consumption
statistics since start first.
Fuel consumption statistics since start
XPress button U or V repeatedly until
the message From Start appears in the
multifunction display.
:Distance driven since start;Time elapsed since start=Average speed since start?Average fuel consumption since start
All statistics stored since the last engine start
will be reset approximately 4 hours after the
SmartKey in the starter switch is turned to
position 0 or removed from the starter switch.
112Control systemControls in detail
463_AKB; 3; 35, en-USd2ureepe,Version: 2.11.8.12009-07-16T20:59:56+02:00 - Seite 112
Page 146 of 272
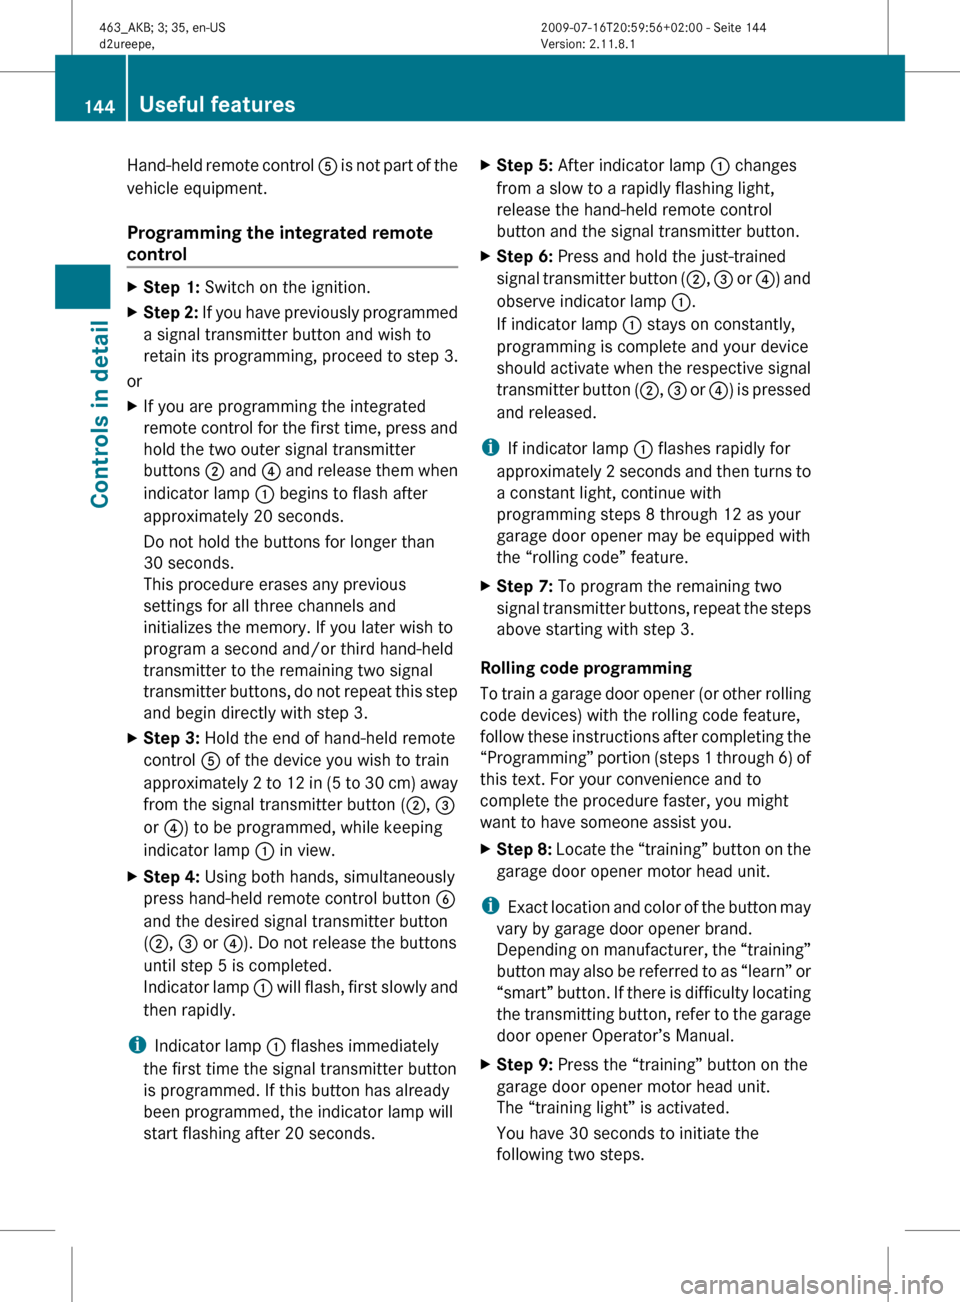
Hand-held remote control A is not part of the
vehicle equipment.
Programming the integrated remote
controlXStep 1: Switch on the ignition.XStep 2: If you have previously programmed
a signal transmitter button and wish to
retain its programming, proceed to step 3.
or
XIf you are programming the integrated
remote control for the first time, press and
hold the two outer signal transmitter
buttons ; and ? and release them when
indicator lamp : begins to flash after
approximately 20 seconds.
Do not hold the buttons for longer than
30 seconds.
This procedure erases any previous
settings for all three channels and
initializes the memory. If you later wish to
program a second and/or third hand-held
transmitter to the remaining two signal
transmitter buttons, do not repeat this step
and begin directly with step 3.XStep 3: Hold the end of hand-held remote
control A of the device you wish to train
approximately 2 to 12 in (5 to 30 cm) away
from the signal transmitter button ( ;, =
or ? ) to be programmed, while keeping
indicator lamp : in view.XStep 4: Using both hands, simultaneously
press hand-held remote control button B
and the desired signal transmitter button
( ; , = or ?). Do not release the buttons
until step 5 is completed.
Indicator lamp : will flash, first slowly and
then rapidly.
i Indicator lamp : flashes immediately
the first time the signal transmitter button
is programmed. If this button has already
been programmed, the indicator lamp will
start flashing after 20 seconds.
XStep 5: After indicator lamp : changes
from a slow to a rapidly flashing light,
release the hand-held remote control
button and the signal transmitter button.XStep 6: Press and hold the just-trained
signal transmitter button ( ;, = or ?) and
observe indicator lamp :.
If indicator lamp : stays on constantly,
programming is complete and your device
should activate when the respective signal
transmitter button ( ;, = or ?) is pressed
and released.
i If indicator lamp : flashes rapidly for
approximately 2 seconds and then turns to
a constant light, continue with
programming steps 8 through 12 as your
garage door opener may be equipped with
the “rolling code” feature.
XStep 7: To program the remaining two
signal transmitter buttons, repeat the steps
above starting with step 3.
Rolling code programming
To train a garage door opener (or other rolling
code devices) with the rolling code feature,
follow these instructions after completing the
“Programming” portion (steps 1 through 6) of
this text. For your convenience and to
complete the procedure faster, you might
want to have someone assist you.
XStep 8: Locate the “training” button on the
garage door opener motor head unit.
i Exact location and color of the button may
vary by garage door opener brand.
Depending on manufacturer, the “training”
button may also be referred to as “learn” or
“smart” button. If there is difficulty locating
the transmitting button, refer to the garage
door opener Operator’s Manual.
XStep 9: Press the “training” button on the
garage door opener motor head unit.
The “training light” is activated.
You have 30 seconds to initiate the
following two steps.144Useful featuresControls in detail
463_AKB; 3; 35, en-USd2ureepe,Version: 2.11.8.12009-07-16T20:59:56+02:00 - Seite 144
Page 147 of 272
XStep 10: Return to the vehicle and firmly
press, hold for 2 seconds and release the
programmed signal transmitter button ( ;,
= or ?).XStep 11: Press, hold for 2 seconds and
release same signal transmitter button a
second time to complete the training
process.
i Some garage door openers (or other
rolling code equipped devices) may require
you to press, hold for 2 seconds and
release the same signal transmitter button
a third time to complete the training
process.
XStep 12: Confirm the garage door
operation by pressing the programmed
signal transmitter button ( ;, = or ?).XStep 13: To program the remaining two
signal transmitter buttons, repeat the steps
above starting with step 3.
Gate operator/Canadian programming
Canadian radio-frequency laws require
transmitter signals to “time-out” (or quit)
after several seconds of transmission which
may not be long enough for the integrated
signal transmitter to pick up the signal during
programming. Similar to this Canadian law,
some U.S. gate operators are designed to
“time-out” in the same manner.
If you live in Canada or if you are having
difficulties programming a gate operator
(regardless of where you live) by using the
programming procedures, replace step 4 with
the following:
XStep 4: Press and hold the signal
transmitter button ( ;, = or ?). Do not
release this button until it has been
successfully trained.XWhile still holding down the signal
transmitter button ( ;, = or ?), “cycle”
your hand-held remote control button B
as follows: Press and hold button B for
2 seconds, then release it for 2 seconds,
and again press and hold it for 2 seconds.Repeat this sequence on the hand-held
remote control until the frequency signal
has been learned.
Upon successful training, indicator
lamp : will flash slowly and then rapidly
after several seconds.XProceed with programming step 5 and
step 6 to complete.
i Upon completion of programming the
integrated remote control, make sure you
retain the hand-held remote control that
came with the garage door opener, gate
operator or other device. You may need it
for use in other vehicles, for future
programming of an integrated remote
control, or simply for continued use as a
hand-held remote control to operate the
respective device in other situations.
Reprogramming a single signal
transmitter button
To program a device using a signal
transmitter button previously trained, follow
these steps:
XSwitch on the ignition.XPress and hold the desired signal
transmitter button ( ;, = or ?). Do not
release the button.
Indicator lamp : will begin to flash after
20 seconds.XWithout releasing the signal transmitter
button, proceed with programming starting
with step 3.
Operation of integrated remote control
XSwitch on the ignition.XSelect and press the appropriate
integrated signal transmitter button ( ;,
= or ?) to activate the remote controlled
device.
The integrated remote control transmitter
continues to send the signal as long as the
button is pressed – up to 20 seconds.Useful features145Controls in detail463_AKB; 3; 35, en-USd2ureepe,Version: 2.11.8.12009-07-16T20:59:56+02:00 - Seite 145Z
Page 148 of 272
Erasing the integrated remote control
memory
i If you sell your vehicle, erase the codes of
all three channels.
XSwitch on the ignition.XSimultaneously press and hold outer signal
transmitter buttons ; and ?, for
approximately 20 seconds, until indicator
lamp : flashes rapidly. Do not hold for
longer than 30 seconds.
The codes of all three channels are erased.
Programming tips
If you are having difficulty programming the
integrated remote control, here are some
helpful tips:
R Check the frequency of hand-held remote
control A (typically located on the reverse
side of the remote). The integrated remote
control is compatible with radio-frequency
devices operating between 280-390 MHz.
R Put a new battery in hand-held remote
control A. This will increase the likelihood
of the hand-held remote control sending a
stronger and more accurate signal to the
integrated remote control.
R While performing step 3, hold hand-held
remote control A at different lengths and
angles from the signal transmitter button
( ; , = or ?) you are programming.
Attempt varying angles at the distance of 2
to 12 inches (5 to 30 cm) away or the same
angle at varying distances.
R If another hand-held remote control is
available for the same device, try the
programming steps again using that other
hand-held remote control. Make sure new
batteries are in the hand-held remote
control before beginning the procedure.
R Straighten the antenna wire from the
garage door opener assembly. This may
help improve transmitting and/or receiving
signals.
i Certain types of garage door openers are
incompatible with the integrated remote
control. If you should experience further
difficulties with programming the
integrated remote control, contact an
authorized Mercedes-Benz Center, or call
the Mercedes-Benz Customer Assistance
Center (USA only) at
1-800-FOR-MERCedes (1-800-367-6372),
or the HomeLink ®
Hotline (USA only) at
1-800-355-3515, or the Customer Service
(Canada only) at 1-800-387-0100.
i USA only:
This device complies with Part 15 of the
FCC Rules. Operation is subject to the
following two conditions:
1. This device may not cause harmful interference, and
2. this device must accept any interference received, including
interference that may cause undesired
operation.
Any unauthorized modification to this
device could void the user’s authority to
operate the equipment.
i Canada only:
This device complies with RSS-210 of
Industry Canada. Operation is subject to
the following two conditions:
1. This device may not cause interference,
and
2. this device must accept any interference received, including
interference that may cause undesired
operation of the device.
Any unauthorized modification to this
device could void the user’s authority to
operate the equipment.146Useful featuresControls in detail
463_AKB; 3; 35, en-USd2ureepe,Version: 2.11.8.12009-07-16T20:59:56+02:00 - Seite 146