rear view mirror MERCEDES-BENZ G550 2011 W463 Owner's Manual
[x] Cancel search | Manufacturer: MERCEDES-BENZ, Model Year: 2011, Model line: G550, Model: MERCEDES-BENZ G550 2011 W463Pages: 288, PDF Size: 11.16 MB
Page 9 of 288
Driving safety systemEBD (Electronic Brake force
Distribution) ..................................... 59
ESP ®
(Electronic Stability
Program) .......................................... 57
Important safety information ...........55
Driving safety systems
4ETS (Electronic Traction System) ...58
ABS (Anti-lock Braking System) .......56
BAS (Brake Assist System) ..............56
Overview .......................................... 55
Driving systems
Cruise control ................................ 147
Rear view camera .......................... 152
Driving tips ........................................ 123
Braking .......................................... 139
Downhill gradients .........................137
Driving on flooded roads ................140
Driving on sand .............................. 144
Driving on wet roads ......................140
Driving over obstacles ...................145
Off-road driving .............................. 142
Off-road fording ............................. 140
Tire ruts ......................................... 144
Wet road surface ........................... 138
Winter ............................................ 141
DVD audio (on-board computer) ...... 161
E
EASY-ENTRY feature ............................ 84
Activating/deactivating (on-
board computer) ............................ 165
EASY-EXIT feature ............................... 84
EBD (Electronic Brake force
Distribution) Function/notes ................................ 59
Electrical fuses
see Fuses
Electronic Brake force
see EBD
Electronic Stability Program
see ESP ®
Electronic Traction Support
see 4ETS
Emergency call
see mbrace
Emergency release
Fuel filler flap ................................. 133
Vehicle ............................................. 68
Emergency running mode
Automatic transmission .................126
Emergency tensioning device
Function ........................................... 49
Safety guidelines ............................. 35
Emissions purification
Service and warranty information ....17
Engine
Display message ............................ 174
Irregular running ............................ 120
Starting problems ..........................120
Starting the engine with the
SmartKey ....................................... 117
Switching off .................................. 135
Warning lamp Check Engine ..........188
Engine electronics
Malfunction .................................... 120
Engine number .................................. 276
Engine oil Adding ........................................... 216
Additives ........................................ 279
Checking the oil level ..................... 215
Display message ............................ 176
Notes about oil grades ................... 279
Viscosity ........................................ 279
ESP ®
(Electronic Stability
Program) Activating/deactivating ...................58
Display message ............................ 170
Important safety information ...........57
Exhaust check ................................... 137
Exhaust tail pipe (cleaning
instructions) ...................................... 224
Exterior lighting Delayed switch-off (on-board
computer) ...................................... 164
Exterior mirrors
Adjusting ......................................... 85
Dipping (automatic) .........................87
Malfunction ...................................... 87
Out of position (troubleshooting) .....86
Storing settings (memory
function) .......................................... 88
Storing the parking position ............. 87Index7
Page 13 of 288
Operating safetyImportant safety note ......................19
Operating system
see On-board computer
Outside temperature
Calling up (on-board computer) .....160
Display ........................................... 157
Overhead control panel
Overview .......................................... 30
Override feature
Rear side windows ...........................54
P
Paint code number ............................ 275
Paintwork (cleaning instructions) ... 222
Panic alarm .......................................... 54
Parking ............................................... 134
Parking aid Exterior mirror on the front-
passenger side ................................. 87
Rear view camera .......................... 152
Parking brake .................................... 135
Display message ............................ 171
see Parking brake ..........................139
Parking lamp (display message) ...... 174
Parking lock releasing manually .........................126
Parking position
Exterior mirror on the front-
passenger side ................................. 87
Pedals ................................................. 136
Permanent four-wheel drive see 4MATIC
Permissible gross vehicle weight
rating .................................................. 256
Plastic trim (cleaning instructions) . 225
Power washers .................................. 222
Product information ............................ 17
Programming SmartKeys ....................................... 63
Pulling away
Automatic transmission .................118
R
Radio Changing stations (on-board
computer) ...................................... 160
see separate operating instructions
Range (on-board computer) ............. 167
Rear bench seat Folding forward .............................. 195
Rear compartment
Setting the air vents ......................113
Rear door
Display message ............................ 181
Opening/closing .............................. 69
Rear fog lamp (display message) ..... 173
Rear seat bench Folding into an upright position .....195
Rear view camera
Function/notes ............................. 152
Rear view camera (cleaning
instructions) ...................................... 224
Rear-view mirror Adjusting ......................................... 85
Dipping (automatic) .........................87
Rear window heating ........................ 111
Malfunction .................................... 111
Rear window wiper ........................... 102
Refueling ............................................ 131
Remote control Programming (garage door
opener) .......................................... 209
Reporting
Malfunctions relevant to safety ........ 20
Reserve fuel
Display message ............................ 178
Warning lamp ................................. 188
Residual heat
Switching on/off ........................... 112
Restraint systems
see SRS
Roadside Assistance (breakdown) .... 18
Roof carrier ........................................ 197
Roof lining and carpets (cleaning
guidelines) ......................................... 226
Route see Route guidance (on-board
computer) Index11
Page 26 of 288
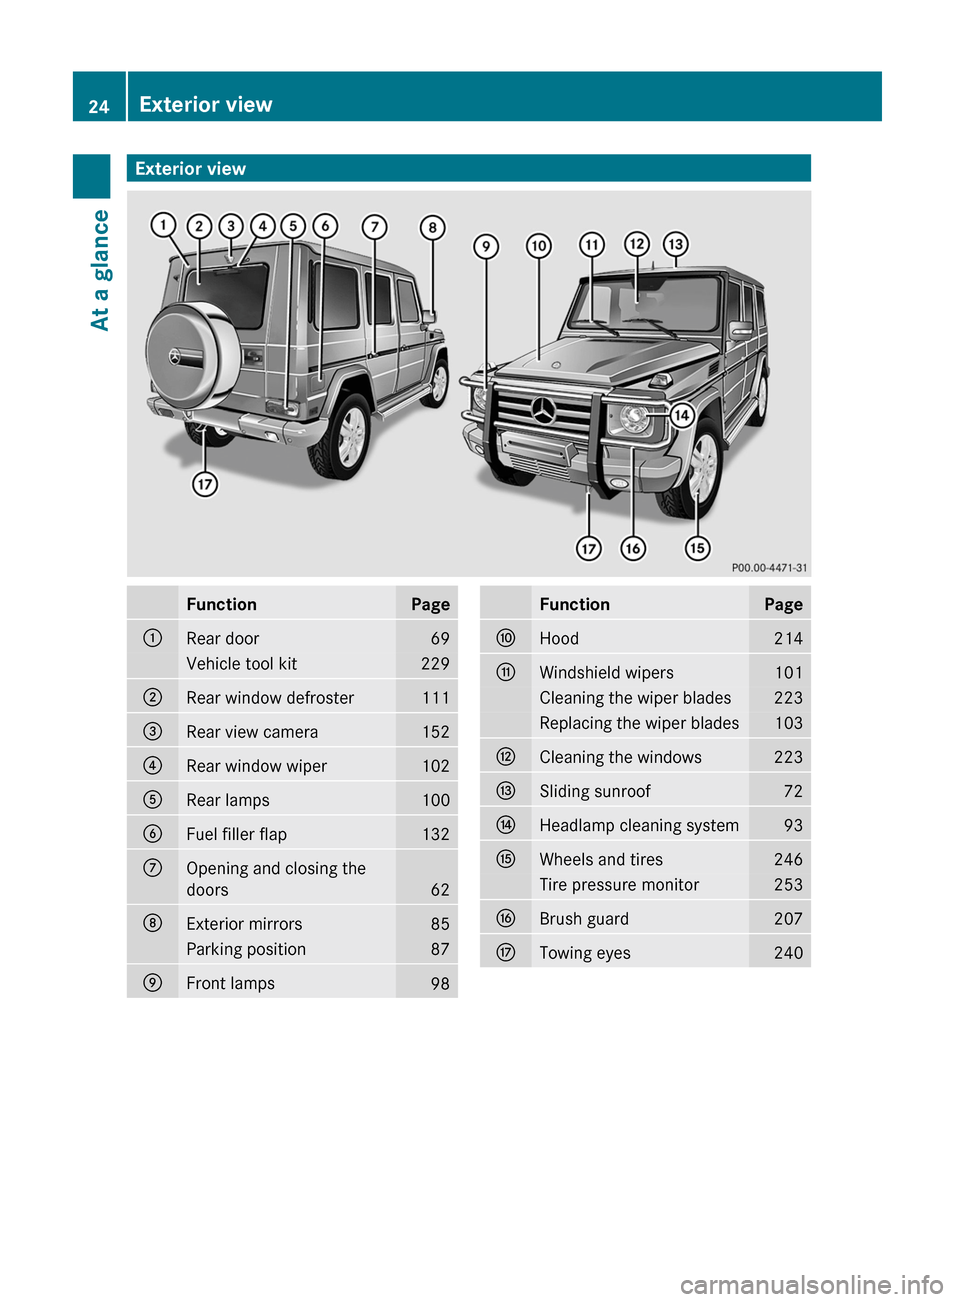
Exterior viewFunctionPage:Rear door69Vehicle tool kit229;Rear window defroster111=Rear view camera152?Rear window wiper102ARear lamps100BFuel filler flap132COpening and closing the
doors
62
DExterior mirrors85Parking position87EFront lamps98FunctionPageFHood214GWindshield wipers101Cleaning the wiper blades223Replacing the wiper blades103HCleaning the windows223ISliding sunroof72JHeadlamp cleaning system93KWheels and tires246Tire pressure monitor253LBrush guard207MTowing eyes24024Exterior viewAt a glance
Page 32 of 288
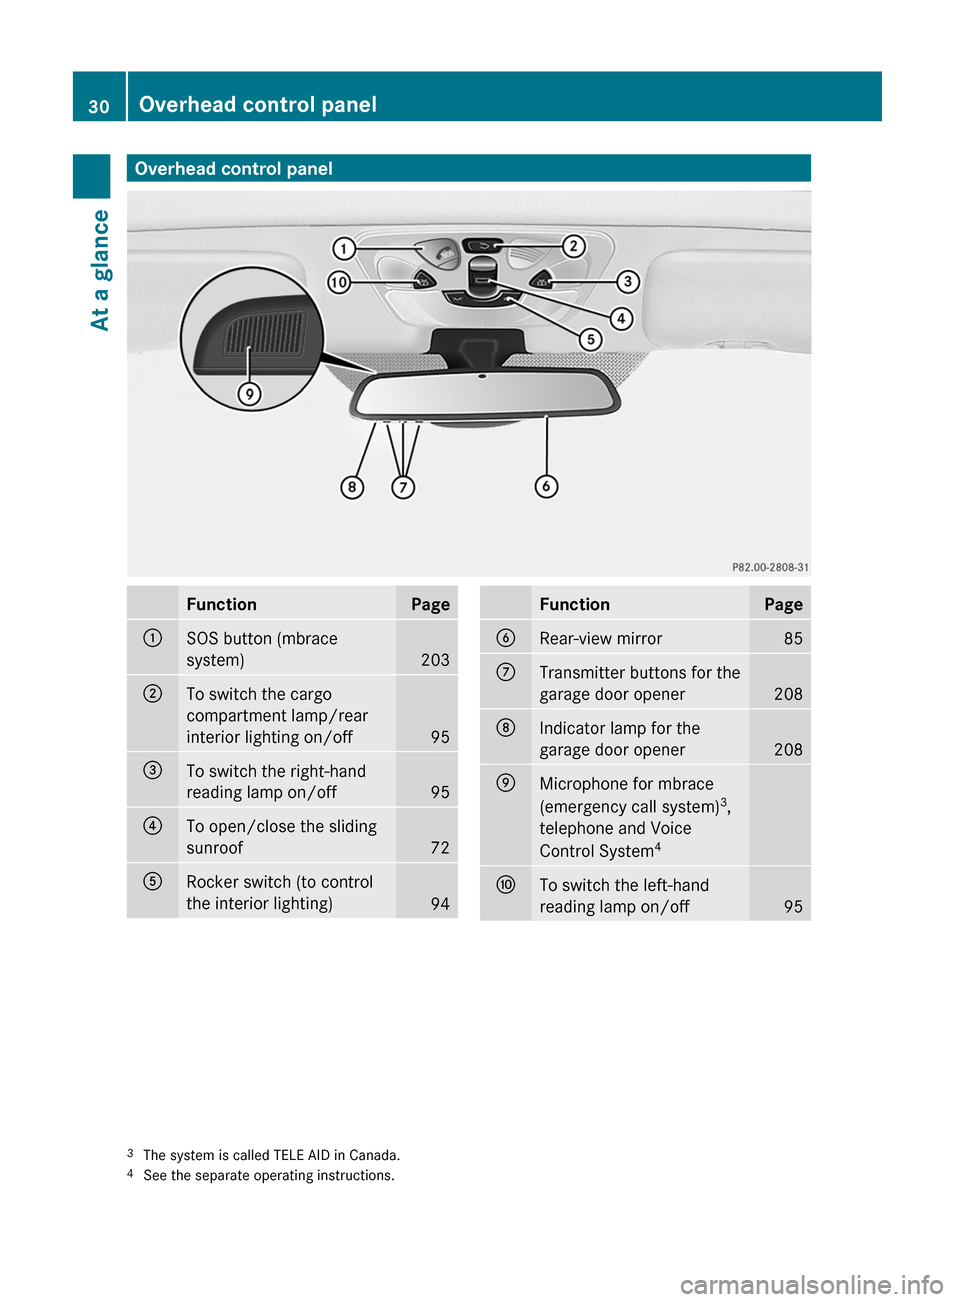
Overhead control panelFunctionPage:SOS button (mbrace
system)
203
;To switch the cargo
compartment lamp/rear
interior lighting on/off
95
=To switch the right-hand
reading lamp on/off
95
?To open/close the sliding
sunroof
72
ARocker switch (to control
the interior lighting)
94
FunctionPageBRear-view mirror85CTransmitter buttons for the
garage door opener
208
DIndicator lamp for the
garage door opener
208
EMicrophone for mbrace
(emergency call system) 3
,
telephone and Voice
Control System 4FTo switch the left-hand
reading lamp on/off
953 The system is called TELE AID in Canada.
4 See the separate operating instructions.30Overhead control panelAt a glance
Page 78 of 288
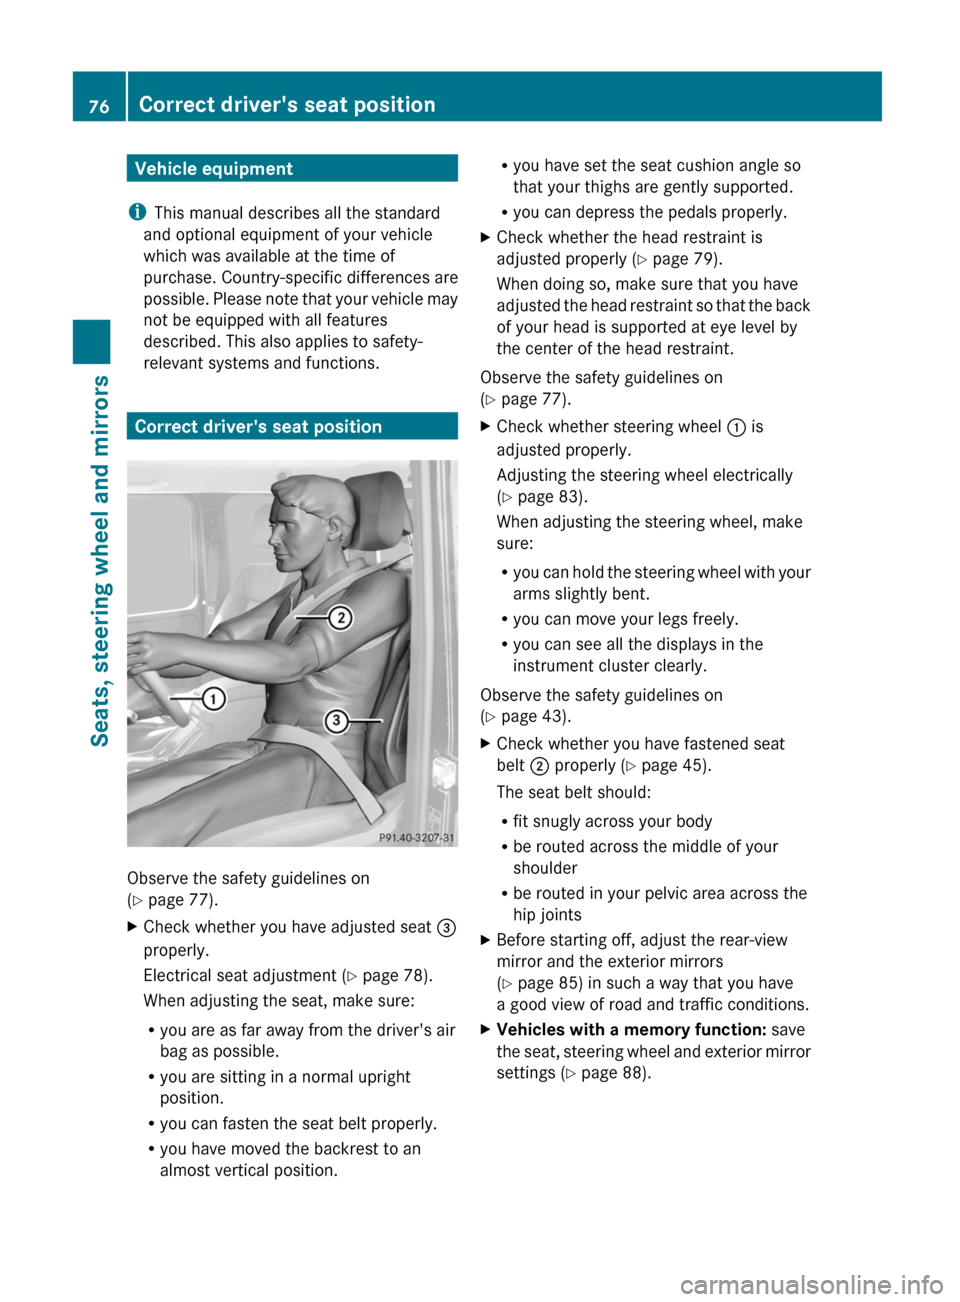
Vehicle equipment
i This manual describes all the standard
and optional equipment of your vehicle
which was available at the time of
purchase. Country-specific differences are
possible. Please note that your vehicle may
not be equipped with all features
described. This also applies to safety-
relevant systems and functions.
Correct driver's seat position
Observe the safety guidelines on
( Y page 77).
XCheck whether you have adjusted seat =
properly.
Electrical seat adjustment ( Y page 78).
When adjusting the seat, make sure:
R you are as far away from the driver's air
bag as possible.
R you are sitting in a normal upright
position.
R you can fasten the seat belt properly.
R you have moved the backrest to an
almost vertical position.R you have set the seat cushion angle so
that your thighs are gently supported.
R you can depress the pedals properly.XCheck whether the head restraint is
adjusted properly ( Y page 79).
When doing so, make sure that you have
adjusted the head restraint so that the back
of your head is supported at eye level by
the center of the head restraint.
Observe the safety guidelines on
( Y page 77).
XCheck whether steering wheel : is
adjusted properly.
Adjusting the steering wheel electrically
( Y page 83).
When adjusting the steering wheel, make
sure:
R you can hold the steering wheel with your
arms slightly bent.
R you can move your legs freely.
R you can see all the displays in the
instrument cluster clearly.
Observe the safety guidelines on
( Y page 43).
XCheck whether you have fastened seat
belt ; properly ( Y page 45).
The seat belt should:
R fit snugly across your body
R be routed across the middle of your
shoulder
R be routed in your pelvic area across the
hip jointsXBefore starting off, adjust the rear-view
mirror and the exterior mirrors
( Y page 85) in such a way that you have
a good view of road and traffic conditions.XVehicles with a memory function: save
the seat, steering wheel and exterior mirror
settings ( Y page 88).76Correct driver's seat positionSeats, steering wheel and mirrors
Page 79 of 288
Seats
Important safety notes
GWarning
In order to avoid possible loss of vehicle
control, all seat, head restraint, steering
wheel and rear view mirror adjustments, as
well as fastening of seat belts, must be done
before setting the vehicle in motion.
GWarning
Do not adjust the driver's seat while driving.
Adjusting the seat while driving could cause
the driver to lose control of the vehicle.
Never travel in a moving vehicle with the seat
backrest in an excessively reclined position as
this can be dangerous. You could slide under
the seat belt in a collision. If you slide under
it, the seat belt would apply force at the
abdomen or neck. This could cause serious or
fatal injuries. The seat backrest and seat belts
provide the best restraint when the wearer is
in a position that is as upright as possible and
seat belts are properly positioned on the
body.
GWarning
Your seat belt must be adjusted so that you
can correctly fasten your seat belt.
Observe the following points:
R adjust the seat backrest until your arms are
slightly angled when holding the steering
wheel.
R adjust the seat to a comfortable seating
position that still allows you to reach the
accelerator/brake pedal safely. The
position should be as far back as possible
with the driver still able to operate the
controls properly.
R adjust the head restraint so that it is as
close to the head as possible and the center
of the head restraint supports the back of
the head at eye level.
R never place hands under the seat or near
any moving parts while a seat is being
adjusted.
Failure to do so could result in an accident
and/or serious personal injury.GWarning
The electrically adjustable seats can be
operated at any time. Therefore, do not leave
children unattended in the vehicle, or with
access to an unlocked vehicle. A child's
unsupervised access to a vehicle could result
in an accident and/or serious personal injury.
GWarning
According to accident statistics, children are
safer when properly restrained on the rear
seats than on the front-passenger seat. Thus,
we strongly recommend that children be
placed in the rear seat whenever possible.
Regardless of seating position, children 12
years old and under must be seated and
properly secured in an appropriately sized
child restraint system or booster seat
recommended for the size and weight of the
child. For additional information, see the
"Children in the vehicle" section.
A child's risk of serious or fatal injuries is
significantly increased if the child restraints
are not properly secured in the vehicle and/
or the child is not properly secured in the child
restraint.
GWarning
For your protection, drive only with properly
positioned head restraints.
Adjust the head restraint so that it is as close
to the head as possible and the center of the
head restraint supports the back of the head
at eye level. This will reduce the potential for
injury to the head and neck in the event of an
accident or similar situation.
Seats77Seats, steering wheel and mirrorsZ
Page 87 of 288
EXIT feature. This could result in an accident
and/or serious personal injury.GWarning
Let the system complete the adjustment
procedure before setting the vehicle in
motion. All steering wheel adjustment must
be completed before setting the vehicle in
motion. Driving off with the steering wheel
still adjusting could cause the driver to lose
control of the vehicle.
! Do not activate the EASY-ENTRY/EXIT
feature, if the seat backrest is reclined too
far backwards. This can damage the front
or rear seats. You must first move the
backrest to a vertical position.
Position of the steering wheel when the
EASY-ENTRY/EXIT feature is active
The steering wheel moves upwards and
towards the dashboard if:
R an easy-entry/exit steering wheel position
has been stored for the key and
R you remove the key from the ignition lock
or
R you open the driver's door with the key in
position 0 or 1 in the ignition lock.
If you insert the key into the ignition lock with
the driver's door closed, the steering wheel is
automatically moved to the previously set
position.
The last position of the steering wheel is
stored when you switch off the ignition or
when you store the setting with the memory
function ( Y page 88).
i The steering wheel only moves upwards
and towards the dashboard if it has not
already reached the upper end stop.
Mirrors
Rear-view mirror
XAdjust the rear-view mirror by hand so you
have a good overview of the traffic
conditions.
Exterior mirrors
Important safety notes
GWarning
Exercise care when using the passenger-side
exterior rear view mirror. The mirror surface
is convex (outwardly curved surface for a
wider field of view). Objects in mirror are
closer than they appear. Check your interior
rear view mirror and glance over your
shoulder before changing lanes.
At low outside temperatures, the exterior
mirrors are heated automatically.
Adjusting the exterior mirrors
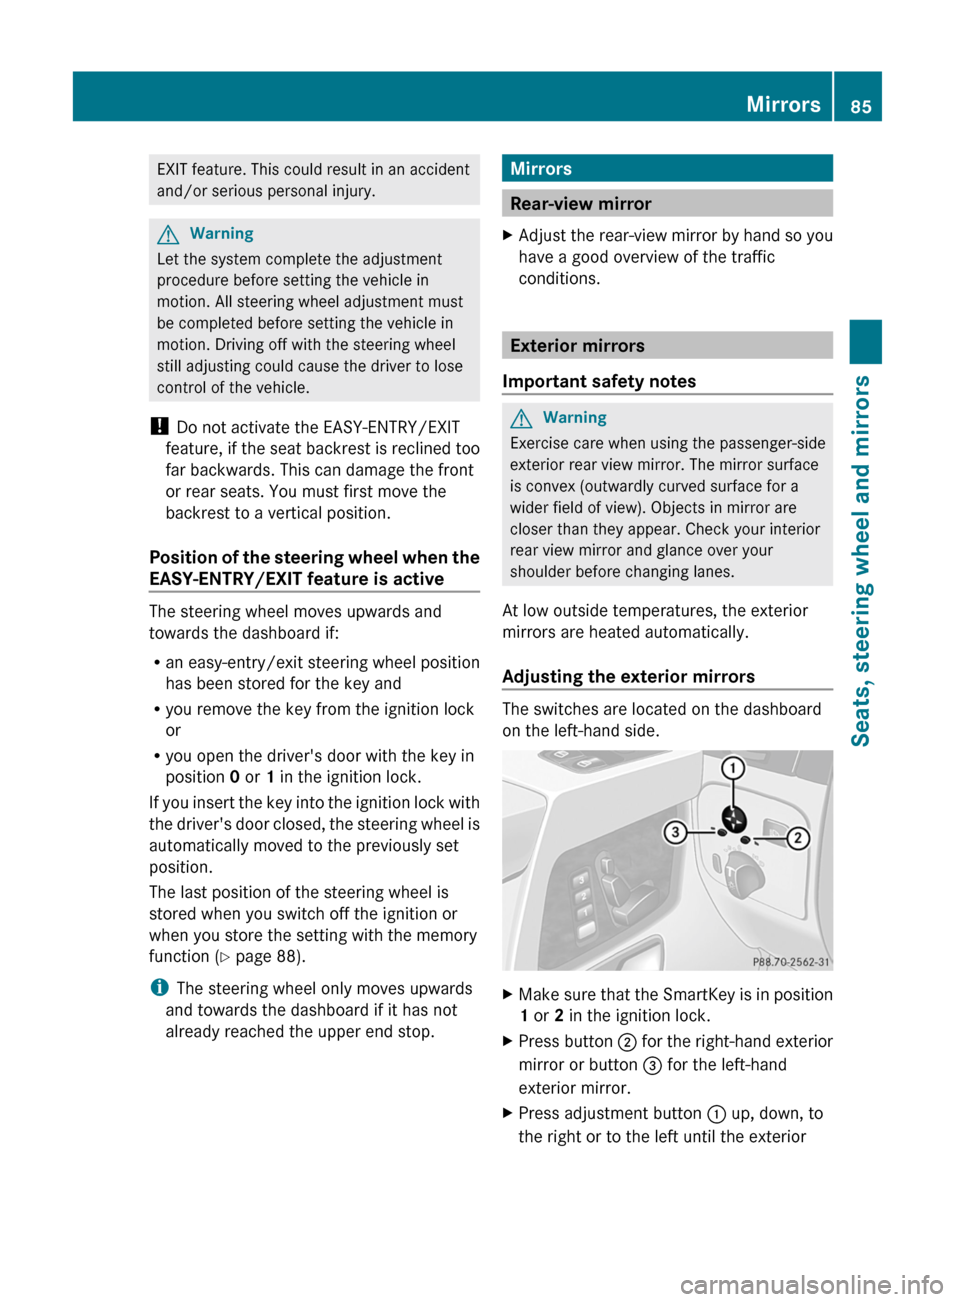
The switches are located on the dashboard
on the left-hand side.
XMake sure that the SmartKey is in position
1 or 2 in the ignition lock.XPress button ; for the right-hand exterior
mirror or button = for the left-hand
exterior mirror.XPress adjustment button : up, down, to
the right or to the left until the exteriorMirrors85Seats, steering wheel and mirrorsZ
Page 89 of 288
Problems with the exterior mirrorsProblemPossible causes/consequences and M SolutionsAn exterior mirror has
been pushed out of
position.XMove the exterior mirror into the correct position manually.Automatic anti-glare mirrorsGWarning!
The auto-dimming function does not react if
incoming light is not aimed directly at sensors
in the interior rear view mirror.
The interior rear view mirror and the exterior
rear view mirror on the driver’s side do not
react, for example, when transporting cargo
which covers the rear window.
Light hitting the mirror(s) at certain angles
(incident light) could blind you. As a result,
you may not be able to observe traffic
conditions and could cause an accident.
The rear-view mirror and the exterior mirror
on the driver's side automatically go into anti-
glare mode if the ignition is switched on and
incident light from headlamps strikes the
sensor in the rear-view mirror.
The mirrors do not go into anti-glare mode if
reverse gear is engaged or the interior lighting
is switched on.
Parking position for the exterior
mirror on the front-passenger side
General notes
To make it easier to park, you can store the
front-passenger side exterior mirror position
in such a way that you can see the rear wheel
on that side as soon as you engage reverse
gear R.
Using the memory buttons on the driver's
side, you can store three parking positions
per key.
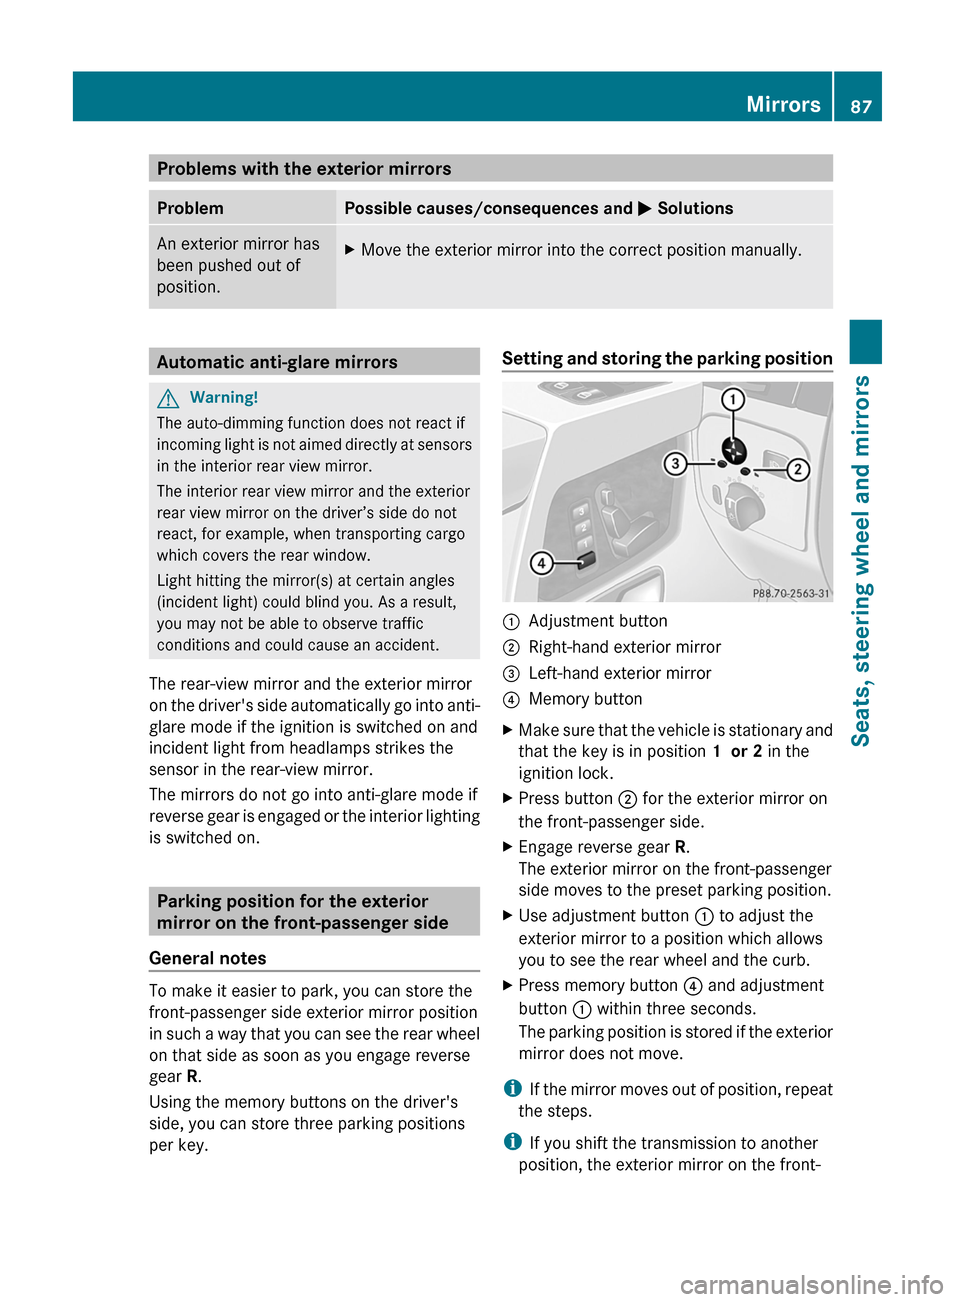
Setting and storing the parking position:Adjustment button;Right-hand exterior mirror=Left-hand exterior mirror?Memory buttonXMake sure that the vehicle is stationary and
that the key is in position 1 or 2 in the
ignition lock.XPress button ; for the exterior mirror on
the front-passenger side.XEngage reverse gear R.
The exterior mirror on the front-passenger
side moves to the preset parking position.XUse adjustment button : to adjust the
exterior mirror to a position which allows
you to see the rear wheel and the curb.XPress memory button ? and adjustment
button : within three seconds.
The parking position is stored if the exterior
mirror does not move.
i If the mirror moves out of position, repeat
the steps.
i If you shift the transmission to another
position, the exterior mirror on the front-
Mirrors87Seats, steering wheel and mirrorsZ
Page 96 of 288
XTo switch on manually: turn the
SmartKey to position 2 in the ignition lock
or start the engine.XBriefly press button : of the headlamp
cleaning system.
The headlamps are cleaned with a high-
pressure water jet.
Cornering light function
The cornering light function improves the
illumination of the road over a wide angle in
the direction you are turning, enabling better
visibility in tight bends, for example. It can
only be activated if the low-beam headlamps
are switched on and the fog lamp is switched
off.
Active: if you are driving at speeds below
25 mph(40 km/h) and switch on the turn
signals and turn the steering wheel.
Not active: if you are driving at speeds above
25 mph (40 km/h) or switch off the turn signal
and turn the steering wheel to the straight-
ahead position.
The cornering lamp may remain lit for a short
time.
Headlamps and turn signal lamps
fogged up on the inside
The headlamps and the indicator lamps in the
exterior mirrors may fog up on the inside if
there is high atmospheric humidity.
XDrive with the headlamps switched on.
The level of moisture diminishes,
depending on the length of the journey and
the weather conditions (humidity and
temperature).
If the level of moisture does not diminish:
XHave the headlamps checked at a qualified
specialist workshop.
Interior lighting
Overview of interior lighting
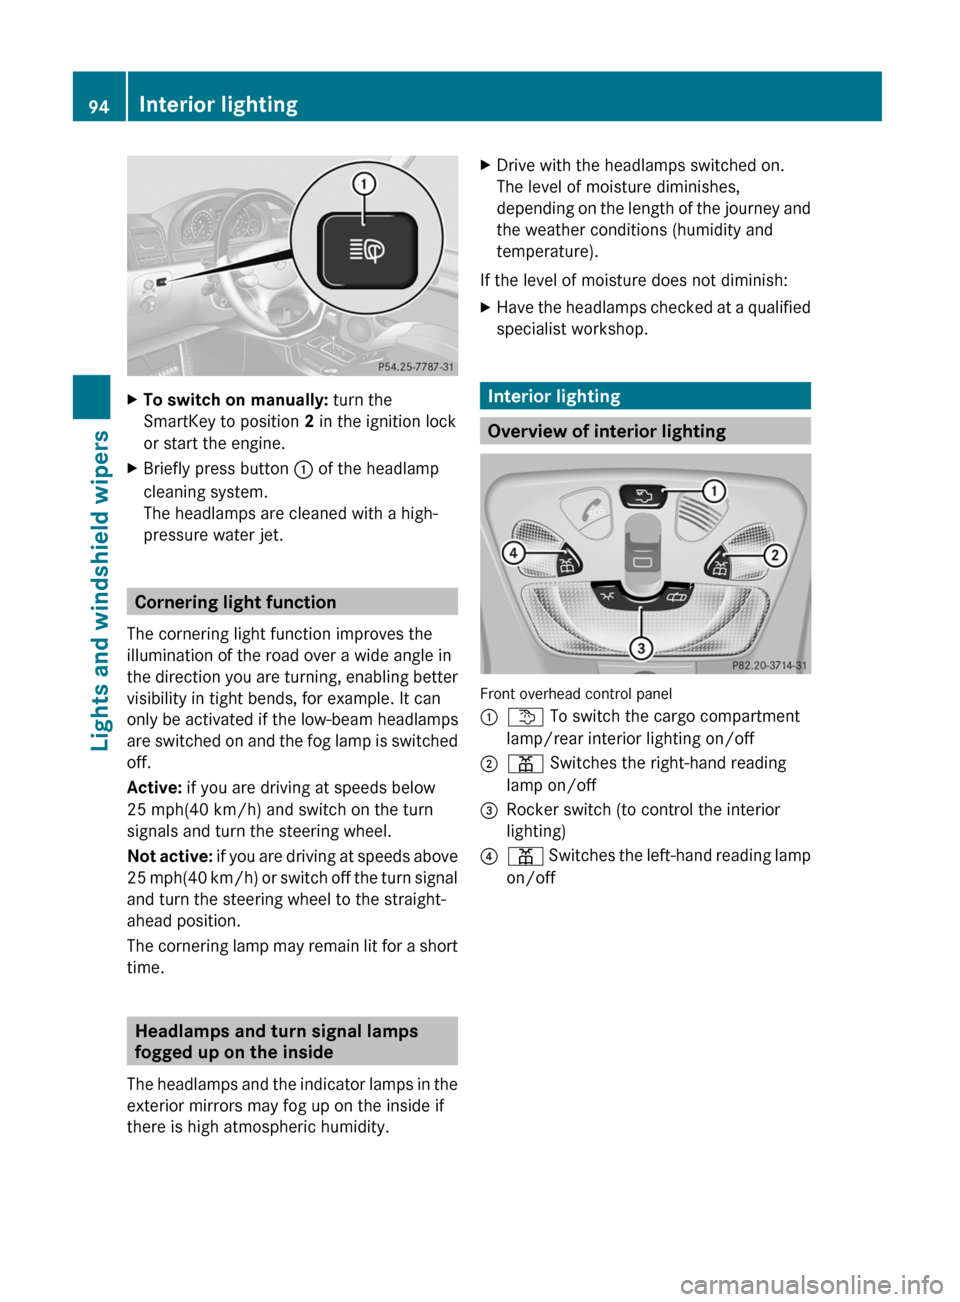
Front overhead control panel
:t To switch the cargo compartment
lamp/rear interior lighting on/off;p Switches the right-hand reading
lamp on/off=Rocker switch (to control the interior
lighting)?p Switches the left-hand reading lamp
on/off94Interior lightingLights and windshield wipers
Page 99 of 288
Halogen bulbs are pressurized and could
explode when you change them, particularly
if they are very hot. You should therefore wear
eye protection and gloves when you are
changing them.
There are bulbs other than the Xenon bulbs
that you cannot replace. Replace only the
bulbs listed ( Y page 97). Have the bulbs that
you cannot replace yourself changed at a
qualified specialist workshop.
Mercedes-Benz recommends that you use an
authorized Mercedes-Benz Center for this
purpose. In particular, work relevant to safety
or on safety-related systems must be carried
out at a qualified specialist workshop.
If you require assistance changing bulbs,
consult a qualified specialist workshop.
Do not touch the glass tube of new bulbs with
your bare hands. Even minor contamination
can burn into the glass surface and reduce
the service life of the bulbs. Always use a lint-
free cloth or only touch the base of the bulb
when installing.
Only use bulbs of the correct type.
If the new bulb still does not light up, consult
a qualified specialist workshop.
Bulbs and lamps are an important aspect of
vehicle safety. You must therefore make sure
that these function correctly at all times.
Have the headlamp setting checked regularly.
Before changing bulbs
Have the following bulbs changed at a
qualified specialist workshop, e.g. an
authorized Mercedes-Benz Center:
R additional turn signals in the exterior
mirrors
R high-mounted brake lamp
R high-beam/low-beam headlamps (Xenon
bulbs)
R parking lamp/standing lamp
R license plate lamp
i Individual segments of the license plate
lamp LEDs may fail without a display
message appearing in the multifunction
display. Check the license plate lamp
regularly. Consult a qualified specialist
workshop if necessary.
You can replace the following bulbs:
R fog lamp/cornering light with fog lamp
function
R turn signal lamp (front)
R brake/tail lamp
R turn signal lamp (rear)
R tail lamp/standing lamp
R backup lamp
R rear fog lamp
R side marker lamp
Overview: changing bulbs/bulb types
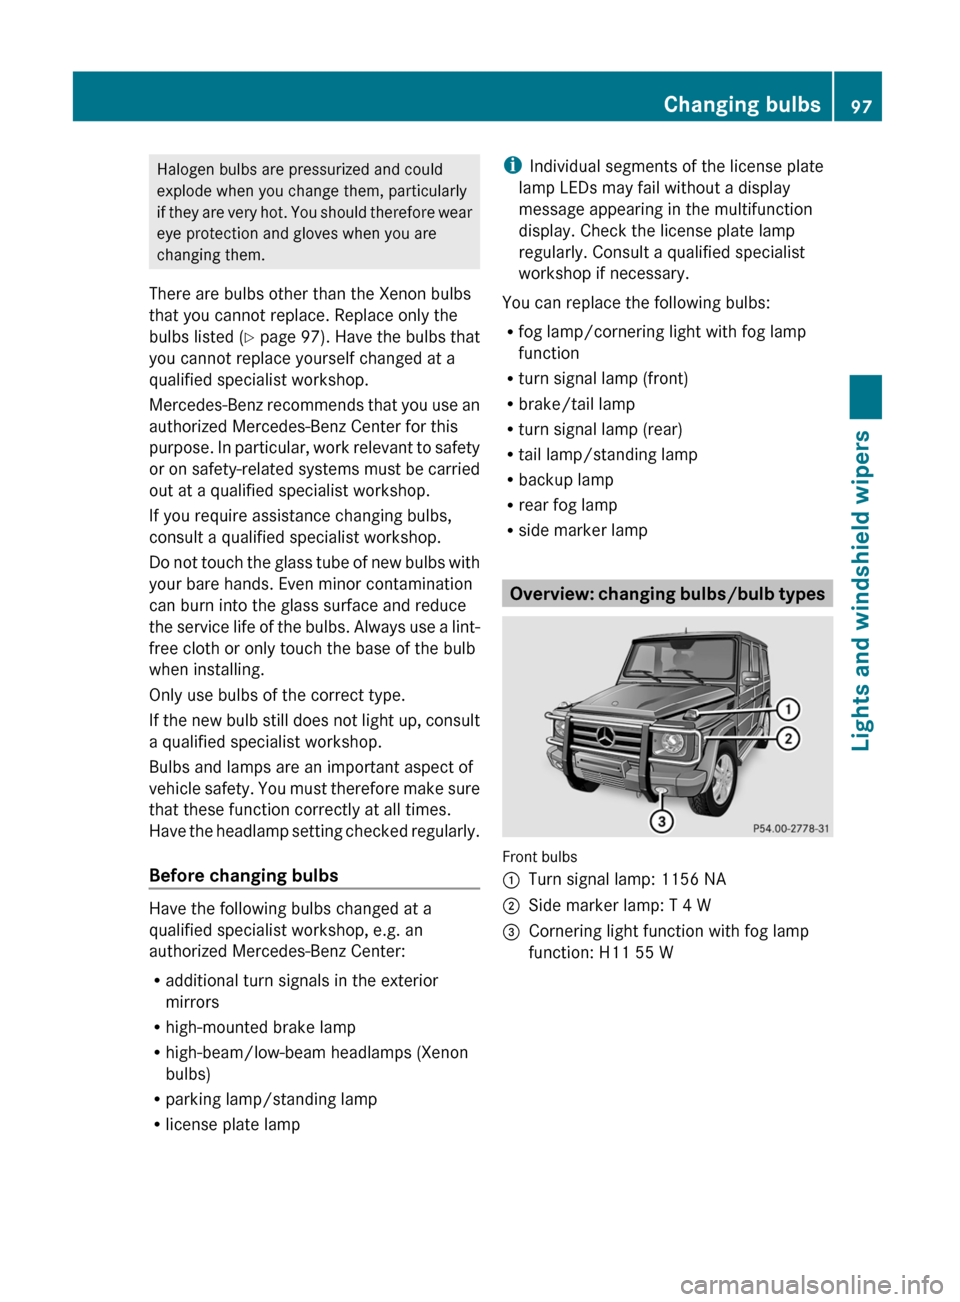
Front bulbs
:Turn signal lamp: 1156 NA;Side marker lamp: T 4 W=Cornering light function with fog lamp
function: H11 55 WChanging bulbs97Lights and windshield wipersZ